MERCEDES-BENZ GL SUV 2012 Owners Manual
Manufacturer: MERCEDES-BENZ, Model Year: 2012, Model line: GL SUV, Model: MERCEDES-BENZ GL SUV 2012Pages: 441, PDF Size: 10.66 MB
Page 411 of 441
X
Unscre wthe uppermost wheel bolt com-
pletely.
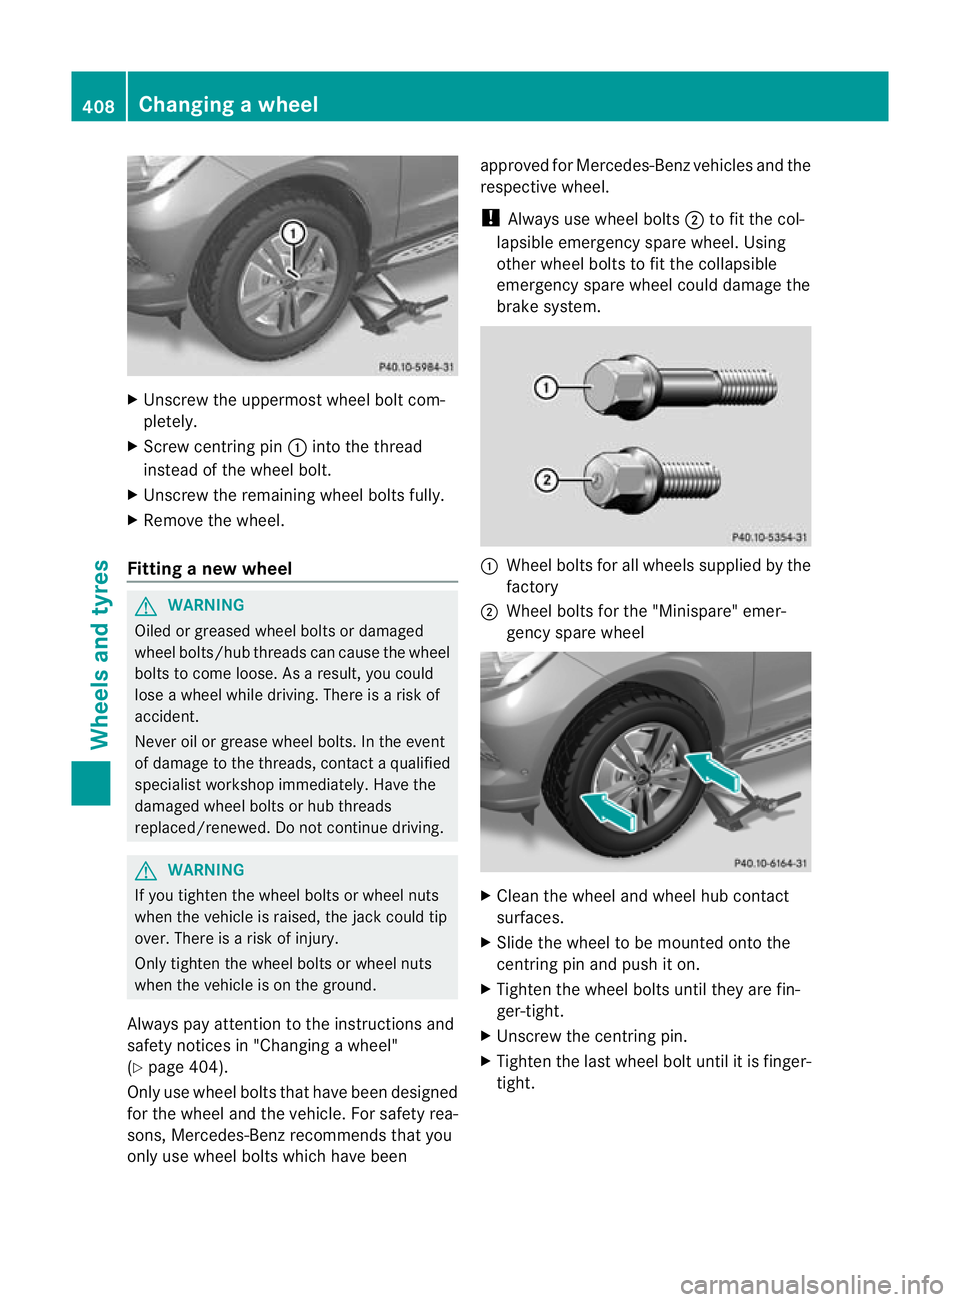
X Screw cen tringpin:into the thread
instead of the wheel bolt.
X Unscrew the remainin gwheel bolts fully.
X Remove the wheel.
Fitting anew wheel G
WARNING
Oiled or greased wheel bolt sordamaged
wheel bolts/hub threads can cause the wheel
bolts to com eloose .Asa result,you could
lose awheel while driving. There is arisk of
accident.
Never oil or grease wheel bolts. In the event
of damage to the threads, contact aqualified
specialist workshop immediately .Have the
damaged wheel bolts or hub threads
replaced/renewed. Do not continue driving. G
WARNING
If you tighten the wheel bolts or wheel nuts
when the vehicle is raised, the jac kcould tip
over .There is arisk of injury.
Only tighten the wheel bolts or wheel nuts
when the vehicle is on the ground.
Always pay attention to the instructions and
safety notices in "Changing awheel"
(Y page 404).
Only use wheel bolts that hav ebeen designed
for the wheel and the vehicle. For safet yrea-
sons, Mercedes-Benz recommends that you
only use wheel bolts which have been approved for Mercedes-Benz vehicles and the
respec
tivewheel.
! Always use wheel bolts ;to fit the col-
lapsibl eemergency spare wheel. Using
othe rwheel bolts to fit the collapsible
emergenc yspare wheel could damage the
brak esystem. :
Wheel bolts for all wheels supplied by the
factory
; Wheel bolts for the "Minispare" emer-
gency spare wheel X
Clean the whee land wheel hub contact
surfaces.
X Slide the wheel to be mounted onto the
centring pin and pus hito n.
X Tighten the wheel bolts until they are fin-
ger-tight.
X Unscrew the centring pin.
X Tighten the last wheel bol tuntil it is finger-
tight. 408
Changin
gawheelWheels and tyres
Page 412 of 441
Lowering th
evehicle G
WARNING
The wheels could work loose if th ewheel nuts
and bolt sare not tightened to the specified
tightening torque. There is arisk of accident.
Have the tightening torque immediately
checked at aqualified specialist workshop
after awheel is changed. X
Plac ethe ratchet ring spanner ont othe
hexagon nut of the jac ksothat the letters
AB arev isible.
X Turn the ratchet ring spanner until the vehi-
cle is once again standing firmly on the
ground.
X Place the jack to one side.
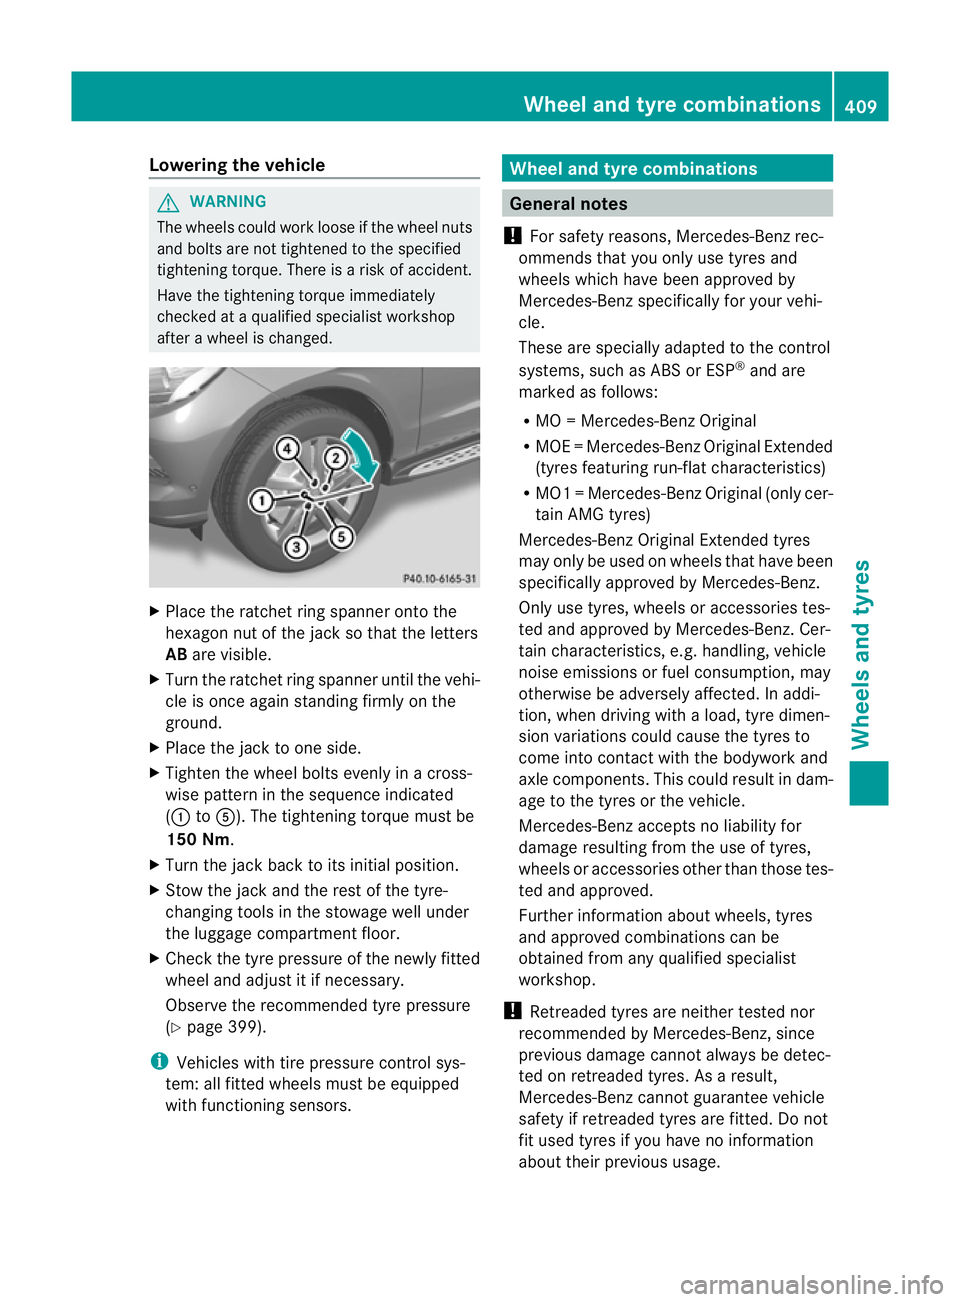
X Tighten the wheel bolts evenly in across-
wis epattern in the sequence indicated
(: toA). The tightening torque must be
150 Nm.
X Turn the jack back to its initial position.
X Stow the jack and the rest of the tyre-
changing tools in the stowage well under
the luggag ecompart ment floor.
X Check the tyre pressure of the newly fitted
wheel and adjus titifnecessary.
Observ ethe recommended tyr epressure
(Y page 399).
i Vehicles wit htire pressure control sys-
tem: all fitted wheels must be equipped
with func tionin gsensors. Wheel and ty
recombinations General notes
! For safety reasons, Mercedes-Benz rec-
ommends that you only use tyres and
wheels which have been approved by
Mercedes-Benz specifically for your vehi-
cle.
Thes eare speciall yadapted to the control
systems, such as ABS or ESP ®
and are
marked as follows:
R MO =Mercedes-Ben zOriginal
R MOE =Mercedes-Ben zOriginal Extended
(tyres featuring run-flat characteristics)
R MO1 =Mercedes-Ben zOriginal (only cer-
tain AMG tyres)
Mercedes-Benz Original Extended tyres
may only be use donwheels that hav ebeen
specifically approved by Mercedes-Benz.
Only use tyres, wheels or accessories tes-
ted and approved by Mercedes-Benz. Cer-
tain characteristics, e.g. handling, vehic le
nois eemis sions or fuel consumption, may
otherwise be adv ersely affected. In addi-
tion, when driving with aload, tyr edimen-
sion variations could cause the tyres to
come into contact with the bodywork and
axle components .This could result in dam-
age to the tyres or the vehicle.
Mercedes-Ben zaccept snoliability for
damag eresulting from the use of tyr es,
wheel soraccess orieso the rthan those tes-
ted and approved.
Further information about wheels, tyres
and approved combination scan be
obtained from any qualified specialist
workshop.
! Retreaded tyres are neither tested nor
recommended by Mercedes-Benz, since
previous damage cannot always be detec-
ted on retreaded tyres. As aresult,
Mercedes-Ben zcannot guarantee vehicle
safet yifretreade dtyres are fitted. Do not
fit used tyres if you have no information
about their previous usage. Wheel and tyre combinations
409Wheelsand tyres Z
Page 413 of 441
!
Larg ewheels: the lower the section width
for acertain wheel size, the lower the ride
comfor tiso np oor roa dsurfaces. Roll com-
fort and suspensio ncomfort ar ereduced
and the risk of damage to the wheels and
tyres as aresult of driving over obstacles
increases.
Overview of abbreviations used in the follow-
ing tyr etables:
R BA: both axles
R FA: front axle
R RA: rear axle
You will find atable with recommended tyre
pressures for various operating conditions on
the inside of your vehicle's fuel filler flap. For
further information on tyre pressure, see
(Y page 399). Check tyre pressures regularly
and only when the tyres are cold.
Notes on the vehicle equipment –always fit
the vehicle:
R with tyre softhe sam esize on agiven axle
(left/right)
R with the same type of tyre satagiven time
(summer tyres, winter tyres, MOEx tended
tyres)
Vehicles with MO Extended tyres are not
equippe dwithaTIREFIT kit at th efactory. It
is therefore recommended that you addition-
ally equip your vehicle with aTIREFIT kit if you
fit tyres that do no tfeature run -flat charac-
teristics, e.g. winter tyres. ATIREFIT kit can
be obtaine dfrom aqualified specialist work-
shop.
i Not all wheel/tyre combinations can be
mounted at the factory in all countries. 410
Wheel and tyr
ecombinationsWheels and tyres
Page 414 of 441
Tyres
GL 35 0BlueTEC 4MATIC Summ
ertyres
R19 Tyres Light-alloy whe
els BA: 275/55
R19111 V 1 BA
:8.5 Jx19H2ET62 R20
Tyres Light-allo
ywheels BA: 275/50
R20109 W1 BA: 8.5
Jx20H2ET62 R21
Tyres Light-alloy wheels
BA: 295/40 ZR 21 111
YXL1 BA: 10.0
Jx21H2ET46 All-weather tyres
R18
Tyres Light-alloy wheels
BA: 265/60
R18110HM +S BA: 8.0
Jx18H2ET56.5 All-terrain tyres
R18
Tyres Light-alloy wheels
BA: 265/60
R18110HM +S BA: 8.0
Jx18H2ET56.5 R19
Tyres Light-alloy wheels
BA: 275/55
R19111HM +S1 BA: 8.5
Jx19H2ET62 Winter tyres
R18
Tyres Light-alloy wheels
BA: 265/60
R18110HM +Si BA: 8.0
Jx18H2ET56.5 1
Use of sno wchains is not permitted. Observe the notes under "Snow chain s". Whee
land tyre combinations
411Wheels and tyres Z
Page 415 of 441
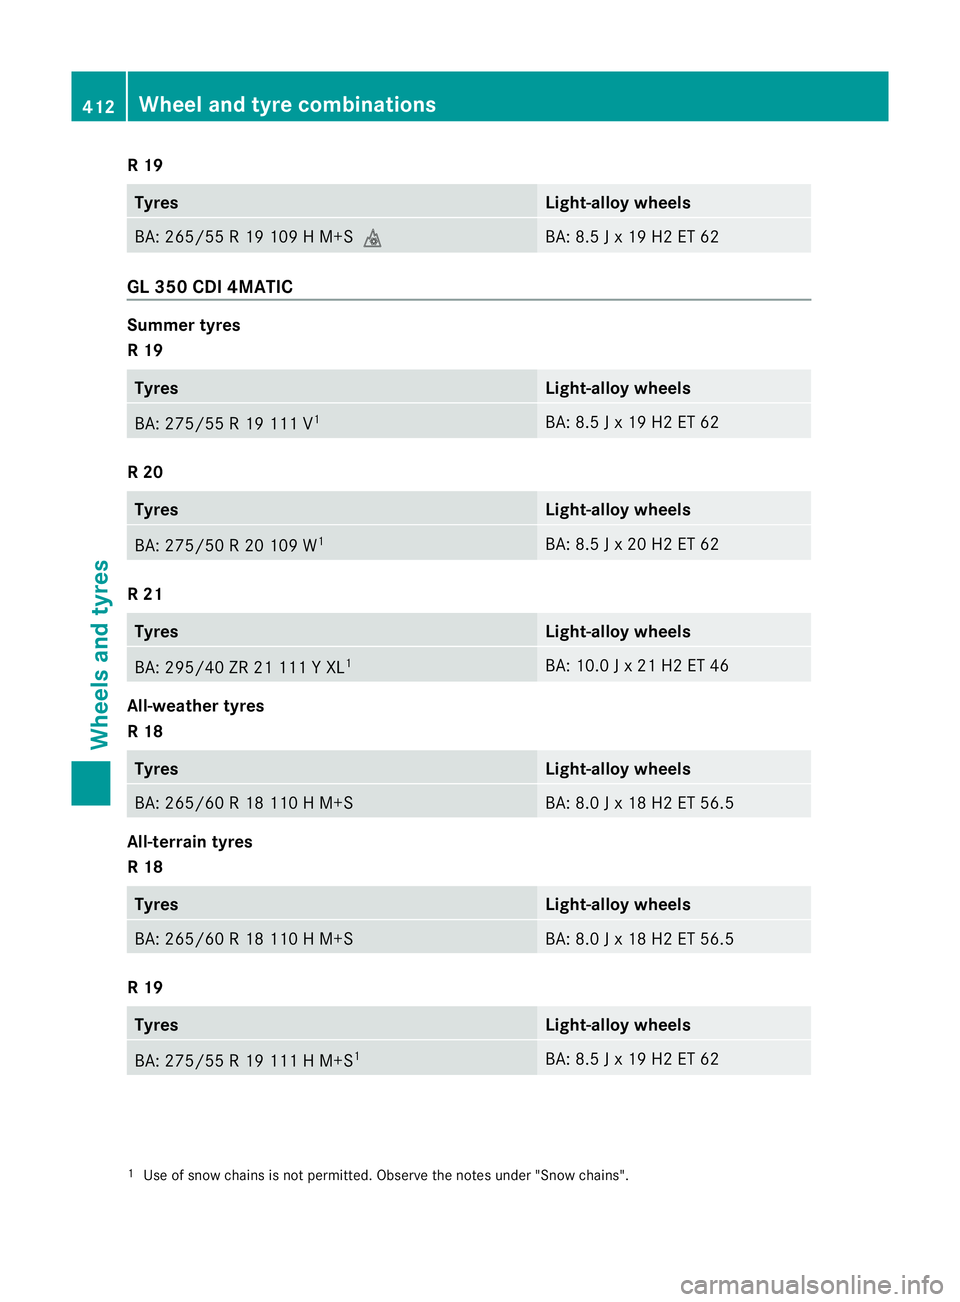
R19
Tyres Light-allo
ywheels BA: 265/55
R19109HM +Si BA: 8.5
Jx19H2ET62 GL 35
0CDI 4M ATIC Summer tyres
R19
Tyres Light-alloy wheels
BA: 275/55
R19111 V1 BA: 8.5
Jx19H2ET62 R20
Tyres Light-alloy wheels
BA: 275/50
R20109 W1 BA: 8.5
Jx20H2ET62 R21
Tyres Light-alloy wheels
BA: 295/40 ZR 21 111
YXL1 BA: 10.0
Jx21H2ET46 All-weather tyres
R18
Tyres Light-alloy wheels
BA: 265/60
R18110HM +S BA: 8.0
Jx18H2ET56.5 All-terrain tyres
R18
Tyres Light-alloy wheels
BA: 265/60
R18110HM +S BA: 8.0
Jx18H2ET56.5 R19
Tyres Light-alloy wheels
BA: 275/55
R19111HM +S1 BA: 8.5
Jx19H2ET62 1
Use of snow chains is no tpermitted. Observe the notes under "Snow chains". 412
Wheel and tyre combinationsWheels and tyres
Page 416 of 441
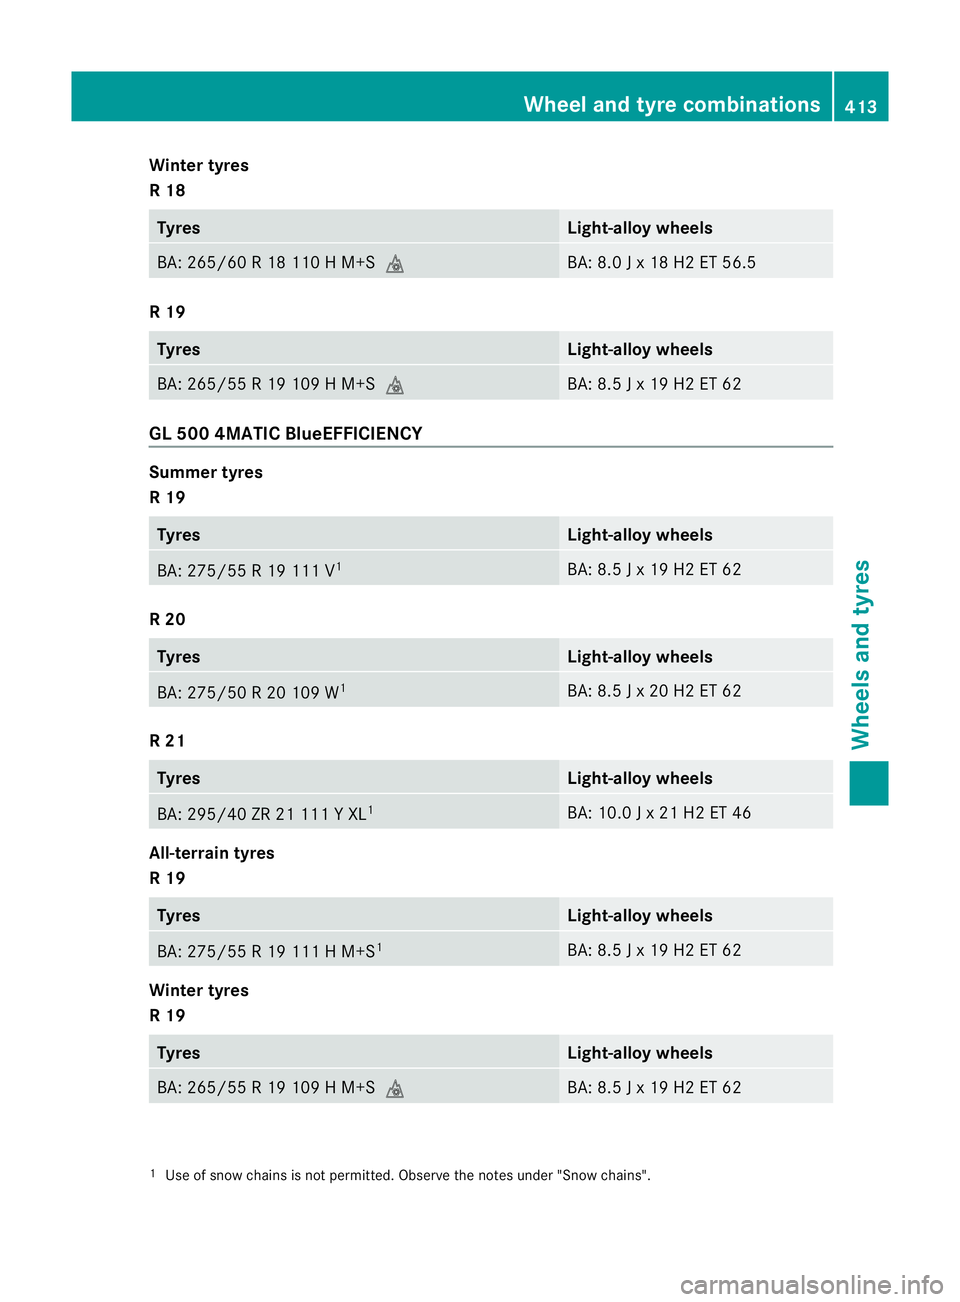
Winter tyres
R18
Tyres Light-alloy wheels
BA: 265/60
R18110HM +Si BA: 8.0
Jx18H2ET56.5 R19
Tyres Light-alloy wheels
BA: 265/55
R19109HM +Si BA: 8.5
Jx19H2ET62 GL 50
04MATI CBlueEFFICIENCY Summer tyres
R19
Tyres Light-alloy wheels
BA: 275/55
R19111 V1 BA: 8.5
Jx19H2ET62 R20
Tyres Light-alloy wheels
BA: 275/50
R20109 W1 BA: 8.5
Jx20H2ET62 R21
Tyres Light-alloy wheels
BA: 295/40 ZR 21 111
YXL1 BA: 10.0
Jx21H2ET46 All-terrain tyres
R19
Tyres Light-alloy wheels
BA: 275/55
R19111HM +S1 BA: 8.5
Jx19H2ET62 Winter tyres
R19
Tyres Light-alloy wheels
BA: 265/55
R19109HM +Si BA: 8.5
Jx19H2ET62 1
Use of snow chains is no tpermitted. Observe the notes under "Snow chains". Wheel and tyre combinations
413Wheels and tyres Z
Page 417 of 441
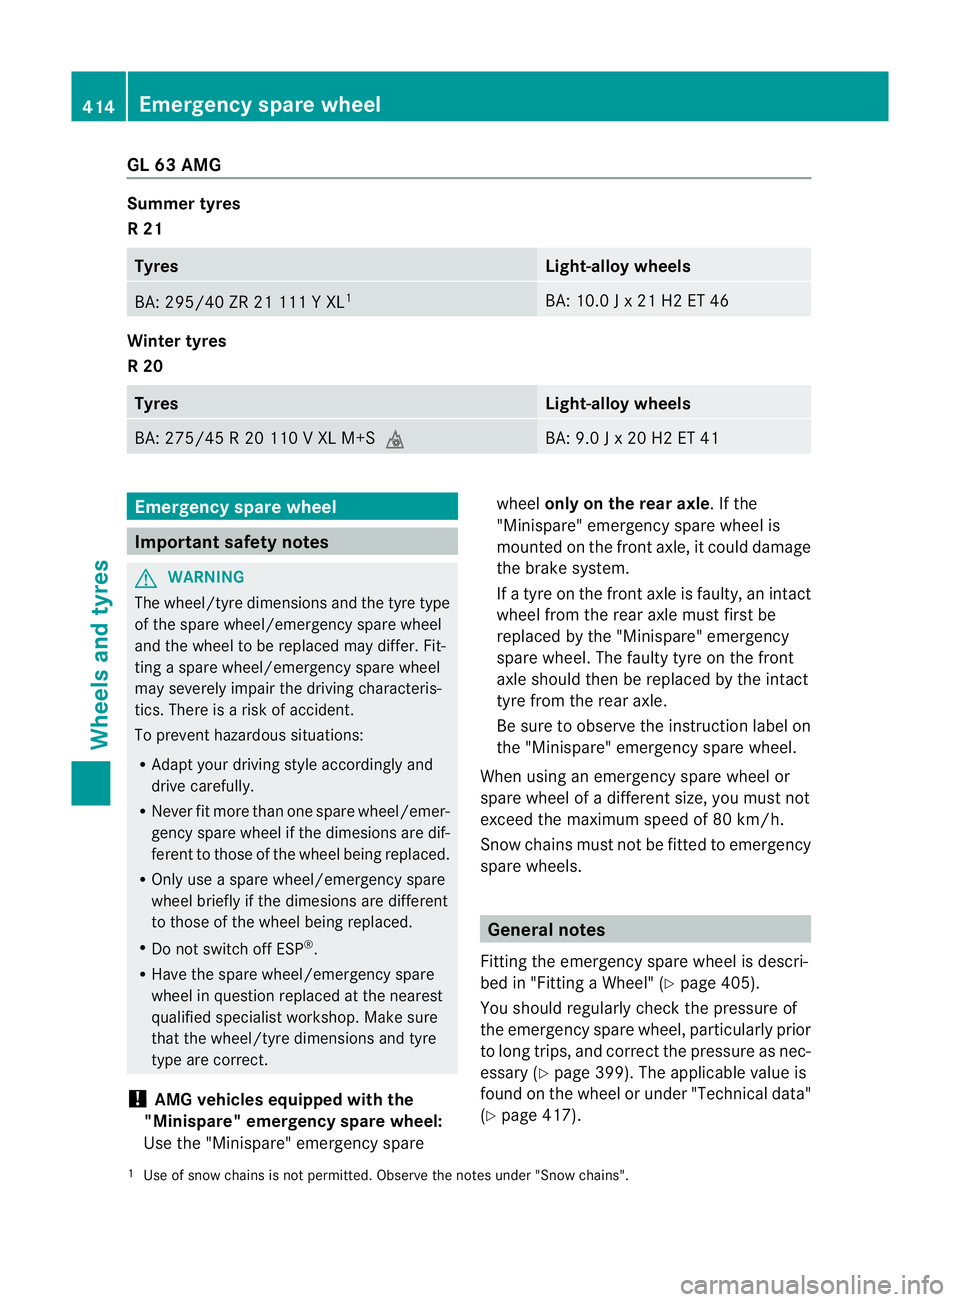
GL 63 AMG
Summer tyres
R21
Tyres Light-alloy wheels
BA: 295/40 ZR 21 111
YXL1 BA: 10.0
Jx21H2ET46 Winter tyres
R20
Tyres Light-alloy wheels
BA: 275/45
R20110VXLM +Si BA: 9.0
Jx20H2ET41 Emergency spare wheel
Important safety notes
G
WARNING
The wheel/tyr edimensions and the tyre type
of the spare wheel/emergency spare wheel
and the whee ltobereplaced may differ. Fit-
ting aspare wheel/emergency spare wheel
may severely impair the driving characteris-
tics. There is arisk of accident.
To prevent hazardous situations:
R Adapt you rdriving style accordingl yand
drive carefully.
R Never fit more than one spare whe el/emer-
gency spare whe elif the dimesions are dif-
ferent to those of the whee lbeing replaced.
R Only use aspare wheel/emergency spare
whee lbriefl yift he dimesions ar ediffer ent
to thos eofthe wheel being repl aced.
R Do not switch off ESP ®
.
R Hav ethe spar ewheel/emergency spare
wheel in question repl aced at the nearest
qualified specialist workshop .Make sure
that the wheel/ty redimension sand tyre
type are correct.
! AMG vehicles equipped with the
"Minis pare"emergency spare wheel:
Use the "Minispare" emergency spare wheel
only on th ereara xle.Ift he
"Mini spare" eme rgency spar ewheel is
mou nted on th efront axle, it could damage
the brake system.
If at yre on the front axl eisfaulty ,anintact
whee lfrom th ereara xlem ustfirst be
replaced by th e"Minispare" emergency
spare wheel. The faulty tyre on the front
axl es hould then be replaced by the int act
tyre from the rea raxle.
Be sure to observe the instructio nlabel on
the "Minispare" emergenc yspar ew heel.
When usin ganemergenc yspar ew heel or
spar ewheel of adifferent size, you must not
excee dthe maximu mspee dof80k m/h.
Snow chain smust not be fitted to emergency
spare wheels. General notes
Fittin gthe emergency spar ewheel is descri-
bed in "Fi ttin gaW heel" (Y page 405).
You should regularly chec kthe pressur eof
the emergency spare wheel, particularly prior
to long trips, and correct the pressure as nec-
essary (Y page 399). The applicable value is
found on the whee loru nder "Technical data"
(Y pag e417).
1 Use of sno wchains is not permitted. Observ ethe notes under "Snow chains". 414
Emergency spar
ewheelWheels and tyres
Page 418 of 441
An emergency spare whee
lmayalso be fitted
against the direction of rotation. Observe the
time restrictio nonuse as well as the speed
limitation specified on the emergenc yspare
wheel.
Replace the tyres after six year satthe latest,
regardless of wear .This also applies to the
emergenc yspare wheel.
i When you are driving with the collapsible
emergency spare wheel fitted, the tyre
pressur eloss warnin gsystem or the tyre
pressure monitor cannot function reliably.
Only restart the tyre pressure los swarning
system/tyre pressure monitor when the
defective wheel has been replaced with a
new wheel.
Vehicles with tyre pressure monitor:
after mounting an emergency spare wheel,
the system may still displ aythe tyre pres-
sure of the removed whee lfor afew
minutes. The value displayed for the moun-
ted emergency spare wheel is not the same
as the curren ttyre pressure of the emer-
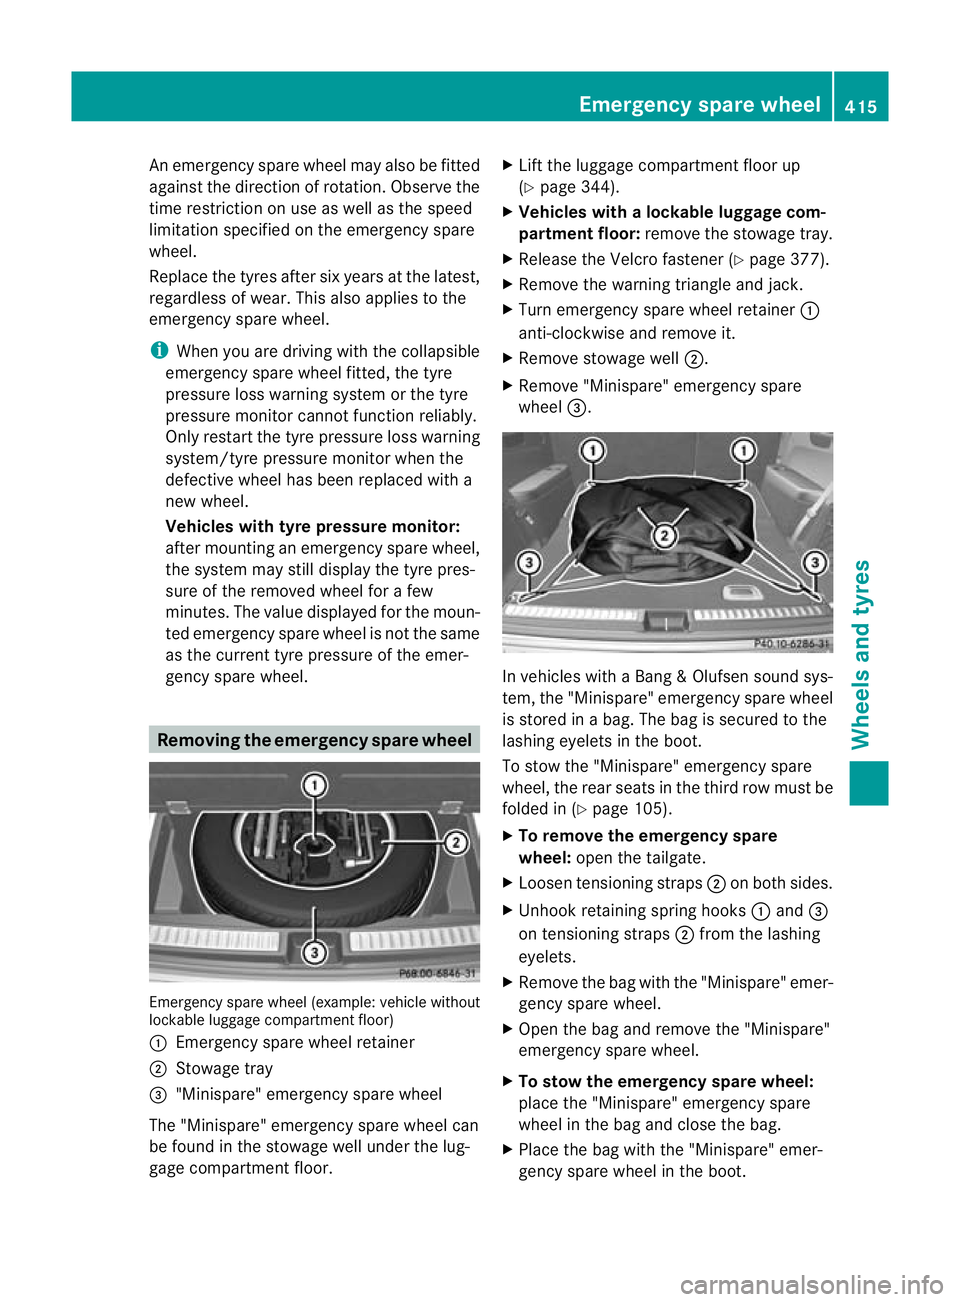
gency spare wheel. Removin
gthe emergenc yspare wheel Emergency spare wheel (example: vehicl
ewithout
lockable luggage compartment floor)
: Emergenc yspare wheel retainer
; Stowage tray
= "Minispare" emergency spare wheel
The "Minispare" emergency spare wheel can
be foun dinthe stowage well under the lug-
gage compartment floor. X
Lift the luggage compartment floor up
(Y page 344).
X Vehicle swithalockable luggage com-
partment floor: remove the stowage tray.
X Release the Velcro fastener ( Ypage 37 7).
X Remove the warning triangle and jack.
X Turn emergenc yspare wheel retainer :
anti -clockwise and remov eit.
X Remove stowage well ;.
X Remove "Minispare" emergency spare
wheel =. In vehicle
swithaBang &Olufsen sound sys-
tem ,the "Minispare" emergency spar ewheel
is stored in abag. The bag is secured to the
lashing eyelets in the boot.
To stow the "Minispare" emergency spare
wheel, the rear seats in the thir drow must be
folde din( Ypage 10 5).
X To remove th eemergency spare
wheel: openthe tailgate.
X Loosen tensioning straps ;on bot hsides.
X Unhook retainin gsprin ghooks :and =
on tensioning straps ;from the lashing
eyelets.
X Remov ethe bag with the "Minispare" emer-
genc yspare wheel.
X Open the bag and remove the "Minispare"
emergency spare wheel.
X To stow the emergency spar ewheel:
place th e"Minispare" emergenc yspare
wheel in the bag and close the bag.
X Place the bag with the "Minispare" emer-
gency spare wheel in the boot. Emergency spar
ewheel
415Wheels and tyres Z
Page 419 of 441
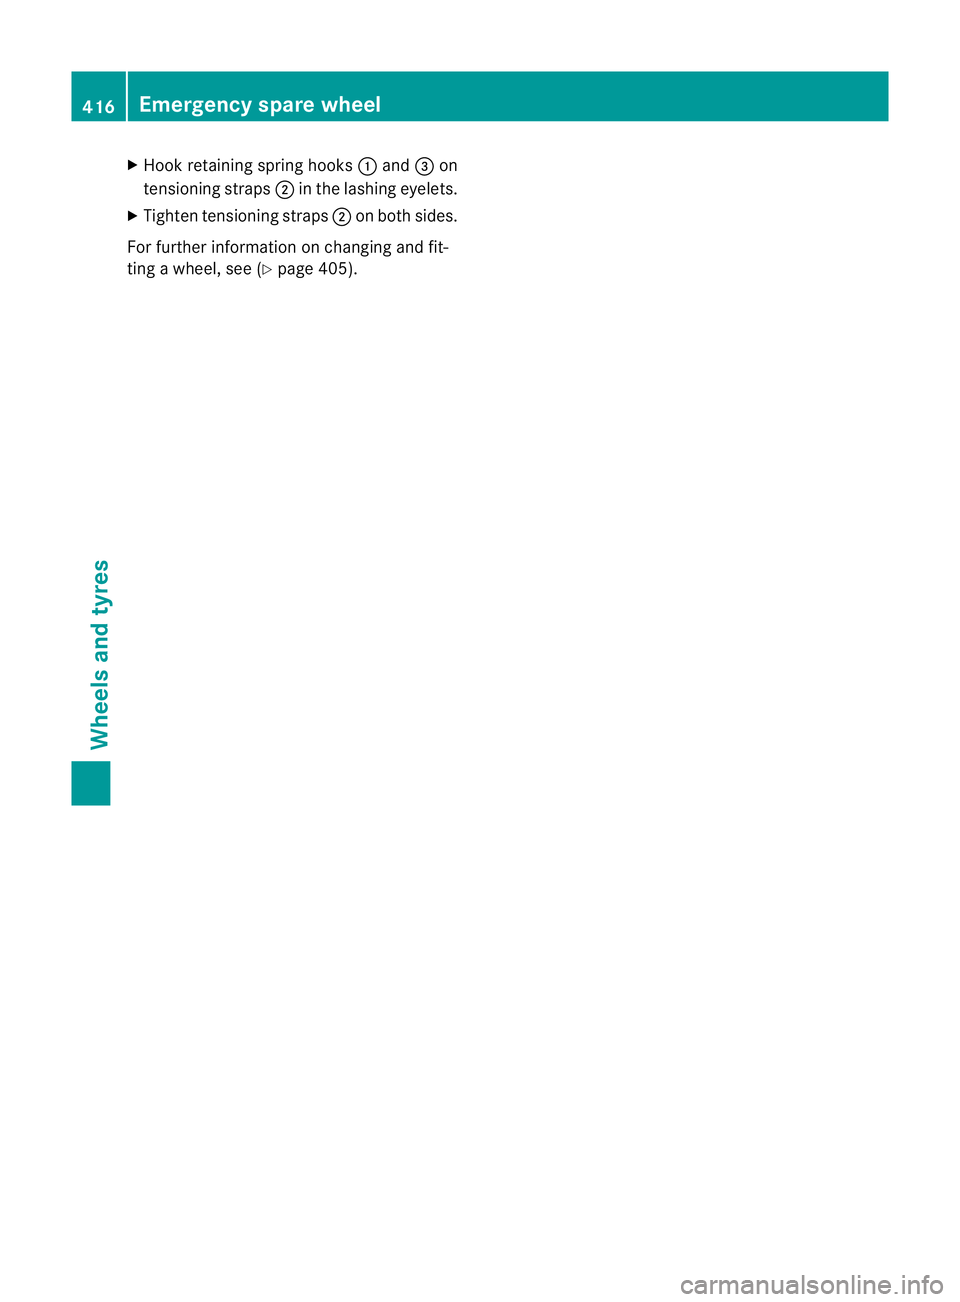
X
Hoo kretaining spring hooks :and =on
tensioning stra ps; in the lashing eyelets.
X Tighten tensioning straps ;on both sides.
For further information on changing and fit-
ting awheel, see (Y page 405).416
Emergency spare wheelWheels and tyres
Page 420 of 441
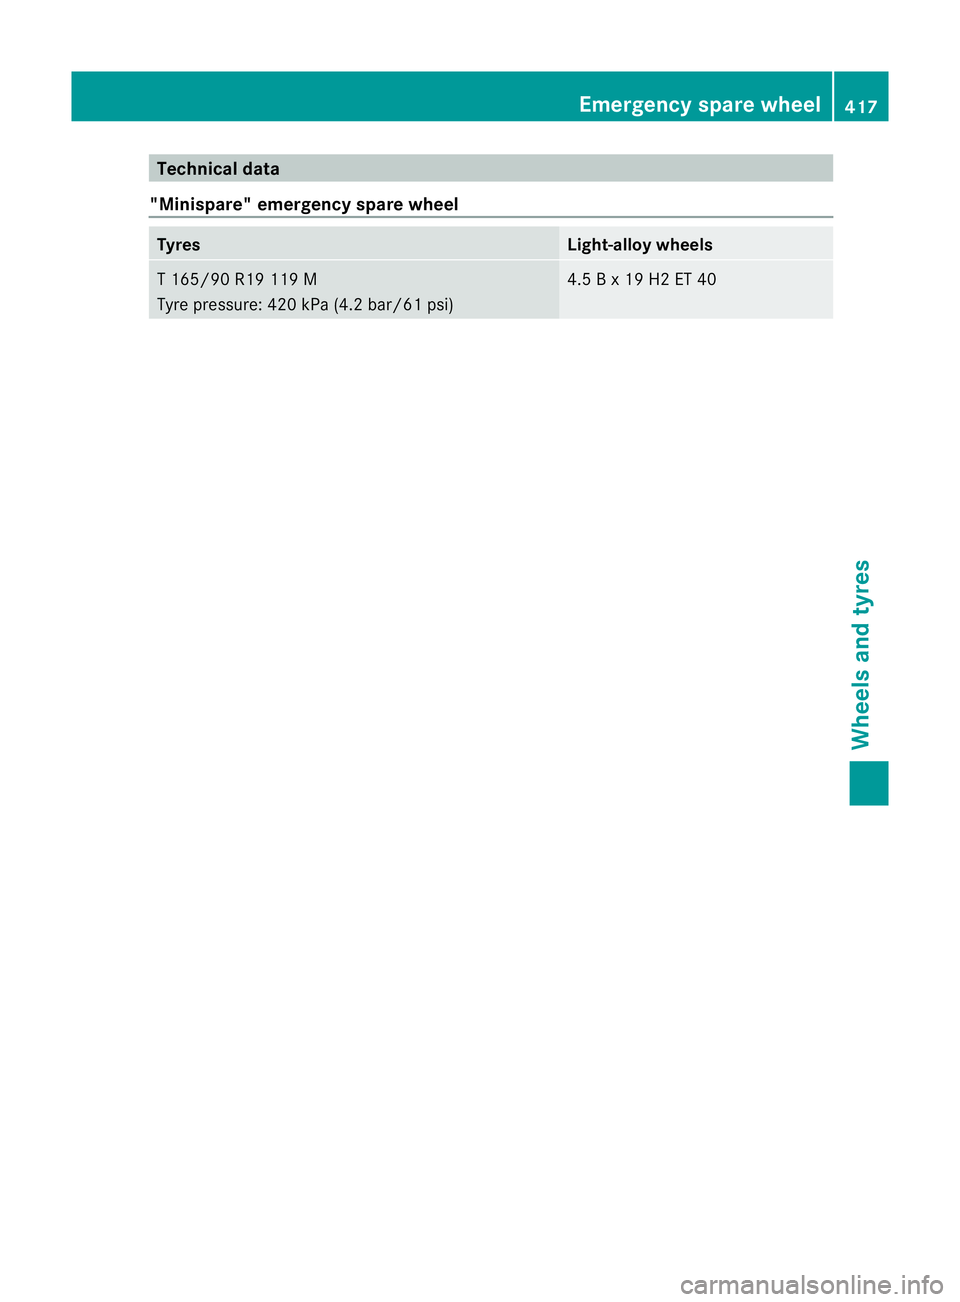
Technical data
"Minispare "emergency spare whe elTyres Light-allo
ywheels T1
65/90 R19 119 M
Tyre pressure: 420 kPa (4.2 bar/61 psi) 4.5
Bx19H2ET40 Emergenc
yspare wheel
417Wheelsand tyres Z