MERCEDES-BENZ GL SUV 2012 Owners Manual
Manufacturer: MERCEDES-BENZ, Model Year: 2012, Model line: GL SUV, Model: MERCEDES-BENZ GL SUV 2012Pages: 441, PDF Size: 10.66 MB
Page 391 of 441
X
Slide cover :of positive terminal ;in the direction of the arro w.
X Connect positive terminal ;on your vehicl etopositive terminal =of donor battery B
using the jum plead. Alway sbegin with positive terminal ;on your own vehicle fir st.
X Start th eengine of the donor vehicle and run it at idling speed.
X Connec tnegativ eterminal ?of donor battery Bto eart hpoint Aof your vehicle using
the jum plead, connectin gthe jum plead to donor battery Bfirst.
X Start the engine.
X Before disconnecting the jum pleads, let the engines run for several minutes.
X First, remove the jum pleads from eart hpoint Aand negative terminal ?,then from pos-
itiv eterminal ;and positiv eterminal =,each time beginning at the contacts on your own
vehicle first.
X Close cover :of positive terminal ;after removing the jump leads.
X Have the battery checked at aqualified specialist workshop.
i Jump-starting is not considered to be anormal operatin gcondition.
i Jump-starting cables and further information regarding jum pstartin gcan be obtained at
any qualified specialis tworkshop. Towing and tow-starting
Important safety notes
G
WARNING
Safety-relevant func tions are restric tedorn ot
available if:
R the engin eisnot running.
R the brake system or the power steering is
malfunctioning
R the voltage supply or the vehicle' selectrical
system is malfunctioning.
If your vehicle is towed, significantly greater
forc emay be required to steer the vehicle or
to brake. There is arisk of an accident.
In such circumstances, use atowing bar.
Make sure that the steering is moving freely
befor etowing. G
WARNING
If the weight of the vehicle to be towed or tow-
started is greater than the permissible gross
weight of your vehicle:
R the towin geye could detach itself
R the vehicle/traile rcombination coul dover-
turn.
There is arisk of an accident.
When towing or tow-startin ganothe rvehicle,
its weight should not be greater than the per-
missible gross weight of your vehicle. G
WARNING
The vehicle is braked when the HOL Dfunction
or DISTRONIC PLUS is activated. Therefore,
deactivate HOLD and DISTRONIC PLUS if the
vehicle is to be towed.
! Make sure that the electric parking brake
is released. If the electric parking brake is
faulty, visit aqualified specialist workshop.
! Only secure the tow rope or towing bar to
the towing eyes. The vehicle may otherwise
be damaged. 388
Towin
gand tow-startingBreakdow nassistance
Page 392 of 441
!
Observe the following points when towing
wit hat ow rope:
R secur ethe tow rope on the sam eside on
both vehicles.
R the tow rope must not be longer than is
legally permitted. It should be marked in
the middle, e.g. with awhite cloth
(30 x30c m) so that other roa dusers are
aware that avehicle is being towed.
R the tow rope may only be attached to the
towing eyes.
R observ ethe brake lamps of the towing
vehicle while driving. Always maintain a
distanc esothat the tow rope does not
sag.
R do not use steel cables or chains to tow
your vehicle. The vehicle could be dam-
aged.
! Do not use the towing eye for recovery,
this could damage the vehicle. If in doubt,
recover the vehicle with acrane.
! When towing, pu llaway slowly and
smoothly .Ifthe tractive power is too high,
the vehicles could be damaged.
! To tow vehicles with KEYL ESS-GO,use
the key instead of the Star t/Stop button.
Th ea utomatic transmission may otherwise
switch to position Pwhen you open the
driver' sorfront-passenger door which
could damag ethe transmission.
! Vehicles with differential locks: make
sur ethe differential lock sare in automatic
mode. When towing, th edifferential locks
must not be switched on. The transmission
may otherwise be damaged.
! You may tow the vehicle for amaximum
of 50km .Atowing speed of 50 km/h must
not be exceeded.
For towin gdistances over 50 km, the entire
vehicle must be lifted up and transported.
! If you tow or tow-start another vehicle, its
weight must not exceed the maximum per- missible gross vehicle weight of your vehi-
cle.
Information on your vehicle' sgros svehicle
weight rating can be foun donthe vehicle
identification plat e(Ypage 422).
Observe the legal requirement sfor the rele-
vant countries when towing.
It is bette rtoh ave the vehicle transported
than to have it towed.
If the vehicle has suffered transmission dam-
age, have it transported on atransporter or
trailer.
Th ea utomatic transmission must be in posi-
tion Nwhen the vehicle is being towed.
The battery must be connected and charged.
Otherwise, you:
R cannot turn the key in the ignition lock to
position 2
R cannot release the electric parking brake
R cannot shift the automatic transmission to
position N
i Deactivate the automatic locking feature
(Y page 283). You could otherwis ebe
locked out when pushing or towing the
vehicle.
Deactivate tow-away protection
(Y page 71) before the vehicle is towed. Towing and tow-starting
389Breakdown assistance Z
Page 393 of 441
Fitting/removing th
etowing eye
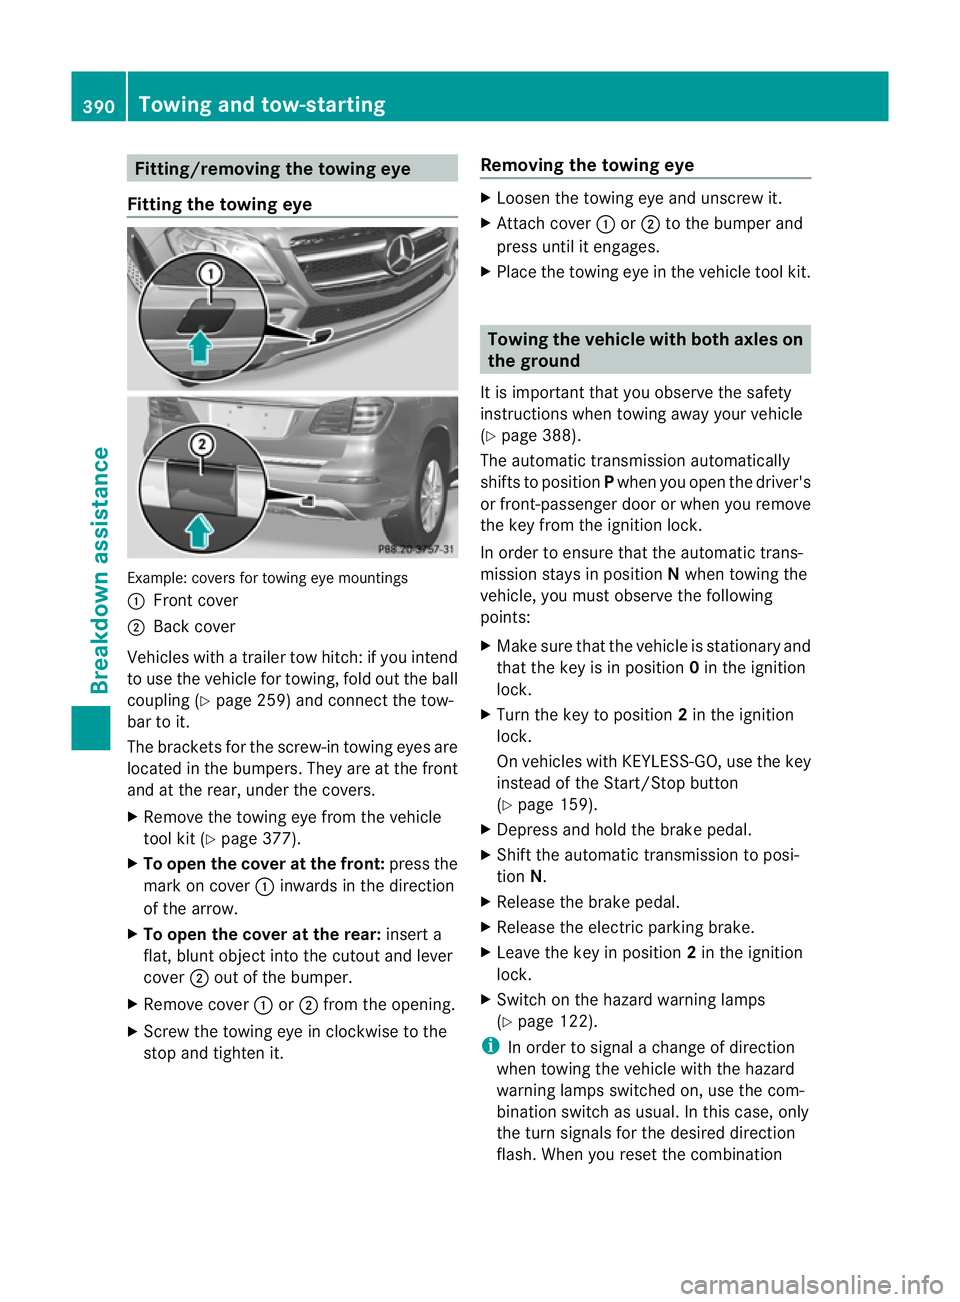
Fitting th etowing eye Example: cover
sfor towin geye mountings
: Front cover
; Bac kcover
Vehicles with atrailer to whitch :ify ou intend
to use the vehicle for towing, fold out the ball
coupling (Y page 259) and con nect the tow-
bar to it.
Th eb rackets for th escrew-i ntowing eyes are
located in the bumpers. They ar eatthe front
and at the rear, under the covers.
X Remove the towing eye from the vehicle
tool kit (Y page 377).
X To ope nthe cover at the front: press the
mark on cover :inwards in th edirection
of the arrow.
X To open the cover at the rear: insert a
flat, blunt object into the cutout and lever
cover ;out of the bumper.
X Remove cover :or; from the opening.
X Screw the towing eye in clockwise to the
stop and tighten it. Removing the towing eye X
Loosen the towing eye and unscrew it.
X Attach cover :or; to the bumper and
press until it engages.
X Place the towing eye in the vehicle tool kit. Towing the vehicle with both axles on
the ground
It is important that you observe the safety
instructions when towing away your vehicle
(Y page 388).
The automatic transmission automatically
shifts to position Pwhen you open the driver's
or front-passenger door or when you remove
the key from the ignition lock.
In order to ensure that the automatic trans-
mission stays in position Nwhen towing the
vehicle, you must observe the following
points:
X Make sure that the vehicle is stationary and
that the key is in position 0in the ignition
lock.
X Turn the key to position 2in the ignition
lock.
On vehicles with KEYL ESS-GO, use the key
instead of the Start/Stop button
(Y pag e159).
X Depres sand hol dthe brake pedal.
X Shif tthe automatic transmission to posi-
tion N.
X Release the brake pedal.
X Release the electric parkin gbrake.
X Leave th ekey in position 2in the ignition
lock.
X Switch on the hazar dwarning lamps
(Y page 122).
i In order to signal achange of direction
when towing the vehicle with the hazard
warnin glamps switched on, use the com-
bination switch as usual .Inthis case ,only
the turn signals for the desired direction
flash .When you reset the combination 390
Towing and tow-startingBreakdown assistance
Page 394 of 441
switch, the hazard warnin
glamps start
flashing again. Transporting the vehicle
! Only lash the vehicle down by the wheels
or wheel rims, not by parts of the vehicle
such as axle or steering components. Oth-
erwise, the vehicle could be damaged.
The towing eyes or trailer tow hitch can be
used to pull the vehicle onto atrailer or trans-
porter if yo uwish to transport it.
X Turn the key to position 2in the ignition
lock.
X Shift the automatic transmission to posi-
tion N.
As soon as the vehicle is loaded:
X Prevent the vehicle from rolling away by
applying the electric parkin gbrake.
X Shift th eautomatic transmission to posi-
tion P.
X Turn the key to position 0in the ignition
lock and remove it.
X Secure the vehicle. Information for 4MATIC vehicles
! Vehicles with 4MATIC must not be towed
with the front or rear axle raised; otherwise,
the transmission may be damaged.
If the vehicle has transmission damage or
damage to the front or rear axle, have it trans-
ported on atransporter or trailer.
In the even tofdamage to the ele ctrical
system
If the battery is defective, the automatic
transmission will be locked in position P.To
shif tthe automatic transmission to position
N,y ou must provide power to the vehicle's
electrical system in the same way as when
jump-starting (Y page 386).
Hav ethe vehicle transported on atransporter
or trailer. Recov
ering avehicle that ha sbecome
stuck
! When recovering atrapped vehicle ,donot
je rk the vehicle or pull it at an angle. If the
tractive powe rist oo high, th evehicles
could be damaged.
If th edrive wheels ge ttrapped on loose or
muddy ground, recover th evehicle with the
utmost care, especially so if the vehicle is
laden.
Never attempt to recover avehicle with a
trailer atta ched.
Pull out the vehicle backwards, if possible,
using the tracks it made when it became
stuck. Tow-starting (emergency engine
starting)
! Vehicles with automatic transmission
must not be tow-star ted. Otherwise, you
could damage the automatic tra nsmission.
You ca nfind information on "Jump-starting"
at (Y page 386). Electrical fuses
Important safet
ynotes G
WARNING
Only use fuses that have been approved for
Mercedes-Benz vehicles and which have the
correct fuse ratin gfor the system scon-
cer ned. Do not attempt to repair or bridge
faulty fuses. Usin gfuses which have not been
approved or attempting to repair or bridge
faulty fuses could cause the fuse to be over-
loaded and result in afire. Have the cause
traced and rectified at aqualified specialist
workshop.
! Only use fuses marked with an "S" for the
fuse box in the engine compartment and
under the rear bench seat. Components or
systems could othe rwise be damaged. Electrical fuses
391Breakdown assistance Z
Page 395 of 441
The fuses in your vehicle serv
etoclose down
faulty circuits .Ifafuse blows, all the compo-
nen tson th ecircuit and their function sstop
operating.
Blown fuse smust be replaced with fuses of
the same rating, which you can recognise by
the colour and fuse rating. The fuse ratings
are listed in the fuse allocation chart.
If the newly inser tedf use also blows ,have the
cause traced and rectified at aqualified spe-
cialist workshop, e.g. aMercedes-Benz
Servic eCentre. Befor
ereplacing afuse
X Secure th evehicle against rollin gaway
(Y page 181).
X Switch off all electrical consumers.
X Turn the key to position 0in the ignition
lock and remove it (Y page 159). On vehi-
cles with KEYLESS-GO, mak esure the igni-
tion is switched off (Y page 159).
All indicator lamps in the instrumen tcluster
must be off.
The fuses are located in various fuse boxes:
R fuse box on the fron t-passenger side of the
dashboard
R fuse box in the engine compartmen tonthe
right-hand side of the vehicle, when viewed
in the direction of travel
R fuse box under the rea rbench seat
The fuse allocation char tisl ocated in the fuse
box under the rea rbench seat (Y page 393). Dashboar
dfuse box
! Do not us eapointed objec tsuch as a
screwdriver to open the cover in the dash-
board. You could damage the dashboard or
the cover.
! Make sure that no moisture can enter the
fuse box when the cover is open.
! When closing the cover, make sure that it
is lying correctly on the fuse box. Moisture seeping in or dirt could otherwis
eimpair
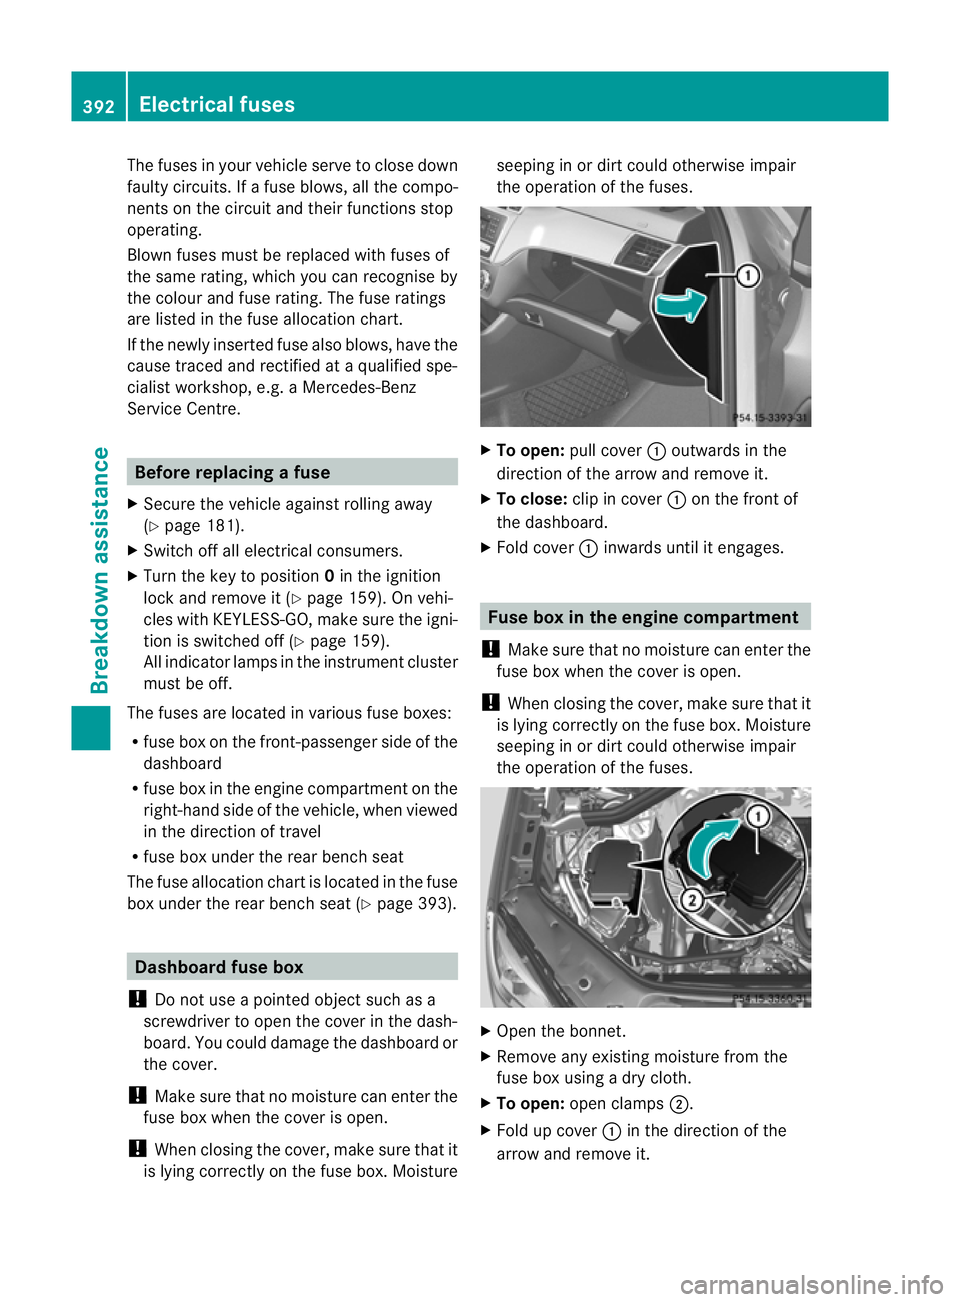
th eo peration of the fuses. X
To open: pull cover :outwards in the
direction of the arrow and remove it.
X To close: clip in cover :on the front of
the dashboard.
X Fold cover :inwards unti litengages. Fuse box in the engine compartment
! Make sure that no moisture can enter the
fuse box whe nthe cover is open.
! When closing the cover, make sur ethat it
is lyin gcorrectly on the fuse box. Moisture
seeping in or dir tcould otherwise impair
the operation of the fuses. X
Open the bonnet.
X Remove any existing moistur efrom the
fus eb ox using adry cloth.
X To open: open clamps ;.
X Fol dupc over:in the direction of the
arrow and remove it. 392
Electrical fusesBreakdown assistance
Page 396 of 441
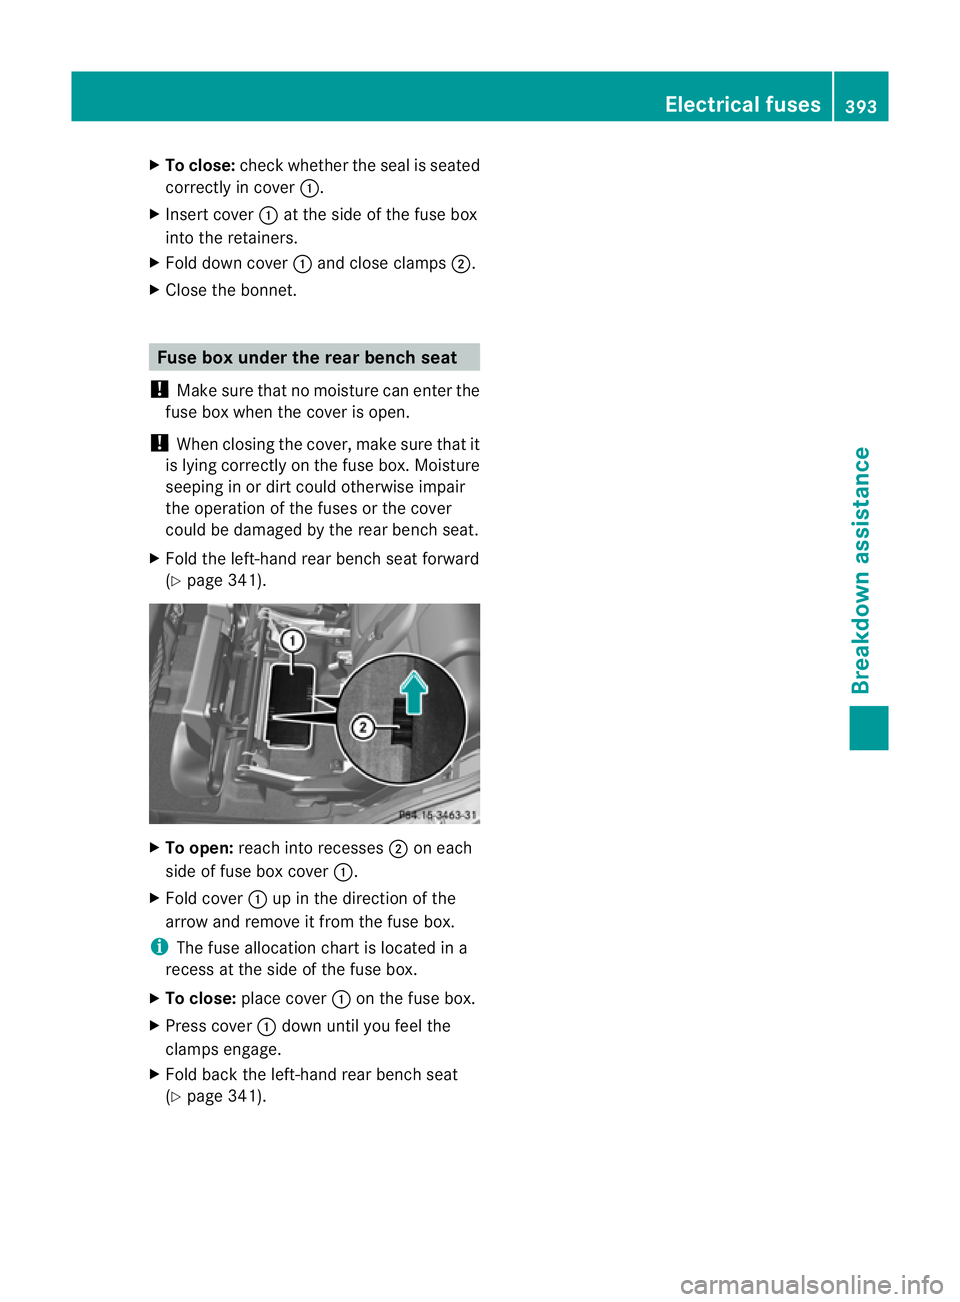
X
To close: check whethe rthe seal is seated
correc tlyinc over:.
X Insert cover :at the side of the fuse box
int ot he retainers.
X Fold down cover :and close clamps ;.
X Close the bonnet. Fuse box under th
erear bench seat
! Make sure that no moisture can enter the
fuse box when the cover is open.
! When closing the cover, make sure that it
is lying correctly on the fuse box. Moisture
seeping in or dirt could otherwise impair
the operation of the fuses or the cover
could be damaged by the rear bench seat.
X Fold the left-hand rear bench seat forward
(Y page 341). X
To open: reach into recesses ;on each
side of fuse box cover :.
X Fold cover :up in the direction of the
arrow and remov eitfrom th efuse box.
i The fuse allocation chart is located in a
recess at the side of the fuse box.
X To close: place cover :on the fuse box.
X Press cover :down until you feel the
clamps engage.
X Fold back the left-hand rear bench seat
(Y page 341). Electrical fuses
393Breakdown assistance Z
Page 397 of 441

394
Page 398 of 441
Usefu
linfor mation ............................ 396
Important safet ynotes .................... 396
Operation ........................................... 396
Winter oper ation ............................... 398
Ty re pressure .................................... 399
Changing awheel ............................. 404
Wheel and ty recombinations ..........409
Emergency spa rewheel ................... 414 395Wheels and tyres
Page 399 of 441
Usefu
linfor mati on
i This Owner's Manual describes all mod-
els, series and optional equipment for your
vehicle that were available at the time of
going to press. National variation sare pos-
sible. Note that your vehicl emay not be
equippe dwith all of the function sdescri-
bed. This is also the case for system sand
functions relevant to safety.
i Read the information on qualified special-
ist workshops: (Y page25). Impo
rtantsafety notes G
WARNING
If wheels and tyres of the wron gsize are used,
the wheel brakes or suspension components
may be damaged. There is arisk of accident.
Always replac ewheels and tyr es with those
that fulfil th especifications of the original part
(designation ,manufacturer, model). G
WARNING
Af lat tyre severely impair sthe driving, steer-
ing and bra king characteristics of the vehicle.
There is arisk of accident.
Tyres withou trun-flat characteristics:
R do not drive with aflat tyre.
R immediately replac ethe fla ttyre with your
emergenc yspare wheel or spare wheel, or
consult aqualified specialist workshop.
Tyres with run-flat characteristics:
R pay attention to the information and warn-
ing notices on MOExtended tyre s(tyres
with run-flat charac teristics).
Accessorie sthat ar enot approved for your
vehicle by Mercedes-Ben zorare not be ing
use dcorrectly can impair the operating
safety. Before purchasing and using non-approved
accessories, visi
taqualified specialist work-
sho pand enquire about:
R suitability
R leg alstipulations
R factory recommendations
Information on the dimensions and types of
wheels and tyres for your vehicle can be
found in the "Wheel/tyre combinations" sec-
tion (Y page 409).
Information on air pressure for the tyres on
your vehicle can be found:
R on the tyre pressure label on the fuel filler
flap (Y page 175)
R in the "Tyre pressure" section
R under "Tyre pressure" (Y page 399)
Modification work on the brake system and
wheels is not permitted. The use of wheel
spacers or brake dust shields is not permit-
ted. This invalidates the general operating
permit for the vehicle.
i Further information on wheels and tyres
can be obtained at any qualified specialist
workshop. Operation
Information on driving
Check the tyre pressures when the vehicle is
heavily laden and, if necessary, adjust.
While driving, pay attention to vibrations,
noises and unusual handling charac teristics,
e.g .pulling to one side .This ma yindicate that
the wheels or tyres are damaged. If you sus-
pect that atyre is defective, reduce your
speed immediately. Stop the vehicle as soon
as possibl etocheckthe wheels and tyres for
damage. Hidden tyr edamage could also be
causing the unusual handling characteristics.
If you find no signs of damage, have the tyres
and wheel schecked at aqualified specialist
workshop.
When parking your vehicle, make sure that
the tyres do not get deformed by the kerb or 396
OperationWheels and tyres
Page 400 of 441
other obstacles. If it is necessary to drive over
kerbs, speed humps or similar elevations, try
to do so slowly and at an obtuse angle .Oth-
erwise ,the tyres, particularly the sidewalls,
ma ybed amaged. Regular checking of wheels and tyres
G
WARNING
Damaged tyres can cause tyre inflation pres-
sure loss .Asaresult,you coul dlose control
of your vehicle. There is arisk of accident.
Check the tyres regularly for signs of damage
and replace any damaged tyres immediately.
Regularly check the wheels and tyres of your
vehicle for damage at least once amonth, as
well as after drivin goff-road or on rough
roads .Damaged wheels can cause aloss of
tyr ep ressure. Pa yparticular attention to
damage such as:
R cuts in the tyres
R punctures
R tears in the tyres
R bulges on tyres
R deformation or severe corrosion on wheels
Regularly check the tyre tread depth and the
condition of the tread across the whole width
of the tyre (Y page 397). If necessary, turn
the front wheelst ofull lock in order to inspect
the inner side of the tyre surface.
All wheel smust have avalve cap to protect
the valve against dirt and moisture. Do not fit
anything onto the valve other than the stand-
ard valve cap or other valve caps approved by
Mercedes-Benz for your vehicle. Do not fit any
other valve caps or systems, e.g. tyre pres-
sure monitoring systems.
Regularly check the pressure of all the tyres,
particularly prior to long trips. Adjust the tyre
pressure as necessary (Y page 399).
Observe the notes on the emergenc yspare
wheel (Y page 414). The service life of tyres depends on various
factors, including the following:
R
driving style
R tyr ep ressure
R tyre mileage Tyre tread
G
WARNING
Insufficient tyre trea dwill reduce tyre trac-
tion. The tyre is no longer able to dissipate
water. This means that on wet road surfaces,
the risk of aquaplaning increases, in particular
where speed is not adapted to suit the driving
conditions. There is arisk of accident.
If the tyre pressure is too high or too low, tyres
may exhibit different levels of wear at differ-
ent locations on the tyre tread. Thus, you
should regularly check the tread depth and
the condition of the tread across the entire
width of all tyres.
Minimum tyre tread depth for:
R summer tyres: 3mm
R M+S tyres: 4mm
For safety reasons ,replace the tyres before
the legally prescribed limi tfor the minimum
tyr etrea ddepth is reached.. Selecting, fitting and replacing ty
res
R Only fi ttyres and wheels of the same type
and make.
R Only fit tyres of the correc tsize ont othe
wheels.
R Run in new tyres at moderate speeds for
the first 10 0km. They onl yreach their full
performanc eafter this distance.
R Do not drive wit htyres which have too little
tread depth .This otherwise significantly
reduce sthe traction on wet roads (aqua-
planing).
R Replace the tyres after six year satthe lat-
est, regardless of wear. Operation
397Wheels and ty res Z