MERCEDES-BENZ GL SUV 2012 Owners Manual
Manufacturer: MERCEDES-BENZ, Model Year: 2012, Model line: GL SUV, Model: MERCEDES-BENZ GL SUV 2012Pages: 441, PDF Size: 10.66 MB
Page 401 of 441
Observe the notes on the emergenc
yspare
wheel (Y page 414). MOExtended tyres (tyres with run-flat
characteristics)
With MOExtended tyres (tyres with run-flat
characteristics), you can continue to drive
your vehicle even if there is atotal loss of
pressure in one or mor etyres.
MOExtended tyres may only be used in con-
junction with an active tyre pressure loss
warning syste morwith an activ etyre pres-
sure monitor and on wheels specificall ytes-
ted by Mercedes-Ben z.
No tes on driving with MOExtended tyres with
af lat tyre (Y page 378).
i Vehicles with MOExtended tyres are not
equipped with aTIREFIT kit at th efactory.
It is therefore recommended that you addi-
tionally equi pyour vehicle with aTIREFIT kit
if yo ufit tyres that do not featur erun-flat
characteristics, e.g. winter tyres. ATIREFIT
kit can be obtaine dfrom aqualified spe-
cialist workshop. Winter operation
General notes
Have your vehicle winterproofed at aqualified
specialist worksho patthe onset of winter.
Observ ethe notes in the "Changin gawheel"
section (Y page 404). Driving wit
hsummer tyres
At temperatures belo w+7† ,summer tyres
lose elasticity and therefore traction and
braking power. Change the tyres on your vehi-
cle to M+S tyres .Using summer tyres at very
cold temperatures could cause tears to form,
thereby damaging the tyres permanently.
Mercedes-Benz cannot accept responsibility
for this typ eofdamage. M+S tyres
G
WARNING
M+S tyres with atyre tread depth of less than
4mma re not su itable for use in winter as they
do not provid esufficient traction. There is a
risk of accident.
M+S tyres with atrea ddepth of less than
4mmm ust be replaced.
At temperatures below +7 †, use winter tyres
or all-seas ontyres.B oth types of tyr eare
identified by th eM+S marking.
Onl ywinter tyres bearing the isnowflake
symbol in addition to the M+S marking pro-
vide the best possible grip in wintr yroad con-
ditions.
Only these tyres will allow drivin gsafety sys-
tems such as ABS and ESP ®
to function opti-
mally in winter. Thes etyres have been devel-
ope dspecifically for driving in snow.
Use M+S tyres of the same mak eand tread
on all wheels to maintain safe handling char-
acteris tics.
Alway sobserv ethe maximum permissible
speed specifie dfor the M+S tyres you have
fit ted.
If you fit M+S tyres that have alower maxi-
mu mp ermissible speed than that of the vehi-
cle, affix acorresponding warnin glabel in the
driver' sfield of vision. This can be obtained
at aq ualified specialist workshop.
Under these circumstances, you should also
restrict the maximum spee dofthe vehicle
usin gpermanen tSPEEDTRONIC so that it
does not exceed the maximu mpermissible
speed for the M+S tyres(Y page 198).
When you have fit tedt he M+S tyres:
X Chec kthe tyr epressures (Y page 399).
X Restart th etyre pressure monitor
(Y page 403).
X Restart the tyre pressure los swarning sys-
tem (Y page 401).
For more information on driving with the
emergenc yspare wheel, see (Y page 414).398
Winter opera
tionWheels and tyres
Page 402 of 441
Snow chains
G
WARNING
If you hav efitted snow chains to the front
wheels, they may scrape against the vehicle
body or chassis components. This could
cause damage to the vehicle or the tyres.
There is arisk of an accident.
To avoid hazardous situations:
R never fit snow chains on the fron twheels
R fit snow chains to the rea rwheels in pairs.
! You must driv eatraised vehicle level if
snow chains have been fitted. The vehicle
could otherwise be damaged. Observe the
information in the "AIRMATIC package"
section.
! Do not use the Adaptive Damping System
(ADS )sports mode if you have fit teds now
chains .The vehicle could otherwise be
damaged.
! On some tyr esizes there is not enough
space for snow chains. In order to prevent
damage to the vehicle or the tyres, observe
the "Tyre and wheel combinations" section
under "Tyres and wheels".
For safety reasons, Mercedes-Benz recom-
mends that you only use snow chains that
have been specially approved for your vehicle
by Mercedes-Benz, or that are of acorre-
spondin gstandard of quality.
If you intend to fit snow chains ,please bear
the following points in mind:
R only use snow chains when the road sur-
face is completely snow-covered. Remove
the snow chains as soon as possible when
you come to aroad that is not snow- cov-
ered.
R do not exceed the maximu mpermissible
speed of 50 km /h. R
local regulations may restric tthe use of
snow chains. Observ ethe appropriate reg-
ulations if you wish to fit snow chains.
R snow chains cannot be fitted to all wheel-
tyr ec ombinations. Permissible wheel-tyre
combination s(Ypage 409).
i You may wish to deactivat eESP®
when
pull inga way with snow chains fitted
(Y page 67). This way you can allow the
wheels to spin in acontrolled manner ,ach-
ieving an increased driving force (cutting
action).
For more information on driving with the
emergency spare wheel, se e(Ypage 414). Ty
re pr essure Tyr
epressure specifications G
WARNING
Tyres with too low or too high tyre pressure
contain the following hazards:
R they can burst, in particular if the vehicle is
heavily laden or when driven at high
speeds.
R the tyres can wear excessively and/or
unevenly, which can severely impair tyre
traction.
R the driving, steering and braking character-
istics may be severely impaired.
There is arisk of accident.
Follow recommended tyre inflation pressures
and check the pressure of all the tyres includ-
ing the spare wheel:
R at least every two weeks
R if the load changes
R before beginning along journey
R for changed operatin gconditions, e.g. off-
road driving
If necessary ,correct the tyr epressure. G
WARNING
If you fit unsuitabl eaccessories onto tyre
valves ,the tyr evalves may be overloaded and Tyr
epressure
399Wheels and ty res
Z
Page 403 of 441
malfunction, which can caus
etyre press ure
loss. Due to their design, retrofitted tyre pres-
sure monitor skeep the tyr evalve open. This
can als oresul tint yre pressur eloss .There is
ar isk of accident.
Only screw standard valv ecaps or valve caps
specifically provided by Mercedes-Benz for
your vehicle onto the tyre valve. G
WARNING
If the tyre pressure drops repeatedly, the
wheel, valve or tyre may be damaged. Tyre
pressure that is too low may result in atyre
blow-out. There is arisk of accident.
R Check the tyre for foreign objects.
R Check whether the wheel is losing air or the
valv eisl eaking.
If you are unabl etorectify the damage, con-
tac ta qualified specialist workshop. H
Environmental note
Check the tyr epressure regularly, at least
every 14 days.
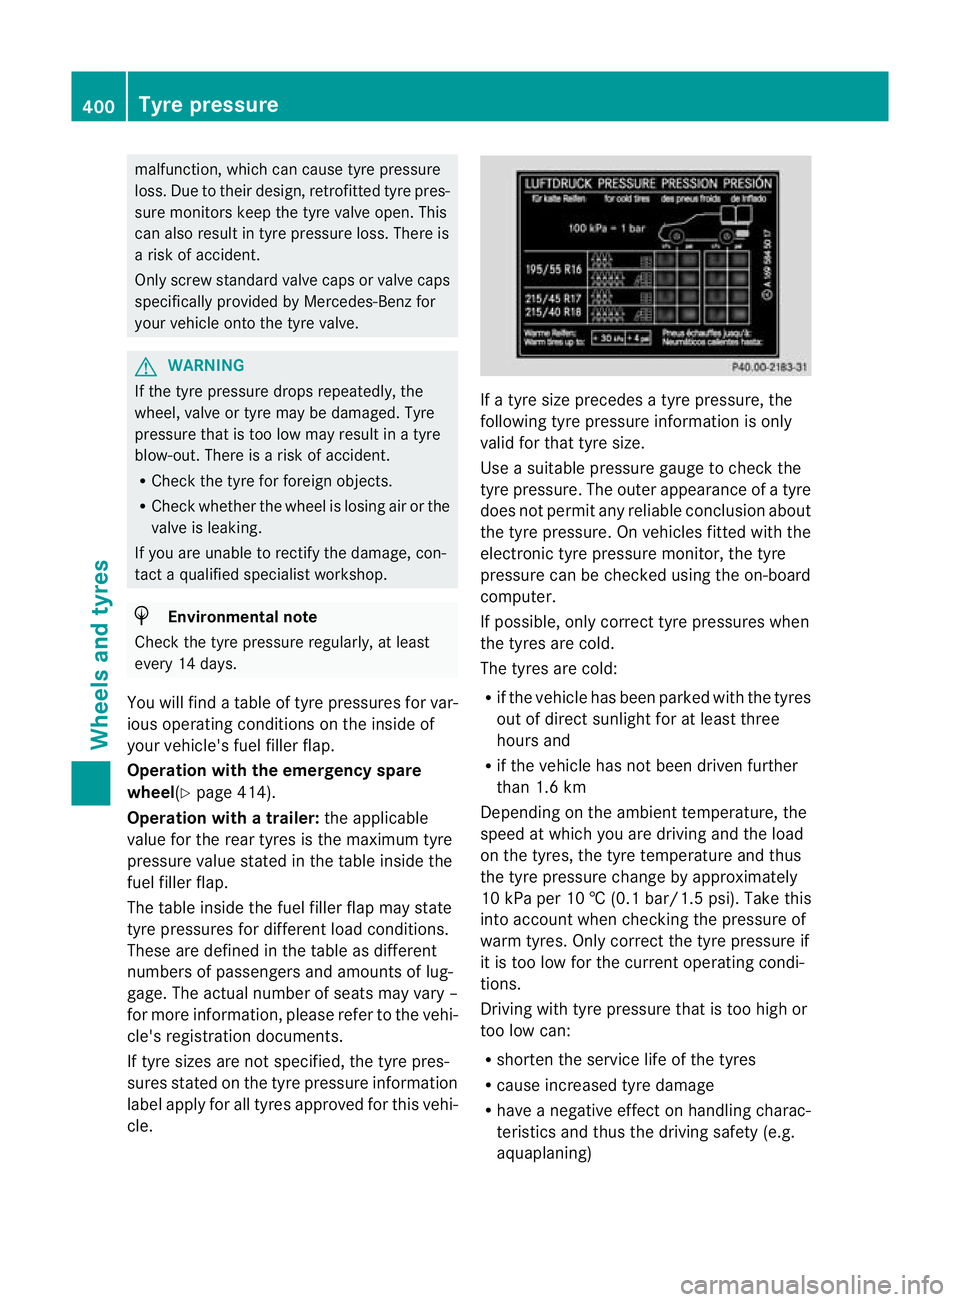
Yo uw ill find atable of tyre pressures for var-
ious operating conditions on the inside of
your vehicle's fuel filler flap.
Operation with the emergency spare
wheel(Y page 414).
Operation with atrai ler: the applicable
value for the rear tyres is the maximum tyre
pressure value stated in the table inside the
fuel filler flap.
The table inside the fuel filler flap may state
tyr ep ressures for different load conditions.
Thes eare define dinthe tabl easdifferent
number sofpassengers and amounts of lug-
gage. The actual number of seats may vary –
for more information, please refer to the vehi-
cle's registration documents.
If tyre sizes are not specified, the tyre pres-
sures stated on the tyre pressure information
label apply for all tyres approved for this vehi-
cle. If
at yre size precede satyre pressure, the
following tyre pressure information is only
valid for that tyre size.
Use asuitable pressure gauge to check the
tyre pressure. The outer appearance of atyre
doe snot permit any reliable con clusion about
the tyre pressure. On vehicles fitted with the
electronic tyre pressure monitor, the tyre
pressure can be checked using the on-board
computer.
If possible, only correc ttyre pressures when
the tyres are cold.
The tyres are cold:
R if the vehicl ehas been parked wit hthe tyres
out of direc tsunlight for at least three
hours and
R if the vehicle has not been driven further
than 1. 6km
Depe nding on the ambient temperature, the
speed at which you are drivin gand the load
on the tyres, the tyre temperature and thus
the tyre pressure chang ebyapproximately
10 kPa per 10 †(0.1 ba r/1.5 ps i).T ake this
into account whe nchecking the pressur eof
warm tyres. Only correc tthe tyr epressure if
it is to olow for the curren toperating condi-
tions.
Drivin gwith tyre pressure that is too high or
too low can:
R shorten the servic elife of the tyres
R cause increased tyre damage
R have anegativ eeffect on handling charac-
teristics and thus th edriving safet y(e.g.
aquaplaning) 400
Ty
re pressureWheel sand ty res
Page 404 of 441
i
The tyr epressure values given for low
load sare minimum values which offe ryou
good rid ecomfor tcharacteristics.
However ,you can also use the values given
for higher loads. These ar epermissible and
will not adversely affect the running of the
vehicle. Ty
re pr essur eloss warning system
Important safety notes While the vehicle is in motion, the tyre pres-
sure loss warnin gsystem monitors the set
tyre pressure using the rotational speed of
the wheels. This enable sthe system to detect
significant pressur eloss in atyre. If the speed
of rotation of awheel changes as aresult of
al oss of pressure, acorrespondin gwarning
message will appea rinthe multifunction dis-
play.
The tyr epressure warning system does not
warn yo uofani ncorrectly set tyre pressure.
Observe the notes on the recommended tyre
pressure (Y page399).
Th et yre pressure los swarning system does
not replace the need to regularly check your
vehicle's tyre pressures, since an even loss of
pressure on several tyres at the same time
cannot be detected by the tyre pressure loss
warning system.
The tyre pressure monitor is not able to warn
you of asudden loss of pressure, e.g. if the
tyre is penetrated by aforeign objec t. Inthe
event of asudden loss of pressure, bring the
vehicle to ahalt by braking carefully. Avoid
abrupt steering manoeuvres.
The function of the tyre pressure loss warning
system is limited or delayed if:
R snow chains are fitted to your vehicle's
tyres.
R road conditions are wintry.
R you are driving on sand or gravel.
R you adopt avery sporty driving style (cor-
nering at high speeds or driving with high
rates of acceleration). R
you are towing avery heavy or large trailer.
R you are driving with aheavy load (in the
vehicle or on the roof).
Resta rting the ty re pressur eloss warn-
ing system Restart the tyre pressure loss warnin
gsystem
if you have:
R changed the tyre pressure
R changed the wheels or tyres
R fitted new wheels or tyres
X Before restarting, make sure that the tyre
pressures are set properly on all four tyres
for the respective operating conditio ns.
The recommended tyr epressures can be
found in th etable on the fuel filler flap.
The tyre pressure loss warning system can
only give reliabl ewarnings if you have set
the correct tyre pressure. If an incorrect
tyre pressure is set, these incorrec tvalues
will be monitored.
X Also observ ethe notes in the sectionon
tyre pressures (Y page 399).
X Make sure tha tthe key is in posi-
tion 2(Ypage 159) in the ignition lock.
X Press the =or; button on the steer-
ing wheel to selec tthe Serv. menu.
X Press the 9or: button to select
Tyre pressure .
X Press the abutton.
The RunF lat Indicator active Restart with OK message appe
arsint he
multifunction display.
If yo uwish to confirm the resta rt:
X Press the abutton.
The Tyre press. no wOK? message
appe arsint he multifunction display.
X Press the 9or: button to select
Yes .
X Press the abutton.
The RunF lat Indicator restarted message appe
arsint he multifunction dis-
play. Ty
re pressure
401Wheelsand ty res Z
Page 405 of 441
After
ateach-in period ,the tyr epressure
loss warning system wil lmonitor the set
tyr ep ressures of all fou rtyres.
If you wish to cancel the restart:
X Press the %button.
or
X If the Tyrepress. now OK? message
appears ,use the 9or: button to
select Cancel .
X Press the abutton.
The tyr epressure values stored at th elast
restar twill continue to be monitored. Tyr
epressur emonitor
Important safet ynotes It is the driver's responsibility to set the tyre
pressure to the recommended cold tyre pres-
sure suitable for the operatin
gsituation
(Y page 399). Note that the correct tyre pres-
sure for the curren toperatin gsituation must
first be taught-in to the tyre pressure monitor.
If ther eisas ubstantial loss of pressure, the
warning threshold for the warning messag eis
aligned to the referenc evalues taught-in.
Restart the tyre pressure monitor after
adjustin gtothe cold tyr epressure
(Y page 403). Th ecurren tpressures are
saved as new referenc evalues. This will
ensure that awarning mess agewillonly
appear if the tyre pressure drops significantly.
The tyre pressure monitor doe snot warn you
of an incorrectly set tyr epressure. Observe
th en otes on the recommended tyr epressure
(Y page 399).
Th et yre press urem onitor is not able to warn
you of asudden loss of pressure, e.g. if the
tyre is penetrated by aforeign object. In the
even tofas udden loss of pressure, bring the
vehicl etoah altbyb raking carefully. Avoid
abrupt stee ringmanoeuvres.
If at yrep ressur emonitor system is fitted, the
vehicle's wheels hav esensor sfitte dthat
mo nito rthe tyre pressures in all four tyres. The tyr
epressur emonitor war nsyou if the
pressur edrops in one or more of the tyres.
Th et yrep ressur emonitor only fu nctionsif
the cor respondin gsensor sare fitte dtoall
wheels.
Information on tyr epressures is displayed in
the multifunctio ndisplay .After afew minutes
of driv ing, the curren ttyre pressure of each
tyre is sho wn inthe multifunction display.
Th et yre pressure values indicated by the on-
board computer may differ from thos emeas-
ured at afilling station using apressure
gauge. Th etyre pressures shown by the on-
board computer refer to thos emeasured at
sea level. At high altitudes, the tyr epressure
values indicated by apressure gaug eare
higher than thos eshown by the on-board
computer. In this case ,donot reduce the tyre
pressures.
The operation of the tyr epressure monitor
can be affecte dbyinterference from radio
transmitting equipment (e.g .radio head-
phones ,two-way radios) that may be being
operated in or near the vehicle.
Checking tyr epressure electronically X
Make sure that the key is in posi-
tion 2(Ypage 159) in the ignitio nlock.
X Press the =or; button on the steer-
ing wheel to select the Serv. menu.
X Press the 9or: button to select
Tyre pressure .
X Press the abutton.
The curren ttyre pressure for each wheel
will be displayed in the multifunction dis-
play.
If the vehicle has been parked for longe rthan
20 minutes ,the Tyre pressures will be
displaye
dafter afew minutes of driving message appe
ars.
After ateach-in period, the tyr epressure
monito rautomatically recognises new
wheel sornew sensors. As long as aclear
allocation of the tyre pressure values to the
individual wheels is not possible ,the Tyre 402
Ty
re pressureWheel sand ty res
Page 406 of 441
pressure monitor active displa
ymes-
sage is shown instead of the tyr epressure
display. Th etyre pressures are already being
monitored.
Warning message softhe tyre pressure
monitor If th
etyre pressure monitor detects asignifi-
cant pressure loss on one or more tyres, a
warnin gmessage is shown in the multifunc-
tion display. Awarning ton ealso sounds and
th et yrep ressure warning lamp ligh tsup in
the instrumen tcluster.
Eac htyret hat is affec tedbyas ignificant loss
of pressure is highlighted in th epressure dis-
play.
X If the Please correc ttyrep ressure messag
eappear sint he multifunctio ndis-
play, check th etyrep ressure on all four
wheels and correct it if necessary.
i If the whee lpositions on th evehicle are
interchanged, th etyrep ressures may be
displayed for the wro ngpositions for a
shor ttime. This is rectified after afew
minute sofdriving, and the tyre pressures
are displayed for the correct positions.
Restartin gthe tyre press urem onitor When you restar
tthe tyr epressure monitor,
all existing warning message sare deleted and
th ew arning lamps go out. The monitor uses
the currently set tyre pressures as the refer-
ence values for monitoring. In most cases, the
tyre pressure monitor will automatically
detect the new referenc evalues after you
have changed the tyr epressure. However,
you can also define referenc evalues man-
uall yasd escribed here.
X Use the table on the inside of the fuel filler
flap to ensur ethat the tyr epressure is set
corre ctly in all four tyres for the current
operating conditions. Also observe the notes in the section on
tyre pressures (Y
page 399).
X Make sure that the key is in position 2in
the ignition lock.
X Press the =or; button on the steer-
ing wheel to select the Serv. menu.
X Press the 9or: button to select
Tyre pressure .
X Press the abutton.
The multifunction display shows the cur-
rent tyre pressure for the individual tyres or
the Tyre pressure swill be dis‐ played after a few minutes of driv‐
ing message.
X Press the :button.
The Use current pressures as new reference values message appears in
th em ultifunction display.
If you wish to confirm the restart:
X Press the abutton.
The Tyre press. monito rrestarted message appears in th
emultifunction dis-
play.
After you have driven for afew minutes, the
system check swhether the curren ttyre
pressures are within the specified range.
The new tyre pressures are then accepted
as reference values and monitored.
If you wish to cancel the restart:
X Press the %button.
The tyre pressure values stored at the last
restart will continue to be monitored.
Radio typ eapproval for the tyr epres-
sure monitor In certain countries
,aradio type approval for
the tyre pressure monitor may be required.
The radio type approval number for the tyre
pressure monitor can be found online at:
http:/ /www.mercedes-benz.de/
betriebsanleitung. Tyr
epressure
403Wheels and ty res Z
Page 407 of 441
Country Radio type approval number
Brazil 1489-10-4415
Dubai TRA, Registered NO
0016161/08
TRA, Registered NO
0016162/08
Morocco MR5527 ANRT 2010
/27. April
2010
MR5526 ANRT 2010/ 27. April
2010 Ph
ilip-
pines ESD-1105558C
Singa-
pore Compliance with IDA Standard
N0140-09
South
Africa TA-2008/1068
TA-2008/1069
Changing
awheel Flat tyre
Yo uc an find information on wha ttodointhe
even tofa flat tyre in th e"Breakdown assis-
tance" sectio n(Ypage 378). Instruction sfor
drivin gwith MOExtended tyres in the event of
af lat tyre are also provided there.
Vehicles with an emergency spare
wheel: in the event of aflat tyre, the emer-
gency spare wheel is fitted according to the
description under "Fittin gawheel"
(Y page 405). Inte
rchangin gthe wheels G
WARNING
Interchanging the front and rear wheel smay
severely impair the driving characteristic sif
the wheels or tyres have differen tdimensions.
The wheel brakes or suspension componen ts
may als obedamaged. There is arisk of acci-
dent. Interchange front and rear wheels only if the
wheels and tyre
sare of th esame dimensions.
! On vehicles fitted with atyre pressure
monitor ,electronic componen tsare loca-
ted in the wheel.
Tyre-fittin gtools should not be applied in
the area of the valve, as this coul ddamage
the electronic components.
Only have tyre schanged at aqualified spe-
cialist workshop.
Interchanging the front and rear wheel sof
diff ering dimension scan render the general
operating permit invalid.
Obse rvet he instructions and safet ynotes in
the "Fi ttin gaw heel" section (Y page 405).
The wear pattern sonthe fr ont an drear tyr es
diff er,depending on the operating conditions.
Interchange the wheels befor eaclear wear
pattern ha sform edon the tyr es.F ront tyres
typicall ywearm ore on the shoulder sand the
rea rtyre sint he centre.
On vehicles that have the same size front and
rear wheels, you can interchange the wheels
every 5000k mto10,000 km depending on
the degre eoftyre wear. Maintain the direc-
tion of tyre rotation.
Clea nthe con tact surface softhe wheel and
the brake disc thoroughly ever ytime awheel
is interchanged. Chec kthe tyr epressure and,
if necessary, restart th etyre pressure loss
warning syste morthe tyrepressure monitor. Directio
nofrotation
Tyres with aspecified direction of rotation
have additional benefits, e.g. if there is arisk
of aquaplaning. You will only gain these ben-
efits if the correct direction of rotation is
observed.
An arrow on the sidewall of the tyre indicates
its correct direction of rotation. 404
Changing
awheelWheels and tyres
Page 408 of 441
Storing wheels
Stor ewheels that ar enot being used in acool,
dry and preferably dar kplace. Protect the
tyres against oil, grease, petrol and diesel. Cleaning the wheels
G
WARNING
The water jet of circular-jet nozzles (dirt grind-
ers) can cause damage not visible from the
outside to tyres or chassis components. Com-
ponent sdamaged in this way can unexpect-
edly fail. There is arisk of an accident.
Do not use high-pressure cleaners with circu-
lar-jet nozzles to clean the vehicle. Have dam-
aged tyres or chassis components replaced
immediately. Fitting
awheel
Preparing the vehicle X
Vehi cles with an emergency spare
wheel: whenfitting the emergenc yspare
wheel in the even tofaflat tyre, observe the
addi tional note sonvehicl epreparation
under "Flat tyre" (Y page 378).
X Pa rk th evehicle on firm, non-slippery and
level ground.
X Unload heavy luggage.
X Engage the electric parking brak eman-
ually.
X Bring the front wheels into the straight-
ahead position.
X Shift the transmission to position P.
X Switch off the engine.
X Vehicles without KEYLESS-GO: remove
the key from the ignition lock.
X Vehicles with KEYLESS-GO: open the
driver' sdoor.
The on-boar delectronic shave status 0,
which is the same as the key having been
removed. X
Vehicles with KEYLESS-GO: remove the
Start/Stop button from the ignition lock
(Y page 159).
X If included in the vehicle equipment, take
the tyre-change tool kit out of the vehicle.
X Secure the vehicle to prevent it from rolling
away.
i Apart from some country-specific var-
iants, vehicles are not equipped with tyre-
changing tools .For mor einformation on
which tool sare require dtop erform awheel
change on your vehicle, consult a
Mercedes-Ben zService Centre.
Required tyre-cha nging tools could be, for
example:
R jack
R wheel chock
R wheel wrench
Securing the vehicle against rolling
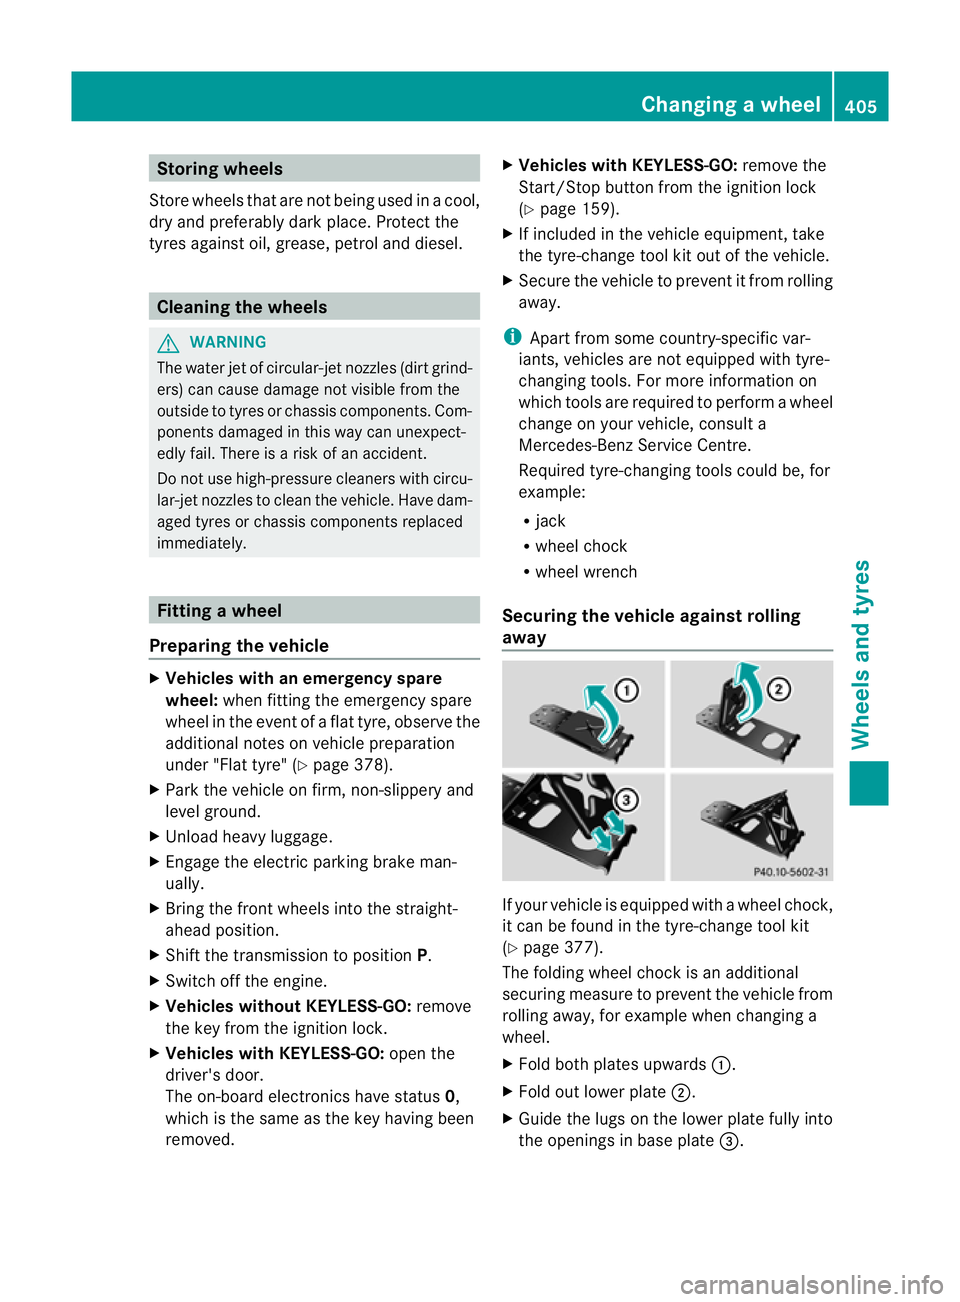
away If your vehicle is equipped with
awheel choc k,
it can be found in the tyre-change tool kit
(Y page 377).
The folding wheel chock is an additional
securing measure to prevent the vehicle from
rolling away, for example when changing a
wheel.
X Fold both plates upwards :.
X Fold out lower plate ;.
X Guide the lugs on the lower plate fully into
the openings in base plate =. Changing
awheel
405Wheels and tyres Z
Page 409 of 441
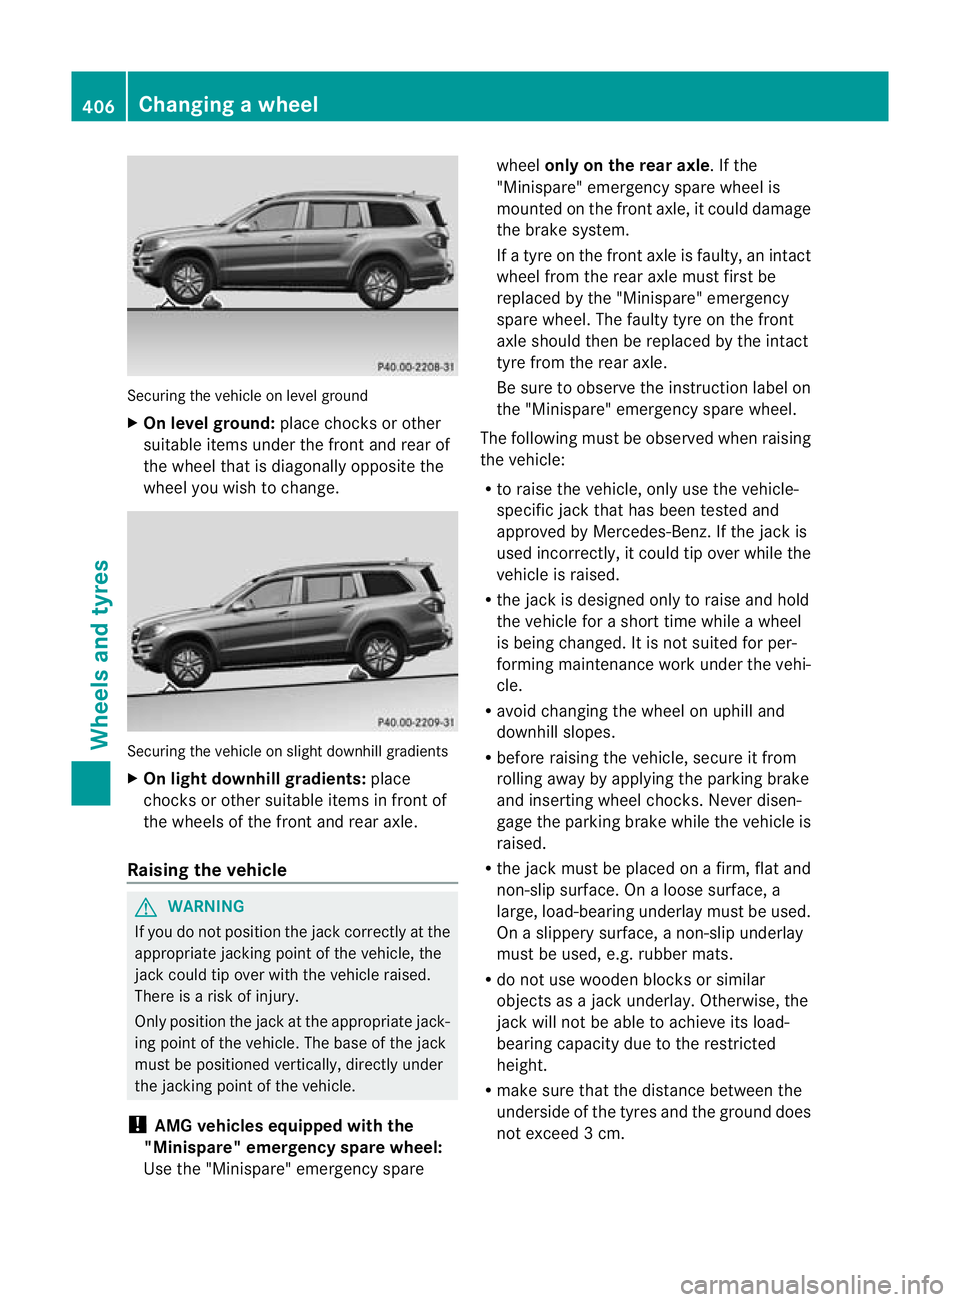
Securing the vehicle on level ground
X
On level ground: place chocks or oth er
su itabl eitem sunder the front and rea rof
the whee lthat is diagonally opposite the
whee lyou wish to change. Securing the vehicle on slight downhill gradients
X On ligh tdownhill gradients: place
chocks or other suitabl eitems in front of
the wheels of the front and rear axle.
Raisin gthe vehicle G
WARNING
If you do not positio nthe jac kcorrectly at the
appropriate jackin gpoint of the vehicle, the
jac kc ould tip over with the vehicle raised.
There is arisk of injury.
Only position the jack at the appropriate jack-
ing point of the vehicle. The base of the jack
must be positioned vertically, directly under
the jackin gpoint of the vehicle.
! AMG vehicles equipped with the
"Minispare" emergency spare wheel:
Use the "Minispare" emergency spare wheel
only on th erear axle.Ift he
"Minispare" emergenc yspare wheel is
mounted on the front axle, it could damage
the brak esystem.
If at yre on the front axle is faulty, an intact
whee lfrom th erear axle must first be
replaced by the "Minispare" emergency
spare wheel. The faulty tyr eonthe front
axl es hould then be replaced by the intact
tyr efrom th erear axle.
Be sure to observ ethe instruction label on
the "Minispare" emergenc yspare wheel.
The following must be observed when raising
the vehicle:
R to raise the vehicle, only use the vehicle-
specifi cjack that has been tested and
approved by Mercedes-Benz .Ifthe jac kis
used incorrectly, it could tip over while the
vehicle is raised.
R the jack is designed only to raise and hold
the vehicle for ashort tim ewhile awheel
is being changed. It is not suited for per-
forming maintenance wor kunder the vehi-
cle.
R avoid changing the wheel on uphil land
downhil lslopes.
R before raising the vehicle, secure it from
rolling away by applying the parkin gbrake
and inserting whee lchocks. Never disen-
gage the parkin gbrake whil ethe vehicle is
raised.
R the jac kmust be placed on afirm ,flat and
non-slip surface. On aloose surface, a
large, load-bearing underlay must be used.
On aslippery surface, anon-slip underlay
must be used, e.g. rubber mats.
R do not use wooden block sorsimilar
objects as ajack underlay .Otherwi se,the
jack wil lnot be able to achiev eits load-
bearing capacity due to the restricted
height.
R mak esure that the distanc ebetween the
underside of the tyr es andthe grou nddoes
not exceed 3cm. 406
Changing
awheelWheels and tyres
Page 410 of 441
R
neve rplace your hands or feet under the
raised vehicle.
R never lie under the raised vehicle.
R never start the engin ewhen the vehi cleis
raised.
R never open or close adoor or the tailgate
when the vehicle is raised.
R ma kesur ethat no persons ar epresent in
th ev ehicle when the vehicle is raised. X
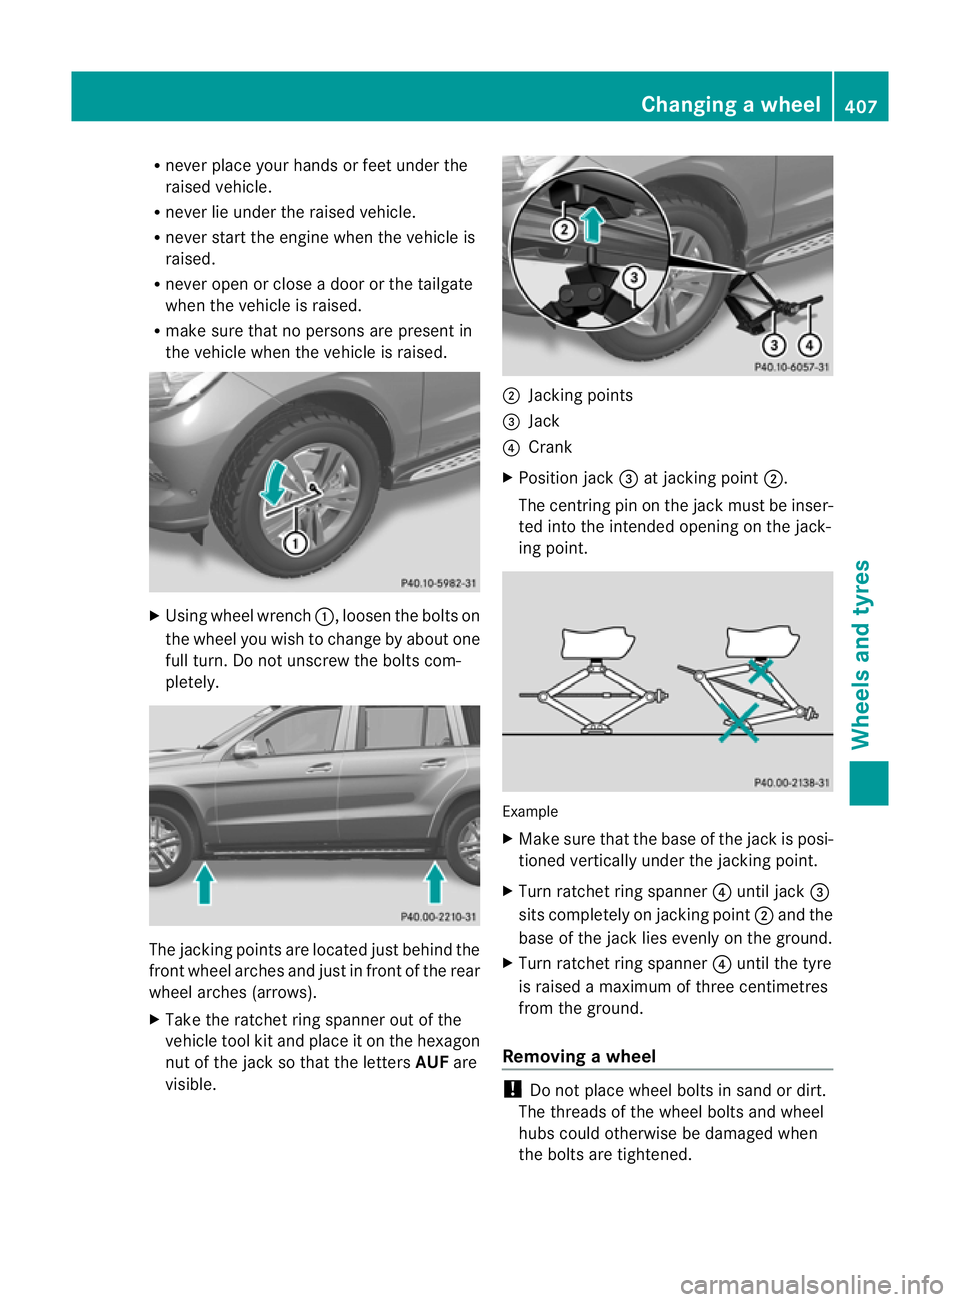
Usin gwheel wrench :,loosen the bolt son
the whee lyou wish to change by about one
full turn. Do not unscrew the bolt scom-
pletely. The jackin
gpoint sare located jus tbehin dthe
fr ont wh eel archesa nd just in front of the rear
wheel arches (arrows).
X Take the ratchet rin gspanner out of the
vehicle too lkit and place it on the hexagon
nut of the jac ksothat the letters AUFare
visible. ;
Jacking points
= Jack
? Crank
X Position jack =at jackin gpoint ;.
The centring pin on the jac kmust be inser-
ted int othe intended opening on th ejack-
ing point. Example
X
Mak esure that the base of the jac kisposi-
tioned vertically under the jackin gpoint.
X Tur nratchet ring spanner ?until jack =
sits completely on jacking point ;and the
base of the jack lies evenly on the ground.
X Turn ratchet ring spanner ?until the tyre
is raised amaximum of three centimetres
from the ground.
Removing awheel !
Do not pl acew heel bolts in sand or dirt.
The threads of the wheel bolts and wheel
hubs could otherwise be dam aged when
the bolts are tightened. Changing
awheel
407Wheels and tyres Z