engine MERCEDES-BENZ GLA SUV 2018 User Guide
[x] Cancel search | Manufacturer: MERCEDES-BENZ, Model Year: 2018, Model line: GLA SUV, Model: MERCEDES-BENZ GLA SUV 2018Pages: 338, PDF Size: 5.59 MB
Page 21 of 338
Start/Stop buttonRemoving ....................................... 125
Starting the engine ........................ 126
Start/stop function
see ECO start/stop function
Starting (engine) ................................ 125
STEER CONTROL ..................................6 7
Steering
Display message ............................2 25
Steering assistant STEER CON-
TROL
see STEER CONTROL
Steering wheel
Adjusting (manually) ........................ 96
Button overview ............................... 33
Buttons (on-board computer) ......... 186
Cleaning ......................................... 280
Important safety notes .................... 96
Paddle shifters ............................... 138
Steering wheel paddle shifters ........ 138
Stopwatch (RACETIMER) ................... 198
Stowage compartments
Armrest (front) ............................... 248
Armrest (under) ............................. 249
Center console .............................. 248
Center console (rear) ..................... 249
Cup holders ................................... 253
Eyeglasses compartment ............... 248
Glove box ....................................... 248
Important safety information ......... 247
Map pockets .................................. 249
Stowage net ................................... 249
Stowage net ....................................... 249
Summer opening
see Convenience opening feature
Summer tires ..................................... 301
Sun visor ............................................ 255
Suspension setting
AMG adaptive sport suspension
system ........................................... 165
Switching air-recirculation mode
on/off ................................................. 121
Switching on media mode
Via the device list .......................... 245
T
Tachometer ........................................ 185 Tail lamps
see Lights
Tailgate
Display message ............................ 224
Emergency unlocking ....................... 82
Important safety notes .................... 77
Limiting the opening angle ............... 82
Obstruction detection ...................... 78
Opening dimensions ...................... 333
Opening/closing (from outside) ....... 78
Opening/closing automatically
from inside ....................................... 81
Opening/closing automatically
from outside .................................... 79
Tank
see Fuel tank
Tank content
Fuel gauge ....................................... 32
Technical data
Capacities ...................................... 328
Information .................................... 326
Tires/wheels ................................. 323
Vehicle data ................................... 333
TELEAID
Call priority .................................... 260
Downloading destinations
(COMAND) ..................................... 261
Downloading routes ....................... 263
Emergency call .............................. 258
General notes ................................ 257
Geo fencing ................................... 264
Locating a stolen vehicle ............... 262
MB info call button ........................ 260
Remote vehicle locking .................. 262
Roadside Assistance button .......... 259
Search & Send ............................... 261
Self-test ......................................... 257
Speed alert .................................... 263
System .......................................... 257
Triggering the vehicle alarm ........... 264
Vehicle Health Check .................... 263
Vehicle remote unlocking .............. 262
Telephone
Accepting a call (multifunction
steering wheel) .............................. 193
Authorizing a mobile phone (con-
necting) ......................................... 243
Index19
Page 22 of 338
Authorizing a mobile phone via the
device manager (connecting) ......... 244
Connecting a mobile phone
(device manager) ........................... 244
Connecting a mobile phone (gen-
eral information) ............................ 243
Display message ............................ 225
Introduction ................................... 192
Menu (on-board computer) ............ 192
Number from the phone book ........ 193
Redialing ........................................ 193
Rejecting/ending a call ................. 193
see also Digital Operator's Man-
ual .................................................. 239
Temperature
Coolant .......................................... 186
Coolant (on-board computer,
Mercedes-AMG vehicles) ............... 197
Engine oil (on-board computer,
Mercedes-AMG vehicles) ............... 197
Outside temperature ...................... 185
Setting (climate control) ................ 118
Transmission oil (on-board com-
puter, Mercedes-AMG vehicles) ..... 197
Through-loading feature ................... 250
Timing (RACETIMER) ......................... 198
Tire pressure
Calling up (on-board computer) ..... 306
Checking manually ........................ 305
Display message ............................ 220
Maximum ....................................... 305
Not reached (TIREFIT) .................... 287
Notes ............................................. 304
Reached (TIREFIT) .......................... 287
Recommended ............................... 302
Tire pressure loss warning system
General notes ................................ 305
Important safety notes .................. 306
Restarting ...................................... 306
Tire pressure monitor
Checking the tire pressure elec-
tronically ........................................ 308
Function/notes ............................. 306
General notes ................................ 306
Important safety notes .................. 307
Radio type approval for the tire
pressure monitor ........................... 309
Restarting ...................................... 309 Warning lamp ................................. 238
Warning message .......................... 308
TIREFIT kit .......................................... 285
Imp
ortant safety notes .................. 285
Storage location ............................ 284
Tire pressure not reached .............. 287
Tire pressure reached .................... 287
Tires
Aspect ratio (definition) ................. 319
Average weight of the vehicle
occupants (definition) .................... 317
Bar (definition) ............................... 317
Changing a wheel .......................... 319
Characteristics .............................. 317
Checking ........................................ 299
Curb weight (definition) ................. 318
Definition of terms ......................... 317
Direction of rotation ...................... 320
Display message ............................ 220
Distribution of the vehicle occu-
pants (definition) ............................ 319
DOT (Department of Transporta-
tion) (definition) ............................. 317
DOT, Tire Identification Number
(TIN) ............................................... 317
GAWR (Gross Axle Weight Rating)
(definition) ..................................... 318
General notes ................................ 323
GVW (Gross Vehicle Weight) (def-
inition) ........................................... 318
GVWR (Gross Vehicle Weight Rat-
ing) (definition) .............................. 318
Important safety notes .................. 299
Increased vehicle weight due to
optional equipment (definition) ...... 318
Information on driving .................... 299
Kilopascal (kPa) (definition) ........... 318
Labeling (overview) ........................ 314
Load bearing index (definition) ...... 319
Load index ..................................... 316
Load index (definition) ................... 318
M+S tires ....................................... 301
Maximum load on a tire (defini-
tion) ............................................... 318
Maximum loaded vehicle weight
(definition) ..................................... 318
Maximum permissible tire pres-
sure (definition) ............................. 318
20Index
Page 23 of 338
Maximum tire load .........................316
Maximum tire load (definition) ....... 318
MOExtended tires .......................... 301
Optional equipment weight (defi-
nition) ............................................ 319
PSI (pounds per square inch) (def-
inition) ...........................................3 19
Replacing ....................................... 319
Service life ..................................... 300
Sidewall (definition) ....................... 319
Speed rating (definition) ................ 318
Storing ...........................................3 20
Structure and characteristics
(definition) ..................................... 317
Summer tires ................................. 301
Temperature .................................. 314
TIN (Tire Identification Number)
(definition) ..................................... 319
Tire bead (definition) ......................3 19
Tire pressure (definition) ................ 319
Tire pressures (recommended) ...... 318
Tire size (data) ............................... 323
Tire size designation, load-bearing
capacity, speed rating .................... 314
Tire tread ....................................... 300
Tire tread (definition) ..................... 319
Total load limit (definition) ............. 319
Traction ......................................... 313
Traction (definition) ....................... 319
Tread wear ..................................... 313
Uniform Tire Quality Grading
Standards ...................................... 313
Uniform Tire Quality Grading
Standards (definition) .................... 318
Wear indicator (definition) ............. 319
Wheel rim (definition) .................... 318
see Flat tire
Tool
see Vehicle tool kit
Top Tether ............................................ 56
Tow-starting
Emergency engine starting ............ 297
Important safety notes .................. 294
Installing the towing eye ................ 295
Removing the towing eye ............... 295
Towing a trailer
ESP
®(Electronic Stability Pro-
gram) ............................................... 66 To
wing away
Important safety guidelines ........... 294
Installing the towing eye ................ 295
Notes for 4MATIC vehicles ............ 296
Removing the towing eye ............... 295
Transporting the vehicle ................ 296
With both axles on the ground ....... 296
With the front axle raised ............... 295
Towing eye ......................................... 283
Traction system
see ETS/4ETS (Electronic Trac-
tion System)
Traffic reports
see also Digital Operator's Man-
ual .................................................. 239
Transmission
see Automatic transmission
Transmission position display
(DIRECT SELECT lever) ...................... 132
Transporting the vehicle .................. 296
Traveling uphill
Brow of hill ..................................... 154
Driving downhill ............................. 154
Maximum gradient-climbing capa-
bility ............................................... 154
Trim pieces (cleaning instruc-
tions) .................................................. 280
Trip computer (on-board com-
puter) .................................................. 189
Trip odometer
Calling up ....................................... 189
Resetting (on-board computer) ...... 190
Trunk
Emergency release button ............... 83
Opening (from outside the vehi-
cle, HANDS-FREE ACCESS) .............. 80
Trunk lid
see Tailgate
Turn signals
Display message ............................ 211
Replacing bulbs (front) ................... 107
Switching on/off ........................... 103
Two-way radio
Frequencies ................................... 326
Installation ..................................... 326
Transmission output (maximum) .... 326
Index21
Page 24 of 338
Type identification platesee Vehicle identification plate
U
UnlockingEmergency unlocking ....................... 76
From inside the vehicle (central
unlocking button) ............................. 75
Upshift indicator (on-board com-
puter, Mercedes-AMG vehicles) ....... 197
USB devices
Connecting to the Media Inter-
face ...............................................2 46
V
Vanity mirror (in the sun visor)........255
Vehicle
Correct use ...................................... 27
Data acquisition ............................... 28
Display message ............................ 222
Equipment ....................................... 26
Individual settings .......................... 195
Limited Warranty .............................2 8
Loading .......................................... 310
Locking (in an emergency) ............... 77
Locking (SmartKey) .......................... 69
Lowering ........................................ 323
Maintenance .................................... 26
Parking for a long period ................ 145
Pulling away ................................... 127
Raising ........................................... 321
Reporting problems ......................... 27
Securing from rolling away ............ 321
Transporting .................................. 296
Unlocking (in an emergency) ........... 76
Unlocking (SmartKey) ...................... 69
Vehicle data ................................... 333
Vehicle battery
see Battery (vehicle)
Vehicle data
Roof load (maximum) ..................... 333
Vehicle data (off-road driving)
Approach/departure angle ............ 334
Maximum gradient climbing abil-
ity .................................................. 334
Vehicle dimensions ........................... 333 Vehicle emergency locking
................ 77
Vehicle identification number
see VIN
Vehicle identification plate .............. 327
Vehicle tool kit .................................. 283
Ventilation
Setting the vents ........................... 122
Video
Operating the DVD ......................... 192
see also Digital Operator's Man-
ual .................................................. 239
VIN
Seat ............................................... 328
Type plate ...................................... 327
W
Warning and indicator lampsABS ................................................ 230
Active Brake Assist ........................ 237
Brakes ........................................... 229
Check Engine ................................. 234
Coolant .......................................... 235
Distance warning ........................... 237
ESP
®.............................................. 231
ESP®OFF ....................................... 232
Fuel tank ........................................ 234
Overview .......................................... 32
Reserve fuel ................................... 234
Restraint system ............................ 234
Seat belt ........................................ 227
SPORT handling mode ................... 232
Tire pressure monitor .................... 238
Warning triangle ................................ 283
Washer fluid
Display message ............................ 225
Weather display (COMAND)
see also Digital Operator's Man-
ual .................................................. 239
Wheel and tire combinations
Tires ............................................... 323
Wheel bolt tightening torque ........... 323
Wheel chock ...................................... 321
Wheels
Changing a wheel .......................... 319
Checking ........................................ 299
Cleaning ......................................... 277
Emergency spare wheel ................. 324
22Index
Page 27 of 338
Protecting the environment
General notes
HEnvironmental note
Daimler's declared policy is one of compre-
hensive environmental protection.
The objectives are for the natural resources
that form the basis of our existence on this
planet to be used sparingly and in a manner
that takes the requirements of both nature
and humanity into account.
You too can help to protect the environment
by operating your vehicle in an environmen-
tally responsible manner.
Fuel consumption and the rate of engine,
transmission, brake and tire wear are affected by these factors:
Roperating conditions of your vehicle
Ryour personal driving style
You can influence both factors. You should
bear the following in mind:
Operating conditions:
Ravoid short trips as these increase fuel con-
sumption.
Ralways make sure that the tire pressures
are correct.
Rdo not carry any unnecessary weight.
Rremove roof racks once you no longer need
them.
Ra regularly serviced vehicle will contribute
to environmental protection. You should
therefore adhere to the service intervals.
Ralways have service work carried out at a
qualified specialist workshop.
Personal driving style:
Rdo not depress the accelerator pedal when
starting the engine.
Rdo not warm up the engine when the vehicle
is stationary.
Rdrive carefully and maintain a safe distance
from the vehicle in front.
Ravoid frequent, sudden acceleration and
braking.
Rchange gear in good time and use each gear
only up to Ôof its maximum engine speed.
Rswitch off the engine in stationary traffic.
Rkeep an eye on the vehicle's fuel consump-
tion.
Environmental concerns and recom-
mendations
Wherever the Operator's Manual requires you to
dispose of materials, first try to regenerate or re-
use them. Observe the relevant environmental
rules and regulations when disposing of materi-
als. In this way you will help to protect the envi-
ronment.
Genuine Mercedes-Benz parts
HEnvironmental note
Daimler AG also supplies reconditioned major
assemblies and parts which are of the same
quality as new parts. They are covered by the
same Limited Warranty entitlements as new
parts.
!Air bags and Emergency Tensioning Devi-
ces, as well as control units and sensors for
these restraint systems, may be installed in
the following areas of your vehicle:
Rdoors
Rdoor pillars
Rdoor sills
Rseats
Rcockpit
Rinstrument cluster
Rcenter console
Do not install accessories such as audio sys-
tems in these areas. Do not carry out repairs or welding. You could impair the operating
efficiency of the restraint systems.
Have aftermarket accessories installed at a
qualified specialist workshop.
You could jeopardize the operating safety of
your vehicle if you use parts, tires and wheels as
well as accessories relevant to safety which
have not been approved by Mercedes-Benz. This
could lead to malfunctions in safety-relevant
Genuine Mercedes-Benz parts25
Introduction
Z
Page 29 of 338
Operating safety
Declarations of conformity
USA:"The wireless devices of this vehicle com-
ply with Part 15 of the FCC Rules. Operation is
subject to the two following two conditions: 1)
These devices may not cause harmful interfer-
ence, and 2) These devices must accept any
interference received, including interference
that may cause undesired operation. Changes
or modifications not expressly approved by the
party responsible for compliance could void the
user’s authority to operate the equipment."
Canada: "The wireless devices of this vehicle
comply with Industry Canada license-exempt
RSS standard(s). Operation is subject to the fol- lowing two conditions: (1) These devices may
not cause interference, and (2) These devices
must accept any interference, including inter-
ference that may cause undesired operation of
the device."
Diagnostics connection
The diagnostics connection is only intended forthe connection of diagnostic equipment at a
qualified specialist workshop.
GWARNING
If you connect equipment to a diagnostics
connection in the vehicle, it may affect the
operation of vehicle systems. As a result, the
operating safety of the vehicle could be affec-
ted. There is a risk of an accident.
Only connect equipment to a diagnostics con-
nection in the vehicle, which is approved for
your vehicle by Mercedes-Benz.
GWARNING
Objects in the driver's footwell can restrict the pedal travel or obstruct a depressed pedal.
The operating and road safety of the vehicle is
jeopardized. There is a risk of an accident.
Make sure that all objects in the vehicle are
stowed correctly, and that they cannot enter
the driver's footwell. Install the floormats
securely and as specified in order to ensure
sufficient clearance for the pedals. Do not use
loose floormats and do not place floormats on
top of one another.
!If the engine is switched off and equipment
on the diagnostics connection is used, the
starter battery may discharge.
Connecting equipment to the diagnostics con-
nection can lead to emissions monitoring infor-
mation being reset, for example. This may lead
to the vehicle failing to meet the requirements of
the next emissions test during the main inspec-
tion.
Qualified specialist workshop
An authorized Mercedes-Benz Center is a quali-
fied specialist workshop. It has the necessary
specialist knowledge, tools and qualifications to
correctly carry out the work required on your
vehicle. This is especially the case for work rel-
evant to safety.
Observe the notes in the Maintenance Booklet.
Always have the following work carried out at an
authorized Mercedes-Benz Center:
Rwork relevant to safety
Rservice and maintenance work
Rrepair work
Ralterations, installation work and modifica-
tions
Rwork on electronic components
Correct use
If you remove any warning stickers, you or oth-
ers could fail to recognize certain dangers.
Leave warning stickers in position.
Observe the following information when driving
your vehicle:
Rthe safety notes in this manual
Rtechnical data for the vehicle
Rtraffic rules and regulations
Rlaws and safety standards pertaining to motor vehicles
Problems with your vehicle
If you should experience a problem with your
vehicle, particularly one that you believe may
Operating safety27
Introduction
Z
Page 42 of 338
Restraint system warning lamp
The functions of the restraint system are
checked after the ignition is switched on and at
regular intervals while the engine is running.
Therefore, malfunctions can be detected in
good time.
The6 restraint system warning lamp on the
instrument cluster lights up when the ignition is
switched on. It goes out no later than a few sec-
onds after the vehicle is started. The compo-
nents of the restraint system are in operational
readiness.
A malfunction has occurred if the 6restraint
system warning lamp:
Rdoes not light up after the ignition is switched
on
Rdoes not go out after a few seconds with the
engine running
Rlights up again while the engine is running
GWARNING
If the restraint system is malfunctioning,
restraint system components may be trig-
gered unintentionally or may not deploy as
intended during an accident. This can affect
for example the Emergency Tensioning
Device or the air bag. This poses an increased
risk of injury or even fatal injury.
Have the restraint system checked and
repaired in a qualified specialist workshop as
soon as possible.
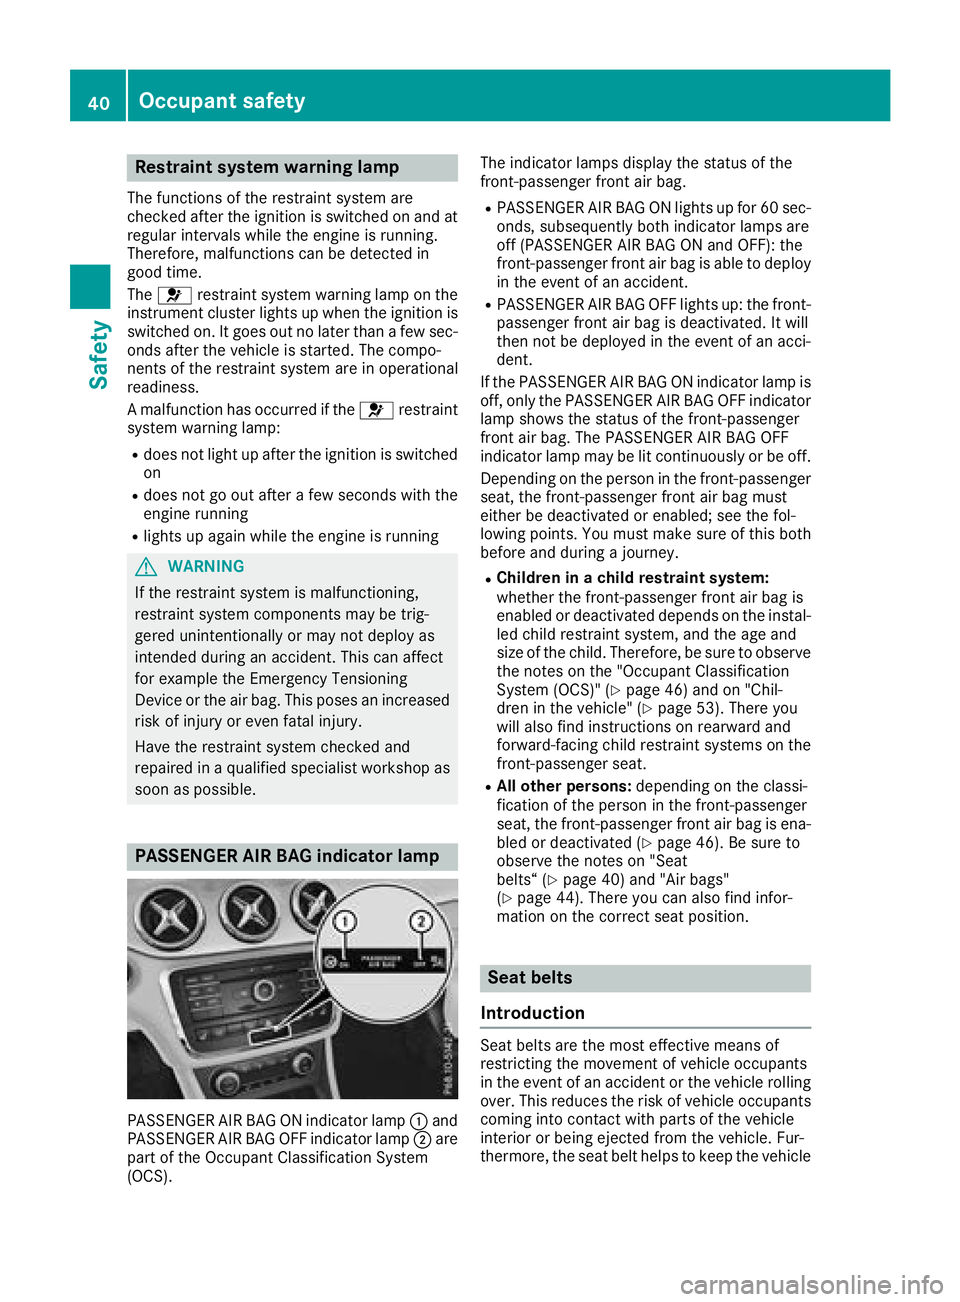
PASSENGER AIR BAG indicator lamp
PASSENGER AIR BAG ON indicator lamp :and
PASSENGER AIR BAG OFF indicator lamp ;are
part of the Occupant Classification System
(OCS). The indicator lamps display the status of the
front-passenger front air bag.
RPASSENGER AIR BAG ON lights up for 60 sec-
onds, subsequently both indicator lamps are
off (PASSENGER AIR BAG ON and OFF): the
front-passenger front air bag is able to deploy
in the event of an accident.
RPASSENGER AIR BAG OFF lights up: the front-
passenger front air bag is deactivated. It will
then not be deployed in the event of an acci-
dent.
If the PASSENGER AIR BAG ON indicator lamp is
off, only the PASSENGER AIR BAG OFF indicator lamp shows the status of the front-passenger
front air bag. The PASSENGER AIR BAG OFF
indicator lamp may be lit continuously or be off.
Depending on the person in the front-passenger
seat, the front-passenger front air bag must
either be deactivated or enabled; see the fol-
lowing points. You must make sure of this both
before and during a journey.
RChildren in a child restraint system:
whether the front-passenger front air bag is
enabled or deactivated depends on the instal-led child restraint system, and the age and
size of the child. Therefore, be sure to observe
the notes on the "Occupant Classification
System (OCS)" (
Ypage 46) and on "Chil-
dren in the vehicle" (Ypage 53). There you
will also find instructions on rearward and
forward-facing child restraint systems on the
front-passenger seat.
RAll other persons: depending on the classi-
fication of the person in the front-passenger
seat, the front-passenger front air bag is ena-
bled or deactivated (
Ypage 46). Be sure to
observe the notes on "Seat
belts“ (
Ypage 40) and "Air bags"
(Ypage 44). There you can also find infor-
mation on the correct seat position.
Seat belts
Introduction
Seat belts are the most effective means of
restricting the movement of vehicle occupants
in the event of an accident or the vehicle rolling over. This reduces the risk of vehicle occupants
coming into contact with parts of the vehicle
interior or being ejected from the vehicle. Fur-
thermore, the seat belt helps to keep the vehicle
40Occupant safety
Safety
Page 45 of 338
Infants and children must never travel sitting
on the lap of a vehicle occupant. In the event
of an accident, they could be crushed
between the vehicle occupant and seat belt.
Robjects are never secured with a seat belt if
the seat belt is also being used by one of the
vehicle's occupants
Also ensure that there are never objects
between a person and the seat, e.g. cushions.
Seat belts are only intended to secure and
restrain vehicle occupants. Always observe the
"Loading guidelines" for securing objects, lug-
gage or loads (
Ypage 247).
Fastening and adjusting the seat belts
Observe the safety notes on the seat belt
(Ypage 41) and the notes on correct use of seat
belts (Ypage 42).
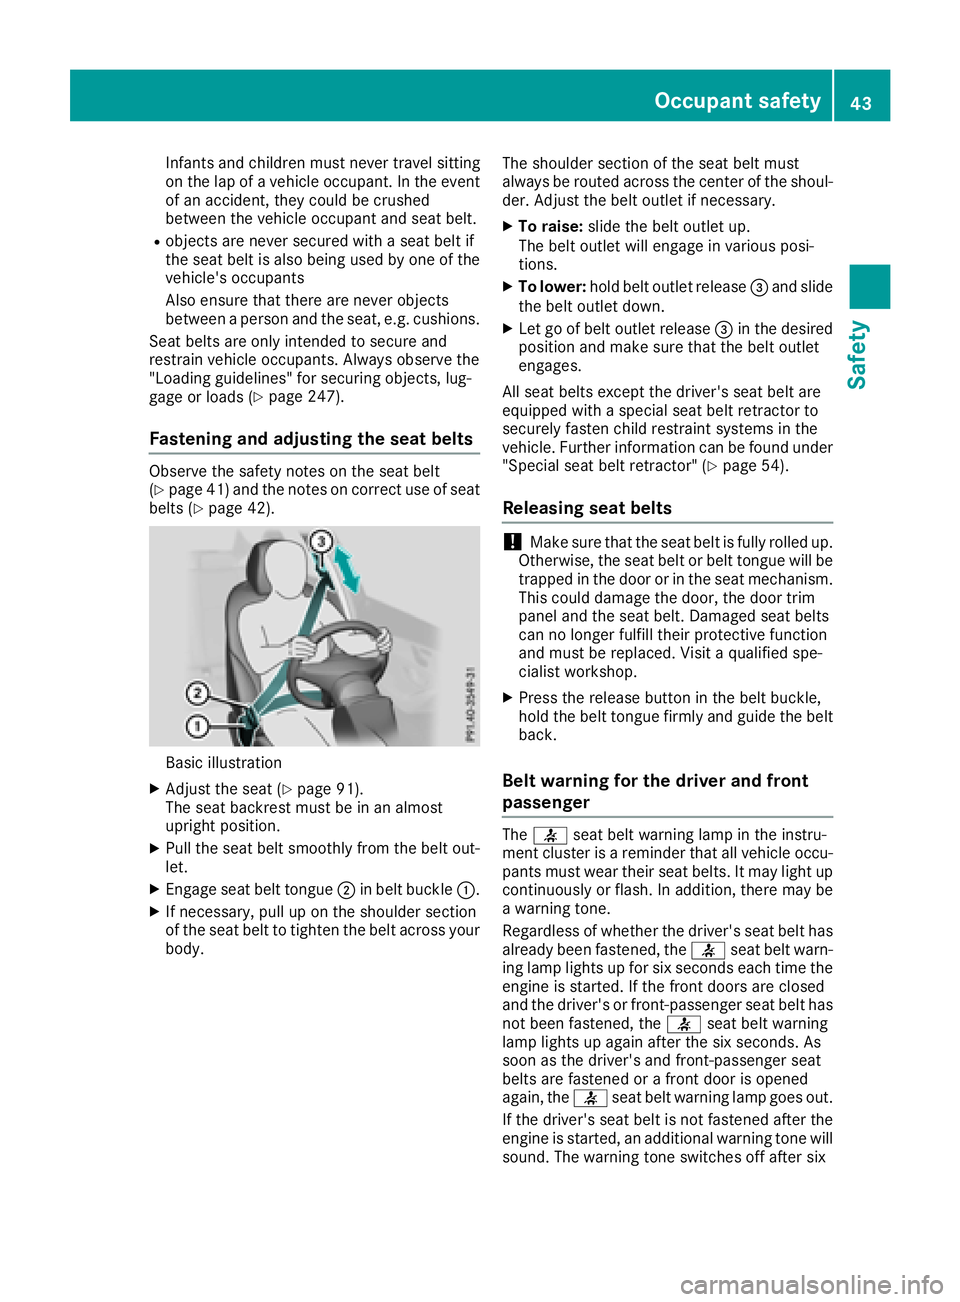
Basic illustration
XAdjust the seat (Ypage 91).
The seat backrest must be in an almost
upright position.
XPull the seat belt smoothly from the belt out-
let.
XEngage seat belt tongue ;in belt buckle :.
XIf necessary, pull up on the shoulder section
of the seat belt to tighten the belt across your
body. The shoulder section of the seat belt must
always be routed across the center of the shoul-
der. Adjust the belt outlet if necessary.
XTo raise:
slide the belt outlet up.
The belt outlet will engage in various posi-
tions.
XTo lower: hold belt outlet release =and slide
the belt outlet down.
XLet go of belt outlet release =in the desired
position and make sure that the belt outlet
engages.
All seat belts except the driver's seat belt are
equipped with a special seat belt retractor to
securely fasten child restraint systems in the
vehicle. Further information can be found under
"Special seat belt retractor" (
Ypage 54).
Releasing seat belts
!Make sure that the seat belt is fully rolled up.
Otherwise, the seat belt or belt tongue will be
trapped in the door or in the seat mechanism.
This could damage the door, the door trim
panel and the seat belt. Damaged seat belts
can no longer fulfill their protective function
and must be replaced. Visit a qualified spe-
cialist workshop.
XPress the release button in the belt buckle,
hold the belt tongue firmly and guide the belt
back.
Belt warning for the driver and front
passenger
The 7 seat belt warning lamp in the instru-
ment cluster is a reminder that all vehicle occu-
pants must wear their seat belts. It may light up
continuously or flash. In addition, there may be
a warning tone.
Regardless of whether the driver's seat belt has
already been fastened, the 7seat belt warn-
ing lamp lights up for six seconds each time the engine is started. If the front doors are closed
and the driver's or front-passenger seat belt has
not been fastened, the 7seat belt warning
lamp lights up again after the six seconds. As
soon as the driver's and front-passenger seat
belts are fastened or a front door is opened
again, the 7seat belt warning lamp goes out.
If the driver's seat belt is not fastened after the
engine is started, an additional warning tone will sound. The warning tone switches off after six
Occupant safety43
Safety
Z
Page 55 of 338
sive role in the deployment of an air bag. Nor do
they provide an indication of air bag deploy-
ment.
The vehicle can be deformed considerably, with-
out an air bag being deployed. This is the case if only parts which are relatively easily deformed
are affected and the rate of deceleration is not
high. Conversely, air bags may be deployed even
though the vehicle suffers only minor deforma-
tion. This is the case if, for example, very rigid
vehicle parts such as longitudinal body mem-
bers are hit, and sufficient deceleration occurs
as a result.
If the restraint system control unit detects a side
impact or if the vehicle rolls over, the applicable
components of the restraint system are
deployed independently of each other depend-
ing on the apparent type of accident.
RSide impact air bags on the side where the
impact takes place, independently of the
Emergency Tensioning Device and the use of
the seat belt on the driver's seat and outer
seats in the second row
The side impact air bag on the front-
passenger side deploys under the following
conditions:
-the OCS system detects that the front-
passenger seat is occupied or
-the seat belt buckle tongue is engaged in
the belt buckle of the front-passenger seat
RWindow curtain air bag on the side of impact,
independently of the use of the seat belt andindependently of whether the front-
passenger seat is occupied
REmergency Tensioning Devices, if the system
determines that deployment can offer addi-
tional protection in this situation
RWindow curtain air bags on the driver's and
front-passenger side in certain situations
when the vehicle rolls over, if the system
determines that deployment can offer addi-
tional protection to that provided by the seat
belt
iNot all air bags are deployed in an accident.
The different air bag systems work independ-
ently of each other. How the air bag system works is determined
by the severity of the accident detected,
especially the vehicle deceleration or accel-
eration and the apparent type of accident:
RFrontal collision
RSide impact
RRollover
Automatic measures after an acci-
dent
Immediately after an accident, the following
measures are implemented, depending on the
type and severity of the impact:
Rthe hazard warning lamps are activated
Rthe emergency lighting is activated
Rthe vehicle doors are unlocked
Rthe front side windows are lowered
Rthe engine is switched off and the fuel supply
is cut off
Rvehicles with mbrace: automatic emergency
call
Children in the vehicle
Important safety notes
Accident statistics show that children secured
in the rear seats are safer than children secured
in the front-passenger seat. For this reason,
Mercedes-Benz strongly advises that you install
a child restraint system on a rear seat. Children are generally better protected there.
If a child younger than twelve years old and
under 5 ft (1.50 m) in height is traveling in the
vehicle:
Ralways secure the child in a child restraint
system suitable for Mercedes-Benz vehicles.
The child restraint system must be appropri-
ate to the age, weight and size of the child.
Rbe sure to observe the instructions and safety
notes in this section in addition to the child
restraint system manufacturer's installation
instructions.
Ralways observe the instructions and safety
notes on the "Occupant classification system
(OCS)". (
Ypage 46)
Children in the vehicle53
Safety
Z
Page 56 of 338
GWARNING
If you leave children unsupervised in the vehi-
cle, they could set it in motion by, for example:
Rrelease the parking brake.
Rshift the automatic transmission out of the
parking position P.
Rstart the engine.
In addition, they may operate vehicle equip-
ment and become trapped. There is a risk of
an accident and injury.
When leaving the vehicle, always take the
SmartKey with you and lock the vehicle. Never
leave children unsupervised in the vehicle.
GWARNING
If persons, particularly children are subjected to prolonged exposure to extreme heat or
cold, there is a risk of injury, possibly even
fatal. Never leave children unattended in the
vehicle.
GWARNING
If the child restraint system is subjected to
direct sunlight, parts may get very hot. Chil-
dren may burn themselves on these parts,
particularly on the metal parts of the child
restraint system. There is a risk of injury.
If you leave the vehicle, taking the child with
you, always ensure that the child restraint
system is not exposed to direct sunlight. Pro- tect it with a blanket, for example. If the child
restraint system has been exposed to direct
sunlight, let it cool down before securing the
child in it. Never leave children unattended in
the vehicle.
Always ensure that all vehicle occupants have
their seat belts fastened correctly and are sitting
properly. Particular attention must be paid to
children.
Observe the safety notes on the seat belt
(
Ypage 41) and the notes on correct use of seat
belts (Ypage 42).
A booster seat may be necessary to achieve
proper seat belt positioning for children over
40 lbs (18 kg) until they reach a height where a three-point seat belt can be properly fastened
without a booster seat.
Special seatbelt retractor
GWARNING
If the seat belt is released while driving, the
child restraint system will no longer be
secured properly. The special seat belt retrac- tor is disabled and the inertia real draws in a
portion of the seat belt. The seat belt cannot
be immediately refastened. There is an
increased risk of injury, possibly even fatal.
Stop the vehicle immediately, paying atten-
tion to road and traffic conditions. Reactivate
the special seat belt retractor and secure the
child restraint system properly.
All seat belts in the vehicle, except the driver's
seat belt, are equipped with a special seat belt
retractor. When activated, the special seat belt
retractor ensures that the seat belt cannot
slacken once the child seat is secured.
Installing a child restraint system:
XMake sure you observe the child restraint
system manufacturer's installation instruc-
tions.
XPull the seat belt smoothly from the belt out-
let.
XEngage seat belt tongue in belt buckle.
Activating the special seat belt retractor:
XPull the seat belt out fully and let the inertia
reel retract it again.
While the seat belt is retracting, you should
hear a ratcheting sound. The special seat belt
retractor is enabled.
XPush the child restraint system down so that
the seat belt is tight and does not loosen.
Removing the child restraint system and deac-
tivating the special seat belt retractor:
XMake sure you observe the child restraint
system manufacturer's installation instruc-
tions.
XPress the release button of the seat belt
buckle and guide the seat belt tongue back
towards the belt sash guide.
The special seat belt retractor is deactivated.
54Children in the vehicle
Safety