MERCEDES-BENZ M-CLASS SUV 2011 Owners Manual
Manufacturer: MERCEDES-BENZ, Model Year: 2011, Model line: M-CLASS SUV, Model: MERCEDES-BENZ M-CLASS SUV 2011Pages: 389, PDF Size: 9.22 MB
Page 111 of 389
it, the previous rear foglam
psettings are
restored.
Adjusting th eheadlam prang e(halog en
headlamps) Th
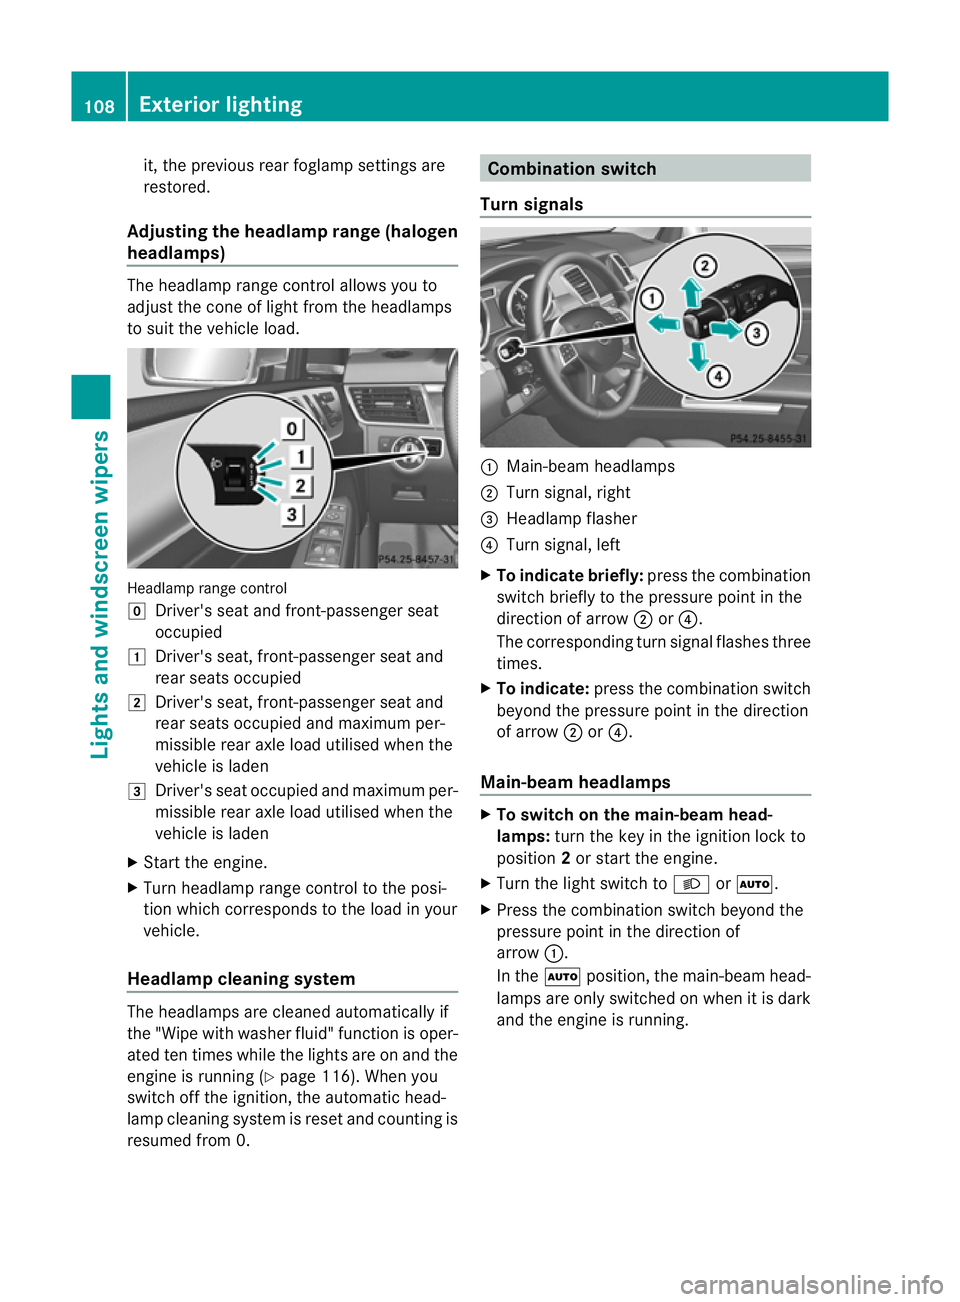
eh eadlamp range control allow syou to
adjust the con eoflight from the headlamps
to sui tthe vehicle load. Headlam
prange control
g Driver' sseat and front-passenger seat
occupied
1 Driver's seat, front-passenger seat and
rear seats occupied
2 Driver's seat, front-passenger seat and
rear seats occupied and maximu mper-
missible rear axle load utilised when the
vehicle is laden
3 Driver's seat occupied and maximu mper-
missible rear axle load utilised when the
vehicle is laden
X Start the engine.
X Turn headlamp range control to the posi-
tion which corresponds to the load in your
vehicle.
Headla mpcleaning system The headlamps are cleaned automatically if
the "Wipe with washer fluid" fun
ction is oper-
ated ten times while the lights are on and the
engin eisrunning (Y page 116). When you
switc hoff th eignition, the automa tich ead-
lam pcleaning system is reset and counting is
resumed from 0. Combination switch
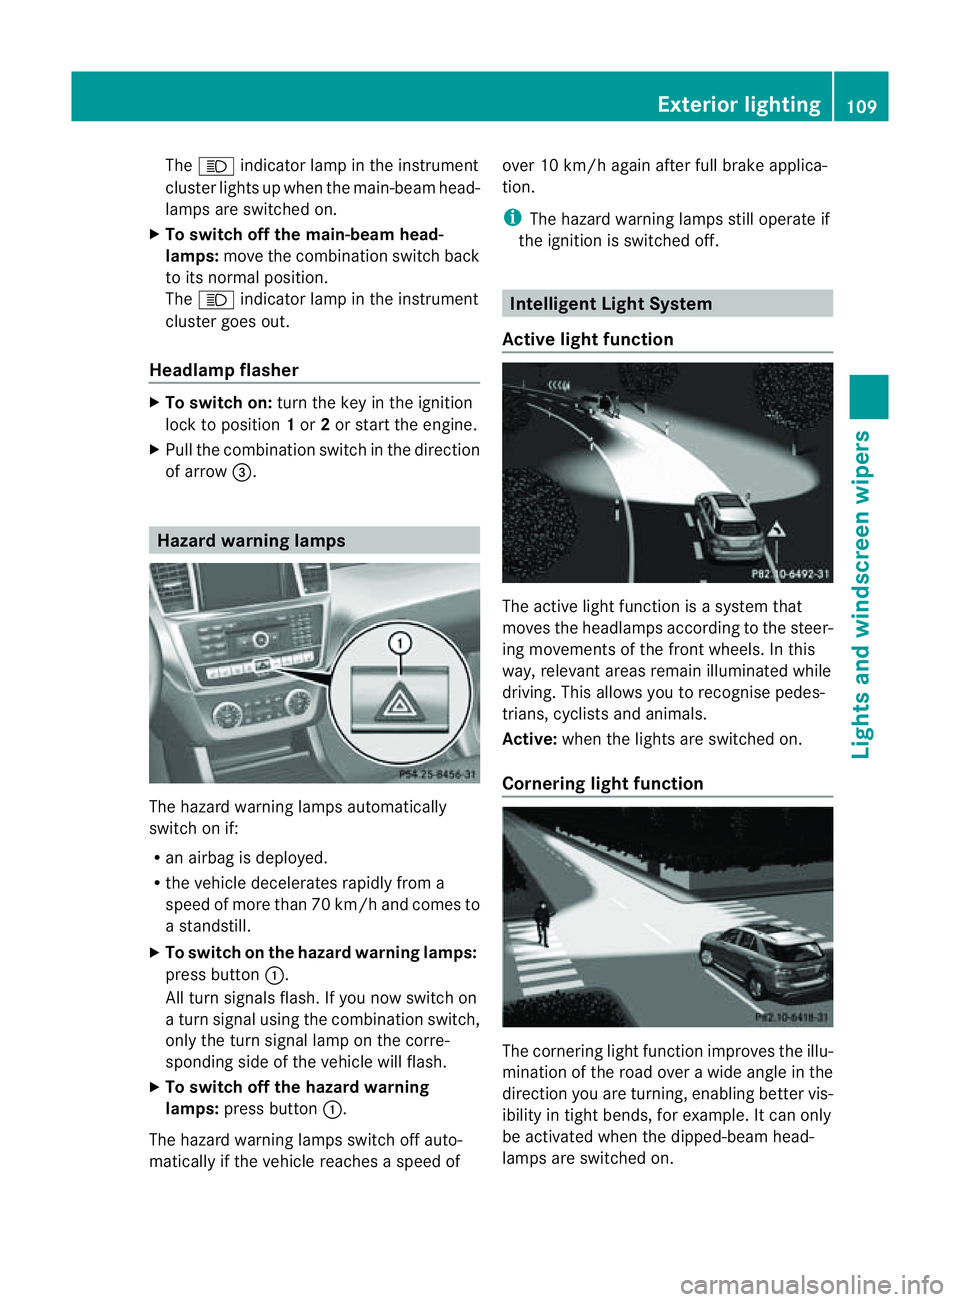
Tu rn signals :
Main-beam headlamps
; Turnsignal, right
= Headlamp flasher
? Turn signal, left
X To indicate briefly: press the combination
switch briefly to the pressure point in the
direction of arrow ;or?.
The corresponding turn signal flashes three
times.
X To indicate: press the combination switch
beyond the pressure point in the direction
of arrow ;or?.
Main-beam headlamps X
To switch on the main-bea mhead-
lamps: turn the key in the ignition lock to
position 2or start the engine.
X Turn the light switch to LorÃ.
X Press the combination switch beyond the
pressure point in the direction of
arrow :.
In the Ãposition, the main-beam head-
lamps are only switched on when it is dark
and the engine is running. 108
Exterio
rlightingLights and windscreen wipers
Page 112 of 389
The
K indicator lam pint he inst rument
cluster lights up when th emain-beam head-
lamps are switched on.
X To switch off the main-bea mhead-
lamps: move the combination switch back
to its normal position.
The K indicator lamp in the instrument
cluster goes out.
Headlam pflasher X
To switch on: turnthe key in the ignition
lock to position 1or 2or star tthe engine.
X Pull the combina tion switc hinthe direction
of arrow =. Hazard warning lam
psThe hazar
dwarning lamps automatically
switch on if:
R an airbag is deployed.
R the vehicle decelerates rapidly from a
spee dofm ore than 70 km /hand come sto
as tandstill.
X To switc honthe hazard warning lamp s:
press button :.
All turn signal sflash. If you now switc hon
at urns ignal using the combination switch,
only the tur nsignal lamp on the corre-
spondin gside of the vehicle will flash.
X To switch off th ehazard warning
lamps: press but ton:.
The hazar dwarnin glamps switc hoff auto-
matically if th evehicle reaches aspeed of over 10 km/h again after full brak
eapplica-
tion.
i The hazar dwarnin glamps still operat eif
the ignition is switched off. Intelligen
tLight System
Active light function The active light fun
ction is asystem that
moves the headlamps according to the steer-
ing movements of the front wheels. In this
way, relevan tarea sremai nilluminated while
driving. This allows you to recognise pedes-
trians, cyclists and animals.
Active: when the lights are switched on.
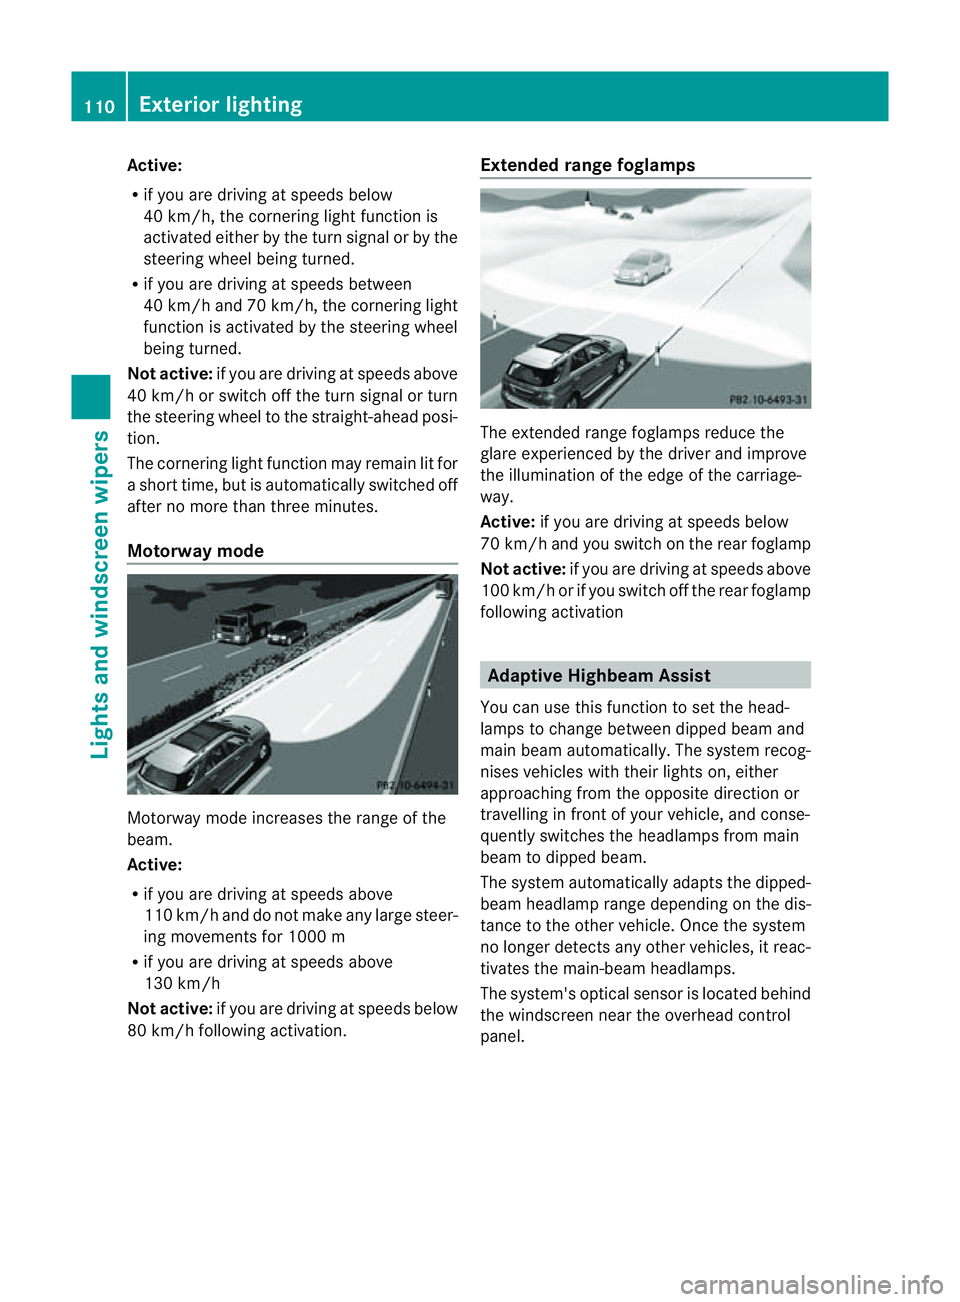
Cornering light function The cornering light func
tion improves the illu-
mination of the roa dover awide angle in the
direction you are turning, enabling better vis-
ibility in tight bends, for example. It can only
be activated when the dipped-beam head-
lamps are switched on. Exterior lighting
109Lightsand windsc reenwipers Z
Page 113 of 389
Active:
R
if you are driving at speeds below
40 km/h, the cor neringl ight function is
activated either by th eturns ignal or by the
steerin gwheel being turned.
R if you ar edriving at speeds between
40 km/h and 70 km/h ,the cornering light
func tion is activated by the steering wheel
being turned.
Not active: if you aredriving at speeds above
40 km/h or switc hoff th eturn signal or turn
the steering wheel to the straight-ahead posi-
tion.
The cornering light function may remain lit for
as hort time, but is automatically switched off
after no mor ethan three minutes.
Motorwa ymode Motorway mode increases the range of the
beam.
Active:
R if you are drivin gatspeeds above
11 0k m/h and do not make any larg esteer-
ing movement sfor 1000 m
R if you ar edriving at speeds above
130 km/h
Not active: if youare driving at speeds below
80 km/h followin gactivation. Extende
drang efoglamps The extended range foglamps reduce the
glare experienced by the driver and improve
the illumination of the edge of the carriage-
way.
Active: if you are drivin gatspeeds below
70 km/ hand you switch on the rear foglamp
Not active: if you are driving at speeds above
100 km/h or if you switch off the rear foglamp
following activation Adaptive Highbeam Assist
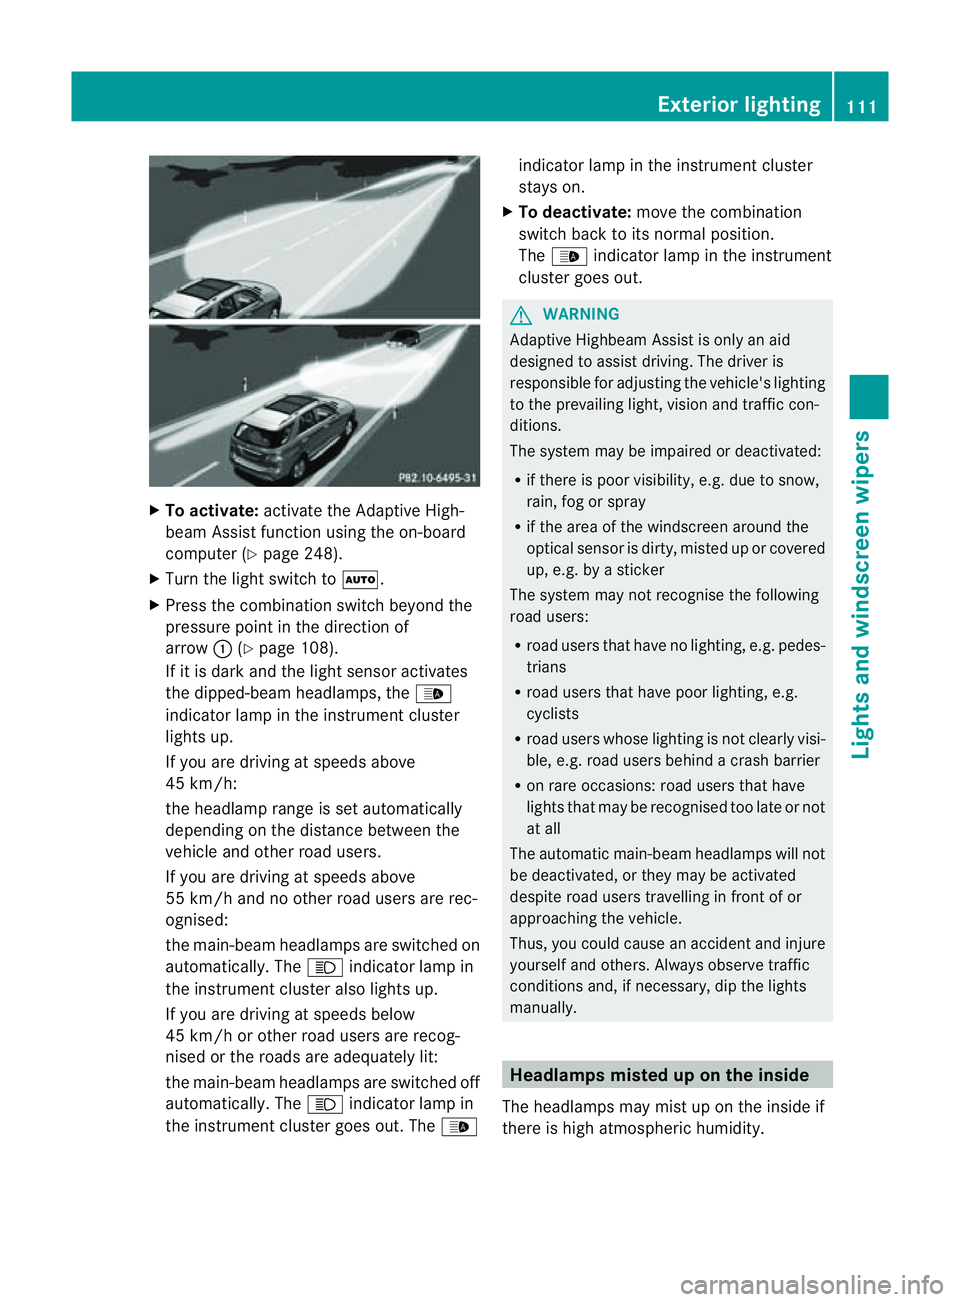
You can use this function to set the head-
lamps to chang ebetween dipped beam and
mai nbeam automatically. The system recog-
nises vehicles with their lights on, either
approaching from the opposite direction or
travelling in front of your vehicle, and conse-
quently switches the headlamps from main
beam to dipped beam.
The system automatically adapts the dipped-
beam headlamp range dependin gonthe dis-
tance to the other vehicle. Onc ethe system
no longer detec tsany other vehicles, it reac-
tivates the main-beam headlamps.
The system's optical senso risl ocated behind
the windscreen near the overhead con trol
panel. 110
Exterior lightingLights and windscreen wipers
Page 114 of 389
X
To activate: activatethe Adaptive High-
beam Assist function using the on-board
computer (Y page 248).
X Turn the ligh tswitch to Ã.
X Press the combination switch beyond the
pressure point in the direction of
arrow :(Ypage 108).
If it is dark and the light sensor activates
the dipped-beam headlamps, the _
indicator lamp in the instrument cluster
lights up.
If you are driving at speed sabove
45 km/h:
the headlamp range is set automatically
depending on the distanc ebetween the
vehicle and other road users.
If you are driving at speeds above
55 km/h and no other road users are rec-
ognised:
the main-bea mheadlamps are switched on
automatically. The Kindicator lam pin
the instrument cluster also lights up.
If you are driving at speeds below
45 km/h or othe rroad user sare recog-
nised or th eroads ar eadequately lit:
the main-beam headlamps are switched off
automatically. The Kindicator lamp in
the instrumen tcluster goes out. The _indicator lamp in the instrument cluster
stays on.
X To deactivate: move the combination
switch back to its normal position.
The _ indicator lamp in the instrument
cluster goes out. G
WARNING
Adaptiv eHighbeam Assist is only an aid
designed to assist driving. The driver is
responsible for adjusting the vehicle's lighting
to the prevailing light, vision and traffic con-
ditions.
The system may be impaired or deactivated:
R if there is poor visibility, e.g. due to snow,
rain, fog or spray
R if the area of the windscreen around the
optical sensor is dirty, misted up or covered
up, e.g. by asticker
The syste mmay not recognise the following
road users:
R road users that have no lighting, e.g. pedes-
trians
R road users that have poor lighting, e.g.
cyclists
R road users whos elighting is not clearly visi-
ble, e.g. road users behind acras hb arrier
R on rare occasions: road users that have
lights that may be recognised too late or not
at all
The automatic main-beam headlamps will not
be deactivated, or they may be activated
despite road users travelling in front of or
approaching the vehicle.
Thus, you could cause an accident and injure
yoursel fand others. Alway sobserv etraffic
conditions and ,ifnecessary, dip the lights
manually. Hea
dlamps misted up on the inside
The headlamps may mist up on the insid eif
there is hig hatmospheric humidity. Exterio
rlighting
111Lightsand windscreen wipers Z
Page 115 of 389
X
Drive with the headlamps switched on.
Th elevel of moisture diminishes, depend-
ing on the length of the journey and the
weather conditions (humidity and tem per-
ature).
If th elevel of moisture does not diminish:
X Have the headlamps checked at aquali fied
specialis tworkshop. Interior lighting
Overview of interior lighting
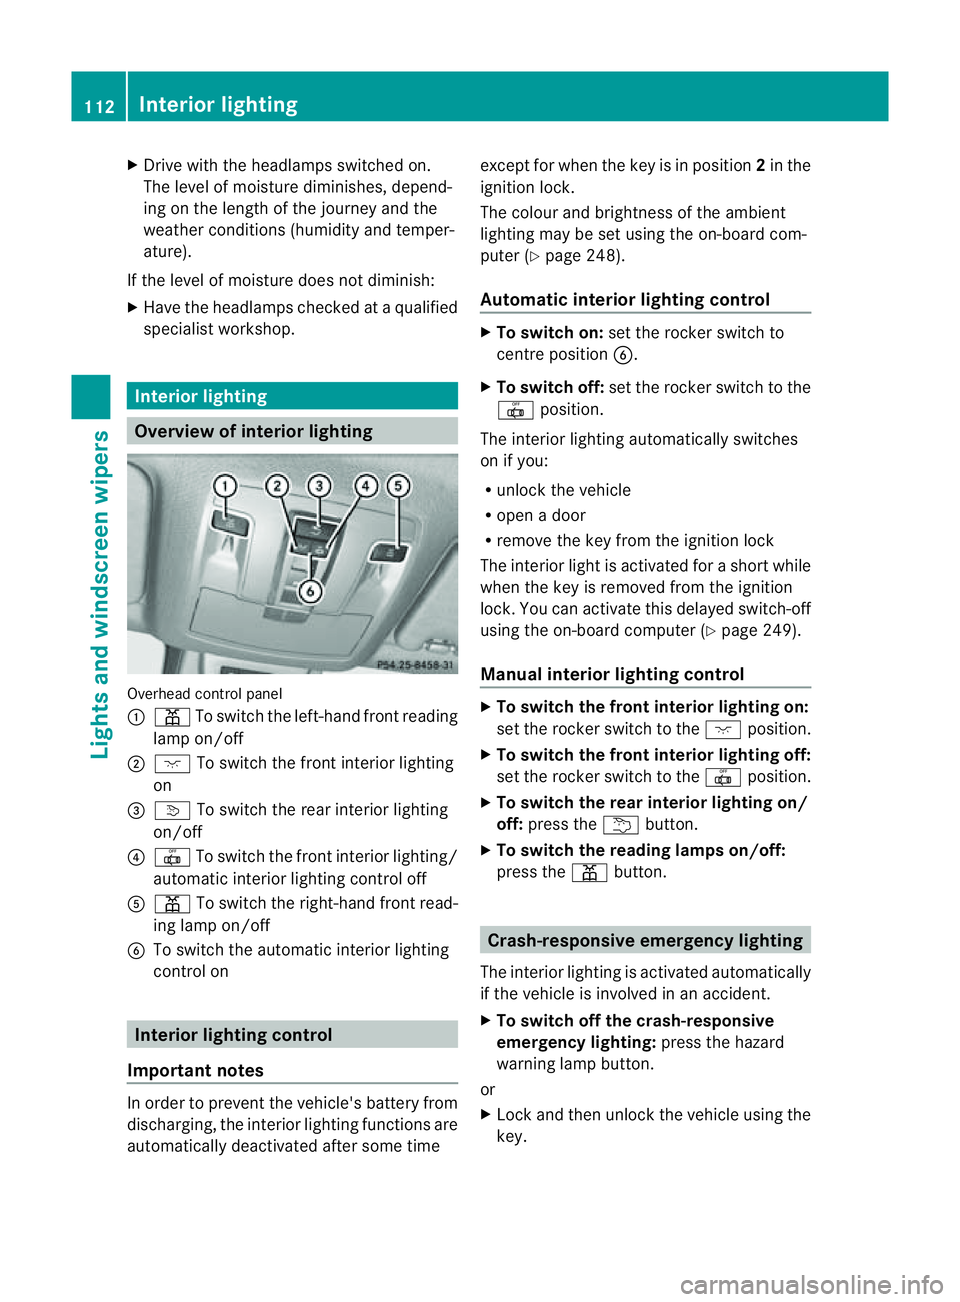
Overhead con
trol panel
: p To switch the left-hand front reading
lamp on/off
; c To switch the front interior lighting
on
= v To switch the rear interior lighting
on/off
? | To switch the front interior lighting/
automatic interior lighting control off
A p To switch the right-hand front read-
ing lamp on/off
B To switch the automatic interior lighting
control on Interio
rlighting control
Impor tant notes In order to prevent the vehicle'
sbattery from
discharging, the interior lighting functions are
automatically deactivated after some time except for when the key is in position
2in the
ignition lock.
The colour and brightness of the ambient
lighting may be set using the on-board com-
puter (Y page 248).
Automatic interior lighting control X
To switch on: set the rocker switch to
centre position B.
X To switch off: set the rocker switch to the
| position.
The interior lighting automatically switches
on if you:
R unlock the vehicle
R open adoor
R remove the key from the ignition lock
The interior light is activated for ashort while
when the key is removed from the ignition
lock .You can activate this delayed switch-off
using the on-boar dcomputer (Y page 249).
Manua linterior lighting control X
To switc hthe fron tinterior lighting on:
set the roc kers witch to the cposition.
X To switch the front interior lighting off:
set the rocker switch to the |position.
X To switch the rear interior lighting on/
off: press the ubutton.
X To switch the reading lamp son/off:
press the pbutton. Crash-responsive emergency lighting
The interior lightin gisactivate dautomatically
if the vehicle is involved in an accident.
X To switch off the crash-responsive
emergency lighting: press the hazard
warning lamp button.
or
X Lock and then unlock the vehicle using the
key. 112
Interior lightingLights and windscreen wipers
Page 116 of 389
Changing bulbs
Important safety notes
Xenon bulbs If your vehicle is equipped wit
hxenon bulb s,
you ca nrecognise this by th efollowing: the
cone of light from th exenon bulbs moves
from th etop to the bottomand back again
whe nyou star tthe engine. Fo rthis to be
observed ,the lights must be switched on
before startin gthe engine. G
DANGER
Xenon bulb scarry ahigh voltage. You could
get an electric shock and be seriously or even
fatally injured if you touch the electric con-
tacts on xenon bulbs. Therefore, never
remov ethe cover from xenon bulbs.
Do not change xenon bulbs yourself, but have
them replaced at aqualified specialist work-
sho pwhich has the necessar yspecialist
knowledge and tools to carry out the work
required.
Mercedes-Ben zrecom mends that you use a
Mercedes-Benz Service Centre for this pur-
pose. In particular, work relevant to safety or
on safety-related systems must be carried out
at aq ualified specialist workshop.
Bulbs and lamps are an important aspect of
vehicle safety. You must therefore make sure
that thes efunction correctly at all times.
Have the headlamp setting checked regularly.
Other bulbs There are bulbs other than the xenon bulbs
that you cannot replace. Replace only the
bulbs listed (Y page 113). Have the bulbs that
you cannot replace yourself changed at a
qualified specialist workshop.
Mercedes -Benz recommends that you use a
Mercedes-Benz Ser vice Centre for thi spur-
pose .Inp articular, work relevant to safety or
on safety-related systems must be carried out
at aq ualified specialist workshop. If you require assistanc
echangi ngbulbs, con-
sult aqualified specialist workshop.
Do not touch the glass tube of new bulbs with
your bare hands. Even minor contamination
can burn into the glass surface and reduce
the servic elife of the bulbs. Always use alint-
free cloth or only touch the base of the bulb
when fitting.
Only use bulbs of the correct type.
If the new bulb still does not light up, consult
aq ualified specialist workshop.
Bulbs and lamps are an important aspect of
vehicle safety. You must therefore make sure
that these function correctly at all times.
Have the headlamp setting checked regularly. G
WARNING
Bulbs and lights can become very hot. For this
reason, allow them to cool down before
changin gthem. Otherwise, you coul dburn
yourself when you touch them.
Keep bulbs out of the reach of children. Oth-
er wise ,they could damage them, for example,
and inj uret hemselves.
Never use abulbw hich ha sbeend ropped.
Suc hab ulbm ay explod eand injure you.
Halogen bulb sare pressu rised and could
explode when yo uchange them, especiall yif
the yarever yhot. Yo ushould therefor ewear
eye protec tion and gloves when you are
changing them. Overview of bulb replacement
–bulbs
Yo uc an replace the following bulbs. The
details for the bul btype can be found in the
legend. Changing bulbs
113Lightsand windsc reenwipers Z
Page 117 of 389
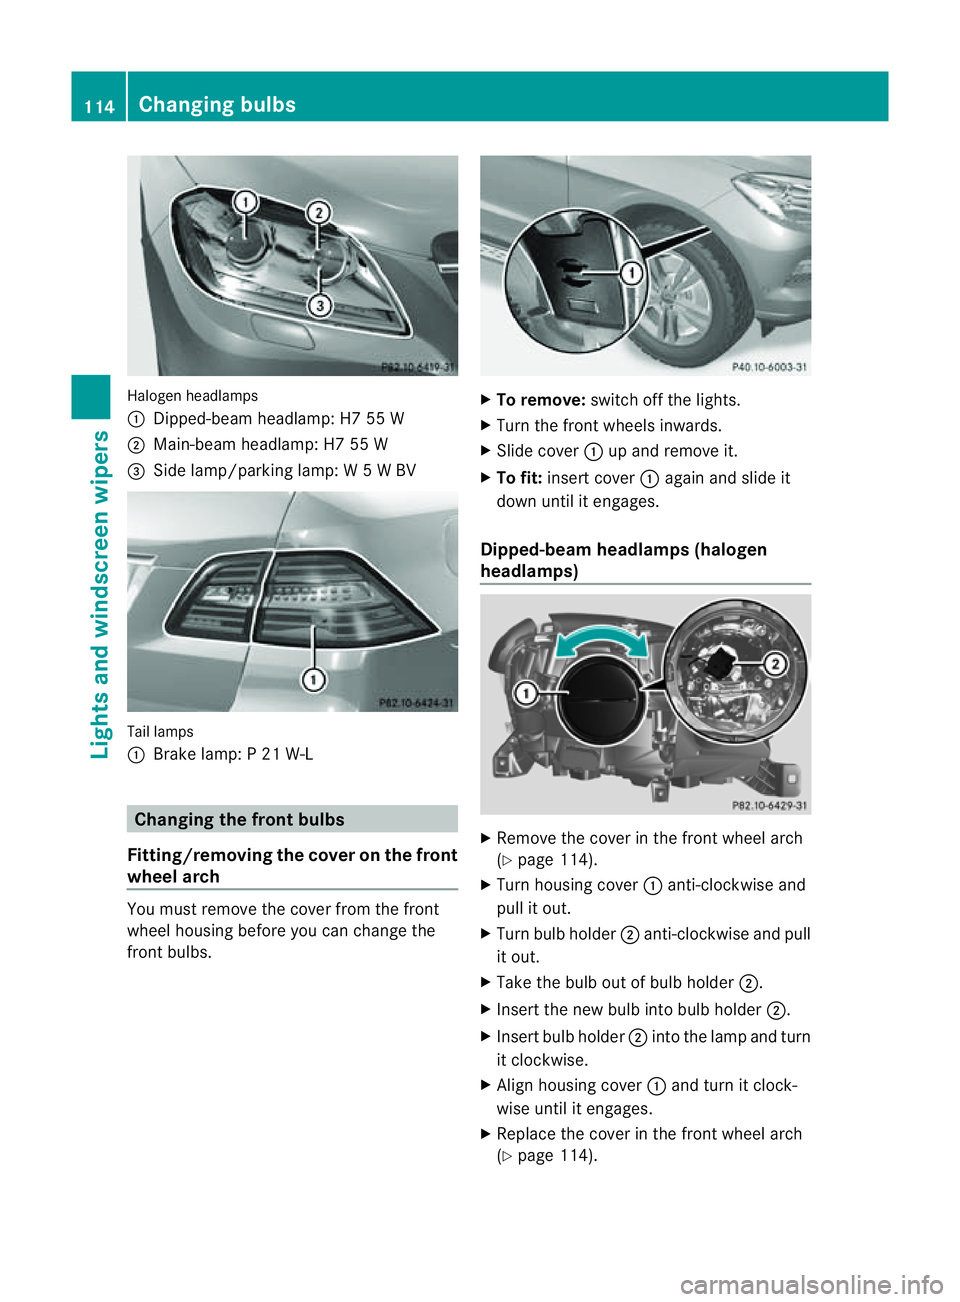
Halogen he
adlamps
: Dipped-bea mheadlamp: H7 55 W
; Main-beam headlamp: H7 55 W
= Side lamp/parkin glamp: W5WBV Tail lamps
:
Brak elamp: P21W -L Changing the front bulbs
Fitting/removing the cover on the front
wheel arch You must remove the cover from the front
wheel housing before you can chang ethe
fron tbulbs. X
To remove: switchoff the lights.
X Turn the front wheels inwards.
X Slide cover :up and remove it.
X To fit: insert cover :again and slide it
down until it engages.
Dipped-beam headlamps (halogen
headlamps) X
Remove the cover in the front wheel arch
(Y page 114).
X Turn housing cover :anti-clockwise and
pull it out.
X Turn bulb holder ;anti-clockwise and pull
it out.
X Take the bulb out of bulb holder ;.
X Insert the new bulb into bulb holder ;.
X Insert bulb holder ;into the lamp and turn
it clockwise.
X Align housing cover :and turn it clock-
wise until it engages.
X Replace the cover in the front wheel arch
(Y page 114). 114
Changin
gbulbsLight sand windscreen wipers
Page 118 of 389
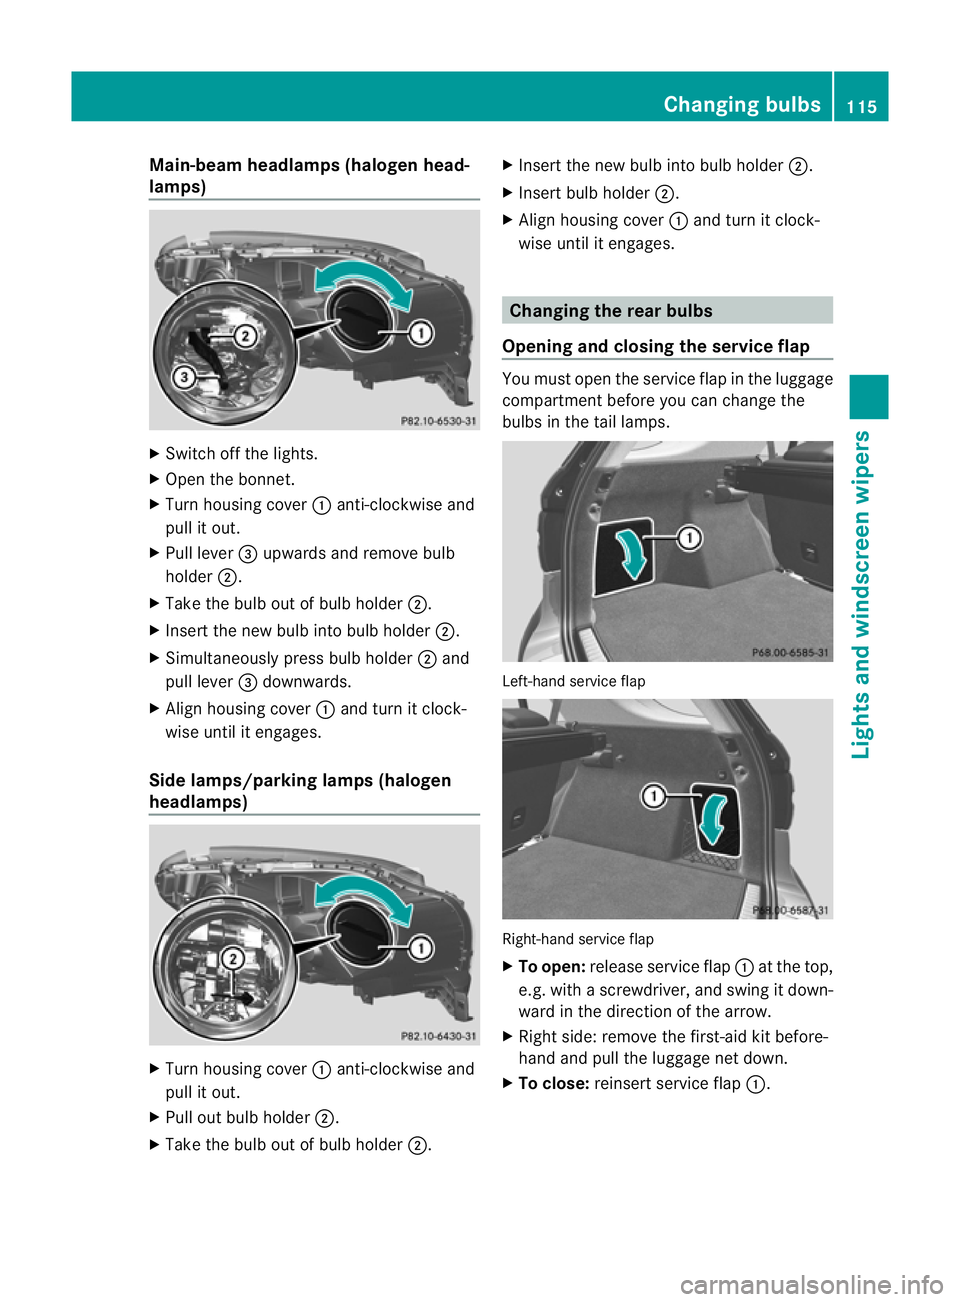
Main-beam headlamps (hal
ogen head-
lamps) X
Switch off the lights.
X Open the bonnet.
X Turn housing cover :anti-clockwis eand
pul lito ut.
X Pul llever =upwards and remove bulb
holder ;.
X Take the bulb out of bulb holder ;.
X Insert the new bulb into bulb holder ;.
X Simultaneously press bulb holder ;and
pull lever =downwards.
X Align housing cover :and tur nitclock-
wis euntil it enga ges.
Side lamps/parking lamps (halogen
headlamps) X
Tur nhousing cover :anti-clockwise and
pull it out.
X Pull out bulb holder ;.
X Take the bulb out of bulb holder ;.X
Insert the new bulb int obulbh older ;.
X Insert bulb holder ;.
X Align housing cover :and tur nitclock-
wis euntil it enga ges. Changing th
erear bulbs
Opening and closin gthe serv icef lap You must open the service flap in the luggage
compartm entb efor eyou can change the
bulbs in the tail lamps. Left-hand service flap
Right-han
dservice flap
X To open: release servic eflap :at the top,
e.g. with ascrewdriver, and swing it do wn-
ward in the direction of the arrow.
X Right side :remov ethe first-ai dkit before-
hand and pull the luggage net down.
X To close: reinsertservice flap :. Changing bulbs
115Lightsand windscreen wipers Z
Page 119 of 389
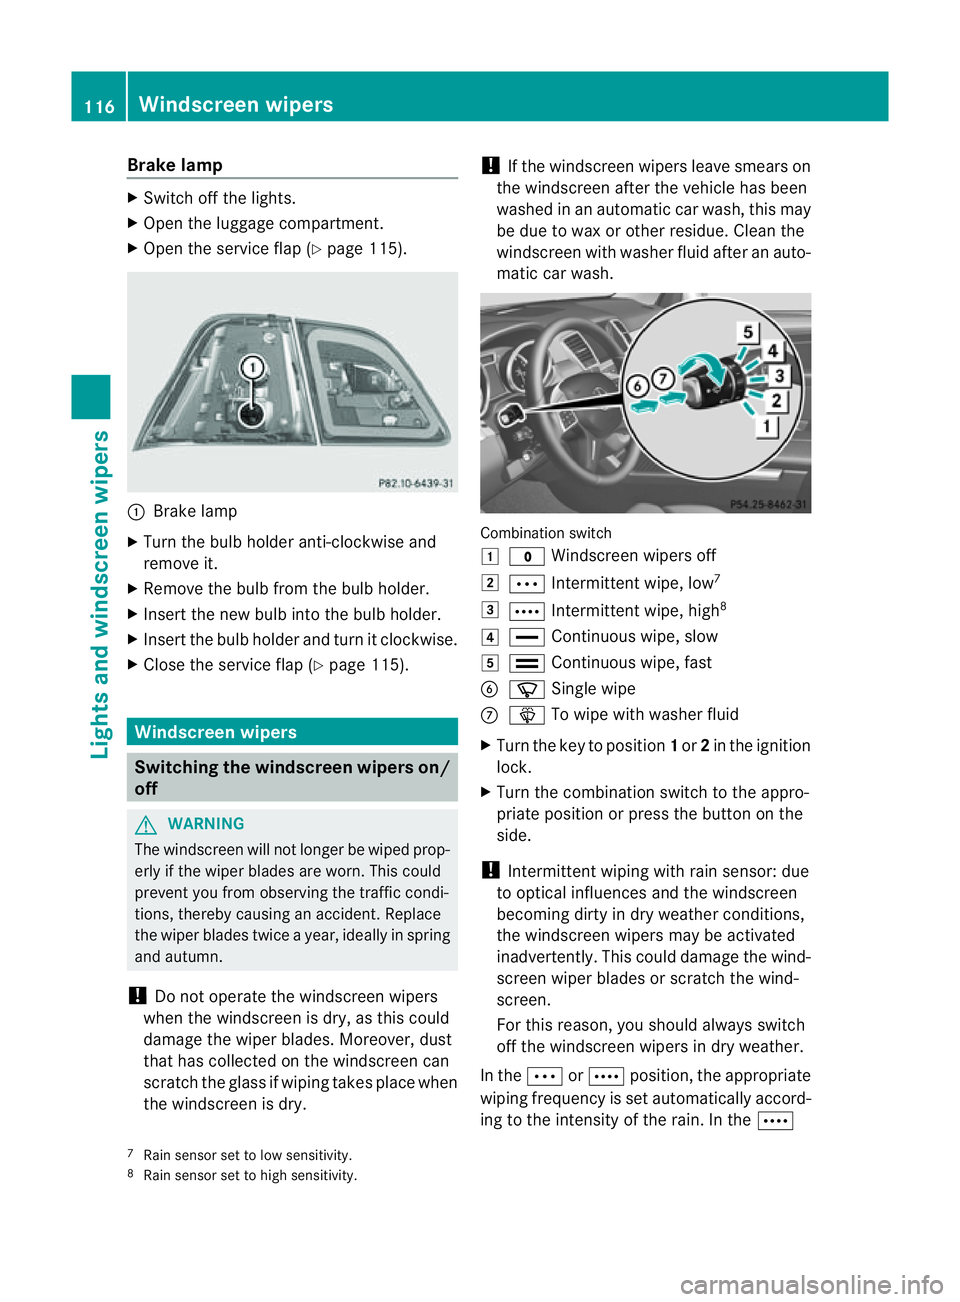
Brake lamp
X
Switch off the lights.
X Ope nthe luggage compartment.
X Open the service fla p(Ypage 115). :
Brake lamp
X Turn the bulb holder anti-clockwise and
remove it.
X Remov ethe bulb from the bulb holder.
X Insert the new bulb int othe bulb holder.
X Insert the bulb holder and tur nitclockwise.
X Close the servic eflap (Y page 115). Windscreen wipers
Switching the windscreen wipers on/
off G
WARNING
The windscreen will not longer be wiped prop-
erly if the wiper blades are worn. This could
preven tyou from observing the traffic condi-
tions, thereby causing an accident .Replace
the wiper blades twic eayear, ideally in spring
and autumn.
! Do not operate the windscreen wipers
when the windscreen is dry, as this could
damage the wiper blades. Moreover ,dust
that has collected on the windscreen can
scratc hthe glass if wipin gtakes place when
the windscreen is dry. !
If the windscreen wipers leave smears on
the windscreen after the vehicle has been
washe dinana utomatic car wash, this may
be due to wax or other residue. Clea nthe
windscreen with washer fluid after an auto-
matic car wash. Combination switch
1
$ Windscreen wiper soff
2 Ä Intermittent wipe, low 7
3 Å Intermittent wipe, high 8
4 ° Continuous wipe, slow
5 ¯ Continuous wipe, fast
B í Single wipe
C î To wip ewith washer fluid
X Turn the key to position 1or 2in the ignition
lock.
X Turn the combination switch to the appro-
priate position or press the button on the
side.
! Intermittent wiping with rain sensor: due
to optical influences and the windscreen
becoming dirty in dry weather conditions,
the windscreen wipers may be activated
inadvertently. This could damage the wind-
screen wiper blades or scratc hthe wind-
screen.
For this reason, you should always switch
off the windscreen wiper sind ry weather.
In the ÄorÅ position, th eappropriate
wiping frequenc yisset automatically accord-
ing to the intensity of the rain. In the Å
7 Rain sensor set to low sensitivity.
8 Rain sensor set to high sensitivity. 116
Windscreen wipersLights and windscreen wipers
Page 120 of 389
position
,the rain senso rismore sensitive
than in the Äposition ,causing the wind-
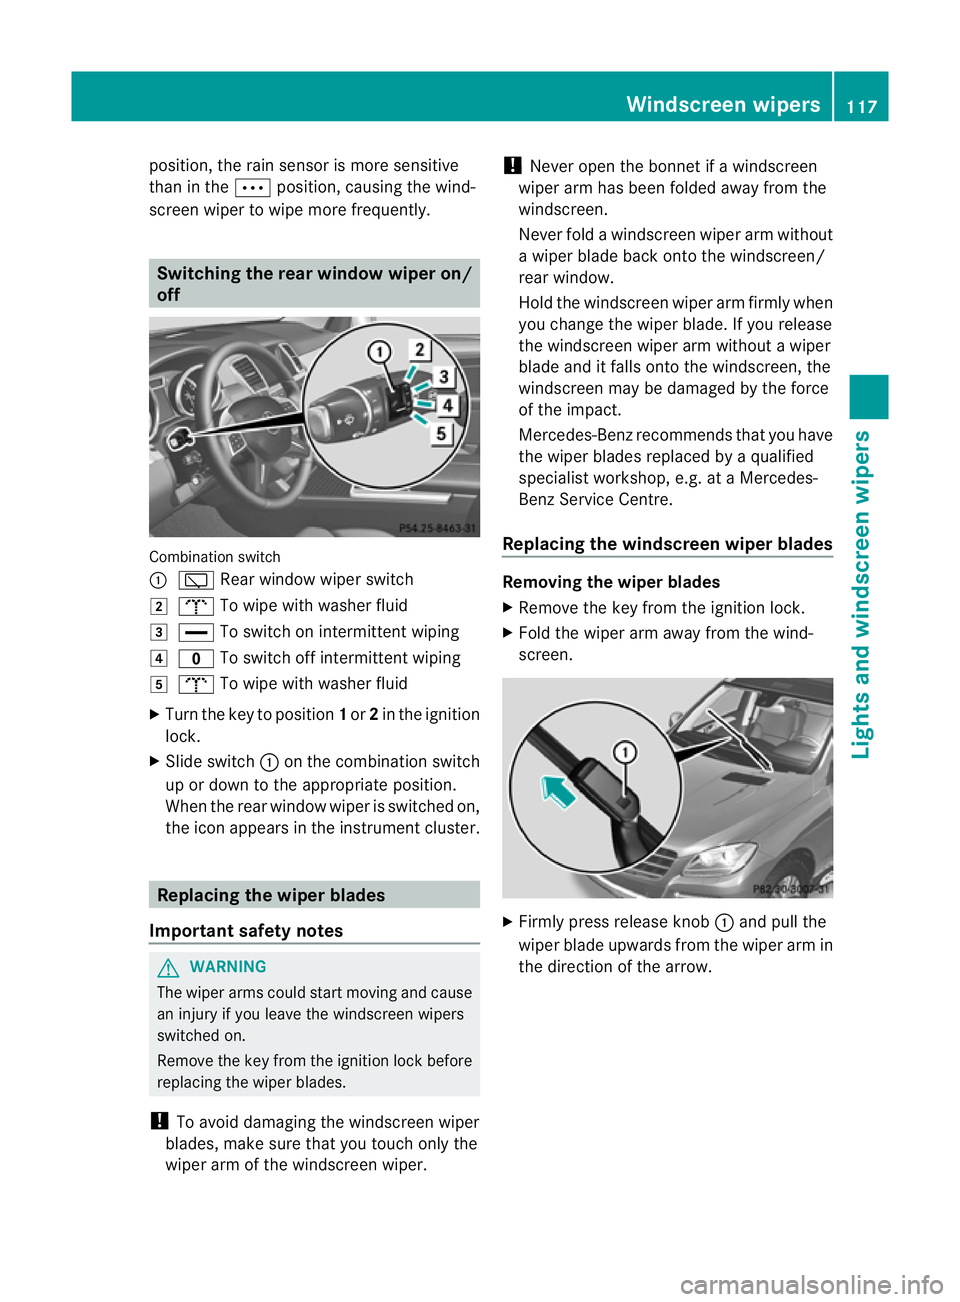
screen wiper to wipe more frequently. Switching the rear window wiper on/
off Combination switch
:
è Rear window wiper switch
2 b To wipe with washe rfluid
3 ° To switch on intermittent wiping
4 e To switch off intermittent wiping
5 b To wipe with washer fluid
X Turn the key to position 1or 2in the ignition
lock.
X Slide switch :on the combination switch
up or down to the appropriate position.
When the rear window wiper is switched on,
the icon appears in the instrument cluster. Replacing the wiper blades
Import ants afety notes G
WARNING
Th ew iper arm scould star tmovin gand cause
an injury if you leave the windscreen wipers
switched on.
Remove the key from the ignition lock before
replacing the wipe rblades.
! To avoid damaging the windscreen wiper
blades, make sure that you touch only the
wiper arm of the windscreen wiper. !
Never open the bonnet if awindscreen
wiper arm has been folded away from the
windscreen.
Never fold awindscreen wiper arm without
aw iper blade back onto the windscreen/
rear window.
Hold the windscreen wiper arm firmly when
you change the wiper blade .Ifyou release
the windscreen wiper ar mwithout awiper
blade and it falls ont othe windscreen ,the
windscreen ma ybedamaged by the force
of the impact.
Mercedes-Benz recommends that you have
the wiper blades replaced by aqualified
specialist workshop, e.g. at aMercedes-
Ben zServic eCentre.
Replacin gthe windscreen wiper blades Removin
gthe wiper blades
X Remov ethe key fro mtheignition lock.
X Fold th ewiper arm away from th ewind-
screen. X
Firmly press release knob :and pull the
wiper blade upward sfromt he wi per arm in
the direction of the arrow. Windscreen wipers
117Lightsand windscr een wipers Z