service MERCEDES-BENZ M-CLASS SUV 2011 User Guide
[x] Cancel search | Manufacturer: MERCEDES-BENZ, Model Year: 2011, Model line: M-CLASS SUV, Model: MERCEDES-BENZ M-CLASS SUV 2011Pages: 389, PDF Size: 9.22 MB
Page 26 of 389
are listed in the original purchase agreement
of your vehicle. Should you hav eany ques-
tions concerning equipment and operation,
please consult aMercedes-Ben zService
Cent re. Oper
ating safety Safe
tynotes G
WARNING
All wor konthe vehicle and, in particular ,work
relevant to safet yoronsafety-related sys-
tems must be carried out at aqualified spe-
cialist workshop. The specialist workshop
must have the necessary specialist knowl-
edge and tools to carry out the work required.
Mercedes -Benz recommends that you use a
Mercedes-Benz Ser vice Centre for thi spur-
pose. G
WARNING
Some safety systems only function when the
engine is running. You should therefore never
switch off the engine when driving. Otherwise,
the safety systems of your vehicle may not
function correctly and as aresult will no lon-
ger protec tyou and other person sasinten-
ded .Ina ddition, there is arisk that you may
lose control of your vehicle and thus cause an
accident. G
WARNING
Work carried out incorrectly, or alterations
made to the vehicle, e.g. re-routing of cables
under coverings, could cause the safety sys-
tems of your vehicle to stop working properly.
The safety systems would thus no longer pro-
tect you and other persons as intended. In
addition, there is arisk that you may lose con-
trol of your vehicle and thus cause an acci-
dent.
All work and alteration stothe vehicle, e.g.
installation sormodifications, should there-
for ebec arried out at aqualified specialist
workshop. G
WARNING
If work on electronic equipmen tand its soft-
ware is carried out incorrectly, this equipment
could stop working. The electronic systems
are networ kedv ia interfaces. Tampering with
these electronic systems could cause mal-
func tions in system swhich hav enot been
modified. Malfunction ssuch as these can
seriously jeopardis ethe vehicle' soperating
safety and therefore your own safety.
You should therefore have all work and mod-
ifications to electronic components carried
out at aqualified specialist workshop. G
WARNING
If you drive over obstacle sathigh speed or if
the vehicle bottoms out in rough terrain, it
could cause heavy impact stothe vehicle
underbody, tyres or wheels. This coul dcause
your vehicle to be damaged, which in turn
might lead to an accident. This also applies to
vehicles which are equipped with underbody
protection.
You shoul dtherefore drive over obstacles
slowly. Prevent the vehicle from bottoming
out when driving off-road an difnecessar y,
hav eyourvehicle inspected at aqualified spe-
cialist workshop. General notes
The following information applie stoa ll radio
system component sinthe vehicle and to
COMAN D:
The radio system component sinthis vehicle
ar ec ompliant with the basic requirements
and all other relevant condition sofDirective
1999/5/EC. You can obtain further informa-
tion from any Mercedes-Ben zService Centre.
The equipment is approved by the vehicle
manufacturer in accordance with European
Automotive EMC Directive 95/54/ EC.O per-
ation accordin gtoits intende dpurpose is
thus approved for your vehicle. The equip-
ment does not require certification. Introduction
23 Z
Page 27 of 389
The equipment conform
stothe relevant
equipment -specific EMC specification sin
accordanc ewith the following European
standards:
R EN 550 13
R EN 55020
Therefore, adherence to the relevant specifi-
cations for electromagnetic compatibility is
guarantee dfor this device.
As aresult, interferenc ecaused by your
equipment to other electrical/electronic
equipment and interferenc etoyour equip-
men tcaused by other electrical/electronic
equipment can be largely prevented. On-board diagnostic interface
G
WARNING
If you connect equipment to the on-board
diagnostic interface, it can affect the opera-
tion of the vehicle systems. This can impair
the operating safety of your vehicle while driv-
ing. There is arisk of accident.
Do not connect any equipment to the on-
board diagnostic interface. G
WARNING
Loose equipment or equipment cables which
are connected to the on-board diagnostic
interface may infringe on the space around
the pedals. The equipment or the cables could
get between the pedals in the event of sudden
braking or acceleration .You may then no lon-
ger be able to brake, operate the clutch or
accelerate as intended. There is arisk of acci-
dent.
Do not attach any equipment or cables in the
driver footwell.
Connecting equipment to the on-board diag-
nostic interface can lead to emissions moni-
torin ginformation being reset. Thi smay lead
to the vehicle failing to meet the require-
ment satthe nex temissions con trol test or
main inspec tion. If the engin
eisswitched off and equipment
on the on-board diagnostic interface is used,
the starter battery may discharge.
The on-board diagnostic interface is intended
for the connection of diagnostic equipment at
aq ualified specialist workshop. Qualified specialist workshop
Aq ualified specialist workshop has the nec-
essary specialist knowledge, tools and quali-
fication stocorrectlyc arry out the work
required on your vehicle. This is especially the
cas efor work releva ntto safety.
Observ ethe information in th eServic eBook-
let.
Alway shave th efollowin gwork carried out at
aq ualified specialist workshop:
R work relevan ttosafety
R servic eand maintenance work
R repair work
R alterations, installation work and modifica-
tions
R work on ele ctroniccomponen ts
Mercedes-Ben zrecom mends that you use a
Mercedes-Benz Service Centre. Vehicle registration
Mercedes-Benz may ask its Service Centres
to carry out technical inspectio nson certain
ve hicles to improv etheir quality or safety.
If you did not purchase your vehicle from an
authorised specialist dealer and your vehicle
has never been inspected at aMercedes-
Ben zService Cent re,itisp ossible that your
vehicle is not registered in your nam ewith
Mercedes-Benz. Mercedes-Ben zcan only
infor myou about vehicle chec ksif it has your
registration data.
It is advisable to register your vehicle with a
Mercedes-Benz Servic eCentre. 24
Introduction
Page 28 of 389
Inform Mercedes-Benz as soon as poss
ible
abou tany change in address or vehicl eown-
ership. Correct use
G
WARNING
Variou swarning stickers are affixed to your
vehicle. Their purpose is to draw your atten-
tion, and the attention of others, to various
dangers. Therefore, do not remove any warn-
ing stic kers unles sthe stic kerc learly states
that you may do so.
If you remov ethe warnin gstickers, you or
others could be injured by failing to recognise
certain dangers.
Observe the following information whe nusing
your vehicle:
R the safety notes in this manual
R the "Technical data" section in this manual
R national roa dtraffic regulations
R national roa dtraffic licensing regulations Implie
dwarranty
! Follo wthe instructions in this manual
about the proper operation of your vehicle
as well as about possible vehicle damage.
Damage to your vehicle that arises from
culpable contravention sagainst these
instructions ar enot covered either by
Mercedes-Ben zimplie dwarrant yorbythe
New or Used-Vehicle Warrant yof
Daimler AG. Data stored in the vehicle
Fault data
Compone ntsc ritical for vehicl eoperation are
equipped with fault data memories as stand-
ard. There are also data storage devices
which recor dthe technical reactions of vehi-
cle component stocertain driving situations (e.g. airbag deployment or ESP
®
interven-
tion).
This data is used exclusivel yto:
R assist in the rec tificatio noffaults and
defects
R help Mercedes -Benz optimise and develop
vehicle fun ctions
The data cannot be used to trac ethe vehicle's
movements.
When your vehicle is serviced by Mercedes-
Ben z,this technical information can be read
out from the fault memory. Thi sisperformed
by authorised employees of the Mercedes-
Benz service network using special diagnos-
tic computers.
Af teraf ault has been rectified, the informa-
tion is deleted from the memory. Other mem-
ory data is constantly overwritten. Other devices tha
tstore data
Depe nding on the equipment level, your vehi-
cle may featur ecommunication sand/or
entertainment systems (e.g .navigation devi-
ces, telephone systems). Thes eallow you to
save and edit data required for the operation
of the respective device.
Fur ther information on operation (e.g. on
deletin gdata) can be found in the separate
operating instructions. Introduction
25 Z
Page 43 of 389
Usefu
linfor mati on
i This Owner's Manual describes all models
and all standard and optional equipment
available to your vehicle at the time of pub-
lication of the Owner's Manual. Country-
specific deviation sare possible .Please
not ethat your vehicle ma ynot be equipped
with all featur es described. This also
applies to safety-releva ntsystems and
functions.
i Please read the information on qualified
specialist workshops (Y page 24).Occupant safety
Important safet
ynotes
Seat belts, together wit hthe Supp lemental
Restrain tSyste m–S RS (Y page 41), are
complementary, co-ordinated restrain tsys-
tems. They reduce the risk of injur yinspe-
cific, pre-defined types of accident situations
and thereby increase occupant safety .How-
ever ,seat belts and airbags generally do not
protec tagainst objec tspenetratin gthe vehi-
cle from the outside.
To ensur ethat the restraint system scan
deliver their full potential protection, make
sure that:
R the seat and head restraint are adjusted
properly (Y page 92).
R the seat belt has been fastened properly
(Y page 47).
R the airbags can inflate unrestricted if
deplo yed (Y page42).
R the steering whee lisadjusted properly
(Y page 92).
R the restraint systems have not been modi-
fied.
i An airba gincrease sthe protection of
vehicle occupants wearing aseat belt. As
such, they are only an additional restraint
system which complemen ts,b ut does not
replace, the seat belt. All vehicle occupants must wear their seat belt correctly at all
times, even if the vehicle is equipped with
airbags. The airbags are not deplo yed inall
types of accidents. For example, if the pro-
tective capacity of correctly fastened seat
belts is not increased by deplo yingthe air-
bags, the airbags will not deploy. Airbag
deploymen tonly provides incre asedpro-
tection if th eseatb eltisw ornc orrect ly
because:
R the sea tbelt helps to keep the vehicle
occupan tinthe best position in relation
to the airbag.
R in ah ead-on collision ,for example, the
seat belt prevents the vehicle occupant
from being propelled towards the point
of impact .Itcan thus reduce the risk of
injury.
In accidents in which an airbag is deployed,
it provides increased protection only if the
seat belt is worn correctly. G
WARNING
If service work is not carried out correctly, the
operating safety of your vehicle may be affec-
ted. This could cause you to lose control of
your vehicle and cause an accident. More-
over, the safety systems may no longer be
able to protect you or others as they are
designed to do.
Always have service work carried out at a
qualified specialist workshop. The workshop
must have the necessary specialist knowl-
edge and tools to carr yout the work required.
Mercedes-Ben zrecom mends that you use a
Mercedes-Benz Service Centre for this pur-
pose. In particular, work relevant to safety or
on safety-related systems must be carried out
at aq ualified specialist workshop. 40
Occupant safetySafety
Page 48 of 389
obtained from
aMercedes-Benz Service
Centre. G
WARNING
Sensor stocontrol the airbags are located in
the doors. Therefore, do not mak eany modi-
fications to the doors or doo rtrim, e.g .retro-
fit ting loudspeakers. Damage to the doors
can affect operation of the sidebags.
Whe ndeployed, the sidebags offer additional
protection for the thora xand the pelvis of the
vehicl eoccupants on the sid eofthe vehicle
on whic hthe impac toccurs. However, they
do not prote ctthe:
R head
R neck
R arms Fron
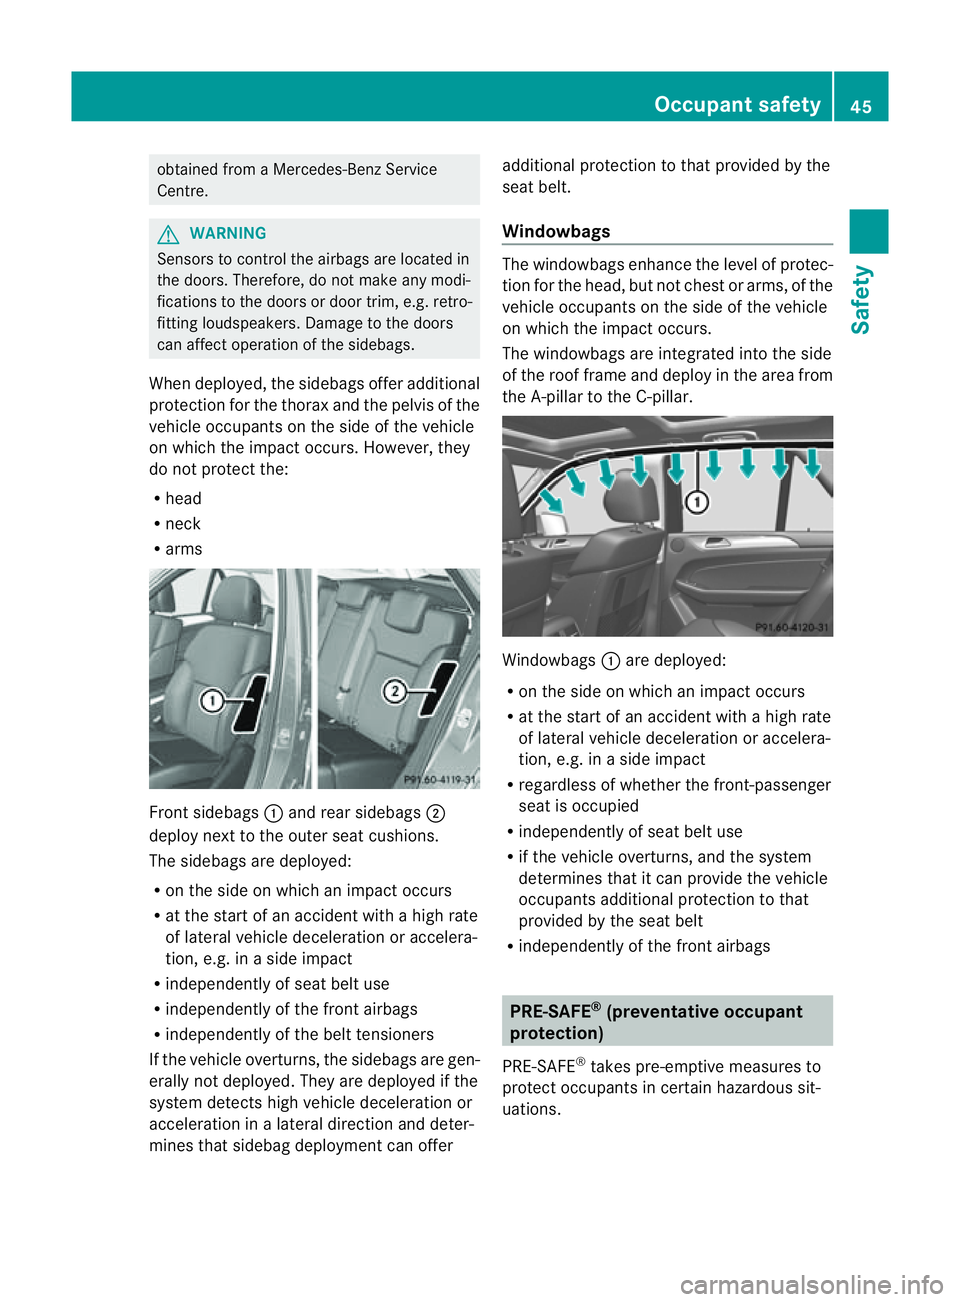
tsidebags :and rear sidebags ;
deploy nex ttothe outer seat cushions.
The sidebags ar edeployed:
R on the side on which an impact occurs
R at the star tofanaccident with ahigh rate
of lateral vehicle deceleration or accelera-
tion, e.g. in aside impact
R independently of seat belt use
R independently of the front airbags
R independently of the belt tensioners
If the vehicle overturns, the sidebags are gen-
erally not deployed. They are deployed if the
system detect shigh vehicle deceleration or
acceleration in alateral direction and deter-
mines that sidebag deployment can offer additional protection to that provided by the
seat belt.
Windowbags The windowbag
senhance the level of protec-
tion for the head, but not ches torarms, of the
vehicl eoccupants on the sid eofthe vehicle
on whic hthe impac toccurs.
Th ew indowbags are integrated into the side
of the roof frame and deploy in the area from
the A-pillar to the C-pillar. Windowbags
:are deployed:
R on the side on which an impact occurs
R at the start of an accident with ahigh rate
of lateral vehicle deceleration or accelera-
tion, e.g. in aside impact
R regardless of whether the front-passenger
seat is occupied
R independently of seat belt use
R if the vehicle overturns, and the system
determines that it can provide the vehicle
occupant sadditiona lprotectio ntothat
provided by the seat belt
R independen tlyo fthe front airbags PRE-SAFE
®
(preventative occupant
protection)
PRE- SAFE®
take spre-emptive measures to
protect occupants in certain hazardo us sit-
uations. Occupan
tsafety
45Safety Z
Page 53 of 389

Comply with safety regulations when dispos-
ing of belt tensioners. Any Mercedes-Benz
Servic eCentr ecan provide details of these
regulations.
! If the front-passenger seat is not occu-
pied, do not engage the seat belt tongue in
the buckle on the front-passenger seat.
Otherwise, the belt tensioner could be trig-
gered in the event of an accident. Children in the vehicle
Child restraint systems
Important safety notes G
WARNING
To reduce the risk of serious or even fatal
injury to the child in the event of asudden
change in direction, braking or an accident:
R children less than 1.50 mtall and under
twelve years of age must always be secured
in special child restraint systems on asuit-
able vehicle seat. This is necessary
because the seat belts are not designed for
children.
R do not secure children less than 1.50 mtall
or under twelv eyears of age on th efront-
passenger seat .Exception: the vehicl eis
equipped with automatic child sea trecog-
nition on the front-passenger seat and the
child is secured in achild rest raint system
with transponders for automatic child seat
recognition.
R if you secure aforward-facing child
rest raint system to the front-passenger
seat, you must move the front-passenger
seat as far back as possible.
R children must never travel sitting on the lap
of another occupant .Due to the forces
which occur in the event of asudden
change of direction, heavy braking or an
accident, it would not be possible to
restrain the child. The child could be thrown against parts of the vehicle interior and be
seriously or even fatally injured. G
WARNING
The child restraint system cannot perform its
protective function if it is not correctly fitted
to as uitable vehicle seat. The child cannot be
restrained in the event of an accident, heavy
braking or sudde nchanges of direction. The
chil dcould be seriously or even fatally injured.
For this reason, when fit ting achild rest raint
system, observe the manufacturer's installa-
tion instructions and the correct use of the
child restraint system.
Child restraint systems should be fitted to the
rear seats. Children are generally better pro-
tected there.
The entire base of the child restraint system
must always rest on the seat cushion. There-
fore, never place objects, e.g. acushion,
under the child restraint system.
Only use child restraint systems with the orig-
inal cover designed for them. Only replace
damaged cover swith genuine Mercedes-Benz
covers.
We recommend the use of child restraint sys-
tems which have been approved for
Mercedes-Benz vehicles.
If ac hild is travellin ginyour vehicle, secure
the child using achild restraint system which
is appropriate to the size, age and weight of
the chil dand recommende dfor Mercedes-
Ben zvehicles. You should preferabl yfit the
restraint system to asuitable rear seat. Make
sure that the child is secured in achild
restraint system thr oughout the trip.
Mercedes-Ben zrecommends that you only
use the child restraint system slisted at
(Y page 58).
You can obtain further information about the
correct child restrain tsystem from any
Mercedes-Benz Service Centre.
i It is advisable to use Mercedes-Benz care
products to clean child restraint systems. 50
Childre
ninthevehicleSafety
Page 97 of 389
!
When the rear bench seat is folded for-
wards, the front seats cannot be moved to
their rearmost position. You could other-
wise damage the seats and the rear bench
seat.
! Make sure that the sun visor is folded up
befor eadjustin gthe backrest and head
restraint height. The head restraint and sun
viso rcould otherwise collide when the head
restraint is fully extended.
i It is not possible to remove thehead
restraint sfrom th efront seats .The rear-
compartment head restraint scan be
removed (Y page 96).
Pleas econtact aMercedes-Ben zService
Centre for mor einformation.
i Related topics:
R Luggag ecompartmen tenlargement
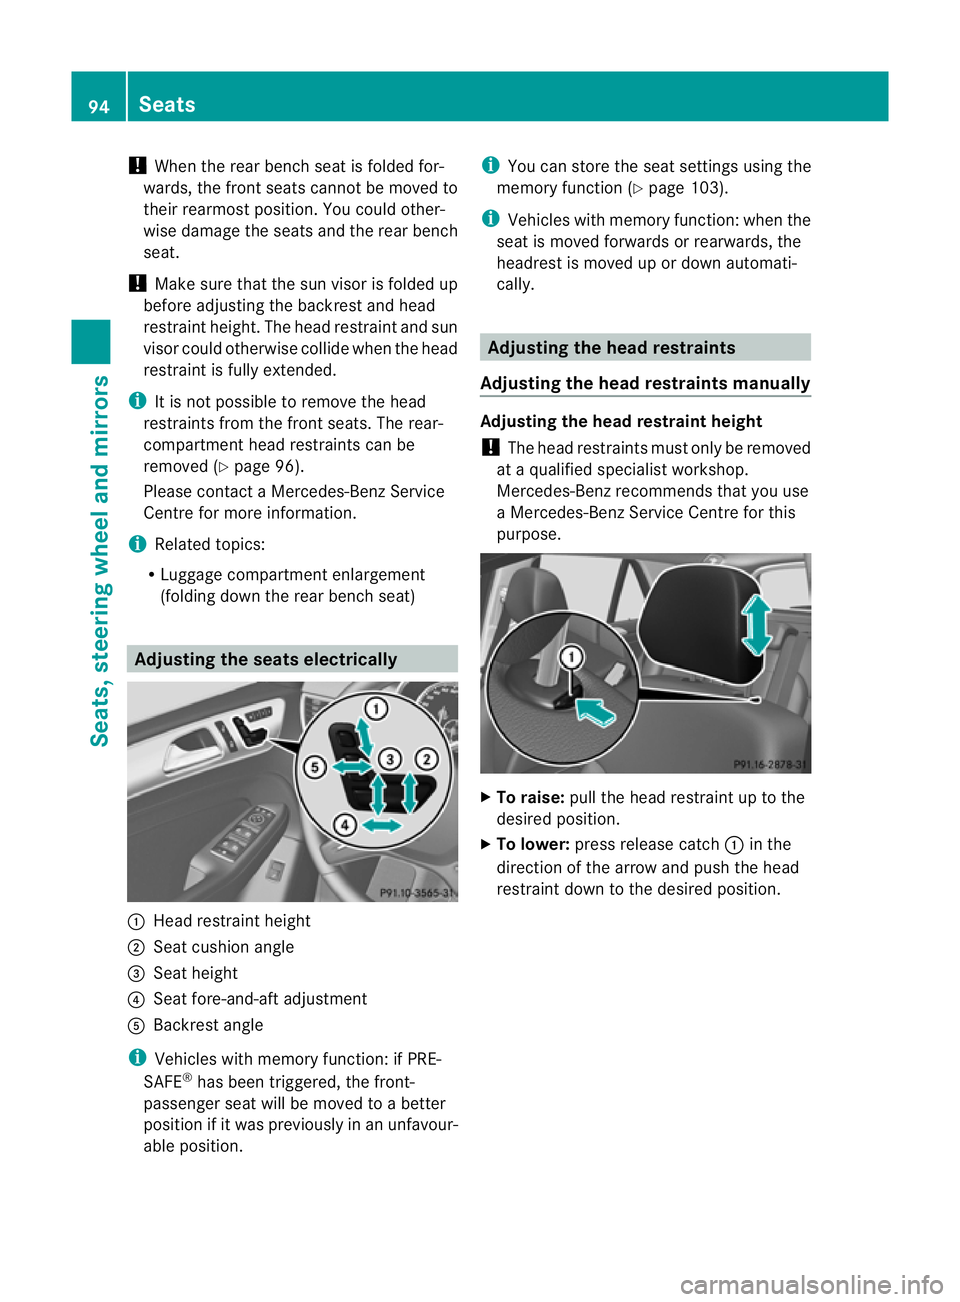
(folding dow nthe rea rbench seat) Adjusting the seat
selectrically :
Head restraint height
; Seat cushion angle
= Seat height
? Seat fore-and-aft adjustment
A Backrest angle
i Vehicles with memory function :ifP RE-
SAFE ®
has been triggered ,the front-
passenger seat will be moved to abetter
position if it was previously in an unfavour-
able position. i
You can store the seat settings using the
memory function (Y page 103).
i Vehicles with memory function :when the
seat is moved forwards or rearwards, the
headrest is moved up or down automati-
cally. Adjusting th
ehead restraints
Adjusting the head restraints manually Adjusting the head restraint height
! The head restraints must only be removed
at aq ualified special istw orkshop.
Mercedes-Benz recommends that you use
aM ercedes-Ben zService Centre for this
purpose. X
To raise: pull the head restraint up to the
desired position.
X To lower: press release catch :in the
direction of the arrow and push the head
restraint down to the desired position. 94
SeatsSeats, steering wheel and mirrors
Page 116 of 389
Changing bulbs
Important safety notes
Xenon bulbs If your vehicle is equipped wit
hxenon bulb s,
you ca nrecognise this by th efollowing: the
cone of light from th exenon bulbs moves
from th etop to the bottomand back again
whe nyou star tthe engine. Fo rthis to be
observed ,the lights must be switched on
before startin gthe engine. G
DANGER
Xenon bulb scarry ahigh voltage. You could
get an electric shock and be seriously or even
fatally injured if you touch the electric con-
tacts on xenon bulbs. Therefore, never
remov ethe cover from xenon bulbs.
Do not change xenon bulbs yourself, but have
them replaced at aqualified specialist work-
sho pwhich has the necessar yspecialist
knowledge and tools to carry out the work
required.
Mercedes-Ben zrecom mends that you use a
Mercedes-Benz Service Centre for this pur-
pose. In particular, work relevant to safety or
on safety-related systems must be carried out
at aq ualified specialist workshop.
Bulbs and lamps are an important aspect of
vehicle safety. You must therefore make sure
that thes efunction correctly at all times.
Have the headlamp setting checked regularly.
Other bulbs There are bulbs other than the xenon bulbs
that you cannot replace. Replace only the
bulbs listed (Y page 113). Have the bulbs that
you cannot replace yourself changed at a
qualified specialist workshop.
Mercedes -Benz recommends that you use a
Mercedes-Benz Ser vice Centre for thi spur-
pose .Inp articular, work relevant to safety or
on safety-related systems must be carried out
at aq ualified specialist workshop. If you require assistanc
echangi ngbulbs, con-
sult aqualified specialist workshop.
Do not touch the glass tube of new bulbs with
your bare hands. Even minor contamination
can burn into the glass surface and reduce
the servic elife of the bulbs. Always use alint-
free cloth or only touch the base of the bulb
when fitting.
Only use bulbs of the correct type.
If the new bulb still does not light up, consult
aq ualified specialist workshop.
Bulbs and lamps are an important aspect of
vehicle safety. You must therefore make sure
that these function correctly at all times.
Have the headlamp setting checked regularly. G
WARNING
Bulbs and lights can become very hot. For this
reason, allow them to cool down before
changin gthem. Otherwise, you coul dburn
yourself when you touch them.
Keep bulbs out of the reach of children. Oth-
er wise ,they could damage them, for example,
and inj uret hemselves.
Never use abulbw hich ha sbeend ropped.
Suc hab ulbm ay explod eand injure you.
Halogen bulb sare pressu rised and could
explode when yo uchange them, especiall yif
the yarever yhot. Yo ushould therefor ewear
eye protec tion and gloves when you are
changing them. Overview of bulb replacement
–bulbs
Yo uc an replace the following bulbs. The
details for the bul btype can be found in the
legend. Changing bulbs
113Lightsand windsc reenwipers Z
Page 118 of 389
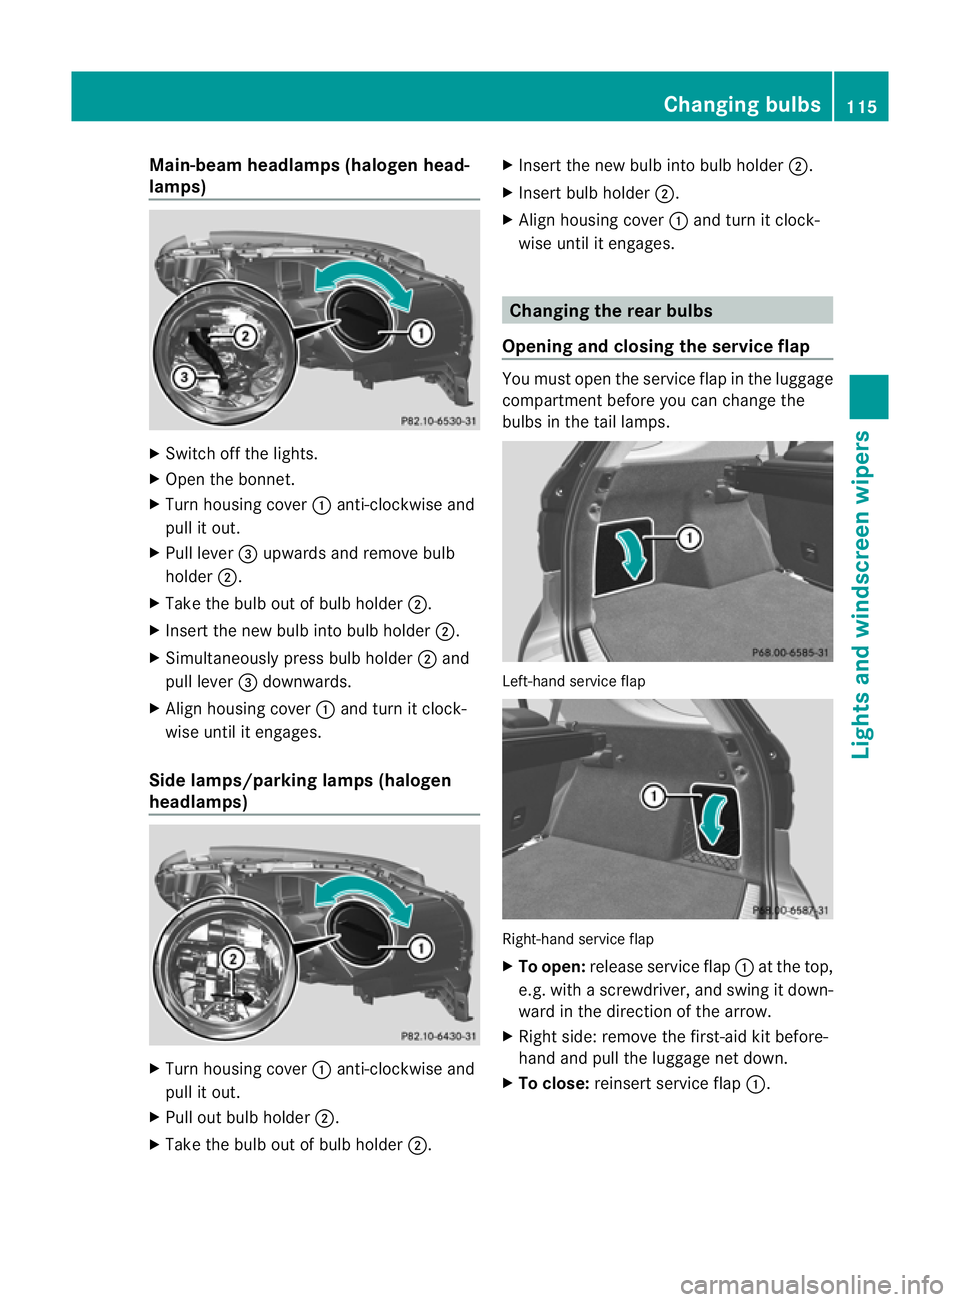
Main-beam headlamps (hal
ogen head-
lamps) X
Switch off the lights.
X Open the bonnet.
X Turn housing cover :anti-clockwis eand
pul lito ut.
X Pul llever =upwards and remove bulb
holder ;.
X Take the bulb out of bulb holder ;.
X Insert the new bulb into bulb holder ;.
X Simultaneously press bulb holder ;and
pull lever =downwards.
X Align housing cover :and tur nitclock-
wis euntil it enga ges.
Side lamps/parking lamps (halogen
headlamps) X
Tur nhousing cover :anti-clockwise and
pull it out.
X Pull out bulb holder ;.
X Take the bulb out of bulb holder ;.X
Insert the new bulb int obulbh older ;.
X Insert bulb holder ;.
X Align housing cover :and tur nitclock-
wis euntil it enga ges. Changing th
erear bulbs
Opening and closin gthe serv icef lap You must open the service flap in the luggage
compartm entb efor eyou can change the
bulbs in the tail lamps. Left-hand service flap
Right-han
dservice flap
X To open: release servic eflap :at the top,
e.g. with ascrewdriver, and swing it do wn-
ward in the direction of the arrow.
X Right side :remov ethe first-ai dkit before-
hand and pull the luggage net down.
X To close: reinsertservice flap :. Changing bulbs
115Lightsand windscreen wipers Z
Page 119 of 389
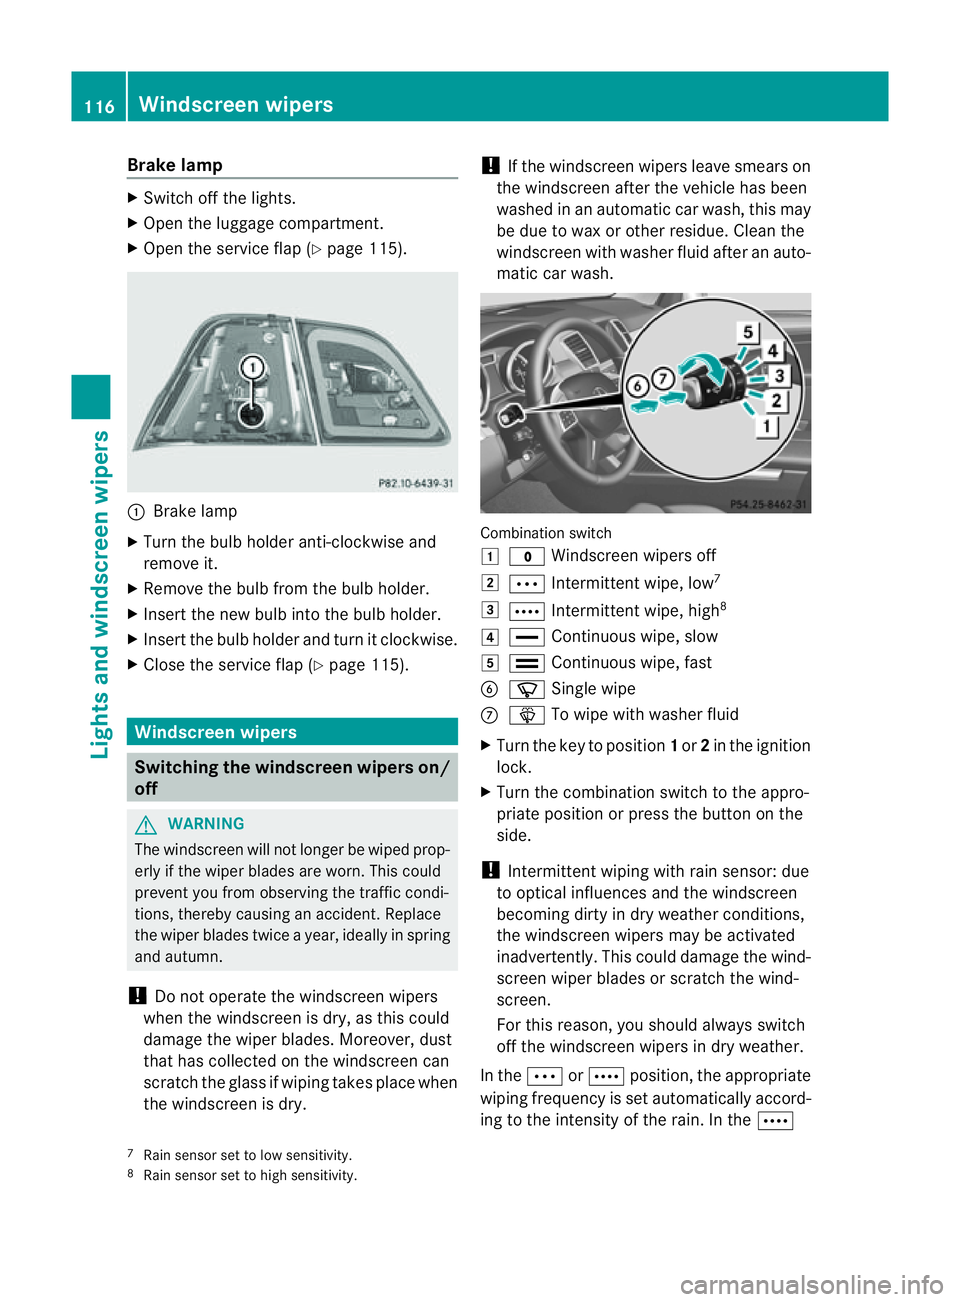
Brake lamp
X
Switch off the lights.
X Ope nthe luggage compartment.
X Open the service fla p(Ypage 115). :
Brake lamp
X Turn the bulb holder anti-clockwise and
remove it.
X Remov ethe bulb from the bulb holder.
X Insert the new bulb int othe bulb holder.
X Insert the bulb holder and tur nitclockwise.
X Close the servic eflap (Y page 115). Windscreen wipers
Switching the windscreen wipers on/
off G
WARNING
The windscreen will not longer be wiped prop-
erly if the wiper blades are worn. This could
preven tyou from observing the traffic condi-
tions, thereby causing an accident .Replace
the wiper blades twic eayear, ideally in spring
and autumn.
! Do not operate the windscreen wipers
when the windscreen is dry, as this could
damage the wiper blades. Moreover ,dust
that has collected on the windscreen can
scratc hthe glass if wipin gtakes place when
the windscreen is dry. !
If the windscreen wipers leave smears on
the windscreen after the vehicle has been
washe dinana utomatic car wash, this may
be due to wax or other residue. Clea nthe
windscreen with washer fluid after an auto-
matic car wash. Combination switch
1
$ Windscreen wiper soff
2 Ä Intermittent wipe, low 7
3 Å Intermittent wipe, high 8
4 ° Continuous wipe, slow
5 ¯ Continuous wipe, fast
B í Single wipe
C î To wip ewith washer fluid
X Turn the key to position 1or 2in the ignition
lock.
X Turn the combination switch to the appro-
priate position or press the button on the
side.
! Intermittent wiping with rain sensor: due
to optical influences and the windscreen
becoming dirty in dry weather conditions,
the windscreen wipers may be activated
inadvertently. This could damage the wind-
screen wiper blades or scratc hthe wind-
screen.
For this reason, you should always switch
off the windscreen wiper sind ry weather.
In the ÄorÅ position, th eappropriate
wiping frequenc yisset automatically accord-
ing to the intensity of the rain. In the Å
7 Rain sensor set to low sensitivity.
8 Rain sensor set to high sensitivity. 116
Windscreen wipersLights and windscreen wipers