service MERCEDES-BENZ M-CLASS SUV 2011 Owner's Manual
[x] Cancel search | Manufacturer: MERCEDES-BENZ, Model Year: 2011, Model line: M-CLASS SUV, Model: MERCEDES-BENZ M-CLASS SUV 2011Pages: 389, PDF Size: 9.22 MB
Page 133 of 389
X
To deactivate: press theÌ/Á but-
ton.
The indicator lamp in the Ì/Ábut-
ton goe sout.
i Residual hea tisdeactivated automati-
cally:
R after about 30 minutes
R when the ignition is switched on
R if the batter yvoltage drops
R if the coolant temperatur eistoo low Auxiliar
yheating
Important safety notes G
WARNING
Exhaust fumes are produced when the auxili-
ary heating is in operation. Inhalin gthese
exhaust fumes can be poisonous. You should
therefor eswitch off the auxiliary heating in
confined spaces without an extraction sys-
tem, e.g. agarage. G
WARNING
When operating the auxiliary heating, parts of
the vehicle may become very hot, and highly
inflammable material such as fuels could be
ignited. Operating the auxiliary heating is thus
prohibited at filling stations or when your vehi-
cle is being refuelled .You must therefore
switc hoff the auxiliary heating at filling sta-
tions.
! Operatin gthe auxiliary heating/ ventila-
tion draws on the vehicl ebattery. After you
have heated or ventilated the vehicle a
maximum of two times, drive for alonger
distance.
i Switch on the auxiliary heatin gregularly,
e.g. for about ten minutes ever ymonth.
The auxiliary heatin gheats the air in the vehi-
cle interior to the set temperature without
using the heat of the runnin gengine .The aux-
iliary heating is operated directly usin gthe
vehicle' sfuel. For this reason, the tank con- tent must be at least at reserve fuel level to
ensure that the auxiliary heating functions.
The auxiliary heating/ventilation automati-
cally adjusts to changes in temperature and
weather conditions. For this reason, the aux-
iliary heating could switch from ventilation
mode to heating mode or from heating mode
to ventilation mode.
The auxiliary heating switches off when the
engine is switched off. The auxiliary ventila-
tion switches off when you turn the key to key
position 2.
The auxiliary heating switches off automati-
cally after 30 minutes. This time limit can be
altered. To do this, visit aqualified specialist
workshop, e.g. aMercedes-Benz Service
Centre.
You can notu se the auxiliary ven tilation to
cool the vehicle interior to atemperature
lower than the outside temperature.
Before switching on X
Turn the key to position 2in the ignition
lock.
X Set the temperature.
The auxiliary heating/ventilation can be acti-
vated even when the climate control is being
controlled manually. Optimum comfor tcan
be attained when the system is set to auto-
matic mode. Set the temperature to 22 †.
The auxiliary heating/ventilation can be acti-
vated or deactivated using the remote control
or the button on the centre console.
The on-board computer can be used to spec-
ify up to three departure times, one of which
may be preselected (Y page 250).130
Operating the climate control systemClimate control
Page 134 of 389
Switching th
eauxiliary heating/venti-
lation on/off using the centre console
button Th
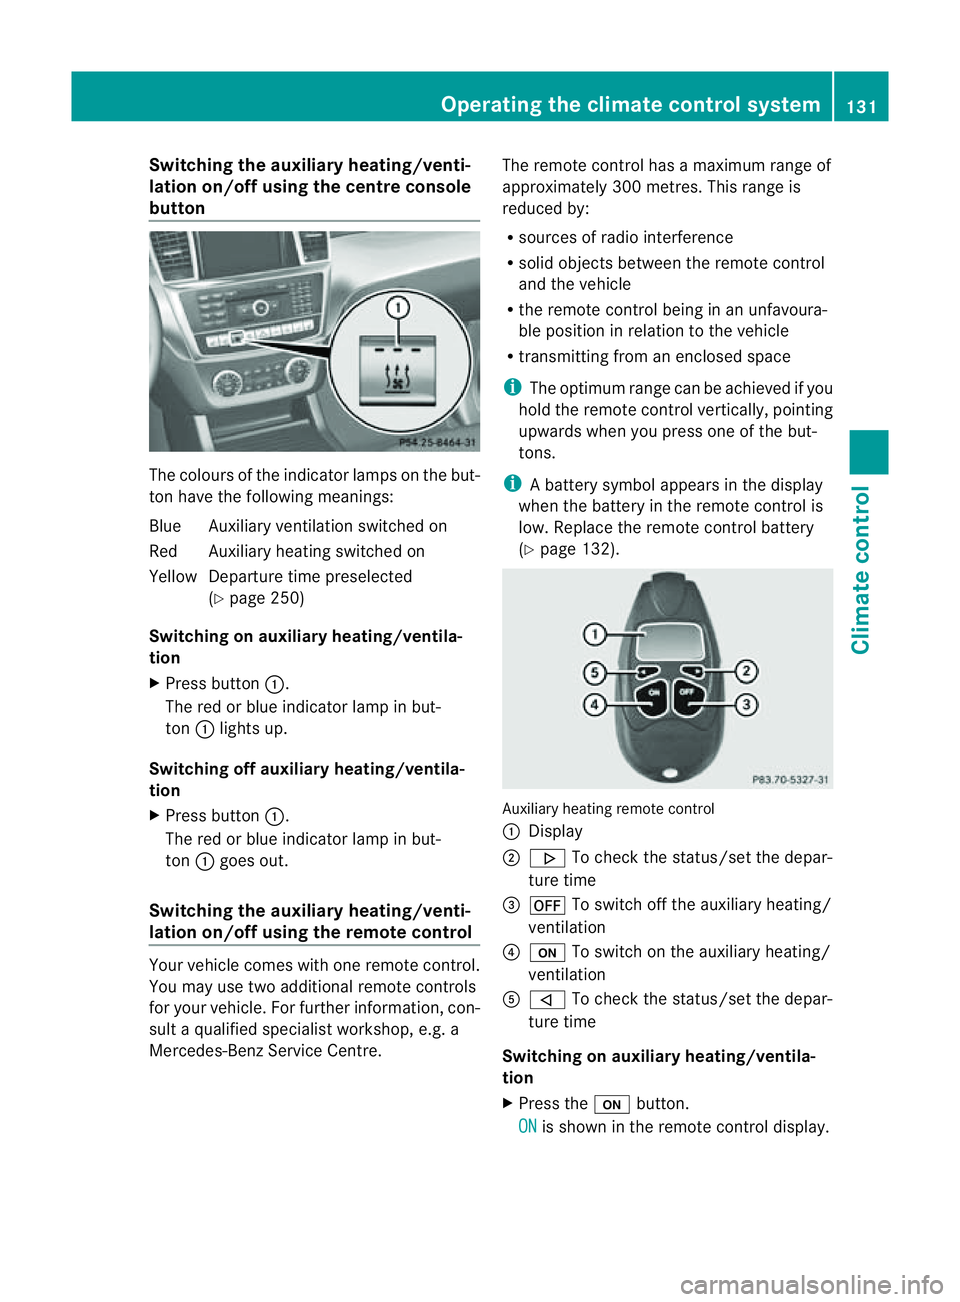
ec olour softhe indicator lamps on the but-
ton hav ethe followin gmeanings:
Blue Auxiliar yventilation switched on
Red Auxiliar yheatin gswitched on
Yellow Departur etime preselected
(Y page 250)
Switching on auxiliary heating/ventila-
tion
X Press button :.
The red or blue indicator lamp in but-
ton :lights up.
Switching off auxiliary heating/ventila-
tion
X Press button :.
The red or blue indicator lamp in but-
ton :goes out.
Switching the auxiliar yheating/venti-
lation on/off using the remote control Your vehicle comes with one remote control.
You may use two additional remote controls
for your vehicle. For further information, con-
sult aqualified specialist workshop, e.g. a
Mercedes-Benz Service Centre. The remote control has
amaximum range of
approximately 300 metres. This range is
reduced by:
R sources of radio interference
R solid objects between the remote control
and the vehicle
R the remote control being in an unfavoura-
ble position in relation to the vehicle
R transmittin gfrom an enclose dspace
i The optimu mrange can be achieved if you
hold the remote control vertically, pointing
upwards when you press one of the but-
tons.
i Abattery symbol appears in th edisplay
when th ebatter yint he remote control is
low. Re placethe remote control battery
(Y page 132). Auxiliar
yheating remot econtrol
: Display
; . To check th estatus/set the depa r-
tur etime
= ^ To switch off th eauxiliar yheating/
ventilation
? u To switch on th eauxiliar yheating/
ventilation
A , To check th estatus/set the depa r-
tur etime
Switching on auxiliary heating/ventila-
tion
X Press the ubutton.
ON is shown in th
eremot econtrol di splay. Operatin
gthe clima tecontrol system
131Climatecontr ol Z
Page 136 of 389
H
Environmenta
lnote Batteries contain pollutants.
It is agains
tthe law to dis-
pose of them with the house-
hold rubbish. They must be
collected separatel yand
recycled in an environmen-
tally responsible manner. Dispose of batteries in an
environmentally responsible
manner. Take discharged
batteries to aqualified spe-
cialist workshop ,e.g. a
Mercedes-Benz Service
Centre, or to aspecial col-
lection point for old batter-
ies.
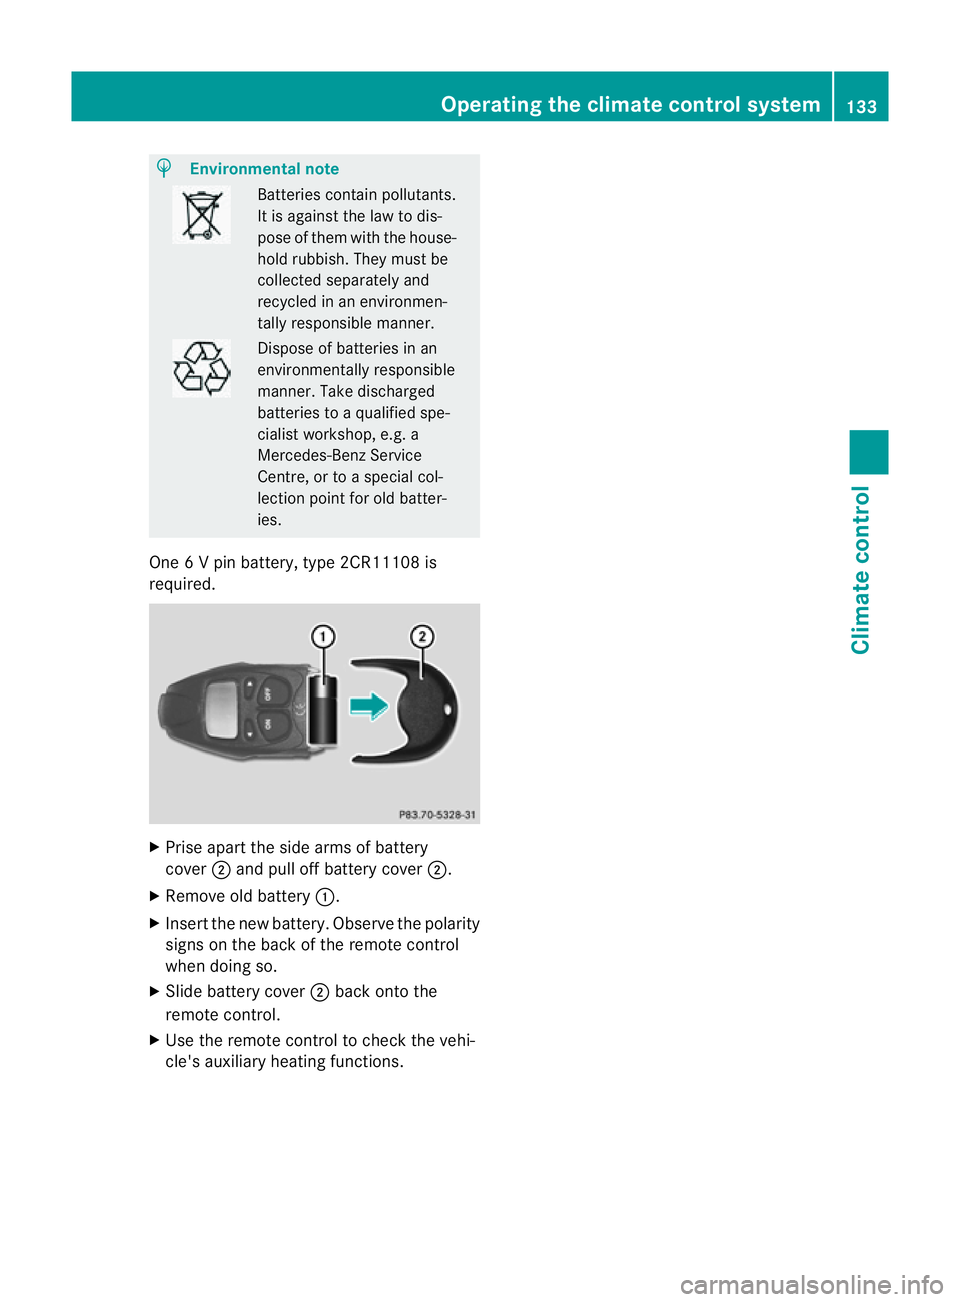
One 6Vp in battery ,type 2CR11108 is
required. X
Prise apart the side arms of battery
cover ;and pull off battery cover ;.
X Remove old battery :.
X Insert the new battery. Observe the polarity
signs on the back of the remote control
when doing so.
X Slide battery cover ;back onto the
remote control.
X Use the remote control to check the vehi-
cle's auxiliary heating functions. Operating the climate control system
133Climate control Z
Page 148 of 389
Problem Possible causes/consequences and
M Solutions
Vehicles with
apetrol
engine:
The engine is not run-
ning smoothly and is
misfiring. There is
amalfunction in the engine electronics or in amechanical
componen tofthe engin emanagement system.
X Only depress the accelerator pedal slightly.
X Have the cause rectified immediately at aqualified specialist
workshop, e.g. aMercedes-Benz Servic eCentre.
Otherwise, non-combusted fuel may get into the catalytic con-
verter and damage it. The coolan
ttempera-
tur ed isplay is showing
more than 120 †. The
coolant warnin glamp
may also be on and a
warning tone may
sound. The coolant level is too low. The coolant is too hot and the engine
is no longer being cooled sufficiently.
X Stop as soon as possible and allow the engine and the coolant
to cool down.
X Check the coolant level (Y page 321). Observe the warning
notes as you do so and top up the coolant if necessary. If the coolant level is correct
,the radiator fa nmay be faulty. The
coolant is too hot and the engine is no longer being cooled suffi-
ciently.
X At coolant temperatures under 120 †, drive on to the nearest
qualified specialis tworkshop, e.g. to aMercedes-Benz Service
Centre.
X Avoid heavy loads on the engine as you do so, e.g. driving on
mountain roads and stop-start traffic. Automa
tict ransmission Important safety notes
G
WARNING
The movement of the pedal smust not be
impaired in any way. Do not keep any objects
in the driver's footwell. Make sure that floor-
mats or carpets are correctly secured and
that there is sufficient clearance for the ped-
als.
Do not place several floormats on top of one
another. G
WARNING
Do not change down for additional engine
braking on aslippery road surface. This could
cause the drive wheels to lose their grip and
the vehicle could skid. This could cause you to lose control of your vehicle and cause an
accident. DIRECT SELECT lever
Overview of transmissio npositions The DIRECT SELECT leve
risonthe right of the
steering column. Automa
tict ran smission
145Drivingand park ing Z
Page 156 of 389
R
M85 (petrol with 85 %methanol)
R M10 0(100% methanol)
R Petrol wit hmetallic additives
R Diesel
Do not mix fuel ssuch as this with petrol
and do not use any additives. Doing so may
cause engine damage. This does not
include additives for the removal and pre-
vention of residue build-up. Petrol must
only be mixed with additives recommended
by Mercedes-Benz. More information about
recommended additives can be obtained
from any Mercedes-Ben zService Centre.
! Use afilter when adding fuel from afuel
can. The fuel lines and/or the diesel injec-
tion system could otherwis ebeblocked by
particles from the fuel can.
i E10 fuel contains up to 10% bioethanol.
Your vehicle is E10 compatible. You can
refuel your vehicle using E10 premium-
grade petrol.
i If the recommended fuel is not available,
but only as atemporary measure, you may
also use regula runleaded petrol,
91 RON/82.5 MON. Thi smay reduce
engine performance and increase fuel con-
sumption. Avoid driving at full throttle.
In some countries, the fuel grade available
may not be adequate and could cause
deposits to build up. In consultation with a
Mercedes-Ben zService Cent re,this petrol
ma ybem ixed with the additive recommen-
ded by Mercedes-Ben z(part no.
A0009 89254510). Yo umust observe the
notes and mixin gratios specified on the
container.
For further information on "Fuel", see
(Y page 374). !
Only refuel using unleaded, sulphur-free
premium-grade petrol with at least
95 RON/85 MON, which conform stoEuro- pean standar
dEN2 28or an equivalent
specifi cation.
You can otherwise impair engine output or
damage the emission contro lsystem.
i In some countries, the available petrol
may not be sufficiently low in sulphur. This
fuel can temporarily produce unpleasant
odours, especially on short journeys. As
soo nassulphur-free fuel (sulphur content
<10p pm) is used for refuelling, the odours
are reduced. Diesel (EN 590)
Fuel grade !
When refuelling, only use diesel fuel that
confor ms to th eEuropean standard EN 590
or is of equivalent quality. You can other-
wise impair engine output or damage the
engine.
! Vehicles with diesel particle filters: in
countries outsid ethe EU ,only use low sul-
phu rEuro diesel with asulphu rcontent of
under 50 ppm. Otherwise, the emission
con trol system coul dbedamaged.
! Vehicles without adiesel particle fil-
ter: in countries where only diesel fuels
with ahigher sulphur conten tare avail able,
the vehicle's oil change intervals are
shorter. More information about intervals
for changing the oil can be obtained from
any Mercedes-Benz Service Centre.
! Only use fuel that complies with the EN
590 European standard. Fuel that does not
compl ywithEN5 90can lea dtoincreased
wear, engin edamag eand damage to the
exhaust system.
Do not use the following:
R marine diesel
R heating oil
R bio-diesel
R vegetable oil
R petrol Refuelling
153Drivingand park ing Z
ML 350 4MATIC
Page 160 of 389
AdBlue
®
Important notes on use To function properly, BlueTE
Cexhaust gas
aftertreatmen tmust be ope rated with the
reducin gagen tAdBlue ®
.
When the supply of AdBlue ®
is almost used
up, the Refill AdBlue See Owner's Man‐
ual message is shown in the multifunction
display.
When the AdBlue ®
supply drops to amini-
mum ,the Refill AdBlue No star tinXXXX km message is show
ninthe multifunc-
tion display.
If the Refill AdBlue No star tinXXXX km message is show
ninthe multifunction dis-
play ,you can still drive the vehicle over the
distance shown. If the AdBlue ®
is not topped
up, you will subsequen tlybeu nable to start
the engi ne.R efill the AdBlue ®
tank or have
the AdBlue ®
tank refilled at aqualified spe-
cialist workshop. If the Refill AdBlueEng. star
tnot possible message
appears in th emultifunction display and the
engine does not start ,you must top up with
at least 3. 8lAdBlue ®
(approximately 2
AdBlue ®
refill bottles).
i If you drive the vehicl efaster than
15 km/h, the Refill AdBlue Se eOwn‐ er's Manual message goes ou
tafter
approximately one minute.
Further info rmation about BlueTEC exhaust
gas aftertreatment and about AdBlue ®
can
be obtained from any Mercedes-Benz Service
Centre. Topping up AdBlue
® G
WARNING
AdBlue ®
must not come int ocontac twith
skin ,eyes or clothing.
R If AdBlue ®
comes into contact with your
eyes or skin, rinse affected areas with clean
water immediately.
R If AdBlue ®
is swallowed ,immediatel yrinse
your mouth out with alot of clea nwater and
drink plenty of water.
R Change clothing that is soile dwith
AdBlue ®
immediately.
R If allergic reactions occur, consult adoctor
immediately.
Keep AdBlue ®
out of the reach of children. G
WAR
NING
If you ope nthe AdBlue ®
tan kcap, small
amount sofammonia vapou rmay be released.
This depends in particular upon the age of the
AdBlue ®
.
Ammonia vapours have apungent odour and
are particularly irritating to:
R skin
R mucous membranes
R eyes
You may experienc eaburnin gsensation in
your eyes, nose and throat, as well as cough-
ing and waterin gofthe eyes.
Do not inhale any ammonia vapour sthat may
be released. Fil lthe AdBlue ®
tan konly in well-
ventilate dareas.
! Only us eAdBlue ®
in accordanc ewith
ISO 22241. Do not mix any additives with
AdBlue ®
,a nd do not dilute AdBlue ®
with
water. Thi smay destroy the BlueTEC
exhaust gas aftertreatment system.
! In order to fill the AdBlue ®
tank ,the vehi-
cle must be parked on alevel surface. The
AdBlue ®
tank can only be filled as intended
with the vehicle parked on alevel surface.
Fluc tuations in capacit ywill thus be avoi- Refuelling
157Drivingand park ing Z
Page 161 of 389
ded. Fillin
gavehicle standing on an uneven
surface is not permitted. There is adanger
of overfilling, which can cause damage to
BlueTEC exhaust gas aftertreatment com-
ponents.
Have the AdBlue ®
tank refilled at aqualified
specialist workshop. However ,you can also
top up the AdBlue ®
tan k:
R at afilling station with an AdBlue ®
filling
pump
R with AdBlue ®
refill bottles
R with an AdBlue ®
refill canister
If the outside temperature is lower than
Ò 11 †, it may be difficult to top up. If
AdBlue ®
is frozen and ther eisanactive warn-
ing indicator, topping up may not be possible.
Park the vehicle in awarmer place, e.g. in a
garage, until AdBlue ®
has become fluid again.
Topping up is then possible again. Alterna-
tively, have the AdBlue ®
tank refilled at a
qualified specialis tworkshop.
When the pum pnozzle switches off automat-
ically during filling at afilling pump, the
AdBlue ®
tank has been completely filled. Do
not fill the the AdBlue ®
tank any fur ther.
AdBlue ®
may possibly leak.
! Surfaces which have com eintoc ontact
with AdBlue ®
while refillin gshould be
rinsed immediately with water, or remove
AdBlue ®
with amoist clot hand cold water.
If AdBlue ®
has alread ycrystallised, us ea
sponge and cold water to clean the area.
AdBlue ®
residue crystallises after acertain
amount of tim eand soils the affected sur-
faces.
! AdBlue ®
is not afuel additive and must
not be added to the fuel tank .IfAdBlue ®
is
added to the fuel tank ,this can lead to
engin edamage.
Further information on
AdBlue ®
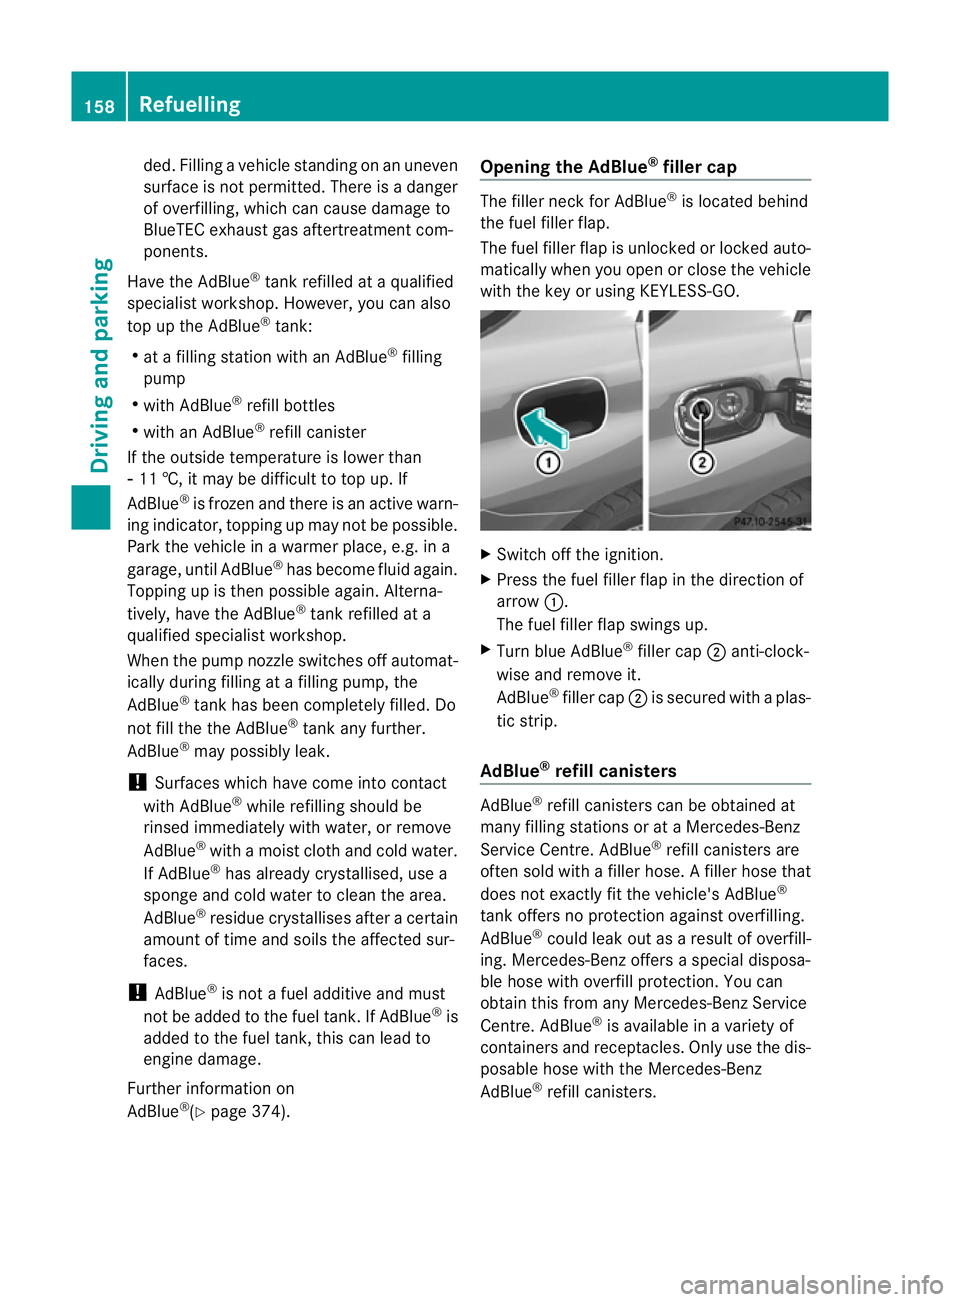
(Y page 374). Opening the AdBlue
®
filler cap The filler nec
kfor AdBlue ®
is located behind
the fuel filler flap.
The fuel filler fla pisunlocked or locked auto-
matically whe nyou open or close the vehicle
with the key or using KEYLESS-GO. X
Swit choff the ignition.
X Press the fuel filler fla pinthe direction of
arrow :.
The fuel filler fla pswings up.
X Turn blue AdBlue ®
filler cap ;anti-clock-
wise and remov eit.
AdBlue ®
filler cap ;is secured with aplas-
tic strip.
AdBlue ®
refill canisters AdBlue
®
refill canisters can be obtained at
many filling stations or at aMercedes-Benz
Ser vice Centre. AdBlue ®
refill canis ters are
often sold with afiller hose. Afiller hose that
does not exactly fit the vehicle's AdBlue ®
tan koffers no pro tection agains toverfilling.
AdBlue ®
could leak ou tasar esult of overfill-
ing. Mercedes-Ben zoffers aspecial disposa-
ble hose with overfill protection. You can
obtain this from any Mercedes-Benz Service
Centre. AdBlue ®
is available in avariety of
containers and receptacles. Only use the dis-
posable hos ewith the Mercedes-Benz
AdBlue ®
refill canister s.158
RefuellingDriving and parking
Page 162 of 389
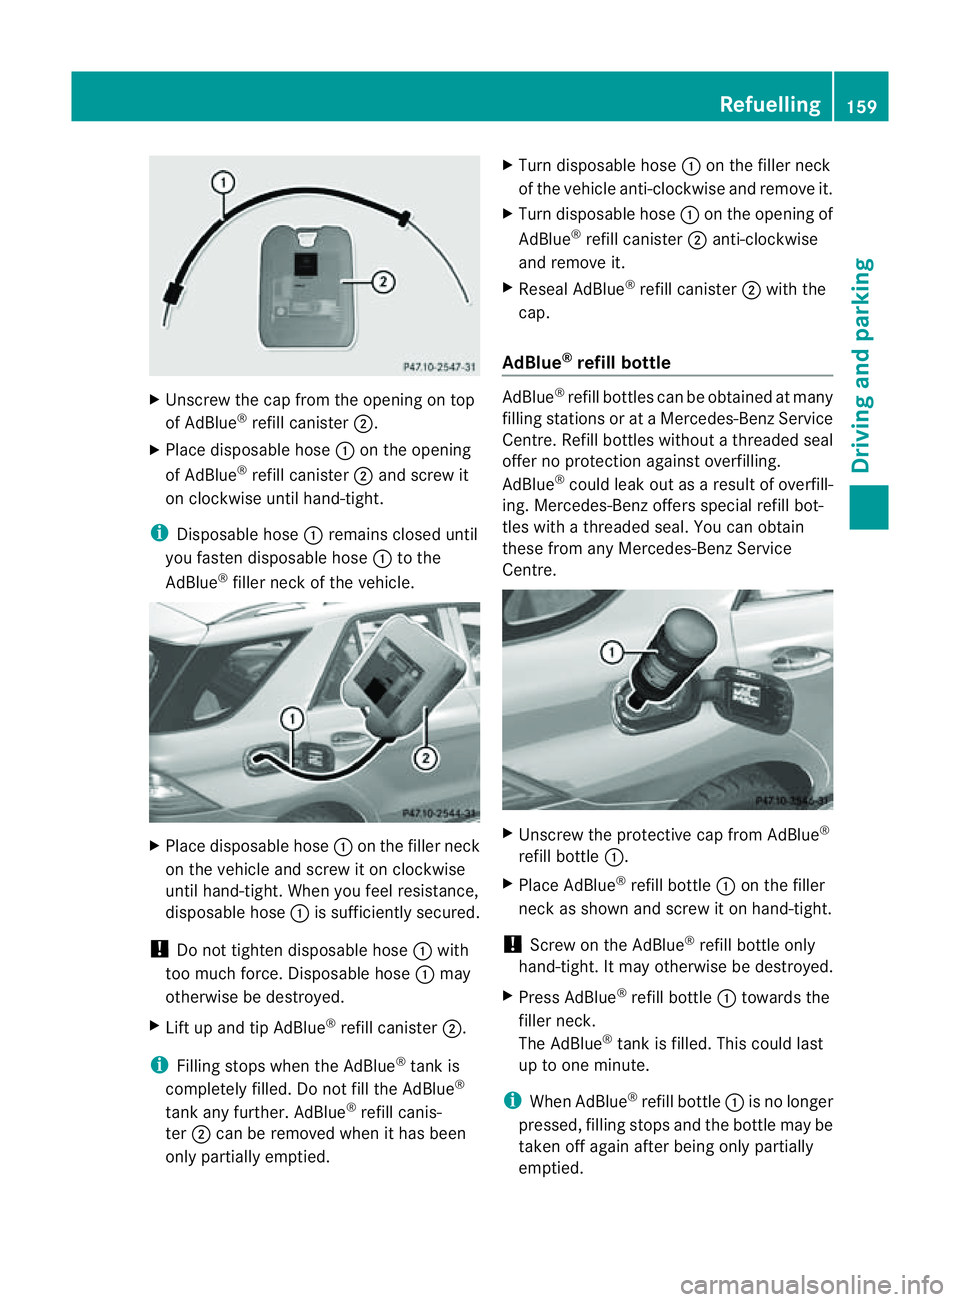
X
Unscre wthe cap from the opening on top
of AdBlue ®
refill canister ;.
X Plac edisposable hose :on the opening
of AdBlue ®
refill canister ;and screw it
on clockwise until hand-tight.
i Disposable hose :remains closed until
you fasten disposable hose :to the
AdBlue ®
filler neck of the vehicle. X
Place disposable hose :on the filler neck
on the vehicle and screw it on clockwise
until hand-tight. When you feel resistance,
disposable hose :is sufficiently secured.
! Do not tighten disposable hose :with
too muc hforce. Disposabl ehose :may
otherwise be destroyed.
X Lif tu pa nd tip AdBlue ®
refill canister ;.
i Filling stops whe nthe AdBlue ®
tan kis
completely fille d.Do no tfill the AdBlue ®
tank any further. AdBlue ®
refill canis-
ter ;can be removed when it has been
only partially emptied. X
Turn disposable hose :on the filler neck
of the vehicle anti-clockwise and remov eit.
X Turn disposable hose :on the opening of
AdBlue ®
refill canister ;anti-clockwise
and remove it.
X Reseal AdBlue ®
refill canister ;with the
cap.
AdBlue ®
refill bottle AdBlue
®
refill bottle scan be obtained at many
filling stations or at aMercedes-Benz Service
Cent re.R efill bottles without athreaded seal
offer no protection against overfilling.
AdBlue ®
could leak out as aresult of overfill-
ing. Mercedes-Ben zoffers special refi llbot-
tles with athrea deds eal. You can obtain
these from any Mercedes-Ben zService
Centre. X
Unscrew the protectiv ecap from AdBlue ®
refill bottle :.
X Place AdBlue ®
refill bottle :on the filler
neck as sho wn andscre witonh and-tight.
! Screw on the AdBlue ®
refill bottle only
hand-t ight.Itm ay other wise be destroyed.
X Press AdBlue ®
refil lbottle : toward sthe
fille rneck.
The AdBlue ®
tank is filled. Thi scould last
up to one min ute.
i Whe nAdBlue ®
refill bottle :is no longer
pressed, filling stops and the bottle may be
taken off again after being only partially
emptied. Refuelling
159Drivingand parking Z
Page 163 of 389
X
Release AdBlue ®
refill bottle :.
X Turn AdBlue ®
refill bottle :anti-clockwise
and remove it.
X Screw the protective cap onto AdBlue ®
refill bottle :again.
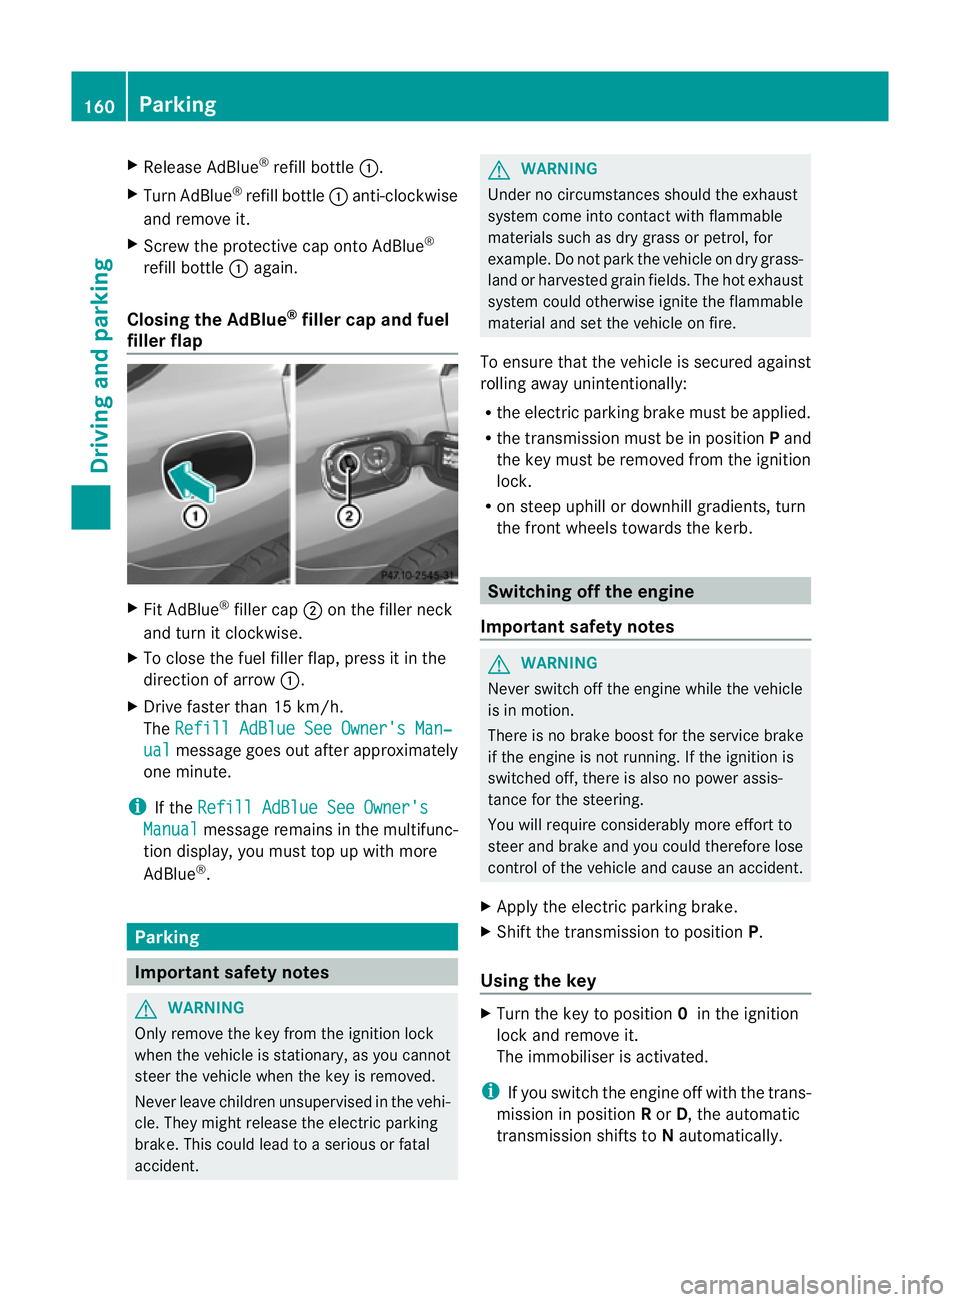
Closing th eAdBlue ®
filler cap and fuel
filler flap X
Fit AdBlue ®
filler cap ;on the filler neck
and tur nitclockwise.
X To close th efuel filler flap ,press it in the
di rectio nofarrow:.
X Drive faster than 15 km/h.
The Refill AdBlue See Owner' sMan‐ ual messag
egoeso ut after approximately
on em inute.
i If the Refill AdBlue See Owner's Manual messag
eremain sinthe mu ltifunc-
tion display, you mus ttop up with more
AdBlue ®
. Parking
Important safety notes
G
WARNING
Only remove the key from the ignition lock
when the vehicle is stationary, as you can not
steer the vehicle when the key is removed.
Never leav echildren unsupervised in the vehi-
cle. They might release the electric parking
brake. This coul dlead to aserious or fatal
accident. G
WAR
NING
Under no circumstances should the exhaust
system come into contact with flammable
materials such as dry grass or petrol ,for
example. Do not par kthe vehicle on dry grass-
lan dorh arvested grain fields. The hot exhaust
system could otherwise ignite the flammable
material and set the vehicle on fire.
To ensure that the vehicle is secured against
rolling away unintentionally:
R the electric parking brake must be applied.
R the transmission must be in position Pand
the key must be removed from the ignition
lock.
R on steep uphill or downhill gradients, turn
the fron twheels towards the kerb. Switching of
fthe engine
Important safety notes G
WARNING
Neve rswitch off the engine while the vehicle
is in motion.
There is no brake boost for the service brake
if the engine is not running. If the ignition is
switched off, there is also no power assis-
tance for the steering.
You will require considerably more effort to
steer and brake and you could therefore lose
control of the vehicle and cause an accident.
X Apply the electric parking brake.
X Shift the transmission to position P.
Using the key X
Turn the key to position 0in the ignition
lock and remove it.
The immobiliser is activated.
i If you switch the engine off with the trans-
mission in position Ror D,t he automatic
transmission shift stoNautomatically. 160
ParkingDriving and parking
Page 165 of 389
R
the seat belt is fastened.
R yo ud epress th eaccelerator pedal.
If the transmiss ioni sinp osition R,the boot
lid must be closed.
If your seat belt is not fastened ,the following
con ditions mus tbefulfilled to automatically
release the electri cparking brake:
R the driver's door is closed.
R yo uh aves hifted out of transmissio nposi-
tion Por you have previousl ydrive nfaster
than 3km/h.
Emergency braking The vehicle can also be braked durin
gan
emergenc yusingthe electric parking brake.
X While driving ,push handle :of the electric
parking brak e(Ypage 161).
i The vehicle is braked as lon gasyou keep
th eh andle of the elect ricp arking brake
pressed. The longer the elect ricp arking
brak ehandle is depressed, the greater the
brakin gforce.
During braking:
R aw arning tone sounds.
R the Releas eparking brake message
ap pe ars.
R the red !indicator lamp in the instru-
ment cluster flashes.
When the vehicl ehas been braked to astand-
still ,the electric parkin gbrake is engaged. Parkin
gupthe vehicle
If you le avet he vehicle parked up for longer
than fou rweeks, the batter ymay be damaged
by exhaustive discharge.
X Disconnect the battery ( Ypag e346) or
connect it to atrickl echarger.
i You can obtain information about trickle
chargers from aqualified specialist work-
shop, e.g. aMercedes-Ben zService
Centre. If you leave the vehic
leparked up for longer
than six weeks, the vehic lemay sufferd am-
age as aresult of lack of use.
X Visi taq ualifieds pecialist workshop and
seek advice. Driving tips
General driving tips
Coasting with the engine switched off G
WAR
NING
Never switch the engine off whil ethe vehicle
is in motion.
There is no power assista ncef or the service
brake when the engin eisnot run ning.
You will require considerably more effort to
brake and you could therefore los econtrol of
the vehicle and cause an accident. Engine oil
! Vehicles with adiesel particle filter:
If the vehicle is mostly driven for short dis-
tances, it is possible that malfunctions may
occur durin gthe automa ticc leaning of the
diesel particle filter. This can lead to engine
damage. Therefore, if you frequently drive
short distances, make sure to drive on
motorways or countr yroads for 20 minutes
at least ever y500 km. Brakes
Important safe tynotes G
WARNING
Do not change down for additional engine
brakin gonas lippery road surface. This could
cause the drive wheels to lose their grip and
the vehicle could skid. 162
Drivin
gtipsDriving and parking