MERCEDES-BENZ S-CLASS SEDAN 2012 Owners Manual
Manufacturer: MERCEDES-BENZ, Model Year: 2012, Model line: S-CLASS SEDAN, Model: MERCEDES-BENZ S-CLASS SEDAN 2012Pages: 536, PDF Size: 39.39 MB
Page 271 of 536
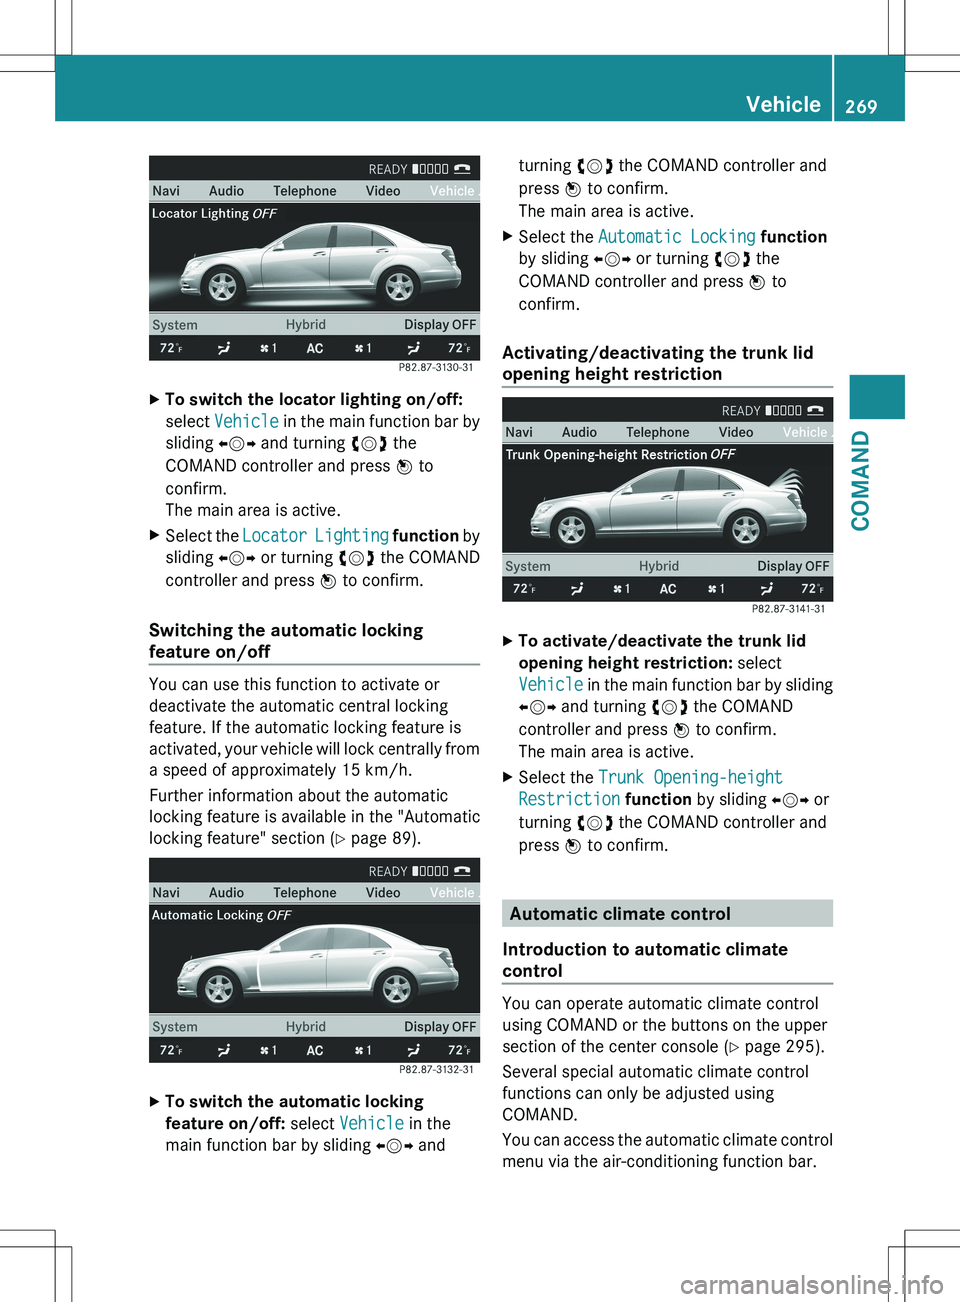
XTo switch the locator lighting on/off:
select Vehicle in the main function bar by
sliding XVY and turning cVd the
COMAND controller and press W to
confirm.
The main area is active.XSelect the Locator Lighting function by
sliding XVY or turning cVd the COMAND
controller and press W to confirm.
Switching the automatic locking
feature on/off
You can use this function to activate or
deactivate the automatic central locking
feature. If the automatic locking feature is
activated, your vehicle will lock centrally from
a speed of approximately 15 km/h.
Further information about the automatic
locking feature is available in the "Automatic
locking feature" section ( Y page 89).
XTo switch the automatic locking
feature on/off: select Vehicle in the
main function bar by sliding XVY andturning cVd the COMAND controller and
press W to confirm.
The main area is active.XSelect the Automatic Locking function
by sliding XVY or turning cVd the
COMAND controller and press W to
confirm.
Activating/deactivating the trunk lid
opening height restriction
XTo activate/deactivate the trunk lid
opening height restriction: select
Vehicle in the main function bar by sliding
XVY and turning cVd the COMAND
controller and press W to confirm.
The main area is active.XSelect the Trunk Opening-height
Restriction function by sliding XVY or
turning cVd the COMAND controller and
press W to confirm.
Automatic climate control
Introduction to automatic climate
control
You can operate automatic climate control
using COMAND or the buttons on the upper
section of the center console ( Y page 295).
Several special automatic climate control
functions can only be adjusted using
COMAND.
You can access the automatic climate control
menu via the air-conditioning function bar.
Vehicle269COMANDZ
Page 272 of 536
To do so, make certain that the SmartKey is
in position 2 in the ignition lock.
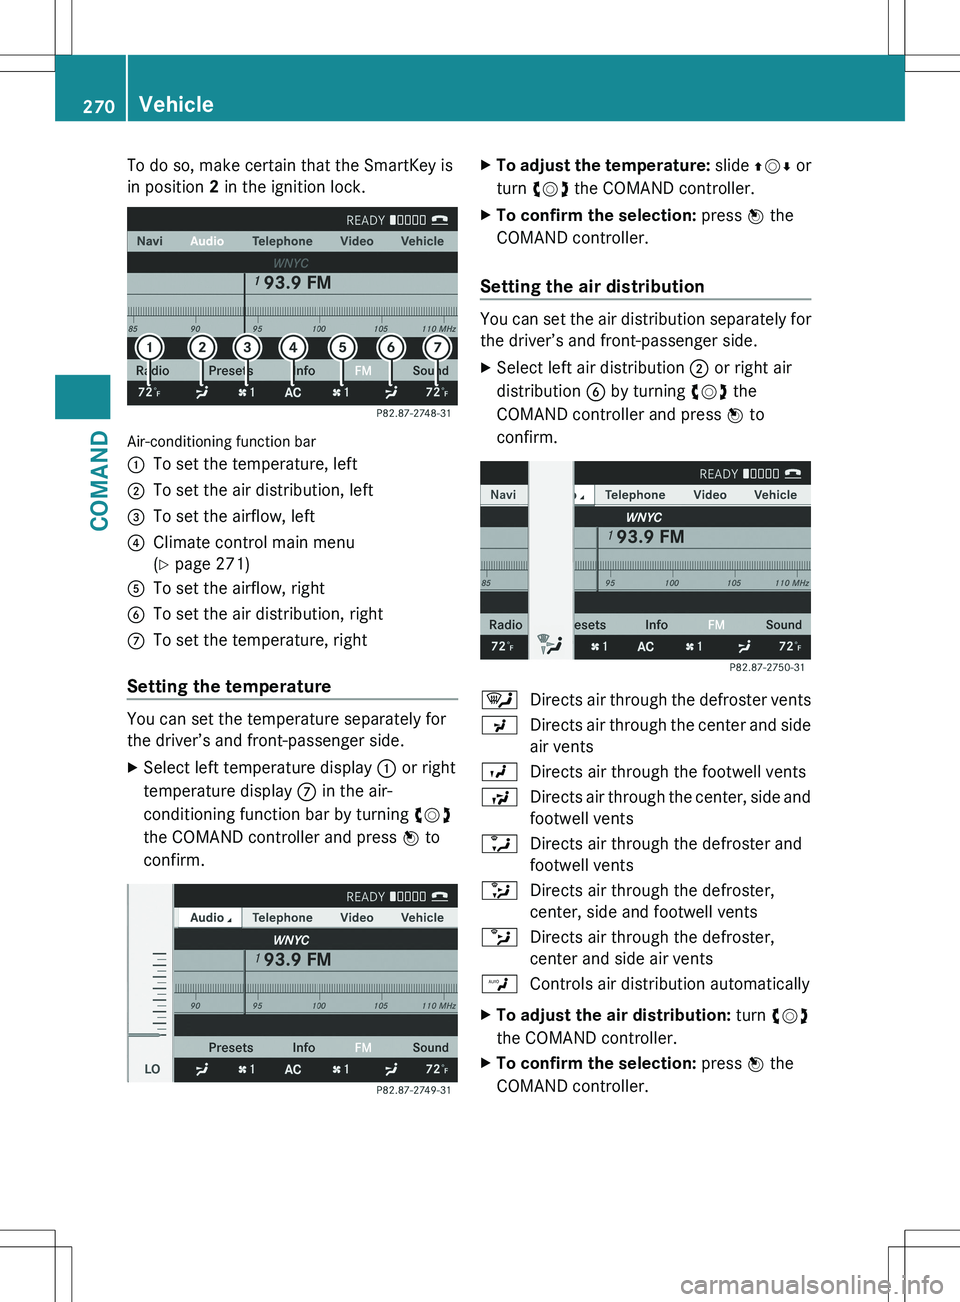
Air-conditioning function bar
:To set the temperature, left;To set the air distribution, left=To set the airflow, left?Climate control main menu
( Y page 271)ATo set the airflow, rightBTo set the air distribution, rightCTo set the temperature, right
Setting the temperature
You can set the temperature separately for
the driver’s and front-passenger side.
XSelect left temperature display : or right
temperature display C in the air-
conditioning function bar by turning cVd
the COMAND controller and press W to
confirm.XTo adjust the temperature: slide ZVÆ or
turn cVd the COMAND controller.XTo confirm the selection: press W the
COMAND controller.
Setting the air distribution
You can set the air distribution separately for
the driver’s and front-passenger side.
XSelect left air distribution ; or right air
distribution B by turning cVd the
COMAND controller and press W to
confirm.¯Directs air through the defroster ventsPDirects air through the center and side
air ventsODirects air through the footwell ventsSDirects air through the center, side and
footwell ventsaDirects air through the defroster and
footwell vents_Directs air through the defroster,
center, side and footwell ventsbDirects air through the defroster,
center and side air ventsWControls air distribution automaticallyXTo adjust the air distribution: turn cVd
the COMAND controller.XTo confirm the selection: press W the
COMAND controller.270VehicleCOMAND
Page 273 of 536
Setting the airflow
You can set the airflow separately for the
driver’s and front-passenger side.
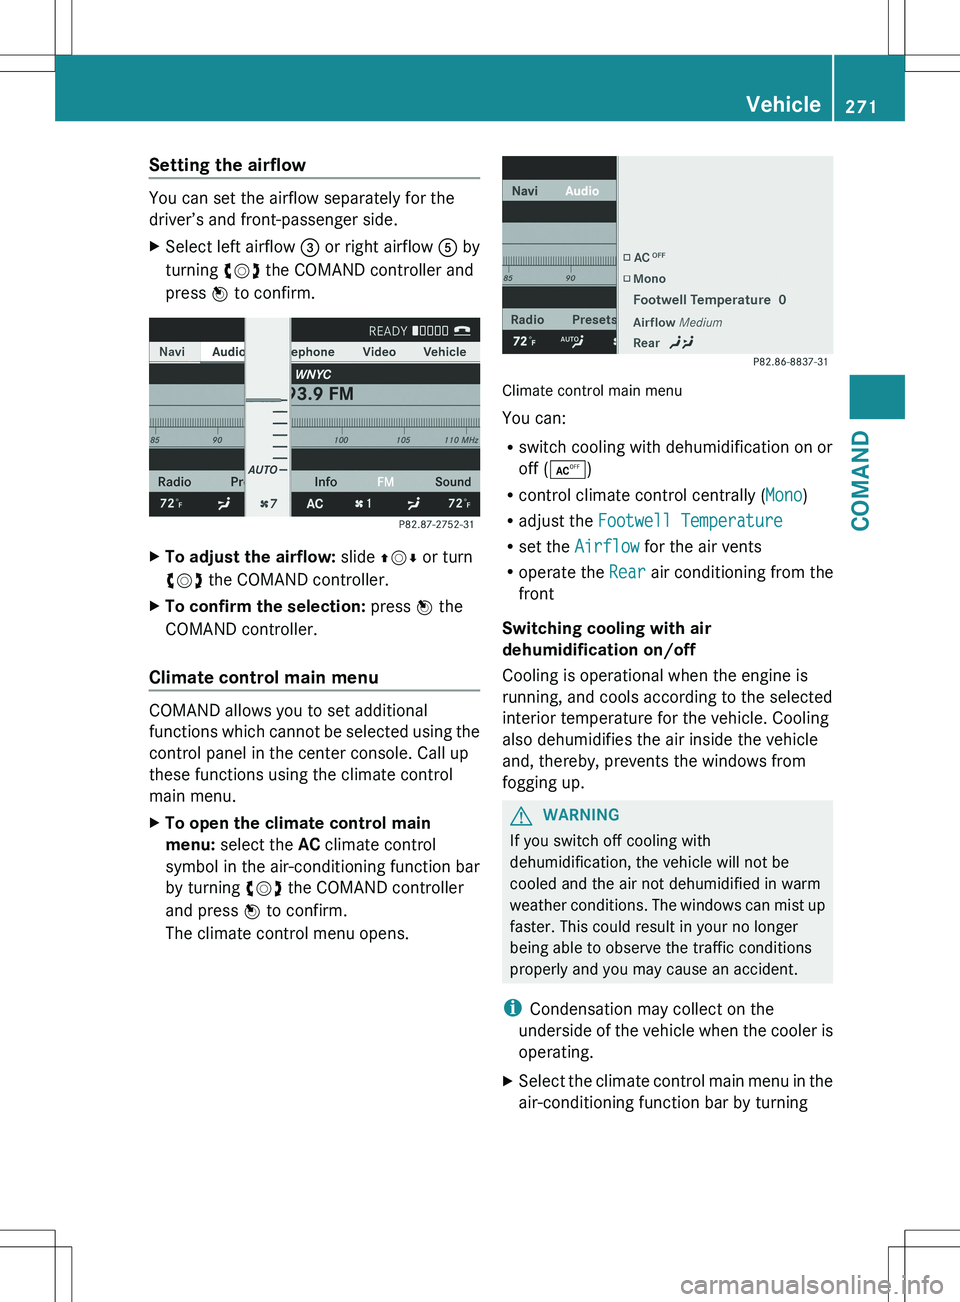
XSelect left airflow = or right airflow A by
turning cVd the COMAND controller and
press W to confirm.XTo adjust the airflow: slide ZVÆ or turn
cVd the COMAND controller.XTo confirm the selection: press W the
COMAND controller.
Climate control main menu
COMAND allows you to set additional
functions which cannot be selected using the
control panel in the center console. Call up
these functions using the climate control
main menu.
XTo open the climate control main
menu: select the AC climate control
symbol in the air-conditioning function bar
by turning cVd the COMAND controller
and press W to confirm.
The climate control menu opens.
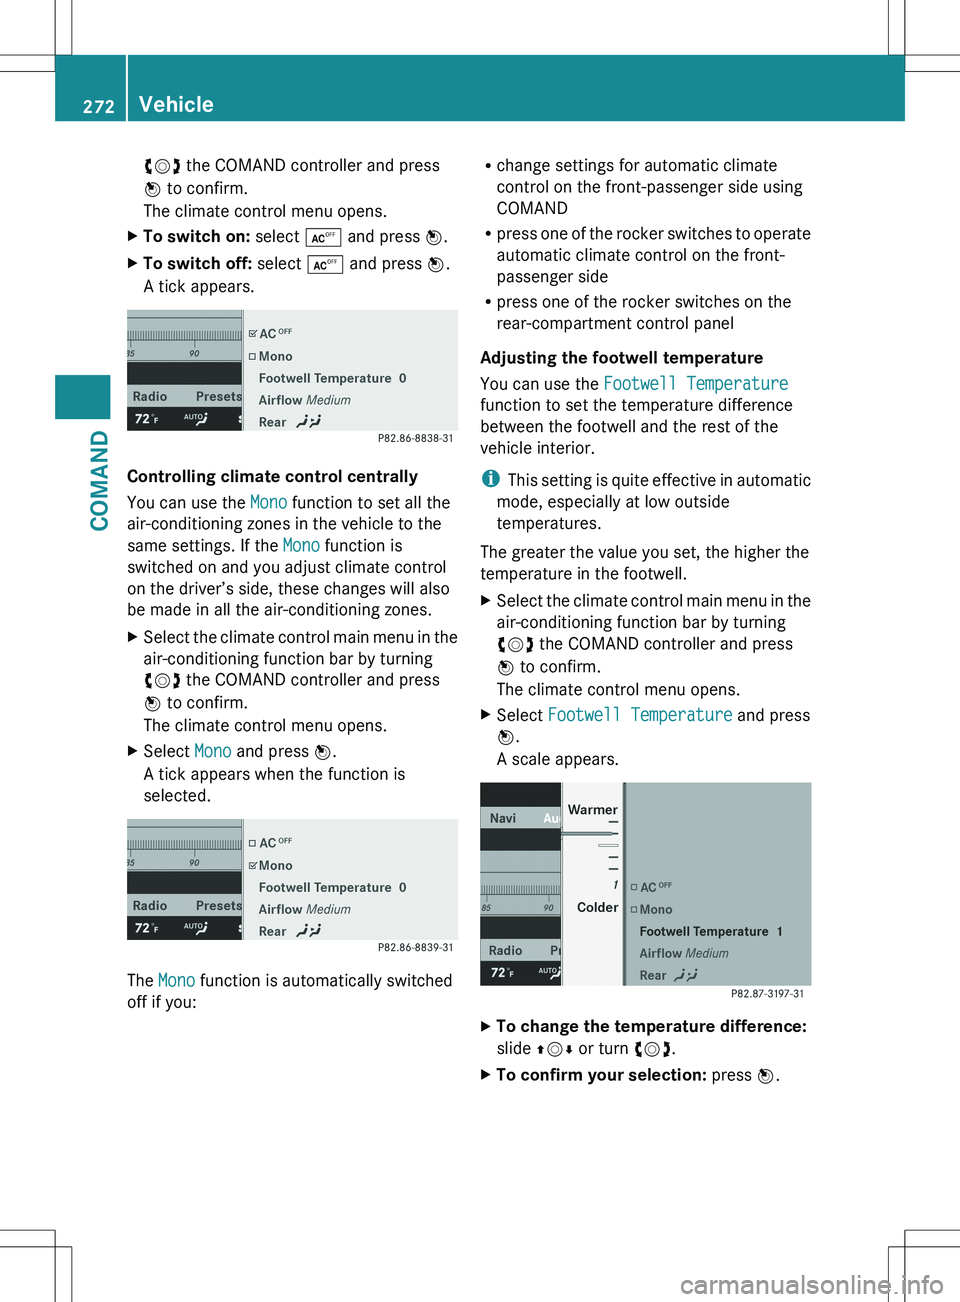
Climate control main menu
You can:
R switch cooling with dehumidification on or
off ( Æ )
R control climate control centrally ( Mono)
R adjust the Footwell Temperature
R set the Airflow for the air vents
R operate the Rear air conditioning from the
front
Switching cooling with air
dehumidification on/off
Cooling is operational when the engine is
running, and cools according to the selected
interior temperature for the vehicle. Cooling
also dehumidifies the air inside the vehicle
and, thereby, prevents the windows from
fogging up.
GWARNING
If you switch off cooling with
dehumidification, the vehicle will not be
cooled and the air not dehumidified in warm
weather conditions. The windows can mist up
faster. This could result in your no longer
being able to observe the traffic conditions
properly and you may cause an accident.
i Condensation may collect on the
underside of the vehicle when the cooler is
operating.
XSelect the climate control main menu in the
air-conditioning function bar by turningVehicle271COMANDZ
Page 274 of 536
cVd the COMAND controller and press
W to confirm.
The climate control menu opens.XTo switch on: select Æ and press W.XTo switch off: select Æ and press W.
A tick appears.
Controlling climate control centrally
You can use the Mono function to set all the
air-conditioning zones in the vehicle to the
same settings. If the Mono function is
switched on and you adjust climate control
on the driver’s side, these changes will also
be made in all the air-conditioning zones.
XSelect the climate control main menu in the
air-conditioning function bar by turning
cVd the COMAND controller and press
W to confirm.
The climate control menu opens.XSelect Mono and press W.
A tick appears when the function is
selected.
The Mono function is automatically switched
off if you:
R change settings for automatic climate
control on the front-passenger side using
COMAND
R press one of the rocker switches to operate
automatic climate control on the front-
passenger side
R press one of the rocker switches on the
rear-compartment control panel
Adjusting the footwell temperature
You can use the Footwell Temperature
function to set the temperature difference
between the footwell and the rest of the
vehicle interior.
i This setting is quite effective in automatic
mode, especially at low outside
temperatures.
The greater the value you set, the higher the
temperature in the footwell.XSelect the climate control main menu in the
air-conditioning function bar by turning
cVd the COMAND controller and press
W to confirm.
The climate control menu opens.XSelect Footwell Temperature and press
W .
A scale appears.XTo change the temperature difference:
slide ZVÆ or turn cVd.XTo confirm your selection: press W.272VehicleCOMAND
Page 275 of 536
Setting the blower settings for the air
vents
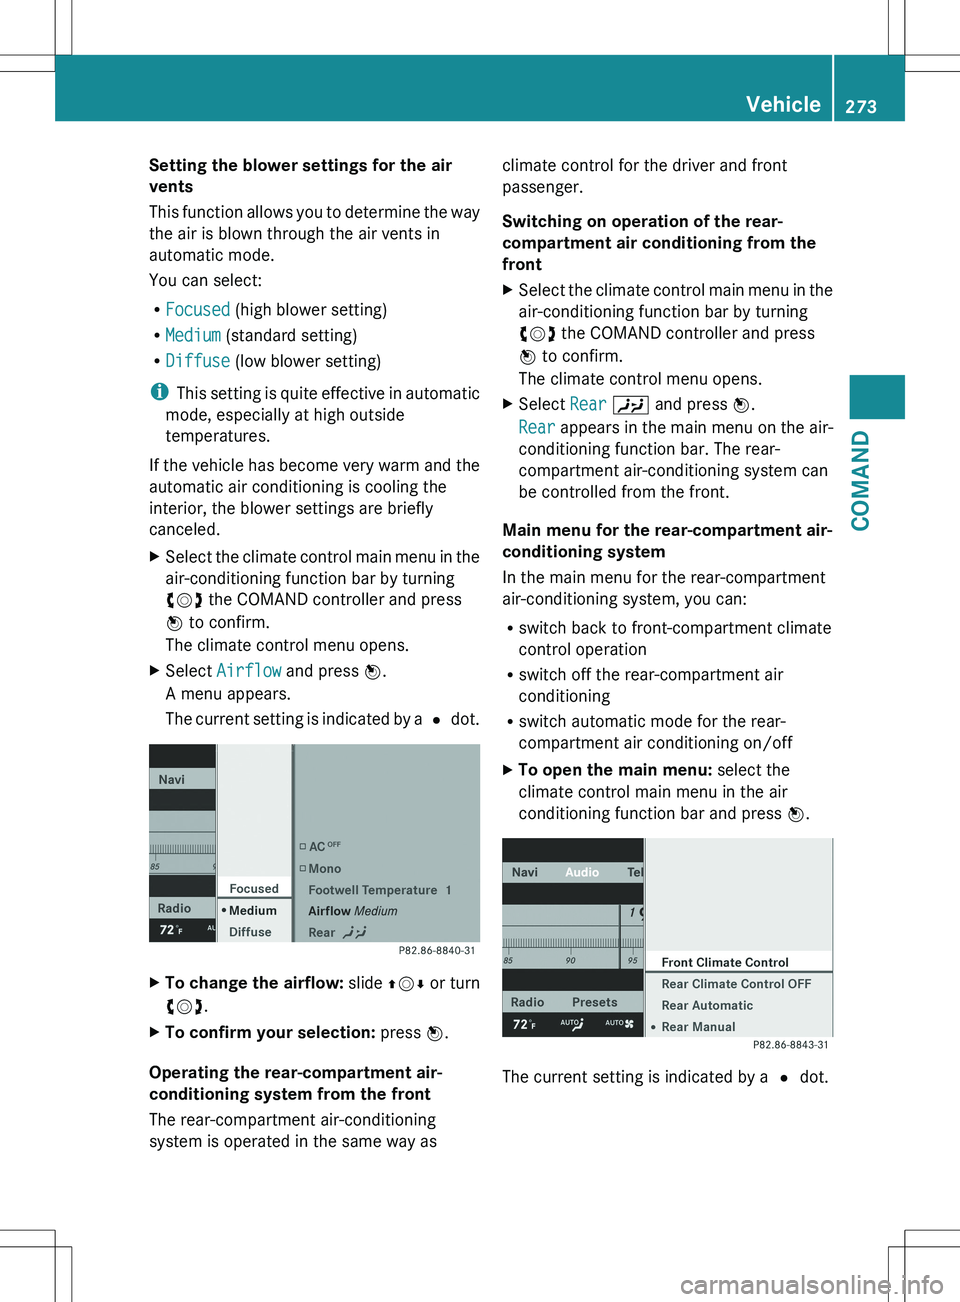
This function allows you to determine the way
the air is blown through the air vents in
automatic mode.
You can select:
R Focused (high blower setting)
R Medium (standard setting)
R Diffuse (low blower setting)
i This setting is quite effective in automatic
mode, especially at high outside
temperatures.
If the vehicle has become very warm and the
automatic air conditioning is cooling the
interior, the blower settings are briefly
canceled.XSelect the climate control main menu in the
air-conditioning function bar by turning
cVd the COMAND controller and press
W to confirm.
The climate control menu opens.XSelect Airflow and press W.
A menu appears.
The current setting is indicated by a # dot.XTo change the airflow: slide ZVÆ or turn
cVd .XTo confirm your selection: press W.
Operating the rear-compartment air-
conditioning system from the front
The rear-compartment air-conditioning
system is operated in the same way as
climate control for the driver and front
passenger.
Switching on operation of the rear-
compartment air conditioning from the
frontXSelect the climate control main menu in the
air-conditioning function bar by turning
cVd the COMAND controller and press
W to confirm.
The climate control menu opens.XSelect Rear Y and press W.
Rear appears in the main menu on the air-
conditioning function bar. The rear-
compartment air-conditioning system can
be controlled from the front.
Main menu for the rear-compartment air-
conditioning system
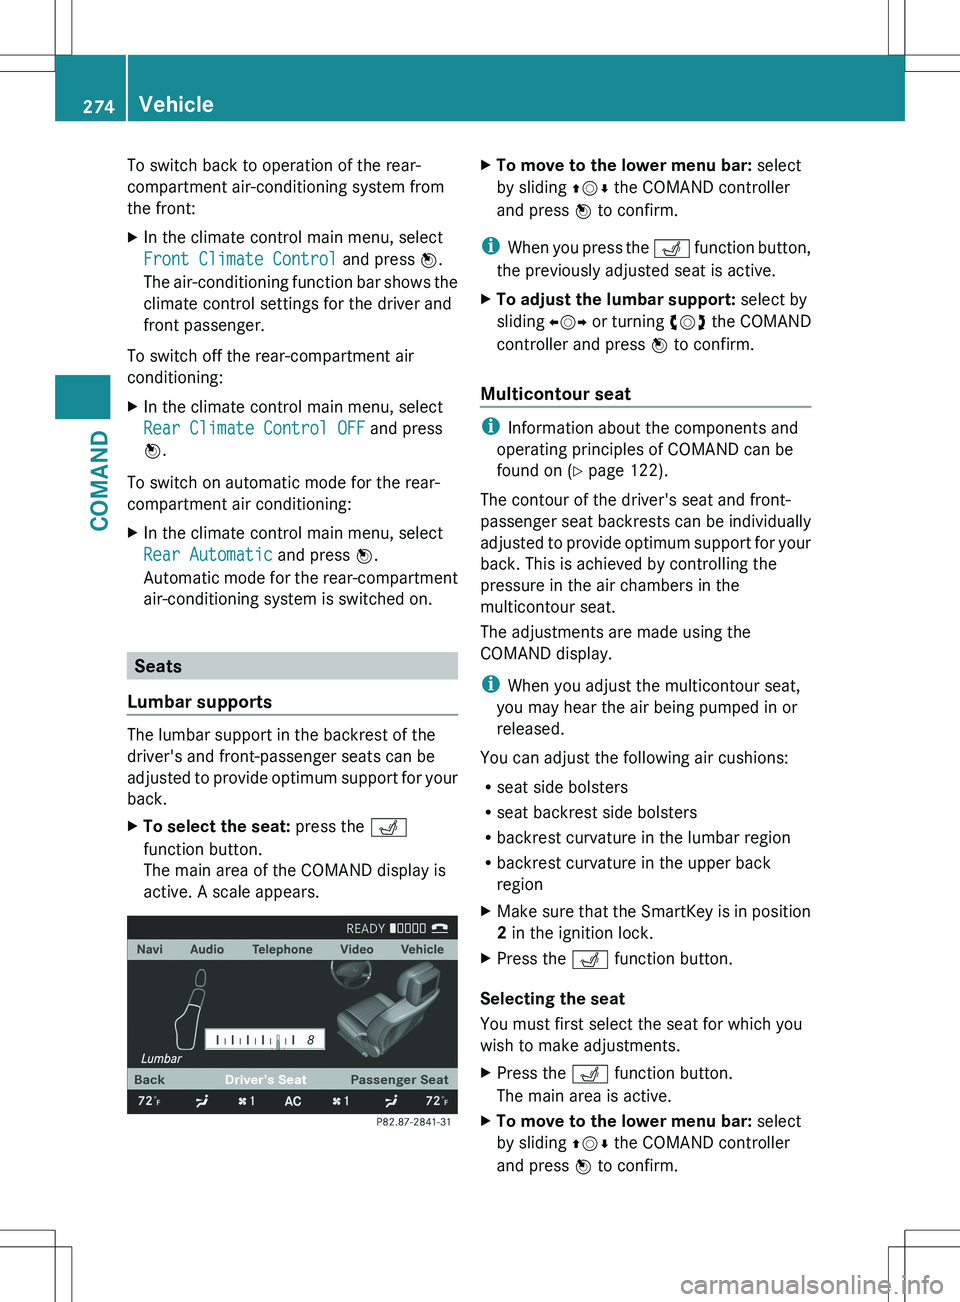
In the main menu for the rear-compartment
air-conditioning system, you can:
R switch back to front-compartment climate
control operation
R switch off the rear-compartment air
conditioning
R switch automatic mode for the rear-
compartment air conditioning on/off
XTo open the main menu: select the
climate control main menu in the air
conditioning function bar and press W.
The current setting is indicated by a # dot.
Vehicle273COMANDZ
Page 276 of 536
To switch back to operation of the rear-
compartment air-conditioning system from
the front:XIn the climate control main menu, select
Front Climate Control and press W.
The air-conditioning function bar shows the
climate control settings for the driver and
front passenger.
To switch off the rear-compartment air
conditioning:
XIn the climate control main menu, select
Rear Climate Control OFF and press
W .
To switch on automatic mode for the rear-
compartment air conditioning:
XIn the climate control main menu, select
Rear Automatic and press W.
Automatic mode for the rear-compartment
air-conditioning system is switched on.
Seats
Lumbar supports
The lumbar support in the backrest of the
driver's and front-passenger seats can be
adjusted to provide optimum support for your
back.
XTo select the seat: press the T
function button.
The main area of the COMAND display is
active. A scale appears.XTo move to the lower menu bar: select
by sliding ZVÆ the COMAND controller
and press W to confirm.
i
When you press the T function button,
the previously adjusted seat is active.
XTo adjust the lumbar support: select by
sliding XVY or turning cVd the COMAND
controller and press W to confirm.
Multicontour seat
i
Information about the components and
operating principles of COMAND can be
found on ( Y page 122).
The contour of the driver's seat and front-
passenger seat backrests can be individually
adjusted to provide optimum support for your
back. This is achieved by controlling the
pressure in the air chambers in the
multicontour seat.
The adjustments are made using the
COMAND display.
i When you adjust the multicontour seat,
you may hear the air being pumped in or
released.
You can adjust the following air cushions:
R seat side bolsters
R seat backrest side bolsters
R backrest curvature in the lumbar region
R backrest curvature in the upper back
region
XMake sure that the SmartKey is in position
2 in the ignition lock.XPress the T function button.
Selecting the seat
You must first select the seat for which you
wish to make adjustments.
XPress the T function button.
The main area is active.XTo move to the lower menu bar: select
by sliding ZVÆ the COMAND controller
and press W to confirm.274VehicleCOMAND
Page 277 of 536
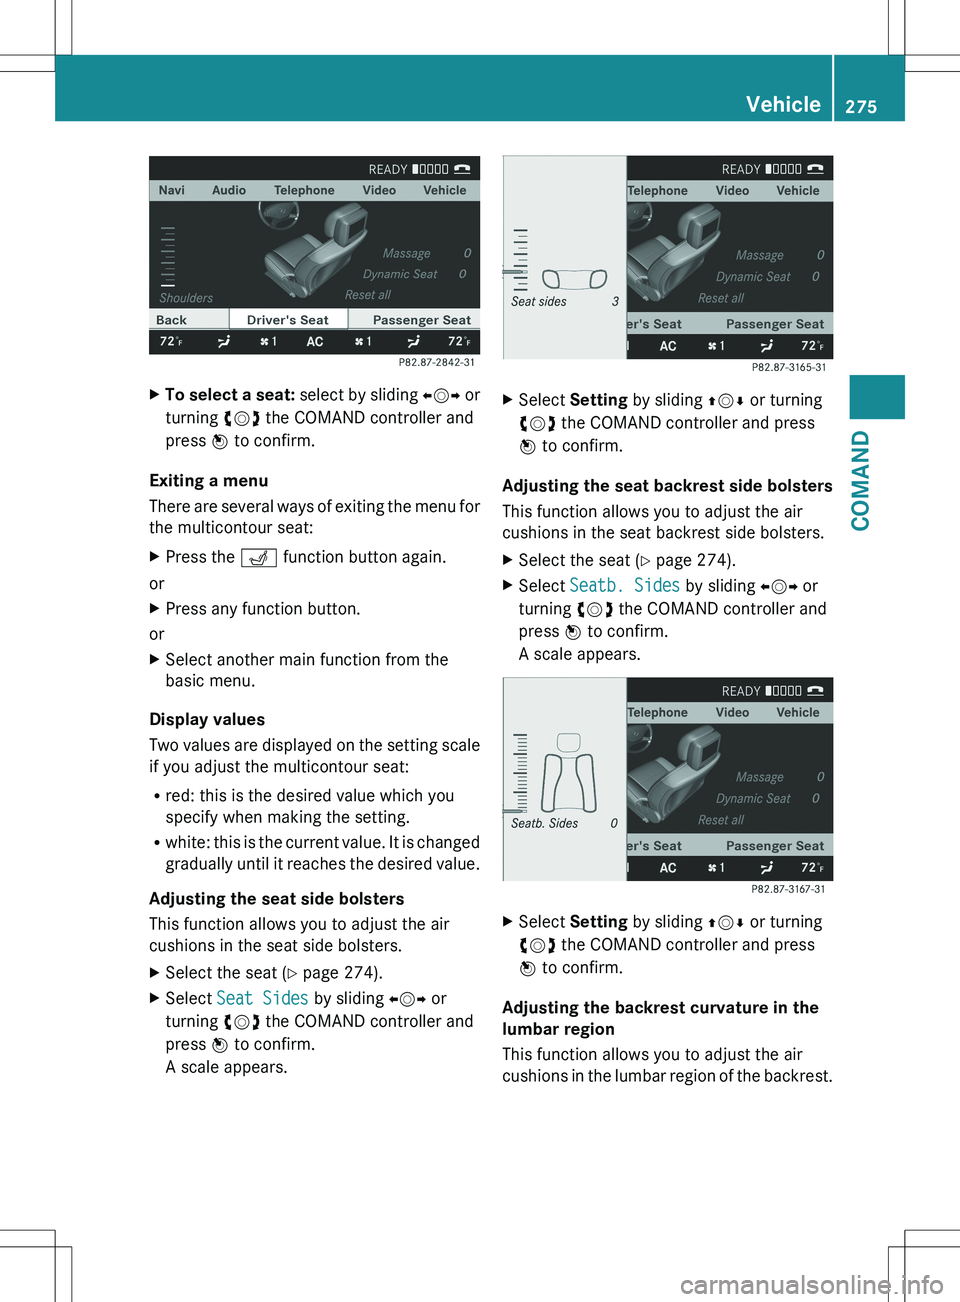
XTo select a seat: select by sliding XVY or
turning cVd the COMAND controller and
press W to confirm.
Exiting a menu
There are several ways of exiting the menu for
the multicontour seat:
XPress the T function button again.
or
XPress any function button.
or
XSelect another main function from the
basic menu.
Display values
Two values are displayed on the setting scale
if you adjust the multicontour seat:
R red: this is the desired value which you
specify when making the setting.
R white: this is the current value. It is changed
gradually until it reaches the desired value.
Adjusting the seat side bolsters
This function allows you to adjust the air
cushions in the seat side bolsters.
XSelect the seat ( Y page 274).XSelect Seat Sides by sliding XVY or
turning cVd the COMAND controller and
press W to confirm.
A scale appears.XSelect Setting by sliding ZVÆ or turning
cVd the COMAND controller and press
W to confirm.
Adjusting the seat backrest side bolsters
This function allows you to adjust the air
cushions in the seat backrest side bolsters.
XSelect the seat ( Y page 274).XSelect Seatb. Sides by sliding XVY or
turning cVd the COMAND controller and
press W to confirm.
A scale appears.XSelect Setting by sliding ZVÆ or turning
cVd the COMAND controller and press
W to confirm.
Adjusting the backrest curvature in the
lumbar region
This function allows you to adjust the air
cushions in the lumbar region of the backrest.
Vehicle275COMANDZ
Page 278 of 536
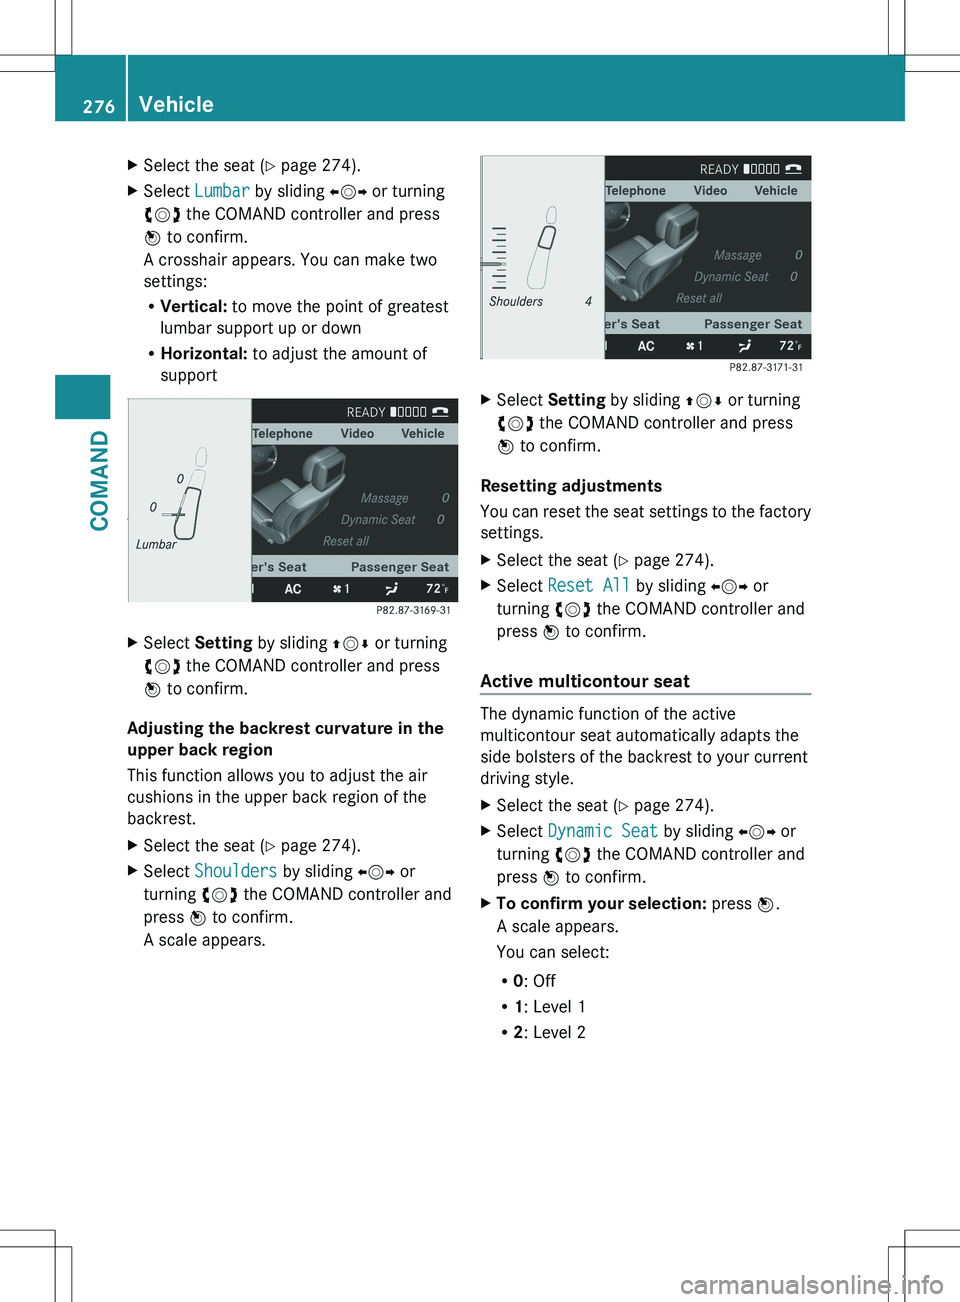
XSelect the seat (Y page 274).XSelect Lumbar by sliding XVY or turning
cVd the COMAND controller and press
W to confirm.
A crosshair appears. You can make two
settings:
R Vertical: to move the point of greatest
lumbar support up or down
R Horizontal: to adjust the amount of
supportXSelect Setting by sliding ZVÆ or turning
cVd the COMAND controller and press
W to confirm.
Adjusting the backrest curvature in the
upper back region
This function allows you to adjust the air
cushions in the upper back region of the
backrest.
XSelect the seat ( Y page 274).XSelect Shoulders by sliding XVY or
turning cVd the COMAND controller and
press W to confirm.
A scale appears.XSelect Setting by sliding ZVÆ or turning
cVd the COMAND controller and press
W to confirm.
Resetting adjustments
You can reset the seat settings to the factory
settings.
XSelect the seat ( Y page 274).XSelect Reset All by sliding XVY or
turning cVd the COMAND controller and
press W to confirm.
Active multicontour seat
The dynamic function of the active
multicontour seat automatically adapts the
side bolsters of the backrest to your current
driving style.
XSelect the seat ( Y page 274).XSelect Dynamic Seat by sliding XVY or
turning cVd the COMAND controller and
press W to confirm.XTo confirm your selection: press W.
A scale appears.
You can select:
R 0: Off
R 1: Level 1
R 2: Level 2276VehicleCOMAND
Page 279 of 536
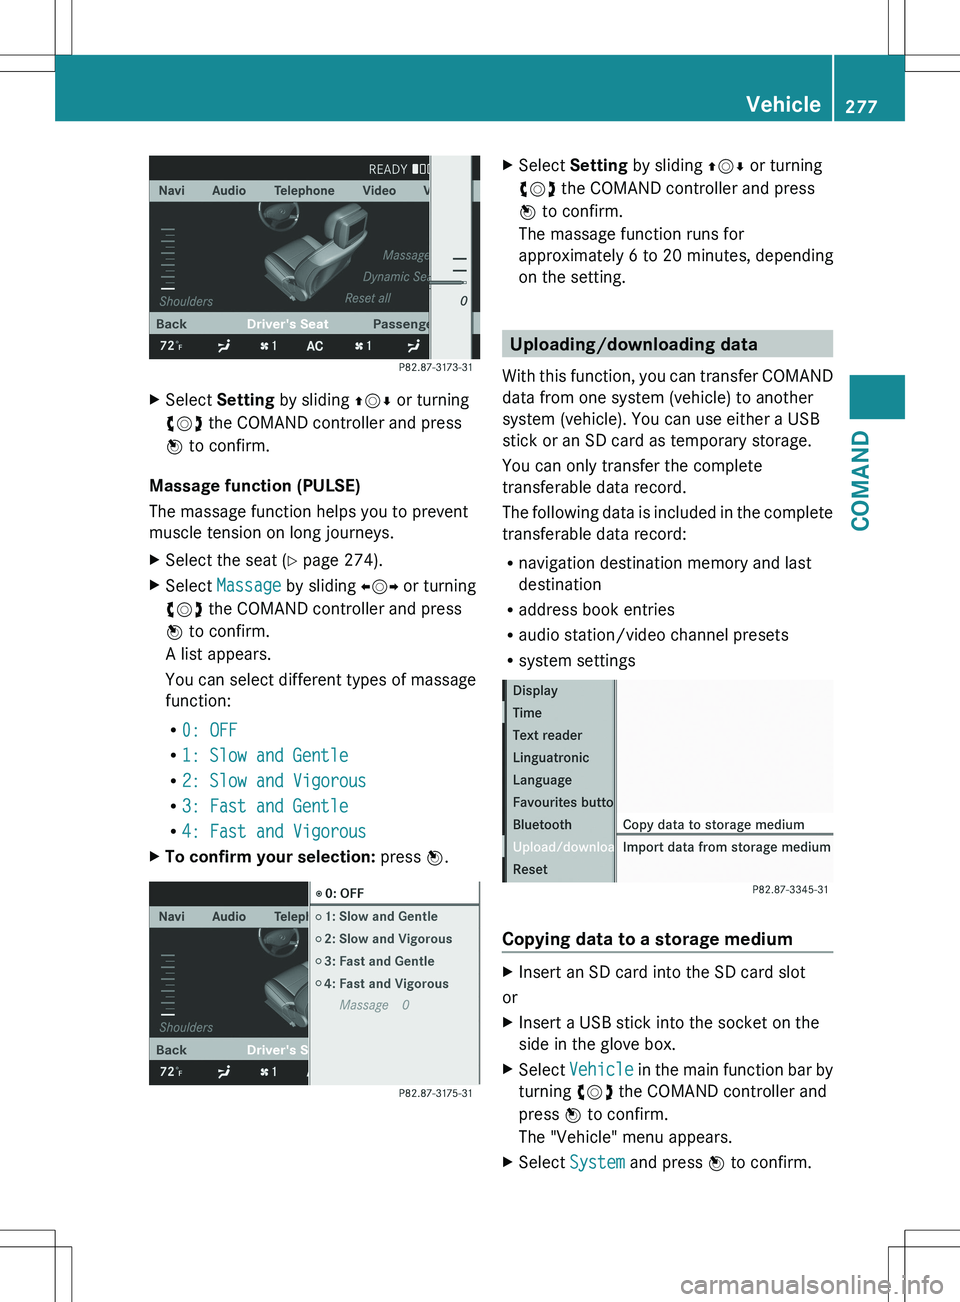
XSelect Setting by sliding ZVÆ or turning
cVd the COMAND controller and press
W to confirm.
Massage function (PULSE)
The massage function helps you to prevent
muscle tension on long journeys.
XSelect the seat ( Y page 274).XSelect Massage by sliding XVY or turning
cVd the COMAND controller and press
W to confirm.
A list appears.
You can select different types of massage
function:
R 0: OFF
R 1: Slow and Gentle
R 2: Slow and Vigorous
R 3: Fast and Gentle
R 4: Fast and VigorousXTo confirm your selection: press W.XSelect Setting by sliding ZVÆ or turning
cVd the COMAND controller and press
W to confirm.
The massage function runs for
approximately 6 to 20 minutes, depending
on the setting.
Uploading/downloading data
With this function, you can transfer COMAND
data from one system (vehicle) to another
system (vehicle). You can use either a USB
stick or an SD card as temporary storage.
You can only transfer the complete
transferable data record.
The following data is included in the complete
transferable data record:
R navigation destination memory and last
destination
R address book entries
R audio station/video channel presets
R system settings
Copying data to a storage medium
XInsert an SD card into the SD card slot
or
XInsert a USB stick into the socket on the
side in the glove box.XSelect Vehicle in the main function bar by
turning cVd the COMAND controller and
press W to confirm.
The "Vehicle" menu appears.XSelect System and press W to confirm.Vehicle277COMANDZ
Page 280 of 536
XSelect Upload/Download Data and press
W to confirm.XSelect Copy Data to Storage Medium
and press W to confirm.XSelect the storage medium to which the
data should be copied.XSelect Start Copying .
COMAND checks whether the storage
medium has enough storage capacity. If
there is enough storage capacity, the data
is copied to the storage medium.XIf there is not enough storage capacity,
remove the storage medium. Make more
storage space available on the storage
medium. Then, try to copy the COMAND
data to the storage medium again.XRemove the storage medium.
Transferring data to another system
(vehicle)
XInsert/connect the storage medium (SD
card or USB stick) with the saved data into/
to the relevant interface.XSelect Vehicle in the main function bar by
turning cVd the COMAND controller and
press W to confirm.
The "Vehicle" menu appears.XSelect System and press W to confirm.XSelect Upload/Download Data and press
W to confirm.XSelect Import Data from Storage
Medium and press W to confirm.XSelect Start Data Import .
A prompt appears, asking whether the
COMAND data should be overwritten.XPress Yes to confirm that the data saved in
COMAND should be overwritten.
COMAND imports the data and restarts the
system.
or
XPress No to cancel the import process.278VehicleCOMAND