headlamp MERCEDES-BENZ SPRINTER 2015 MY15 Operator’s Manual
[x] Cancel search | Manufacturer: MERCEDES-BENZ, Model Year: 2015, Model line: SPRINTER, Model: MERCEDES-BENZ SPRINTER 2015Pages: 334, PDF Size: 5.94 MB
Page 96 of 334
i
If your vehicle is only equipped with one
rear fog lamp, you must turn the light
switch to 0058.
i When the light switch is set to
0058, you
cannot switch on the front or rear fog
lamps.
X To switch on the front fog lamps: pull the
light switch out to the first locking point.
The green 005Aindicator lamp on the light
switch lights up.
X To switch on the rear fog lamp: pull the
light switch out to the second locking point.
The yellow 005Eindicator lamp on the light
switch lights up.
X To switch off the front fog lamps/rear
fog lamp: push in the light switch to the
stop.
The 005E and005A indicator lamp on the
light switch go out. Combination switch
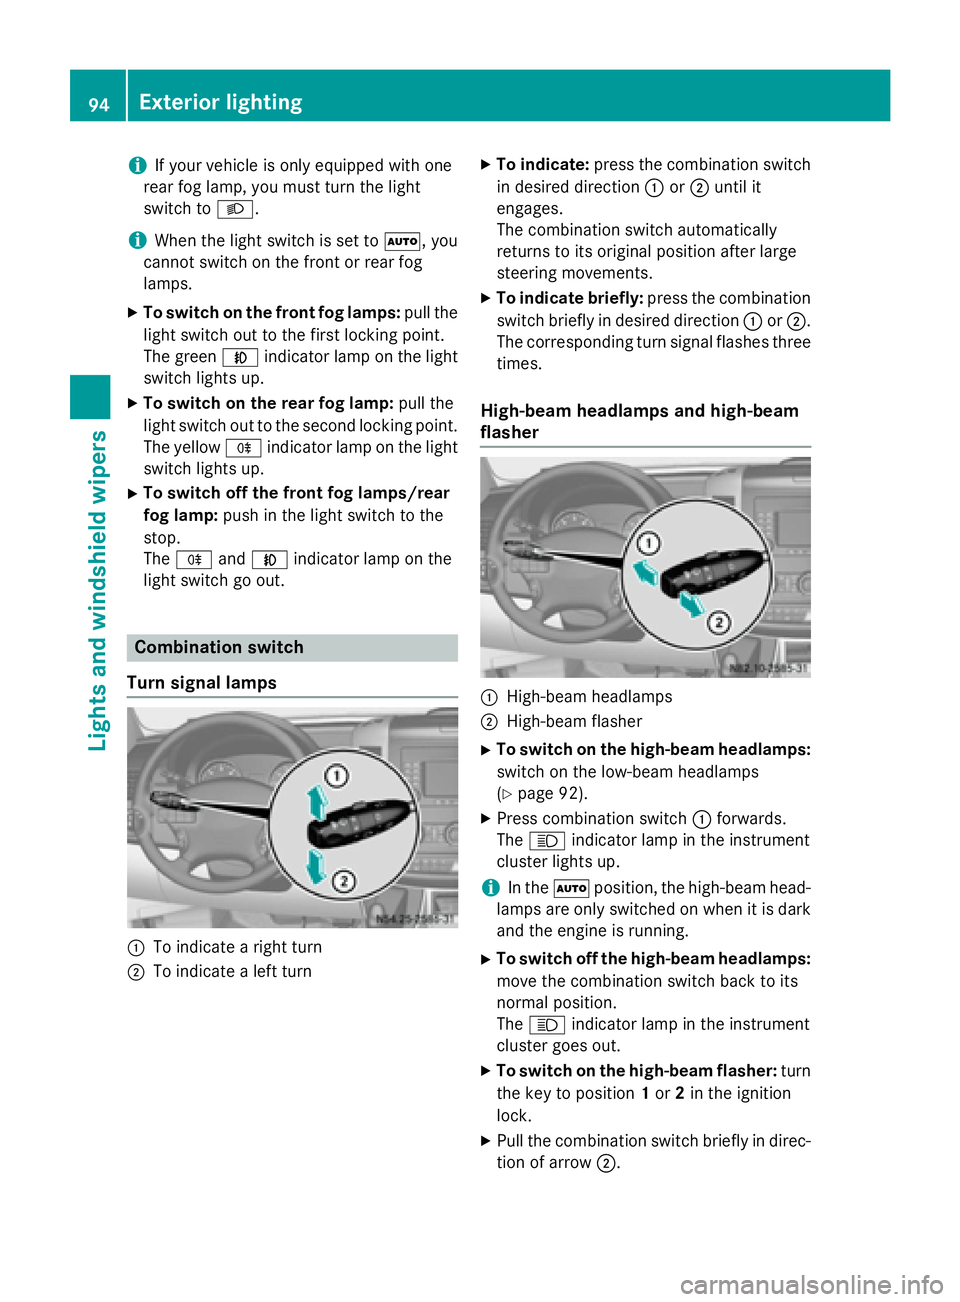
Turn signal lamps 0043
To indicate a right turn
0044 To indicate a left turn X
To indicate: press the combination switch
in desired direction 0043or0044 until it
engages.
The combination switch automatically
returns to its original position after large
steering movements.
X To indicate briefly: press the combination
switch briefly in desired direction 0043or0044.
The corresponding turn signal flashes three
times.
High-beam headlamps and high-beam
flasher 0043
High-beam headlamps
0044 High-beam flasher
X To switch on the high-beam headlamps:
switch on the low-beam headlamps
(Y page 92).
X Press combination switch 0043forwards.
The 0057 indicator lamp in the instrument
cluster lights up.
i In the
0058position, the high-beam head-
lamps are only switched on when it is dark
and the engine is running.
X To switch off the high-beam headlamps:
move the combination switch back to its
normal position.
The 0057 indicator lamp in the instrument
cluster goes out.
X To switch on the high-beam flasher: turn
the key to position 1or 2in the ignition
lock.
X Pull the combination switch briefly in direc-
tion of arrow 0044.94
Exterior lightingLights and windshield wipers
Page 97 of 334
Cornering lamps
The cornering lamps improve the illumination of the road over a wide angle in the direction
you are turning, enabling better visibility in
tight bends, for example.
The cornering light function switches on
automatically, if:
R you are traveling at a speed of less than
25 mph (40 km/h) and you switch on a turn signal or turn the steering wheel.
R you are traveling at a speed between
25 mph (40 km/ h)and 43 mph (70 km/h)
and turn the steering wheel.
The cornering lamp may remain lit for a short
time, but is automatically switched off after
no more than 3 minutes.
i If reverse gear is engaged the lamp on the
opposite side of the vehicle switches on
instead. Hazard warning lamps
G
WARNING
The rear exterior light will be covered if you:
R open the rear doors by 90°
R open the rear dropside.
The vehicle will then be difficult for other road users to see or will not be seen by them at all,
particularly if it is dark or visibility is poor.
There is a risk of an accident.
You should therefore ensure in this and simi-
lar situations that the vehicle is visible from
the rear in accordance with the relevant
national regulations, by using the warning tri- angle, for instance. Hazard warning lamp switch
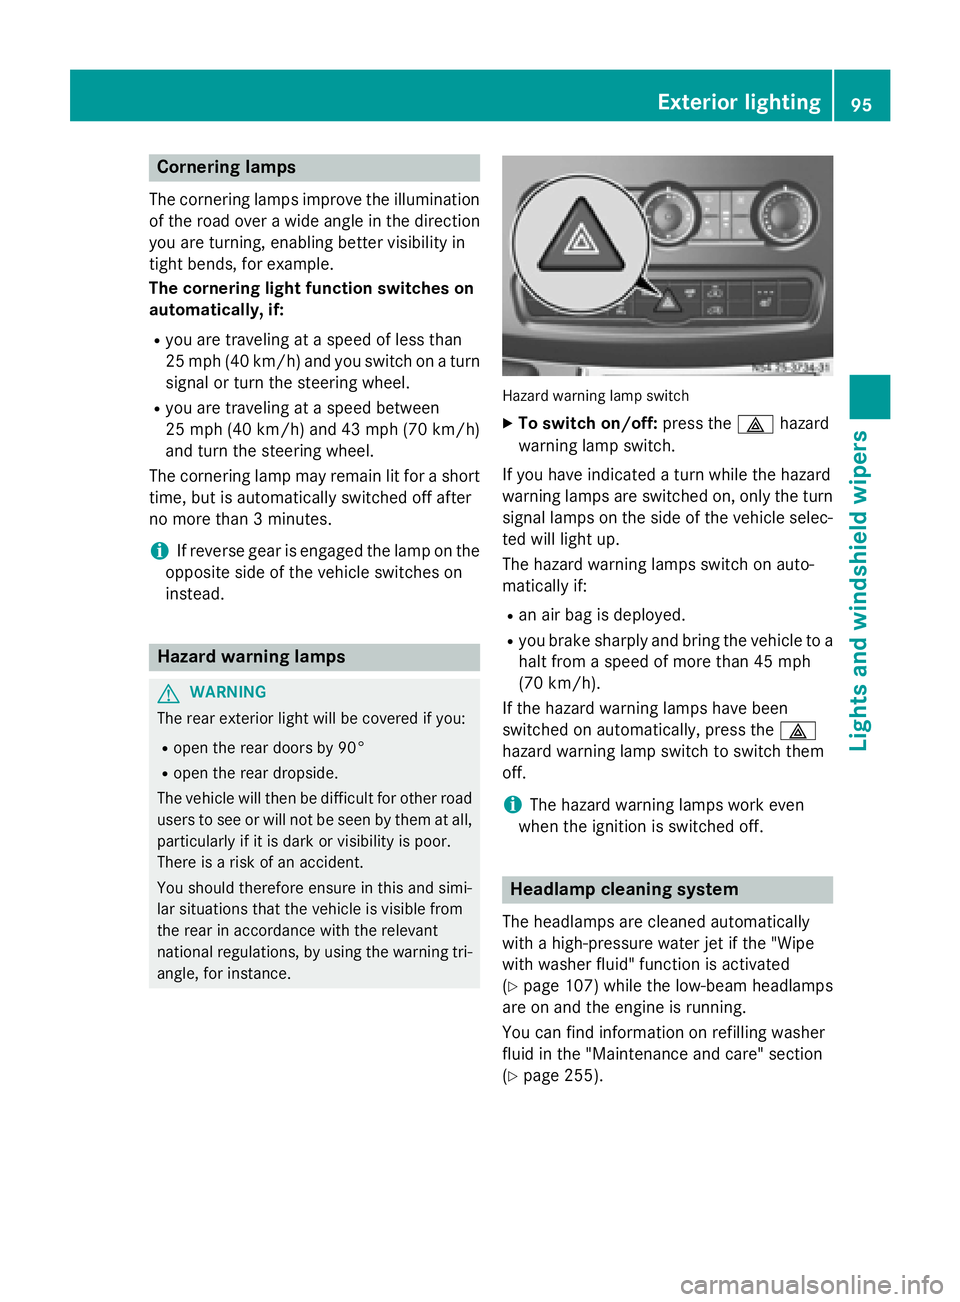
X
To switch on/off: press the002Fhazard
warning lamp switch.
If you have indicated a turn while the hazard
warning lamps are switched on, only the turn signal lamps on the side of the vehicle selec- ted will light up.
The hazard warning lamps switch on auto-
matically if:
R an air bag is deployed.
R you brake sharply and bring the vehicle to a
halt from a speed of more than 45 mph
(70 km/h).
If the hazard warning lamps have been
switched on automatically, press the 002F
hazard warning lamp switch to switch them
off.
i The hazard warning lamps work even
when the ignition is switched off. Headlamp cleaning system
The headlamps are cleaned automatically
with a high-pressure water jet if the "Wipe
with washer fluid" function is activated
(Y page 107) while the low-beam headlamps
are on and the engine is running.
You can find information on refilling washer
fluid in the "Maintenance and care" section
(Y page 255). Exterior lighting
95Lights and windshield wipers Z
Page 98 of 334
Highbeam Assist
General notes You can use this function to set the head-
lamps to change between low beam and high beam automatically. The system recognizes
vehicles with their lights on, either approach-
ing from the opposite direction or traveling in front of your vehicle, and consequently
switches the headlamps from high beam to
low beam.
Once the system no longer detects any other
vehicles, it reactivates the high-beam head-
lamps.
The system's optical sensor is located behind the windshield near the overhead control
panel.
Important safety notes G
WARNING
Highbeam Assist does not recognize road
users:
R who have no lights, e.g. pedestrians
R who have poor lighting, e.g. cyclists
R whose lighting is blocked, e.g. by a barrier
In very rare cases, Highbeam Assist may fail to
recognize other road users who have lights, or
may recognize them too late. In this or similar situations, the automatic high-beam head-
lamps will not be deactivated or will be acti-
vated regardless. There is a risk of an acci-
dent.
Always carefully observe the traffic conditions and switch off the high-beam headlamps in
good time.
Highbeam Assist cannot take into account
road, weather or traffic conditions. Highbeam Assist is only an aid. You are responsible for
adjusting the vehicle's lighting to the prevail-
ing light, visibility and traffic conditions. In particular, the detection of obstacles can
be restricted if there is:
R poor visibility, e.g. due to fog, heavy rain or
snow
R dirt on the sensors or anything else cover-
ing the sensors
Activating/deactivating Highbeam
Assist X
To activate: switch on the Highbeam
Assist function using the on-board com-
puter (Y page 192).
X Turn the light switch to the 0058position.
X Press the combination switch beyond the
pressure point in the direction of arrow 0043
(Y page 94).
Highbeam Assist is active.
The 00CE or indicator lamp in the
multifunction display lights up when it is
dark and the light sensor activates the low-
beam headlamps.
If you are driving at speeds above approx-
imately 22 mph (35 km/h) and no other
road users have been detected:
The high-beam headlamps are switched on
automatically. The 0057indicator lamp in
the instrument cluster also lights up.
If you are driving at speeds below approx-
imately 19 mph (30 km/h), other road
users are recognized or the roads are ade-
quately lit:
The high-beam headlamps are switched off automatically. The 0057indicator lamp in
the instrument cluster goes out. The 00CE
or indicator lamp in the multifunc-
tion display remains lit.
X To deactivate: move the combination
switch back to its normal position or move the light switch to another position.
The 00CE or indicator lamp in the
multifunction display goes out. 96
Exterior lightingLights and windshield wipers
Page 99 of 334
Headlamps fogged up on the inside
The headlamps may fog up on the inside if
there is high atmospheric humidity.
X Switch on the low-beam headlamps and
drive off.
The level of moisture diminishes, depend-
ing on the length of the journey and the
weather conditions (humidity and temper-
ature).
If the level of moisture does not diminish:
X Have the headlamps checked at a qualified
specialist workshop. Interior lighting
Switching the dashboard lighting on/
off
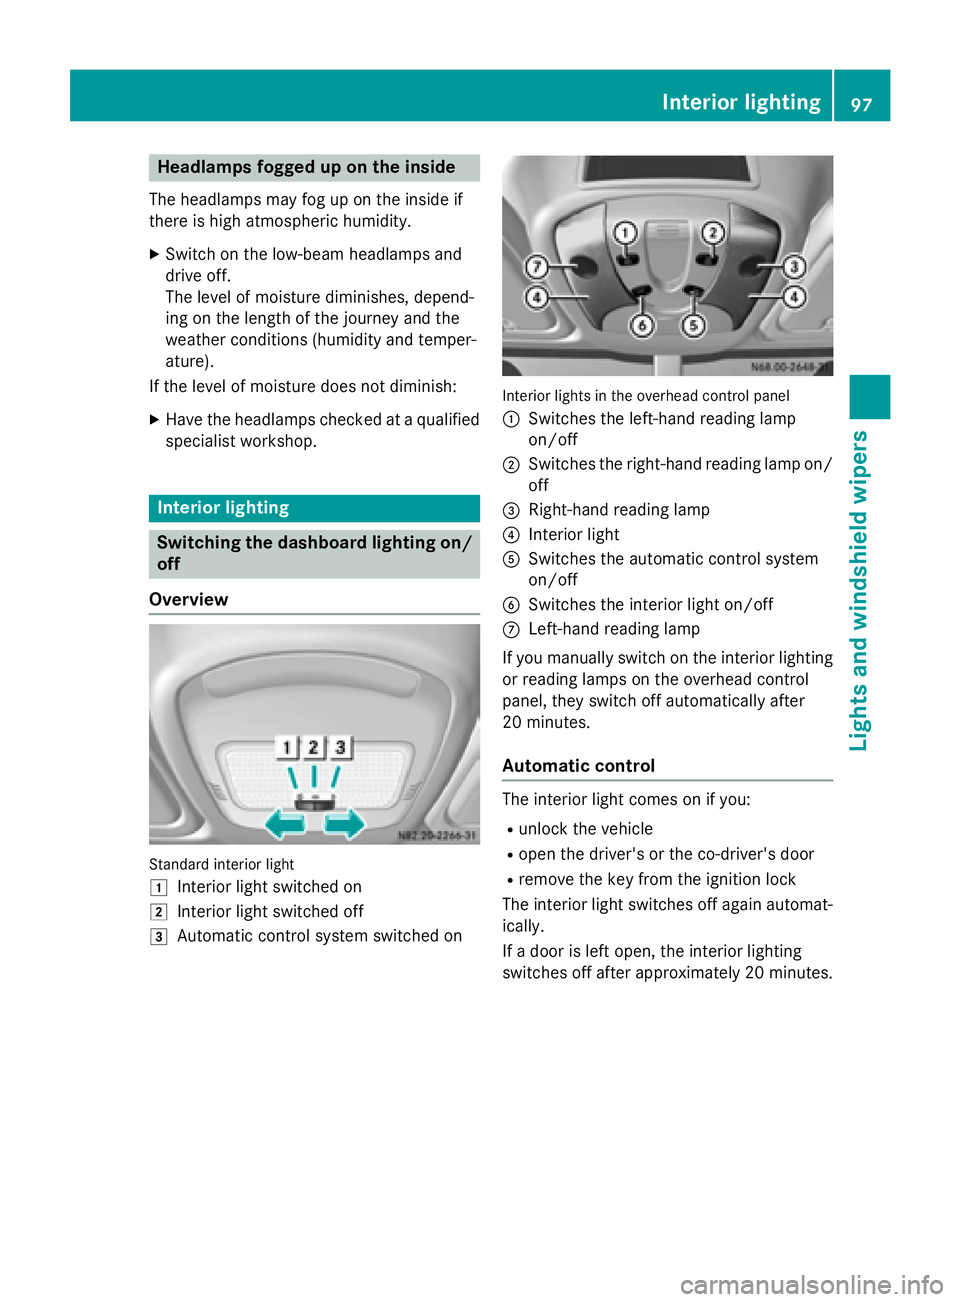
Overview Standard interior light
0047 Interior light switched on
0048 Interior light switched off
0049 Automatic control system switched on Interior lights in the overhead control panel
0043
Switches the left-hand reading lamp
on/off
0044 Switches the right-hand reading lamp on/
off
0087 Right-hand reading lamp
0085 Interior light
0083 Switches the automatic control system
on/off
0084 Switches the interior light on/off
006B Left-hand reading lamp
If you manually switch on the interior lighting
or reading lamps on the overhead control
panel, they switch off automatically after
20 minutes.
Automatic control The interior light comes on if you:
R unlock the vehicle
R open the driver's or the co-driver's door
R remove the key from the ignition lock
The interior light switches off again automat- ically.
If a door is left open, the interior lighting
switches off after approximately 20 minutes. Interior lighting
97Lights and windshield wipers Z
Page 101 of 334
Motion detector
G
WARNING
The motion detector sends the invisible infra- red radiation emitted by LEDs (light emitting
diodes).
These LEDs are classified as class 1M lasers
and can damage the retina if you:
R look directly into the unfiltered laser beam
of the motion detector for an extended
period
R look directly into the laser beam of the
motion detector using optical instruments,
e.g. eyeglasses or a magnifying glass.
There is a risk of injury.
Never look directly into the motion detector.
The cargo compartment lighting is also
switched on by the motion detector in the
cargo compartment of Cargo Vans equipped
with this feature.
If the motion detector detects a movement in the cargo compartment when the vehicle is
stationary, the cargo compartment lighting
switches on for approximately two minutes.
The cargo compartment lighting can be
switched on by the motion detector within
four seconds if:
R the rear interior light switch (Y page 98) is
set to automatic control.
R the vehicle is stationary, the parking brake
is applied and the brake pedal is not being
depressed
Or
R the selector lever is in position Pon vehi-
cles with automatic transmission and the
brake pedal is not being depressed and
R the vehicle has not been locked from the
outside using the key
The motion detector switches off automati-
cally if no change is detected in the vehicle for
several hours, e.g. if a door is opened, if the
ignition key is turned, etc. This prevents the
battery from becoming discharged. Changing bulbs
Important safety notes
G
DANGER
Xenon bulbs carry a high voltage. You can get an electric shock if you remove the cover of
the Xenon bulb and touch the electrical con-
tacts. There is a risk of fatal injury.
Never touch the parts or the electrical con-
tacts of the Xenon bulb. Always have work on
the Xenon bulbs carried out at a qualified spe-
cialist workshop. G
WARNING
Bulbs, lamps and connectors can get very hot when operating. If you change a bulb, you
could burn yourself on these components.
There is a risk of injury.
Allow these components to cool down before changing a bulb.
! Make sure the bulbs are always securely
installed.
If your vehicle is equipped with Bi-Xenon
bulbs, you can recognize this by the following: the cone of light from the Xenon bulbs moves
from the top to the bottom and back again
when you start the engine. For this to be
observed, the low-beam headlamps must be
switched on before starting the engine.
The bulbs and lamps are an essential compo- nent of vehicle safety. You must therefore
make sure that these function correctly at all
times. Have the headlamp setting checked
regularly.
R Always switch off the vehicle's lighting sys-
tem before changing a bulb.
This will prevent a short circuit.
R Do not touch the glass tube of new bulbs
with your bare hands. Always use a clean,
lint-free cloth or only touch the base of the bulb when installing.
Even minor contamination can burn into
the glass surface and reduce the service life
of the bulbs. Changing bulbs
99Lights and windshield wipers Z
Page 102 of 334
R
Do not use a bulb that has been dropped or
that has scratches on its glass tube.
The bulb could explode.
R Only use bulbs in closed lamps which have
been designed for this purpose.
R Only use spare bulbs of the same type and
with the prescribed voltage
R Protect the bulbs from moisture when in
use.
If the new bulb still does not light up, consult a qualified specialist workshop.
R Have the LEDs and bulbs of the following
lamps changed at a qualified specialist
workshop:
- the additional turn signals in the exterior
mirrors
- the high-mounted brake lamp
- LED daytime running lamps (Bi-Xenon
headlamps)
- Bi-Xenon lamps (Bi-Xenon headlamps)
- front fog lamps
If you require assistance changing bulbs, con-
sult a qualified specialist workshop. Front bulbs
Overview of bulb replacement – bulb
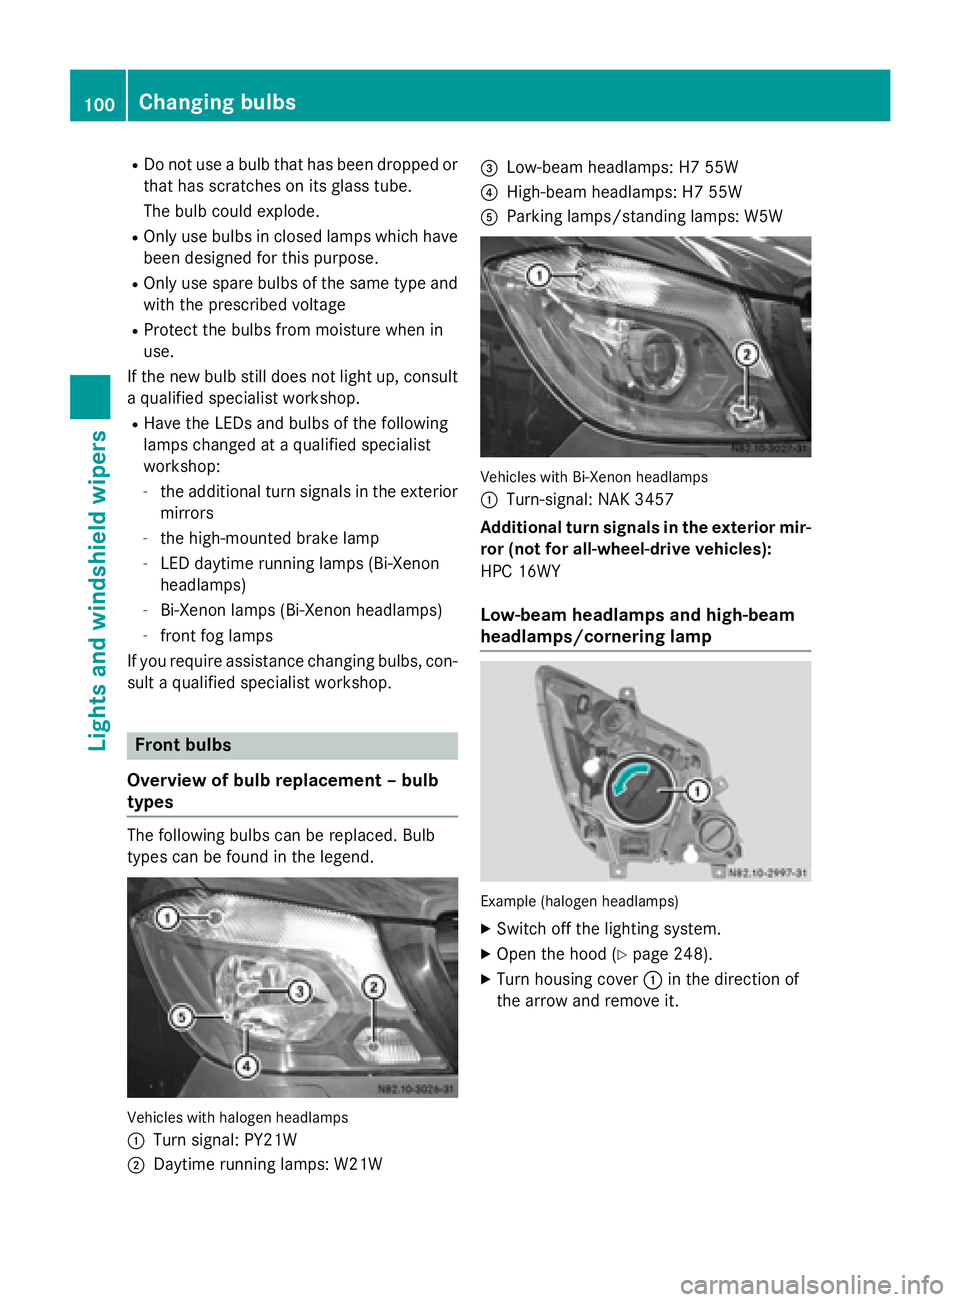
types The following bulbs can be replaced. Bulb
types can be found in the legend. Vehicles with halogen headlamps
0043
Turn signal: PY21W
0044 Daytime running lamps: W21W 0087
Low-beam headlamps: H7 55W
0085 High-beam headlamps: H7 55W
0083 Parking lamps/standing lamps: W5W Vehicles with Bi-Xenon headlamps
0043
Turn-signal: NAK 3457
Additional turn signals in the exterior mir-
ror (not for all-wheel-drive vehicles):
HPC 16WY
Low-beam headlamps and high-beam
headlamps/cornering lamp Example (halogen headlamps)
X Switch off the lighting system.
X Open the hood (Y page 248).
X Turn housing cover 0043in the direction of
the arrow and remove it. 100
Changing bulbsLights and
windshield wipers
Page 103 of 334
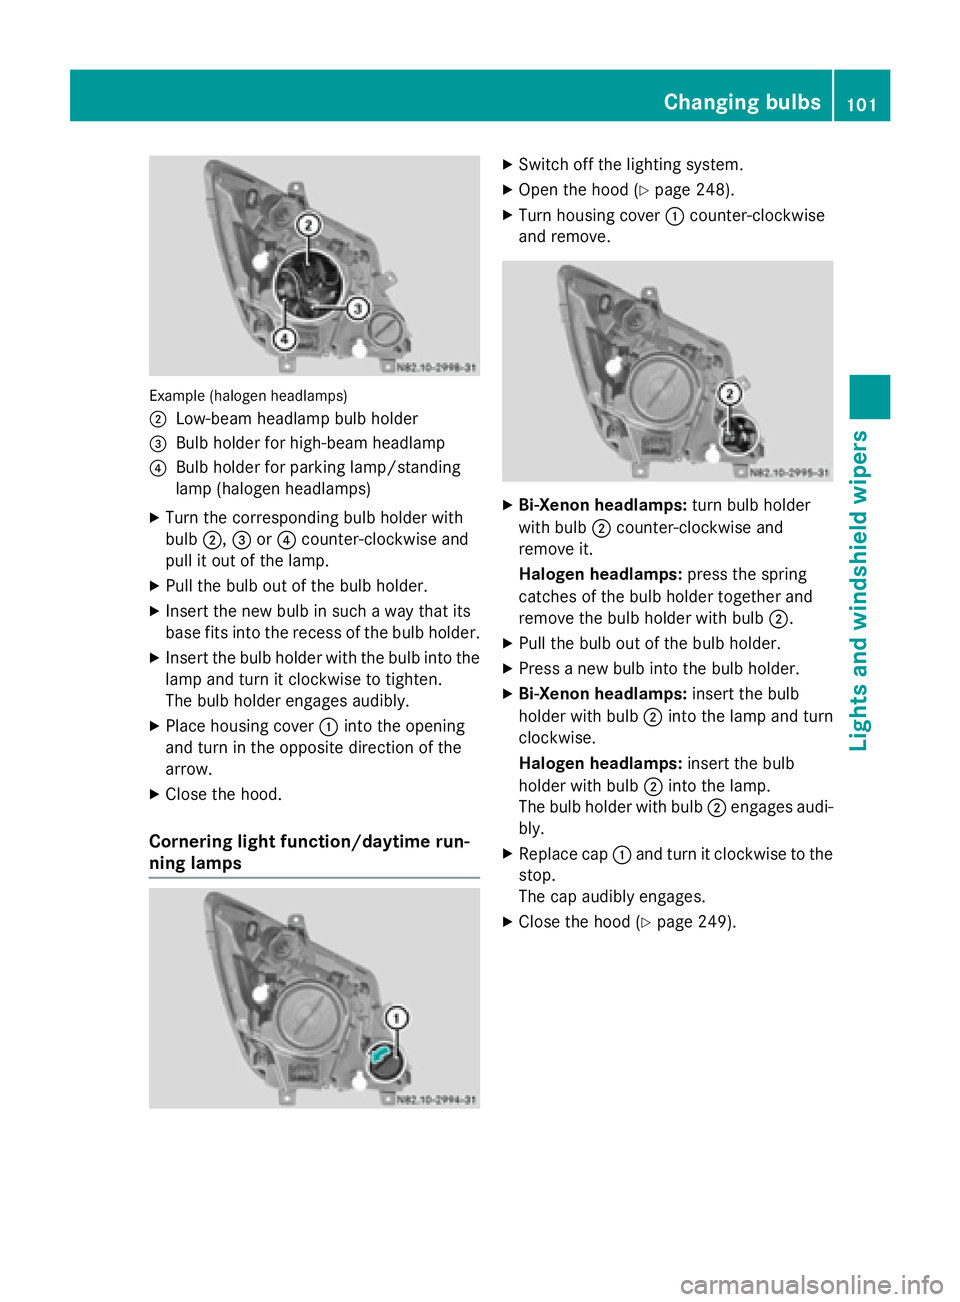
Example (halogen headlamps)
0044
Low-beam headlamp bulb holder
0087 Bulb holder for high-beam headlamp
0085 Bulb holder for parking lamp/standing
lamp (halogen headlamps)
X Turn the corresponding bulb holder with
bulb 0044,0087or0085 counter-clockwise and
pull it out of the lamp.
X Pull the bulb out of the bulb holder.
X Insert the new bulb in such a way that its
base fits into the recess of the bulb holder.
X Insert the bulb holder with the bulb into the
lamp and turn it clockwise to tighten.
The bulb holder engages audibly.
X Place housing cover 0043into the opening
and turn in the opposite direction of the
arrow.
X Close the hood.
Cornering light function/daytime run-
ning lamps X
Switch off the lighting system.
X Open the hood (Y page 248).
X Turn housing cover 0043counter-clockwise
and remove. X
Bi-Xenon headlamps: turn bulb holder
with bulb 0044counter-clockwise and
remove it.
Halogen headlamps: press the spring
catches of the bulb holder together and
remove the bulb holder with bulb 0044.
X Pull the bulb out of the bulb holder.
X Press a new bulb into the bulb holder.
X Bi-Xenon headlamps: insert the bulb
holder with bulb 0044into the lamp and turn
clockwise.
Halogen headlamps: insert the bulb
holder with bulb 0044into the lamp.
The bulb holder with bulb 0044engages audi-
bly.
X Replace cap 0043and turn it clockwise to the
stop.
The cap audibly engages.
X Close the hood (Y page 249). Changing bulbs
101Lights andwindshield wipers Z
Page 155 of 334
cific maintenance work must be carried out at
regular intervals and in accordance with the
service requirements of the dealer listed here
on the inside title page. Details can be found
in the Maintenance Booklet. Short journey
! If the vehicle is predominantly used for
short-distance driving or is stationary for
long periods, this could lead to a malfunc-
tion in the automatic cleaning function for
the diesel particle filter. This can lead to
blockage of the diesel particle filter. This
can also result in fuel collecting in the
engine oil and cause engine failure.
Therefore, if you mainly drive short distances,
drive on a highway or an inter-urban road for
20 minutes every 300 miles (500 km). This
facilitates the diesel particle filter's burn-off
process. Speed limiter
G
WARNING
Exceeding the stated tire load-bearing capa-
city and the approved maximum speed could
lead to tire damage or the tire bursting. There is a risk of accident.
Therefore, only use tire types and sizes
approved for your vehicle model. Observe the
tire load rating and speed rating required for
your vehicle.
As the driver, you must find out about the
maximum speed of the vehicle and the result-
ing permissible maximum speed of the tires
(tire and tire pressure). In particular, also
observe the tire approval regulations for each
country.
You must not exceed the speed limit for the
tires listed in the tire pressure tables. You can find information on tire pressures in the
"Wheels and tires" section (Y page 288).You can permanently limit the maximum
speed of your vehicle to 55 mph (90 km/h),
60 mph (100 km/h) or 75 mph (120 km/h).
We recommend that you use an authorized
Sprinter Dealer for the programming of the
maximum speed.
Before overtaking, take into consideration
that the engine speed limiter prevents the
speed increasing beyond the programmed
maximum speed. Driving abroad
Service An extensive network of authorized Sprinter
Dealers is also at your disposal when you are
traveling abroad. Nevertheless, please bear in
mind that service facilities or replacement
parts may not always be immediately availa-
ble. You can obtain a list of workshops at any
authorized Sprinter Dealer.
Fuel In some countries, only fuels with a higher
sulfur content are available.
Unsuitable fuel can cause engine damage.
Information on fuel (Y page 318).
Low-beam headlamps If you are traveling in countries where vehi-
cles are driven on the opposite side of the
road to that in which the vehicle is registered,
you will need to:
R have the halogen headlamps partially
masked
R have the Bi-Xenon headlamps set to sym-
metrical low beam
This prevents glare to oncoming traffic and no
longer illuminates the edge of the road to the same height and distance.
Have the headlamps masked or adjusted at a qualified specialist workshop before you
cross the border, but as close to it as possi-
ble. Driving tips
153Driving and parking Z
Page 156 of 334
When you return from your journey, and as
close to the border as possible, you will need
to:
R remove the adhesive surfaces from your
halogen headlamps and clean the glass of
the headlamps if necessary
R have the Bi-Xenon headlamps reset to
asymmetrical low beam at a qualified spe-
cialist workshop Transport by rail
Transporting your vehicle by rail may be sub-
ject to certain restrictions or require special
measures to be taken in some countries due
to varying tunnel heights and loading stand-
ards.
You can obtain further information from any
authorized Sprinter dealer. Braking
Important safety notes G
WARNING
If you shift down on a slippery road surface in an attempt to increase the engine's braking
effect, the drive wheels could lose their grip.
There is an increased danger of skidding and
accidents.
Do not shift down for additional engine brak-
ing on a slippery road surface. G
WARNING
If you rest your foot on the brake pedal while
driving, the braking system can overheat. This increases the stopping distance and can even
cause the braking system to fail. There is a
risk of an accident.
Never use the brake pedal as a footrest. Never
depress the brake pedal and the accelerator
pedal at the same time.
! Depressing the brake pedal constantly
results in excessive and premature wear to
the brake pads. Downhill gradients !
Depressing the brake pedal constantly
results in excessive and premature wear to
the brake pads.
On long and steep downhill gradients, you
should change down to shift range 0048or0047
in good time. This should be observed in par- ticular when driving with a laden vehicle and
when towing a trailer.
i You must also change the shift range in
good time when cruise control is switched
on.
You thereby make use of the braking effect of the engine and do not have to brake as oftento maintain the speed. This relieves the load
on the service brake and prevents the brakes
from overheating and wearing too quickly.
Heavy and light loads G
WARNING
If you rest your foot on the brake pedal while
driving, the braking system can overheat. This increases the stopping distance and can even
cause the braking system to fail. There is a
risk of an accident.
Never use the brake pedal as a footrest. Never
depress the brake pedal and the accelerator
pedal at the same time.
! Depressing the brake pedal constantly
results in excessive and premature wear to
the brake pads.
If the brakes have been subjected to a heavy load, do not stop the vehicle immediately.
Drive on for a short while. The brakes are
cooled down more quickly in the airflow.
Wet road surfaces If you have been driving for a long time in
heavy rain without braking, there may be a
delayed response when you first apply the
brakes. This may also occur after driving
through a car wash or deep water. 154
Driving tipsDriving and parking
Page 160 of 334
cable and a folding spade are carried in the
vehicle.
X Wheels and tires: check the tire tread
depth (Y page 285) and tire pressure
(Y page 288).
Rules for driving off-road !
Always bear the vehicle's ground clear-
ance in mind and avoid obstacles, e.g. deep ruts.
Obstacles may damage the following parts
of the vehicle:
R the chassis
R the drive train
R the fuel and supply tanks
For this reason, you should always drive
slowly when driving off-road. If you have to drive over obstacles, have the co-driver
direct you.
i We recommend that you additionally
carry a shovel and a recovery rope with
shackle in the vehicle.
R Ensure that loads and items of luggage are
securely stowed or lashed down
(Y page 240).
R Before driving off-road, stop the vehicle and
shift to a low gear.
R If the surface demands it, temporarily deac-
tivate ASR when pulling away (Y page 58).
R Only drive off-road with the engine running
and a gear engaged.
R Drive slowly and smoothly. Walking pace is
necessary in many situations.
R Avoid spinning the drive wheels.
R Make sure that the wheels always remain in
contact with the ground.
R Drive with extreme care over unknown ter-
rain where you can only see for a short dis-
tance. As a precaution, get out of the vehi-
cle to take a look at the route to be taken in
advance.
R Check the water depth before fording. R
Watch out for obstacles (e.g. rocks, holes,
tree stumps and ruts).
R Avoid edges where the surface could crum-
ble or break away.
Checklist after driving off-road !
If you detect damage to the vehicle after
driving off-road, have the vehicle checked
immediately at a qualified specialist work-
shop.
Off-road driving places a higher demand on
your vehicle than normal road operation.
Check your vehicle after driving on rough ter- rain. By doing so you will notice any damage in
good time and reduce the risk of an accident for yourself and other road users. Clean your
vehicle thoroughly before driving on public
roads.
Observe the following points after driving off-
road, on construction sites and before driving on public roads:
X Activate ASR (Y page 58).
X Clean the headlamps and tail lamps and
check them for damage.
X Clean the front and rear license plates.
X Clean the windshield, windows and exterior
mirrors.
X Clean the steps, door sills and grab han-
dles.
This increases safety of footing.
X Clean the wheels/tires, wheel housings
and the underbody of the vehicle with a
water jet.
This increases road grip, especially on wet
road surfaces.
X Check the wheels/tires and wheel hous-
ings for trapped foreign objects and
remove them.
Trapped foreign objects can damage the
wheels/tires and may be flung out from the
vehicle when you continue driving.
X Check the underbody for trapped branches
or other parts of plants and remove them.
Trapped branches or other parts of plants
increase the risk of fire and can cause dam- 158
Driving tipsDriving and parking