MERCEDES-BENZ SPRINTER 2015 MY15 Operator’s Manual
Manufacturer: MERCEDES-BENZ, Model Year: 2015, Model line: SPRINTER, Model: MERCEDES-BENZ SPRINTER 2015Pages: 334, PDF Size: 5.94 MB
Page 61 of 334
If you deactivate ASR:
R engine torque is not limited and the drive
wheels are able to spin. The spinning
wheels will then achieve a cutting effect for
better traction.
R traction control remains active through
brake intervention. If a drive wheel attains
its tire traction limit because one side of the
road is slippery, for example, that wheel is
braked. The traction is then increased in
this situation.
R active brake intervention by ESP ®
to
increase driving stability remains active.
The 0072 warning lamp in the instrument
cluster flashes when ESP ®
is intervening. BAS (Brake Assist System)
G
WARNING
If BAS is malfunctioning, the braking distance
in an emergency braking situation is
increased. There is a risk of an accident.
In an emergency braking situation, depress
the brake pedal with full force. ABS prevents
the wheels from locking.
Vehicles without steering wheel buttons: if
the BAS driving safety system is malfunction-
ing, the 003Dwarning lamp lights up while the
engine is running (Y page 218).
BAS operates in emergency braking situa-
tions. If you depress the brake quickly, BAS
automatically increases the brake pressure,
thereby reducing the stopping distance.
The brakes will function as usual once you
release the brake pedal. BAS is deactivated. EBD (electronic brake force distribu-
tion) G
WARNING
If EBD is malfunctioning, the rear wheels can
lock, e.g. under full braking. This increases the risk of skidding and an accident. You should therefore adapt your driving style
to the different handling characteristics. Have
the brake system checked at a qualified spe-
cialist workshop.
EBD monitors and controls the brake pres-
sure to the rear wheels. This enables EBD to
improve handling during braking.
Observe the information on warning and indi- cator lamps (Y page 218). ESP
®
(Electronic Stability Program)
Important safety notes Observe the important safety guidelines for
the driving safety system (Y
page 57). G
WARNING
If ESP ®
is malfunctioning it will not provide
any vehicle stabilization. There is an increased
risk of skidding or of an accident.
Exercise caution when continuing to drive.
Have ESP ®
checked at a qualified specialist
workshop.
! Do not run the vehicle on a roller dyna-
mometer (e.g. for performance tests). If
you must operate the vehicle on a roller
dynamometer, please consult a qualified
specialist workshop in advance. You could
otherwise damage the drive train or the
brake system.
If ESP ®
is malfunctioning, the 0089warning
lamp lights up while the engine is running and
the engine power may be reduced
(Y page 218).
Only use wheels with the recommended tire
sizes. Only then will ESP ®
function properly.
Crosswind Assist Crosswind Assist does not work if ESP
®
is
deactivated or disabled because of a mal-
function. Driving safety systems
59Safety Z
Page 62 of 334
Crosswind Assist does not react:
R in the event of severe jolts and vibrations,
e.g. as a result of uneven surfaces or pot-
holes
R if the vehicle loses traction, e.g. on snow or
ice or when aquaplaning
R to large and sudden steering movements
by the driver
Crosswind Assist is operational again as soon as the driving conditions return to normal.
Crosswind Assist detects strong crosswind
gusts that can impair the road holding of your
vehicle when driving straight ahead. Cross-
wind Assist intervenes depending on the
direction and strength of the crosswind.
A stabilizing brake application helps you to
keep the vehicle on track.
Information appears in the instrument cluster
In the event that Crosswind Assist intervenes noticeably.
On vehicles without steering wheel but-
tons: the0072 indicator lamp in the instru-
ment cluster flashes.
On vehicles with steering wheel buttons:
the 0072 indicator lamp in the instrument
cluster flashes and the message Crosswind
Crosswind
Assist Active Assist Active appears in the multifunction
display.
Crosswind Assist is active above a vehicle
speed of 50 mph (80 km/h)when the vehicle
is driving straight ahead or cornering gently. Emergency exit
Emergency exit window
G
WARNING
The emergency exit window cannot be locked in place. You risk injury if you exit the vehicle
through the emergency exit window.
R Make sure that nobody becomes trapped,
both when closing and when opening the
emergency exit window.
R The opened emergency exit window must
be held in place by another person. Pay attention to traffic conditions.
G
WARNING
If the emergency exit window is unlocked
while driving, it could open and slam shut and consequently fall down. There is a risk of an
accident and injury.
Before starting off, make sure that the emer-
gency exit window is locked and the locking
pins are undamaged.
! Make sure there is sufficient clearance
when opening the emergency exit window. Hold the open window in position. You
could otherwise damage the emergency
exit window. The emergency exit window is intended for
use in an emergency only and must not be
opened unless the vehicle is stationary. The
emergency exit window is the first window
behind the driver's seat on the driver's side. It
is marked by the "Emergency Exit" label.
X To open: position both handles 0043verti-
cally. This will break locking pins 0044.
The window is unlocked.
X Swing the window outward by the handles
and hold it in this position. Make sure there
is sufficient clearance when doing so.
X To close: close the window. 60
Emergency exitSafety
Page 63 of 334
X
Position both handles 0043horizontally.
Make sure that the locks 0087are inside in
front of the window frame.
The window is locked.
X Replace locking pins 0044at the latest before
starting on a new journey.
You can obtain information on this at any
qualified specialist workshop.
In an emergency, or after an accident, the
vehicle occupants can exit the vehicle
through the emergency exit window.
Observe the following notes to make sure that
the emergency exit window can be used
safely in the event of an emergency:
R Before beginning a journey, inform the vehi-
cle occupants of the emergency exit win-
dow and explain how to use it. Make sure to
explicitly point out the risks described here.
R Only vehicle occupants who know how to
use the emergency exit window are permit-
ted to sit next to it.
R Access to the emergency exit window must
remain unobstructed. Do not place any
large or heavy objects on or in front of the
seats next to the emergency exit window.
R The window handles must not be used as
hooks, e.g. to hang up light objects, bags or
items of clothing.
R When exiting the vehicle through the emer-
gency exit window, pay attention to the
vehicle height and the local conditions. Par- ticularly children and smaller adults may
require assistance when exiting the vehi-
cle. Theft deterrent locking system
Immobilizer
X To activate: remove the key from the igni-
tion lock.
X To deactivate: turn the key to position 2in
the ignition lock.
The immobilizer prevents your vehicle from
being started without the correct key. Always take the key with you and lock the
vehicle when leaving the vehicle. If you leave
the key in the vehicle, anyone can start the
engine.
i The immobilizer is always deactivated
when you start the engine.
In the event that the engine cannot be star- ted when the starter battery is fully
charged, the immobilizer may be faulty.
Contact an authorized Sprinter dealer or
call 1-877-762-8267 (in USA) or
1-800-387-0100 (in Canada). ATA (Anti-Theft Alarm system)
X To arm: close all doors.
X Lock the vehicle with the key.
The indicator lamp in the central locking
button (Y page 71) flashes.
X To deactivate: unlock the vehicle with the
key.
The indicator lamp in the central locking
button (Y page 71) goes out.
i Cargo Van and Passenger Van only:
Unless you open a door within 40 seconds
after unlocking the vehicle:
R the vehicle will be locked again
R the anti-theft alarm system will be armed
again
If the alarm system is armed, a visual and
audible alarm is triggered by the following:
R Unlocking the vehicle from inside
R Opening a door
R Opening the hood
i The alarm is not switched off, even if you
immediately close the open door that has
triggered it, for example.
X To stop the alarm: press the0036button
on the remote control.
or
X Insert the key into the ignition lock.
The alarm stops. Theft deterrent locking system
61Safety Z
Page 64 of 334
Tow-away alarm
Operation A visual and audible alarm is triggered if the
inclination of the vehicle changes when the
tow-away alarm is armed. This can be the
case if the vehicle is raised on one side, for
example.
Arming/disarming The tow-away alarm is automatically armed
approximately 20 second
s after you lock the
vehicle.
The tow-away alarm is automatically deacti-
vated when you unlock the vehicle.
Disarming X
Remove the key from the ignition lock.
X Press button 0043.
When the button is released, indicator
lamp 0044in the button lights up for about
5 second s.
X Lock the vehicle.
The tow-away alarm is disarmed.
The tow-away alarm remains disarmed until
you lock the vehicle again.
Disarm the tow-away alarm when locking
your vehicle and: R loading and/or transporting the vehicle, on
a ferry or car transporter, for example
R parking on a moving surface, as split-level
garage
This will prevent false alarms. Interior motion sensor
Operation If the armed interior motion sensor detects
motion in the vehicle interior, a visual and
acoustic alarm is triggered. This can happen if
someone reaches into the vehicle interior, for example.
Switching on X
Close the side windows.
X Make sure that nothing (such as mascots or
coat hangers) are hanging on the rear-view
mirror or on the grab handles on the head- liner.
This will prevent false alarms.
X Lock the vehicle.
The interior motion sensor is armed after
approximately 40 seconds.
Switching off X
Unlock vehicle.
The interior motion sensor automatically
switches off.
Deactivating X
Remove the key from the ignition lock.
X Press button 0043.
When the button is released, indicator
lamp 0044of the button lights up for about
5 seconds.
X Lock the vehicle.
The interior motion sensor is deactivated. 62
Theft deterrent locking systemSafety
Page 65 of 334
The interior motion sensor remains deactiva-
ted until you lock the vehicle again.
Deactivate the interior motion sensor when
locking your vehicle:
R with people or animals remaining inside
R with the side windows remaining open
R when transporting it on a ferry or car trans-
porter, for example
This will prevent false alarms. Theft deterrent locking system
63Safety Z
Page 66 of 334

64
Page 67 of 334
Useful information
..............................66
Key ........................................................ 66
Central locking .................................... 71
Driver's door and co-driver's door .....72
Sliding door ......................................... 72
Electrical step ...................................... 73
Rear doors ........................................... 75
Partition sliding door ..........................77
Side windows ...................................... 78 65Opening and closing
Page 68 of 334
Useful information
This Operator's Manual describes all models
as well as standard and optional equipment of your vehicle that were available at the time of going to print. Country-specific variations are
possible. Note that your vehicle may not be
equipped with all of the described functions.
This also applies to systems and functions
relevant to safety.
Read the information on qualified specialist
workshops (Y page 25). Key
Important safety notes
G
WARNING
Activate the child-proof door locks if children are traveling in the vehicle. The children could
otherwise open the doors while the vehicle is
in motion, injuring themselves and others. G
WARNING
Do not leave children unsupervised in the
vehicle, even if they are secured in a child
restraint system. Children could otherwise
injure themselves on parts of the vehicle.
They could be severely or even fatally injured by prolonged exposure to intense heat or
cold.
If children open a door, they could:
R injure other people
R get out of the vehicle and thereby injure
themselves or be injured by a passing vehi-
cle
R severely injure themselves by falling down,
in particular due to the vehicle height
Always take the key with you when leaving the
vehicle, even if you are only leaving for a short time. G
WARNING
If you attach heavy or large objects to the
SmartKey, the SmartKey could be uninten- tionally turned in the ignition lock. This could
cause the engine to be switched off. There is a risk of an accident.
Do not attach any heavy or large objects to the
SmartKey. Remove any bulky key rings before
inserting the SmartKey into the ignition lock.
Do not keep the key with remote control:
R with electronic devices, e.g. a mobile
phone or another key with remote control
R with metallic objects, e.g. coins or metal
foil
R in metallic objects, e.g. metal cases
This can affect the key's functionality. Key functions of the remote control
General notes The vehicle is equipped with either 2 or
4 remote controls with a folding key, or 4
mechanical keys. In this Operator's Manual,
both the mechanical keys and the keys with
remote control are referred to as keys. The
remote control key has a range of up to 32 ft (10 m). Use the remote control of the key only
when in immediate proximity of the vehicle.
This prevents theft.
Remote controls that are not included in the
scope of delivery for the vehicle must be pro- grammed before use. Further information can
be obtained at any authorized Sprinter
Dealer.
The key's remote control locks/unlocks the
driver's door and/or the following centrally if the factory settings have not been changed:
R the driver's and the co-driver's door
R the sliding doors
R the rear doors
i If the driver's or co-driver's door is not
closed, the corresponding door is not
locked. If a sliding door or a rear door is not
closed properly, none of the rear doors are
locked. 66
KeyOpening and closing
Page 69 of 334
If there is a key is in the ignition lock, the
remote control is inoperative. When locking
or unlocking the vehicle with the remote con- trol, always pay attention to the indicator
lamp signaling. Also check the locking knobs
of the doors.
Unlocking/locking the vehicle with the
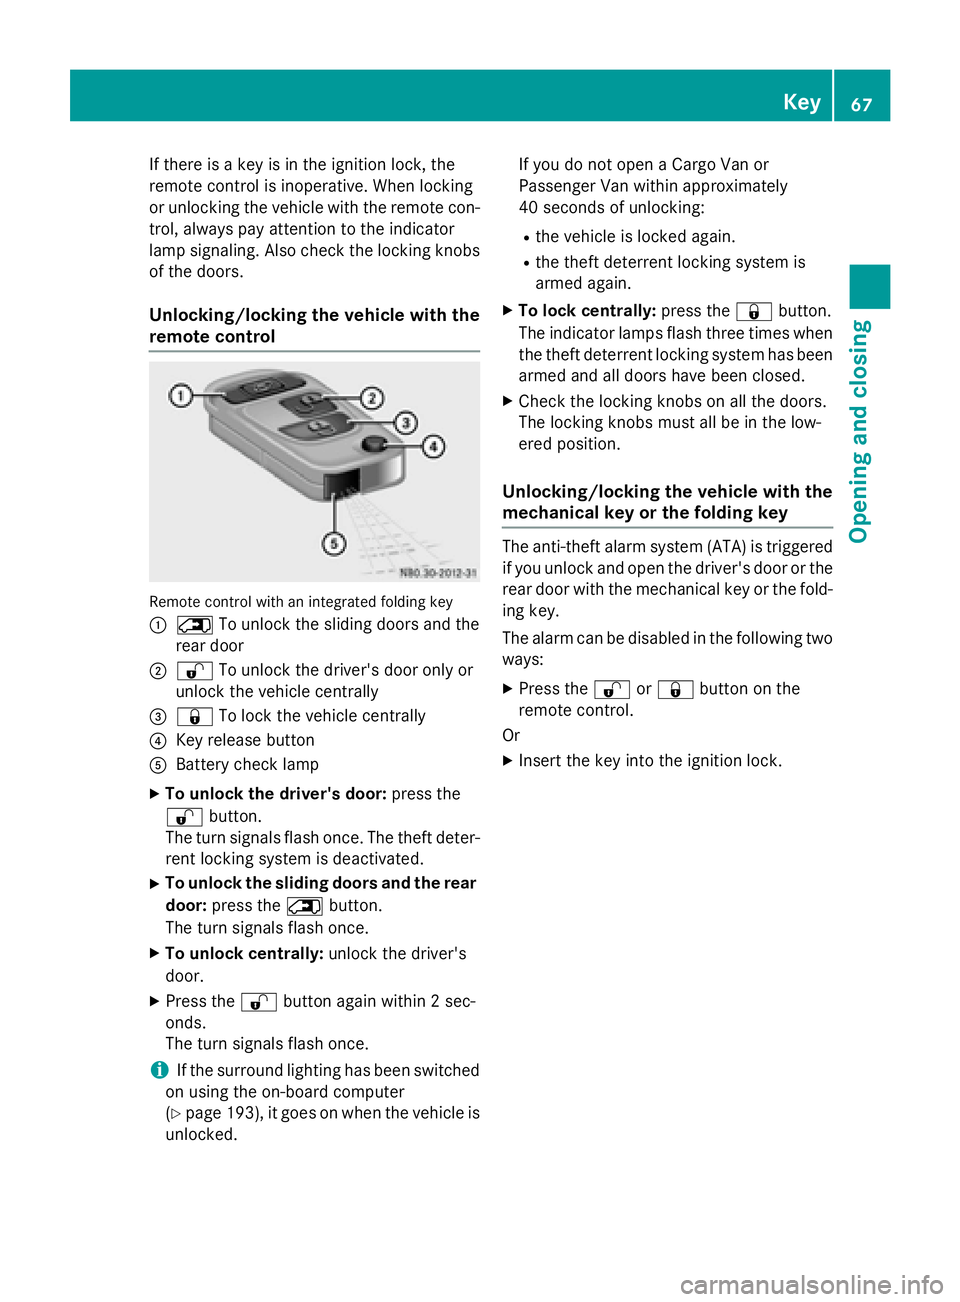
remote control Remote control with an integrated folding key
0043 0042 To unlock the sliding doors and the
rear door
0044 0036 To unlock the driver's door only or
unlock the vehicle centrally
0087 0037 To lock the vehicle centrally
0085 Key release button
0083 Battery check lamp
X To unlock the driver's door: press the
0036 button.
The turn signals flash once. The theft deter-
rent locking system is deactivated.
X To unlock the sliding doors and the rear
door: press the 0042button.
The turn signals flash once.
X To unlock centrally: unlock the driver's
door.
X Press the 0036button again within 2 sec-
onds.
The turn signals flash once.
i If the surround lighting has been switched
on using the on-board computer
(Y page 193), it goes on when the vehicle is
unlocked. If you do not open a Cargo Van or
Passenger Van within approximately
40 seconds of unlocking:
R the vehicle is locked again.
R the theft deterrent locking system is
armed again.
X To lock centrally: press the0037button.
The indicator lamps flash three times when
the theft deterrent locking system has been armed and all doors have been closed.
X Check the locking knobs on all the doors.
The locking knobs must all be in the low-
ered position.
Unlocking/locking the vehicle with the
mechanical key or the folding key The anti-theft alarm system (ATA) is triggered
if you unlock and open the driver's door or the
rear door with the mechanical key or the fold-
ing key.
The alarm can be disabled in the following two ways:
X Press the 0036or0037 button on the
remote control.
Or
X Insert the key into the ignition lock. Key
67Opening and closing Z
Page 70 of 334
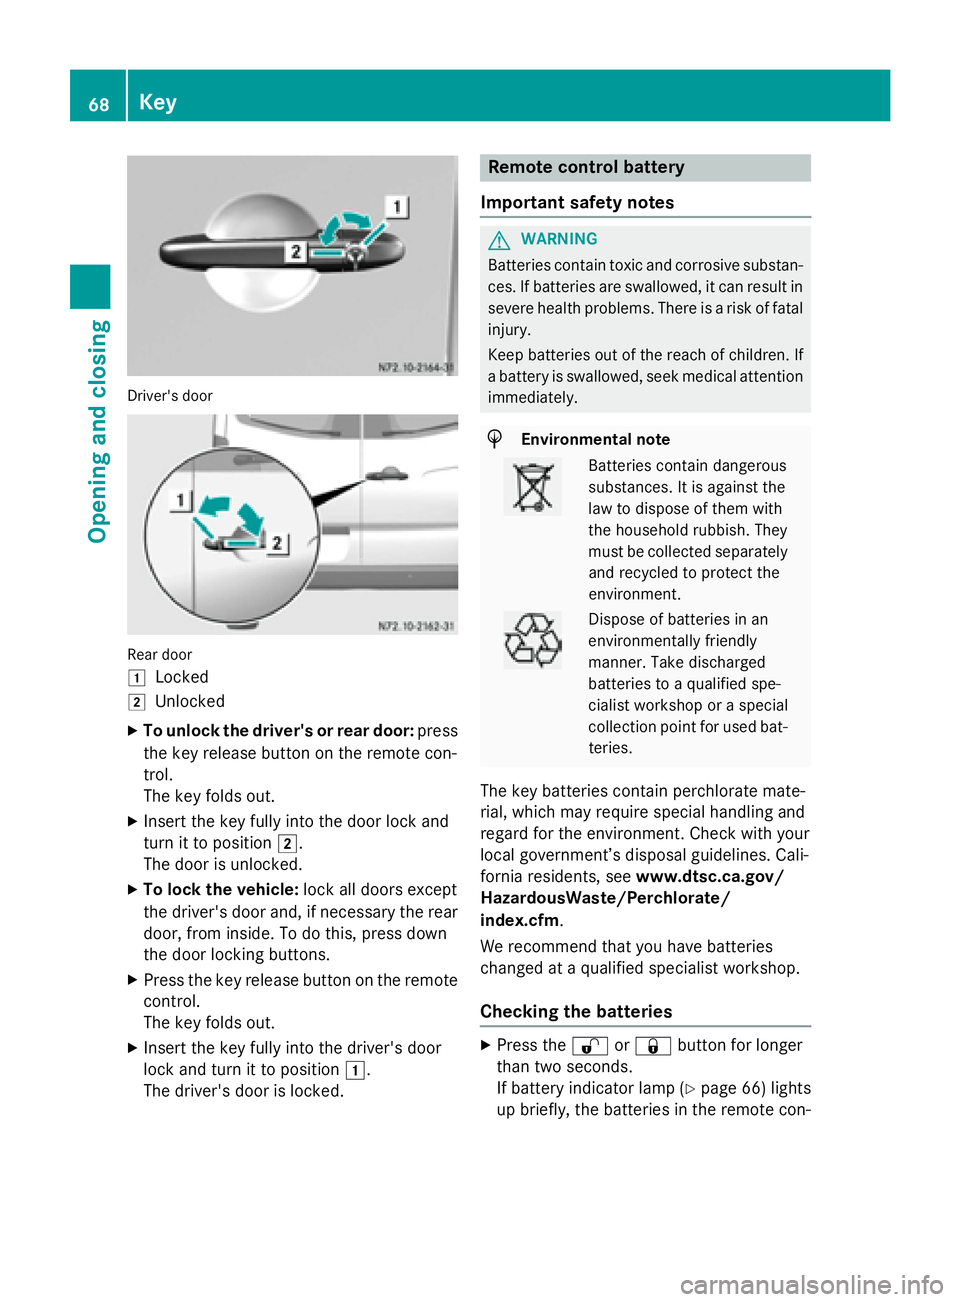
Driver's door
Rear door
0047
Locked
0048 Unlocked
X To unlock the driver's or rear door: press
the key release button on the remote con-
trol.
The key folds out.
X Insert the key fully into the door lock and
turn it to position 0048.
The door is unlocked.
X To lock the vehicle: lock all doors except
the driver's door and, if necessary the rear
door, from inside. To do this, press down
the door locking buttons.
X Press the key release button on the remote
control.
The key folds out.
X Insert the key fully into the driver's door
lock and turn it to position 0047.
The driver's door is locked. Remote control battery
Important safety notes G
WARNING
Batteries contain toxic and corrosive substan- ces. If batteries are swallowed, it can result in
severe health problems. There is a risk of fatal injury.
Keep batteries out of the reach of children. If
a battery is swallowed, seek medical attention immediately. H
Environmental note Batteries contain dangerous
substances. It is against the
law to dispose of them with
the household rubbish. They
must be collected separately
and recycled to protect the
environment. Dispose of batteries in an
environmentally friendly
manner. Take discharged
batteries to a qualified spe-
cialist workshop or a special
collection point for used bat-
teries.
The key batteries contain perchlorate mate-
rial, which may require special handling and
regard for the environment. Check with your
local government’s disposal guidelines. Cali-
fornia residents, see www.dtsc.ca.gov/
HazardousWaste/Perchlorate/
index.cfm.
We recommend that you have batteries
changed at a qualified specialist workshop.
Checking the batteries X
Press the 0036or0037 button for longer
than two seconds.
If battery indicator lamp (Y page 66) lights
up briefly, the batteries in the remote con- 68
KeyOpening and closing