oil pressure MERCEDES-BENZ SPRINTER 2015 MY15 Operator’s Manual
[x] Cancel search | Manufacturer: MERCEDES-BENZ, Model Year: 2015, Model line: SPRINTER, Model: MERCEDES-BENZ SPRINTER 2015Pages: 334, PDF Size: 5.94 MB
Page 6 of 334
1, 2, 3 ...
12 V socket ........................................ 236 A
ABS (Anti-lock Braking System) Display message ............................ 204
Function/notes ................................ 57
Important safety notes .................... 57
Indicator lamp ................................ 218
Access step in the bumper
Cleaning .........................................2 69
Activating/deactivating cooling
with air dehumidification ................. 117
Activating/deactivating the roof
ventilator .......................................... .133
Adaptive Brake Assist
Function/notes ............................ .162
ADAPTIVE ESP ®
see ESP ®
(Electronic Stability Program)
Add-on equipment ............................... 26
Additional indicators
Replacing bulbs (roof) .................... 104
Additives
Diesel ............................................ 320
Engine oil ....................................... 323
ADR (working speed governor) ........172
Air bags
Deployment ..................................... 49
Front air bag (driver, front
passenger) ....................................... 48
Important safety notes .................... 47
Introduction ..................................... 47
Thoraxbag ........................................ 48
Window curtain air bag .................... 49
Air filter
Indicator lamp ................................ 225
Air pressure
see Tire pressure
Air vents
Adjusting for the passenger com-
partment ........................................ 121
Adjusting on the roof ..................... 121
Important safety notes .................. 120
Setting the center air vents ........... 121
Setting the side air vents .............. .121 Air-conditioning system
Refrigerant ..................................... 326
see Climate control
Air-recirculation mode
Important safety notes .................. 120
Switching on/off ........................... 120
Anti-lock Braking System
see ABS (Anti-lock Braking System)
Anti-theft system
Interior motion sensor ..................... 62
Armrests .............................................. 87
Ashtray ............................................... 235
ASR (acceleration skid control)
Activating/deactivating ................... 58
Display message ............................ 205
Function/notes ................................ 58
Important safety notes .................... 58
Indicator lamp ................................ 218
ATA (Anti-Theft Alarm system)
Activating/deactivating ................... 61
Switching off the alarm .................... 61
Authorized workshop
see Qualified specialist workshop
Automatic car wash (care) ...............265
Automatic climate control
see Climate control
Automatic headlamp mode ................ 93
Automatic locking ............................... 71
Automatic transmission
Accelerator pedal position ............. 144
Changing gear ............................... 143
Changing gear yoursel f.................. 143
Driving tips .................................... 144
Emergency running mod e.............. 145
Important safety notes .................. 142
Kickdown ....................................... 144
Maneuvering .................................. 144
Overview ........................................ 142
Problem (malfunction) ................... 145
Releasing the parking lock man-
uall y............................................... 145
Selector lever ................................ 142
Selector lever positions ................. 143
Shift ranges ................................... 144
Starting the engine ........................ 139
Touchshift ...................................... 143
Trailer towing ................................. 144 4
Index
Page 23 of 334
W
Warning Stickers .......................................... .22
Warning and indicator lamps
Brakes .......................................... .219
Check Engine ................................. 224
Coolant .......................................... 223
Diesel Exhaust Fluid (DEF) ............. 221
Electrical step ................................ 227
ESP ®
.............................................. 218
ESP ®
function ................................ 221
Overview .......................................... 35
Seat belt ........................................ 227
Warning lamp ................................... .275
Warning triangle ................................ 275
Warning- and indicator lamps
ABS ................................................ 218
Air filter .......................................... 225
ASR ................................................ 218
BAS ................................................ 218
Battery charge ............................... 222
Brake wear ................................... .222
Bulbs .............................................. 227
Doors ............................................. 227
Engine oil level ............................... 222
Preglow .......................................... 225
Reserve fuel ................................... 224
Tire pressure monitor .................... 226
Water separator ............................ .226
Windshield washer fluid ................. 226
Washer fluid
Adding .......................................... .255
Capacities ...................................... 327
Display message ............................ 217
Indicator lamp ................................ 226
Notes ............................................. 326
Wiping with ................................... .107
Wheels
Changing a wheel .......................... 305
Checking ........................................ 285
Cleaning ......................................... 267
Important safety notes .................. 284
Installing the adapter (spare
wheel) ............................................ 309
Interchanging/changing ................ 305
Mounting a new wheel ................... 309
Mounting a wheel .......................... 306 Removing a wheel .......................... 309
Removing and mounting the spare
wheel ............................................. 313
Snow chains .................................. 287
Storing .......................................... .306
Tightening torque ........................... 310
Wheel size/tire size ....................... 311
Window curtain air bag ....................... 49
Windows
see Side windows
Windshield
Defrosting ...................................... 118
Windshield heating
Problem (malfunction) ................... 119
Switching on/off ........................... 119
Windshield washer fluid
Adding .......................................... .255
Indicator lamp ................................ 226
Windshield wipers
Problem (malfunction) ................... 109
Rain and light sensor ..................... 107
Rear window wiper ........................ 108
Replacing the wiper blades ............ 108
Setting the sensitivity (vehicles
with steering wheel buttons and
rain/light sensor) ........................... 193
Switching on/off ........................... 107
Wiping with windshield washer
fluid ............................................... 107
Winter diesel ..................................... 319
Winter driving
Slippery road surfaces ................... 156
Snow chains .................................. 287
Winter operation
General notes ................................ 286
Radiator cover ................................. 27
Winter tires
M+S tires ....................................... 286
Setting a limit speed ..................... .153
Wiper blades
Cleaning ......................................... 268
Replacing ....................................... 108
Workshop
see Qualified specialist workshop Index
21
Page 25 of 334
G
WARNING
Gases and fluids from substances that con-
stitute a health hazard or react aggressively
can escape even from securely closed con-
tainers. When transporting such substances
in the vehicle interior, your ability to concen-
trate or your health could be affected during
the journey. Malfunctions, short circuits or
electrical component system failures may
also result. There is a risk of an accident and
fire.
Do not store or transport any substances in
the vehicle interior which are hazardous to
health or react aggressively.
These instructions must also be observed for
vehicles where the cargo compartment is not fully separated from the driver's cab.
Partition with door/window: always keep thedoor/window in the partition closed during
transport.
Examples of substances that are hazardous
to health and/or react aggressively:
R Solvents
R Fuel
R Oil and grease
R Cleaning agents
R Acids Protection of the environment
Economic and environmentally aware
driving H
Environmental note
Daimler's declared policy is one of compre-
hensive environmental protection.
The objectives are for the natural resources
that form the basis of our existence on this
planet to be used sparingly and in a manner
that takes the requirements of both nature
and humanity into account.
You too can help to protect the environment
by operating your vehicle in an environmen-
tally responsible manner. Fuel consumption and the rate of engine,
transmission, brake and tire wear are affected
by these factors:
R operating conditions of your vehicle
R your personal driving style
You can influence both factors. You should
bear the following in mind:
Operating conditions:
R avoid short trips as these increase fuel con-
sumption.
R always make sure that the tire pressures
are correct.
R do not carry any unnecessary weight.
R remove roof racks once you no longer need
them.
R a regularly serviced vehicle will contribute
to environmental protection. You should
therefore adhere to the service intervals.
R always have service work carried out at a
qualified specialist workshop.
Personal driving style:
R do not depress the accelerator pedal when
starting the engine.
R do not warm up the engine when the vehicle
is stationary.
R drive carefully and maintain a safe distance
from the vehicle in front.
R avoid frequent, sudden acceleration and
braking.
R change gear in good time and use each gear
only up to 00C3of its maximum engine speed.
R switch off the engine in stationary traffic.
R keep an eye on the vehicle's fuel consump-
tion. Environmental issues and recommen-
dations
When prompted by this Operator's Manual to dispose of materials, please try to regenerate
and recycle these materials. Observe all rel-
evant environmental guidelines and regula- Introduction
23 Z
Page 37 of 334
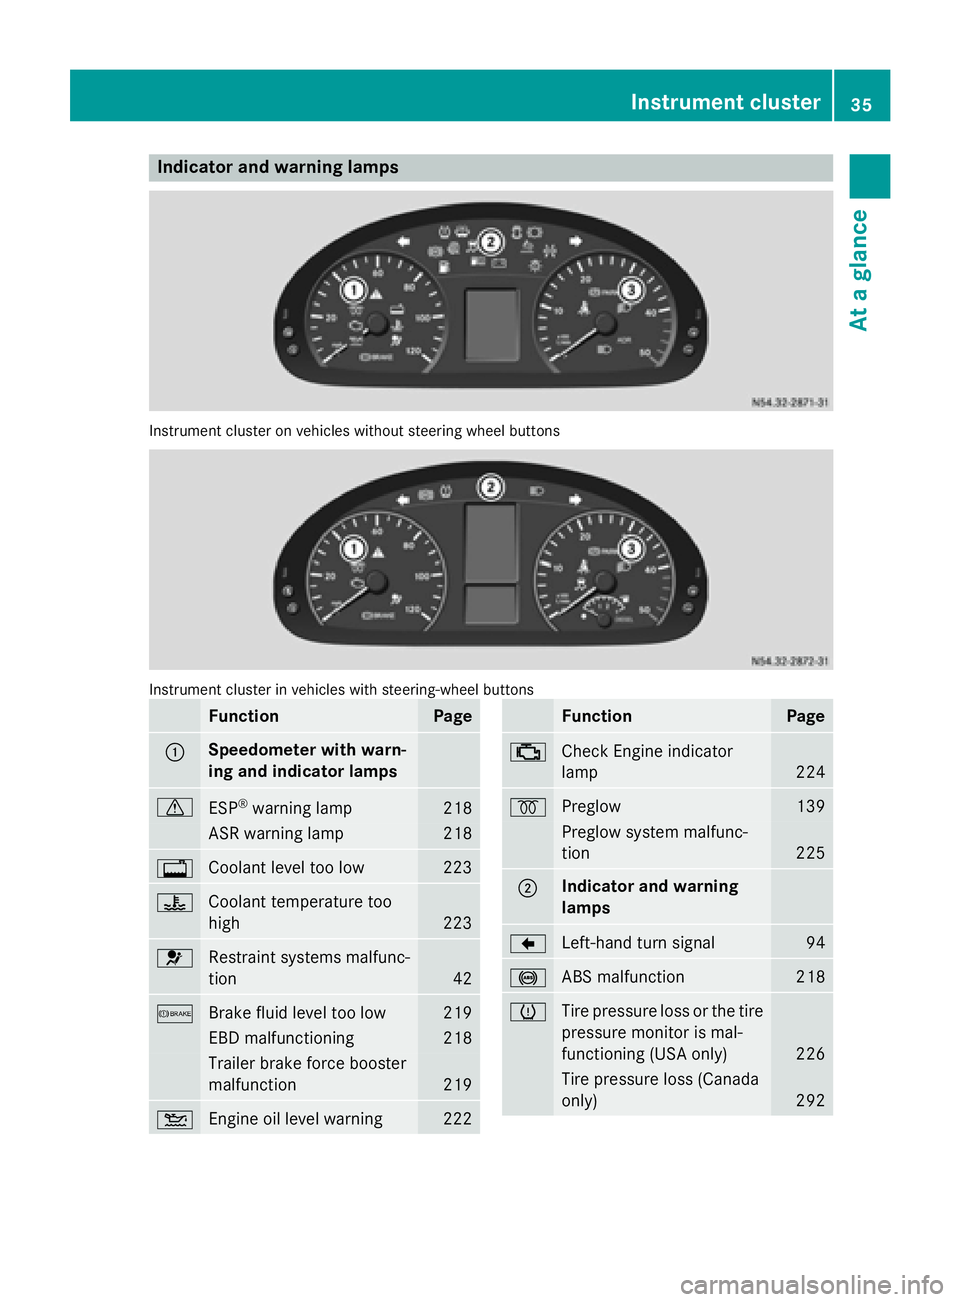
Indicator and warning lamps
Instrument cluster on vehicles without steering wheel buttons
Instrument cluster in vehicles with steering-wheel buttons
Function Page
0043 Speedometer with warn-
ing and indicator lamps
0072
ESP
®
warning lamp 218
ASR warning lamp 218
003F
Coolant level too low 223
00AC
Coolant temperature too
high 223
0075
Restraint systems malfunc-
tion 42
0065
Brake fluid level too low 219
EBD malfunctioning 218
Trailer brake force booster
malfunction
219
00B2
Engine oil level warning 222 Function Page
00B9
Check Engine indicator
lamp
224
0028
Preglow 139
Preglow system malfunc-
tion
225
0044 Indicator and warning
lamps
004A
Left-hand turn signal 94
0025
ABS malfunction 218
0077
Tire pressure loss or the tire
pressure monitor is mal-
functioning (USA only) 226
Tire pressure loss (Canada
only)
292Instrument cluster
35At a glance
Page 155 of 334
cific maintenance work must be carried out at
regular intervals and in accordance with the
service requirements of the dealer listed here
on the inside title page. Details can be found
in the Maintenance Booklet. Short journey
! If the vehicle is predominantly used for
short-distance driving or is stationary for
long periods, this could lead to a malfunc-
tion in the automatic cleaning function for
the diesel particle filter. This can lead to
blockage of the diesel particle filter. This
can also result in fuel collecting in the
engine oil and cause engine failure.
Therefore, if you mainly drive short distances,
drive on a highway or an inter-urban road for
20 minutes every 300 miles (500 km). This
facilitates the diesel particle filter's burn-off
process. Speed limiter
G
WARNING
Exceeding the stated tire load-bearing capa-
city and the approved maximum speed could
lead to tire damage or the tire bursting. There is a risk of accident.
Therefore, only use tire types and sizes
approved for your vehicle model. Observe the
tire load rating and speed rating required for
your vehicle.
As the driver, you must find out about the
maximum speed of the vehicle and the result-
ing permissible maximum speed of the tires
(tire and tire pressure). In particular, also
observe the tire approval regulations for each
country.
You must not exceed the speed limit for the
tires listed in the tire pressure tables. You can find information on tire pressures in the
"Wheels and tires" section (Y page 288).You can permanently limit the maximum
speed of your vehicle to 55 mph (90 km/h),
60 mph (100 km/h) or 75 mph (120 km/h).
We recommend that you use an authorized
Sprinter Dealer for the programming of the
maximum speed.
Before overtaking, take into consideration
that the engine speed limiter prevents the
speed increasing beyond the programmed
maximum speed. Driving abroad
Service An extensive network of authorized Sprinter
Dealers is also at your disposal when you are
traveling abroad. Nevertheless, please bear in
mind that service facilities or replacement
parts may not always be immediately availa-
ble. You can obtain a list of workshops at any
authorized Sprinter Dealer.
Fuel In some countries, only fuels with a higher
sulfur content are available.
Unsuitable fuel can cause engine damage.
Information on fuel (Y page 318).
Low-beam headlamps If you are traveling in countries where vehi-
cles are driven on the opposite side of the
road to that in which the vehicle is registered,
you will need to:
R have the halogen headlamps partially
masked
R have the Bi-Xenon headlamps set to sym-
metrical low beam
This prevents glare to oncoming traffic and no
longer illuminates the edge of the road to the same height and distance.
Have the headlamps masked or adjusted at a qualified specialist workshop before you
cross the border, but as close to it as possi-
ble. Driving tips
153Driving and parking Z
Page 185 of 334
Menus in the on-board computer
Overview If you wish to exit a menu and go to the stand-
ard display:
X Press the 0079menu button for longer than
1 second.
or
X Do not press any button for 10 seconds.
The display accepts the changed settings.
Using the 0074,0075,0079or0045 adjustment but-
tons, you can select the following functions:
R Calling up the service due date
(Y page 258)
R Checking the oil level (Y page 250)
R Checking the DEF supply (Y page 182)
R Preselecting/setting the auxiliary heating
switch-on time (Y page 124)
R Tire pressure monitor (Y page 291)
R Setting the time (Y page 183)
R Activating/deactivating Highbeam Assist
(Y page 192)
R Setting the daytime running lamps
(Y page 92)
Setting the time X
Turn the key to position 2in the ignition
lock.
X Press the 0079menu button repeatedly until
the hours figure flashes.
X Press the 0074or0075 button to set the hour.
X Press the 0045reset button.
The minute display flashes.
X Press the 0074or0075 button to set the minute.
i If you keep the
0074or0075 button pressed,
the value will change continuously. Activating/deactivating Highbeam
Assist X
Turn the key to position 2in the ignition
lock.
X Press the 0079menu button repeatedly until
the 00CE indicator lamp flashes and the on on
or OFF
OFF message appears in the display.
X Use the 0074or0075 button to switch High-
beam Assist on/off.
Switching the daytime running lamps
on/off If you switch the daytime running lamps
on on,
the daytime running lamps will automatically
light up when the engine is running.
For safety reasons, it is only possible to
change this setting when the vehicle is sta-
tionary. The factory setting is on onin countries
in which daytime running lamp mode or day-
time running lamps are mandatory.
X Turn the key to position 2in the ignition
lock.
X Press the 0079menu button repeatedly until
the 0058 indicator lamp flashes and the on on
or OFF
OFF message appears in the display.
X Press the 0074or0075 button to activate or
deactivate the daytime running lamps.
i USA only:
If you turn the light switch to 0060or0058,
the corresponding light switches on. If you
turn the light switch to 0058, the daytime
running lamps remain switched on.
Canada only:
If you turn the light switch to 0058, the low-
beam headlamps switch on. If you turn the light switch to 0060or0058, the daytime
running lamps remain switched on. On-board computer (vehicles without steering wheel buttons)
183On-board computer and displays Z
Page 188 of 334
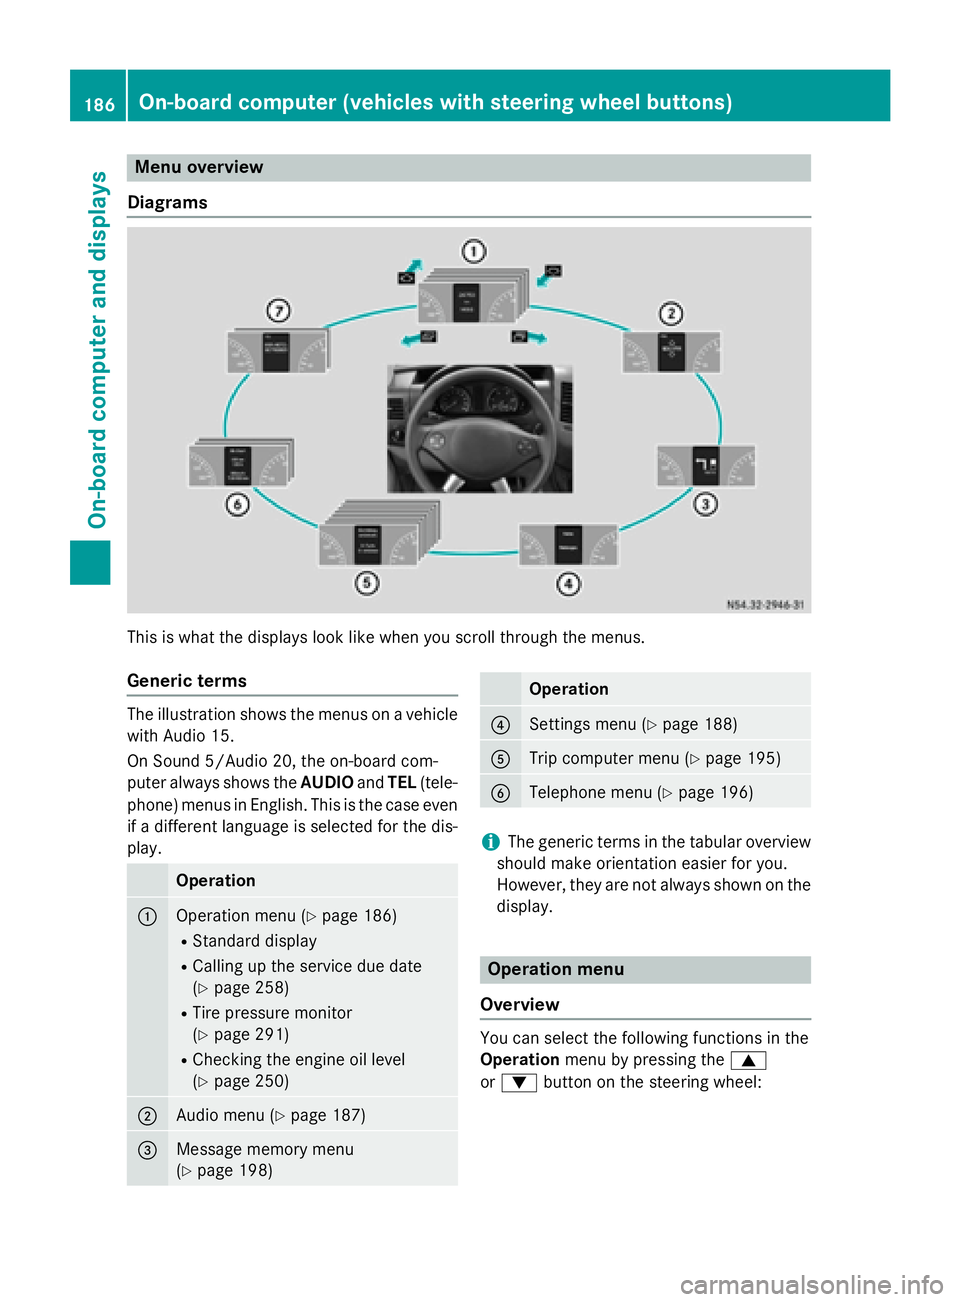
Menu overview
Diagrams This is what the displays look like when you scroll through the menus.
Generic terms The illustration shows the menus on a vehicle
with Audio 15.
On Sound 5/Audio 20, the on-board com-
puter always shows the AUDIOandTEL (tele-
phone) menus in English. This is the case even
if a different language is selected for the dis- play. Operation
0043
Operation menu (Y
page 186)
R Standard display
R Calling up the service due date
(Y page 258)
R Tire pressure monitor
(Y page 291)
R Checking the engine oil level
(Y page 250) 0044
Audio menu (Y
page 187) 0087
Message memory menu
(Y
page 198) Operation
0085
Settings menu (Y
page 188) 0083
Trip computer menu (Y
page 195) 0084
Telephone menu (Y
page 196) i
The generic terms in the tabular overview
should make orientation easier for you.
However, they are not always shown on the display. Operation menu
Overview You can select the following functions in the
Operation
menu by pressing the 0063
or 0064 button on the steering wheel: 186
On-board computer (vehicles with steering wheel buttons)On-board computer and displays
Page 189 of 334
R
Displaying the trip odometer and odometer
(standard display) (Y page 187)
R Displaying the coolant temperature
(Y page 187)
R Calling up the service due date
(Y page 258)
R Tire pressure monitor (Y page 291)
R Checking the oil level (Y page 250)
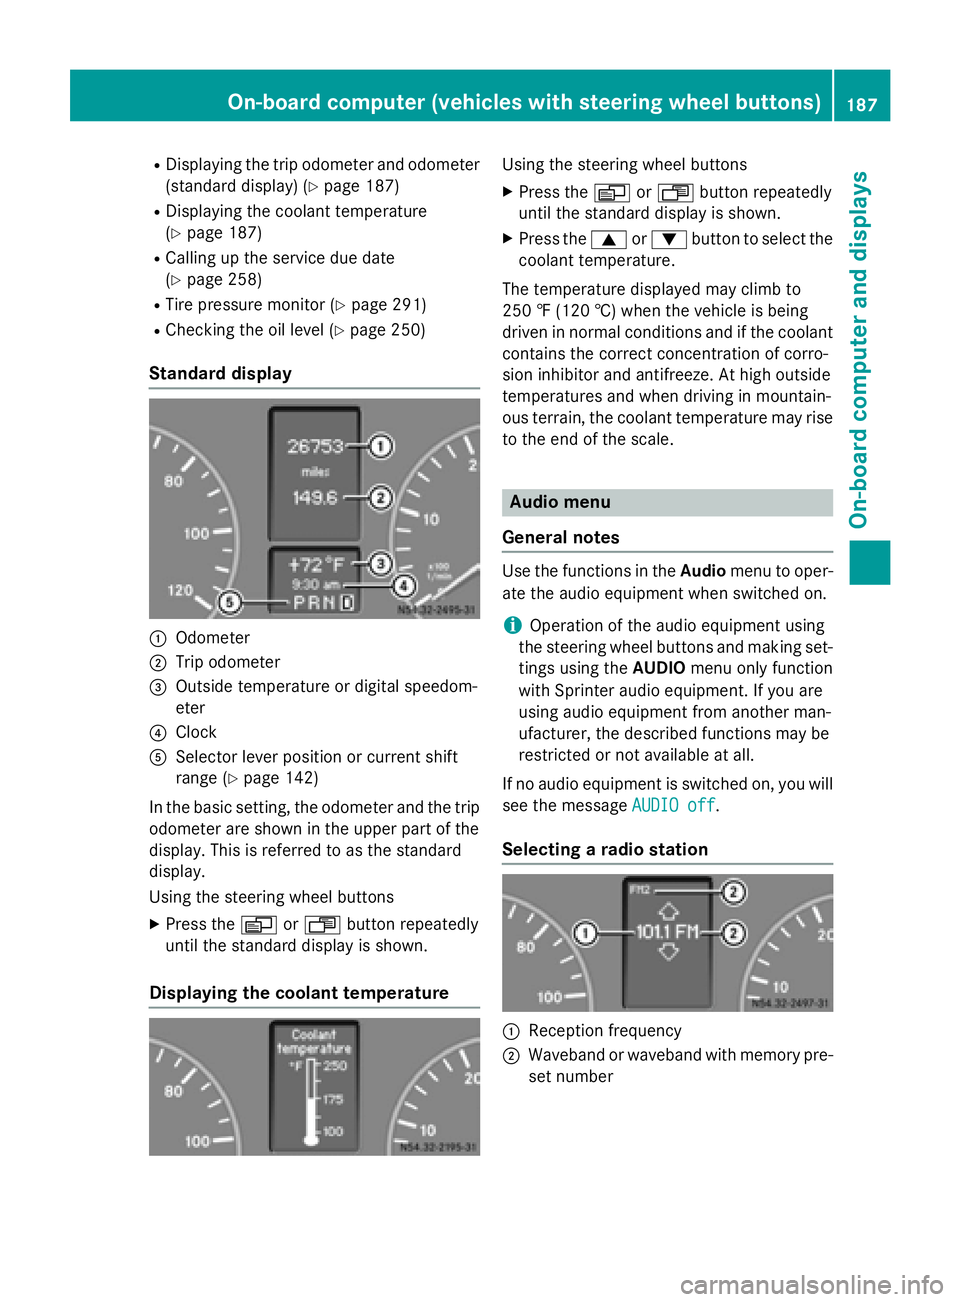
Standard display 0043
Odometer
0044 Trip odometer
0087 Outside temperature or digital speedom-
eter
0085 Clock
0083 Selector lever position or current shift
range (Y page 142)
In the basic setting, the odometer and the trip
odometer are shown in the upper part of the
display. This is referred to as the standard
display.
Using the steering wheel buttons
X Press the 0080or007F button repeatedly
until the standard display is shown.
Displaying the coolant temperature Using the steering wheel buttons
X Press the 0080or007F button repeatedly
until the standard display is shown.
X Press the 0063or0064 button to select the
coolant temperature.
The temperature displayed may climb to
250 ‡ (120 †) when the vehicle is being
driven in normal conditions and if the coolant
contains the correct concentration of corro-
sion inhibitor and antifreeze. At high outside
temperatures and when driving in mountain-
ous terrain, the coolant temperature may rise
to the end of the scale. Audio menu
General notes Use the functions in the
Audiomenu to oper-
ate the audio equipment when switched on.
i Operation of the audio equipment using
the steering wheel buttons and making set-
tings using the AUDIOmenu only function
with Sprinter audio equipment. If you are
using audio equipment from another man-
ufacturer, the described functions may be
restricted or not available at all.
If no audio equipment is switched on, you will
see the message AUDIO off AUDIO off.
Selecting a radio station 0043
Reception frequency
0044 Waveband or waveband with memory pre-
set number On-board computer (vehicles
with steering wheel buttons)
187On-board computer and displays Z
Page 243 of 334
Always observe the operating instructions of
the respective manufacturer when using suit- able load securing aids or tie downs. In par-
ticular, the information on service life.
Load securing aids and tie downs may not be used, for example, if:
R identification marks are missing or illegible
R there are yarn breakages, damage to bear-
ing seams or other signs of tearing
R there are signs of shearing, deformation,
pinching or other damage
R there is damage to clamping or connecting
elements
Such load securing aids and tie downs are
worn; they should not be used and must be
replaced. If you use load securing aids or tie
downs which are worn, the load may not be
sufficiently secured and could cause damage
to property.
After an accident, the following must be
checked at a specialist workshop:
R Cargo compartment floor
R Load surface
R Cargo tie-down rings
R Tie downs
Otherwise, the load may not be correctly
secured the next time anything is stowed.
Even if you follow all loading guidelines, the
load increases the risk of injury in the event of an accident. Observe the tips in the "Securing
luggage/loads" (Y page 242) and "Load dis-
tribution" (Y page 242) sections. Before loading
! The anti-slip mats cannot be used for
securing goods and must be replaced when
they show signs of:
R Permanent deformation and crushing
R Crack formation
R Cuts X
Tire pressure: check the tire pressure and
correct if necessary (Y page 288).
X Cargo compartment floor: clean the
cargo compartment floor.
The cargo compartment floor must be free
from oil and dust, dry and swept clean to
prevent the load from slipping.
X Place non-slip mats (anti-slip mats) on the
cargo compartment floor if necessary. During loading
! On passenger van versions with maxi-
mum seating layout, the permissible rear
axle load would be exceeded if the full pay-
load were to be loaded in the cargo com-
partment.
X Observe the gross axle weight rating and
permissible gross vehicle weight for your
vehicle.
Take into account that your vehicle's curb
weight is increased if accessories or
optional equipment are installed. The max-
imum payload is thus reduced.
X Observe the notes on load distribution
(Y page 242).
The overall center of gravity of the load
should always be as low as possible, cen-
tered and between the axles near the rear
axle.
X Secure the load (Y page 242).
Observe the legal requirements of the
country in which you are currently driving. Checks after loading
G
WARNING
Combustion engines emit poisonous exhaust
gases, such as carbon monoxide. If the sliding door or rear door is open when the engine is
running, exhaust gases can enter the vehicle
interior, especially during the journey. There
is a risk of poisoning. Loading guidelines
241Transporting loads
Z
Page 255 of 334
X
Replace cap 0085on the filler neck and
tighten.
When doing so, make sure that the cap
engages correctly.
X Check the oil level with the oil dipstick
(Y page 251) or on the display
(Y page 250).
X Close the hood. Coolant
G
WARNING
The engine cooling system is pressurized, par- ticularly when the engine is warm. When
opening the cap, you could be scalded by hotcoolant spraying out. There is a risk of injury.
Let the engine cool down before opening the
cap. Wear eye and hand protection when
opening the cap. Open the cap slowly half a
turn to allow pressure to escape.
Only check the coolant level and/or fill the
coolant if the vehicle is on a level surface and the engine has cooled down. The coolant tem-
perature must be below 122 ‡ (50 †).
! Check the engine cooling and heating sys-
tem regularly for leaks.
If a large quantity of coolant is lost, have the
cause traced and rectified at a qualified
specialist workshop. G
WARNING
Coolant contains glycol and is therefore toxic. Do not swallow the coolant. See a doctor
immediately if you swallow coolant.
Make sure that coolant does not come into
contact with skin, eyes or clothing. In case of
contact with eyes, rinse immediately with
plenty of clean water. Clean affected areas of skin and clothing with soap and water imme-
diately. Change any affected clothing imme-
diately. G
WARNING
If antifreeze comes into contact with hot com- ponents in the engine compartment, it may
ignite. There is a risk of fire and injury.
Let the engine cool down before you add anti-
freeze. Make sure that antifreeze is not spilled
next to the filler neck. Thoroughly clean the
antifreeze from components before starting
the engine.
! Take care not to spill any coolant on pain-
ted surfaces. You could otherwise damage
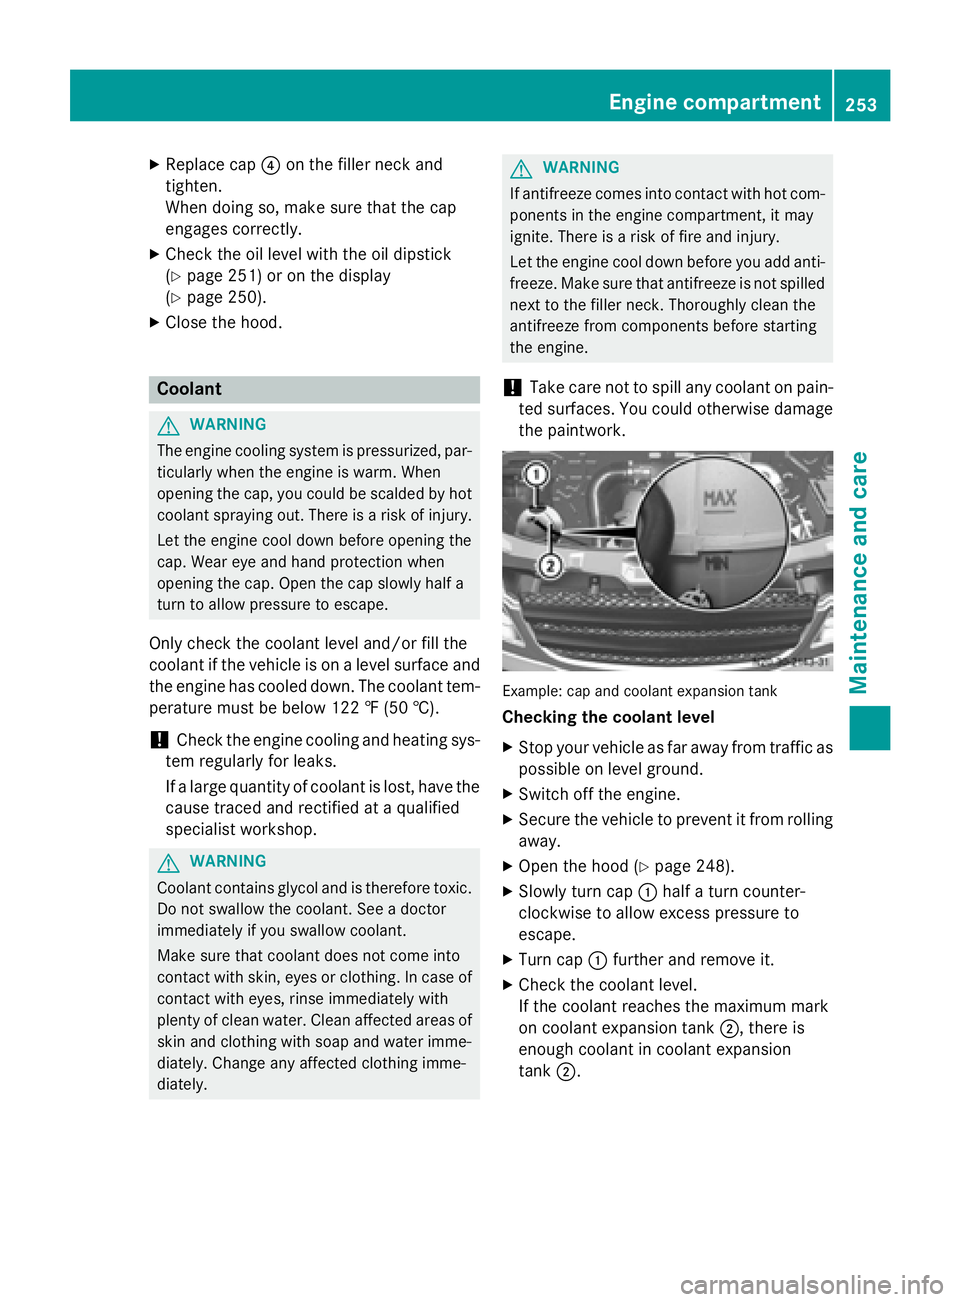
the paintwork. Example: cap and coolant expansion tank
Checking the coolant level
X Stop your vehicle as far away from traffic as
possible on level ground.
X Switch off the engine.
X Secure the vehicle to prevent it from rolling
away.
X Open the hood (Y page 248).
X Slowly turn cap 0043half a turn counter-
clockwise to allow excess pressure to
escape.
X Turn cap 0043further and remove it.
X Check the coolant level.
If the coolant reaches the maximum mark
on coolant expansion tank 0044, there is
enough coolant in coolant expansion
tank 0044. Engine compartment
253Maintenance and care Z