MERCEDES-BENZ SPRINTER 2019 MY19 with 7” screen
Manufacturer: MERCEDES-BENZ, Model Year: 2019, Model line: SPRINTER, Model: MERCEDES-BENZ SPRINTER 2019Pages: 354, PDF Size: 6.15 MB
Page 61 of 354
te
m, the permissible gross mass of thech ild
and child restra int sy stem is 73lb (33 kg).
If th ech ild and thech ild restra int sy stem
to ge ther we igh more than 73 lb (33 kg),the
LA TC H-type (ISOFIX) child restra int sy stem
with integrated seat belt does not of fer suf fi‐
cient pr otection. An excessive load may be
placed on theLA TC H-type (ISOFIX) child seat
attachments and thech ild may not be
re stra ined in theeve nt of an accident, for
ex ample. #
Ifth ech ild and thech ild restra int sys‐
te m toge ther we igh more than 73 lb
(33 kg), use only a LATC H-type (ISOFIX)
ch ild restra int sy stem that secures the
ch ild with theve hicle seat belt. #
Also secure thech ild restra int sy stem
with theTo pTe ther belt, if available. Alw
ays comply with the information about the
mass of thech ild restra int sy stem:
R Inthe manufacturer's ins tallation and operat‐
ing instructions forth ech ild restra int sy stem
used
R On a label on thech ild restra int sy stem, if
av ailable
Check regularly that the permissible gross mass
of thech ild plus thech ild restra int sy stem is not
exc eeded.
When ins talling a child restra int sy stem, be sure
to obser vethe manufacturer's ins tallation and
operating instructions and the cor rect use of the
ch ild restra int sy stem as well as consider the
suitability of the seats. 1
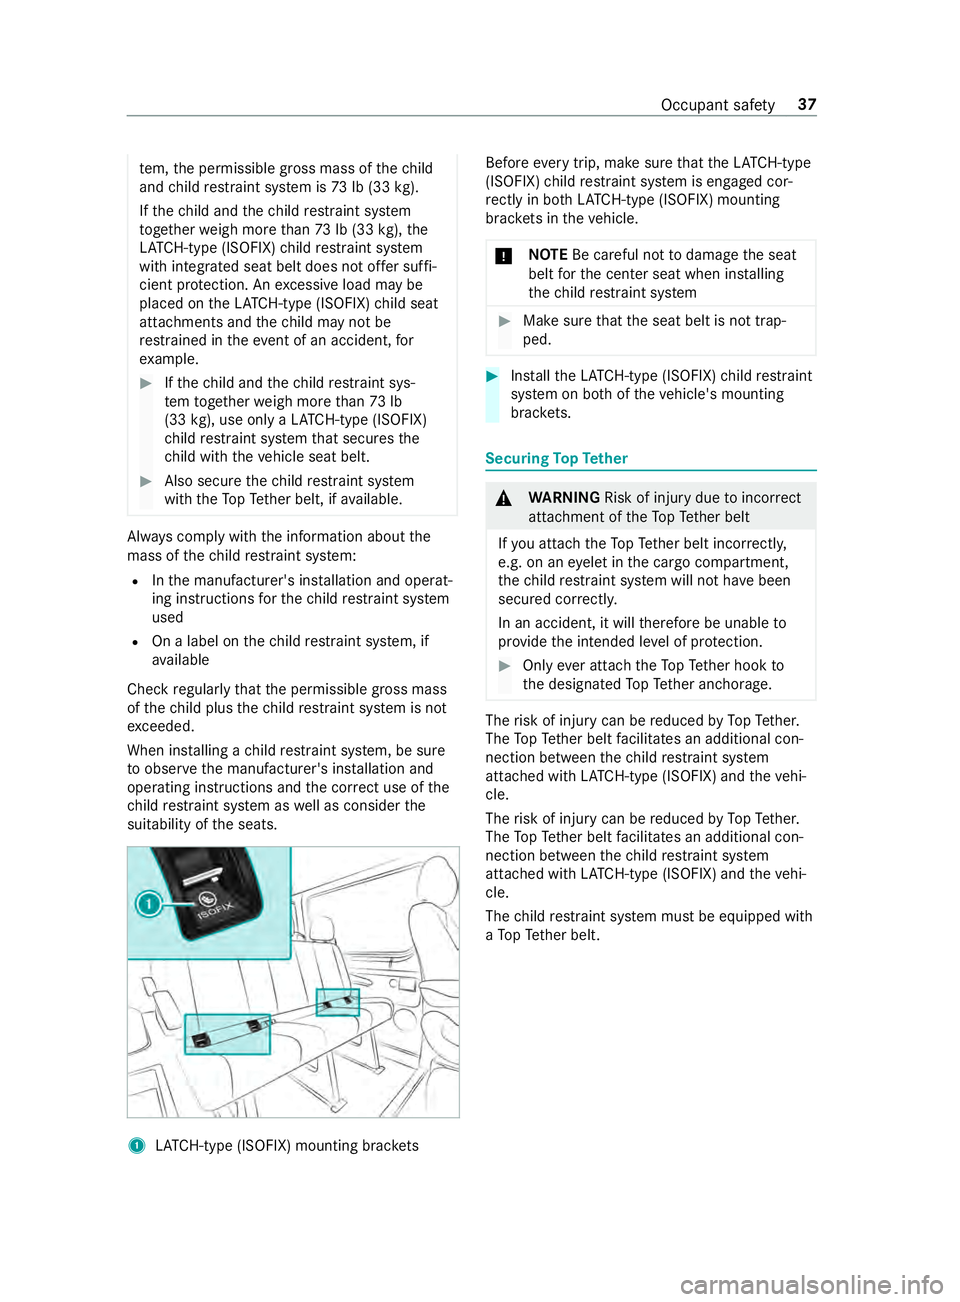
LATC H-type (ISOFIX) mounting brac kets Before
every trip, make sure that theLA TC H-type
(ISOFIX) child restra int sy stem is engaged cor‐
re ctly in bo thLATC H-type (ISOFIX) mounting
brac kets in theve hicle.
* NO
TEBe careful not todamage the seat
belt forth e center seat when ins talling
th ech ild restra int sy stem #
Make sure that the seat belt is not trap‐
ped. #
Installth eLA TC H-type (ISOFIX) child restra int
sy stem on bo thoftheve hicle's mounting
brac kets. Secu
ring TopTe ther &
WARNING Risk of inju rydue toincor rect
attachment of theTo pTe ther belt
If yo u attach theTo pTe ther belt incor rectl y,
e.g. on an eyelet in the cargo compartment,
th ech ild restra int sy stem will not ha vebeen
secured cor rectly.
In an accident, it will therefore be unable to
pr ov ide the intended le vel of pr otection. #
Only ever attach theTo pTe ther hook to
th e designated TopTe ther anchorage. The
risk of injury can be reduced byTopTe ther.
The TopTe ther belt facilitates an additional con‐
nection between thech ild restra int sy stem
attached with LATC H-type (ISOFIX) and theve hi‐
cle.
The risk of injury can be reduced byTopTe ther.
The TopTe ther belt facilitates an additional con‐
nection between thech ild restra int sy stem
attached with LATC H-type (ISOFIX) and theve hi‐
cle.
The child restra int sy stem must be equipped with
a To pTe ther belt. Occupant saf
ety37
Page 62 of 354
To
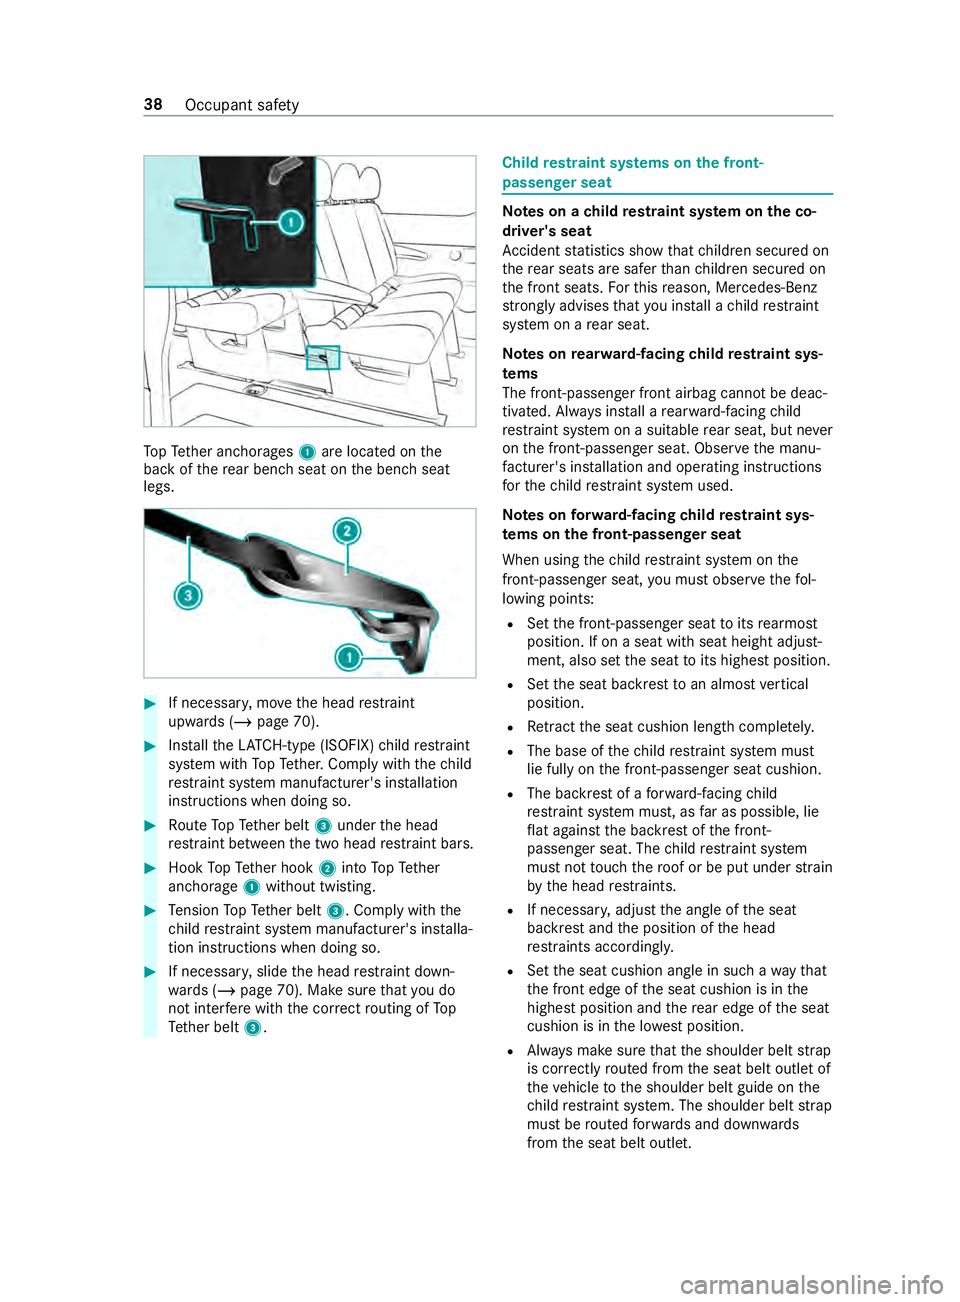
pTe ther anchorages 1are located on the
back of there ar ben chseat on the bench seat
legs. #
If necessar y,mo vethe head restra int
upwards (/ page 70). #
Installth eLA TC H-type (ISOFIX) child restra int
sy stem with TopTe ther. Comply with thech ild
re stra int sy stem manufacturer's ins tallation
instructions when doing so. #
Route TopTe ther belt 3under the head
re stra int between the two head restra int bars. #
Hook TopTe ther hook 2into TopTe ther
anchorage 1without twisting. #
Tension TopTe ther belt 3. Comply with the
ch ild restra int sy stem manufacturer's ins talla‐
tion instructions when doing so. #
If necessar y,slide the head restra int down‐
wa rds (/ page 70). Make sure that you do
not inter fere with the cor rect routing of To p
Te ther belt 3. Child
restra int sy stems on the front-
passenger seat Note
s on a child restra int sy stem on the co-
driver's seat
Ac cident statistics show that children secured on
th ere ar seats are safer than children secured on
th e front seats. Forth is reason, Mercedes-Benz
stro ngly advises that you ins tall a child restra int
sy stem on a rear seat.
Note s onrear wa rd-facing child restra int sys‐
te ms
The front-passen ger front airbag cannot be deac‐
tivated. Alw ays ins tall a rear wa rd-facing child
re stra int sy stem on a suitable rear seat, but ne ver
on the front-passen ger seat. Obser vethe manu‐
fa cturer's ins tallation and operating instructions
fo rth ech ild restra int sy stem used.
Note s onforw ard-facing child restra int sys‐
te ms on the front-passenger seat
When using thech ild restra int sy stem on the
front-passenger seat, you must obse rveth efo l‐
lowing points:
R Set the front-passen ger seat toits rearmost
position. If on a seat with seat height adjust‐
ment, also set the seat toits highest position.
R Set the seat backrest toan almost vertical
position.
R Retract the seat cushion length comple tely.
R The base of thech ild restra int sy stem must
lie fully on the front-passen ger seat cushion.
R The backrest of a forw ard-facing child
re stra int sy stem must, as far as possible, lie
fl at against the backrest of the front-
passenger seat. The child restra int sy stem
must not touch thero of or be put under stra in
by the head restra ints.
R If necessar y,adjust the angle of the seat
backrest and the position of the head
re stra ints acco rding ly.
R Set the seat cushion angle in such a wayth at
th e front edge of the seat cushion is in the
highest position and there ar edge of the seat
cushion is in the lo west position.
R Always make sure that the shoulder belt strap
is cor rectly routed from the seat belt outlet of
th eve hicle tothe shoulder belt guide on the
ch ild restra int sy stem. The shoulder belt strap
must be routed forw ards and down wards
from the seat belt outlet. 38
Occupant saf ety
Page 63 of 354
R
If necessar y,adjust the seat belt outlet and
th e front-passenger seat as appropriate.
R Never place objects under or behind thech ild
re stra int sy stem, e.g. cushions.
Alw ays obser vethe manufacturer's ins tallation
and operating instructions forth ech ild restra int
sy stem being used. Ac
tivating/deactivating child saf ety loc ksfor
th e doors &
WARNING Risk of accident and inju ry
due tochildren left unat tended in the
ve hicle
If ch ildren are left unat tended in theve hicle,
th ey could:
R Open doo rs,th ereby endangering other
persons or road users.
R Get out and be stru ck byoncoming traf‐
fi c.
R Ope rate ve hicle equipment and become
trapped, forex ample.
In addition, thech ildren could also set the
ve hicle in motion, forex ample by:
R Releasing the parking brake.
R Changing the transmission position.
R Starting theve hicle. #
Never lea vechildren unat tended in the
ve hicle. #
When leaving theve hicle, alw aysta ke
th eke y with you and lock theve hicle. #
Keep theve hicle key out of reach of
ch ildren. &
WARNING Risk offata l injury due to
ex posure toextreme heat or cold in the
ve hicle
If people – particular lych ildren – are exposed
to extreme temp eratures over an extended
pe riod of time, there is a risk of serious or
eve nfa ta l injur y. #
Never lea veanyone – pa rticularly chil‐
dren – unat tended in theve hicle. #
Never lea veanimals in theve hicle unat‐
te nded. &
WARNING Risk of accident and injury
due tochildren left unat tended in the
ve hicle
When children are tra veling in theve hicle,
th ey could:
R open doo rs,th ereby endangering other
people or road users
R getout of theve hicle and be hit bytraf fic
R operate vehicle equipment and become
trapped, forex ample #
When children are tra veling in theve hi‐
cle, alw ays activate theav ailable child
saf ety loc ks. #
Never lea vechildren unat tended in the
ve hicle. #
When leaving theve hicle, alw aysta ke
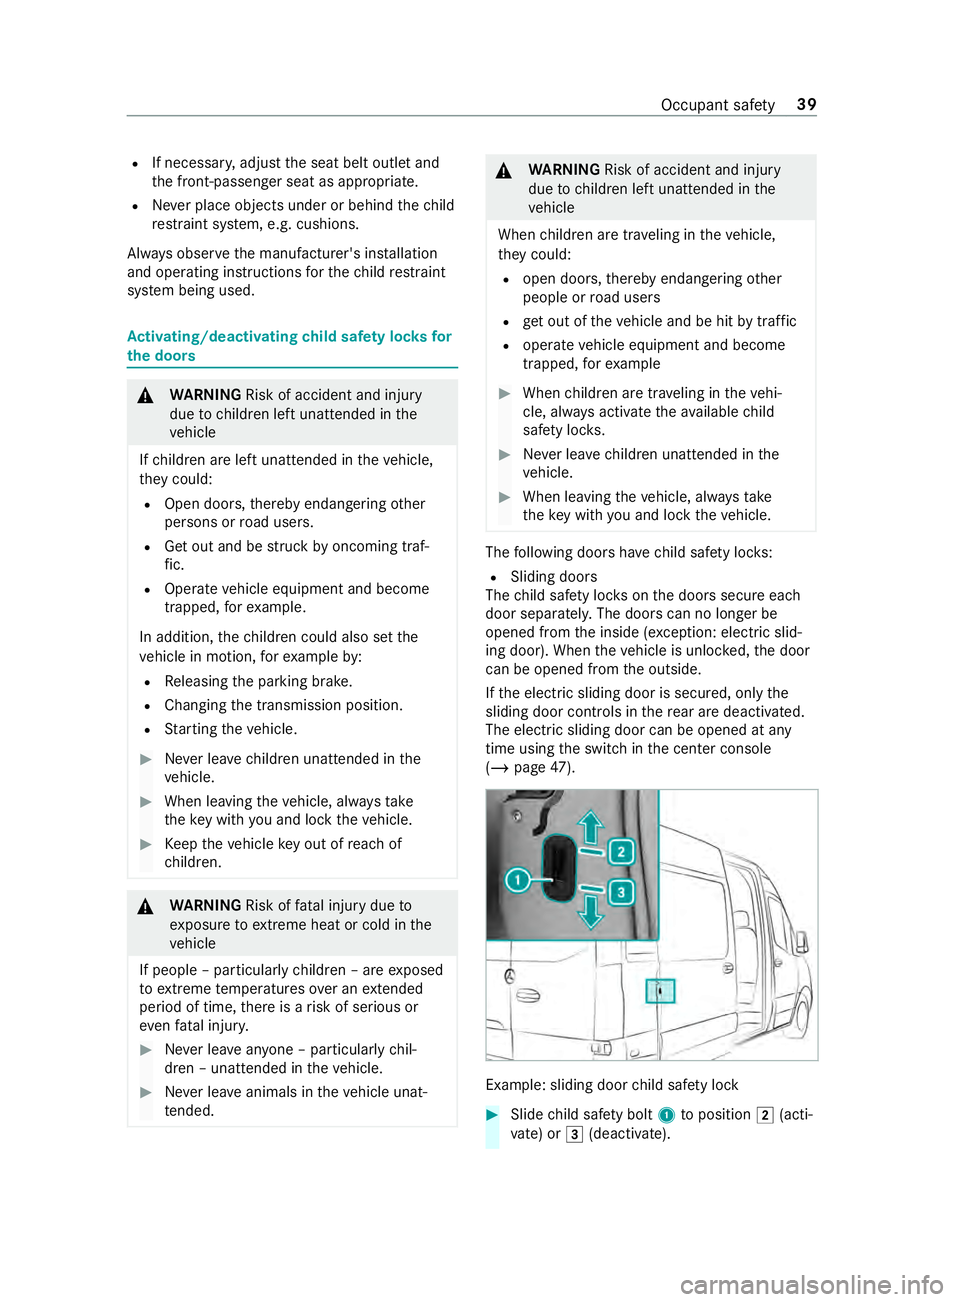
th eke y with you and lock theve hicle. The
following doors ha vechild saf ety loc ks:
R Sliding doo rs
The child saf ety loc kson the doors secure each
door separatel y.The doors can no longer be
opened from the inside (e xception: electric slid‐
ing door). When theve hicle is unloc ked, the door
can be opened from the outside.
If th e electric sliding door is secured, only the
sliding door contro ls inthere ar are deactivated.
The electric sliding door can be opened at any
time using the switch in the center console
(/ page 47). Example: sliding door
child saf ety lock #
Slide child saf ety bolt 1toposition 0048(acti‐
va te) or 0049(deactivate). Occupant saf
ety39
Page 64 of 354
#
Make sure that thech ild saf ety loc ksare
wo rking properly. Note
s on pets in theve hicle &
WARNING Risk of accident and inju ry
due toanimals left unsecured or unat ten‐
ded in theve hicle
If yo u lea veanimals in theve hicle unattended
or unsecured, they could possib lypress down
buttons or switches.
Thereby an animal may:
R activate vehicle equipment and become
trapped, forex ample
R swit chsystems on or off and endanger
ot her road users
Un secured animals may be throw n around in
th eve hicle in theeve nt of an accident or sud‐
den steering and braking maneuver and injure
ve hicle occupants in the process. #
Never lea veanimals in theve hicle unat‐
te nded. #
Always cor rectly secu reanimals while
driving, forex ample using a suitable ani‐
mal car rier. 40
Occupant saf ety
Page 65 of 354
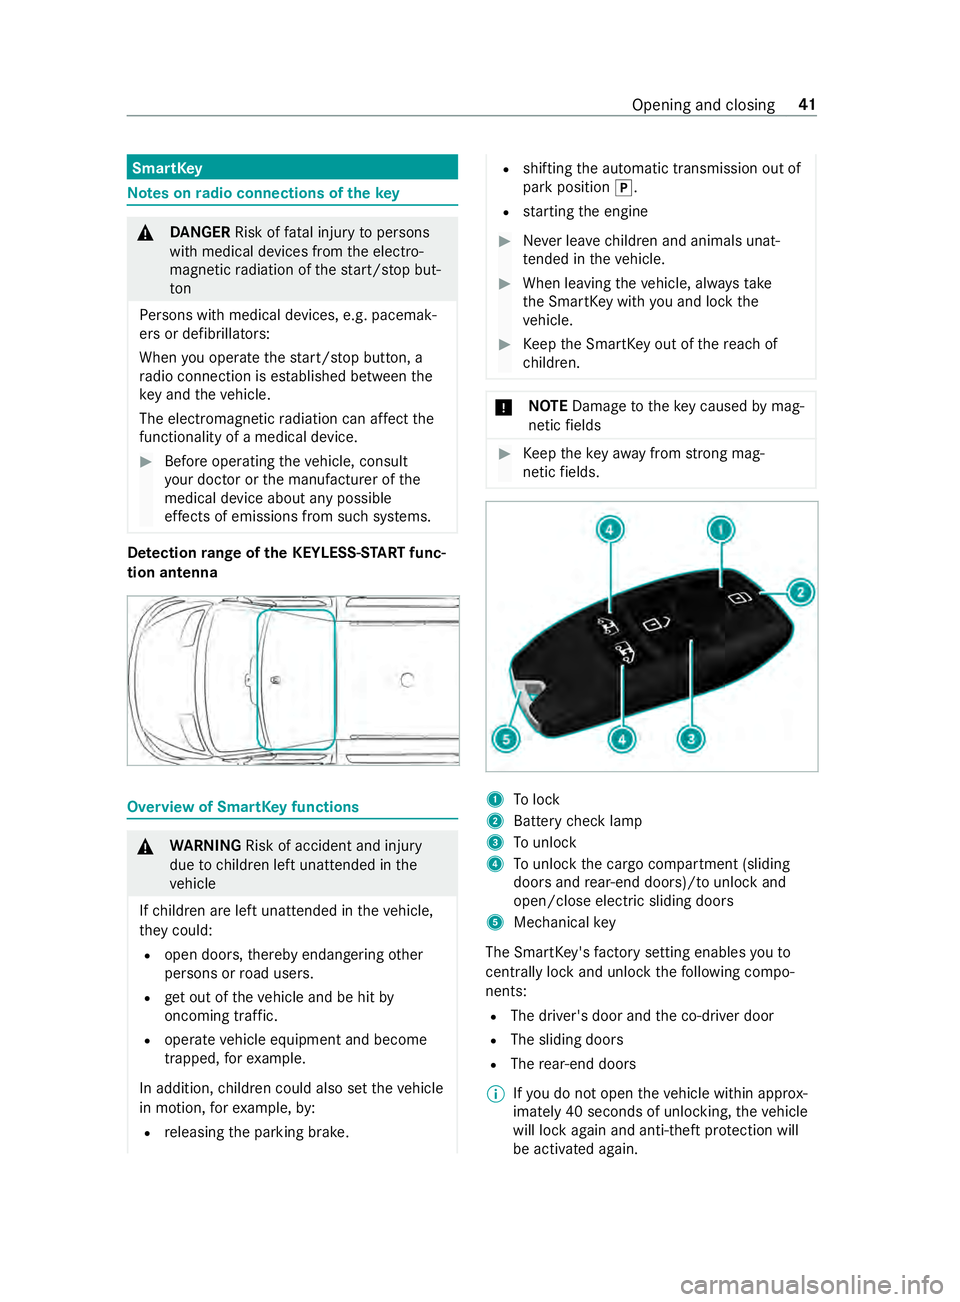
SmartK
ey Note
s onradio connections of the key&
DANG ER Risk of fata l injury topersons
with medical devices from the electro‐
magnetic radiation of thest art/ stop but‐
ton
Pe rsons with medical devices, e.g. pacemak‐
ers or defibrillators:
When you operate thest art/ stop button, a
ra dio connection is es tablished between the
ke y and theve hicle.
The electromagnetic radiation can af fect the
functionality of a medical device. #
Before operating theve hicle, consult
yo ur doc tor or the manufacturer of the
medical device about any possible
ef fects of emissions from such sy stems. De
tection range of the KEYLESS-S TART func‐
tion antenna Overview of SmartK
eyfunctions &
WARNING Risk of accident and inju ry
due tochildren left unat tended in the
ve hicle
If ch ildren are left unat tended in theve hicle,
th ey could:
R open doo rs,th ereby endangering other
persons or road users.
R get out of theve hicle and be hit by
oncoming traf fic.
R operate ve hicle equipment and become
trapped, forex ample.
In addition, children could also set theve hicle
in motion, forex ample, by:
R releasing the parking brake. R
shifting the automatic transmission out of
park position 005D.
R starting the engine #
Never lea vechildren and animals unat‐
te nded in theve hicle. #
When leaving theve hicle, alw aysta ke
th e SmartK eywith you and lock the
ve hicle. #
Keep the SmartK eyout of there ach of
ch ildren. *
NO
TEDama getotheke y caused bymag‐
netic fields #
Keep theke yaw ay from strong mag‐
netic fields. 1
Tolock
2 Battery check lamp
3 Tounlo ck
4 Tounlo ckthe cargo compartment (sliding
doors and rear-end doors)/ tounlo ckand
open/close electric sliding doors
5 Mechanical key
The SmartK ey's factory setting enables youto
centrally lock and unlock thefo llowing compo‐
nents:
R The driver's door and the co-driver door
R The sliding doors
R The rear-end doors
% If
yo u do not open theve hicle within appr ox‐
imately 40 seconds of unlocking, theve hicle
will lock again and anti-theft pr otection will
be activated again. Opening and closing
41
Page 66 of 354
Do not
keep the SmartK eytoge ther with elec‐
tronic devices or me tallic objects. This can af fect
th e SmartK ey's functionality.
% If
th e battery check lamp does not light up
when you press the0036 or0037 button, the
battery is dischar ged.
Re place the SmartK eybattery (/ page 42). Ac
tivating/deactivating the acoustic lo cking
ve rification signal Multimedia sy
stem:
4 © 5
Settings 5
Vehicle #
Switch Acoustic Lock on or off. Changing
the unlocking settings The
key has thefo llowing adjus table unlocking
functions:
R unlock cent rally
R unlock driver's and front-passenger door
(Cargo Van)
R unlock driver's door (Passenger Van,chassis
ve rsion) #
Toswitch between the settings: press and
hold the0036 and0037 buttons at the same
time for appro ximately six seconds until the
battery check lamp flashes twice.
When the locking function is selected forth e driv‐
er's door or the driver's and front-passenger
door:
R pressing the0036 button a second time
unloc kstheve hicle centra lly Re
ducing the energy consum ption of the
SmartK ey If
yo u do not use theve hicle or a SmartK ey for an
ex tended pe riod, you may deactivate the KEY‐
LESS START function of the SmartK ey. #
Todeactivate: pressthe0037 button on the
SmartK eytwice in quick succession.
The battery check lamp on the SmartK ey
lights up twice quickly and once for longer. #
Toactivate: press any button on the Smart‐
Ke y.
When starting theve hicle with the SmartK eyin
th e slot in the shift console, the SmartK eyfunc‐
tions are activated auto matically. Re
moving and inse rting the mechanical key #
Toremo ve:press release button 2.
Mechanical key1 is pushed slight ly out. #
Pull me chanical key1 out co mplete ly. #
Toinser t:press release button 2. #
Slide mechanical key1 in co mplete ly until it
engages. Re
placing the key battery &
DANG ER Serious damage tohealth
caused byswallowing batteries
Batteries contain toxic and cor rosive subs tan‐
ces. Swallowing batteries may cause serious
damage tohealth.
There is a risk of fata l injur y. #
Keep batteries out of there ach of chil‐
dren. #
If batteries are swallo wed, seek medical
attention immediately. +
ENVIRONMEN
TALNO TEEnvironmental
damage caused byimproper disposal of
batteries Bat
teries contain pollutants. It is
illegal todispose of them with the household
ru bbish. #
Dispose of batteries in an
environmen tally responsible manner.
Ta ke dischar ged batteries toaqu alified
specialist workshop or toa collection
point for used batteries. 42
Opening and closing
Page 67 of 354
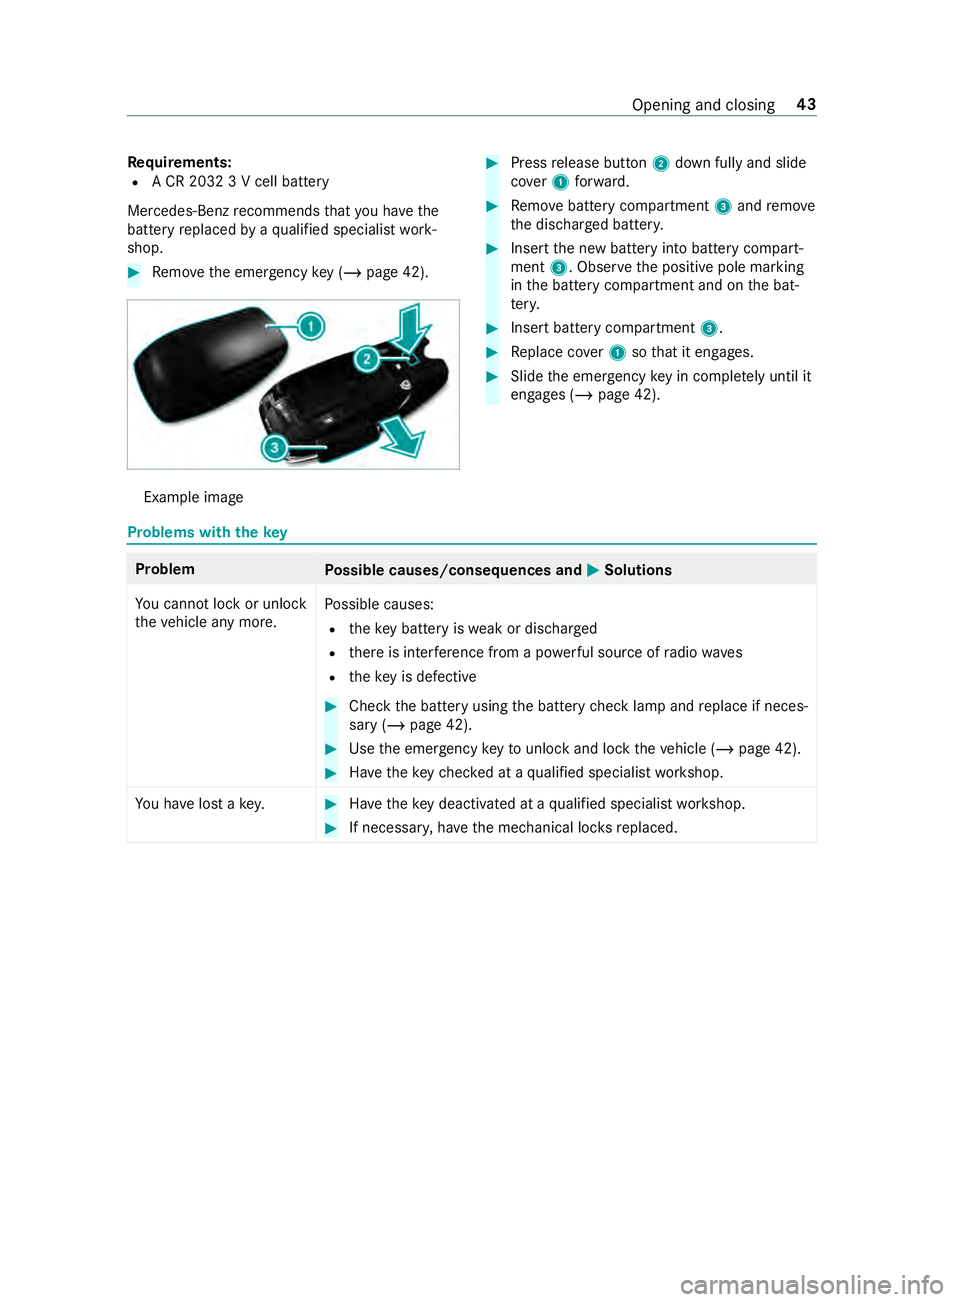
Re
quirements:
R A CR 2032 3 V cell battery
Mercedes-Benz recommends that you ha vethe
battery replaced byaqu alified specialist work‐
shop. #
Remo vethe emer gency key ( / page 42). Example image #
Press release button 2down fully and slide
co ver1 forw ard. #
Remo vebattery compartment 3and remo ve
th e dischar ged batter y. #
Insert the new battery into battery compart‐
ment 3. Obser vethe positive pole marking
in the battery compartment and on the bat‐
te ry. #
Insert battery compartment 3. #
Replace co ver1 sothat it engages. #
Slide the emer gency key in co mplete ly until it
engages (/ page 42). Problems with
thekey Problem
Possible causes/consequences and 0050 0050Solutions
Yo u cannot lock or unlo ck
th eve hicle any more. Po
ssible causes:
R theke y bat tery iswe ak or dischar ged
R there is inter fere nce from a po werful source of radio wav es
R theke y is defective #
Check the battery using the battery check lamp and replace if neces‐
sary (/ page 42). #
Use the emer gency keyto unlo ckand lock theve hicle (/ page 42). #
Have theke ych ecked at a qualified specialist workshop.
Yo u ha velost a key. #
Have theke y deacti vated at a qualified specialist workshop. #
If necessar y,ha ve the mechanical loc ksreplaced. Opening and closing
43
Page 68 of 354
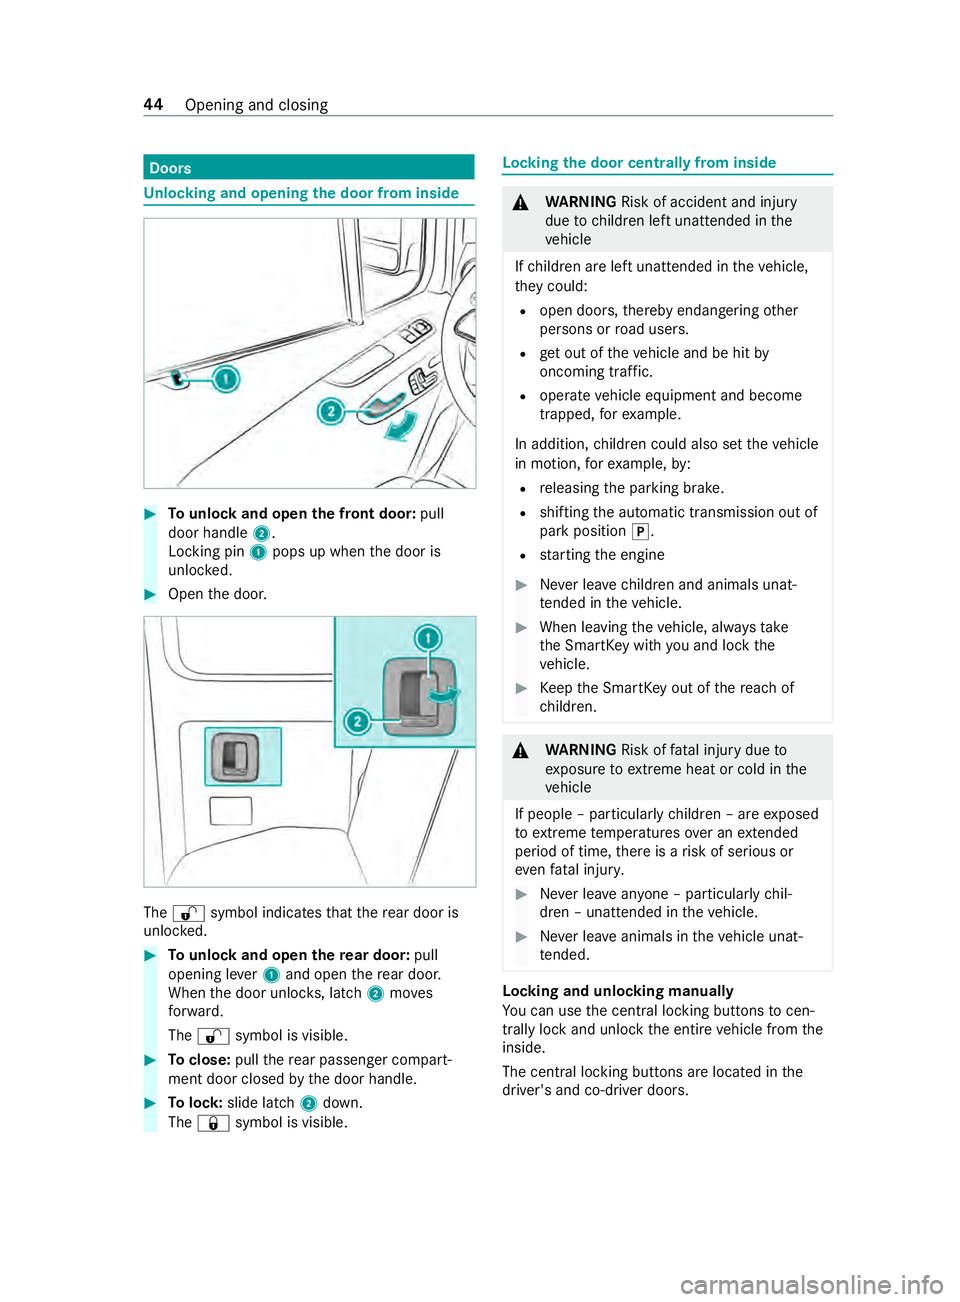
Doors
Un
locking and opening the door from inside #
Tounlo ckand open the front door: pull
door handle 2.
Locking pin 1pops up when the door is
unloc ked. #
Open the door. The
0036 symbol indicates that there ar door is
unlo cked. #
Tounlo ckand open there ar door: pull
opening le ver1 and open there ar door.
When the door unloc ks, latch 2moves
fo rw ard.
The 0036 symbol is visible. #
Toclose: pullthere ar passenger compart‐
ment door closed bythe door handle. #
Tolock: slide latch 2down.
The 0037 symbol is visible. Locking
the door centrally from inside &
WARNING Risk of accident and injury
due tochildren left unat tended in the
ve hicle
If ch ildren are left unat tended in theve hicle,
th ey could:
R open doo rs,th ereby endangering other
persons or road users.
R get out of theve hicle and be hit by
oncoming traf fic.
R operate ve hicle equipment and become
trapped, forex ample.
In addition, children could also set theve hicle
in motion, forex ample, by:
R releasing the parking brake.
R shifting the automatic transmission out of
park position 005D.
R starting the engine #
Never lea vechildren and animals unat‐
te nded in theve hicle. #
When leaving theve hicle, alw aysta ke
th e SmartK eywith you and lock the
ve hicle. #
Keep the SmartK eyout of there ach of
ch ildren. &
WARNING Risk offata l injury due to
ex posure toextreme heat or cold in the
ve hicle
If people – particular lych ildren – are exposed
to extreme temp eratures over an extended
pe riod of time, there is a risk of serious or
eve nfa ta l injur y. #
Never lea veanyone – pa rticularly chil‐
dren – unat tended in theve hicle. #
Never lea veanimals in theve hicle unat‐
te nded. Lo
cking and unlocking manually
Yo u can use the cent ral locking buttons tocen‐
trally lock and unlock the entire vehicle from the
inside.
The central locking buttons are located in the
driver's and co-driver doors. 44
Opening and closing
Page 69 of 354
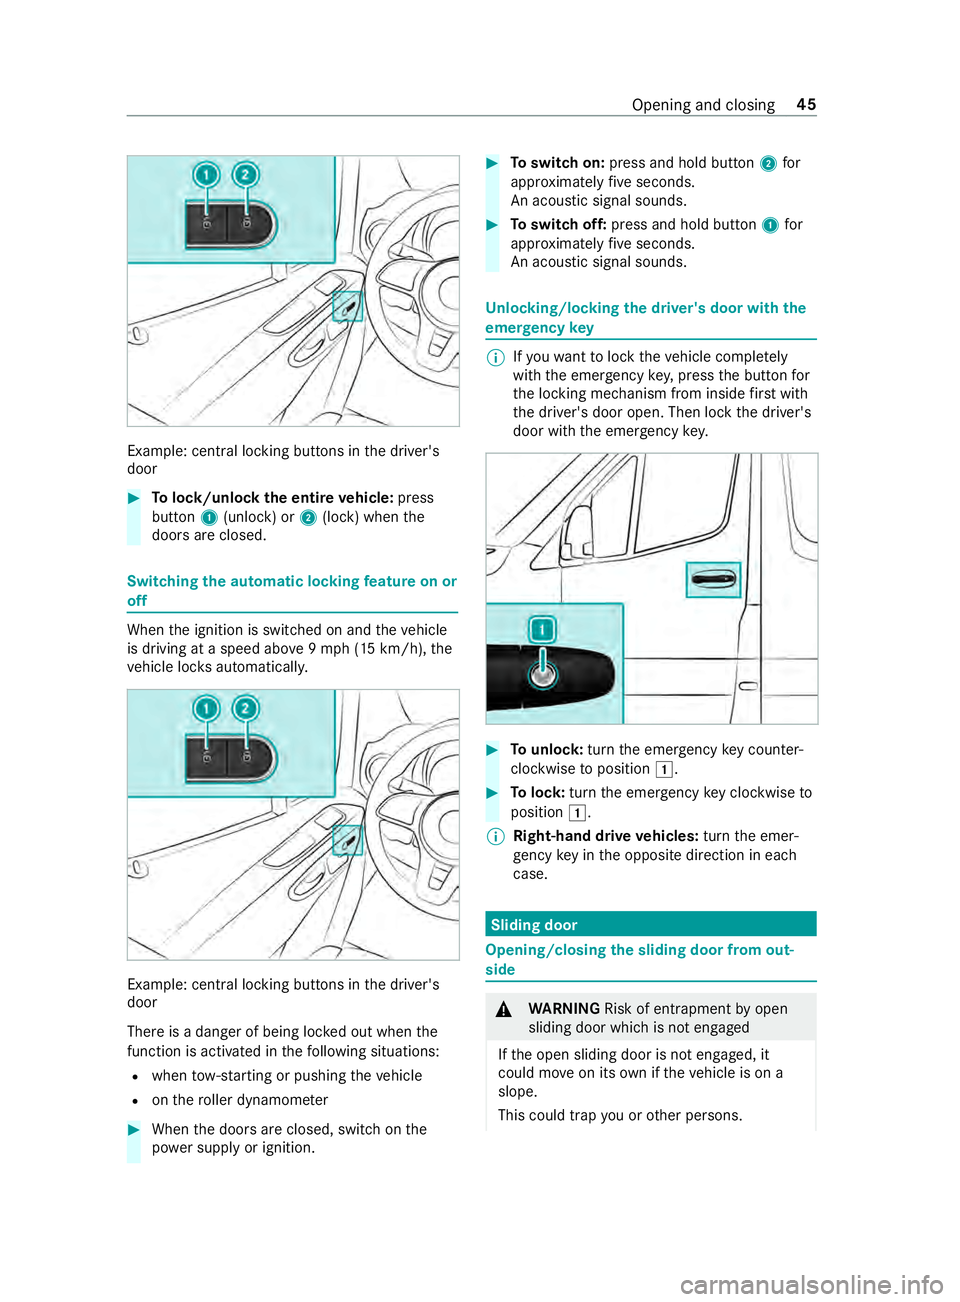
Example: central lo
cking buttons in the driver's
door #
Tolock/unlock the entire vehicle: press
button 1(unlock) or 2(lock) when the
doors are closed. Switching
the automatic locking feature on or
off When
the ignition is switched on and theve hicle
is driving at a speed abo ve9mp h (15 km/h), the
ve hicle loc ksautomaticall y. Example: central lo
cking buttons in the driver's
door
There is a danger of being loc ked out when the
function is activated in thefo llowing situations:
R when tow- starting or pushing theve hicle
R onthero ller dynamom eter #
When the doors are closed, switch on the
po we r supp lyor ignition. #
Toswitch on: press and hold button 2for
appr oximately five seconds.
An acoustic signal sounds. #
Toswitch off: press and hold button 1for
appr oximately five seconds.
An acoustic signal sounds. Un
locking/locking the driver's door with the
emer gency key %
If
yo uwa nttolock theve hicle comple tely
wi th th e emer gency key,press the button for
th e locking mechanism from inside firs t wi th
th e driver's door open. Then lock the driver's
door with the emer gency key. #
Tounlo ck:turn the emer gency key counter-
clo ckwise toposition 0047. #
Tolock: turnthe emer gency key clo ckwise to
position 0047.
% Right-hand drive
vehicles: turnthe emer‐
ge ncy key in the opposite direction in each
case. Sliding door
Opening/closing
the sliding door from out‐
side &
WARNING Risk of entrapment byopen
sliding door which is not engaged
If th e open sliding door is not engaged, it
could mo veon its own if theve hicle is on a
slope.
This could trap you or other persons. Opening and closing
45
Page 70 of 354
#
Always make sure that the open sliding
door is engaged. Open the sliding door
as far as it will go. %
Yo
ur vehicle may be equipped with a long
sliding door with an intermediate de tent. Yo u
can also lock the sliding door in place around
halfw aywhen opening and closing. If you do
th is, the door does not ha vetobe opened
fully when getting into or out of theve hicle.
The sliding door is not fully engaged when in
th e intermediate de tent. #
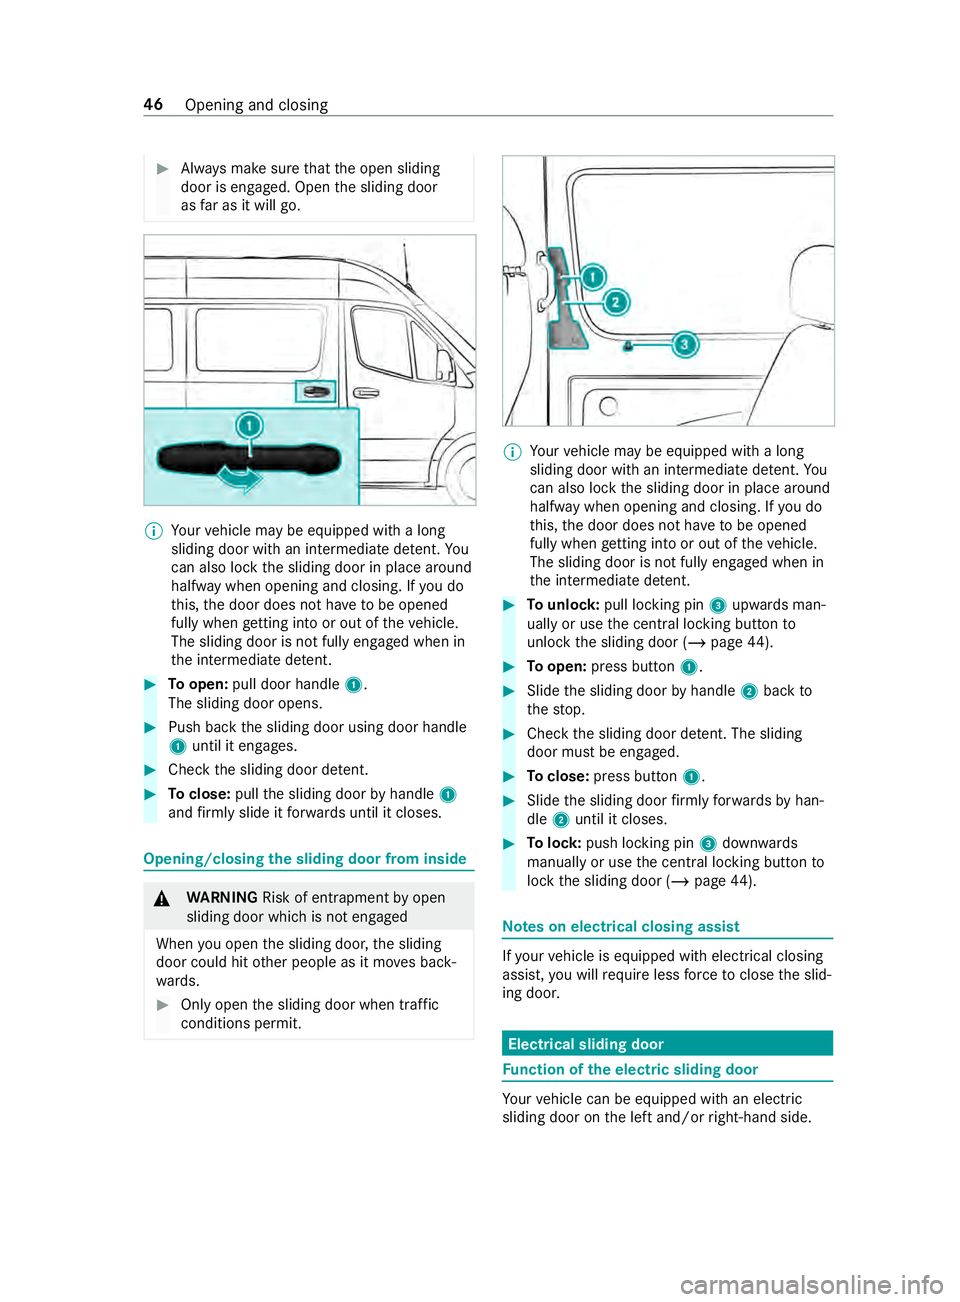
Toopen: pull door handle 1.
The sliding door opens. #
Push back the sliding door using door handle
1 until it engages. #
Check the sliding door de tent. #
Toclose: pullthe sliding door byhandle 1
and firm lyslide it forw ards until it closes. Opening/closing
the sliding door from inside &
WARNING Risk of entrapment byopen
sliding door which is not engaged
When you open the sliding door, the sliding
door could hit other people as it mo ves back‐
wa rds. #
Only open the sliding door when tra ffic
conditions permit. %
Yo
ur vehicle may be equipped with a long
sliding door with an intermediate de tent. Yo u
can also lock the sliding door in place around
halfw aywhen opening and closing. If you do
th is, the door does not ha vetobe opened
fully when getting into or out of theve hicle.
The sliding door is not fully engaged when in
th e intermediate de tent. #
Tounlo ck:pull lo cking pin 3upwards man‐
ually or use the cent ral locking button to
unlo ckthe sliding door (/ page44). #
Toopen: press button 1. #
Slide the sliding door byhandle 2back to
th estop. #
Check the sliding door de tent. The sliding
door must be engaged. #
Toclose: press button 1. #
Slide the sliding door firm lyforw ards byhan‐
dle 2until it closes. #
Tolock: push locking pin 3down wards
manually or use the cent ral locking button to
lock the sliding door (/ page44). Note
s on electrical closing assist If
yo ur vehicle is equipped with electrical closing
assist, you will requ ire less forc eto close the slid‐
ing door. Electrical sliding door
Fu
nction of the electric sliding door Yo
ur vehicle can be equipped with an electric
sliding door on the left and/or right-hand side. 46
Opening and closing