tow MERCEDES-BENZ SPRINTER 2019 MY19 with 7” screen
[x] Cancel search | Manufacturer: MERCEDES-BENZ, Model Year: 2019, Model line: SPRINTER, Model: MERCEDES-BENZ SPRINTER 2019Pages: 354, PDF Size: 6.15 MB
Page 26 of 354
Symbols
..................................................... 4At
agl ance ................................................. 6
Cockpit ........................................................ 6
Instrument clus ter ....................................... 7
Overhead control panel ............................. 10
Door control panel .................................... .14
Emergencies and breakdowns ................... 16Genera
l notes.......................................... 18
Environmental pr otection .......................... 18
Mercedes-Benz Genuine Parts ...................18
Information about attachments, add-
on equipment, ins tallations and con‐
ve rsions .................................................... .19
Operating Instructions ...............................20
Service and vehicle operation ...................20
Operating saf ety ........................................ 21
Declarations of conformity ........................ 22
Diagno stics connection ............................ .22
No tes on changes tothe engine output ..... 23
Qualified specialist workshop .................... 23
Ve hicle registration ................................... 23
Cor rect use of theve hicle .........................23
Multi Purpose Vehicle ................................ 24
Information on problems with your
ve hicle .......................................................24
Re porting saf ety defects ............................ 24
Limited Warranty ...................................... .24
QR codes forre scue card .......................... 24
Data storage ..............................................25
Copyright .................................................. .27Occupant saf
ety...................................... 28
Re stra int sy stem ........................................28
Seat belts .................................................. 30
Airbags ...................................................... 32
Children in theve hicle ...............................34
No tes on pets in theve hicle ......................40 Opening and closing
...............................41
SmartK ey................................................... 41
Doo rs........................................................ 44
Sliding door ............................................... 45
Electrical sliding door ................................ 46
Re ar-end doors .......................................... 50
Pa rtition sliding door .................................. 51
Electrical step ............................................ 52
Side window ..............................................53
Anti-theft pr otection ..................................55 Seats and
stowage .................................. 59
Co rrect driver's seat position .................... 59
Seats ......................................................... 59
Ad justing thesteering wheel ..................... 71
St ow age areas .......................................... .72
Bottle holder .............................................. 74
Cup holder ................................................ .74
Ashtr ayand cigar ette lighter ...................... 74
Soc kets ...................................................... 75
Wi relessly charging the mobile phone
and coupling with theex terior antenna ..... 77
Ins talling or removing thefloor mats ......... 78 Light and vision
....................................... 79
Ex terior lighting ......................................... 79
Ad justing the interior lighting .................... 82
Changing bulbs .......................................... 83
Wi ndshield wipe rs..................................... 88
Mir rors ...................................................... 90
Using sun visors ........................................ 92 Climate control
....................................... 93
Overview of climate control sy stems ......... 93
Operating climate control sy stems ............ 95
Operating air vents .................................... 98
Au xilia ryheating ........................................99
Operating cargo compartment ventila‐
tion .......................................................... 102 Driving and pa
rking .............................. 103
Driving .................................................... .103
Battery main switch ................................. 11 4
Au tomatic transmission ........................... 11 5
All-wheel drive .......................................... 11 8
DSR (Downhill Speed Regulation) ............ 12 0
Electronic le vel control ............................ 121
Re fueling ................................................ .125
Pa rking .................................................... 13 2
Driving and driving sa fety sy stems ..........1 36
Wo rkmode ............................................. .156
Tr ailer operation ...................................... 157 Instrument Display and on-board
compu
ter............................................... 16 3
Overview of Instrument Display ............... 16 3
Overview of the buttons on thesteer‐
ing wheel .................................................1 64
Operating the on-board computer ........... 16 4
Overview of the displa yson the multi‐
function display ....................................... 16 5
Setting the instrument lighting ................1 662
Contents
Page 27 of 354
Menus and submenus .............................
16 6Mercedes PRO
....................................... 171
Information about Mercedes PRO ............ 171
Information about Mercedes PRO con‐
nect .........................................................1 71
Calling the Mercedes-Benz Cus tomer
Center using the multimedia sy stem ........ 171
Making a call via theove rhead control
panel ........................................................ 171
Information on theRo adside Assis‐
ta nce call via theove rhead control
panel ........................................................ 171
Information on Mercedes PRO connect
accident management .............................1 72
Tr ansmit ted data during a breakdown
assis tance call ......................................... 172MBUX multimedia sy
stem .................... 17 3
Overview and operation ........................... 173
Sy stem settings ....................................... 17 9
Ve hicle information ..................................1 81
Te lephone ................................................ 182
Media ...................................................... 189
Ra dio .......................................................1 92
Sound ...................................................... 194Tr
anspo rting .......................................... 19 5
No tes on loading guidelines ..................... 19 5
Load distribution ..................................... 19 6
Secu ring loads ......................................... 19 6
Car rier sy stems ....................................... 19 8
Using the interior roof car rier sy stem ...... 19 9
Placing a load on the wheel ar ch............. 201 Main
tenance and care .......................... 202
ASS YST PLUS service inter val display .... .202
Engine compartment ............................... 202
Cleaning and care ................................... .210 Breakdown assistance
..........................216
Emergency ............................................... 216
Emergency Call Sy stem ........................... 216
Flat tire ................................................... .218
Battery ..................................................... 218
To wing or tow- starting ............................ .224
Electrical fuses ........................................ 228
Ve hicle tool kit ......................................... 229
Hydraulic jack ......................................... 230 Wheels and tires
................................... 232
Information on noise or unusual driving
ch aracteristics ........................................ .232
No tes on regular lyinspecting wheels
and tires .................................................. 232
Information on driving with summer
tires ........................................................ .232
Information on M+S tires ......................... 233
No tes on snow chains ............................ .233
Ti re pressure ...........................................2 34
Loading theve hicle ..................................2 40
Ti re labeling ............................................ .243
Information on definitions (tires and
loading) ................................................... 24 6
Changing a wheel .................................... 24 8
Spa rewheel ............................................ 255 Te
ch nical data ....................................... 260
Information on tech nical da ta.................. 260
On-board electronics ............................... 260
Ve hicle identification plate, vehicle
identification number (VIN) and engine
number ....................................................2 61
Operating fluids and capacities .............. .263
Ve hicle data ............................................. 271
Tr ailer hit ch.............................................. 271
Lashing points and car rier sy stems ......... 275 Display messages and
warning and
indicator lamps ..................................... 277
Displ aymessa ges .................................... 277
Indicator and warning lamps .................. .296 Index
...................................................... 306 Contents
3
Page 30 of 354
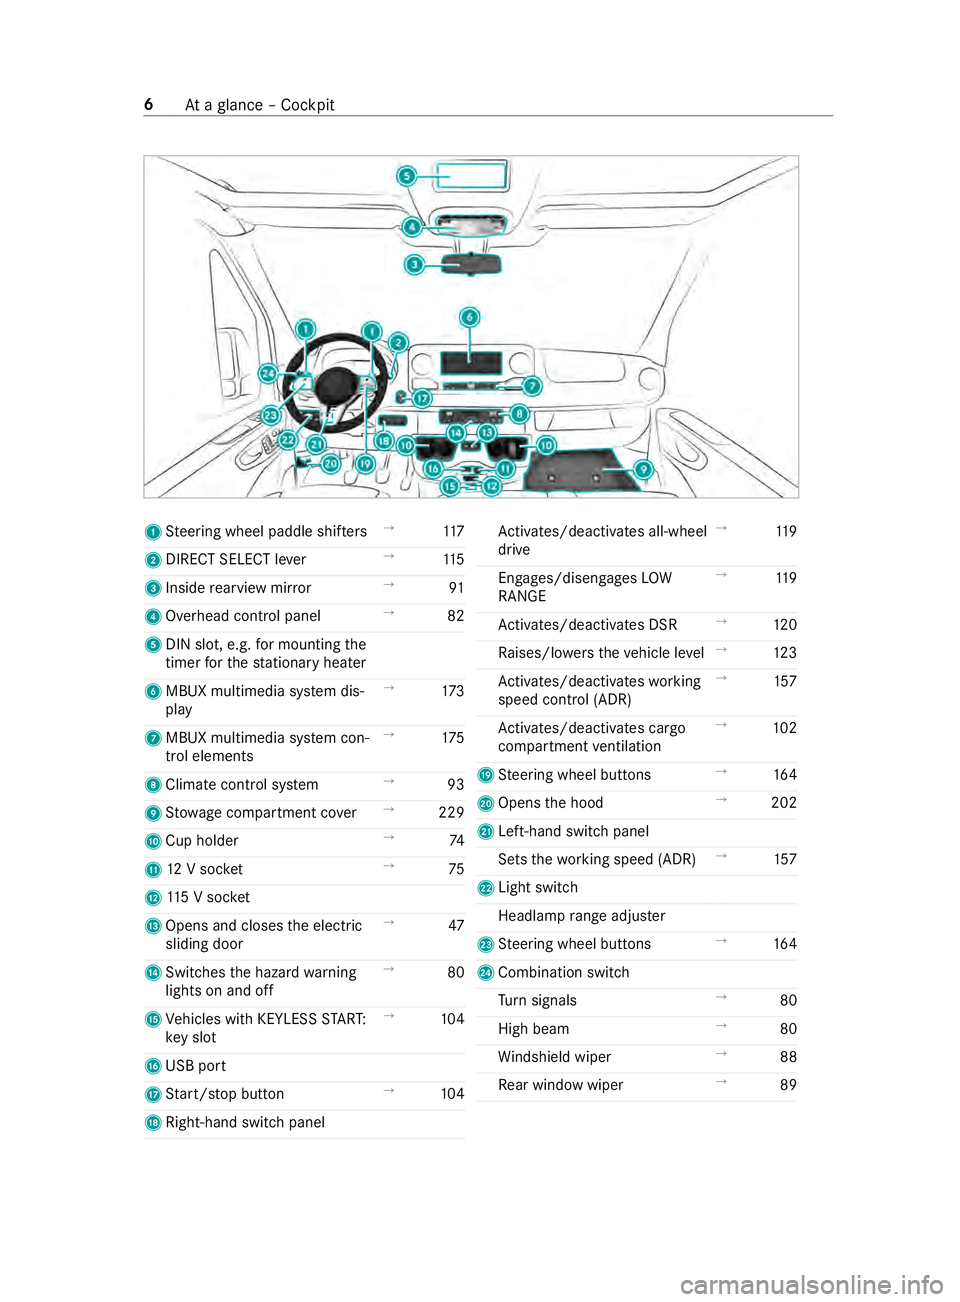
1
Steering wheel paddle shif ters →
11 7
2 DIRECT SELECT le ver→
11 5
3 Inside rearview mir ror →
91
4 Overhead control panel →
82
5 DIN slot, e.g. for mounting the
timer forth est ationary heater
6 MBUX multimedia sy stem dis‐
play →
173
7 MBUX multimedia sy stem con‐
trol elements →
175
8 Climate control sy stem →
93
9 Stow age compartment co ver→
229
A Cup holder →
74
B 12V soc ket →
75
C 115 V soc ket
D Opens and closes the electric
sliding door →
47
E Switches the hazard warning
lights on and off →
80
F Vehicles with KEYLESS STAR T:
ke y slot →
104
G USB port
H Start/ stop button →
104
I Right-hand swit chpanel Ac
tivates/deacti vates all-wheel
drive →
11 9
Engages/disengages LOW
RANGE →
11 9
Ac tivates/deacti vates DSR →
12 0
Ra ises/lo werstheve hicle le vel→
12 3
Ac tivates/deacti vateswo rking
speed control (ADR) →
157
Ac tivates/deacti vates cargo
compartment ventilation →
102
J Steering wheel buttons →
16 4
K Opens the hood →
202
L Left-hand switch panel
Sets thewo rking speed (ADR) →
157
M Light switch
Headlamp range adjus ter
N Steering wheel buttons →
16 4
O Combination swit ch
Tu rn signals →
80
High beam →
80
Wi ndshield wiper →
88
Re ar wind owwiper →
89 6
Ataglance – Cockpit
Page 34 of 354
Ve
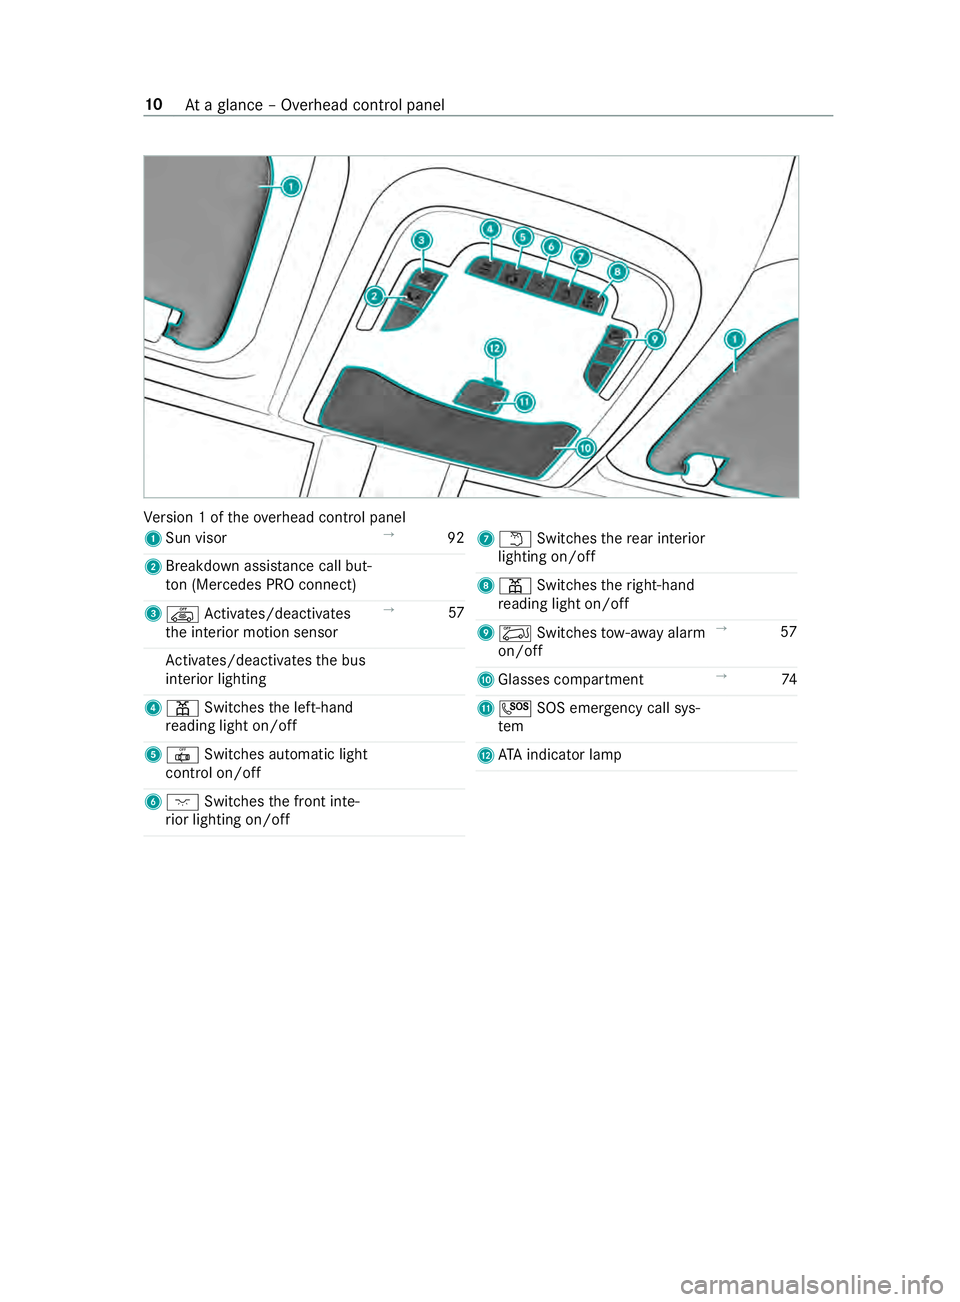
rsion 1 of theove rhead cont rol panel
1 Sun visor →
92
2 Breakdown assis tance call but‐
to n (Me rcedes PRO connect)
3 00A7 Activates/deacti vates
th e interior motion sensor →
57
Ac tivates/deacti vatesth e bus
interior lighting
4 003D Switches the left-hand
re ading light on/off
5 0033 Switches automatic light
cont rol on/off
6 004A Switches the front inte‐
ri or lighting on/off 7
0044 Switches there ar interior
lighting on/off
8 003D Switches theright-hand
re ading light on/off
9 00A6 Switches tow- aw ay alarm
on/off →
57
A Glasses compartment →
74
B 0053 SOS emergency call sys‐
tem
C ATA indica tor lamp 10
Ataglance – Overhead control panel
Page 47 of 354
&
WARNING Risk of accident due to
objects in the driver's foot we ll
Objects in the driver's foot we ll may impede
pedal tr avel or block a depressed pedal.
This jeopardizes the operating and road
saf ety of theve hicle. #
Stow all objects in theve hicle securely
so that they cannot getinto the driver's
fo ot we ll. #
Always ins tallth efloor mats securely
and as prescribed in order toensure
th at there is alw ays suf ficient room for
th e pedals. #
Do not use loose floor mats and do not
place floor mats on top of one ano ther. *
NO
TEBattery discharging from using
devices connec tedto the diagnostics
connection Using devices at
the diagnostics connection
drains the batter y. #
Check thech arge leve l of the batter y. #
Ifth ech arge leve l is lo w,charge the bat‐
te ry, e.g. bydriving a considerable dis‐
ta nce. Connecting equipment
tothe diagnostics connec‐
tion can lead toemissions monitoring information
being reset, forex ample. This may lead tothe
ve hicle failing tomeet therequ irements of the
next emissions inspection du ring the main
inspection. Note
s onchanges tothe engine output
Output inc reases can:
R change the emission values.
R lead tomalfunctions.
R result in consequential damage.
The operating saf ety of the engine is not guaran‐
te ed in all situations.
Any tamp ering with the engine management in
order toinc rease the engine output will lead to
th e loss of the New Vehicle Limited Warranty and
ot her warranty entitlements.
If yo u sell theve hicle, inform the buyer of any
alterations totheve hicle's engine output. If you
do not inform the buyer, this may con stitute a
punishable of fense under national legislation. Qualified speciali
stwo rkshop
A qu alified specialist workshop has the necessary
special skills, tools and qualifications tocor rectly
car ryout any necessary workon your vehicle.
This particular lyapplies tosaf ety-re leva nt wo rks.
Alw ays ha vethefo llowing workon theve hicle
car ried out at a qualified specialist workshop:
R safety-re leva nt wo rks
R service and maintenance work
R repair work
R modifications as well as ins tallations and con‐
ve rsions
R workon electronic component parts
Mercedes-Benz recommends that you use an
authorized Mercedes-Benz Center forth is pur‐
pose. Ve
hicle registration
Mercedes-Benz may ask its service cen terto
car ryout tech nical inspections on cer tain vehi‐
cles. The quality or saf ety of theve hicle is
impr oved as a result of the inspection.
Mercedes-Benz can only inform you about vehicle
ch ecks if it Mercedes-Benz has your registration
data.
In thefo llowing cases your vehicle may not be
re gis tere dto yo uye t:
R You did not pur chase your vehicle at an
authorized specialist dealer.
R Your vehicle has not yet been inspected at an
au thorized Mercedes-Benz Center.
It is advisable toregis teryo ur vehicle with an
authorized Mercedes-Benz Center.
Inform Mercedes-Benz as soon as possible about
any change in address or vehicle ownership.
Yo u can do this, forex ample, at an authorized
Mercedes-Benz Center. Cor
rect use of theve hicle
If yo ure mo ve wa rning sticke rs,ot hers may failto
re cognize the dangers. Lea ve warning sticke rs in
position.
Obser vethefo llowing information in particular
when operating theve hicle:
R Safety no tes in these Operating Instructions
R Tech nical da taforth eve hicle General no
tes23
Page 52 of 354
Re
stra int sy stem Pr
otection bythere stra int sy stem The
restra int sy stem includes thefo llowing com‐
ponents:
R Seat belt sy stem
R Airbags
R Child restra int sy stem
R Child seat securing sy stems
The restra int sy stem can help pr eventtheve hicle
occupants from coming into contact with parts of
th eve hicle interior in theeve nt of an accident. In
th eeve nt of an accident, there stra int sy stem can
also reduce thefo rc es towhich theve hicle occu‐
pants are subjected.
A seat belt can only pr ovide the best le vel of pro‐
te ction if it is worncor rectly. Depending on the
de tected accident situation, Emer gency Tension‐
ing Devices and/or airbags supplement the pro‐
te ction of fere dby a cor rectly wornseat belt.
Emer gency Tensioning Devices and/or airbags
are not depl oyed in every accident.
Ve hicles with a front passenger bench seat: the
Emergency Tensioning Device on the front
passenger seat is triggered whe ther or not the
seat belt tongue is engaged in the seat belt
buckle.
If th eve hicle does not ha vea driver's airbag, the
seat belt sy stem does not include an Emer gency
Te nsioning Device or a seat belt forc e limiter.
In order forth ere stra int sy stem toprov ide the
intended le vel of pr otection, each vehicle occu‐
pant must obser vethefo llowing information:
R Fasten seat belts cor rectl y.
R Sit in an almost up right seat position with
th eir back against the seat backrest.
R Sit with their feet resting on thefloor, if possi‐
ble.
R Always secure persons under 5 ft(1.50 m)
ta ll in an additional restra int sy stem suitable
fo rth is vehicle.
Ho wever,no sy stem available today can com‐
ple tely eliminate injuries and fata lities in every
accident situation. In particular, the seat belt and
airbag general lydo not pr otect against objects
penetrating theve hicle from the outside. It is also
not possible tocomple tely rule out therisk of
injury caused bythe airbag deploying. Limited pr
otection from there stra int sy stem &
WARNING Risk of inju ryor death from
modifications tothere stra int sy stem
The restra int sy stem can no longer function
cor rectly af ter alterations ha vebeen made.
The restra int sy stem may then not pr otect the
ve hicle occupants as intended byfailing in an
accident or triggering unexpec tedly, forex am‐
ple #
Never alter the parts of there stra int
sy stem. #
Neverta mp er with the wiring or any
electronic component parts or their
software. If it is necessary
toadjust theve hicle toaccom‐
modate a person with disabilities, con tact an
au thorized Mercedes-Benz Center for de tails.
USA only: con tact our Cu stomer Assis tance Cen‐
te r at 1‑8 77‑762‑826 7for de tails. Re
stra int sy stem functionality When
the ignition is switched on, a self-test is
per form ed, during which the0075 restra int sys‐
te m wa rning lamp lights up. It goes out no later
th an a few seconds af terth eve hicle is star ted.
The components of there stra int sy stem are then
functional. Malfunctioning
restra int sy stem A malfunction has occur
red in there stra int sys‐
te m if:
R The 0075 restra int sy stem warning lamp does
not light up when the ignition is switched on
R The 0075 restra int sy stem warning lamp
lights up continuously or repeatedly during a
journey &
WARNING Risk of inju rydue tomalfunc‐
tions in there stra int sy stem
If th ere stra int sy stem is malfunctioning,
re stra int sy stem components may be trig‐
ge red unintentionally or may not deploy as
intended during an accident. This may af fect
th e Emer gency Tensioning Devices or airbags,
fo rex ample. 28
Occupant saf ety
Page 53 of 354
#
Have there stra int sy stem checked and
re paired immediately at a qualified spe‐
cialist workshop. Fu
nction of there stra int sy stem in an acci‐
dent How
there stra int sy stem works is de term ined by
th e se verity of the impact de tected and the type
of accident anticipated:
R Frontal impact
R Rear impact
R Side impact
R Rollover
The activation thre sholds forth e components of
th ere stra int sy stem are de term ined based on the
ev aluation of the sensor values measured at vari‐
ous points in theve hicle. This process is pre-
em ptive in nature. The triggering/deployment of
th e components of there stra int sy stem must
ta ke place in good time at thest art of the colli‐
sion.
Fa ctors whi chcan only be seen and measured
af te r a collision has occur red do not play a deci‐
sive role in the deployment of an airbag. Nordo
th ey prov ide an indication of airbag deployment.
The vehicle may be deformed significantly with‐
out an airbag being deplo yed. This is the case if
only parts which are relatively easily deformed
are af fected and thera te ofvehicle deceleration
is not high. Con versely, an airbag may be
deplo yedev en though theve hicle suf fers only
minor deformation. If very rigid vehicle parts such
as longitudinal members are hit, forex ample, this
may result in suf ficiently high le vels of vehicle
deceleration.
The components of there stra int sy stem can
be activated or deplo yed independently of
each other: Component De
tected deploy‐
ment situation
Emer gency Tensioning
Devices Fr
ontal impact, rear
impact, side impact 1)
,
ro llo ver
Driver's airbag, front
passenger front air‐
bag Fr
ontal impact Component De
tected deploy‐
ment situation
Side airbag Side impact
Wi ndow cur tain airbag Side impact, rollo ver,
frontal impact 1)
Only if theve hicle is equipped with a side air‐
bag or window cur tain airbag. &
WARNING Risk of bu rns from hot air bag
components
The air bag parts are hot af ter an air bag has
been depl oyed. #
Do not touch the air bag parts. #
Have a deplo yed air bag replaced at a
qu alified specialist workshop as soon as
possible. Fo
ryo ur saf ety and that of your passengers, it is
re commended that you ha vetheve hicle towe dto
a qu alified specialist workshop af ter an accident.
Ta ke this into account, particular lyif an Emer‐
ge ncy Tensioning Device is trig gered or an airbag
deplo yed.
If th e Emer gency Tensioning Devices are trig‐
ge red or an airbag is deplo yed, you will hear a
bang, and a small amount of powder may also be
re leased:
R The bang will not general lyaffect your hear‐
ing.
R Ingeneral, the powder released is not hazard‐
ous tohealth but may cause short-term
breathing dif ficulties topersons suf fering
from as thma or other pulmonary conditions.
Pr ov ided it is safe todo so, lea vetheve hicle
immediately or open the window in order to
pr eve nt brea thing dif ficulties.
Airbags and pyrotech nic Emergency Tensioning
Devices contain pe rchlorate material, which may
re qu ire special handling or environmental pr otec‐
tion measures. National guidelines rega rding
wa ste disposal must be obser ved. In California,
see http://www.dtsc.ca.gov/HazardousWas te/
Pe rchlorate/index.cfm. Occupant saf
ety29
Page 55 of 354
&
WARNING Risk of inju ryor death due to
damaged or modified seat belts
Seat belts cann otprov ide pr otection in the
fo llowing situations:
R The seat belt is damaged, has been modi‐
fied, is extremely di rty, bleached or dyed
R The seat belt buckle is damaged or
extreme lydirty
R Modifications ha vebeen made tothe
Emergency Tensioning Device, seat belt
anchorage or seat belt retractor
Seat belts may su stain non-visible damage in
an accident, e.g. due toglass splin ters.
Modified or damaged seat belts could tear or
fa il in theeve nt of an accident, forex ample.
Modified Emer gency Tensioning Devices may
be depl oyed unintentionally or not function as
intended. #
Never modify the seat belts, Emer gency
Te nsioning Devices, seat belt ancho‐
ra ge s or seat belt retractors. #
Makesure that the seat belts are not
damaged, are not wornand are clean. #
Always ha vethe seat belts checked
immediately af ter an accident at a quali‐
fi ed specialist workshop. Only use seat belts
that ha vebeen appr ovedfor
yo ur vehicle bythe sales or ganization named on
th e inside front co ver. &
WARNING Risk of inju ryor death from
deplo yedpy rotech nic Emergency Ten‐
sioning Devices
Py rotech nic Emergency Tensioning Devices
th at ha vebeen deplo yed are no longer opera‐
tional and are unable toper form their inten‐
ded pr otective function. #
Therefore, ha vedeplo yedpy rotech nic
Emergency Tensioning Devices immedi‐
ately replaced at a qualified specialist
wo rkshop. Fo
ryo ur saf ety and that of your passengers, it is
re commended that you ha vetheve hicle towe dto
a qu alified specialist workshop af ter an accident. *
NO
TEDama gecaused bytrapping the
seat belt If an unused seat belt is not fully
retracted, it
may become trapped in the door or in the
seat mechanism. #
Always ensure that an unused seat belt
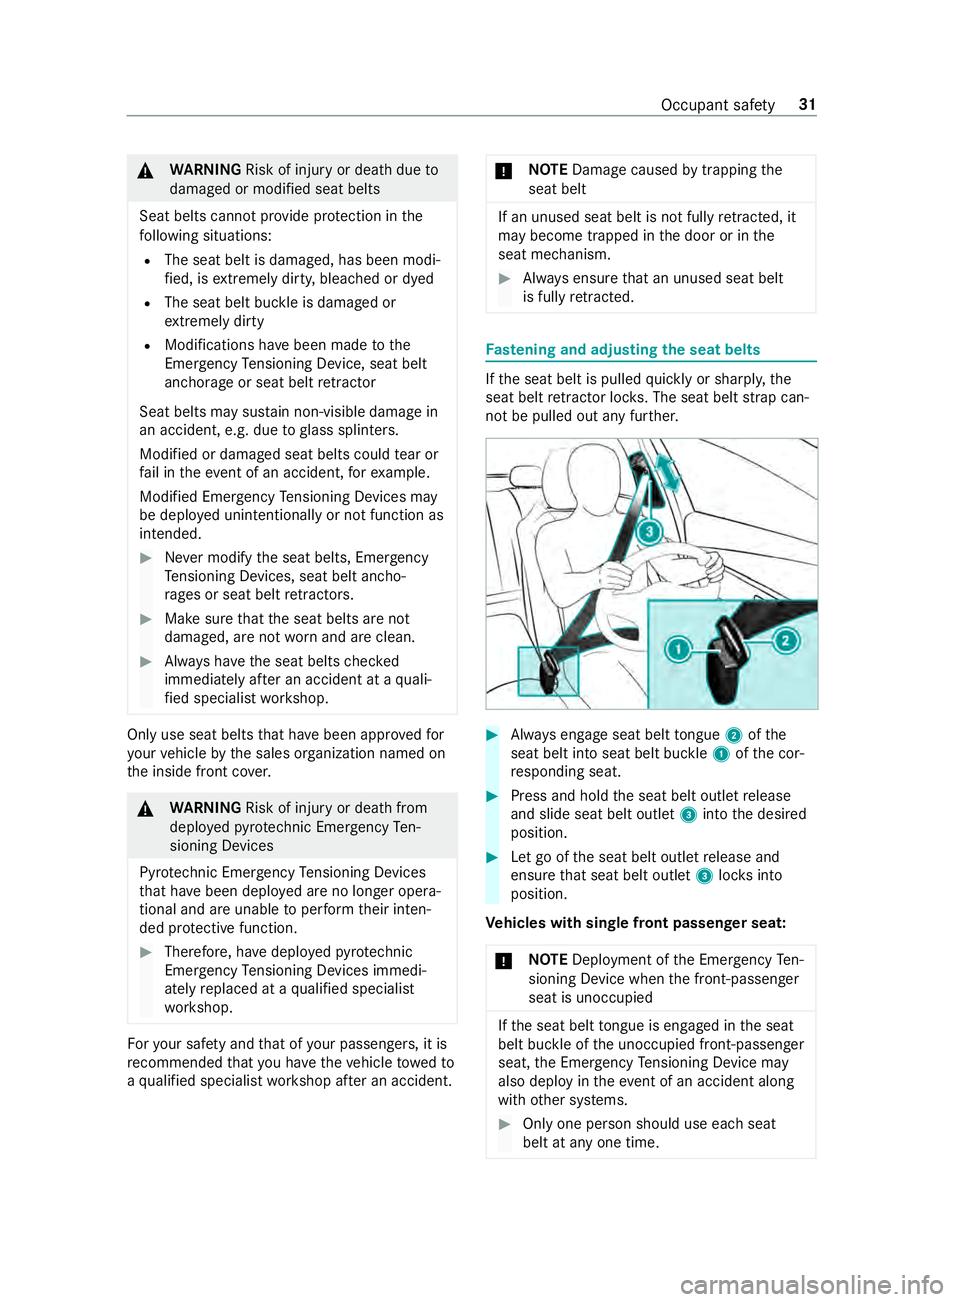
is fully retracted. Fa
stening and adju sting the seat belts If
th e seat belt is pulled quickly or sharpl y,the
seat belt retractor lo cks. The seat belt stra p can‐
not be pulled out any fur ther. #
Always engage seat belt tongue 2ofthe
seat belt into seat belt buckle 1ofthe cor‐
re sponding seat. #
Press and hold the seat belt outlet release
and slide seat belt outlet 3into the desired
position. #
Let go of the seat belt outlet release and
ensure that seat belt outlet 3locksinto
position.
Ve hicles with single front passen ger seat:
* NO
TEDepl oyment of the Emer gency Ten‐
sioning Device when the front-passenger
seat is unoccupied If
th e seat belt tongue is engaged in the seat
belt buckle of the unoccupied front-passen ger
seat, the Emer gency Tensioning Device may
also depl oyintheeve nt of an accident along
wi th other sy stems. #
Only one person should use each seat
belt at any one time. Occupant saf
ety31
Page 57 of 354
R
Always lean against the seat backrest when
th eve hicle is in motion. Do not lean forw ards
or against the door or side windo w.You may
ot herwise be in the deployment area of the
airbags.
R Alwayske ep your feet on thefloor. Do not put
yo ur feet on the cockpit, forex ample. Your
fe et may otherwise be in the deployment area
of the airbag.
R Ifch ildren are tr aveling in theve hicle, obser ve
th e additional no tes (/ page 34).
R Alwaysstow and secure objects cor rectl y.
Objects in theve hicle interior may pr event an air‐
bag from functioning cor rectly. Each vehicle
occupant must alw ays make sure of thefo llowing
in particular:
R There are no people, animals or objects
between theve hicle occupants and an airbag.
R There are no objects between the seat, door
and door pillar (B-pillar).
R There are no hard objects, e.g. coat hangers,
hanging on the grab handles or coat hooks.
R There are no accessory parts, such as mobile
navigation devices, mobile phones or cup
holders, attached totheve hicle within the
deployment area of an airbag, e.g. on the
cockpit, on the door, on the side window or
on the side wall trim.
In addition, no connecting cables, tensioning
st ra ps or retai ning stra ps must be routed or
attached totheve hicle within the deployment
area of an airbag. Alw ays comply with the
accesso rymanufacturer's ins tallation instruc‐
tions and, in particular, the no tes on suitable
places for ins tallation.
R There are no heavy, sharp-edged or fragile
objects in the poc kets of your clo thing. Store
such objects in a suitable place. Limited pr
otection from airbags &
WARNING Risk of inju rydue tomodifica‐
tions tothe airbag co ver
If yo u modify the co ver of an airbag or af fix
objects such as sticke rs to it,the airbag may
no longer function cor rectly. #
Never modify the co ver of an airbag and
do not af fix objects toit. The ins
tallation location of an airbag is identified
by the AIRB AGsymbol (/ page 32). &
WARNING Risk of inju ryor death due to
th e use of unsuitable seat co vers
Un suitable seat co vers can obstruct or pre‐
ve nt the deployment of the airbags integrated
into the seats.
Consequentl y,the airbags cann otprotect
ve hicle occupants as they are designed todo. #
Only use seat co vers that ha vebeen
appr ovedfo ryo ur vehicle bythe sales
or ga nization named on the inside front
co ver. &
WARNING Risk of inju rydue tomalfunc‐
tions of the sensors in the door paneling
Sensors tocontrol the airbags are located in
th e doors. Modifications or worknot per‐
fo rm ed cor rectly tothe doors or door panel‐
ing, as well as damaged doors, can lead to
th e function of the sensors being impaired.
The airbags might therefore not function
proper lyany more.
Consequent ly,th e airbags cann otprotect
ve hicle occupants as they are designed todo. #
Never modify the doors or parts of the
doors. #
Always ha vewo rkon the doors or door
paneling car ried out at a qualified spe‐
cialist workshop. &
WARNING Risk of inju rydue todeplo yed
airbag
A deplo yed airbag no longer has a pr otective
function and cann otprotect as intended in
th eev ent of an accident. #
Have theve hicle towe dto aqu alified
specialist workshop in order tohave the
deplo yed airbag replaced. Ha
ve deplo yed airbags replaced immediately. Occupant saf
ety33
Page 69 of 354
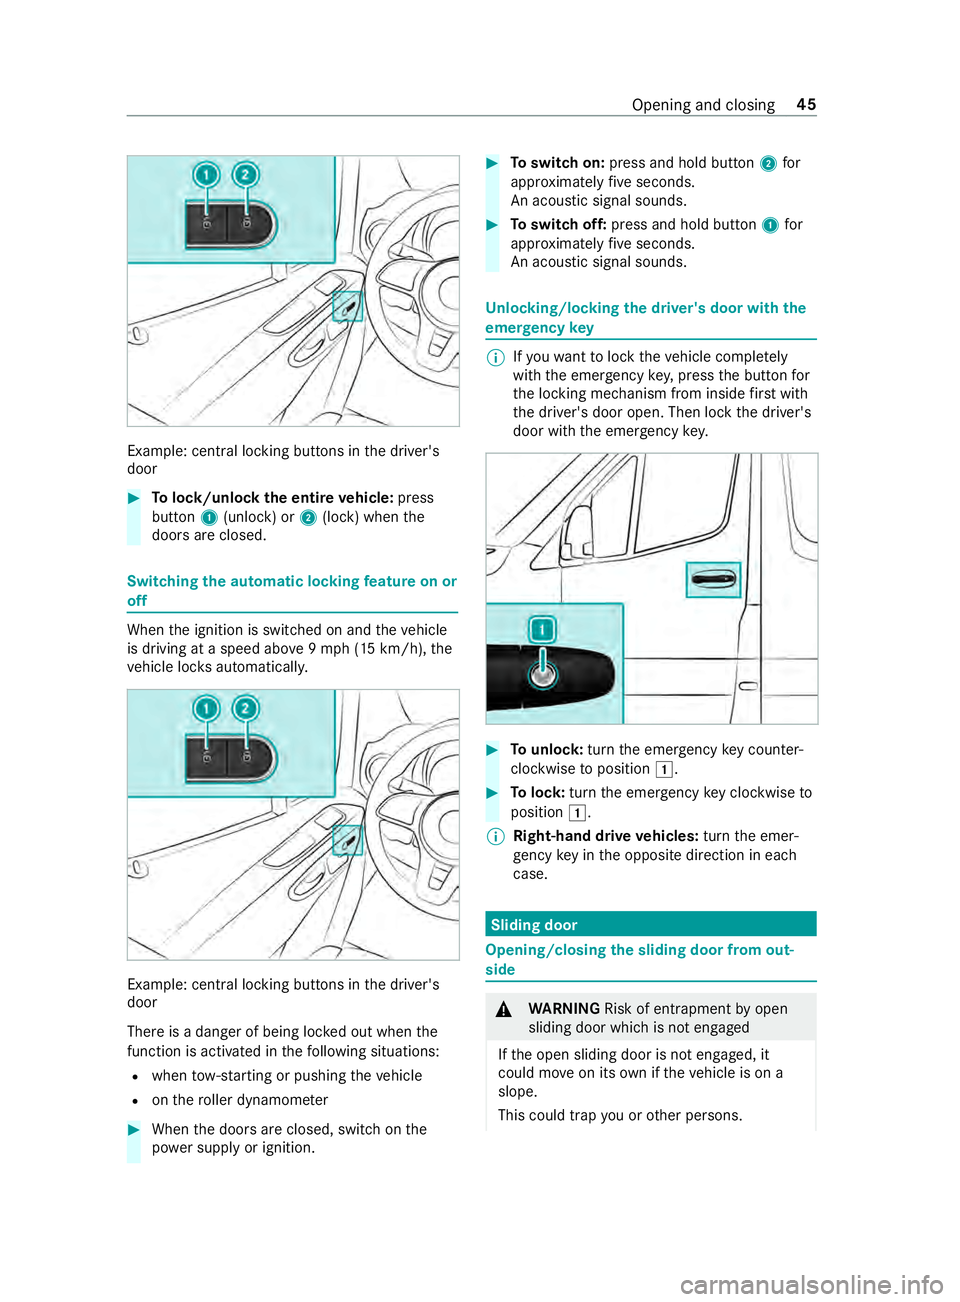
Example: central lo
cking buttons in the driver's
door #
Tolock/unlock the entire vehicle: press
button 1(unlock) or 2(lock) when the
doors are closed. Switching
the automatic locking feature on or
off When
the ignition is switched on and theve hicle
is driving at a speed abo ve9mp h (15 km/h), the
ve hicle loc ksautomaticall y. Example: central lo
cking buttons in the driver's
door
There is a danger of being loc ked out when the
function is activated in thefo llowing situations:
R when tow- starting or pushing theve hicle
R onthero ller dynamom eter #
When the doors are closed, switch on the
po we r supp lyor ignition. #
Toswitch on: press and hold button 2for
appr oximately five seconds.
An acoustic signal sounds. #
Toswitch off: press and hold button 1for
appr oximately five seconds.
An acoustic signal sounds. Un
locking/locking the driver's door with the
emer gency key %
If
yo uwa nttolock theve hicle comple tely
wi th th e emer gency key,press the button for
th e locking mechanism from inside firs t wi th
th e driver's door open. Then lock the driver's
door with the emer gency key. #
Tounlo ck:turn the emer gency key counter-
clo ckwise toposition 0047. #
Tolock: turnthe emer gency key clo ckwise to
position 0047.
% Right-hand drive
vehicles: turnthe emer‐
ge ncy key in the opposite direction in each
case. Sliding door
Opening/closing
the sliding door from out‐
side &
WARNING Risk of entrapment byopen
sliding door which is not engaged
If th e open sliding door is not engaged, it
could mo veon its own if theve hicle is on a
slope.
This could trap you or other persons. Opening and closing
45