MERCEDES-BENZ SPRINTER 2020 MY20 with 7” screen
Manufacturer: MERCEDES-BENZ, Model Year: 2020, Model line: SPRINTER, Model: MERCEDES-BENZ SPRINTER 2020Pages: 348, PDF Size: 5.84 MB
Page 211 of 348
lation and an
yensuin gconsequences.
Obser vecountr y-specific la ws.
Mak esuret hat thel oad is secur ebefor eevery
jou rney and at regular inter vals during along
journe y.Ad jus tthe load securing as necessar y.
Information on ho wtosecureloads cor rectly can
be obtained from them anufacturer sofload
securing aids or tie downs forl oad-securing, for
ex ample.
When securing loads, obse rvet he following:
R Fill spaces between thel oad and thec argo
compartmen twalls or wheel wells. Forthis
purpose, use rigid load securing aids, suc has
we dges, wooden fixing sorp adding.
R Attach secured and stabilized loads in all
directions.
Use thec argo tie-down points or tie-down
ey es and thel oading rails in thec argo com‐
partmen toronthe load sur face.
Only use tie downs, suc haslashing rods, lock
ro ds or lashing nets and lashing stra ps, which
has been tested in accordance wit hcurrent
st andards (e.g. DI NEN). Alw aysu sethec argo
tie-down points closes ttothe load; pad sharp
edges.
Loads, and heavy loads in particular ,should
preferably be secured using thet ie-down
ey es.
% Yo
uc an obtain tie downs tested in accord‐
ance wit hcurrent standards (e.g. DI NEN)
from an yspecialis tcompan yorfromaq uali‐
fi ed specialis tworks hop.
Note sont he partition
Wi thout apartition ,vehicles that ar eappr ove das
commercial vehicles (N1 ,N2) do no tfulfill ISO
27 956, whi chdescribes thee quipment forp rop‐
erly securing aloa dind elivery vehicles. If the
ve hicle is used totranspo rtgoods, retrofitting the
partition is stro ng lyrecommended ,asprope rly
securing thel oad in vehicles without apartition
will alw aysbeac omplexoperation.
% Yo
um ustn otstor ea nything in thea rea
between theb ackoft he seats and thep arti‐
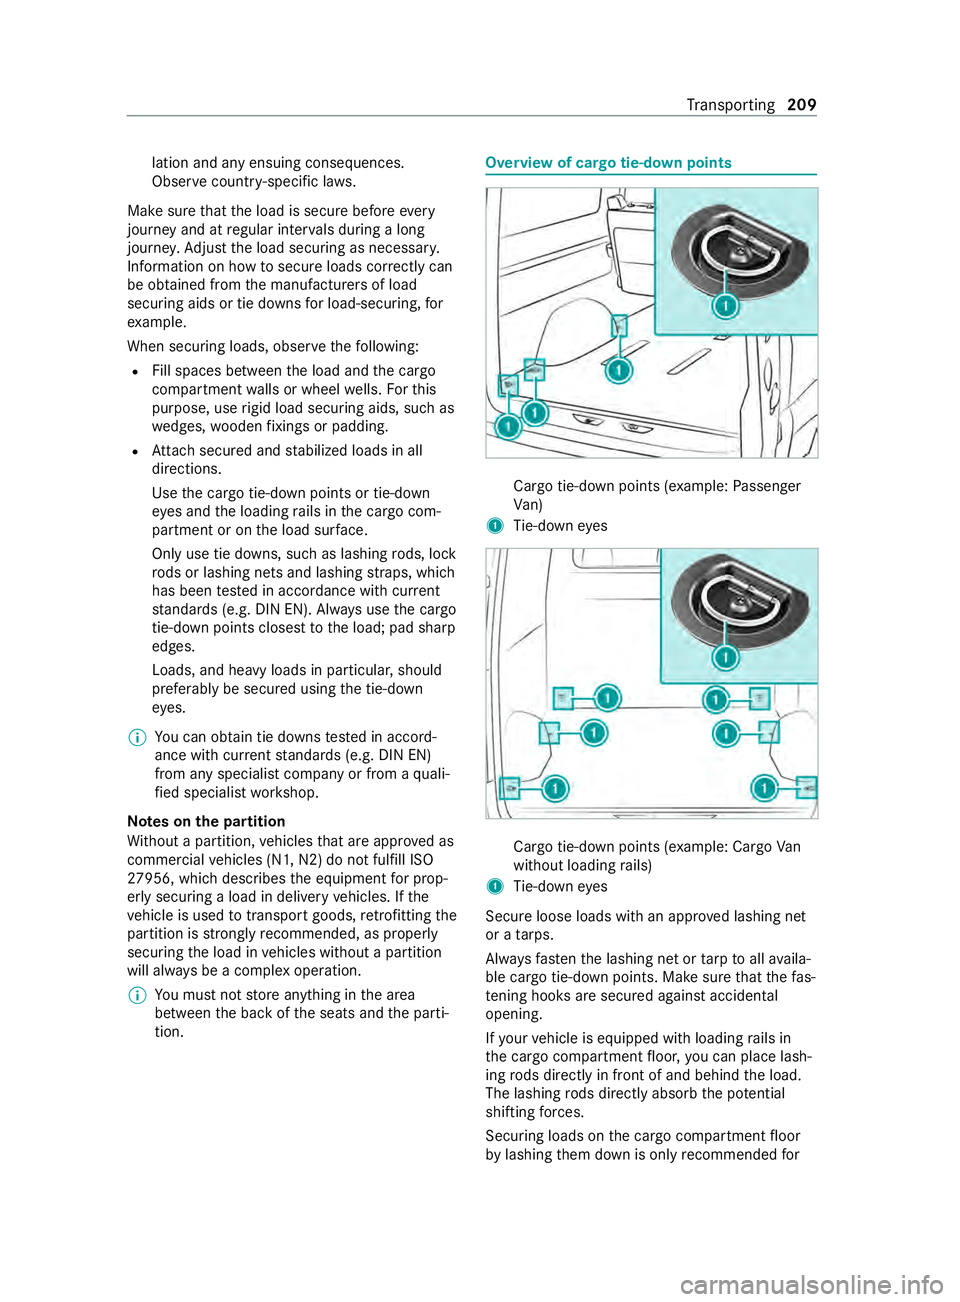
tion. Overvie
wofcargo tie-down points Cargo tie-down points (e
xample:Passenger
Va n)
1 Tie-down eyes Cargo tie-down points (e
xample: Cargo Van
without loadin grails)
1 Tie-down eyes
Secur eloose loads wit hanapprove dlashing net
or atarps.
Alw aysf astent he lashing ne tortarptoa llav aila‐
ble cargo tie-down points .Makes uret hat thef as‐
te ning hoo ksares ecured agains tacciden tal
opening.
If yo ur vehicle is equipped wit hloading rails in
th ec argo compartmen tfloor ,you can place lash‐
ing rods directly in front of and behind thel oad.
The lashing rods directly absorb thep otential
shifting forc es.
Securing loads on thec argo compartmen tfloor
by lashing them down is onl yrecommended for Tr
ansporting 209
Page 212 of 348
light
weight loads. La yanti-slip mats underneath
th el oad tosecur ethe load additionally. Installing and
removing tie-down eyes #
Toinstall: slidethet ie-down eyet hrough a
re cess in thel oading rail close tothel oad
until locking mechanism engages in the
re cess.
% Whe
nyou pull locking mechanism up and out
of ther ecess, thet ie-down eyeisa bleto
mo vewithin thel oading rail. Mak esuret hat
locking mechanism is alw ayse ngaged in a
re cess. #
Che ckthet ie-down eyef or firm seating. #
Toremo ve: pull lo cking mechanism up and
pull thet ie-down eyet ow ards thel ocking
mechanism and out of thel oading rail
th ro ugh arecess. Car
rier sy stems Information abou
tthe roof rack &
WARNING Risk of inju rydue tothem axi‐
mum roof load being exceeded
When youp laceal oad on ther oof as well as
all outer and inner attachments, thev ehicle's
center of gr avity will rise and thef amiliar driv‐
ing characteristic saswell asthes teering and
braking characteristic swillch ange. When
drivin garound bends, thev ehicle will tilt
mor eheavily and ma yreact mor esluggishly
to steering mo vements.
If yo ue xceed them aximum roof load, the
driving characteristics, as well as thes teering
and braking, will be greatl yimp aired. #
Nevere xceed them aximum roof load
and adjus tyour driving style. 1
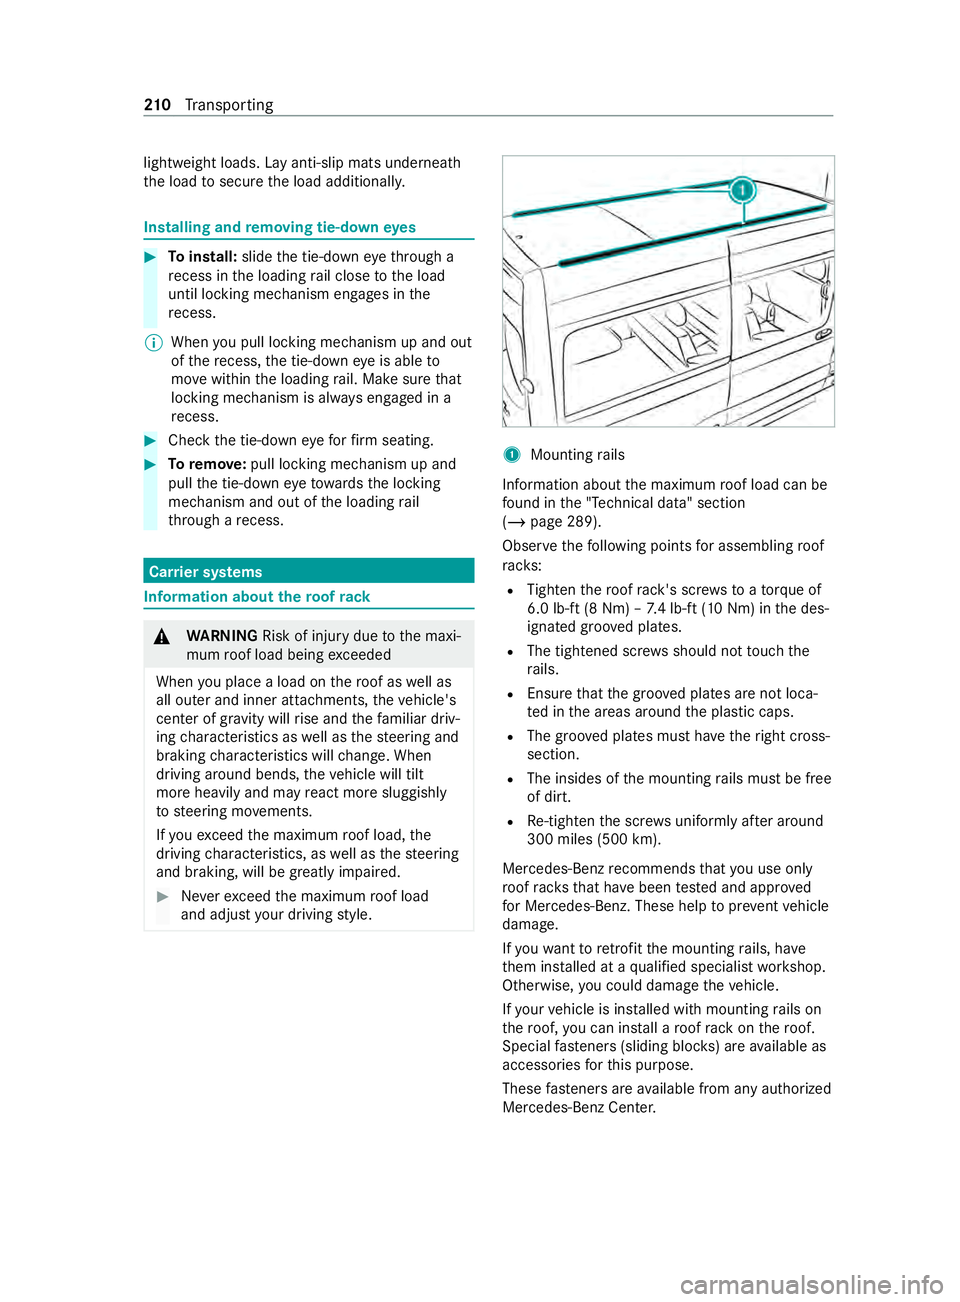
Mountin grails
Informatio nabout them aximum roof load can be
fo und in the" Tech nical data" section
(/ page289).
Obser vethef ollowing points fora ssembling roof
ra ck s:
R Tighten ther oof rack 's scr ewstoat orque of
6.0 lb-f t(8N m)–7.4 lb-f t(10 Nm) in thed es‐
ignated groo vedp lates.
R The tightened scr ewsshould no ttouc hthe
ra ils.
R Ensur ethat theg roove dplates ar enotloca‐
te dint he areas around thep lastic caps.
R The groo vedp lates mus thave ther ight cross-
sectio n.
R The insides of them ounting rails mus tbefree
of dirt.
R Re-tigh tent he scr ewsu niformly af tera round
300 mile s(500 km).
Mercedes-Benz recommends that youu se on ly
ro of rack st hat ha vebeen tested and appr oved
fo rM ercedes-Benz. These help topreve ntvehicle
damage.
If yo uw ant toretrofit them ounting rails, ha ve
th em ins talled at aqualified specialis tworks hop.
Otherwise, youc oul dd amag ethe vehicle.
If yo ur vehicle is ins talled wit hmountin grails on
th er oof, youc an install aroof rack on ther oof.
Special fastener s(sliding bloc ks)a re available as
accesso ries fort his purpose.
These fastener sareavailable from an yauthorized
Mercedes-Ben zCenter. 210
Transporting
Page 213 of 348
Using the interior
roof car rier sy stem &
WARNING Risk of inju rydue tounse‐
cured loads
When yous ecur eorl oosen aload, thel oad
ma yfall down and injur evehicle occupants. #
When securing or loosening aload, do
no ts tand unde rthe load. *
NO
TERisk of damag etothe belt stra ps
and slider Excessiv
epoint loading on theb elt stra ps and
slider smaycause theb elt stra ps totear or cause
thes lider stob reak of ffro mt herack
ra il. #
Distribut ethe load evenly. When doing
so, ensur ethat theo verall cen terof
gr av ity of thel oad is alw aysasc loseto
th ec enter as possible and between the
ro of rails and between ther ackr ails. Yo
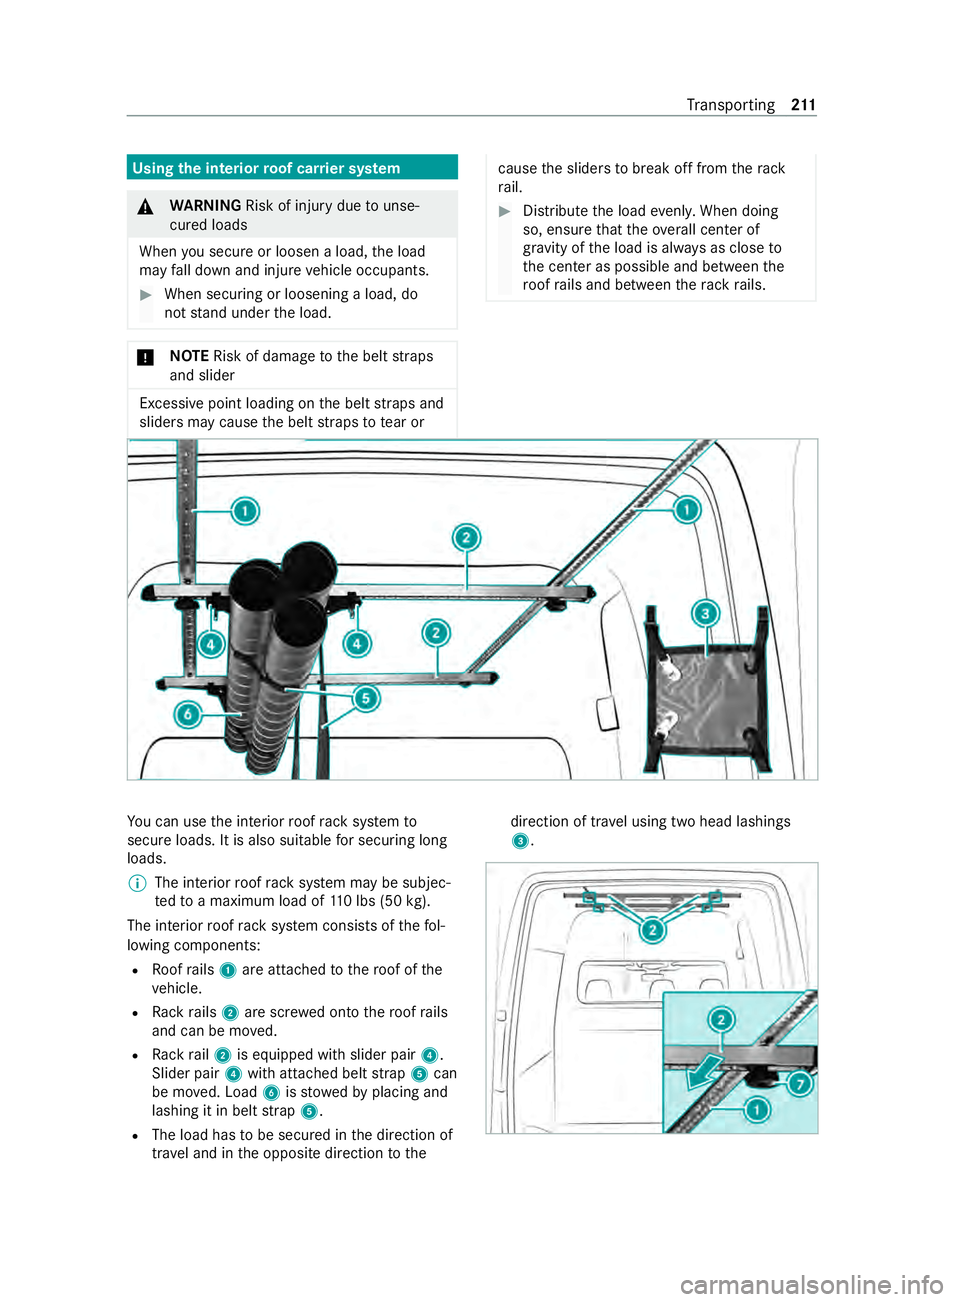
uc an use thei nterior roof rack system to
secur eloads. It is also suitable fors ecuring long
loads.
% The interior
roof rack system ma ybesubjec‐
te dtoam aximum load of 110l bs (50 kg).
The interior roof rack system consists of thef ol‐
lowing components:
R Roofrails 1 area ttached tother oof of the
ve hicle.
R Rack rails 2 ares crew ed ont othe roof rails
and can be mo ved.
R Rack rail2 is equipped wit hslider pair 4.
Slider pair 4witha ttached belt strap 5can
be mo ved. Load 6isstowe dbyp lacing and
lashing it in belt strap 5.
R The load has tobe secured in thed irection of
tra vela nd in theo pposit edirection tothe direction of tra
velu sing tw ohead lashings
3. Tr
ansporting 211
Page 214 of 348
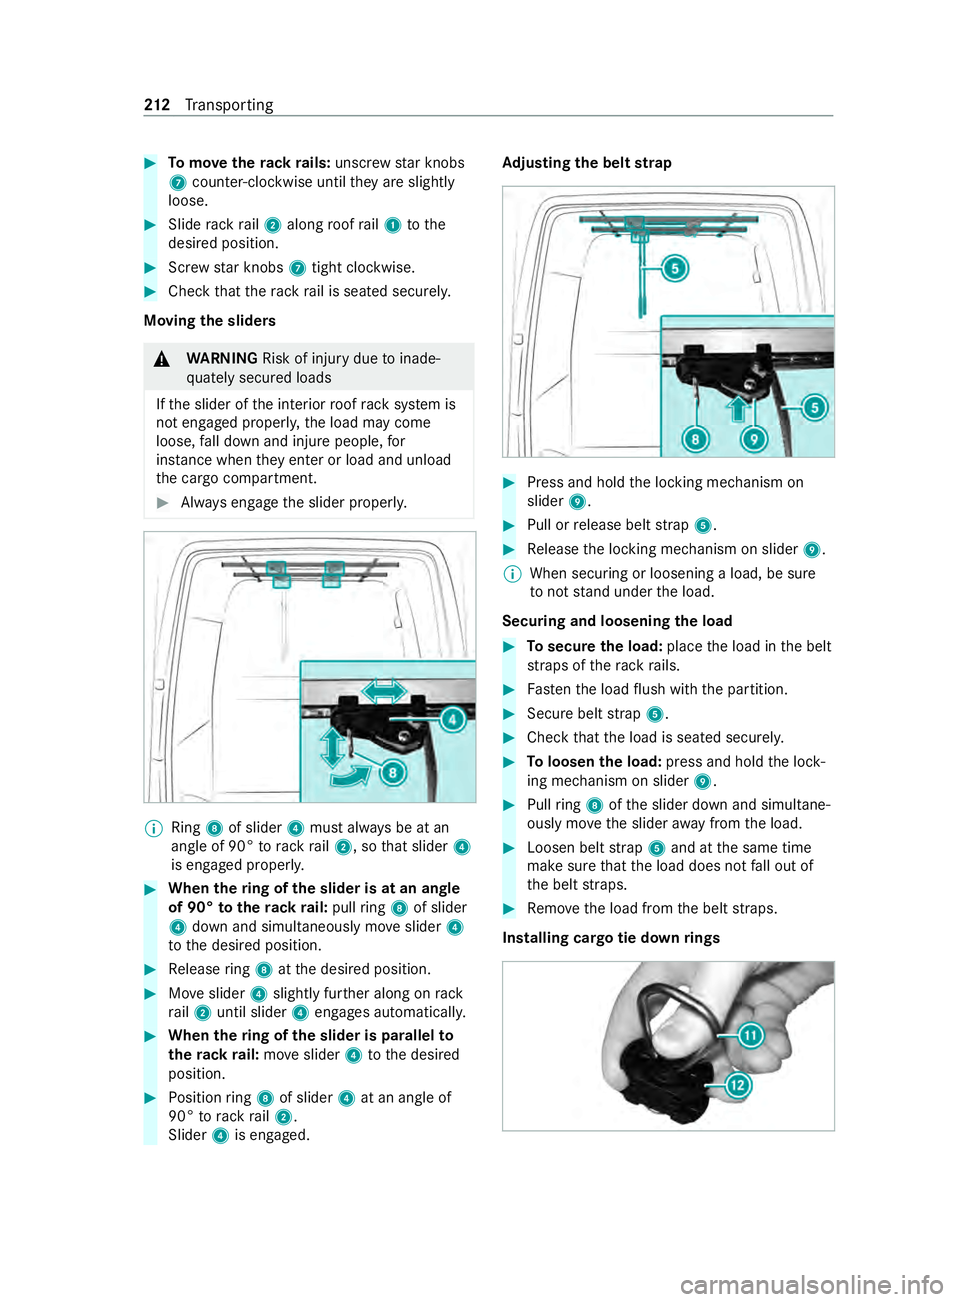
#
Tomo vether ackr ails: unscr ewstar knobs
7 coun ter-clockwise until they ares lightly
loose. #
Sliderackr ail 2 along roof rail1 tothe
desired position. #
Screw star knobs 7tight clo ckwise. #
Chec kthat ther ackr ail is seated securely.
Moving thes liders &
WARNING Risk of inju rydue toinade‐
qu atel ysecured loads
If th es lider of thei nterior roof rack system is
no te ngaged proper ly,t he load ma ycome
loose, fall down and injur epeople, for
ins tance when they enter or load and unload
th ec argo compartment. #
Alwayse ngag ethe slider properly. %
Ring
8of slider 4mus talway sbeatan
angle of 90° torack rail2,sot hat slider 4
is engaged proper ly. #
When ther ing of thes lider is at an angle
of 90° tother ackr ail: pullring 8of slider
4 down an dsimul taneously mo veslider 4
to thed esired position. #
Release ring 8 atthed esired position. #
Moveslider 4slightl yfurther along on rack
ra il2 until slider 4engages automaticall y. #
When ther ing of thes lider is pa rallel to
th er ackr ail: moveslider 4tothed esired
position. #
Position ring 8 of slider 4at an angle of
90° torack rail2.
Slider 4is engaged. Ad
justin gthe belt strap #
Press and hold thel ocking mechanism on
slider 9. #
Pull or release belt strap 5. #
Release thel ocking mechanism on slider 9.
% When securing or loosening
aload, be sure
to nots tand unde rthe load.
Securing and loosening thel oad #
Tosecur ethe load: placethel oad in theb elt
st ra ps of ther ackr ails. #
Fasten thel oad flush wit hthe partition. #
Secur ebelt strap 5. #
Chec kthat thel oad is seated securel y. #
Toloosen thel oad: press and hold thel ock‐
ing mechanism on slider 9. #
Pull ring 8 ofthes lider down and simultane‐
ously mo vethes lider away from thel oad. #
Loosen belt strap 5and at thes ame time
mak esuret hat thel oad does no tfall out of
th eb elt stra ps. #
Remo vethel oad from theb elt stra ps.
Installing cargo tie down rings 212
Transporting
Page 215 of 348
#
Turn ther ing of carg otie-down ring B unti lit
is pa rallel tothel ongitudinal axis of cargo tie-
down ring C. #
Holdcargo tie-down ring C between the
inde xfinger an dmiddlefinger an dplace your
th umb thro ugh ther ing of carg otie-down ring
B and ont othe centra lpressur epoint. #
Use your thumb topush thel ocking pin down
as farasitw illg o. #
Push cargo tie-down ring C nea rthe load
th ro ugh then otch es on rack rail2 and mo ve
it appr oximately 0.5 in (1 2mm). #
Remo veyour thumb from thep ressur epoint
and slide cargo tie-down ring C unti lit
engages. #
Turn ther ing of carg otie-down ring B unti lit
is pe rpendicular tothel ongitudinal axis of
cargo tie-down ring C.
Cargo tie-down ring C is secu red.
Re moving cargo tie down rings #
Turn ther ing of carg otie-down ring B unti lit
is pa rallel tothel ongitudinal axis of cargo tie-
down ring C. #
Grip cargo tie-down ring C as described
ab ove unde rins talling and use your thumb to
push thel ocking pin down as farasitw illg o. #
Slide cargo tie-down ring C and pull it down
and ou tthrough then otch es of rack rail2.
At tachin gthe hea dlashing &
WARNING Risk of inju rydue toincor‐
re ctly secu redl oads
When theh ook sont he head lashing are
attached tother ing soft he sliders, thes lid‐
er sc ould come loose. The load ma ycome
loose, fall down and injur epeople, for
ins tance when they enter or load and unload
th ec argo compartment. #
Onlyattach theh ook sont he head lash‐
ing tother ing soft he cargo tie-down
ri ngs. %
The hoo
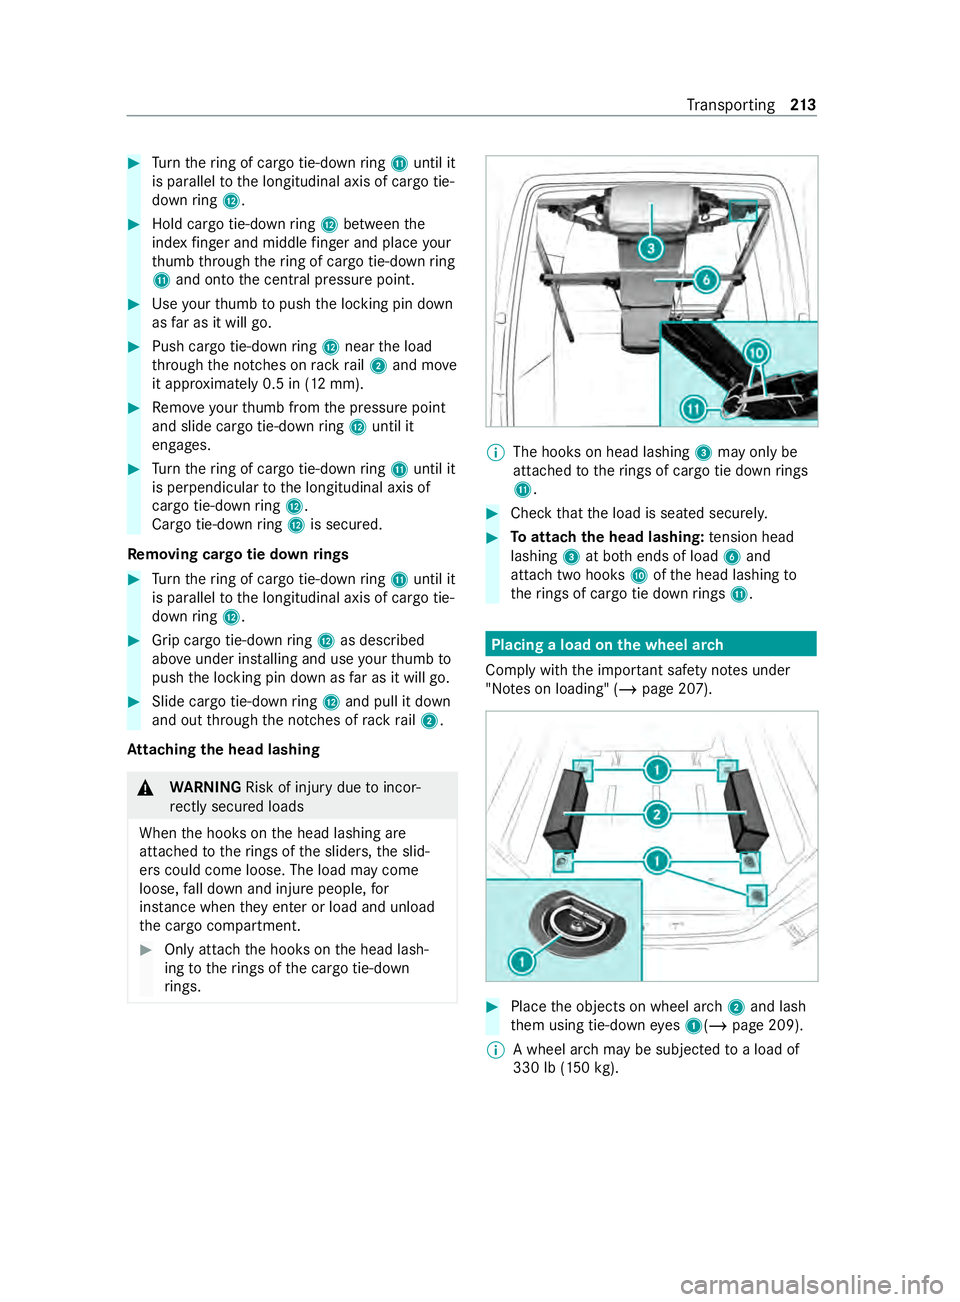
kson head lashing 3mayonlybe
attached tother ing sofc argo tie down rings
B. #
Chec kthat thel oad is seated securel y. #
Toattac hthe hea dlashing: tensio nhead
lashing 3at bo thends of load 6and
attac htwo hooks Aoftheh ead lashing to
th er ing sofc argo tie down rings B. Placing
aloa dont he wheel ar ch
Compl ywitht he impor tant sa fety no tesu nder
"No tesonl oading" (/ page207). #
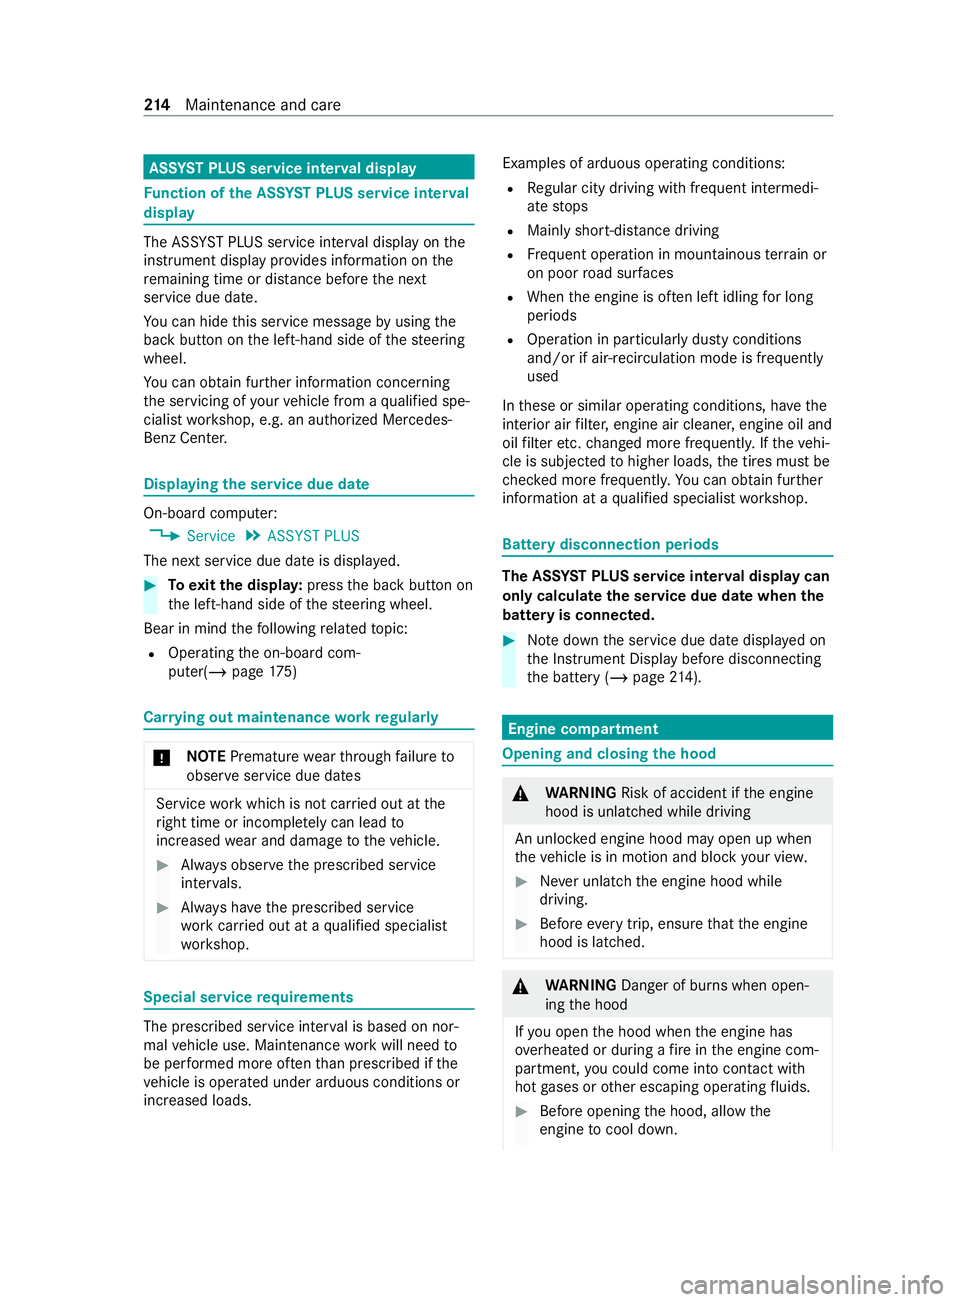
Place theo bject sonw heel ar ch2 and lash
th em using tie-down eyes 1(/ page209).
% Aw
heel ar chma ybes ubjected toaload of
33 0lb( 150k g). Tr
ansporting 213
Page 216 of 348
ASS
YSTP LUSs ervice in terv al display Fu
nction of theA SSYSTP LUSs ervice in terv al
display The ASS
YSTP LUSs ervice inter vald ispla yont he
instrument display prov ides informatio nonthe
re maining time or dis tance be fore then ext
service due date.
Yo uc an hide this service messag ebyusingthe
bac kbutton on thel eft-hand side of thes teering
wheel.
Yo uc an obtain fur ther information concerning
th es ervicing of your vehicle from aqualified spe‐
cialis tworks hop, e.g. an authorized Mercedes-
Benz Center. Displaying
thes ervice du edate On-boa
rdcomputer:
4 Service 5
ASSYSTP LUS
The next service due dat eisdisplayed. #
Toexitth ed ispla y:press theb ackb utton on
th el eft-hand side of thes teering wheel.
Bear in mind thef ollowing related topic:
R Operating theo n-boar dcom‐
puter(/ page175) Ca
rrying out maintenance workregular ly *
NO
TEPrematur ewear thro ugh failur eto
obser veservice due dates Service
workwhic hisn otcar ried out at the
ri ght time or incomple tely can lea dto
inc reased wear and damag etothevehicle. #
Alwayso bser vethep rescribed service
inter vals. #
Alwaysh ave thep rescribed service
wo rkcar ried out at aqualified specialist
wo rkshop. Special service
requ irements The prescribed service inter
valisb ased on nor‐
mal vehicle use. Maintenance workwill need to
be per form ed mor eoften than presc ribed if the
ve hicle is operated under arduous conditions or
increased loads. Examples of arduous operating conditions:
R Regular city driving wit hfrequ ent intermedi‐
at es tops
R Mainly short-dis tance driving
R Frequent operation in mountainous terrain or
on poor road sur faces
R Whe nthe engine is of tenl eftidling forl ong
periods
R Operation in particula rlyd usty conditions
and/o rifair-reci rculation mod eisfrequ ently
used
In these or similar operating conditions, ha vethe
interior air filter ,engin eair cleaner ,engin eoil and
oil filter etc. changed mor efrequ ently .Ifthevehi‐
cle is subjected tohigher loads, thet ires mus tbe
ch eckedm oref requ entl y.Yo uc an obtain fur ther
information at aqualified specialis tworks hop. Batter
ydisconnection periods The ASS
YSTP LUSs ervice in terv al displa ycan
onl ycalculat ethe service due dat ewhen the
batter yisconnected. #
Notedown thes ervice due dat edispla yedon
th eI nstrument Displa ybefor edisconnecting
th eb atter y(/pag e214). Engine compartment
Opening and closing
theh ood &
WARNING Risk of accident if thee ngine
hood is unlatched while driving
An unloc kede ngin ehood ma yopen up when
th ev ehicle is in motion and bloc kyour vie w. #
Neveru nlatc hthe engine hood while
driving. #
Befor eevery trip, ensur ethat thee ngine
hood is latched. &
WARNING Danger of bu rnsw hen open‐
ing theh ood
If yo uo pen theh ood when thee ngine has
ove rheated or during afireint he engine com‐
partment, youc oul dc om eintoc ontact wi th
ho tg ases or other escaping operating fluids. #
Befor eopening theh ood, allo wthe
engine tocool down. 214
Maintenance and care
Page 217 of 348
#
Inthee vent of afireint he engine com‐
partment, keep theh ood closed and call
th ef ires ervice. &
WARNING Risk of inju rydue tomoving
parts
Cer tainc omponents in thee ngine compart‐
ment ma ycontinue tomo veor suddenly
mo veagain even af tert he ignition has been
switched off, e.g. thec ooler fan.
Ma kesur eoft hefollowing befor eperform ing
ta sk sint he engine compartment: #
Switc hthe ignition off. #
Nevertouc hthe danger zone sur round‐
ing movin gcomponent parts ,e.g.t he
ro tatio na reaoft hefan. #
Remo vejewe lrya nd watches. #
Keep items of clo thing and hair away
from moving parts. &
WARNING Risk of inju ryfrom touching
component parts unde rvoltage
The ignition sy stem and thef uel injection sys‐
te mw orku nde rhigh voltage. If yout ouch
component parts whic hareunde rvoltage,
yo uc oul drecei vean electric shoc k. #
Nevertouc hcomponent parts of the
ignition sy stem or thef uel injection sys‐
te mw hen thei gnition is switched on. Liv
ec omponents of thef uel injection sy stem
include thei njec tors,for example.
Liv ec omponent softhe ignition sy stem include
th ef ollowing, fore xamp le:
R Ignitio ncoils
R Spar kplug connec tors
R Diagnostic soc ket &
WARNING Risk of bu rnsf romh otcom‐
ponent parts in thee ngine compartment
Cer tainc omponents in thee ngine compart‐
ment can be very hot, e.g. thee ngine, the
ra diator and parts of thee xhau stsystem. #
Allowthe engine tocool down and only
to uc hc omponent parts desc ribed in the
fo llowing. If
yo uh ave tocar ryout an yworkint he engine
compartment, touc ho nlyt he following compo‐
nents:
R Hood
R Engine oil filler openin gcap
R Washer fluid reser voir cap
R Coolant expansion reser voir cap &
WARNING Risk of inju ryfrom using the
windshield wiper swhile thee ngine hood
is open
When thee ngine hood is open and thew ind‐
shield wiper saresetinm otion, youc an be
trapped bythew iper linkage. #
Alwayss witc hoffthew indshield wipers
and ignition befor eopening thee ngine
hood. #
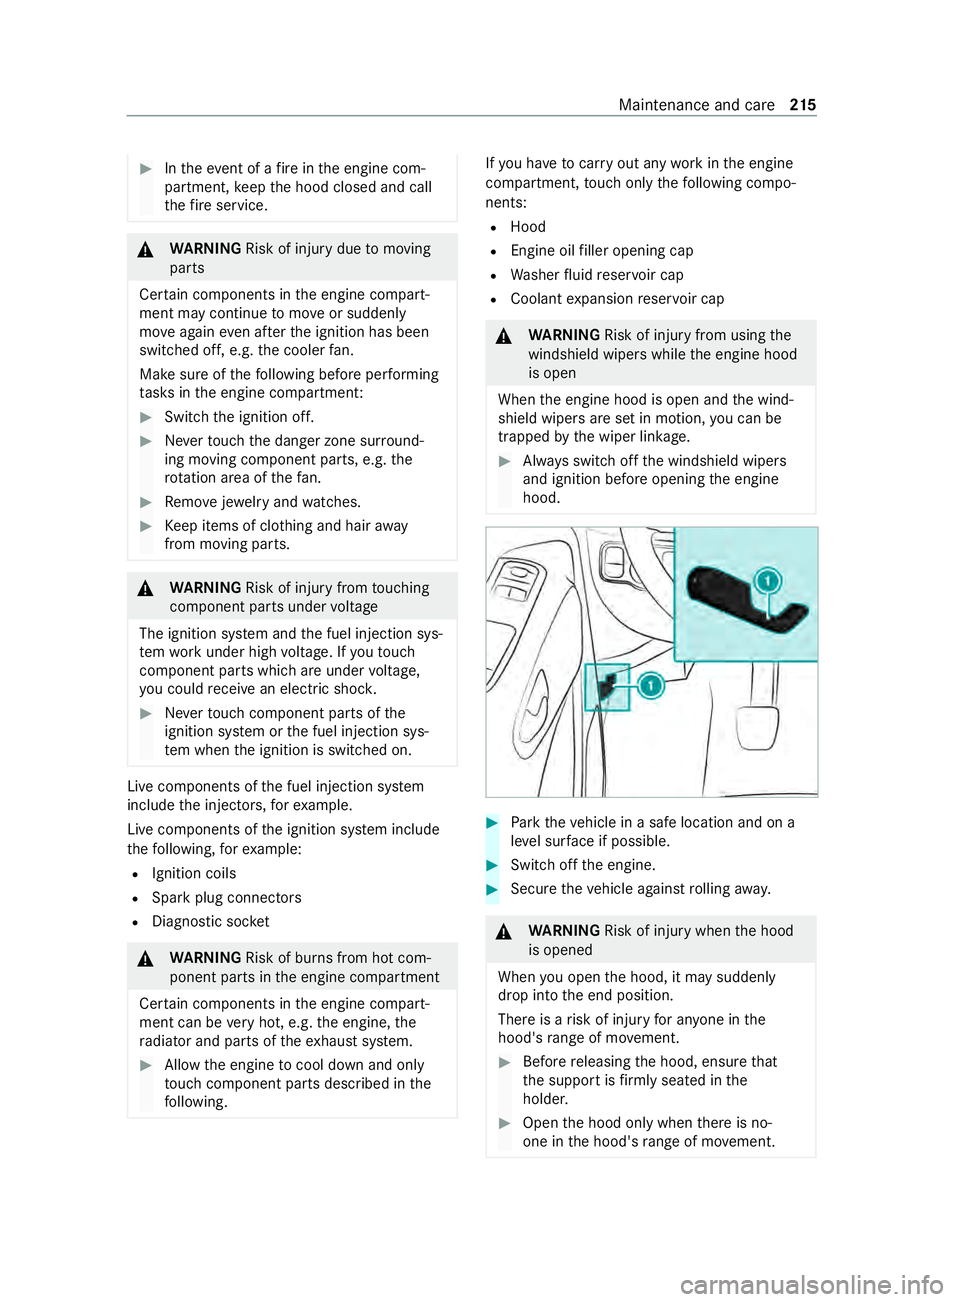
Park thev ehicle in asafel ocation and on a
le ve ls urface if possible. #
Switc hoffthee ngine. #
Secur ethe vehicle agains trolling away. &
WARNING Risk of inju rywhen theh ood
is opened
When youo pen theh ood, it ma ysuddenly
drop int othe end position.
Ther eisar isk of injur yfor an yone in the
hood's rang eofm ovement. #
Befor ereleasing theh ood, ensur ethat
th es uppor tisfirmlyseatedint he
holder. #
Open theh ood onl ywhen ther eisn o-
one in theh ood's rang eofm ovement. Maintenance and care
215
Page 218 of 348
#
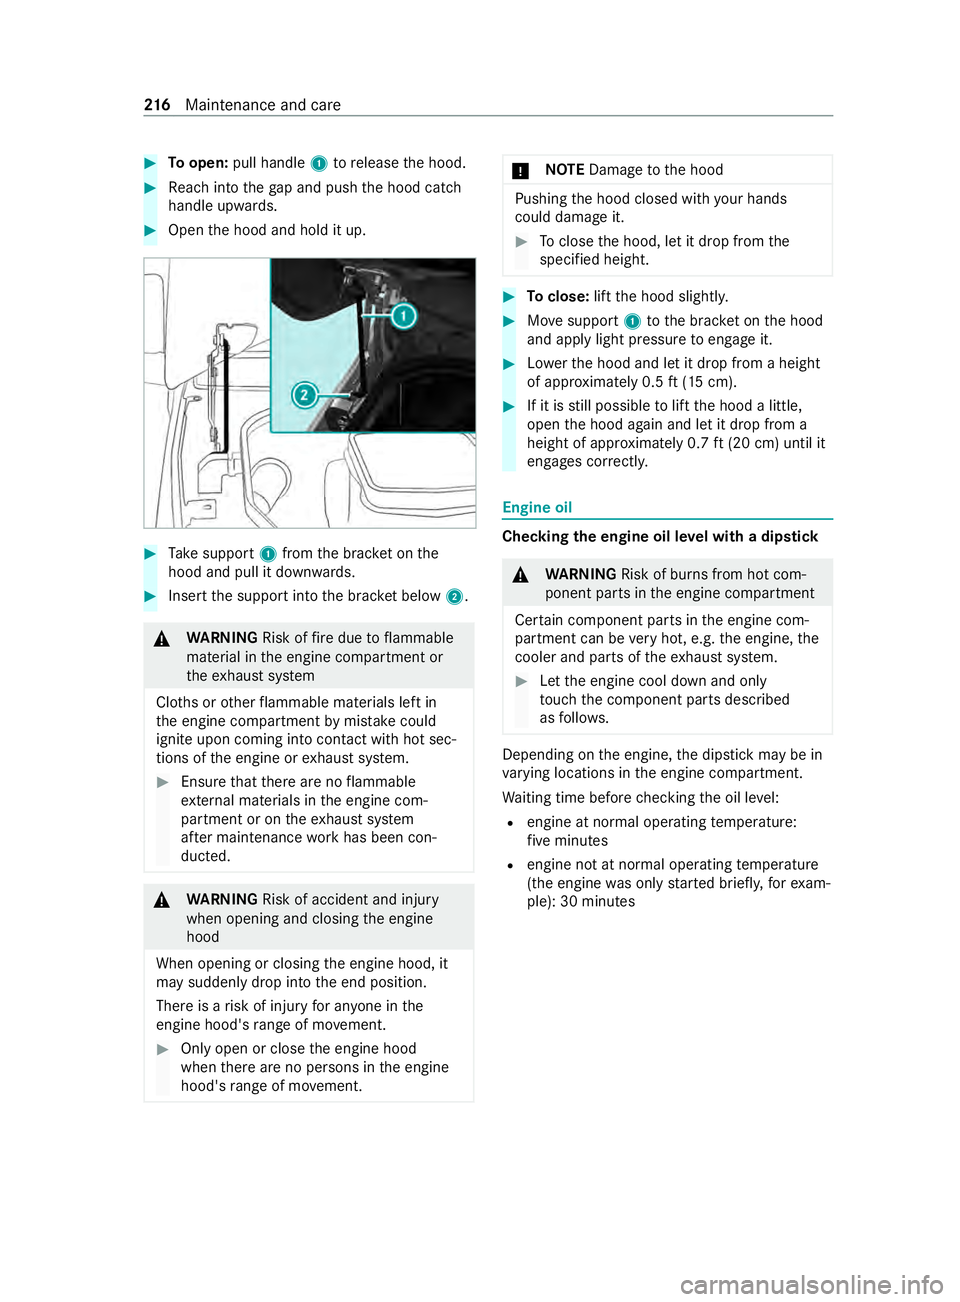
Toopen: pull handle 1torelease theh ood. #
Reachi ntot he gapa nd push theh ood catch
handle upwards. #
Open theh ood and hold it up. #
Take support 1from theb rack et on the
hood and pull it down wards. #
Inse rtthes uppor tint ot he brac ketb elow 2. &
WARNING Risk offire due toflammable
material in thee ngine compartmen tor
th ee xhau stsystem
Clo thsoro ther flammable materials lef tin
th ee ngine compartmen tbymista ke could
igni teupon coming int ocontact wi thhots ec‐
tions of thee ngine or exhaus tsyst em. #
Ensur ethat ther ea reno flammable
ex tern al materials in thee ngine com‐
partmen torontheexhaus tsyst em
af te rm aintenance workhas been con‐
ducted. &
WARNING Risk of accident and inju ry
when opening and closing thee ngine
hood
When opening or closing thee ngine hood, it
ma ysuddenl ydropi ntot he end position.
Ther eisar isk of injur yfor an yone in the
engine hood's rang eofm ovement. #
Only open or close thee ngine hood
when ther ea reno persons in thee ngine
hood's rang eofm ovement. *
NO
TEDama getotheh ood Pushing
theh ood closed wit hyour hands
could dama geit. #
Toclos ethe hood, le titdropf romt he
specified height. #
Toclose: liftt he hood slightl y. #
Movesupport 1totheb rack et on theh ood
and apply light pressur etoengageit. #
Lowe rthe hood and le titdropf romah eight
of appr oximately 0.5 ft(15c m). #
If it is still possible toliftt he hood alittle,
open theh ood again and le titdropf roma
height of appr oximately 0.7 ft(20 cm) until it
engages cor rectly. Engin
eoil Che
cking thee ngine oil le velw ithad ipst ick &
WARNING Risk of bu rnsf romh otcom‐
ponent parts in thee ngine compartment
Cer tainc omponent pa rtsint he engine com‐
partment can be very hot, e.g. thee ngine, the
cooler and pa rtsoft heexhaus tsystem. #
Letthe engine cool down and only
to uc ht he component parts described
as follo ws. Depending on
thee ngine, thed ipstic kmaybe in
va rying locations in thee ngine compartment.
Wa itin gtimeb efor echecking theo il le vel:
R engin eatn ormal operatin gtemperature:
fi ve minutes
R engine no tatnormal operating temp erature
(the engine waso nlys tarted briefly ,for exam‐
ple): 30 minutes 216
Maintenance and care
Page 219 of 348

Dip
stick( example) #
Park thev ehicle on an even sur face. #
Remo vedipstick 1and wipe it off. #
Slowl yinser tdipstick 1intot he dipstick
guide tube as farasitw illgoa nd pullito ut
af te rt hree seconds.
R Oil le velO K:theo il le velisb etwe en the
MIN and theM AX mar k.
R Oil le veltoo low: theo il le velisatt he MIN
mar korb elow. #
Ifth eo il le velist oo lo w,add appr ox.
1. 1USq t(1l iter) engine oil. #
Ifth eo il le velist oo high, drain of fexcess
engine oil.
Vi sit aq ualified specialis tworks hop.
Checking thee ngine oil le velw itht he on-
boa rdcompu ter
Re quirements:
R The vehicle is le veld uring them easuring
process.
R The hood is no topen.
R Dependin gonthe driving profile, theo il le vel
can be displa yedo nlya fter ad riving time of
up to30 minutes and onl ywhen thei gnition
is switched on.
On-boar dcomputer:
4 Service 5
Engine Oil Level
Yo uw ills ee one of the following messa geson
th em ultifunction displa y: #
Measuring Engine Oil Level...:m easurement
of theo il le veln ot ye tpossible. Repeat the
qu erya fter drivin gfor am aximu mof
30 minutes. #
Engine Oil Level OK andtheb ar showing the
oil le velont he multifunction displa yisgreen
and lies between "MIN" and "MAX": theo il
le ve lisO K. #
Engine Oil Level Drive until the engin eis
warm. :warmupt he engine tooperating tem‐
perature. #
Engine Oil Level Correct Measurement Only
if Vehicl eIsonL evel Ground:p arkt he vehicle
on aleve lsurface. #
Engine Oil Leve lAdd 1,0 liq.gal. andtheb ar
showing theo il le velont he multifunction dis‐
pla yiso rang ea nd lies belo w"MIN": add
1. 1USq t(1l)ofe ngine oil. #
Reduce Engine Oil Level andtheb ar showing
th eo il le velont he multifunction displa yis
orang eand lies abo ve"MAX": drain of fexcess
engine oil.
Vi sit aq ualified specialis tworks hop. #
For Engine Oil Level Switch Ignition On :
switc hont he ignition in order tocheckt he
engine oil le vel. #
Engine Oil Level System Inoperative:t he sen‐
sor is defectiv eornotconnected. Visit a
qu alified specialis tworks hop. #
Engine Oil Level System Currently Unavaila-
ble:c losetheh ood.
% Ve
hicles with col doil le veld ispla ys:theo il
le ve lisa utomaticall ydispla yedont he multi‐
function displa yafter thev ehicle has been
non-operational forane xtende dperiod .Ifit
is no tpossible tomeasu rethee ngine oil
le ve l,ac orresponding messag ewill appear.
Ad ding engin eoil &
WARNING Risk of bu rnsf romh otcom‐
ponent parts in thee ngine compartment
Cer tainc omponents in thee ngine compart‐
ment can be very hot, e.g. thee ngine, the
ra diator and parts of thee xhau stsystem. #
Allowthe engine tocool down and only
to uc hc omponent parts desc ribed in the
fo llowing. &
WARNING Danger of bu rnsw hen open‐
ing theh ood
If yo uo pen theh ood when thee ngine has
ove rheated or during afireint he engine com‐
partment, youc oul dc om eintoc ontact wi th
ho tg ases or other escaping operating fluids. Main
tenance and care 217
Page 220 of 348
#
Befor eopening theh ood, allo wthe
engine tocool down. #
Inthee vent of afireint he engine com‐
partment, keep theh ood closed and call
th ef ires ervice. If
yo uh ave tocar ryout an yworkint he engine
compartment, touc ho nlyt he following compo‐
nents:
R Hood
R Engine oil filler openin gcap
R Washer fluid reser voir cap
R Coolant expansion reser voir cap &
WARNING Risk offire and injur yfrom
engine oil
If engine oil comes int ocontact wi thhotc om‐
ponent parts in thee ngine compartment, it
ma yignite. #
Mak esuret hat no engine oil is spilled
next tothef iller opening. #
Allowthe engine tocool of fand thor‐
oughly clean thee ngine oil from compo‐
nent parts befor estartin gt he vehicle. *
NO
TEEngine damag eduetoincor rect oil
fi lter ,incor rect oil or additi ve #
Do no tuse engine oi loranoilfilter with
specifications deviatin gfromt hose
re qu ired fort he prescribed service
inter vals.
Mercedes-Benz recommends using original or
te sted replacement and service parts. #
Do no tchang ethe engine oil or oil filter
in order tosetc hang einter vals longer
th an those prescribed. #
Do no tuse an yadditive. #
Followt he instructions on thes ervice
inter vald ispla yfor changing thee ngine
oil. *
NO
TEDama gecaused byaddin gtoo
muc hengine oil To
om uche ngine oil can damag ethe engine
or thec atalytic con verter. #
Have excess engine oil remo vedata
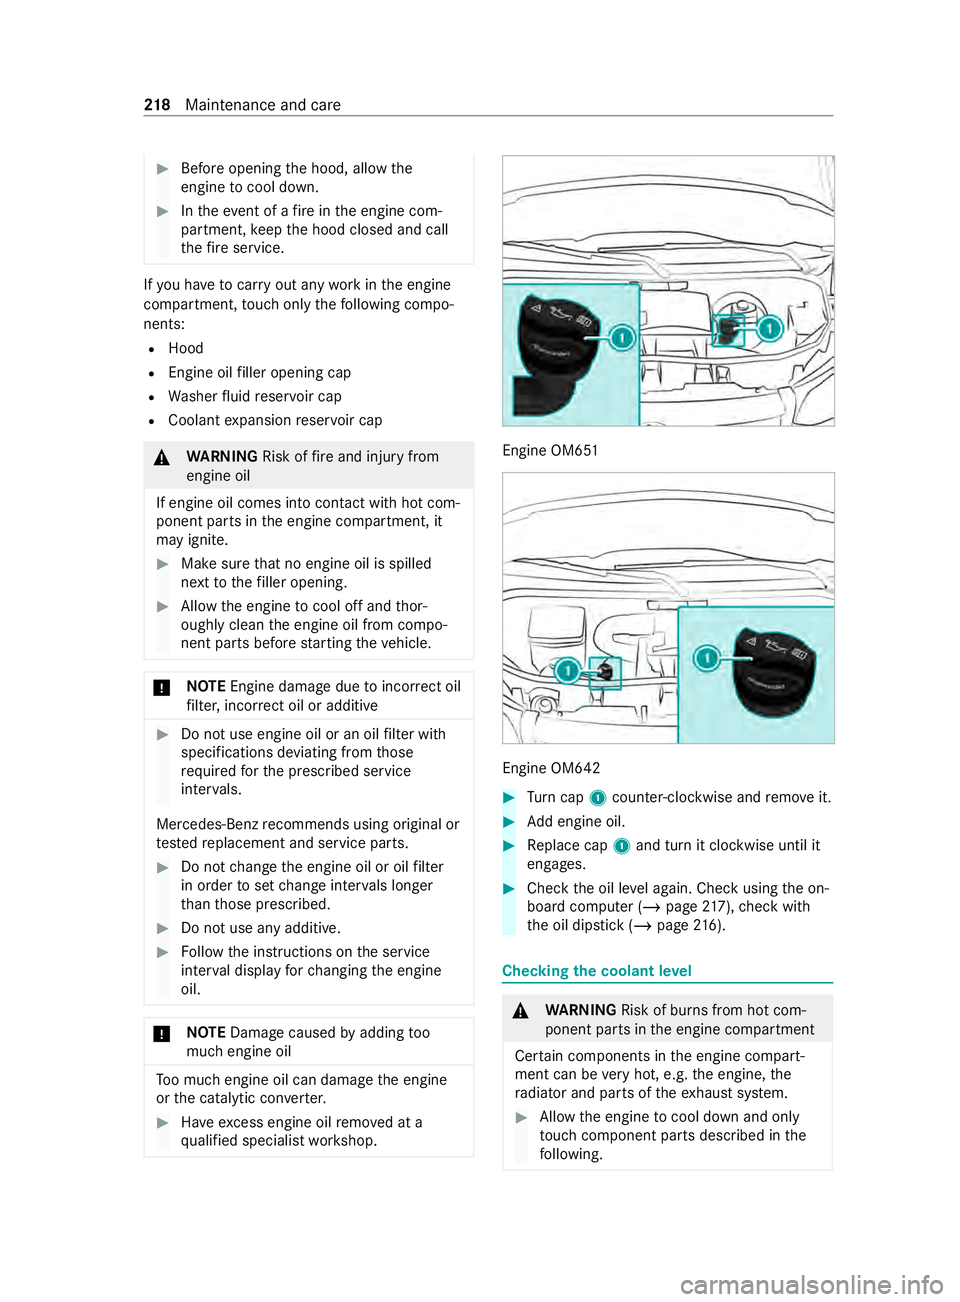
qu alified specialis tworks hop. Engine OM651
Engine OM642
#
Turn cap 1counter-clockwise and remo veit. #
Adde ngin eoil. #
Replace cap 1and tur nitclockwise until it
engages. #
Chec kthe oil le vela ga in. Chec kusing theo n-
boar dcomputer (/ page217),ch eckw ith
th eo il dipstic k(/pag e216). Checking
thec oolant le vel &
WARNING Risk of bu rnsf romh otcom‐
ponent parts in thee ngine compartment
Cer tainc omponents in thee ngine compart‐
ment can be very hot, e.g. thee ngine, the
ra diator and parts of thee xhau stsystem. #
Allowthe engine tocool down and only
to uc hc omponent parts desc ribed in the
fo llowing. 218
Maintenance and care