ESP MITSUBISHI 380 2005 User Guide
[x] Cancel search | Manufacturer: MITSUBISHI, Model Year: 2005, Model line: 380, Model: MITSUBISHI 380 2005Pages: 1500, PDF Size: 47.87 MB
Page 187 of 1500

SYMPTOM PROCEDURES
SIMPLIFIED WIRING SYSTEM (SWS)54B-187
INSPECTION PROCEDURE D-5: Power Window: Front or rear passenger's power windows do not
work at all by operating the power window main switch.
.
CIRCUIT OPERATION
When you operate each power window switch for
front or rear passengers (incorporated in the power
window main switch), the corresponding power win-
dow motor operates, opening or closing each power
window.
.
TECHNICAL DESCRIPTION (COMMENT)
If the corresponding power window opens and closes
normally when each power window sub-switch is
operated, the power window main switch may be
defective.
.
TROUBLESHOOTING HINT
Refer to circuit diagrams GROUP-90
Refer to configuration diagrams GROUP-80
The power window main switch may be defective
DIAGNOSIS
Check that power window sub switches operate normally.
Q: A power window cannot work by using the power
window main switch. Can you operate the power
window by using the corresponding power window sub
switch?
YES : Replace the power window main switch. Check that
the front or rear passenger's power window can work
normally by means of power window main switch.
NO : Refer to Symptom Chart P.54B-57 before resolving
this trouble.
KEYLESS ENTRY SYSTEM
GENERAL DESCRIPTION CONCERNING THE KEYLESS ENTRY SYSTEMM1549022000255
The following ECUs affect the functions and control
of the keyless entry system.
FUNCTIONCONTROL
ECU
All door lock function Pressing the transmitter lock button ETACS-ECU
Driver’s door unlock function Pressing the transmitter unlock button once ETACS-ECU
All door unlock function Pressing the transmitter unlock button twice ETACS-ECU
Trunk unlock function Pressing the transmitter trunk button twice ETACS-ECU
Keyless entry hazard answerback and horn answerback function ETACS-ECU
Timed locking mechanism ETACS-ECU
Page 704 of 1500
GENERAL DESCRIPTION
HEATER, AIR CONDITIONING AND VENTILATION55-3
GENERAL DESCRIPTIONM1552000100351
The heater and cooling units are combined in a sin-
gle unit, which, with the mode film damper and flow
rate control valve in the heater unit, reduces ventila-
tion resistance, increases fan power, and decreases
noise.
SAFETY PRECAUTIONS
Wear safety goggles and gloves when servic-
ing the refrigeration system to prevent
severe damage to eyes and hands.
Because R-134a refrigerant is a hydro fluorocarbon
(HFC) which contains hydrogen atoms in place of
chlorine atoms, it will not cause damage to the ozone
layer.
Ozone filters out harmful radiation from the sun. To
assist in protecting the ozone layer, Mitsubishi
Motors Corporation recommends an R-134a refriger-
ant recycling device.
Refrigerant R-134a is transparent and colorless in
both the liquid and vapor state. Since it has a boiling
point of
29.8C (21.64F) at atmospheric pressure,
it will be a vapor at all normal temperatures and pres-
sures. The vapor is heavier than air, non-flammable,
and non-explosive. The following precautions must
be observed when handling R-134a.
Do not heat R-134a above 40C (104.0F) or it
may catch fire and explode.
R-134a evaporates so rapidly at normal atmospheric
pressures and temperatures that it tends to freeze
anything it contacts. For this reason, extreme care
must be taken to prevent any liquid refrigerant from
contacting the skin and especially the eyes. Always
wear safety goggles when servicing the refrigeration
part of the A/C system. Keep a bottle of sterile min-
eral oil handy when working on the refrigeration sys-
tem.1. If any liquid refrigerant gets into your eyes, use a
few drops of mineral oil to wash them out. R-134a
is rapidly absorbed by the oil.
2. Next, splash your eyes with plenty of cold water.
3. Call your doctor immediately even if irritation has
ceased.
Keep R-134a containers upright when charging
the system.
In most instances, moderate heat is required to bring
the pressure of the refrigerant in its container above
the pressure of the system when charging or adding
refrigerant.
A bucket or large pan of hot water not over 40
C
(104.0
F) is all the heat required for this purpose. Do
not heat the refrigerant container with a blow torch or
any other means that would raise temperature and
pressure above this temperature. Do not weld or
steam-clean on or near the system components or
refrigerant lines.
A leak detector for R-134a should be used to
check for refrigerant gas leaks.
Do not allow liquid refrigerant to touch bright
metal or it will be stained.
When metering R-134a into the refrigeration system,
keep the supply tank or cans in an upright position. If
the refrigerant container is on its side or upside
down, liquid refrigerant will enter the system and
damage the compressor.
Refrigerant will tarnish bright metal and chrome sur-
faces, and in combination with moisture can severely
corrode all metal surfaces. ITEM SPECIFICATION
Heater control assembly Dial type
Compressor 10S17
Compressor Model Swashplate type
Refrigerant and quantity (g) R-134a (HFC-134a), 435
475
Page 772 of 1500
AUTO A/C DIAGNOSIS
HEATER, AIR CONDITIONING AND VENTILATION55-71
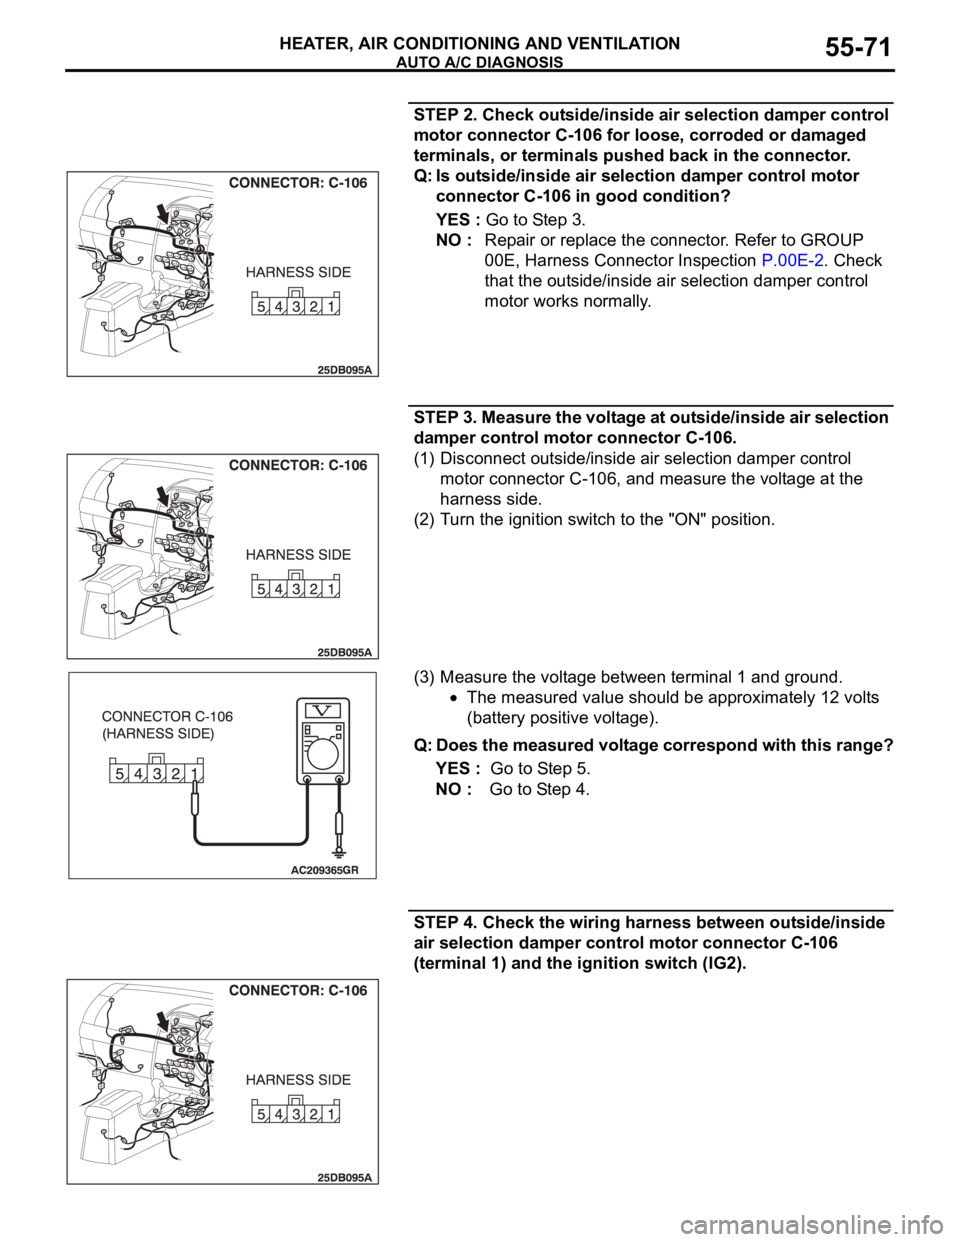
STEP 2. Check outside/inside air selection damper control
motor connector C-106 for loose, corroded or damaged
terminals, or terminals pushed back in the connector.
Q: Is outside/inside air selection damper control motor
connector C-106 in good condition?
YES : Go to Step 3.
NO : Repair or replace the connector. Refer to GROUP
00E, Harness Connector Inspection P.00E-2. Check
that the outside/inside air selection damper control
motor works normally.
STEP 3. Measure the voltage at outside/inside air selection
damper control motor connector C-106.
(1) Disconnect outside/inside air selection damper control
motor connector C-106, and measure the voltage at the
harness side.
(2) Turn the ignition switch to the "ON" position.
(3) Measure the voltage between terminal 1 and ground.
The measured value should be approximately 12 volts
(battery positive voltage).
Q: Does the measured voltage correspond with this range?
YES : Go to Step 5.
NO : Go to Step 4.
STEP 4. Check the wiring harness between outside/inside
air selection damper control motor connector C-106
(terminal 1) and the ignition switch (IG2).
Page 786 of 1500
AUTO A/C DIAGNOSIS
HEATER, AIR CONDITIONING AND VENTILATION55-85
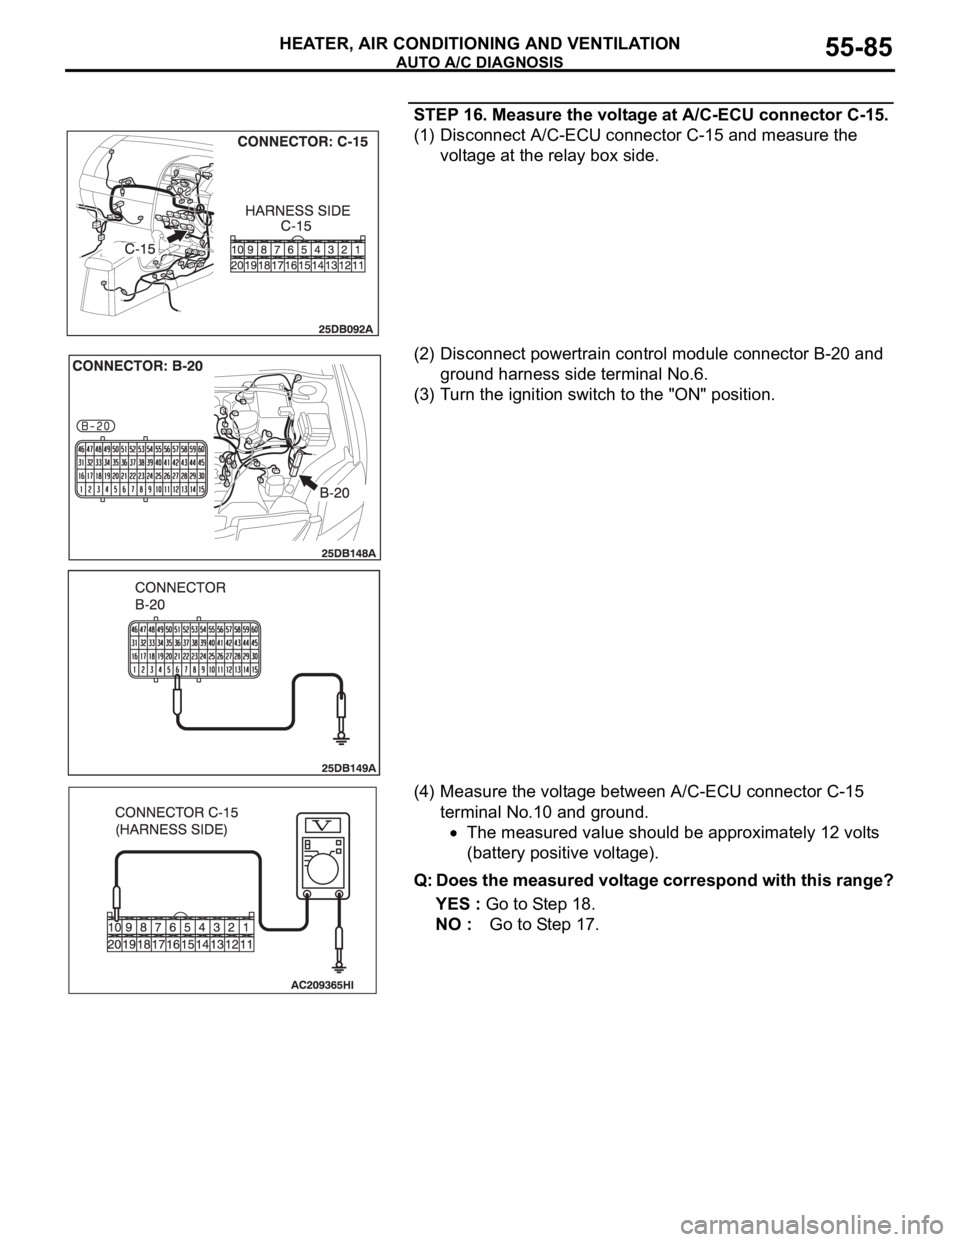
STEP 16. Measure the voltage at A/C-ECU connector C-15.
(1) Disconnect A/C-ECU connector C-15 and measure the
voltage at the relay box side.
(2) Disconnect powertrain control module connector B-20 and
ground harness side terminal No.6.
(3) Turn the ignition switch to the "ON" position.
(4) Measure the voltage between A/C-ECU connector C-15
terminal No.10 and ground.
The measured value should be approximately 12 volts
(battery positive voltage).
Q: Does the measured voltage correspond with this range?
YES : Go to Step 18.
NO : Go to Step 17.
Page 799 of 1500
AUTO A/C DIAGNOSIS
HEATER, AIR CONDITIONING AND VENTILATION55-98
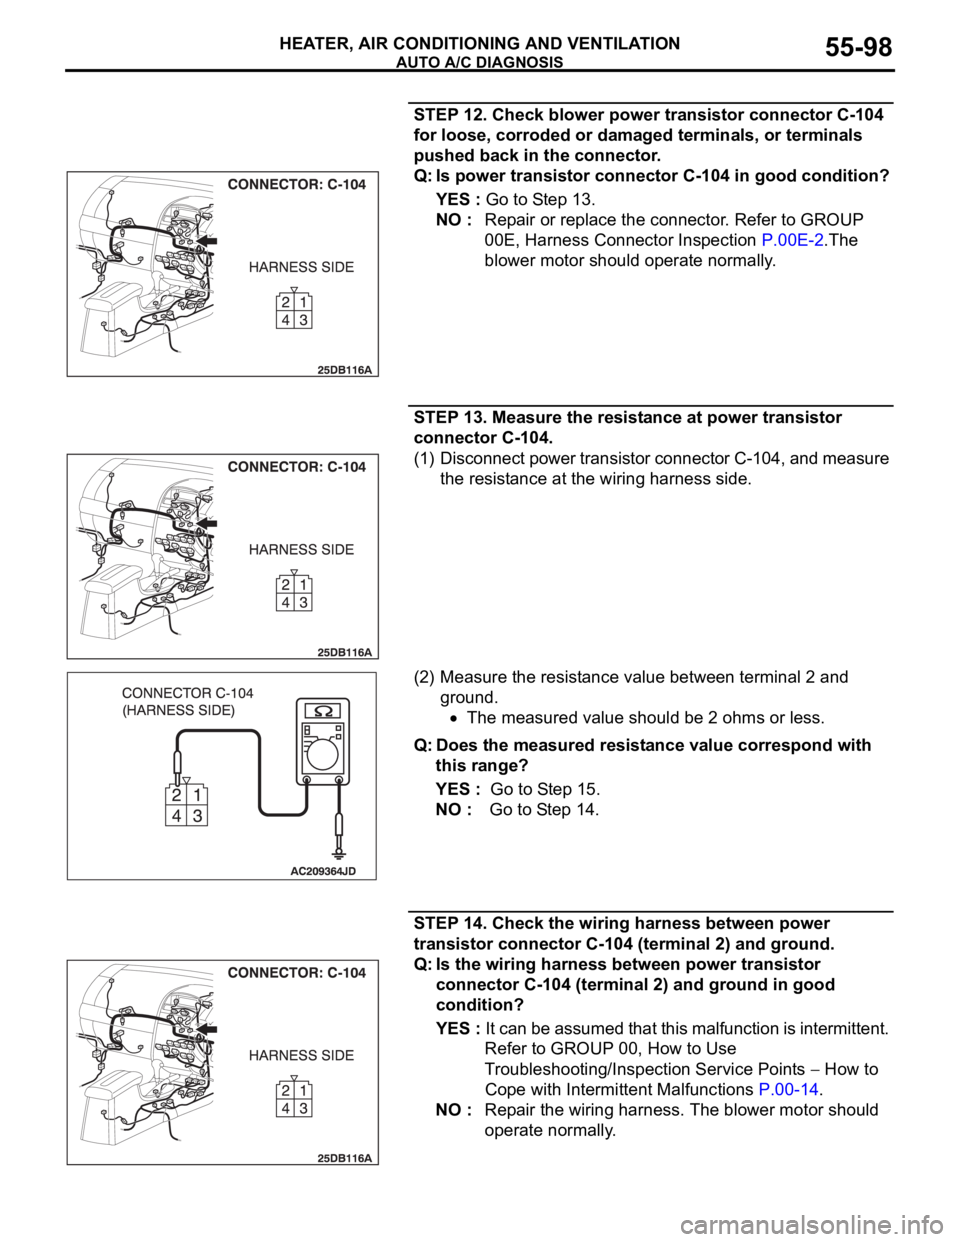
STEP 12. Check blower power transistor connector C-104
for loose, corroded or damaged terminals, or terminals
pushed back in the connector.
Q: Is power transistor connector C-104 in good condition?
YES : Go to Step 13.
NO : Repair or replace the connector. Refer to GROUP
00E, Harness Connector Inspection P.00E-2.The
blower motor should operate normally.
STEP 13. Measure the resistance at power transistor
connector C-104.
(1) Disconnect power transistor connector C-104, and measure
the resistance at the wiring harness side.
(2) Measure the resistance value between terminal 2 and
ground.
The measured value should be 2 ohms or less.
Q: Does the measured resistance value correspond with
this range?
YES : Go to Step 15.
NO : Go to Step 14.
STEP 14. Check the wiring harness between power
transistor connector C-104 (terminal 2) and ground.
Q: Is the wiring harness between power transistor
connector C-104 (terminal 2) and ground in good
condition?
YES : It can be assumed that this malfunction is intermittent.
Refer to GROUP 00, How to Use
Troubleshooting/Inspection Service Points
How to
Cope with Intermittent Malfunctions P.00-14.
NO : Repair the wiring harness. The blower motor should
operate normally.
Page 802 of 1500
AUTO A/C DIAGNOSIS
HEATER, AIR CONDITIONING AND VENTILATION55-101
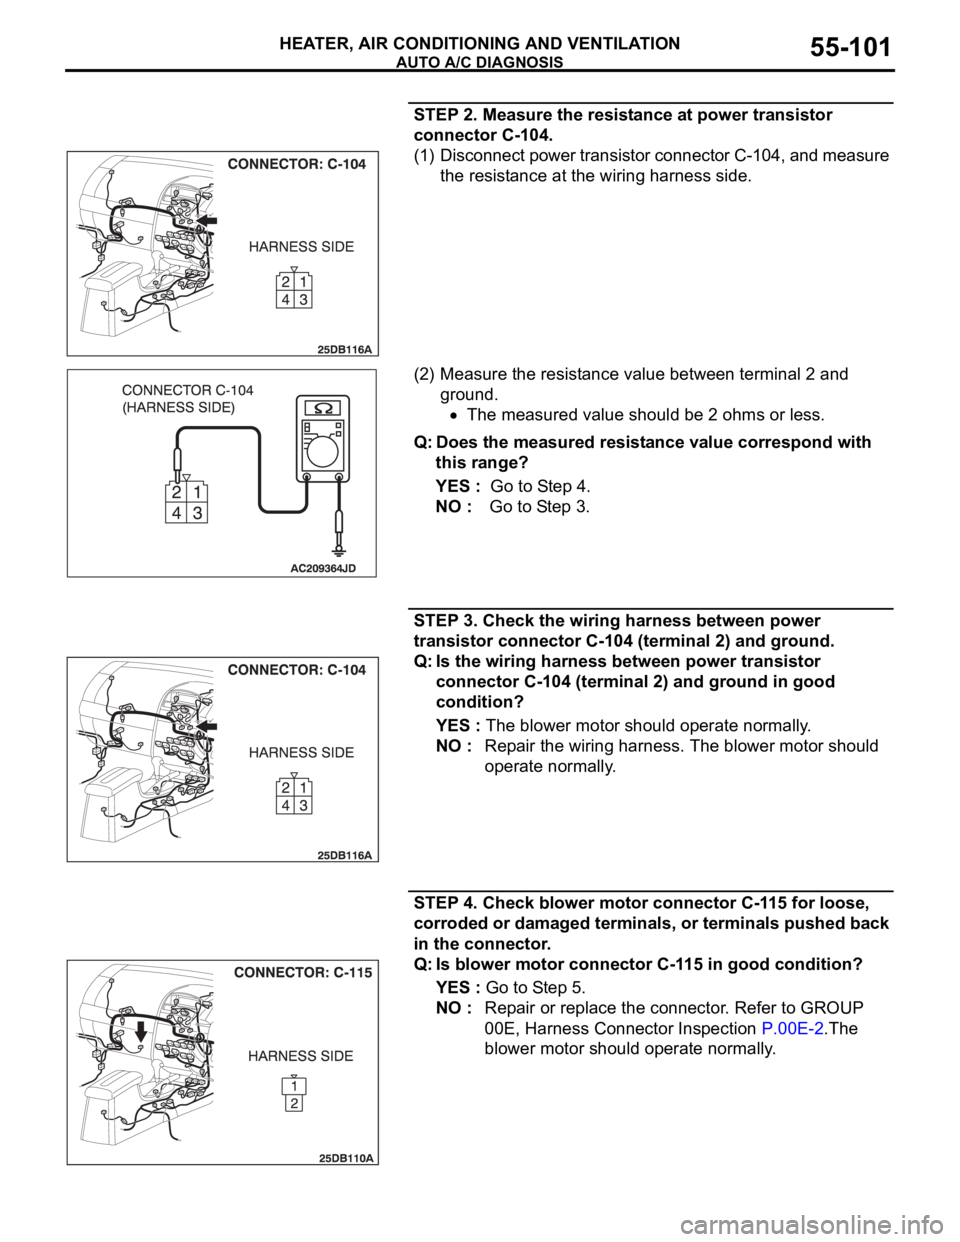
STEP 2. Measure the resistance at power transistor
connector C-104.
(1) Disconnect power transistor connector C-104, and measure
the resistance at the wiring harness side.
(2) Measure the resistance value between terminal 2 and
ground.
The measured value should be 2 ohms or less.
Q: Does the measured resistance value correspond with
this range?
YES : Go to Step 4.
NO : Go to Step 3.
STEP 3. Check the wiring harness between power
transistor connector C-104 (terminal 2) and ground.
Q: Is the wiring harness between power transistor
connector C-104 (terminal 2) and ground in good
condition?
YES : The blower motor should operate normally.
NO : Repair the wiring harness. The blower motor should
operate normally.
STEP 4. Check blower motor connector C-115 for loose,
corroded or damaged terminals, or terminals pushed back
in the connector.
Q: Is blower motor connector C-115 in good condition?
YES : Go to Step 5.
NO : Repair or replace the connector. Refer to GROUP
00E, Harness Connector Inspection P.00E-2.The
blower motor should operate normally.
Page 828 of 1500
AUTO A/C DIAGNOSIS
HEATER, AIR CONDITIONING AND VENTILATION55-127
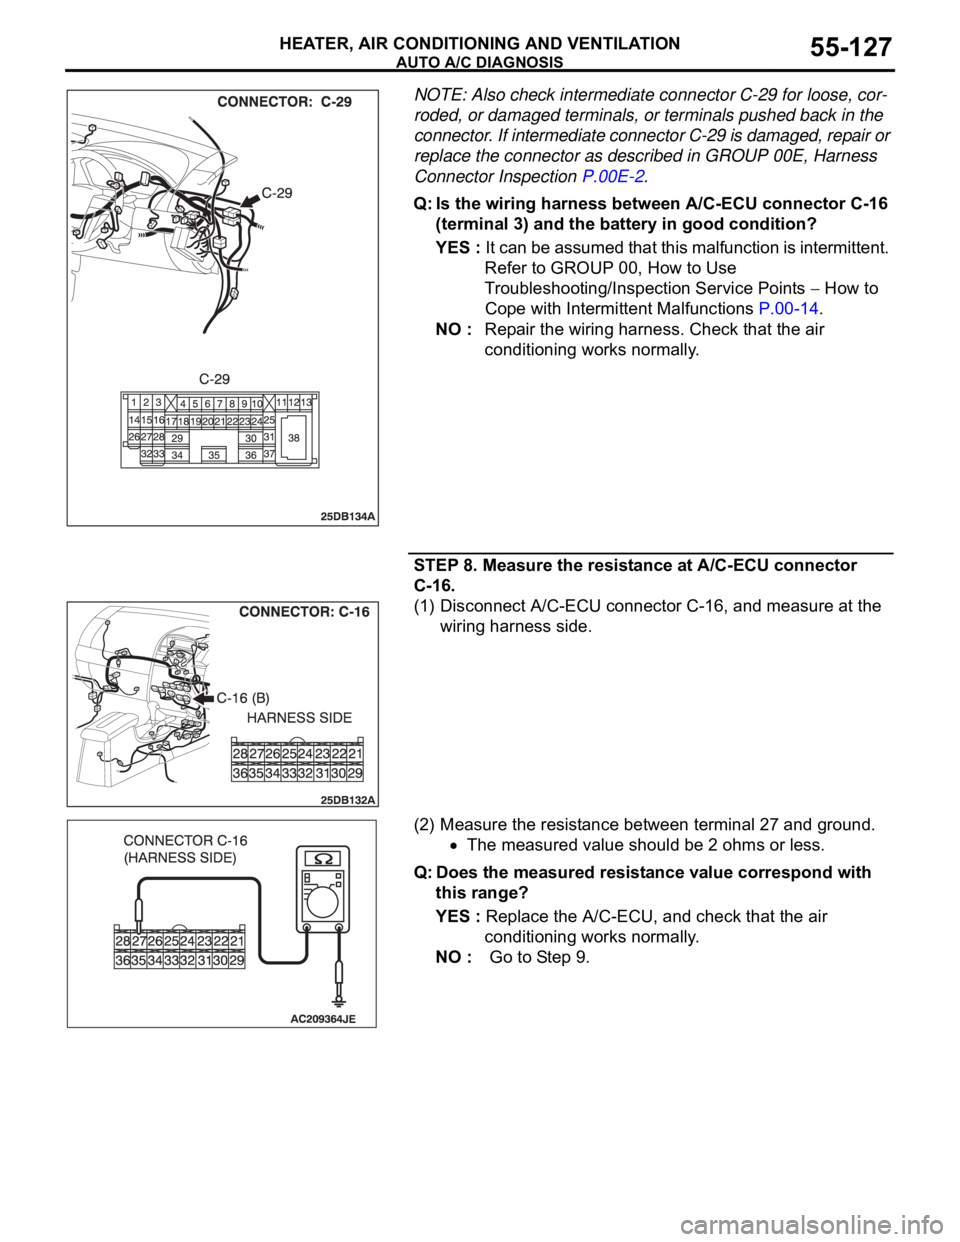
NOTE: Also check intermediate connector C-29 for loose, cor-
roded, or damaged terminals, or terminals pushed back in the
connector. If intermediate connector C-29 is damaged, repair or
replace the connector as described in GROUP 00E, Harness
Connector Inspection P.00E-2.
Q: Is the wiring harness between A/C-ECU connector C-16
(terminal 3) and the battery in good condition?
YES : It can be assumed that this malfunction is intermittent.
Refer to GROUP 00, How to Use
Troubleshooting/Inspection Service Points
How to
Cope with Intermittent Malfunctions P.00-14.
NO : Repair the wiring harness. Check that the air
conditioning works normally.
STEP 8. Measure the resistance at A/C-ECU connector
C-16.
(1) Disconnect A/C-ECU connector C-16, and measure at the
wiring harness side.
(2) Measure the resistance between terminal 27 and ground.
The measured value should be 2 ohms or less.
Q: Does the measured resistance value correspond with
this range?
YES : Replace the A/C-ECU, and check that the air
conditioning works normally.
NO : Go to Step 9.
Page 835 of 1500

AUTO A/C DIAGNOSIS
HEATER, AIR CONDITIONING AND VENTILATION55-134
Air outlet c/o
potentiometer55 Mode selection
damper control
motor potentiometerIgnition switch: ON Damper
positionOpening degree (V)
FA C E A p pr o x . 5
FOOT Approx. 3.75
FOOT/DEF. Approx. 2.5
DEF. Approx. 1.75
Air outlet c/o
potentiometer
(target)56 Target value for
mode selection
damper control
motor potentiometerIgnition switch: ON Damper
positionOpening degree (V)
FA C E A p pr o x . 5
FOOT Approx. 3.75
FOOT/DEF. Approx. 2.5
DEF. Approx. 1.75
In/out air
changeover
damper motor65 Outside/inside air
selection damper
control motorIgnition switch: ON Damper set
positionDamper position
Fresh air
positionFRESH
Air recirculation
positionRECIRC
Front blower fan 68 Blower motor Ignition switch: ON The actual air
volume (blower
motor speed)
corresponds to the
air volume shown on
the diagnostic tool.
Front blower
motor voltage 71 Blower motor Ignition switch: ON The air volume set
by the heater control
corresponds to the
value shown on the
diagnostic tool. (V)
Air conditioning
switch state1 Air conditioning
switchIgnition switch: ON Air conditioning
switch: ONDiagnostic tool
indication: "pressed"
Air conditioning
switch: OFFDiagnostic tool
indication: "release"
Rear defogger
switch state7 Rear window
defogger switchIgnition switch: ON Rear window
defogger
switch: ONDiagnostic tool
indication: "pressed"
Rear window
defogger
switch: OFFDiagnostic tool
indication: "release"
Refrigerant
pressure73 Refrigerant pressure Ignition switch: ON The diagnostic tool
indication is normal MUT-III
DIAGNOSTIC
TOOL DISPLAYITEM
NO.INSPECTION ITEM INSPECTION REQUIREMENT NORMAL VALUE
Page 836 of 1500

AUTO A/C DIAGNOSIS
HEATER, AIR CONDITIONING AND VENTILATION55-135
Temperature
setting23 Temperature setting
actualIgnition switch: ON The actual setting
corresponds with
diagnostic tool
display.
Vehicle speed 26 Actual vehicle speed Ignition switch: ON The vehicle speed
corresponds with
diagnostic tool
display.
A/C compressor
drive request27 Compressor clutch Engine: ON
Compressor:
ONDiagnostic tool
indication: "ON"
Compressor:
OFFDiagnostic tool
indication: "OFF"
Illumination 15 Display lighting Ignition switch: ON
Lights: ON
Diagnostic tool
indication: "ON"
Lights: OFF
Diagnostic tool
indication: "OFF"
Engine speed 23 Actual engine speed Engine: ON The engine speed
corresponds with
diagnostic tool
display.
In/out air select
switch state3 In/out air select
switch Ignition switch: ON In/out air
switch: ONDiagnostic tool
indication: "pressed"
In/out air
switch: OFFDiagnostic tool
indication: "release"
Rear defogger
relay72 Rear defogger relay Ignition switch: ON
Rear defogger:
ONDiagnostic tool
indication: "ON"
Rear defogger:
OFFDiagnostic tool
indication: "OFF" MUT-III
DIAGNOSTIC
TOOL DISPLAYITEM
NO.INSPECTION ITEM INSPECTION REQUIREMENT NORMAL VALUE
Page 846 of 1500
ON-VEHICLE SERVICE
HEATER, AIR CONDITIONING AND VENTILATION55-145
LOST CHARGE
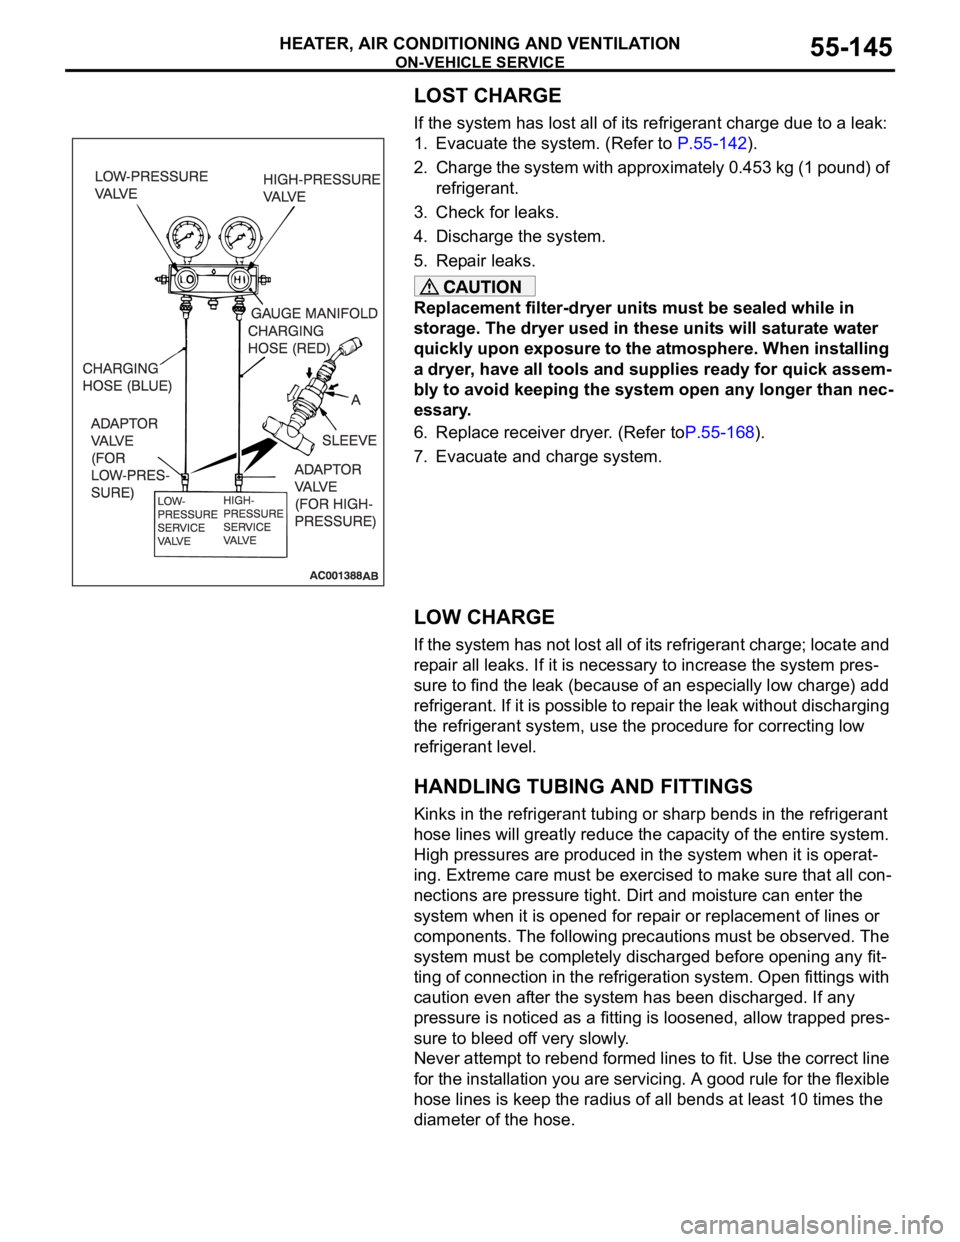
If the system has lost all of its refrigerant charge due to a leak:
1. Evacuate the system. (Refer to P.55-142).
2. Charge the system with approximately 0.453 kg (1 pound) of
refrigerant.
3. Check for leaks.
4. Discharge the system.
5. Repair leaks.
Replacement filter-dryer units must be sealed while in
storage. The dryer used in these units will saturate water
quickly upon exposure to the atmosphere. When installing
a dryer, have all tools and supplies ready for quick assem-
bly to avoid keeping the system open any longer than nec-
essary.
6. Replace receiver dryer. (Refer toP.55-168).
7. Evacuate and charge system.
LOW CHARGE
If the system has not lost all of its refrigerant charge; locate and
repair all leaks. If it is necessary to increase the system pres-
sure to find the leak (because of an especially low charge) add
refrigerant. If it is possible to repair the leak without discharging
the refrigerant system, use the procedure for correcting low
refrigerant level.
HANDLING TUBING AND FITTINGS
Kinks in the refrigerant tubing or sharp bends in the refrigerant
hose lines will greatly reduce the capacity of the entire system.
High pressures are produced in the system when it is operat-
ing. Extreme care must be exercised to make sure that all con-
nections are pressure tight. Dirt and moisture can enter the
system when it is opened for repair or replacement of lines or
components. The following precautions must be observed. The
system must be completely discharged before opening any fit-
ting of connection in the refrigeration system. Open fittings with
caution even after the system has been discharged. If any
pressure is noticed as a fitting is loosened, allow trapped pres-
sure to bleed off very slowly.
Never attempt to rebend formed lines to fit. Use the correct line
for the installation you are servicing. A good rule for the flexible
hose lines is keep the radius of all bends at least 10 times the
diameter of the hose.