bulb MITSUBISHI 380 2005 Owner's Manual
[x] Cancel search | Manufacturer: MITSUBISHI, Model Year: 2005, Model line: 380, Model: MITSUBISHI 380 2005Pages: 1500, PDF Size: 47.87 MB
Page 329 of 1500
SYMPTOM PROCEDURES
SIMPLIFIED WIRING SYSTEM (SWS)54B-329
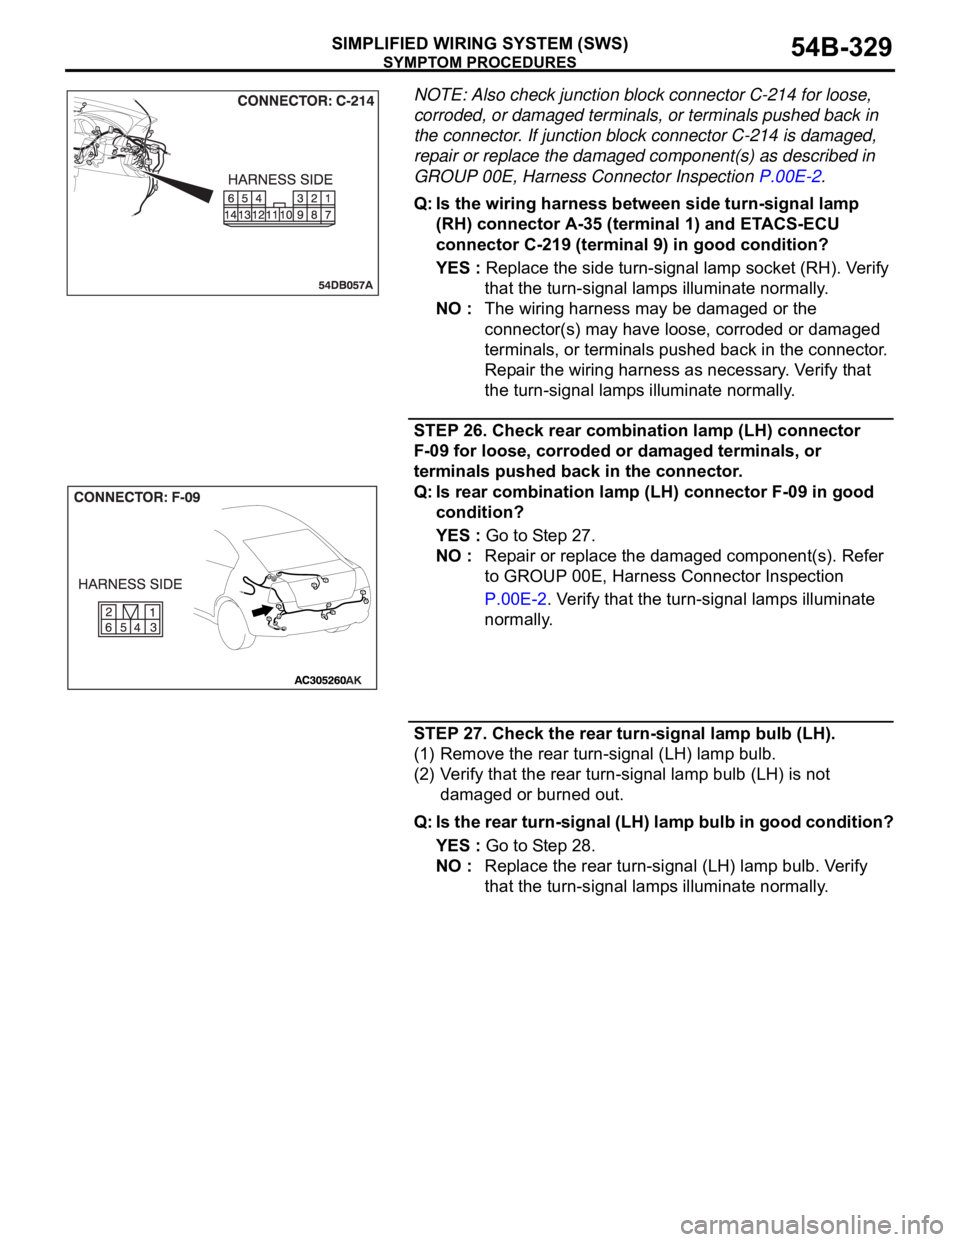
NOTE: Also check junction block connector C-214 for loose,
corroded, or damaged terminals, or terminals pushed back in
the connector. If junction block connector C-214 is damaged,
repair or replace the damaged component(s) as described in
GROUP 00E, Harness Connector Inspection P.00E-2.
Q: Is the wiring harness between side turn-signal lamp
(RH) connector A-35 (terminal 1) and ETACS-ECU
connector C-219 (terminal 9) in good condition?
YES : Replace the side turn-signal lamp socket (RH). Verify
that the turn-signal lamps illuminate normally.
NO : The wiring harness may be damaged or the
connector(s) may have loose, corroded or damaged
terminals, or terminals pushed back in the connector.
Repair the wiring harness as necessary. Verify that
the turn-signal lamps illuminate normally.
STEP 26. Check rear combination lamp (LH) connector
F-09 for loose, corroded or damaged terminals, or
terminals pushed back in the connector.
Q: Is rear combination lamp (LH) connector F-09 in good
condition?
YES : Go to Step 27.
NO : Repair or replace the damaged component(s). Refer
to GROUP 00E, Harness Connector Inspection
P.00E-2. Verify that the turn-signal lamps illuminate
normally.
STEP 27. Check the rear turn-signal lamp bulb (LH).
(1) Remove the rear turn-signal (LH) lamp bulb.
(2) Verify that the rear turn-signal lamp bulb (LH) is not
damaged or burned out.
Q: Is the rear turn-signal (LH) lamp bulb in good condition?
YES : Go to Step 28.
NO : Replace the rear turn-signal (LH) lamp bulb. Verify
that the turn-signal lamps illuminate normally.
Page 332 of 1500
SYMPTOM PROCEDURES
SIMPLIFIED WIRING SYSTEM (SWS)54B-332
NOTE: Also check junction block connector C-204 for loose,
corroded, or damaged terminals, or terminals pushed back in
the connector. If junction block connector C-204 is damaged,
repair or replace the damaged component(s) as described in
GROUP 00E, Harness Connector Inspection P.00E-2.
Q: Is the wiring harness between rear combination lamp
(LH) connector F-09 (terminal 5) and ETACS-ECU
connector C-219 (terminal 14) in good condition?
YES : Replace the rear combination lamp socket assembly
(LH). Verify that the turn-signal lamps illuminate
normally.
NO : The wiring harness may be damaged or the
connector(s) may have loose, corroded or damaged
terminals, or terminals pushed back in the connector.
Repair the wiring harness as necessary. Verify that
the turn-signal lamps illuminate normally.
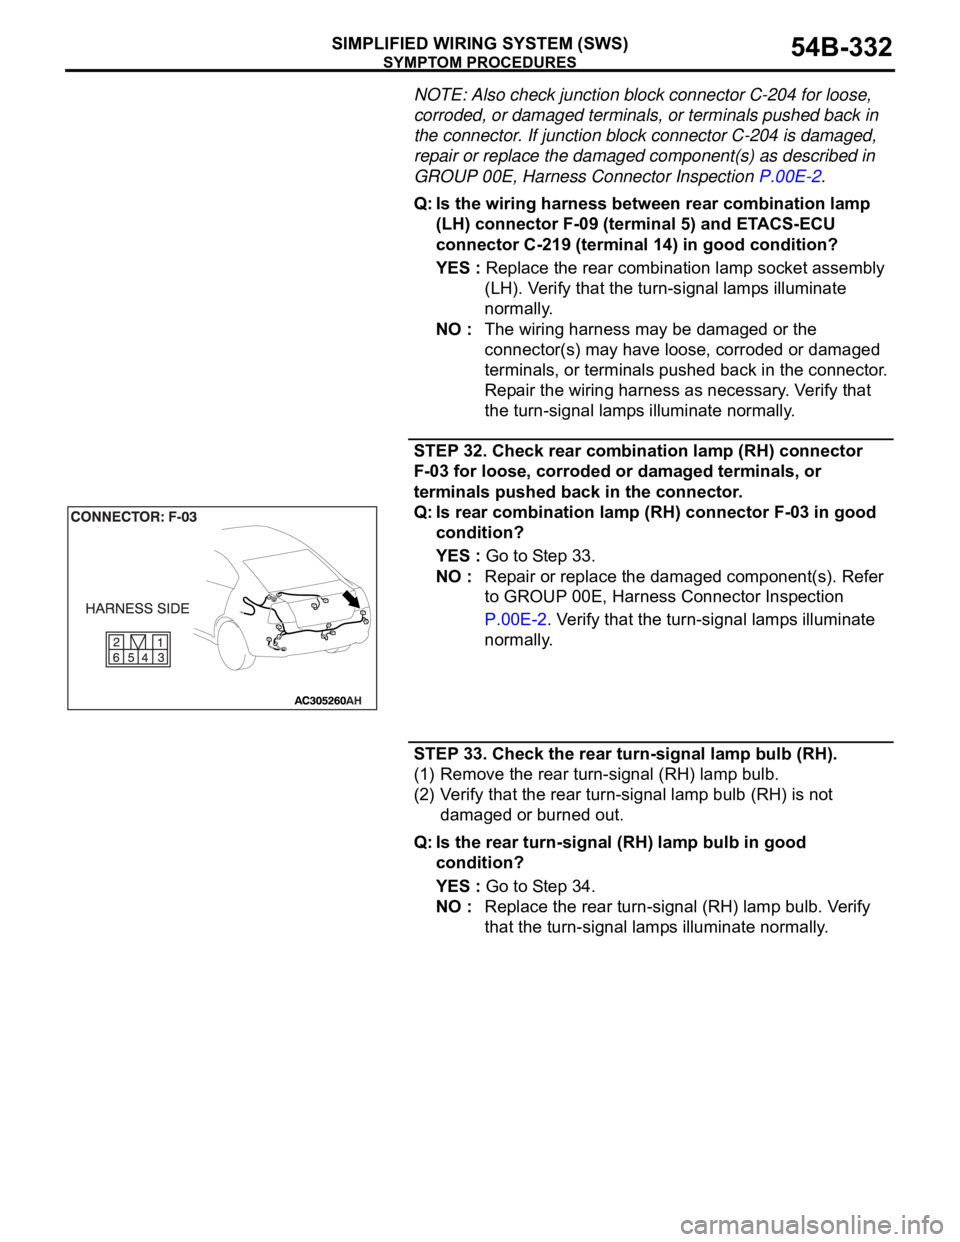
STEP 32. Check rear combination lamp (RH) connector
F-03 for loose, corroded or damaged terminals, or
terminals pushed back in the connector.
Q: Is rear combination lamp (RH) connector F-03 in good
condition?
YES : Go to Step 33.
NO : Repair or replace the damaged component(s). Refer
to GROUP 00E, Harness Connector Inspection
P.00E-2. Verify that the turn-signal lamps illuminate
normally.
STEP 33. Check the rear turn-signal lamp bulb (RH).
(1) Remove the rear turn-signal (RH) lamp bulb.
(2) Verify that the rear turn-signal lamp bulb (RH) is not
damaged or burned out.
Q: Is the rear turn-signal (RH) lamp bulb in good
condition?
YES : Go to Step 34.
NO : Replace the rear turn-signal (RH) lamp bulb. Verify
that the turn-signal lamps illuminate normally.
Page 345 of 1500
SYMPTOM PROCEDURES
SIMPLIFIED WIRING SYSTEM (SWS)54B-345
INSPECTION PROCEDURE J-2: Fog Light: Fog lamps do not go out when the headlamps (low-beam)
are turned off while the fog lamps are on.
.
TECHNICAL DESCRIPTION (COMMENT)
If the trouble above occurs, the front-ECU may be
defective.
.
TROUBLESHOOTING HINT
Refer to circuit diagrams GROUP-90
Refer to configuration diagrams GROUP-80
The front-ECU may be defective
DIAGNOSIS
Replace the front-ECU.
The fog lamps should go out when the headlamps (low-beam)
are turned off while the fog lamps are on.
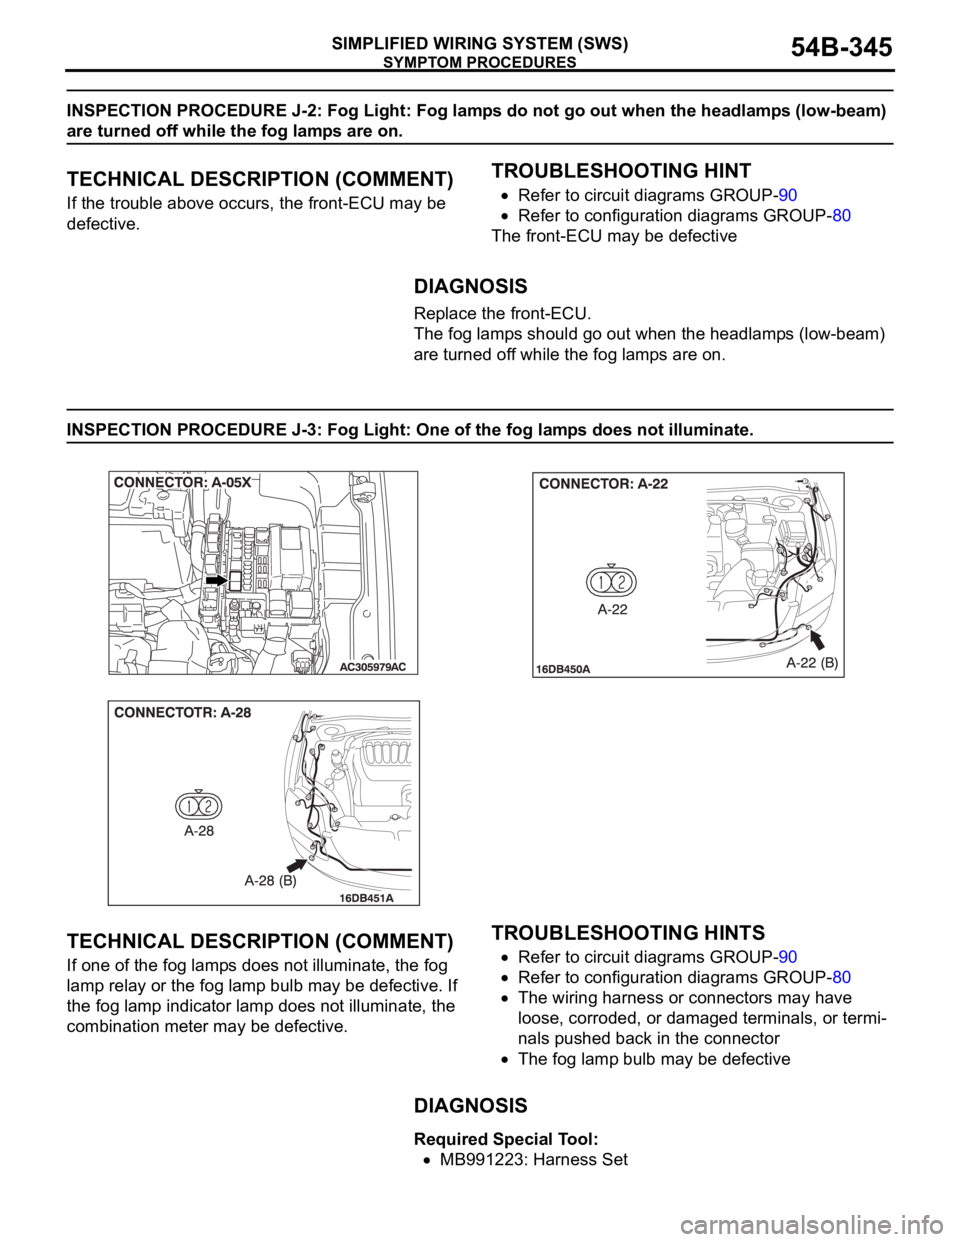
INSPECTION PROCEDURE J-3: Fog Light: One of the fog lamps does not illuminate.
.
TECHNICAL DESCRIPTION (COMMENT)
If one of the fog lamps does not illuminate, the fog
lamp relay or the fog lamp bulb may be defective. If
the fog lamp indicator lamp does not illuminate, the
combination meter may be defective.
.
TROUBLESHOOTING HINTS
Refer to circuit diagrams GROUP-90
Refer to configuration diagrams GROUP-80
The wiring harness or connectors may have
loose, corroded, or damaged terminals, or termi-
nals pushed back in the connector
The fog lamp bulb may be defective
.
DIAGNOSIS
Required Special Tool:
MB991223: Harness Set
Page 346 of 1500
SYMPTOM PROCEDURES
SIMPLIFIED WIRING SYSTEM (SWS)54B-346
STEP 1. Verify that the fog lamps and the fog lamp
indicator lamp illuminate.
Q: Do the fog lamps and the fog lamp indicator lamp
illuminate normally?
Only the fog lamp (LH) does not illuminate : Go to Step
2.
Only the fog lamp (RH) does not illuminate : Go to Step
8.
Only the fog lamp indicator does not illuminate : Refer
to Inspection Procedure J-4 "The fog lamp indicator
does not illuminate normally P.54B-350."
Both of the fog lamps do not illuminate : Refer to
Inspection Procedure J-1 "Fog lamps do not
illuminate when the fog lamp switch is turned on
P.54B-340."
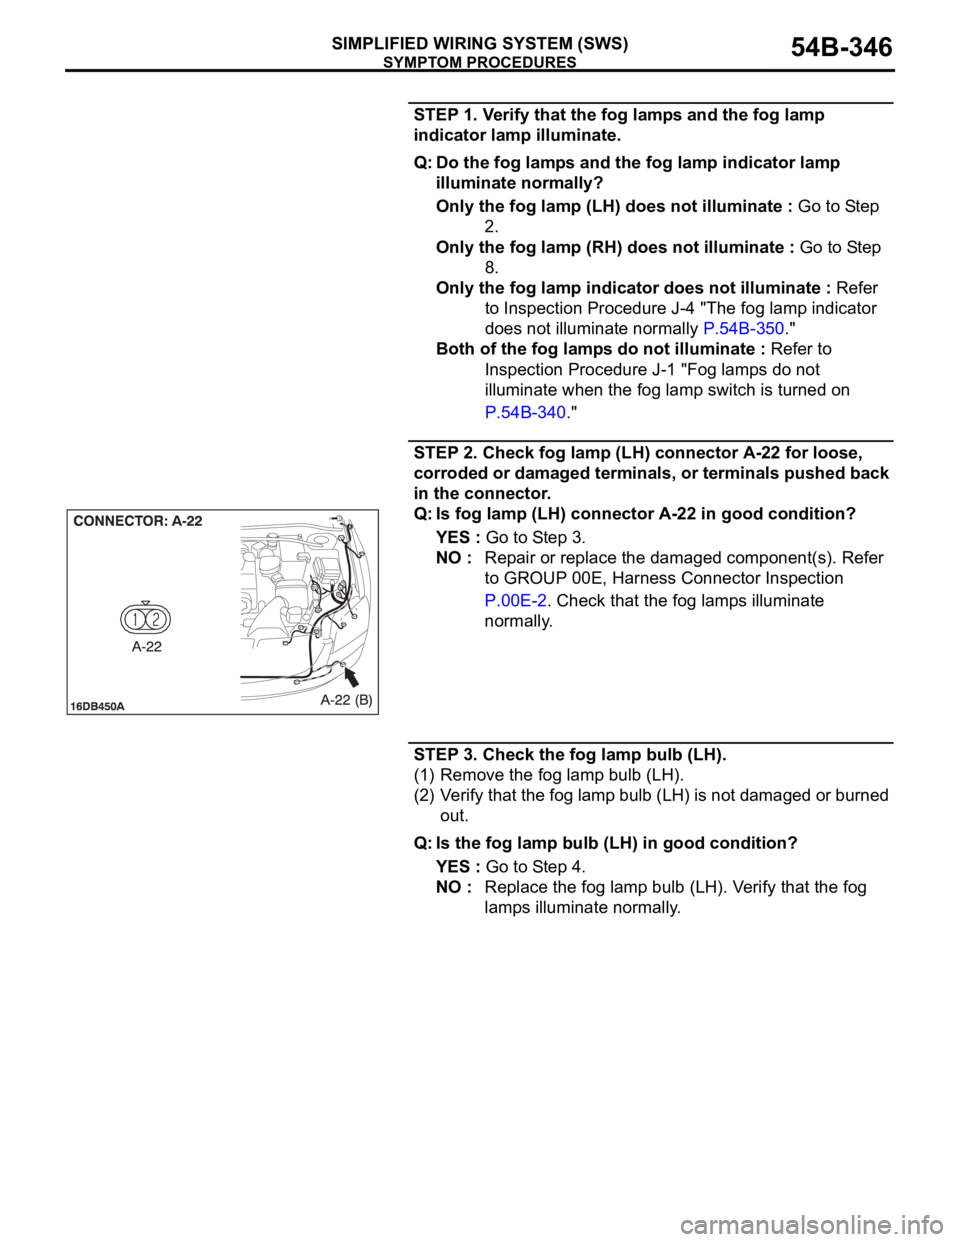
STEP 2. Check fog lamp (LH) connector A-22 for loose,
corroded or damaged terminals, or terminals pushed back
in the connector.
Q: Is fog lamp (LH) connector A-22 in good condition?
YES : Go to Step 3.
NO : Repair or replace the damaged component(s). Refer
to GROUP 00E, Harness Connector Inspection
P.00E-2. Check that the fog lamps illuminate
normally.
STEP 3. Check the fog lamp bulb (LH).
(1) Remove the fog lamp bulb (LH).
(2) Verify that the fog lamp bulb (LH) is not damaged or burned
out.
Q: Is the fog lamp bulb (LH) in good condition?
YES : Go to Step 4.
NO : Replace the fog lamp bulb (LH). Verify that the fog
lamps illuminate normally.
Page 348 of 1500
SYMPTOM PROCEDURES
SIMPLIFIED WIRING SYSTEM (SWS)54B-348
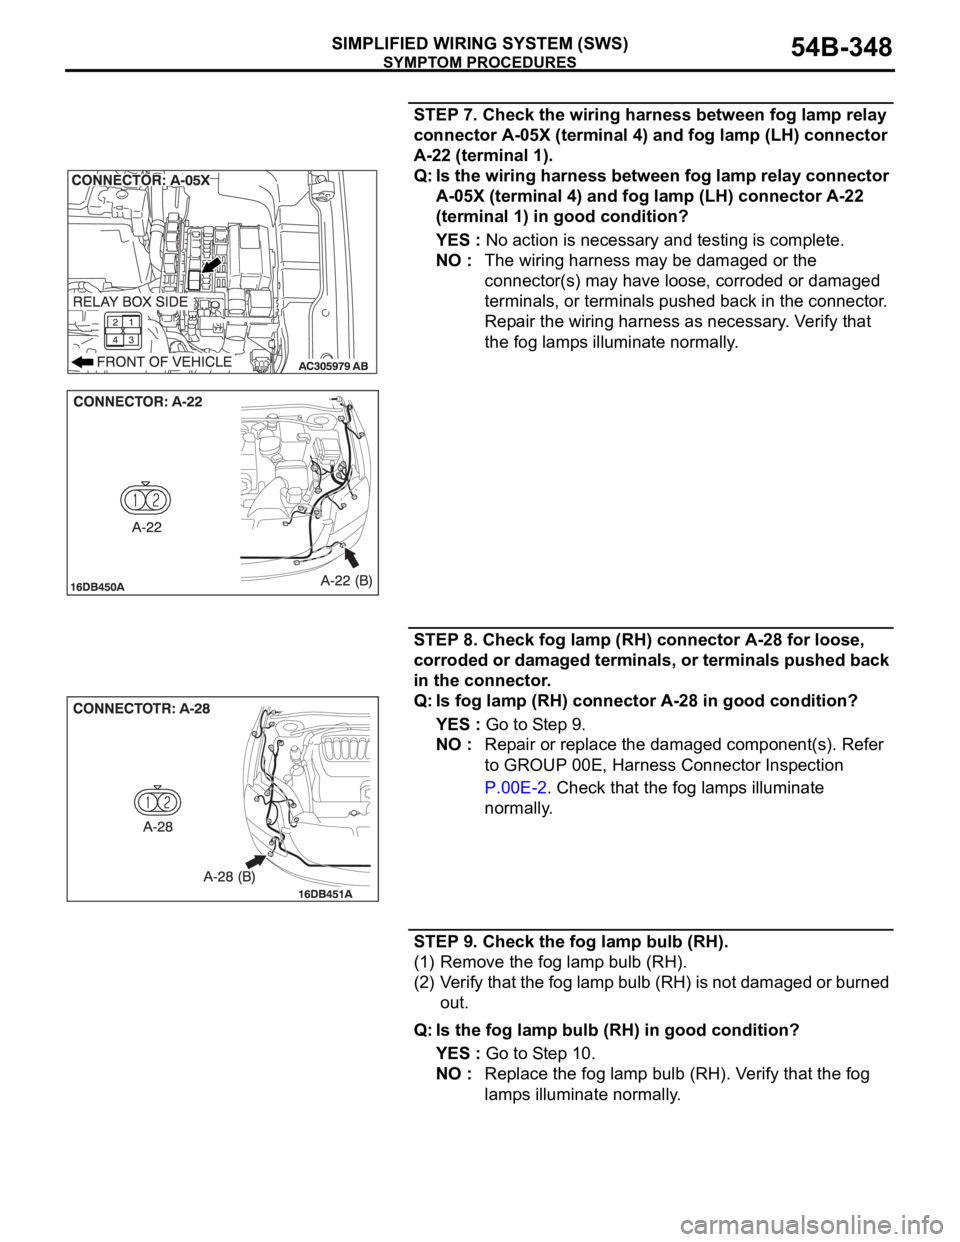
STEP 7. Check the wiring harness between fog lamp relay
connector A-05X (terminal 4) and fog lamp (LH) connector
A-22 (terminal 1).
Q: Is the wiring harness between fog lamp relay connector
A-05X (terminal 4) and fog lamp (LH) connector A-22
(terminal 1) in good condition?
YES : No action is necessary and testing is complete.
NO : The wiring harness may be damaged or the
connector(s) may have loose, corroded or damaged
terminals, or terminals pushed back in the connector.
Repair the wiring harness as necessary. Verify that
the fog lamps illuminate normally.
STEP 8. Check fog lamp (RH) connector A-28 for loose,
corroded or damaged terminals, or terminals pushed back
in the connector.
Q: Is fog lamp (RH) connector A-28 in good condition?
YES : Go to Step 9.
NO : Repair or replace the damaged component(s). Refer
to GROUP 00E, Harness Connector Inspection
P.00E-2. Check that the fog lamps illuminate
normally.
STEP 9. Check the fog lamp bulb (RH).
(1) Remove the fog lamp bulb (RH).
(2) Verify that the fog lamp bulb (RH) is not damaged or burned
out.
Q: Is the fog lamp bulb (RH) in good condition?
YES : Go to Step 10.
NO : Replace the fog lamp bulb (RH). Verify that the fog
lamps illuminate normally.
Page 359 of 1500
SYMPTOM PROCEDURES
SIMPLIFIED WIRING SYSTEM (SWS)54B-359
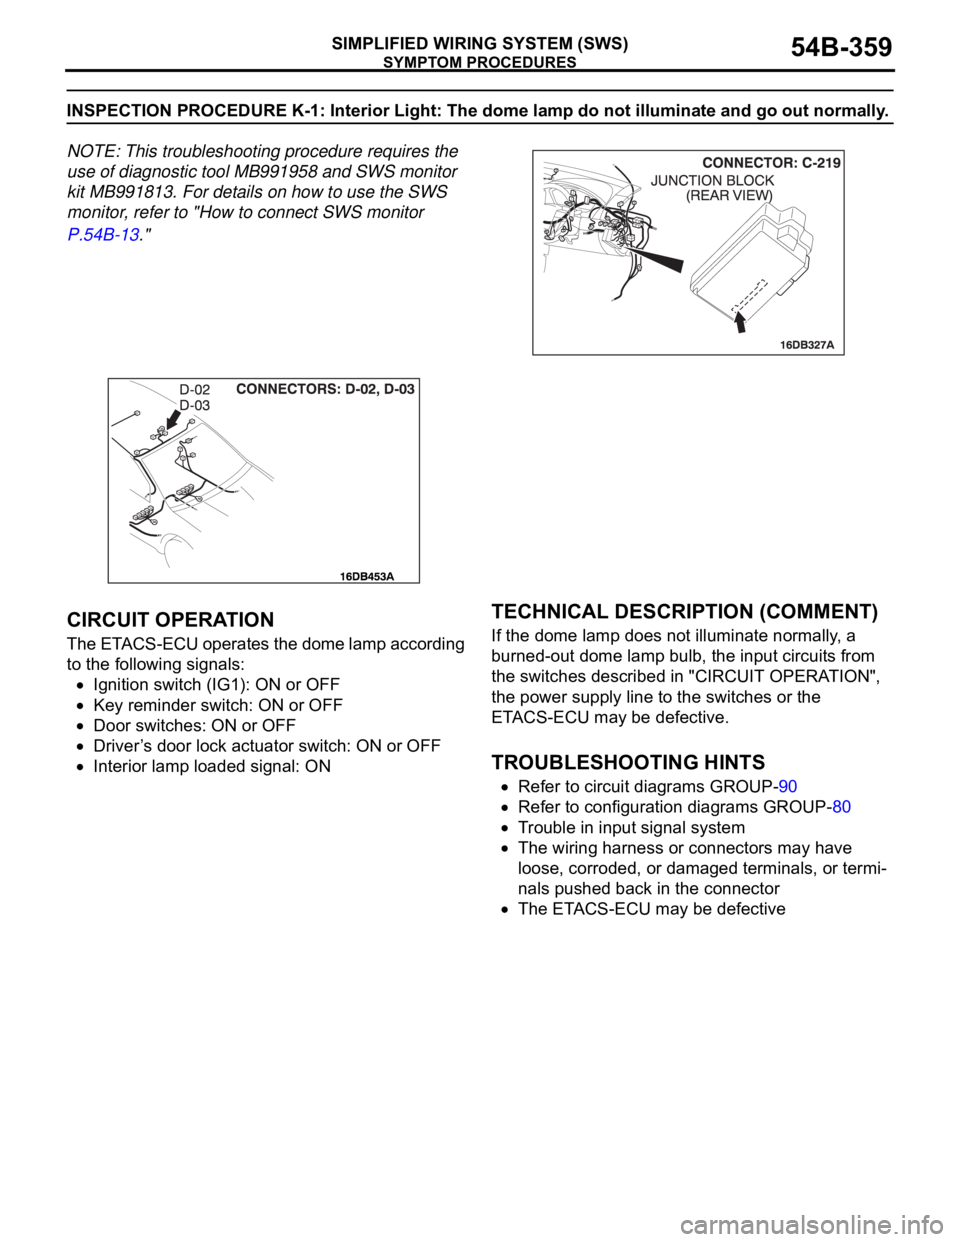
INSPECTION PROCEDURE K-1: Interior Light: The dome lamp do not illuminate and go out normally.
NOTE: This troubleshooting procedure requires the
use of diagnostic tool MB991958 and SWS monitor
kit MB991813. For details on how to use the SWS
monitor, refer to "How to connect SWS monitor
P.54B-13."
.
CIRCUIT OPERATION
The ETACS-ECU operates the dome lamp according
to the following signals:
Ignition switch (IG1): ON or OFF
Key reminder switch: ON or OFF
Door switches: ON or OFF
Driver’s door lock actuator switch: ON or OFF
Interior lamp loaded signal: ON
.
TECHNICAL DESCRIPTION (COMMENT)
If the dome lamp does not illuminate normally, a
burned-out dome lamp bulb, the input circuits from
the switches described in "CIRCUIT OPERATION",
the power supply line to the switches or the
ETACS-ECU may be defective.
.
TROUBLESHOOTING HINTS
Refer to circuit diagrams GROUP-90
Refer to configuration diagrams GROUP-80
Trouble in input signal system
The wiring harness or connectors may have
loose, corroded, or damaged terminals, or termi-
nals pushed back in the connector
The ETACS-ECU may be defective
Page 367 of 1500

SYMPTOM PROCEDURES
SIMPLIFIED WIRING SYSTEM (SWS)54B-367
TECHNICAL DESCRIPTION (COMMENT)
Is the dome lamp does not flash normally, a
burned-out dome lamp bulb, the input circuits from
the switches described in "CIRCUIT OPERATION",
the power supply line to the switches or the
ETACS-ECU may be defective.
.
TROUBLESHOOTING HINTS
Refer to circuit diagrams GROUP-90
Refer to configuration diagrams GROUP-80
The front dome lamp bulb may be defective
The rear dome lamp bulb may be defective
The trunk lamp bulb may be defective
The wiring harness or connectors may have
loose, corroded, or damaged terminals, or termi-
nals pushed back in the connector
The ETACS-ECU may be defective
Page 369 of 1500
SYMPTOM PROCEDURES
SIMPLIFIED WIRING SYSTEM (SWS)54B-369
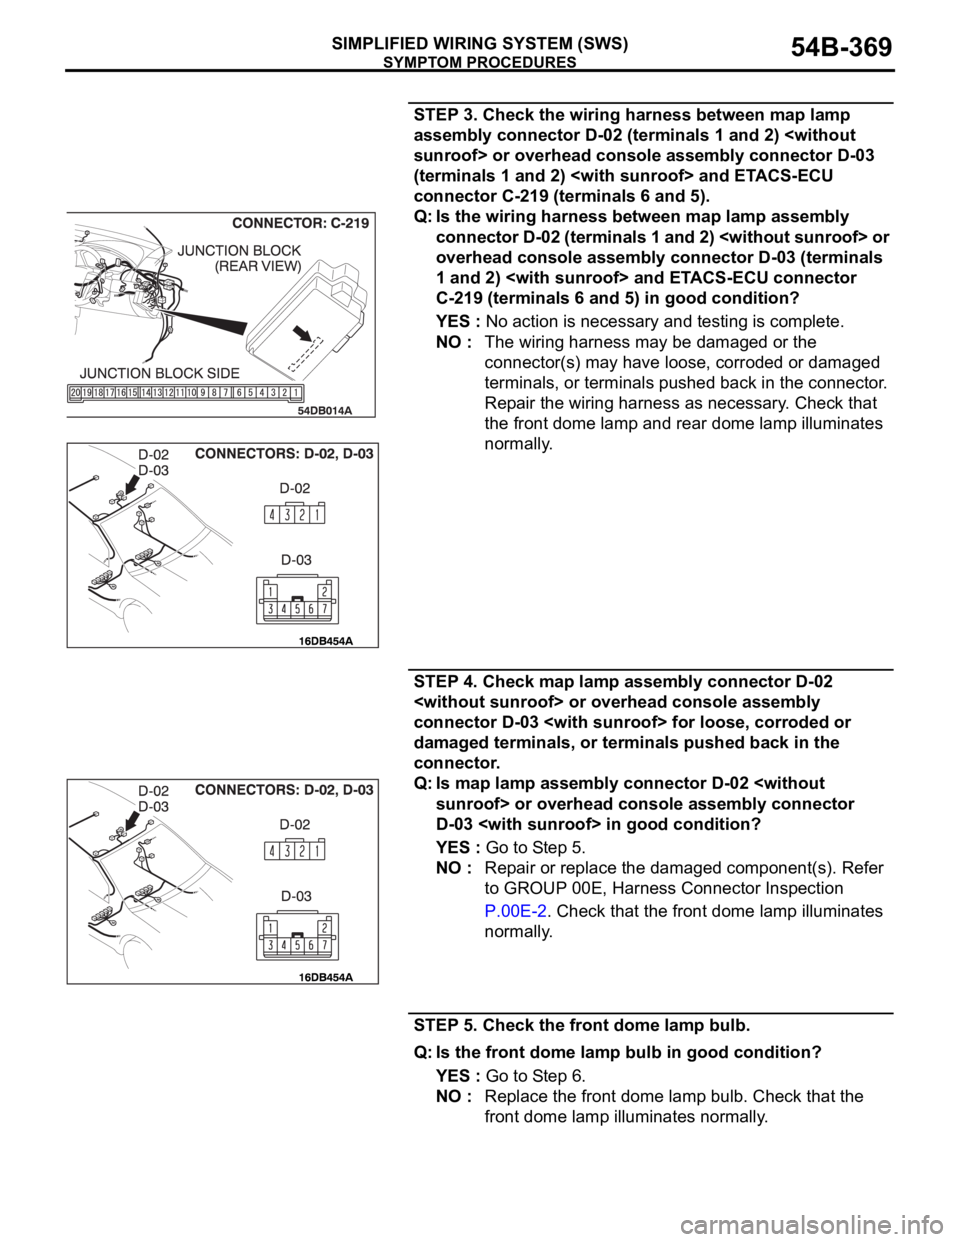
STEP 3. Check the wiring harness between map lamp
assembly connector D-02 (terminals 1 and 2)
(terminals 1 and 2)
connector C-219 (terminals 6 and 5).
Q: Is the wiring harness between map lamp assembly
connector D-02 (terminals 1 and 2)
overhead console assembly connector D-03 (terminals
1 and 2)
C-219 (terminals 6 and 5) in good condition?
YES : No action is necessary and testing is complete.
NO : The wiring harness may be damaged or the
connector(s) may have loose, corroded or damaged
terminals, or terminals pushed back in the connector.
Repair the wiring harness as necessary. Check that
the front dome lamp and rear dome lamp illuminates
normally.
STEP 4. Check map lamp assembly connector D-02
connector D-03
damaged terminals, or terminals pushed back in the
connector.
Q: Is map lamp assembly connector D-02
D-03
YES : Go to Step 5.
NO : Repair or replace the damaged component(s). Refer
to GROUP 00E, Harness Connector Inspection
P.00E-2. Check that the front dome lamp illuminates
normally.
STEP 5. Check the front dome lamp bulb.
Q: Is the front dome lamp bulb in good condition?
YES : Go to Step 6.
NO : Replace the front dome lamp bulb. Check that the
front dome lamp illuminates normally.
Page 371 of 1500
SYMPTOM PROCEDURES
SIMPLIFIED WIRING SYSTEM (SWS)54B-371
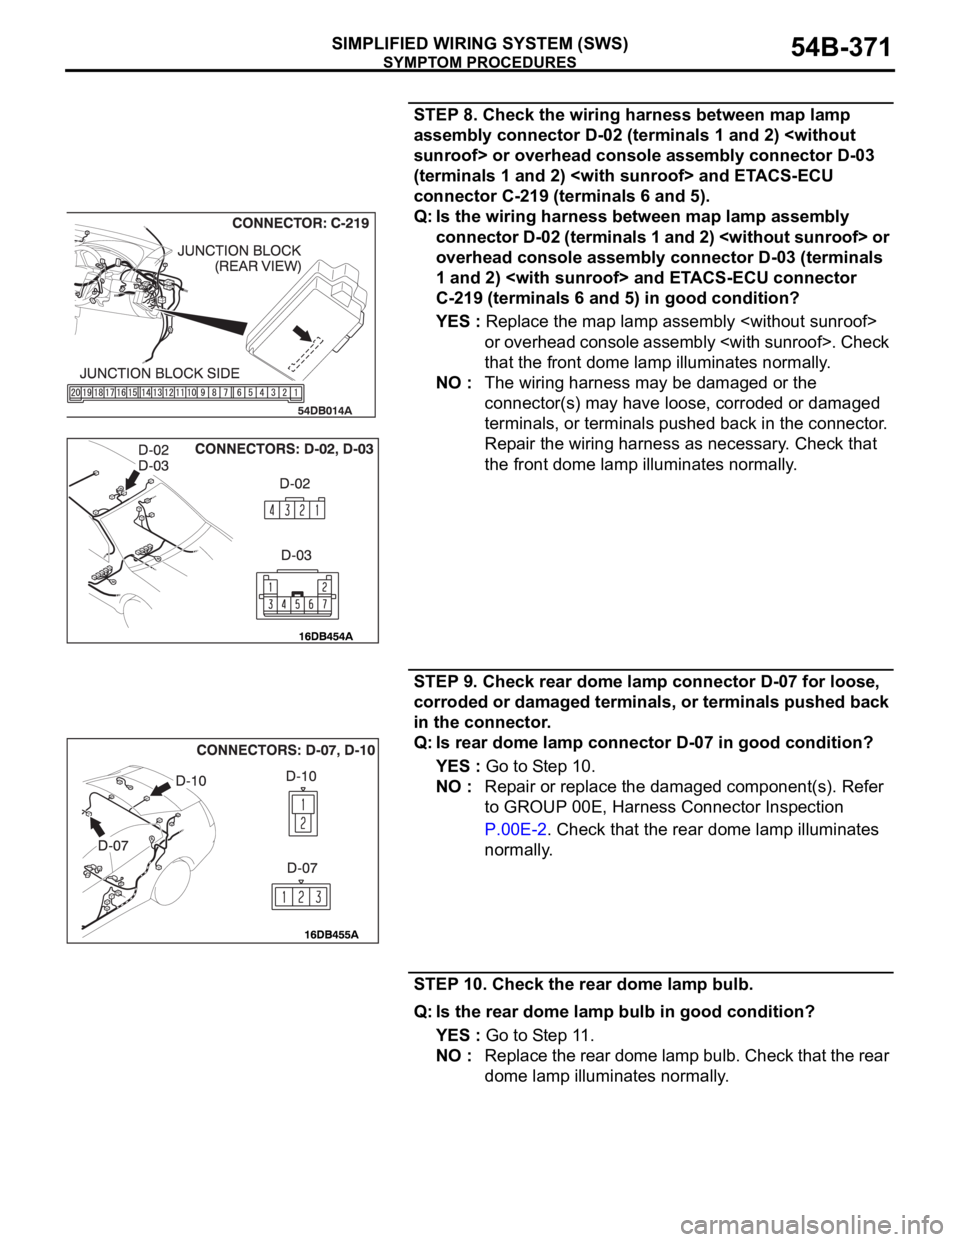
STEP 8. Check the wiring harness between map lamp
assembly connector D-02 (terminals 1 and 2)
(terminals 1 and 2)
connector C-219 (terminals 6 and 5).
Q: Is the wiring harness between map lamp assembly
connector D-02 (terminals 1 and 2)
overhead console assembly connector D-03 (terminals
1 and 2)
C-219 (terminals 6 and 5) in good condition?
YES : Replace the map lamp assembly
or overhead console assembly
that the front dome lamp illuminates normally.
NO : The wiring harness may be damaged or the
connector(s) may have loose, corroded or damaged
terminals, or terminals pushed back in the connector.
Repair the wiring harness as necessary. Check that
the front dome lamp illuminates normally.
STEP 9. Check rear dome lamp connector D-07 for loose,
corroded or damaged terminals, or terminals pushed back
in the connector.
Q: Is rear dome lamp connector D-07 in good condition?
YES : Go to Step 10.
NO : Repair or replace the damaged component(s). Refer
to GROUP 00E, Harness Connector Inspection
P.00E-2. Check that the rear dome lamp illuminates
normally.
STEP 10. Check the rear dome lamp bulb.
Q: Is the rear dome lamp bulb in good condition?
YES : Go to Step 11.
NO : Replace the rear dome lamp bulb. Check that the rear
dome lamp illuminates normally.
Page 374 of 1500
SYMPTOM PROCEDURES
SIMPLIFIED WIRING SYSTEM (SWS)54B-374
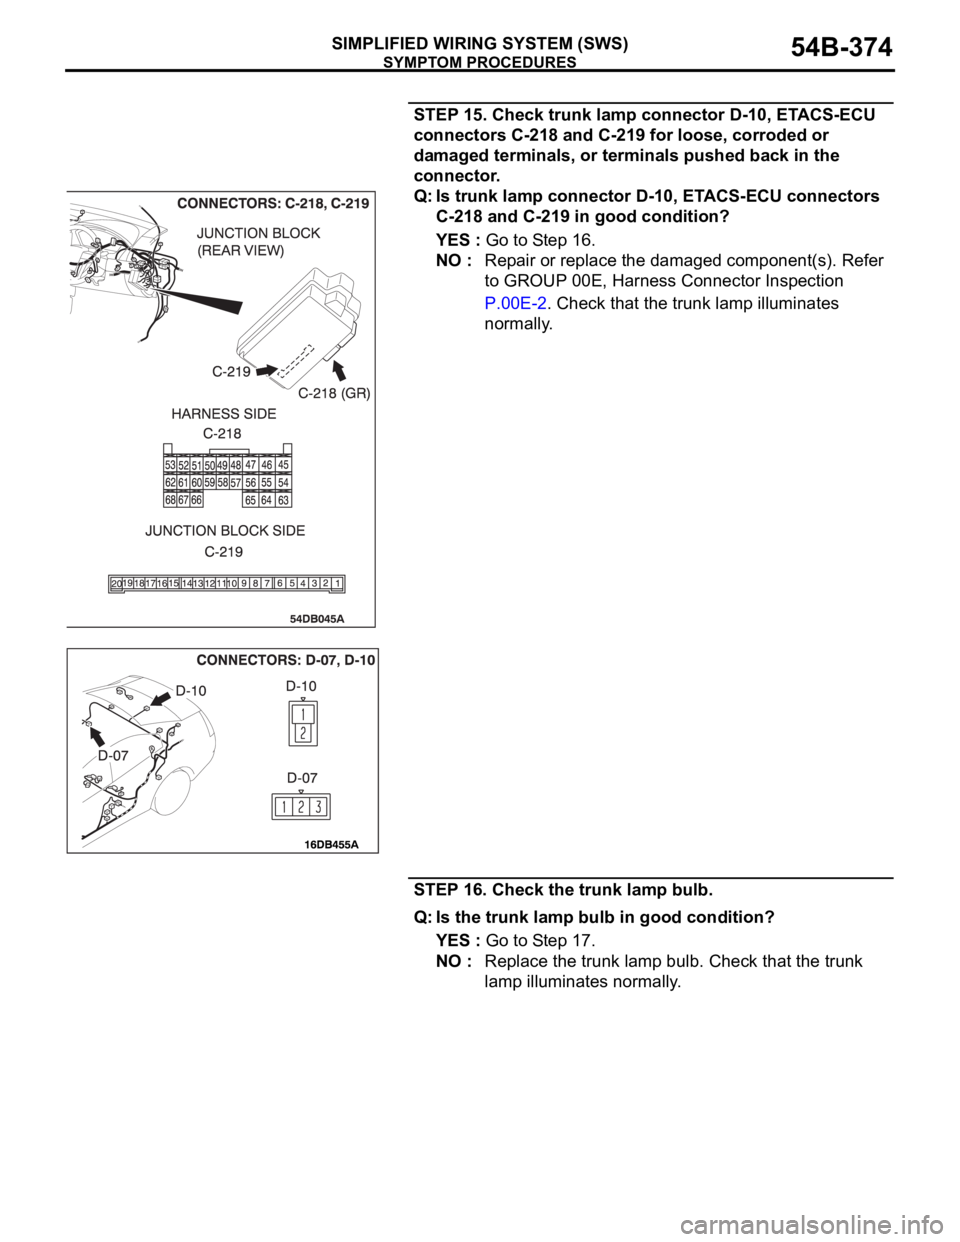
STEP 15. Check trunk lamp connector D-10, ETACS-ECU
connectors C-218 and C-219 for loose, corroded or
damaged terminals, or terminals pushed back in the
connector.
Q: Is trunk lamp connector D-10, ETACS-ECU connectors
C-218 and C-219 in good condition?
YES : Go to Step 16.
NO : Repair or replace the damaged component(s). Refer
to GROUP 00E, Harness Connector Inspection
P.00E-2. Check that the trunk lamp illuminates
normally.
STEP 16. Check the trunk lamp bulb.
Q: Is the trunk lamp bulb in good condition?
YES : Go to Step 17.
NO : Replace the trunk lamp bulb. Check that the trunk
lamp illuminates normally.