brake sensor MITSUBISHI ECLIPSE 1991 Owner's Manual
[x] Cancel search | Manufacturer: MITSUBISHI, Model Year: 1991, Model line: ECLIPSE, Model: MITSUBISHI ECLIPSE 1991Pages: 1216, PDF Size: 67.42 MB
Page 198 of 1216

5-58BRAKES - Master Cylinder
IISASSEMBLY AND REASSEMBLYNOMA-
r------1
11414UO125
Iii
Brake master cylinder kit
6
:.5i340,b;m- . .
; .5F3h0,bfm
- . - +-10
.3.0 Nmft.lbs.
Disassembly steps
1. Reservoir cap assembly2.Diaphragm3.Reservoir cap4.Filter;: ;3r&e fluid level sensor
7.ReservoirI)+8.Nipple9.Reservoir seal
4+10. Piston stopper bolt
MAO57511. Gasket
aLI)12. Piston stopper ring+e ~~ 13. Primary piston assembly+e W 14. Secondary piston assembly
~~ 15. Master cylinder body
FrEeverse the disassembly procedures to reassemble.
(2) 4e : Refer to “Service Points of Disassembly”(3) l + : Refer to “Service Points of Reassembly”I;! m : Non-reusabje parts*: Vehicles with ABS
Page 200 of 1216
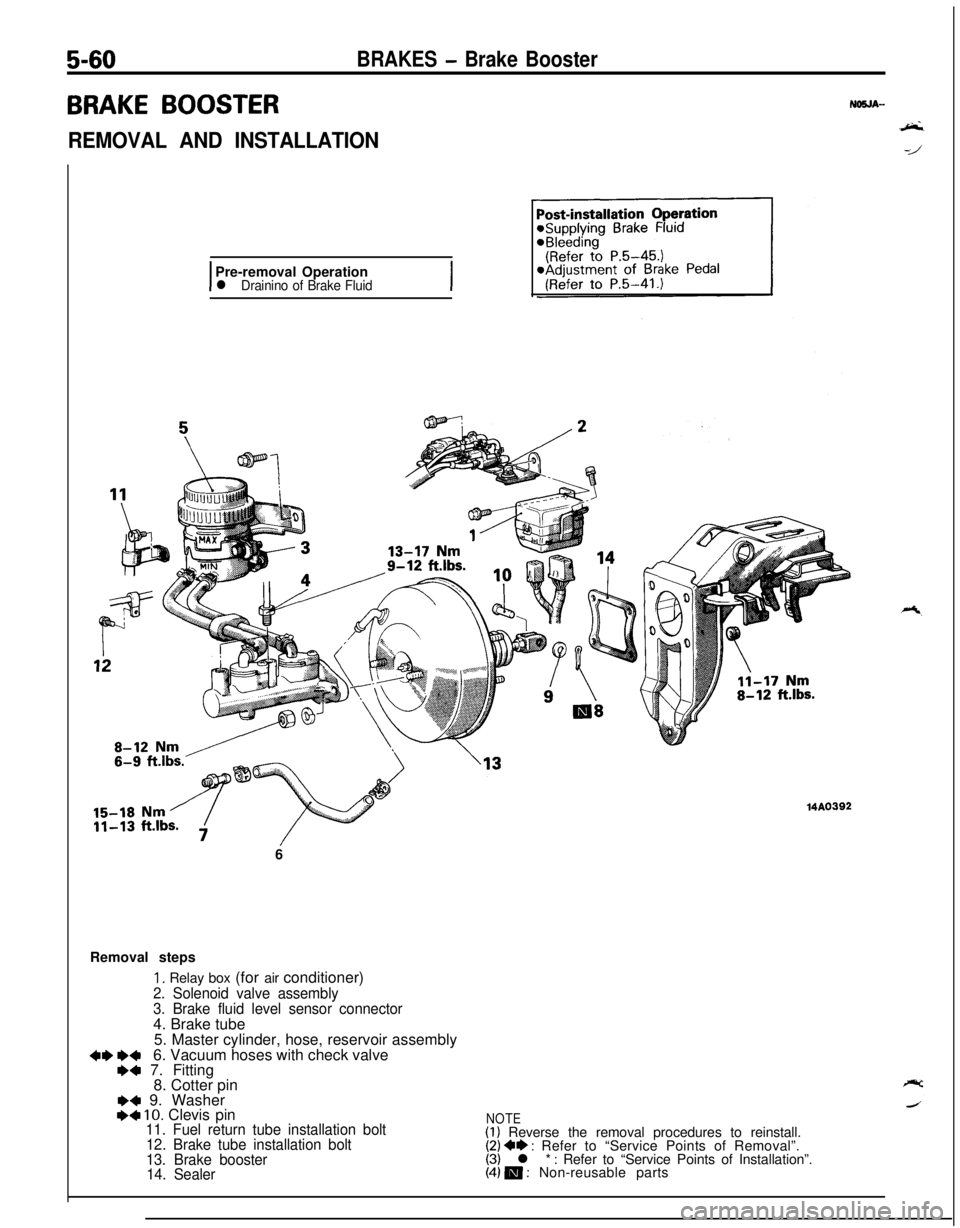
5-60BRAKES - Brake Booster
BRAKE BOOSTER
REMOVAL AND INSTALLATION
IPre-removal Operationl Drainino of Brake FluidI6
Removal steps
1. Relay box (for air conditioner)
2. Solenoid valve assembly
3. Brake fluid level sensor connector4. Brake tube
5. Master cylinder, hose, reservoir assembly
+I) e+6. Vacuum hoses with check valve+a 7. Fitting
8. Cotter pin
I)4 9. WasherI)4 10. Clevis pin11. Fuel return tube installation bolt
12. Brake tube installation bolt
13. Brake booster
14. Sealer
MA0392
NOTE(1) Reverse the removal procedures to reinstall.(2) ** : Refer to “Service Points of Removal”.(3) l * : Refer to “Service Points of Installation”.(4) m : Non-reusable parts
Page 210 of 1216
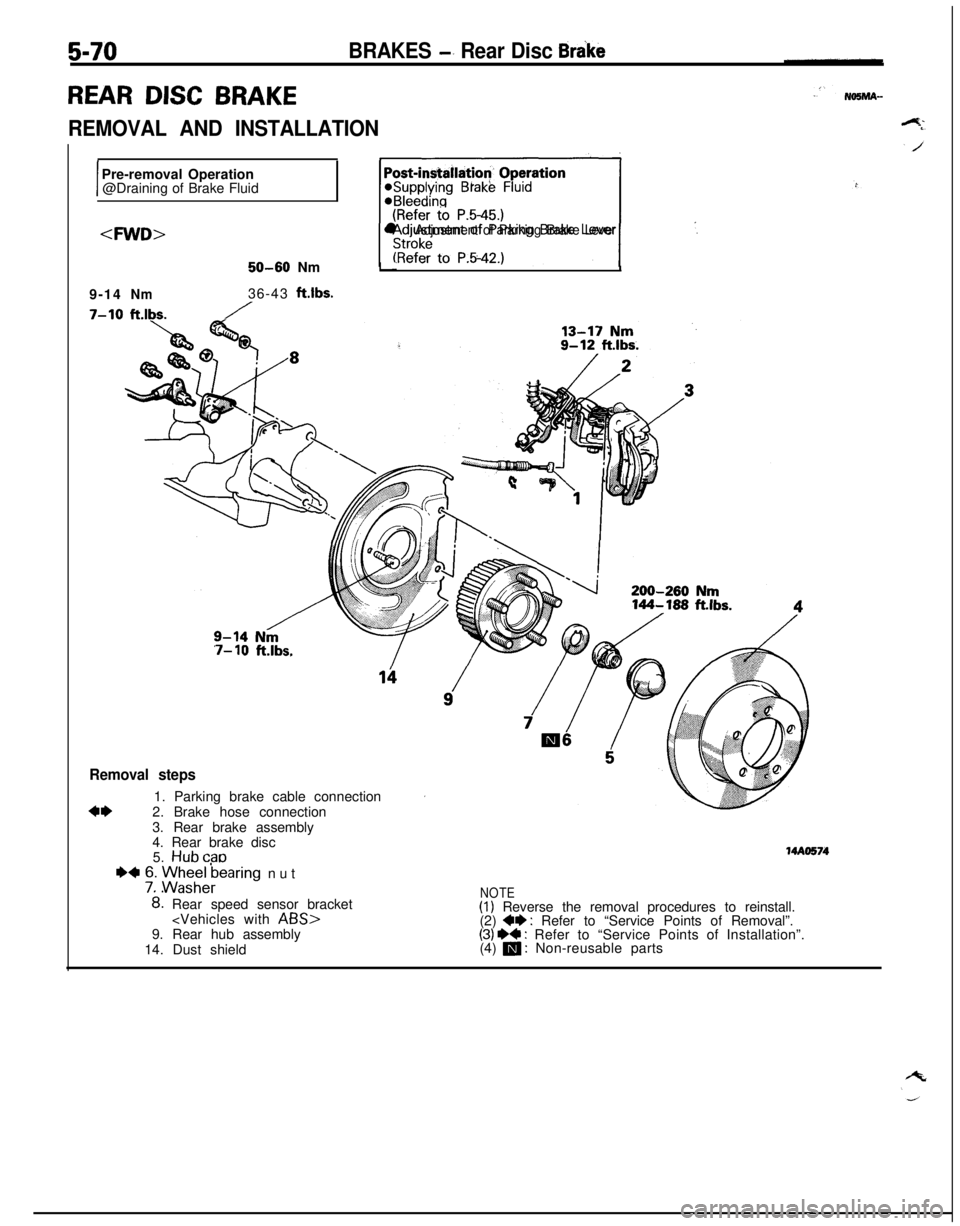
5-70
REAR DISC BRAKE
BRAKES -’ Rear Disc Brake
REMOVAL AND INSTALLATION
IPre-removal Operation
@Draining of Brake Fluid
~1 ,.
l Adjustment of Parking Brake Lever
1.150-60Nm
9-14
Nm36-43ft.lbs.
7-10ft.lbs./
7- 10ft.lbs.
Removal steps
4*1. Parking brake cable connection
2. Brake hose connection
3. Rear brake assembly
4. Rear brake disc
5.
Hubcab
+4 76. ME;AFearing nut
8: Rear speed sensor bracket
14. Dust shield
NOTE(1) Reverse the removal procedures to reinstall.
(2) +* : Refer to “Service Points of Removal”.(3) ** : Refer to “Service Points of Installation”.
(4) m : Non-reusable parts
MAO574
Page 211 of 1216
BRAKES - Rear Disc Brake59q!l
50-60Nm36-43ft.lbs.9-14Nm55-65Nm
39-47
klbs.
/160-220 Nm116-159 ft.lbs.14A0222
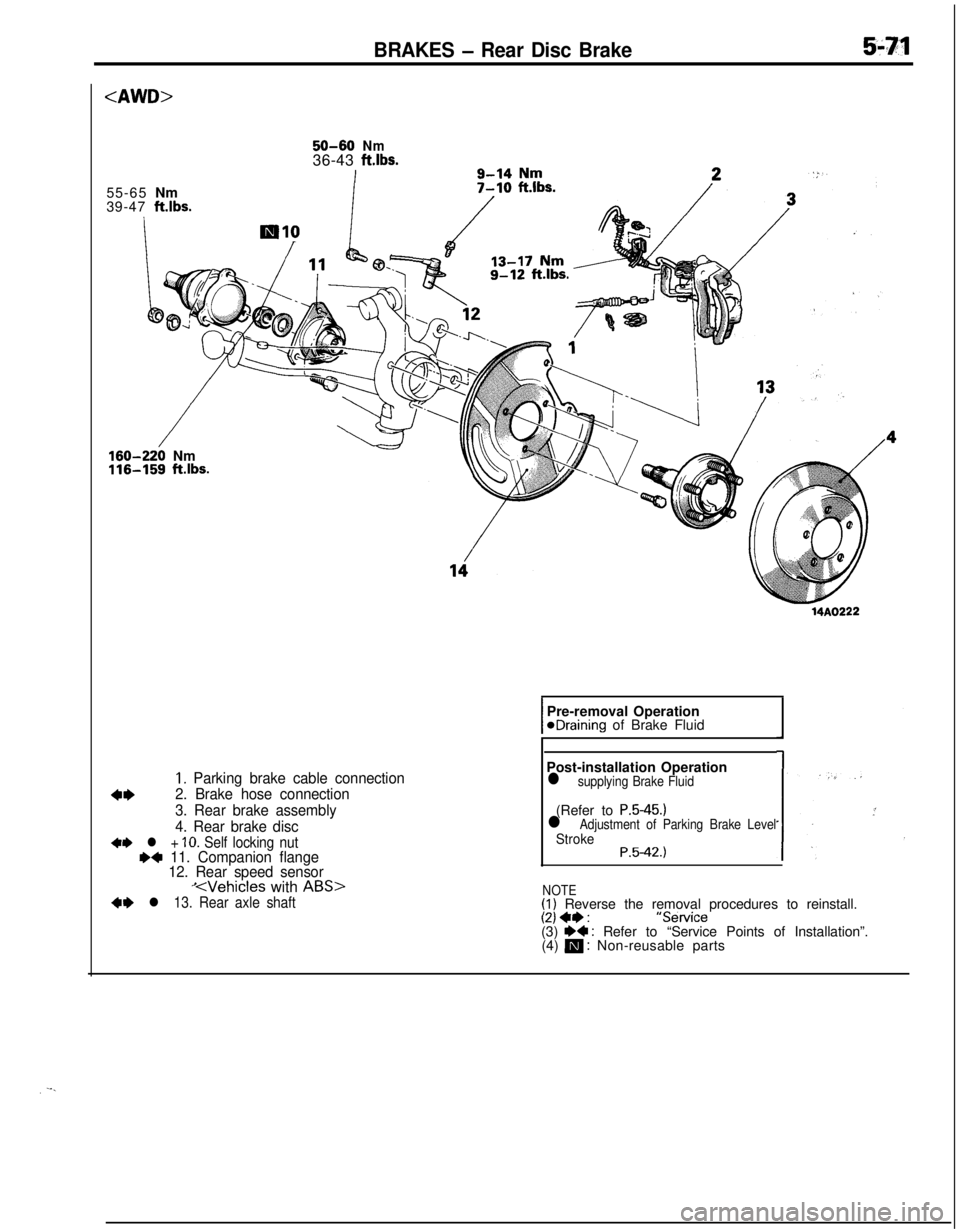
1. Parking brake cable connection
4*2. Brake hose connection
3. Rear brake assembly
4. Rear brake disc
+e l + IO. Self locking nutr)+ 11. Companion flange
12. Rear speed sensor
KVehicles with ABS>+e l 13. Rear axle shaftPre-removal Operation
@Draining of Brake Fluid
Post-installation Operation
l supplying Brake Fluid(Refer to
P.5-45.)l Adjustment of Parking Brake LevelStrokeP.5-42.)
NOTE
(1) Reverse the removal procedures to reinstall.(2) +e:“Service
(3) I)+ : Refer to “Service Points of Installation”.
(4) m : Non-reusable parts
Page 220 of 1216
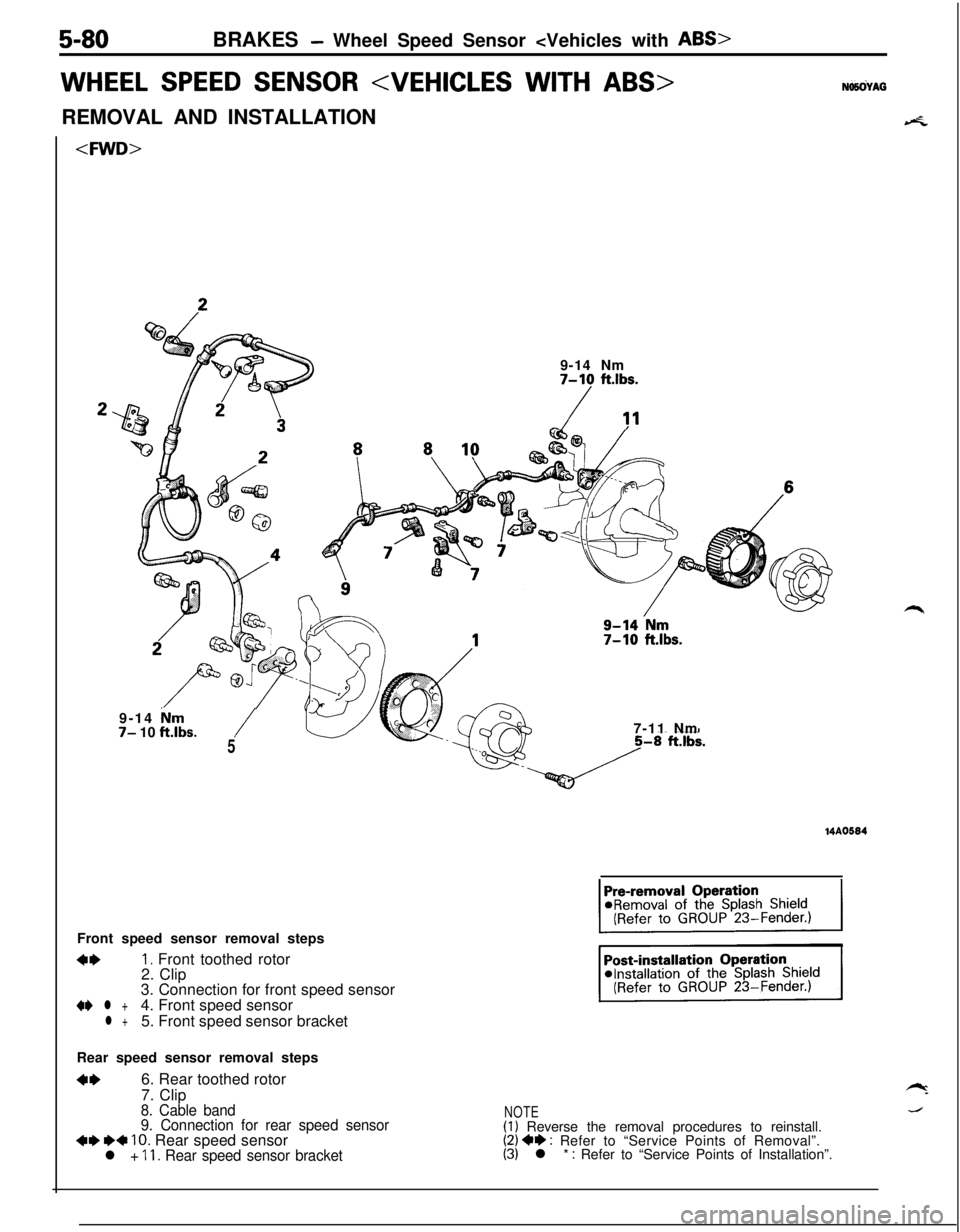
5-80BRAKES - Wheel Speed Sensor
WHEEL SPEED SENSOR
4.
7-10 ft.lbs.
-/?’9-14 Nm
7- 10 ft.lbs./5Front speed sensor removal steps
4*I. Front toothed rotor
2. Clip
3. Connection for front speed sensor
+e l +4. Front speed sensorl +5. Front speed sensor bracket7-11 Nm
14A0584Rear speed sensor removal steps
**6. Rear toothed rotor
7. Clip
8. Cable band
9. Connection for rear speed sensor
+e I)* 10. Rear speed sensorl + 11. Rear speed sensor bracket
NOTE(1) Reverse the removal procedures to reinstall.(2) 4* : Refer to “Service Points of Removal”.(3) l * : Refer to “Service Points of Installation”.
Page 221 of 1216
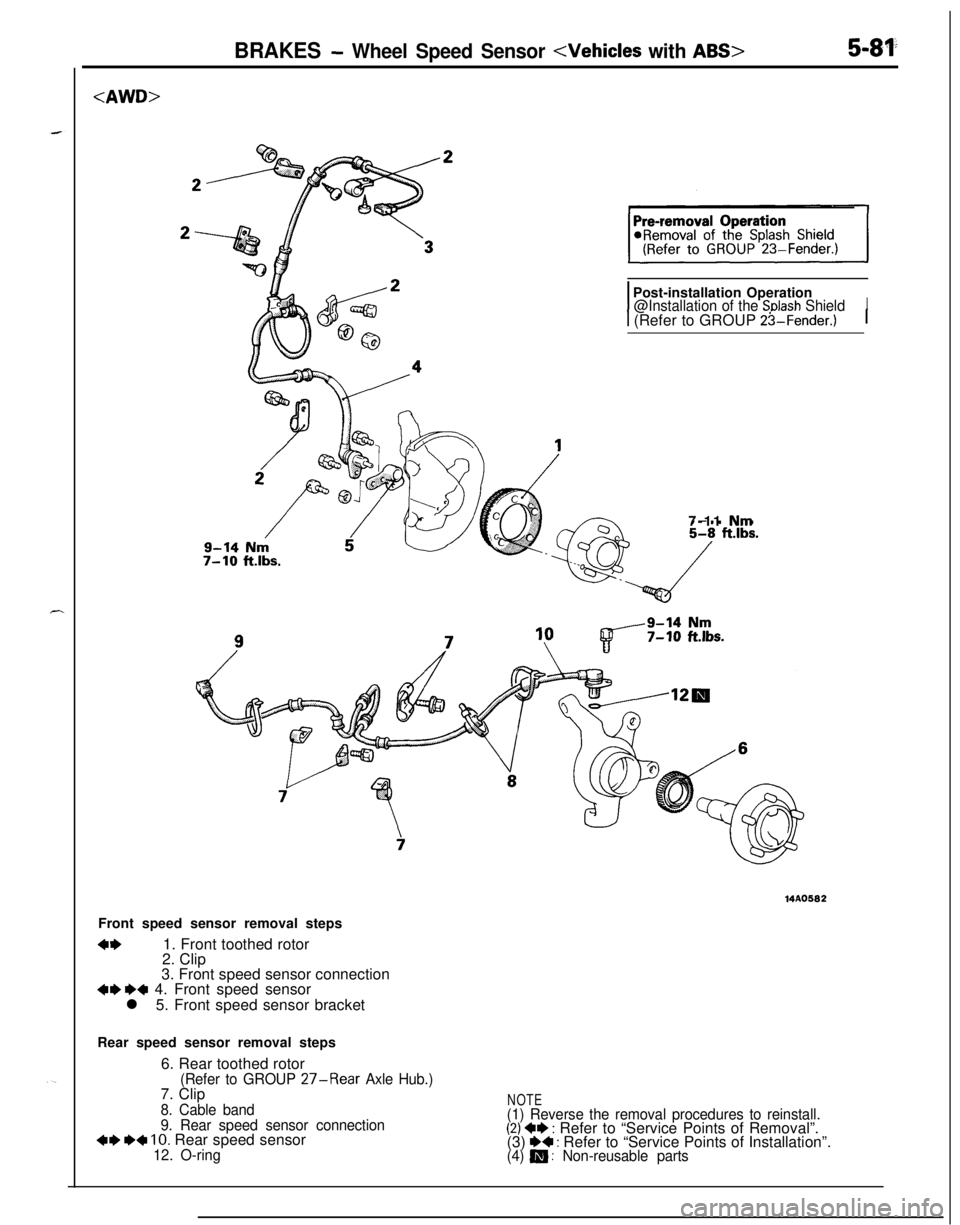
BRAKES - Wheel Speed Sensor
7-10 ft.lbs.
IPost-installation Operation@Installation of the Snlash ShieldI
1 (Refer to GROUP 23-Fender.)17-11 Nm
14A0582Front speed sensor removal steps
4*1. Front toothed rotor
2. Clip
3. Front speed sensor connection
4I) WI 4. Front speed sensor
l 5. Front speed sensor bracket
Rear speed sensor removal steps
6. Rear toothed rotor
(Refer to GROUP 27-Rear Axle Hub.)7. Clip
8. Cable band
9. Rear speed sensor connection
4I) W 10. Rear speed sensor12. O-ring
NOTE(1) Reverse the removal procedures to reinstall.(2) +e : Refer to “Service Points of Removal”.
(3) I)+ : Refer to “Service Points of Installation”.(4) m : Non-reusable parts
Page 222 of 1216
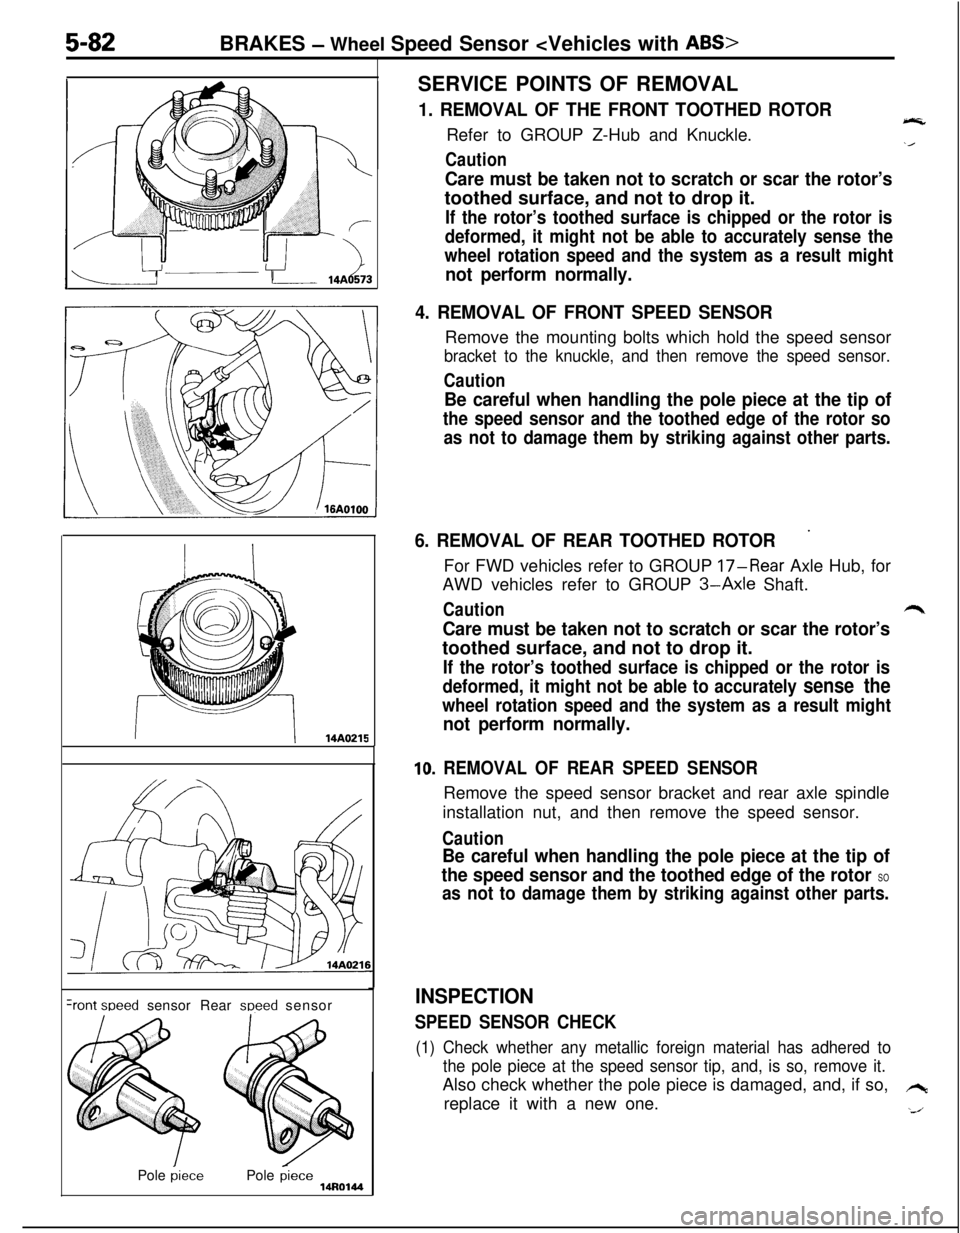
Care must be taken not to scratch or scar the rotor’stoothed surface, and not to drop it.
If the rotor’s toothed surface is chipped or the rotor is
deformed, it might not be able to accurately sense the
wheel rotation speed and the system as a result might
__ r-14A¬ perform normally.
4. REMOVAL OF FRONT SPEED SENSORRemove the mounting bolts which hold the speed sensor
bracket to the knuckle, and then remove the speed sensor.
Caution
5-82BRAKES - Wheel Speed Sensor
1. REMOVAL OF THE FRONT TOOTHED ROTOReRefer to GROUP Z-Hub and Knuckle.
Caution
Be careful when handling the pole piece at the tip of
the speed sensor and the toothed edge of the rotor so
as not to damage them by striking against other parts.
II14A0215
+ont weed sensor Rear meed sensor
Pole
piecePole piece14R0144
6. REMOVAL OF REAR TOOTHED ROTOR’For FWD vehicles refer to GROUP
17-Rear Axle Hub, for
AWD vehicles refer to GROUP
3-Axle Shaft.
Cautionr*
Care must be taken not to scratch or scar the rotor’stoothed surface, and not to drop it.
If the rotor’s toothed surface is chipped or the rotor is
deformed, it might not be able to accurately
sense the
wheel rotation speed and the system as a result might
not perform normally.
10. REMOVAL OF REAR SPEED SENSORRemove the speed sensor bracket and rear axle spindle
installation nut, and then remove the speed sensor.
Caution
Be careful when handling the pole piece at the tip of
the speed sensor and the toothed edge of the rotor
SO
as not to damage them by striking against other parts.
INSPECTION
SPEED SENSOR CHECK
(1) Check whether any metallic foreign material has adhered to
the pole piece at the speed sensor tip, and, is so, remove it.Also check whether the pole piece is damaged, and, if so,
hreplace it with a new one.
‘J
Page 223 of 1216
BRAKES - Wheel Speed Sensor
Front
Rear
14AO04814R0146
0R
Qfs0
0 (-Jor
L/
14AOO47
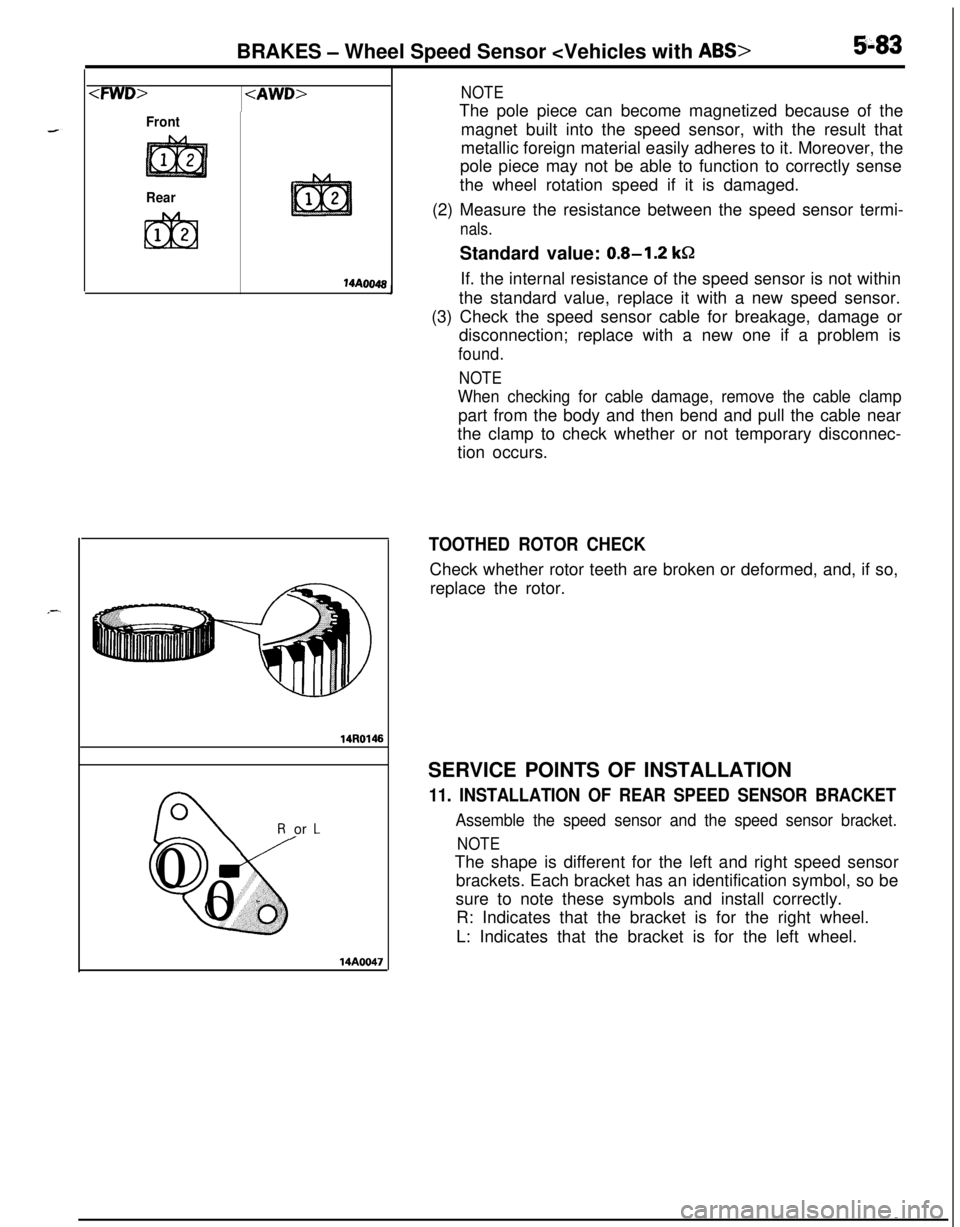
NOTEThe pole piece can become magnetized because of the
magnet built into the speed sensor, with the result that
metallic foreign material easily adheres to it. Moreover, the
pole piece may not be able to function to correctly sense
the wheel rotation speed if it is damaged.
(2) Measure the resistance between the speed sensor termi-
nals.Standard value:
0.8-1.2 kQIf. the internal resistance of the speed sensor is not within
the standard value, replace it with a new speed sensor.
(3) Check the speed sensor cable for breakage, damage or
disconnection; replace with a new one if a problem is
found.
NOTE
When checking for cable damage, remove the cable clamppart from the body and then bend and pull the cable near
the clamp to check whether or not temporary disconnec-
tion occurs.
TOOTHED ROTOR CHECKCheck whether rotor teeth are broken or deformed, and, if so,
replace the rotor.
SERVICE POINTS OF INSTALLATION
11. INSTALLATION OF REAR SPEED SENSOR BRACKET
Assemble the speed sensor and the speed sensor bracket.
NOTEThe shape is different for the left and right speed sensor
brackets. Each bracket has an identification symbol, so be
sure to note these symbols and install correctly.
R: Indicates that the bracket is for the right wheel.
L: Indicates that the bracket is for the left wheel.
Page 224 of 1216
5-84BRAKES - Wheel Speed Sensor
Right side
14AOO4:Left side view
Left side
14A004.fCrossmember
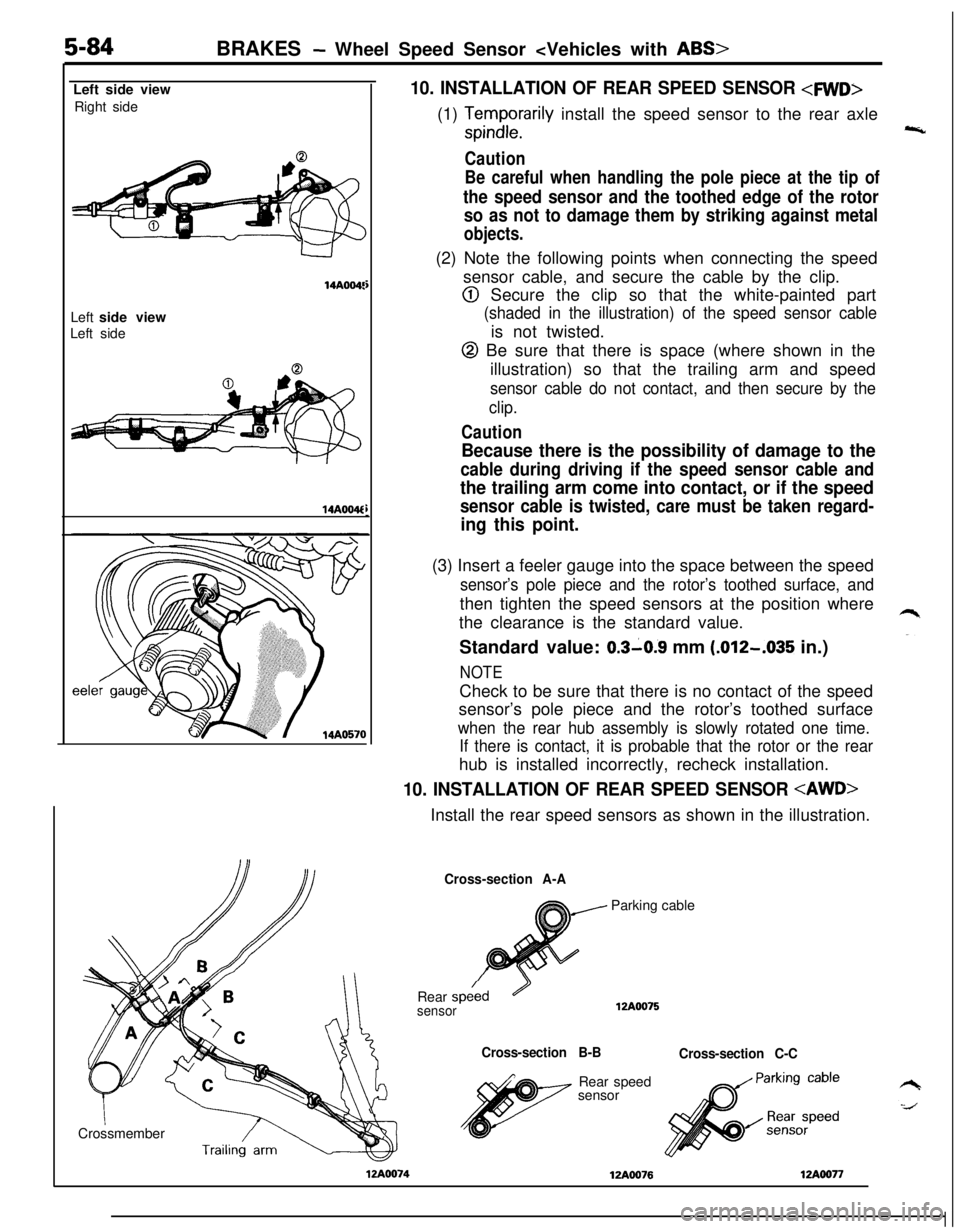
10. INSTALLATION OF REAR SPEED SENSOR
Caution
Be careful when handling the pole piece at the tip of
the speed sensor and the toothed edge of the rotor
so as not to damage them by striking against metal
objects.(2) Note the following points when connecting the speed
sensor cable, and secure the cable by the clip.
@I Secure the clip so that the white-painted part
(shaded in the illustration) of the speed sensor cableis not twisted.
@ Be sure that there is space (where shown in the
illustration) so that the trailing arm and speed
sensor cable do not contact, and then secure by the
clip.
Caution
Because there is the possibility of damage to the
cable during driving if the speed sensor cable and
the trailing arm come into contact, or if the speed
sensor cable is twisted, care must be taken regard-
ing this point.(3) Insert a feeler gauge into the space between the speed
sensor’s pole piece and the rotor’s toothed surface, andthen tighten the speed sensors at the position where
the clearance is the standard value.
Standard value:
0.3-0.9 mm (.012-.035 in.)
NOTECheck to be sure that there is no contact of the speed
sensor’s pole piece and the rotor’s toothed surface
when the rear hub assembly is slowly rotated one time.
If there is contact, it is probable that the rotor or the rearhub is installed incorrectly, recheck installation.
10. INSTALLATION OF REAR SPEED SENSOR
Cross-section A-AParking cable
Rear
spe/edsensor12A0075
Cross-section B-B
Cross-section C-CRear speed
sensor
VA007412AOO7612AOO77
Page 225 of 1216
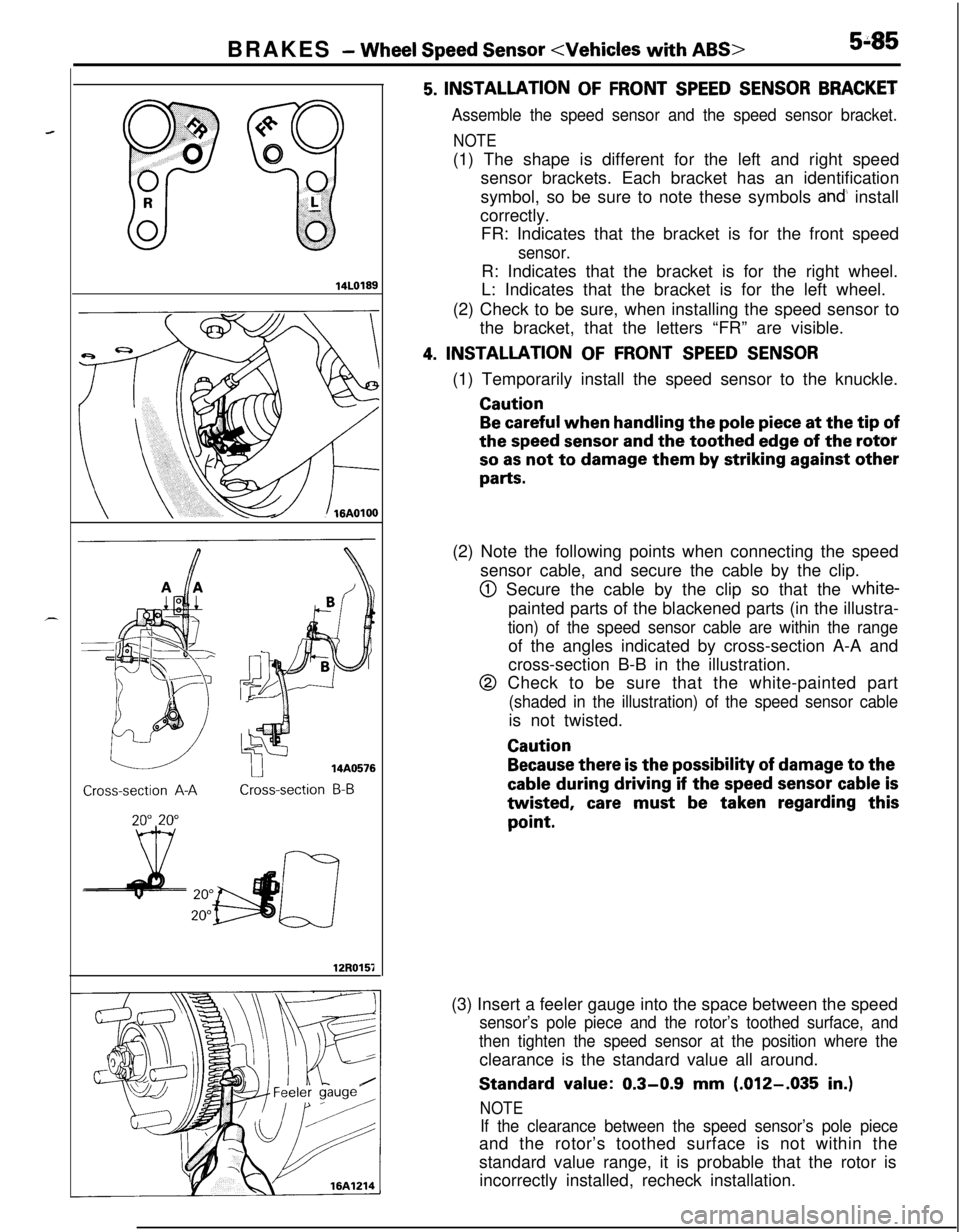
BRAKES - Wheel Speed Sensor
14LOl89
Cross-section A-ACross-section B-B
12R015i
5. INSTALLATION OF FRONT SPEED SENSOR BRACKET
Assemble the speed sensor and the speed sensor bracket.
NOTE(1) The shape is different for the left and right speed
sensor brackets. Each bracket has an identification
symbol, so be sure to note these symbols
ahd. install
correctly.
FR: Indicates that the bracket is for the front speed
sensor.R: Indicates that the bracket is for the right wheel.
L: Indicates that the bracket is for the left wheel.
(2) Check to be sure, when installing the speed sensor to
the bracket, that the letters “FR” are visible.
4. INSTALLATION OF FRONT SPEED SENSOR(1) Temporarily install the speed sensor to the knuckle.Caution
Be careful when handling the pole piece at the tip of
the speed sensor and the toothed edge of the rotor
so as not to damage them by striking against other
parts.(2) Note the following points when connecting the speed
sensor cable, and secure the cable by the clip.
@ Secure the cable by the clip so that the white-
painted parts of the blackened parts (in the illustra-
tion) of the speed sensor cable are within the rangeof the angles indicated by cross-section A-A and
cross-section B-B in the illustration.
@ Check to be sure that the white-painted part
(shaded in the illustration) of the speed sensor cableis not twisted.Caution
Because there is the possibility of damage to the
cable during driving if the speed sensor cable is
twisted, care must be taken regarding thispoint.
(3) Insert a feeler gauge into the space between the speed
sensor’s pole piece and the rotor’s toothed surface, and
then tighten the speed sensor at the position where theclearance is the standard value all around.Standard value:
0.3-0.9 mm (.012-.035 in.)
NOTE
If the clearance between the speed sensor’s pole pieceand the rotor’s toothed surface is not within the
standard value range, it is probable that the rotor is
incorrectly installed, recheck installation.