lock MITSUBISHI ECLIPSE 1991 Owner's Guide
[x] Cancel search | Manufacturer: MITSUBISHI, Model Year: 1991, Model line: ECLIPSE, Model: MITSUBISHI ECLIPSE 1991Pages: 1216, PDF Size: 67.42 MB
Page 122 of 1216
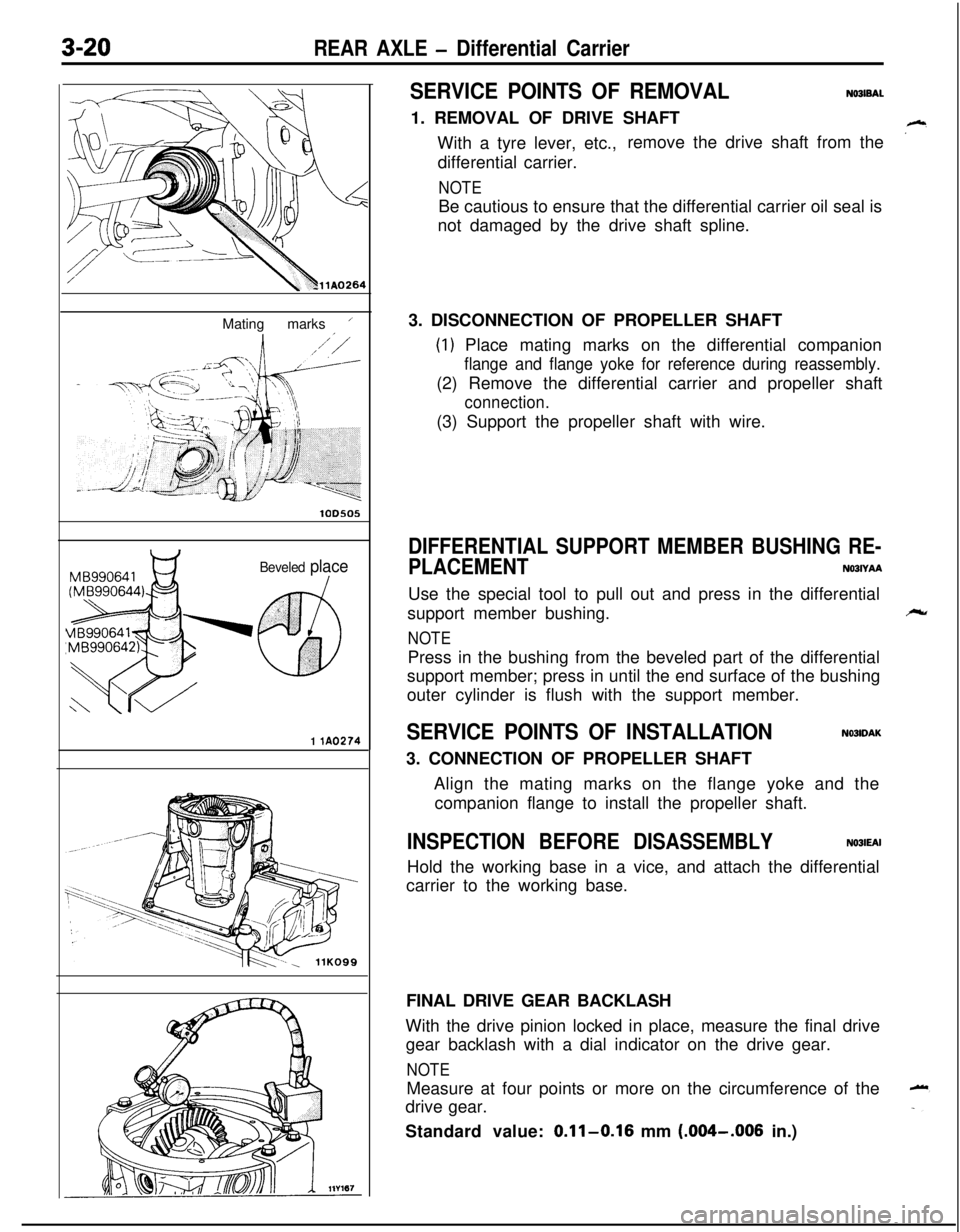
3-20REAR AXLE - Differential CarrierMating marks
’
lODSO5
Beveled place
1 lA0274
SERVICE POINTS OF REMOVALN031BAL1. REMOVAL OF DRIVE SHAFT
With a tyre lever, etc.,remove the drive shaft from the
differential carrier.
NOTEBe cautious to ensure that the differential carrier oil seal is
not damaged by the drive shaft spline.
3. DISCONNECTION OF PROPELLER SHAFT
(1) Place mating marks on the differential companion
flange and flange yoke for reference during reassembly.(2) Remove the differential carrier and propeller shaft
connection.(3) Support the propeller shaft with wire.
DIFFERENTIAL SUPPORT MEMBER BUSHING RE-
PLACEMENT
NOBIYAAUse the special tool to pull out and press in the differential
support member bushing.
NOTEPress in the bushing from the beveled part of the differential
support member; press in until the end surface of the bushing
outer cylinder is flush with the support member.
SERVICE POINTS OF INSTALLATIONN03lDAK3. CONNECTION OF PROPELLER SHAFT
Align the mating marks on the flange yoke and the
companion flange to install the propeller shaft.
INSPECTION BEFORE DISASSEMBLYNOJIEAIHold the working base in a vice, and attach the differential
carrier to the working base.
FINAL DRIVE GEAR BACKLASH
With the drive pinion locked in place, measure the final drive
gear backlash with a dial indicator on the drive gear.
NOTEMeasure at four points or more on the circumference of the
drive gear.
Standard value:
0.11-0.16 mm (.004-.006 in.)
Page 123 of 1216
REAR AXLE -Differential Carrier3-21
.-11GOO73
-
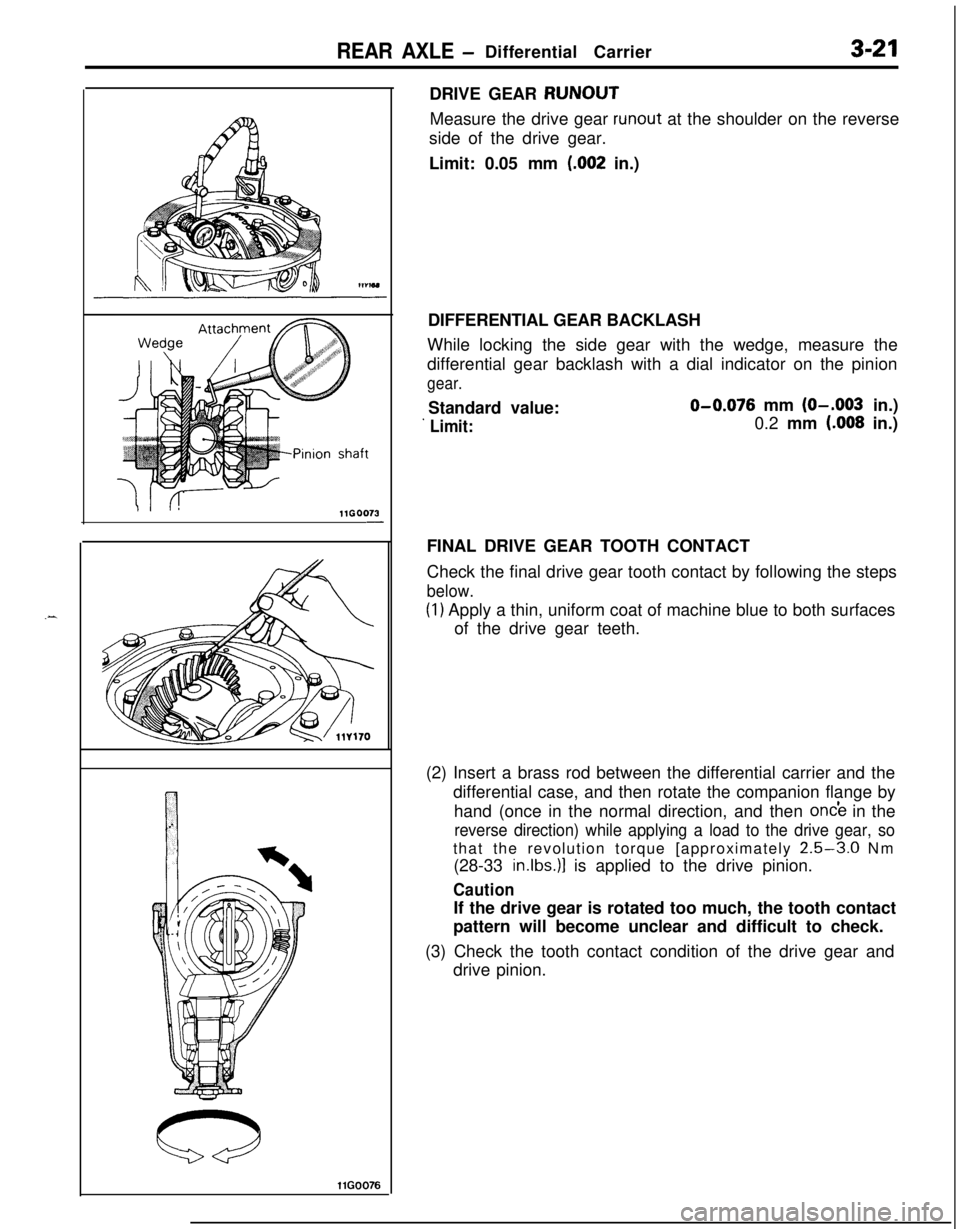
llG0076DRIVE GEAR RUNOUT
Measure the drive gear
runout at the shoulder on the reverse
side of the drive gear.
Limit: 0.05 mm
(.002 in.)
DIFFERENTIAL GEAR BACKLASH
While locking the side gear with the wedge, measure the
differential gear backlash with a dial indicator on the pinion
gear.Standard value:O-0.076 mm (O-.003 in.)
’ Limit:0.2 mm (.008 in.)
FINAL DRIVE GEAR TOOTH CONTACT
Check the final drive gear tooth contact by following the steps
below.
(1) Apply a thin, uniform coat of machine blue to both surfaces
of the drive gear teeth.
(2) Insert a brass rod between the differential carrier and the
differential case, and then rotate the companion flange by
hand (once in the normal direction, and then
on& in the
reverse direction) while applying a load to the drive gear, sothat the revolution torque [approximately
2.5-3.0 Nm
(28-33
in.lbs.)] is applied to the drive pinion.
CautionIf the drive gear is rotated too much, the tooth contact
pattern will become unclear and difficult to check.
(3) Check the tooth contact condition of the drive gear and
drive pinion.
Page 125 of 1216
REAR AXLE - Differential Carrier3-23
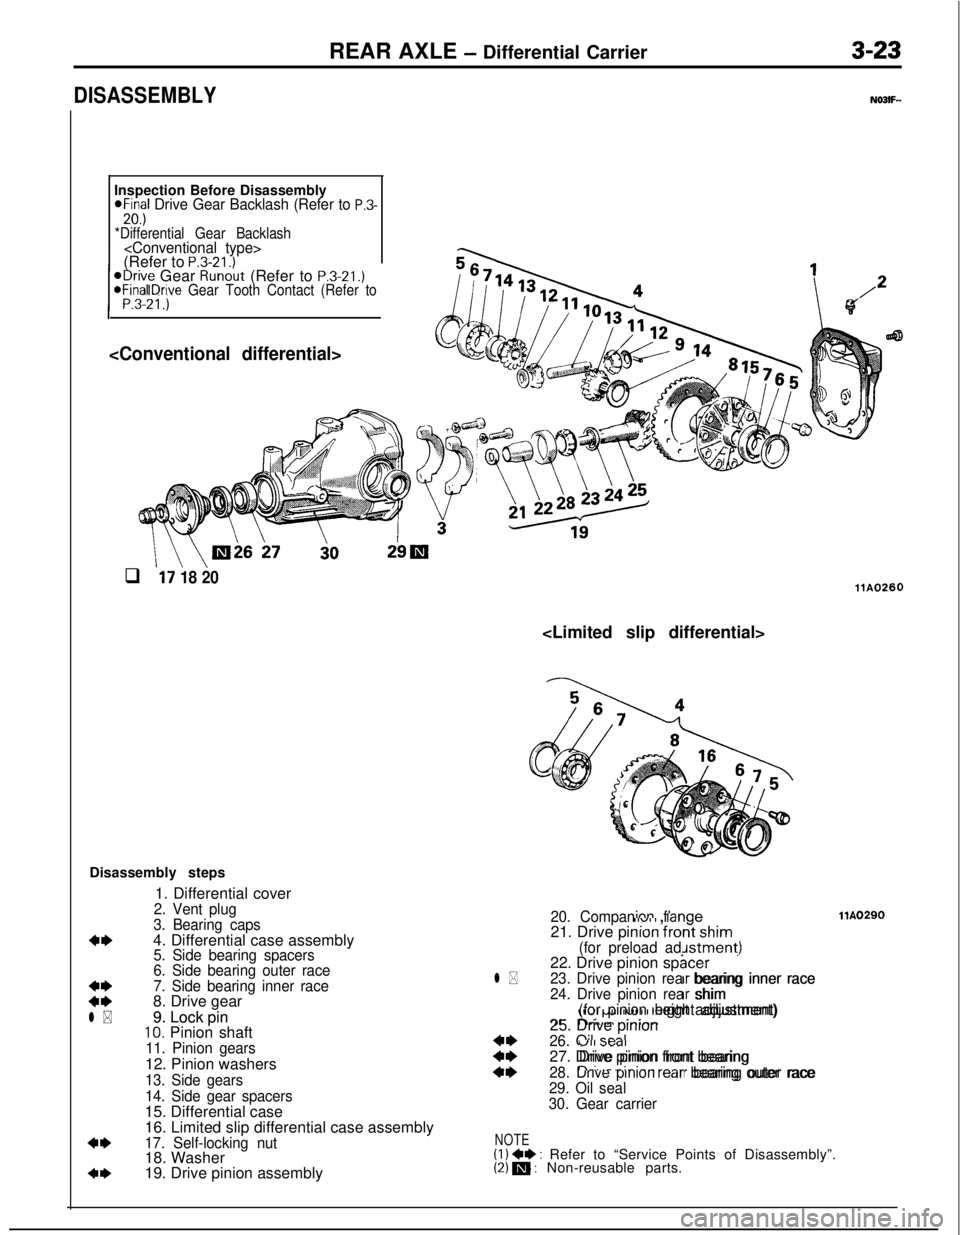
DISASSEMBLYInspection Before Disassembly
@Final Drive Gear Backlash (Refer to P.3-20.)*Differential Gear Backlash
/ ;3-21.)’1
@Drive Gear Runout (Refer to P.3-21.)aFInal Drove Gear Tooth Contact (Refer to
\ \\Oi6 27i0
q l7 18 20llA0260
Disassembly steps
1. Differential cover
2. Vent plug
3. Bearing caps
*I)4. Differential case assembly5. Side bearing spacers
6. Side bearing outer race
:z
7. Side bearing inner race8. Drive gear
l * l *9. Lock pin 9. Lock pin10. Pinion shaft11. Pinion gears12. Pinion washers
13. Side gears
14. Side gear spacers15. Differential case
16. Limited slip differential case assembly
*I)17. Self-locking nut18. Washer
4*19. Drive pinion assembly
20. Companion flangellvlI , ,,,igellA0290llA0290
21. Drive pinion front shim-:-- ‘--nt shim
(for preload adjustment)Jstment)22. Drive pinion spacer3cerl *23. Drive pinion rear bearing inner racerr bearing inner race
24. Drive pinion rear shimrr shim,Ivl PJ” llUl I I IcIyIit adjustment)(for pinion height adjustment)?Cl3.r;. I,-. ..:..;A-25. Drive pinion
::
26. Oil seal“II >twI27. Drive pinion front bearingDrive pinion front bearing
4*28. Drive pinion rear bearing outer racen-‘..- -‘-‘-- --lr bearing outer race
29. Oil seal
30. Gear carrier
NOTE(1) +I) : Refer to “Service Points of Disassembly”.(2) m : Non-reusable parts.
Page 126 of 1216
3-24REAR AXLE- Differential Carrier
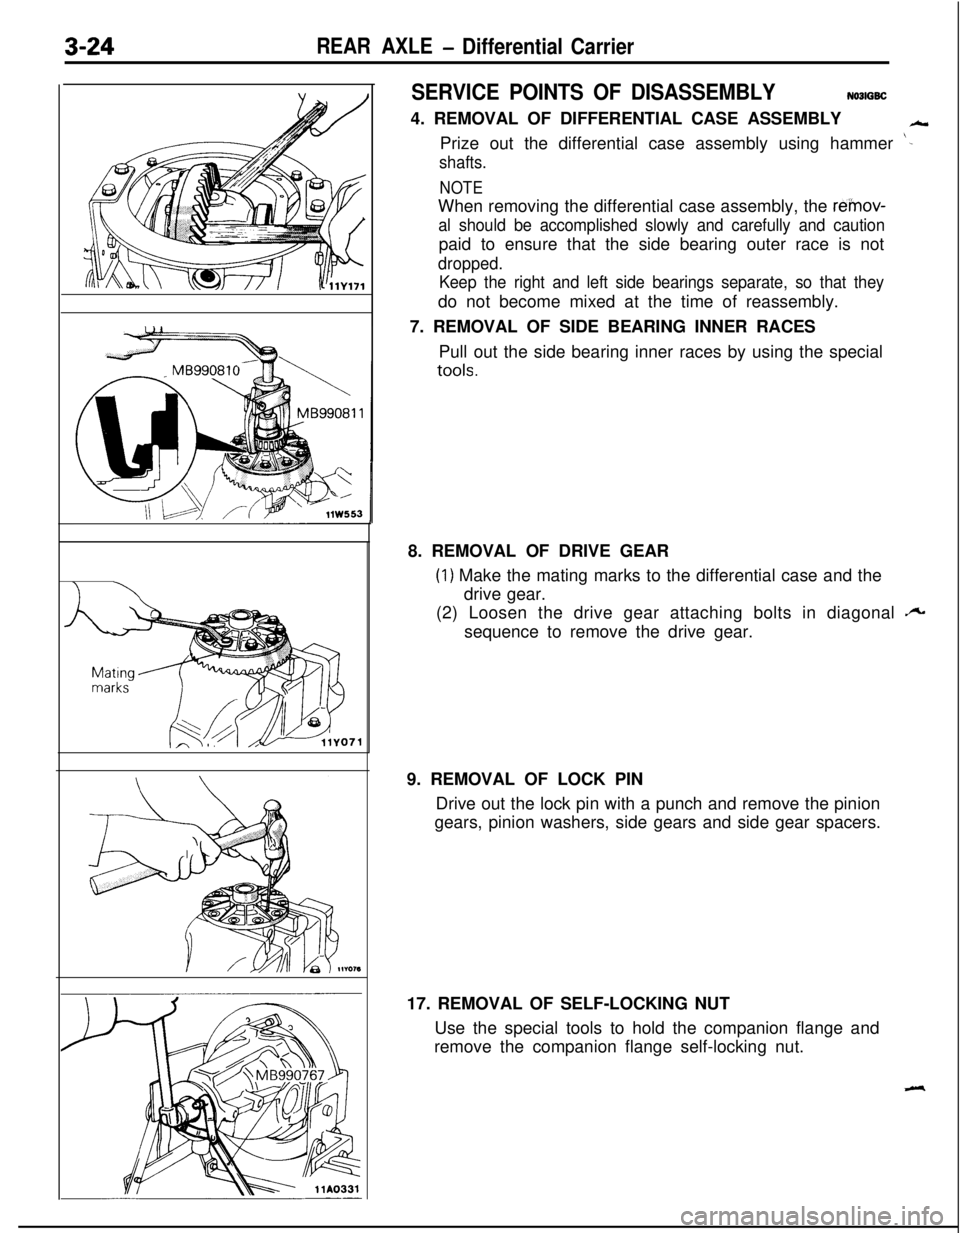
SERVICE POINTS OF DISASSEMBLYN03lGSC4. REMOVAL OF DIFFERENTIAL CASE ASSEMBLY
kPrize out the differential case assembly using hammer
‘-
shafts.
NOTEWhen removing the differential case assembly, the
re’mov-
al should be accomplished slowly and carefully and cautionpaid to ensure that the side bearing outer race is not
dropped.
Keep the right and left side bearings separate, so that theydo not become mixed at the time of reassembly.
7. REMOVAL OF SIDE BEARING INNER RACES
Pull out the side bearing inner races by using the special
tools.8. REMOVAL OF DRIVE GEAR
(1) Make the mating marks to the differential case and the
drive gear.
(2) Loosen the drive gear attaching bolts in diagonal
fisequence to remove the drive gear.
9. REMOVAL OF LOCK PIN
Drive out the lock pin with a punch and remove the pinion
gears, pinion washers, side gears and side gear spacers.
17. REMOVAL OF SELF-LOCKING NUT
Use the special tools to hold the companion flange and
remove the companion flange self-locking nut.
Page 128 of 1216
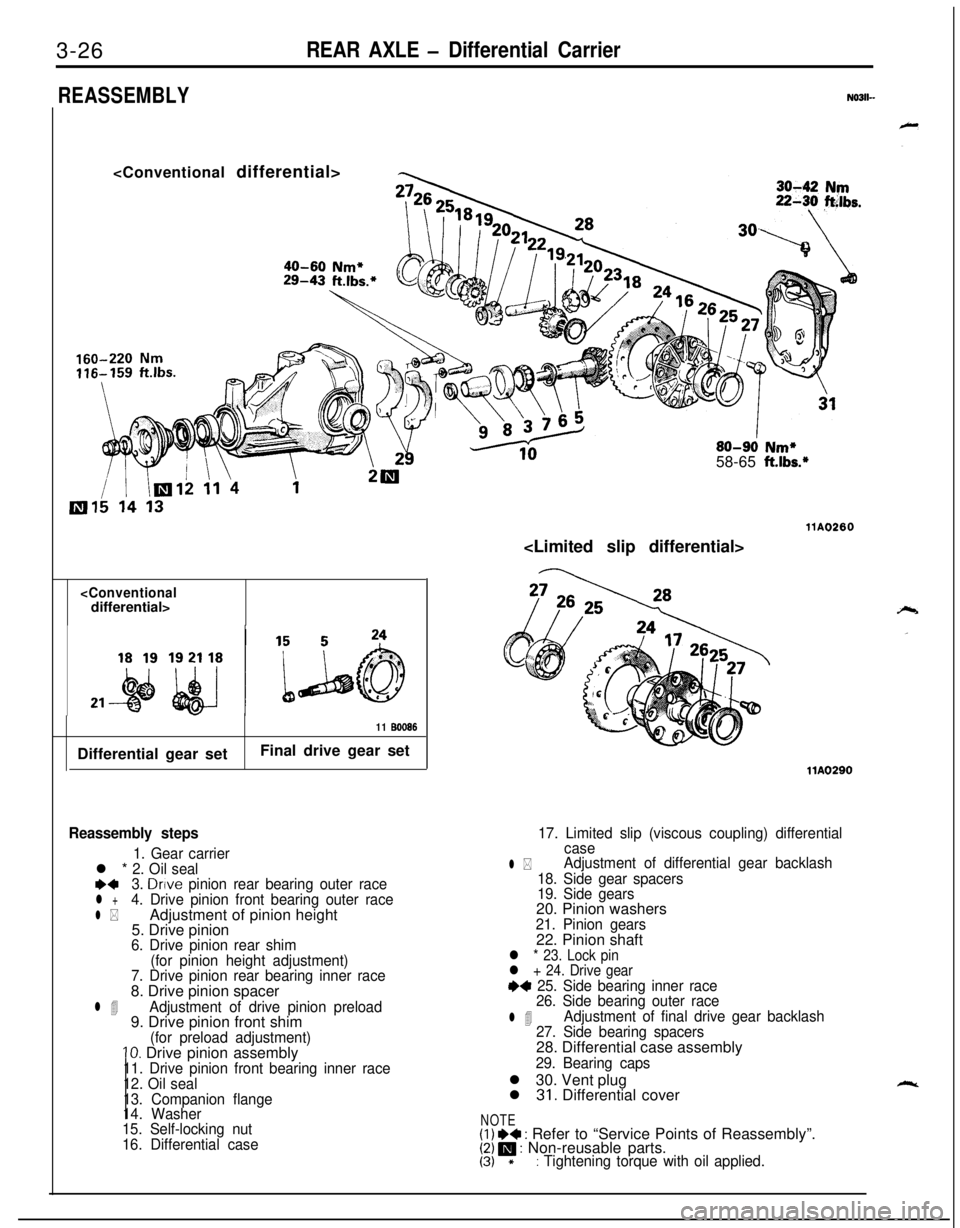
3-26REAR AXLE - Differential Carrier
REASSEMBLYN0311-
Nm*B-43 ft.lbs.*
80-90 Nm*58-65 ft.lbs.*
11 BOO86Differential gear setFinal drive gear set
Reassembly steps
1. Gear carrierl * 2. Oil seale+3. Drive pinion rear bearing outer racel +4. Drive pinion front bearing outer race
l *Adjustment of pinion height
5. Drive pinion
6. Drive pinion rear shim
(for pinion height adjustment)
7. Drive pinion rear bearing inner race8. Drive pinion spacer
l 4Adjustment of drive pinion preload9. Drive pinion front shim
(for preload adjustment)10. Drive pinion assembly11. Drive pinion front bearing inner race
12. Oil seal
13. Companion flange
14. Washer
15. Self-locking nut
16. Differential case
17. Limited slip (viscous coupling) differential
case
l *Adjustment of differential gear backlash
18. Side gear spacers
19. Side gears20. Pinion washers
21. Pinion gears22. Pinion shaft
l * 23. Lock pin
l + 24. Drive gear
+4 25. Side bearing inner race
26. Side bearing outer race
l 4Adjustment of final drive gear backlash
27. Side bearing spacers28. Differential case assembly
29. Bearing capsl 30. Vent plug
l
31. Differential cover
NOTE(I) I)+ : Refer to “Service Points of Reassembly”.[Z!/ m : Non-reusable parts.*: Tightening torque with oil applied.
Page 131 of 1216
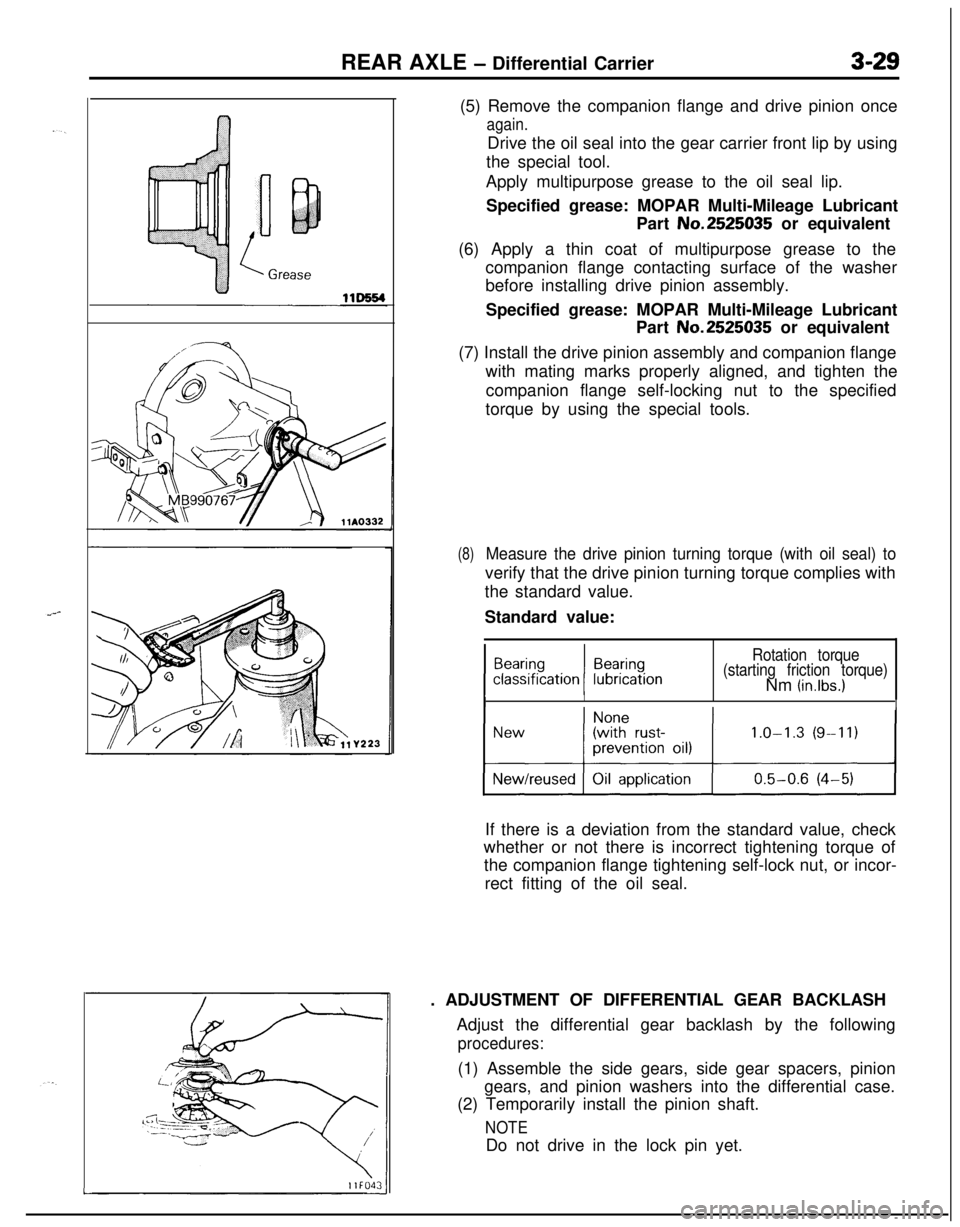
REAR AXLE - Differential Carrier3-29
Y223(5) Remove the companion flange and drive pinion once
again.Drive the oil seal into the gear carrier front lip by using
the special tool.
Apply multipurpose grease to the oil seal lip.
Specified grease: MOPAR Multi-Mileage Lubricant
Part No.2525035 or equivalent
(6) Apply a thin coat of multipurpose grease to the
companion flange contacting surface of the washer
before installing drive pinion assembly.
Specified grease: MOPAR Multi-Mileage Lubricant
Part No.2525035 or equivalent
(7) Install the drive pinion assembly and companion flange
with mating marks properly aligned, and tighten the
companion flange self-locking nut to the specified
torque by using the special tools.
(8)Measure the drive pinion turning torque (with oil seal) toverify that the drive pinion turning torque complies with
the standard value.
Standard value:
Rotation torque
(starting friction torque)Nm
(in.lbs.)
IIIIIf there is a deviation from the standard value, check
whether or not there is incorrect tightening torque of
the companion flange tightening self-lock nut, or incor-
rect fitting of the oil seal.
. ADJUSTMENT OF DIFFERENTIAL GEAR BACKLASH
Adjust the differential gear backlash by the following
procedures:(1) Assemble the side gears, side gear spacers, pinion
gears, and pinion washers into the differential case.
(2) Temporarily install the pinion shaft.
NOTEDo not drive in the lock pin yet.
L-
Page 132 of 1216
REAR AXLE - Differential Carrier
I\I I!llGOO73I
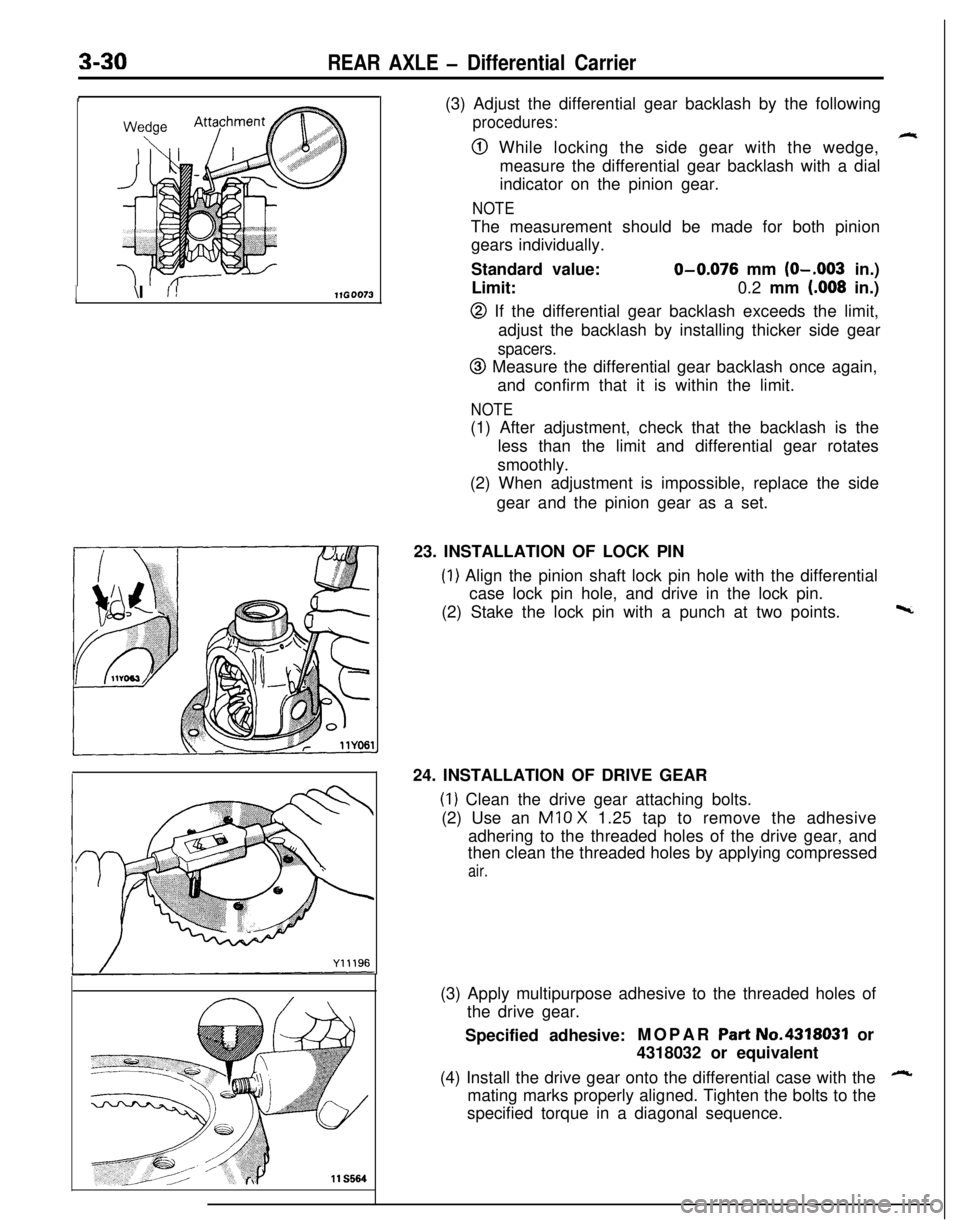
11 S564(3) Adjust the differential gear backlash by the following
procedures:
@ While locking the side gear with the wedge,
measure the differential gear backlash with a dial
indicator on the pinion gear.
NOTEThe measurement should be made for both pinion
gears individually.
Standard value:
O-0.076 mm (O-.003 in.)
Limit:0.2 mm
(.008 in.)
@ If the differential gear backlash exceeds the limit,
adjust the backlash by installing thicker side gear
spacers.
@ Measure the differential gear backlash once again,
and confirm that it is within the limit.
NOTE(1) After adjustment, check that the backlash is the
less than the limit and differential gear rotates
smoothly.
(2) When adjustment is impossible, replace the side
gear and the pinion gear as a set.
23. INSTALLATION OF LOCK PIN
(1) Align the pinion shaft lock pin hole with the differential
case lock pin hole, and drive in the lock pin.
(2) Stake the lock pin with a punch at two points.
w24. INSTALLATION OF DRIVE GEAR
(1) Clean the drive gear attaching bolts.
(2) Use an
Ml0 X 1.25 tap to remove the adhesive
adhering to the threaded holes of the drive gear, and
then clean the threaded holes by applying compressed
air.(3) Apply multipurpose adhesive to the threaded holes of
the drive gear.
Specified adhesive:MOPAR
Part No.4318031 or
4318032 or equivalent
(4) Install the drive gear onto the differential case with the
Amating marks properly aligned. Tighten the bolts to the
specified torque in a diagonal sequence.
Page 134 of 1216
3-32REAR AXLE - Differential Carrier
llY167If backlash is too small
If backlash is too large
llY168
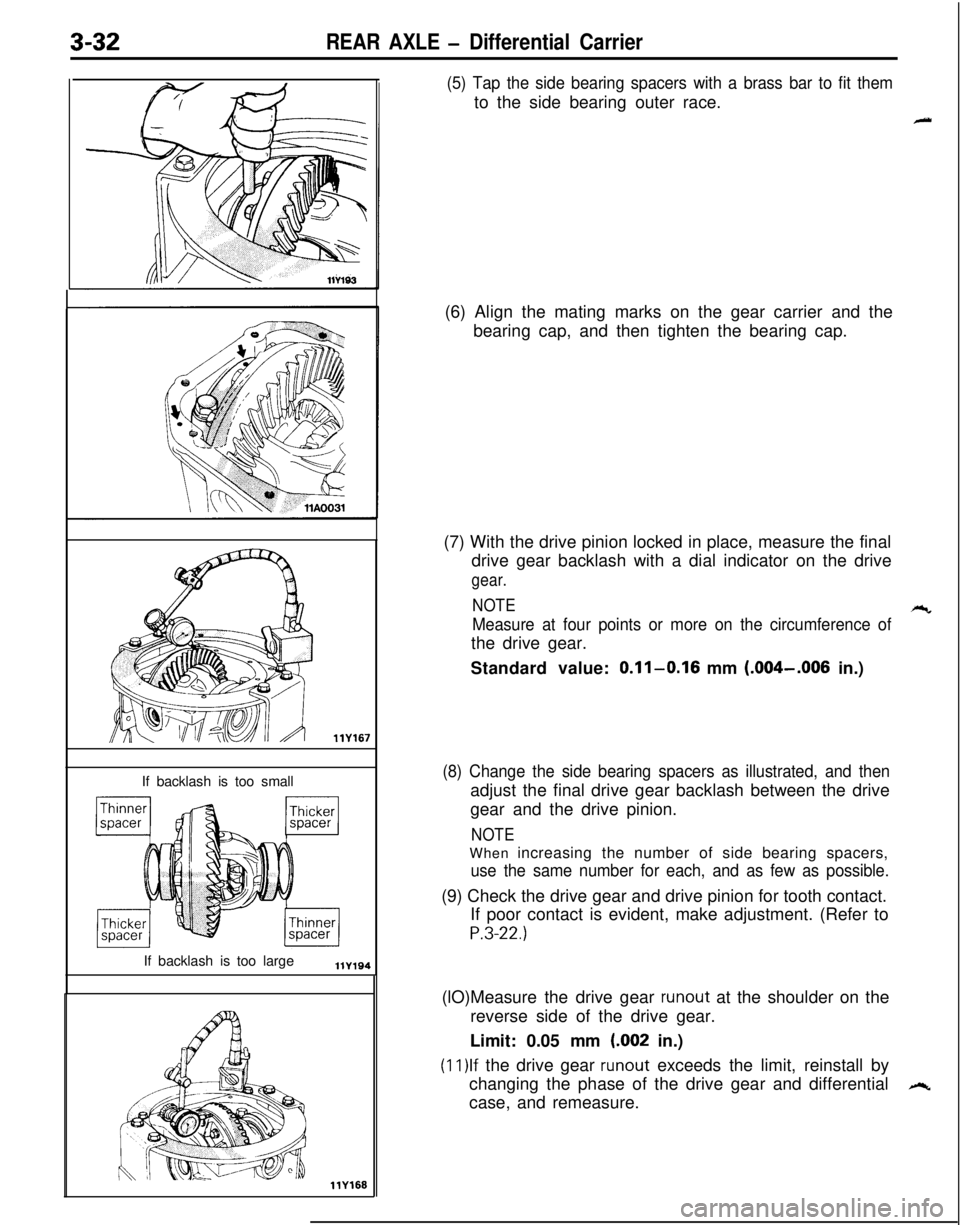
(5) Tap the side bearing spacers with a brass bar to fit themto the side bearing outer race.
4(6) Align the mating marks on the gear carrier and the
bearing cap, and then tighten the bearing cap.
(7) With the drive pinion locked in place, measure the final
drive gear backlash with a dial indicator on the drive
gear.
NOTE
-cc
Measure at four points or more on the circumference ofthe drive gear.
Standard value:
0.11-0.16 mm (.004-.006 in.)
(8) Change the side bearing spacers as illustrated, and thenadjust the final drive gear backlash between the drive
gear and the drive pinion.
NOTEWhen increasing the number of side bearing spacers,
use the same number for each, and as few as possible.(9) Check the drive gear and drive pinion for tooth contact.
If poor contact is evident, make adjustment. (Refer to
P.3-22.)(lO)Measure the drive gear
runout at the shoulder on the
reverse side of the drive gear.
Limit: 0.05 mm
(.002 in.)
(ll)lf the drive gear runout exceeds the limit, reinstall by
changing the phase of the drive gear and differential
,+case, and remeasure.
Page 141 of 1216
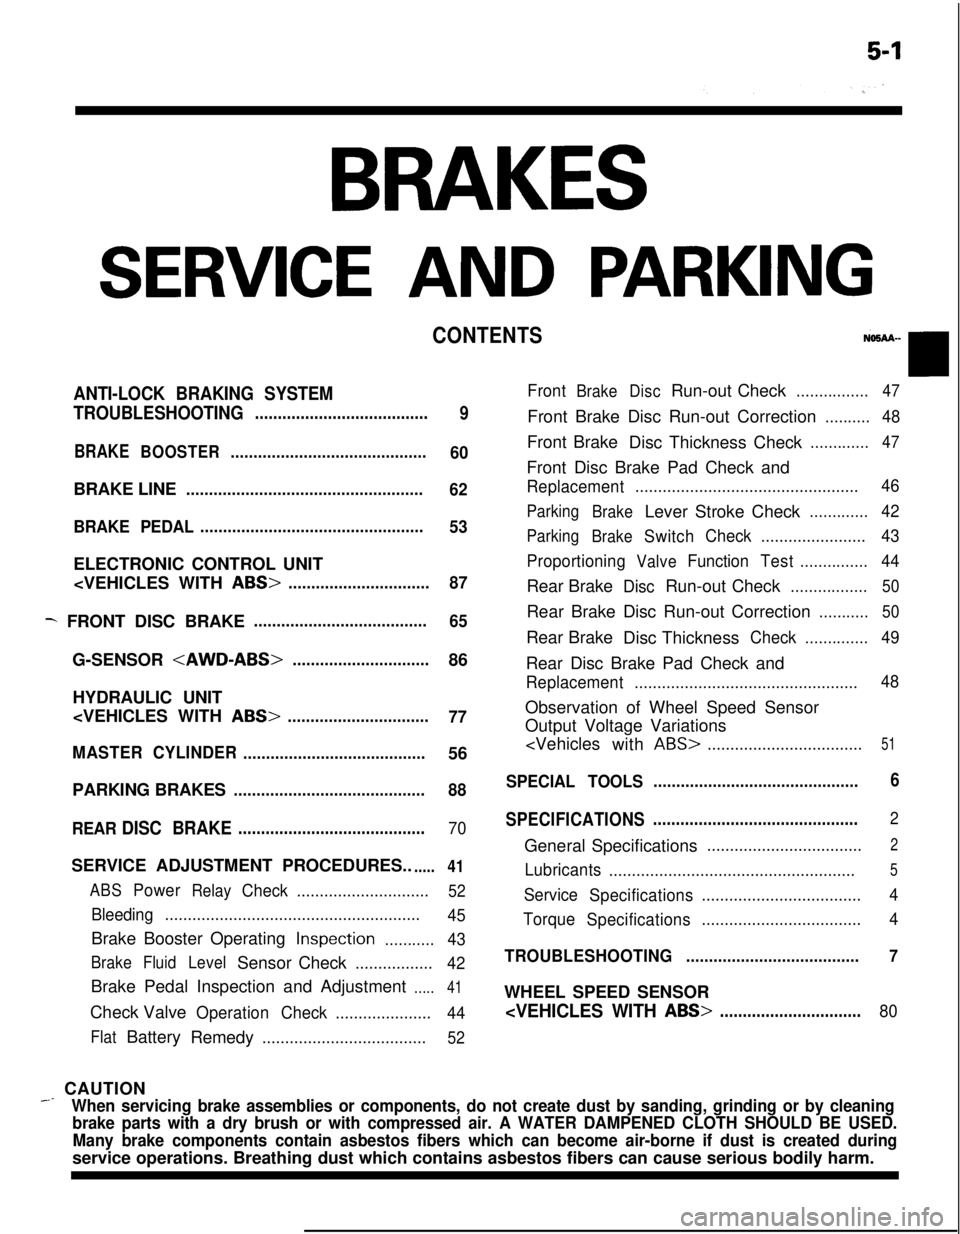
BRAKES
SERVICE AND PARKING
CONTENTS
ANTI-LOCK BRAKING SYSTEM
TROUBLESHOOTING
......................................
9
BRAKEBOOSTER...........................................
60BRAKE LINE
....................................................
62
BRAKE PEDAL.................................................
53ELECTRONIC CONTROL UNIT
- FRONT DISC BRAKE......................................
65G-SENSOR
HYDRAULIC UNIT
77
MASTERCYLINDER
........................................56
PARKING BRAKES
..........................................88
REAR
DISC BRAKE.........................................70SERVICE ADJUSTMENT PROCEDURES..
.....41
ABSPowerRelayCheck.............................52
Bleeding........................................................
45Brake Booster Operating
Inspection...........43
BrakeFluidLevelSensor Check.................
42Brake Pedal Inspection and Adjustment
.....41Check Valve
OperationCheck.....................
44
FlatBattery
Remedy....................................52
FrontBrakeDiscRun-out Check................47Front Brake Disc Run-out Correction
..........48Front Brake
Disc Thickness Check
.............47Front Disc Brake Pad Check and
Replacement.................................................46
Parking
BrakeLever Stroke Check.............42
Parking
BrakeSwitchCheck.......................43
Proportioning
ValveFunctionTest...............44Rear Brake
DiscRun-out Check.................50Rear Brake Disc Run-out Correction
...........50Rear Brake
Disc Thickness
Check..............49Rear Disc Brake Pad Check and
Replacement.................................................48Observation of Wheel Speed Sensor
Output Voltage Variations
ABS>..................................51
SPECIAL TOOLS.............................................6
SPECIFICATIONS.............................................
2General Specifications
..................................2
Lubricants
......................................................5
Service
Specifications...................................4
Torque
Specifications...................................4
TROUBLESHOOTING......................................7WHEEL SPEED SENSOR
_ CAUTION
When servicing brake assemblies or components, do not create dust by sanding, grinding or by cleaning
brake parts with a dry brush or with compressed air. A WATER DAMPENED CLOTH SHOULD BE USED.
Many brake components contain asbestos fibers which can become air-borne if dust is created duringservice operations. Breathing dust which contains asbestos fibers can cause serious bodily harm.
Page 145 of 1216
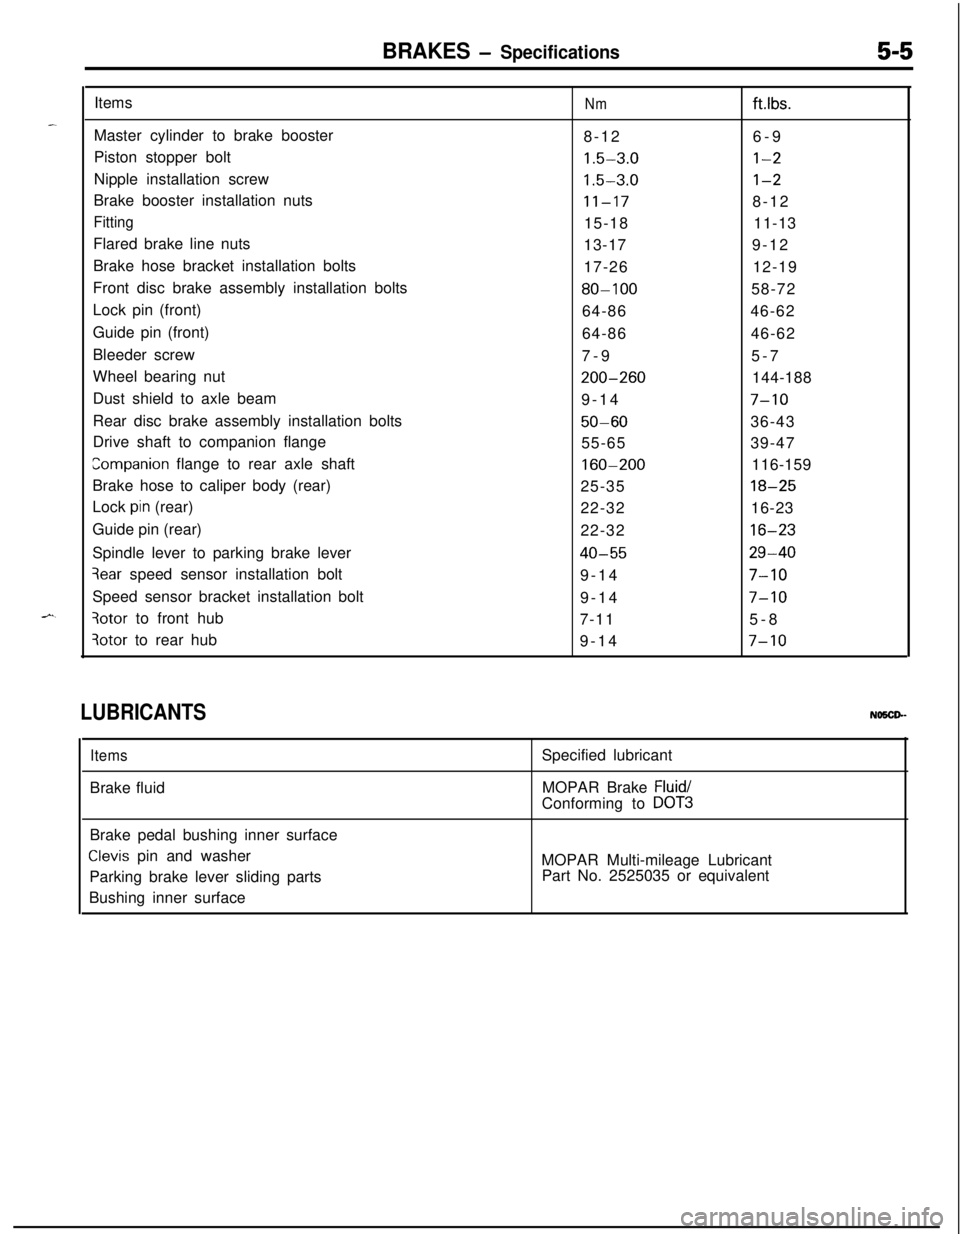
BRAKES - Specifications5-5Items
Nmftlbs.Master cylinder to brake booster
8-126-9
Piston stopper bolt
1.5-3.0l-2Nipple installation screw
1.5-3.0l-2Brake booster installation nuts
11-178-12
Fitting15-1811-13
Flared brake line nuts
13-179-12
Brake hose bracket installation bolts
17-2612-19
Front disc brake assembly installation bolts
80-10058-72
Lock pin (front)
64-8646-62
Guide pin (front)
64-8646-62
Bleeder screw
7-95-7
Wheel bearing nut
200-260144-188
Dust shield to axle beam
9-14
7-10Rear disc brake assembly installation bolts
50-6036-43
Drive shaft to companion flange
55-6539-47
companion flange to rear axle shaft160-200116-159
Brake hose to caliper body (rear)
25-35
18-25Lock
pin (rear)
22-3216-23
Guide pin (rear)
22-32
16-23Spindle lever to parking brake lever
40-5529-40
3ear speed sensor installation bolt
9-147-10Speed sensor bracket installation bolt
9-14
7-10
3otor to front hub
7-115-8
3otor to rear hub
9-147-10
LUBRICANTSNO5CP-
ItemsBrake fluidSpecified lubricant
MOPAR Brake
Fluid/Conforming to
DOT3Brake pedal bushing inner surface
Clevis pin and washer
Parking brake lever sliding parts
Bushing inner surfaceMOPAR Multi-mileage Lubricant
Part No. 2525035 or equivalent