MITSUBISHI GALANT 1989 Service Repair Manual
Manufacturer: MITSUBISHI, Model Year: 1989, Model line: GALANT, Model: MITSUBISHI GALANT 1989Pages: 1273, PDF Size: 37.62 MB
Page 541 of 1273
AUTO-CRUISE CONTROL SYSTEM - Setice Adjustment ~rccedures13-399
Accelerator cable B
Intake manifold
plenum
VAdjusting bolts07A0021
Throttle -.--
StopperCloskd throttleposition swrtch 03~0278
Acceleratorcable A
I
03A0271
-Ai+1-2 mm (.04-.08
in.)
TSB Revision
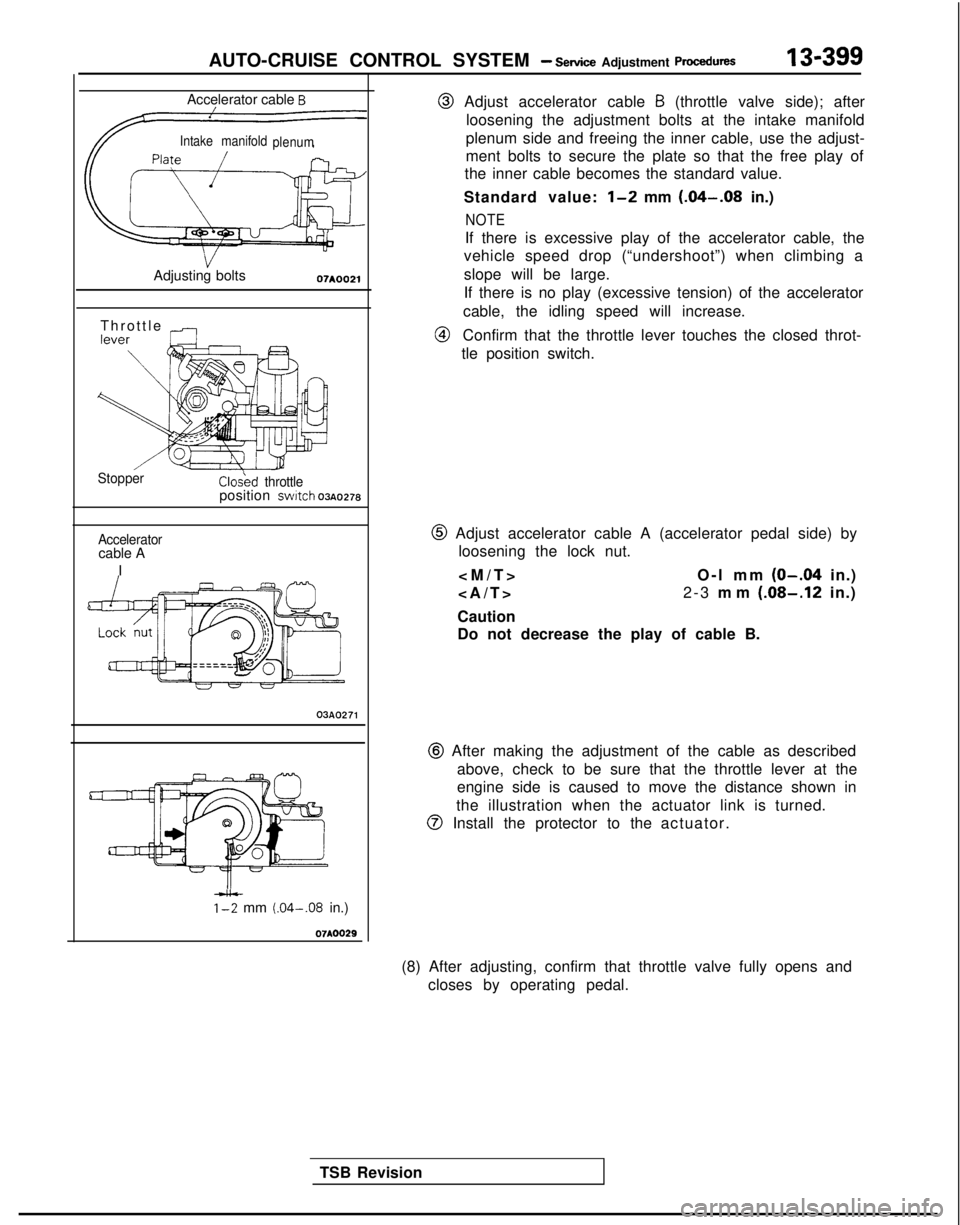
@ Adjust accelerator cable B (throttle valve side); after
loosening the adjustment bolts at the intake manifold
plenum side and freeing the inner cable, use the adjust-
ment bolts to secure the plate so that the free play of
the inner cable becomes the standard value.
Standard value:
l-2 mm (.04-.08 in.)
NOTE
If there is excessive play of the accelerator cable, the
vehicle speed drop (“undershoot”) when climbing a
slope will be large.
If there is no play (excessive tension) of the accelerator
cable, the idling speed will increase.
@Confirm that the throttle lever touches the closed throt-
tle position switch.
@ Adjust accelerator cable A (accelerator pedal side) by loosening the lock nut.
O-l mm
(O-.04 in.)
>
2-3
mm
(.08-.12 in.)
Caution
Do not decrease the play of cable B.
@ After making the adjustment of the cable as described above, check to be sure that the throttle lever at the
engine side is caused to move the distance shown in
the illustration when the actuator link is turned.
@ Install the protector to the actuator.
(8) After adjusting, confirm that throttle valve fully opens and closes by operating pedal.
Page 542 of 1273
13-400AUTO-CRUISE CONTROL SYSTEM - Service Adjustment procedures
rThrottle cableAdjusting nut B
\uto-cruise dontrolcable
ThrottlecableAdjusting nut D
A
03A0281
Stopper
ThrottleLock nut/ Adjusting nut B
Stopper07AOO54
07AOO55
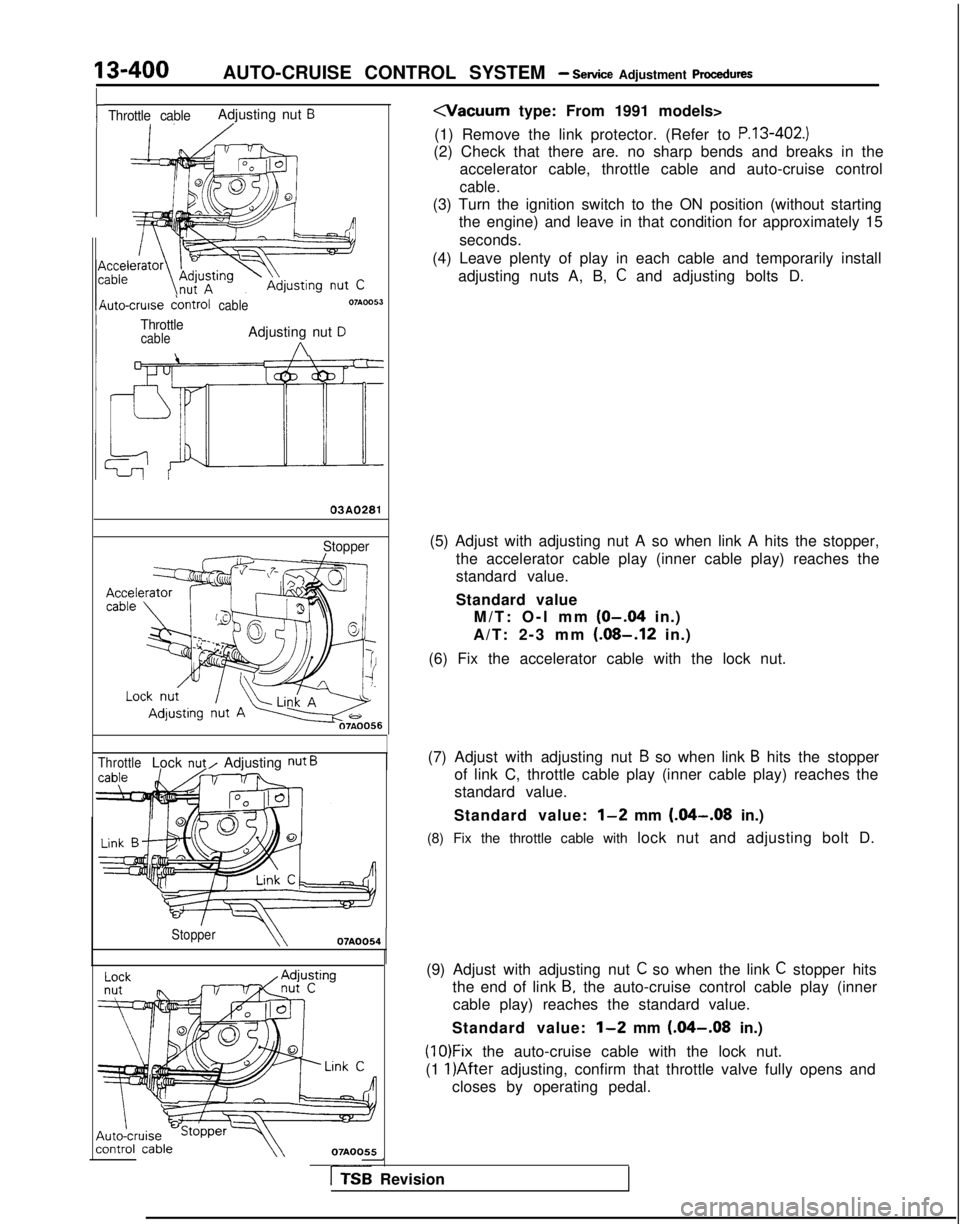
(1) Remove the link protector. (Refer to
P.13-402.)
(2) Check that there are. no sharp bends and breaks in the accelerator cable, throttle cable and auto-cruise control
cable.
(3) Turn the ignition switch to the ON position (without startingthe engine) and leave in that condition for approximately 15
seconds.
(4) Leave plenty of play in each cable and temporarily install adjusting nuts A, B,
C and adjusting bolts D.
(5) Adjust with adjusting nut A so when link A hits the stopper, the accelerator cable play (inner cable play) reaches the
standard value.
Standard valueM/T: O-l mm
(O-.04 in.)
A/T: 2-3 mm
(.08-.12 in.)
(6) Fix the accelerator cable with the lock nut.
(7) Adjust with adjusting nut
B so when link B hits the stopper
of link C, throttle cable play (inner cable play) reaches the
standard value.
Standard value:
l-2 mm (&I-.08 in.)
(8) Fix the throttle cable with lock nut and adjusting bolt D.
(9) Adjust with adjusting nut
C so when the link C stopper hits
the end of link
B, the auto-cruise control cable play (inner
cable play) reaches the standard value.
Standard value:
l-2 mm (.04-.08 in.)
(1O)Fix the auto-cruise cable with the lock nut.
(1
l)After adjusting, confirm that throttle valve fully opens and
closes by operating pedal.
-
rTSB Revision
Page 543 of 1273
AUTO-CRUISE CONTROL SYSTEM - Setice Adiustment Procedures13-401
16AO192
--
Ib/-
SJy-
iii
3 1
24
J
14LO142
INDIVIDUAL PARTS INSPEtiTION
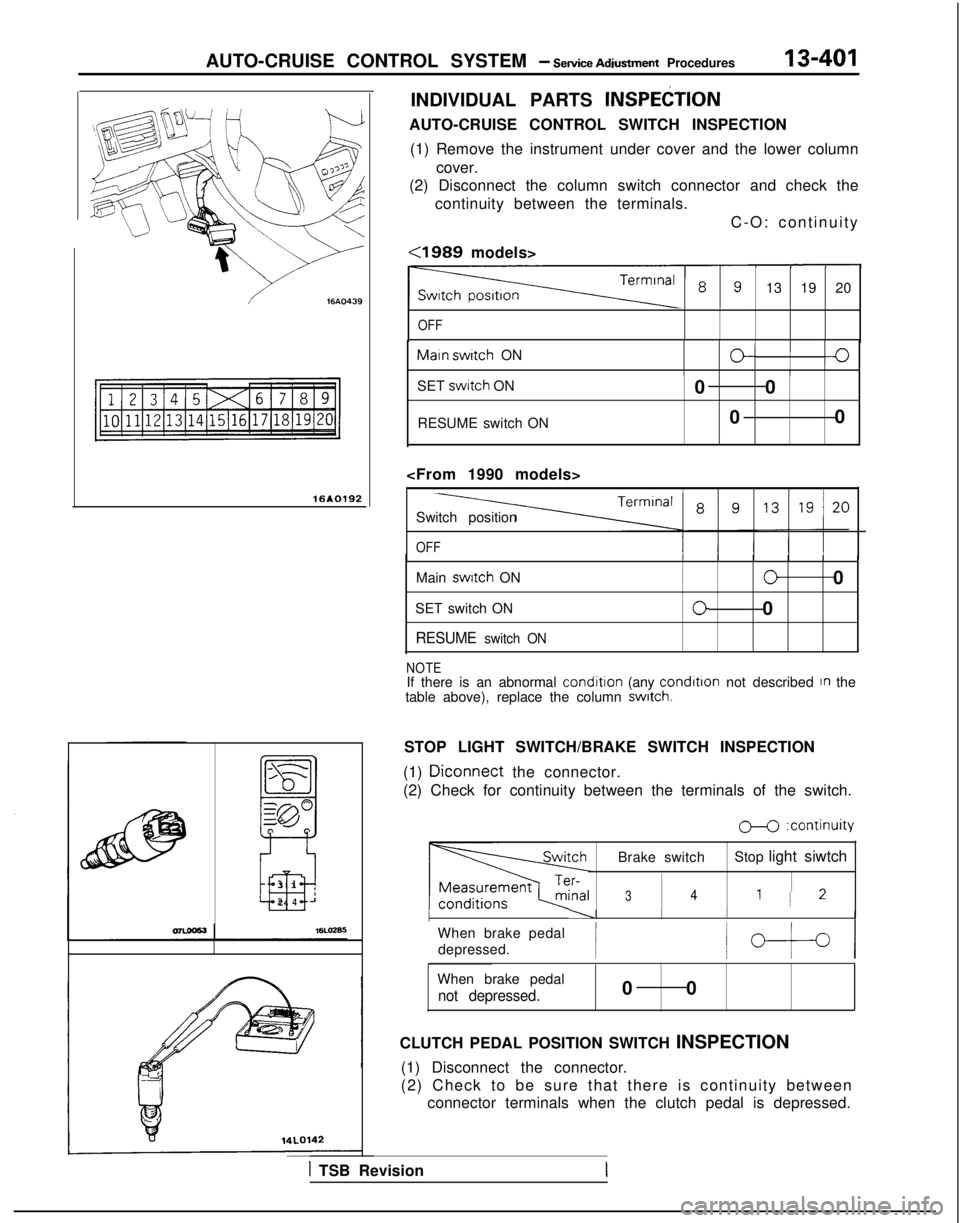
AUTO-CRUISE CONTROL SWITCH INSPECTION
(1) Remove the instrument under cover and the lower column cover.
(2) Disconnect the column switch connector and check the
continuity between the terminals.
C-O: continuity
<1989 models>
13 19 20
OFF Maln
switch
ON
O/I0IIIISET swttch
ON
RESUME switch ON 0 0
0 0
OFF
Main switch
ON
SET switch ON
RESUME switch ON
00
00
NOTEIf there is an abnormal condition
(any condltlon
not described In the
table above), replace the column switch.
STOP LIGHT SWITCH/BRAKE SWITCH INSPECTION
(1)
Diconnect the connector.
(2) Check for continuity between the terminals of the switch.
M :continuity
Brake switch Stop light siwtch
341 1 2
I----II I
When brake pedal
depressed.
/b-t-4
When brake pedal
not depressed.0 0
CLUTCH PEDAL POSITION SWITCH INSPECTION (1) Disconnect the connector.
(2) Check to be sure that there is continuity between connector terminals when the clutch pedal is depressed.
1 TSB Revision
Page 544 of 1273
13-402AUTO-CRUISE CONTROL SYSTEM - service Adjusbnent PWSXIU~S
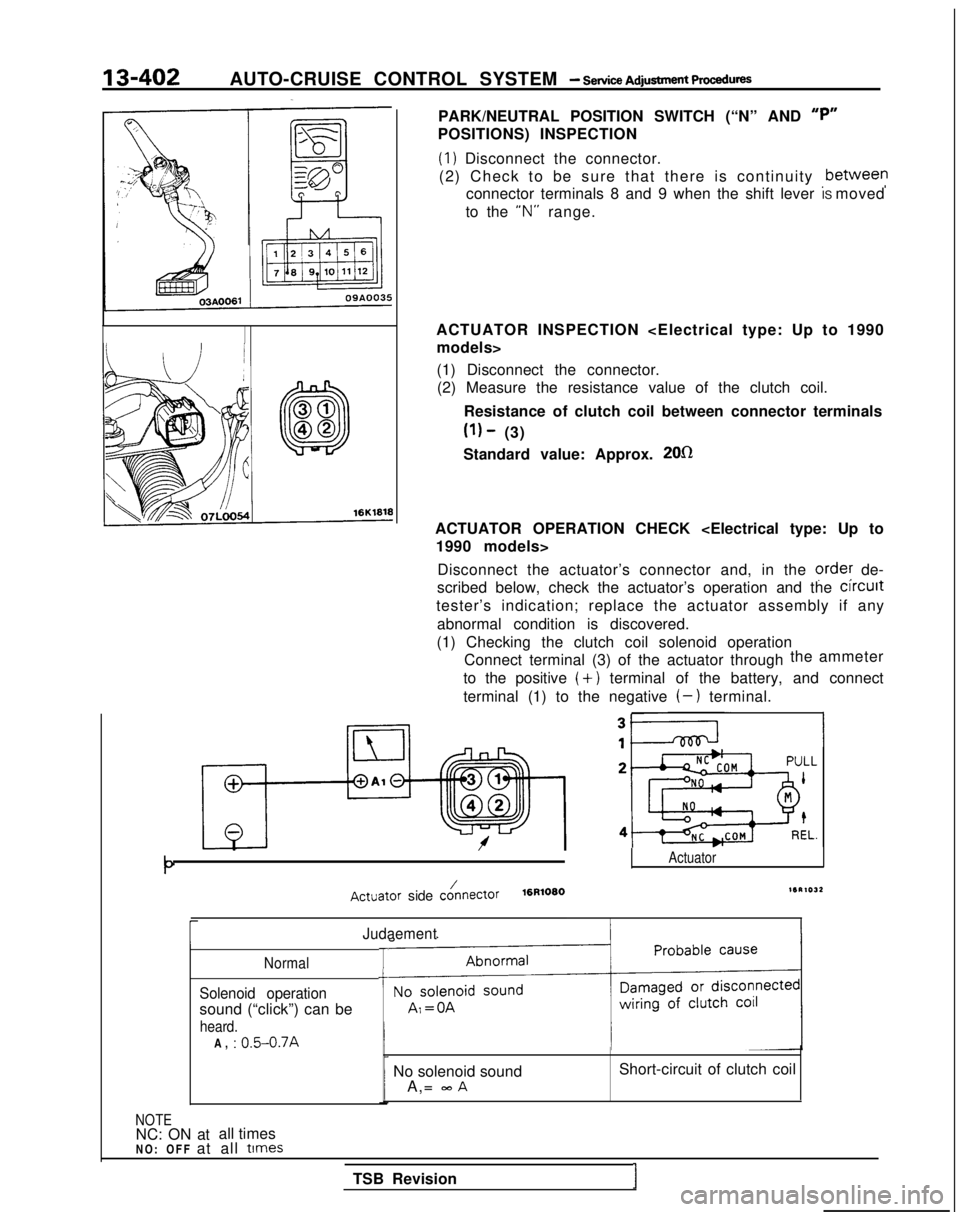
PARK/NEUTRAL POSITION SWITCH (“N” AND “P”
POSITIONS) INSPECTION
(1) Disconnect the connector.
(2) Check to be sure that there is continuity ,between
connector terminals 8 and 9 when the shift lever IS moved
to the “N”
range.
ACTUATOR INSPECTION
(1) Disconnect the connector.(2) Measure the resistance value of the clutch coil.
Resistance of clutch coil between connector terminals
(1) - (3)
Standard value: Approx.
2Ofl
ACTUATOR OPERATION CHECK
Disconnect the actuator’s connector and, in the
ordey de-
scribed below, check the actuator’s operation and the clrcult
tester’s indication; replace the actuator assembly if any
abnormal condition is discovered.
(1) Checking the clutch coil solenoid operation Connect terminal (3) of the actuator through the
ammeter
to the positive
(+) terminal of the battery, and connect
terminal (1) to the negative
(-) terminal.
Actuator
Actuator side cO/nectOr16R10801SR1032
rJudaement
Normal
Solenoid operation
sound (“click”) can be
heard.
T
-t
A, : 0.5-0.7A
NOTENC: ON at all times No solenoid sound
A,=
mA
Short-circuit of clutch coil
NO: OFF at all
times
TSB RevisionI
Page 545 of 1273
AUTO-CRUISE CONTROL SYSTEM - Service Adjustment procedures13-403
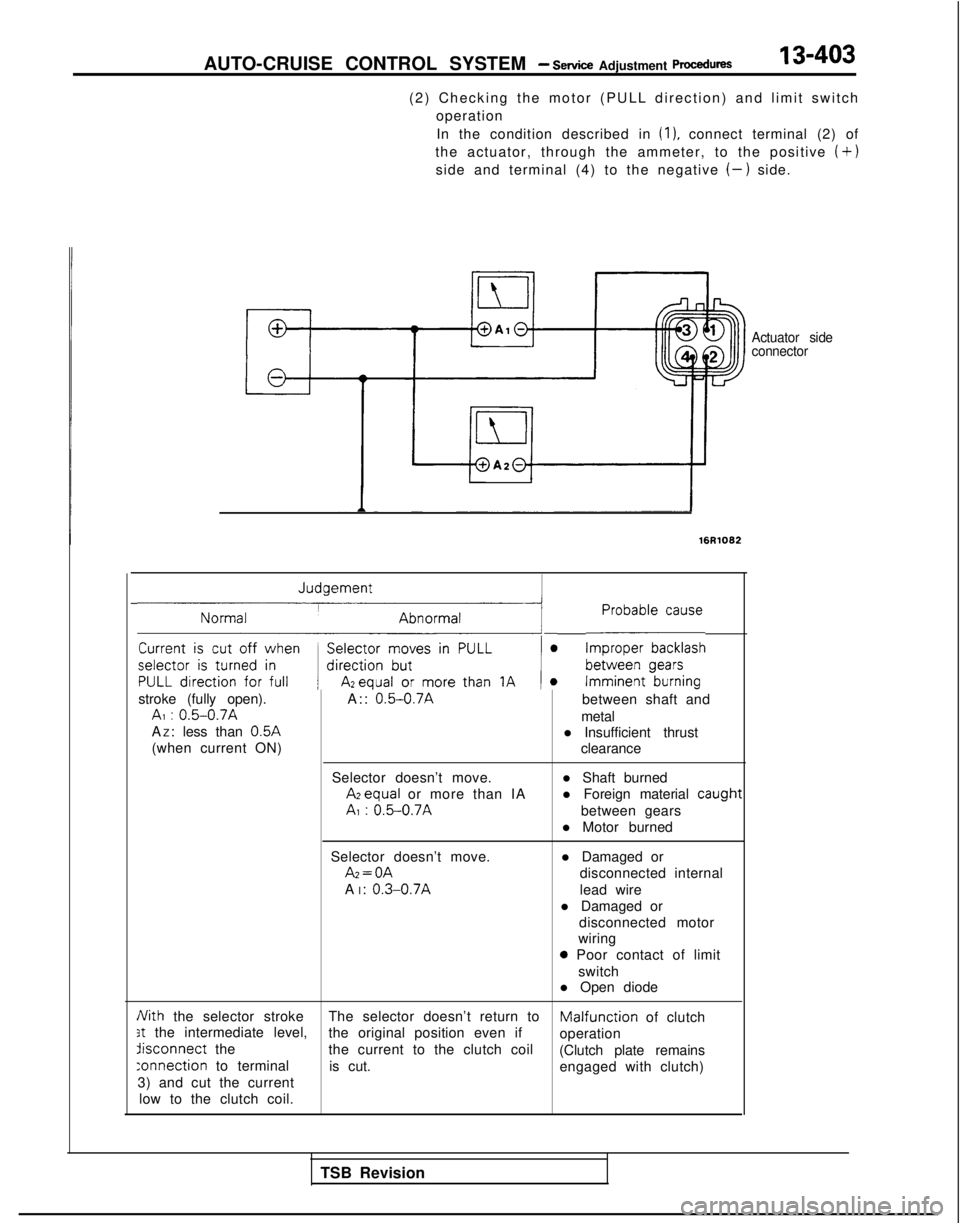
(2) Checking the motor (PULL direction) and limit switch
operation
In the condition described in
(1). connect terminal (2) of
the actuator, through the ammeter, to the positive
(+)
side and terminal (4) to the negative (-) side.
Actuator side
connector
16R1082
~1 L-E~~~~~~
stroke (fully open). A:: 0.5-0.7Abetween shaft andAI : 0.5-0.7Ametal
A Z: less than 0.5A
l Insufficient thrust
(when current ON) clearance
Selector doesn’t move. l Shaft burned Azequal
or more than IA l Foreign material
caugt
AI : 0.5-0.7Abetween gears
l Motor burned
Selector doesn’t move. Az=OA
A I:
0.3-0.7A
l Damaged or
disconnected internal
lead wire
l Damaged or disconnected motor
wiring
0 Poor contact of limit
switch
l Open diode
Nith the selector stroke The selector doesn’t return toMalfunciion of clutch3t the intermediate level,
the original position even if
operationdisconnect
the
the current to the clutch coil
(Clutch plate remains
:onnection to terminalis cut. engaged with clutch)
3) and cut the current
low to the clutch coil.
1t
TSB Revision
Page 546 of 1273
13-404AUTO-CRUISE CONTROL SYSTEM - Service Adjustment procedures
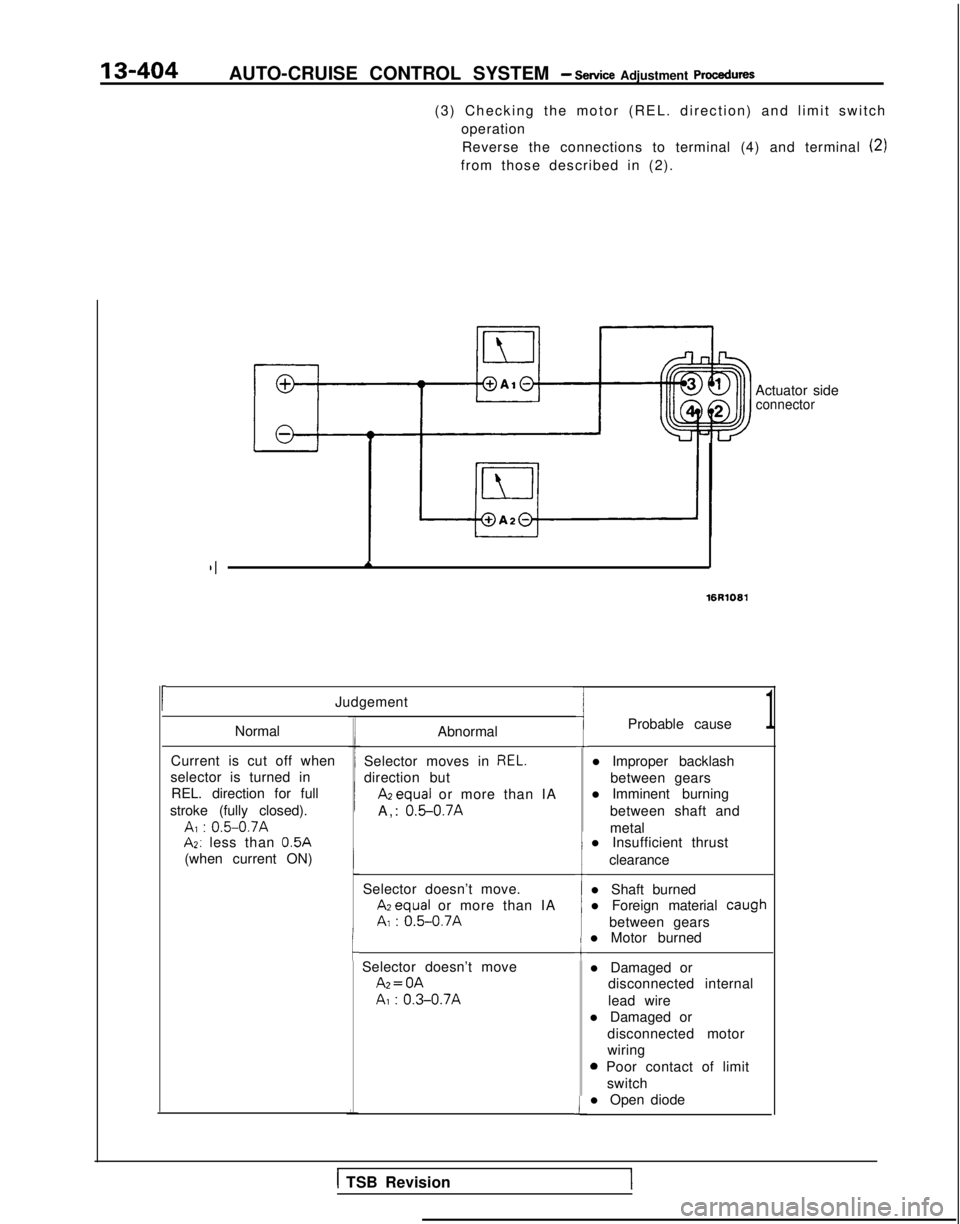
(3) Checking the motor (REL. direction) and limit switchoperationReverse the connections to terminal (4) and terminal
(2)
from those described in (2).
c
Actuator sideconnector
II*
16R1081
Judgement
Normal
Current is cut off when
selector is turned in REL. direction for full
stroke (fully closed).
A, : 0.5-0.7AAZ: less than
0.5A
(when current ON) Abnormal
Selector moves in
REL.
direction but
Apequa or more than IA
A,: 0.5-0.7A
Selector doesn’t move. ATequal
or more than IA
AI : 0.5-0.7AI
cSelector doesn’t move Az=OA
A, :
0.3-0.7A
-I
1
I
i
1
Probable cause1
l Improper backlash
between gears
l Imminent burning
between shaft and
metal
l Insufficient thrust
clearance
l Shaft burned
l Foreign material caugh
between gears
l Motor burned
l Damaged or
disconnected internal
lead wire
l Damaged or
disconnected motor
wiring
0 Poor contact of limitswitch
l Open diode
1 TSB RevisionI
Page 547 of 1273
AUTO-CRUISE CONTROL SYSTEM - Sewice Adjustment Procedures
ECU connector terminals
19171513ll><7531
2018161412 101 98642
16A1060
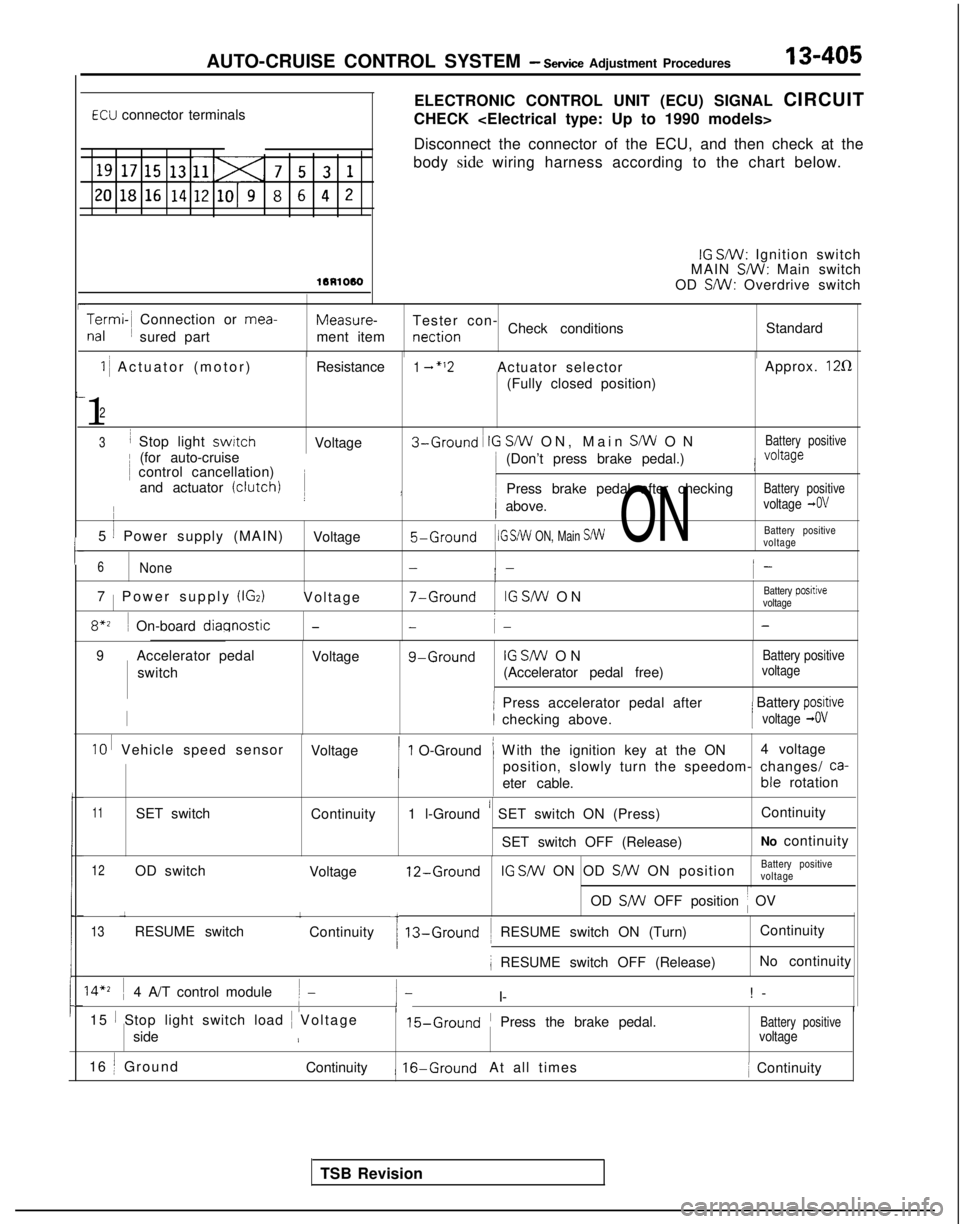
ELECTRONIC CONTROL UNIT (ECU) SIGNAL CIRCUIT
CHECK
Disconnect the connector of the ECU, and then check at the
body side wiring harness according to the chart below.
IG SW: Ignition switch
MAIN SW: Main switch
OD SMI: Overdrive switch
Termi-~ Connection or mea-
nal
~
sured part Measure-
Tester con-
ment item nection
Check conditions
Standard
I-
I-
1 ~
Actuator (motor) Resistance1 - “‘2Actuator selector Approx. 120
(Fully closed position)
1
2
3I Stop light switchVoltage3-Ground ~
IG S/W ON, Main SW O
N
Battery positive
~
(for auto-cruise ~
control cancellation)
j )
i (Don’t press brake pedal.)j voltage
and actuator (clutch)I Press brake pedal after checkingBattery positive
5 1 Power supply (MAIN)
/ above.voltage -0V
Voltage5-Ground
1 IG S/W
ON, Main S/W ONBattery positive
voltage
6None-i -i-
7 1
Power supply (IGz)Voltag
e
7-GroundIG SfW O
N
Battery positive
voltage
8*z ~
On-board diagnostic--i- -
TSB Revision
9Accelerator pedal Voltageg-GroundIG SW O
N
Battery positive
switch
(Accelerator pedal free)voltage
1 Press accelerator pedal after/ Battery positive
II checking above.[voltage -0V
IO I Vehicle speed sensor
Voltage1 O-Ground’ W
ith the ignition key at the ON
’ ~
4 voltage
position, slowly turn the speedom- changes/
ca-
eter cable. ble
rotation
11SET switch
Continuity1 l-Ground ’ SET switch ON (Press) Continuity
SET switch OFF (Release) No continuity
12OD switch
13RESUME switch 1
Voltage
Continuity
12-GroundIG SNV ON OD SW ON position
Battery positive
voltage
OD
SW OFF position ~
OV
13-Ground ~
RESUME switch ON (Turn) Continuity
; RESUME switch OFF (Release)
No continuity
14’2 ~
4 A/T control module( -/- I- !
-
I/15 1 Stop light switch load
~
Voltage15-Ground’ Press the brake pedal.Battery positiveside/voltage
16 j Ground
Continuity1 16-GroundAt all times ~
Continuity
Page 548 of 1273
13-406AUTO-CRUISE CONTROL SYSTEM - Service A&tment ~mcec~ure~
Termi-
nal
17
18
19
20
l-
it
L
Connection of mea-
sured part Park/neutral position
switch (P, N)
T
f
+
Stop light switch
power supply side
Continuity ~
17-Ground
1
.~.~.~ ~.-. _ - ~~- -~/Voltage)
18-Ground
~~
____~ _~ ~.. ----+--.. .-~
Clutch pedal position
Voltage1 1 g-Groundswitch
Measure-1
Tester
ment item 1
connection
Ground
1 ~
Continuity ~
20-Ground
-Conrroljunitj I! @jIII LNOtOMl ‘-r’
+-j-
--J--L--
Actuator motor
03R0210
Check conditionsStandard
“P” or “N” rangeContinuity
Other than “P” or “N” range
,No continui-
v
At all timesj Battery positive
IG S/W
ON
Clutch pedal position switch OFF
At all times/ Continuity 1
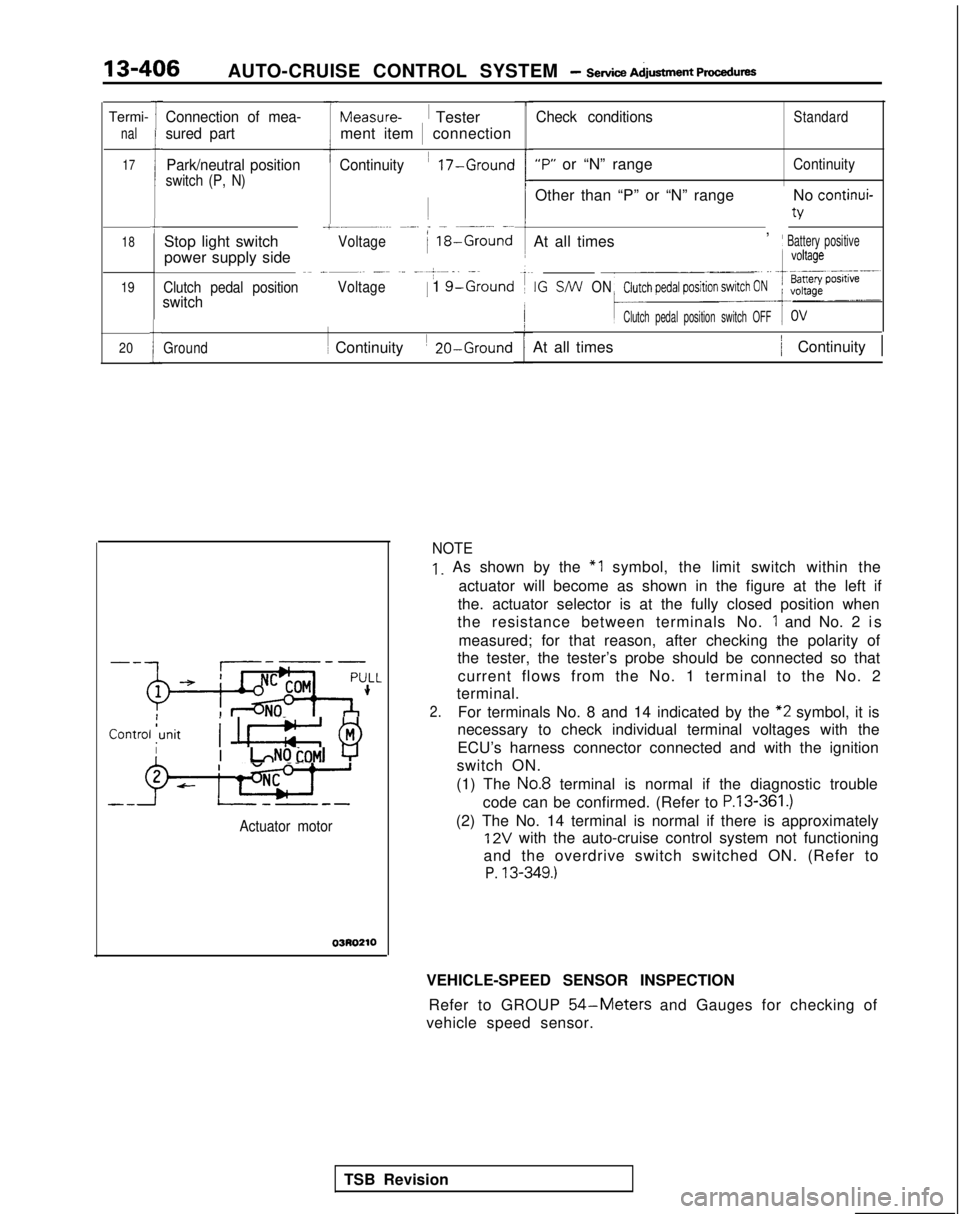
NOTE
1. As shown by the “1 symbol, the limit switch within the
actuator will become as shown in the figure at the left if
the. actuator selector is at the fully closed position when
the resistance between terminals No.
1 and No. 2 i
s
measured; for that reason, after checking the polarity of
the tester, the tester’s probe should be connected so that
current flows from the No. 1 terminal to the No. 2
terminal.
2.For terminals No. 8 and 14 indicated by the “2
symbol, it is
necessary to check individual terminal voltages with the
ECU’s harness connector connected and with the ignition
switch ON.
(1) The
No.8 terminal is normal if the diagnostic trouble
code can be confirmed. (Refer to
P.13-361.)
(2) The No. 14 terminal is normal if there is approximately
12V with the auto-cruise control system not functioning
and the overdrive switch switched ON. (Refer to
P. 13-349.)
VEHICLE-SPEED SENSOR INSPECTION
Refer to GROUP
54-Meters and Gauges for checking of
vehicle speed sensor.
TSB Revision
Page 549 of 1273
AUTO-CRUISE CONTROL SYSTEM - Setice Adjustment procedures13-407
=\
07A005.1
Controlvalve
L2
07AOO50
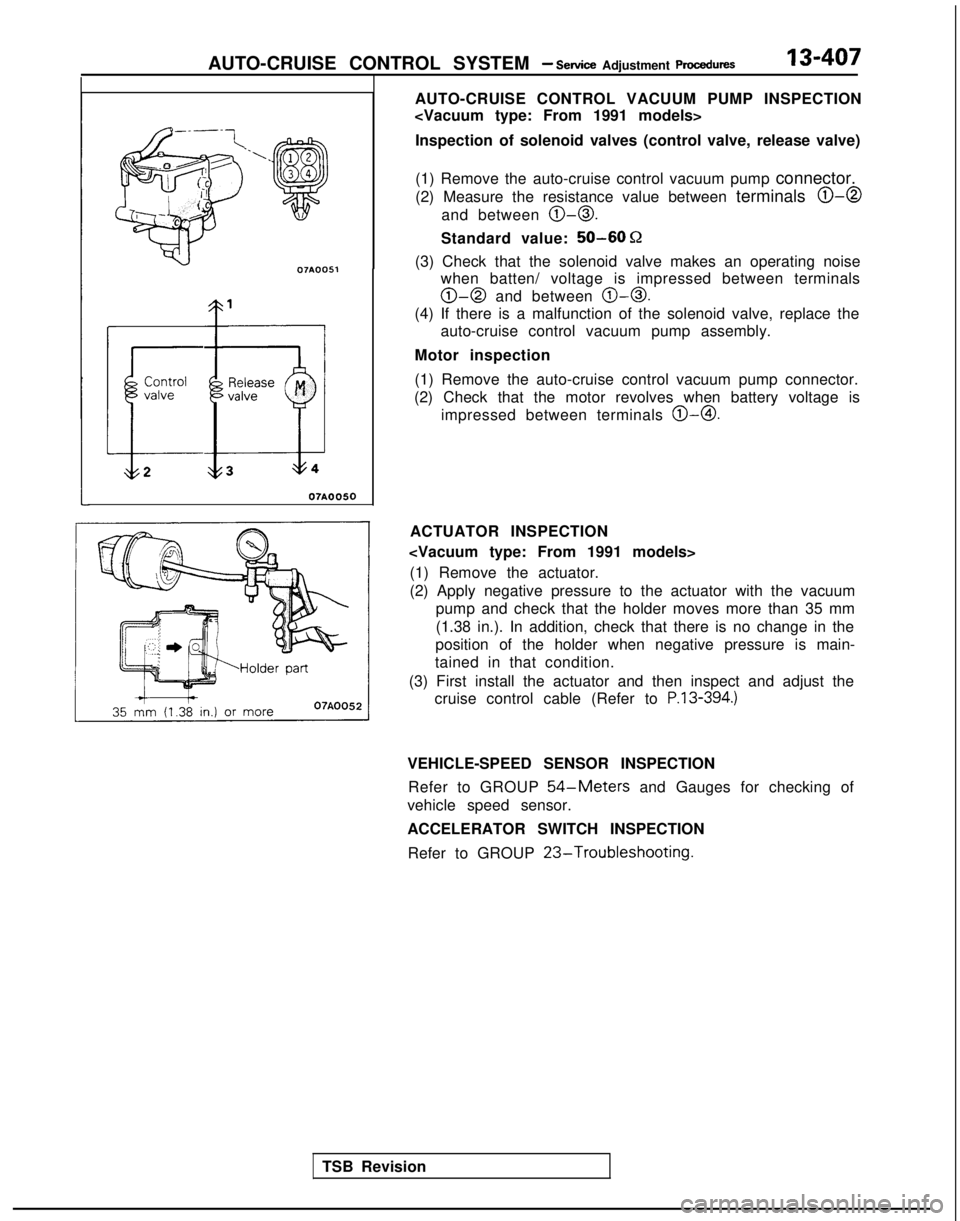
AUTO-CRUISE CONTROL VACUUM PUMP INSPECTION
Inspection of solenoid valves (control valve, release valve)
(1) Remove the auto-cruise control vacuum pump connector.
(2) Measure the resistance value between terminals
0-0
and between 0-0.
Standard value: 50-60 Q
(3) Check that the solenoid valve makes an operating noise
when batten/ voltage is impressed between terminals
0-0 and between 0-0.
(4) If there is a malfunction of the solenoid valve, replace the
auto-cruise control vacuum pump assembly.
Motor inspection
(1) Remove the auto-cruise control vacuum pump connector.
(2) Check that the motor revolves when battery voltage is impressed between terminals
@-0.
TSB Revision ACTUATOR INSPECTION
(1) Remove the actuator.
(2) Apply negative pressure to the actuator with the vacuum pump and check that the holder moves more than 35 mm
(1.38 in.). In addition, check that there is no change in the
position of the holder when negative pressure is main-
tained in that condition.
(3) First install the actuator and then inspect and adjust the cruise control cable (Refer to
P.13-394.)
VEHICLE-SPEED SENSOR INSPECTION
Refer to GROUP
54-Meters and Gauges for checking of
vehicle speed sensor.
ACCELERATOR SWITCH INSPECTION
Refer to GROUP
23-Troubleshooting.
Page 550 of 1273
13-408AUTO-CRUISE CONTROL SYSTEM - Auto-cruise Control
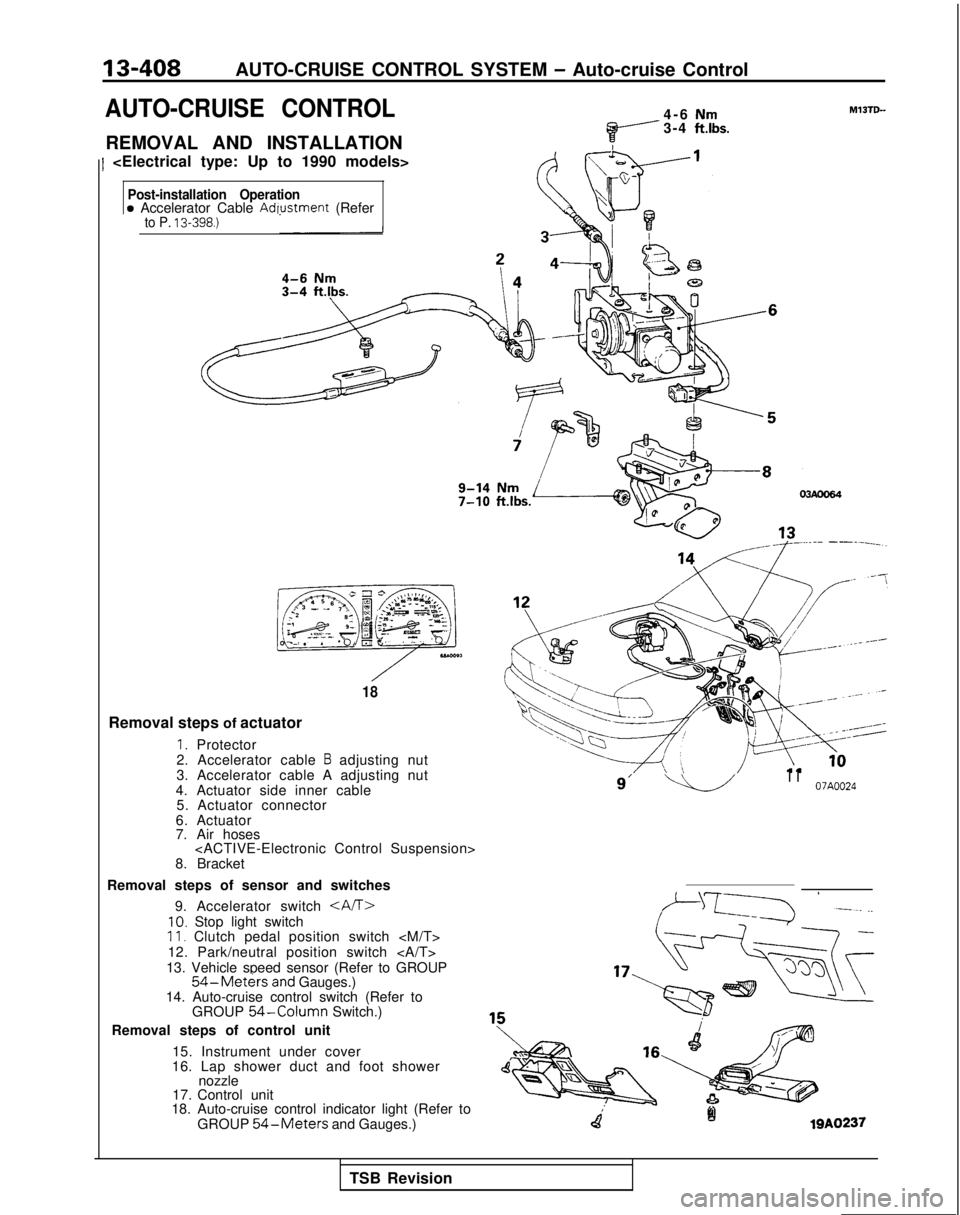
AUTO-CRUISE CONTROL
REMOVAL AND INSTALLATION
1
Nm3-4 ft.lbs.
Post-installation Operationa Accelerator Cable Adwstment (Referto P. 13-398.)
,**.“qy “y ,,,,ezls:’ 3 -. .- ,*%L’J
01
,\@&&,
-<28- E+c- - - --.c,
T
$$y= *g i ;g+j$T
-3
18
Removal steps of actuator
1. Protector
2. Accelerator cable B adjusting nut
3. Accelerator cable A adjusting nut
4. Actuator side inner cable 5. Actuator connector
6. Actuator
7. Air hoses
8. Bracket
Removal steps of sensor and switches 9. Accelerator switch
10. Stop light switch11. Clutch pedal position switch
12. Park/neutral position switch
13. Vehicle speed sensor (Refer to GROUP
54-Met&sand Gauges.)
14. Auto-cruise control switch (Refer to GROUP
54-Column Switch.)
Removal steps of control unit
15. Instrument under cover
16. Lap shower duct and foot shower nozzle
17. Control unit
18. Auto-cruise control indicator light (Refer to
GROUP
54-Meters and Gauges.)
9’ -L.-lI I07A0024
falQA0237
TSB Revision