MITSUBISHI GRANDIS 2008 Owner's Manual (in English)
Manufacturer: MITSUBISHI, Model Year: 2008, Model line: GRANDIS, Model: MITSUBISHI GRANDIS 2008Pages: 458, PDF Size: 18.52 MB
Page 191 of 458
Starting and driving
4-19
4
Starting the engine (petrol-powered vehicles)
E00601701239
This vehicles is equipped with an electronically controlled fuel
injection system which is automatically controlled. When start-
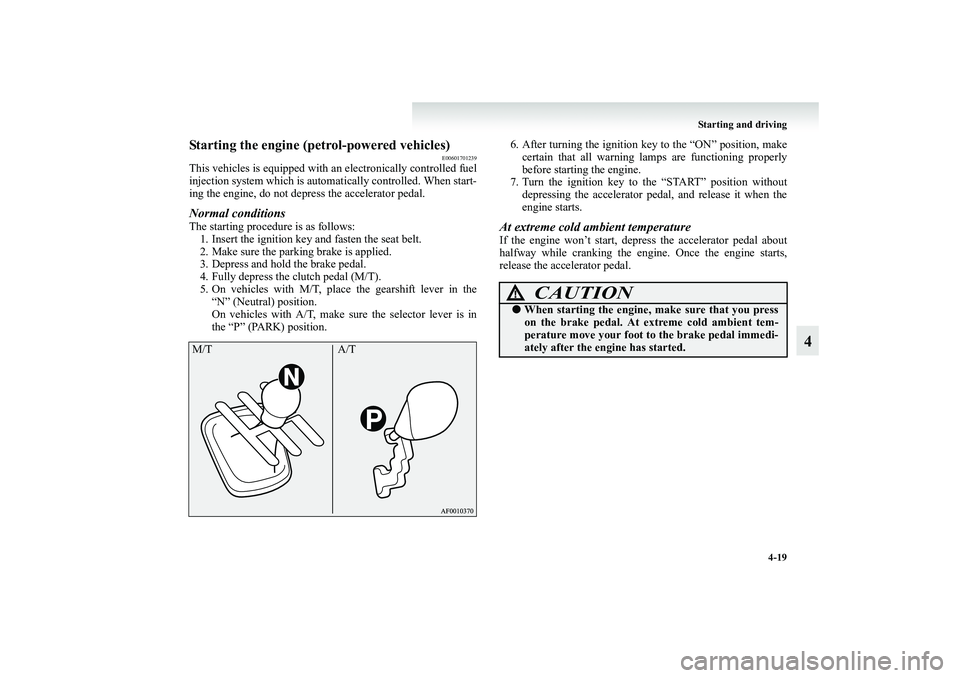
ing the engine, do not depress the accelerator pedal.Normal conditionsThe starting procedure is as follows:
1. Insert the ignition key and fasten the seat belt.
2. Make sure the parking brake is applied.
3. Depress and hold the brake pedal.
4. Fully depress the clutch pedal (M/T).
5. On vehicles with M/T, place the gearshift lever in the
“N” (Neutral) position.
On vehicles with A/T, make sure the selector lever is in
the “P” (PARK) position.6. After turning the ignition key to the “ON” position, make
certain that all warning lamps are functioning properly
before starting the engine.
7. Turn the ignition key to the “START” position without
depressing the accelerator pedal, and release it when the
engine starts.
At extreme cold ambient temperatureIf the engine won’t start, depress the accelerator pedal about
halfway while cranking the engine. Once the engine starts,
release the accelerator pedal.
M/T A/T
CAUTION
!●When starting the engine, make sure that you press
on the brake pedal. At extreme cold ambient tem-
perature move your foot to the brake pedal immedi-
ately after the engine has started.
BK-XP08E1ENUK.en-uk.book Page 19 Monday, August 13, 2007 2:20 PM
Page 192 of 458
4-20 Starting and driving
4
Flooded engineIf the engine was flooded during starting, first operate the
starter for 5 to 6 seconds while fully depressing the accelerator
pedal, then start the engine without depressing the accelerator
pedal.Using the MIVEC engineThe MIVEC engine automatically switches its intake-valve
control between a low-speed mode and a high-speed mode in
accordance with driving conditions for maximum engine per-
formance.NOTE●To protect the engine, the high-speed mode may not be
selected while the engine coolant temperature is low. In
such a case, the engine revolutions do not rise to over
5,000 rpm even if the accelerator pedal is depressed.
Starting the engine (diesel-powered vehicles)
E00601701242
1. Insert the ignition key and fasten the seat belt.
2. Make sure the parking brake is applied.
3. Depress and hold the brake pedal.
4. Fully depress the clutch pedal.
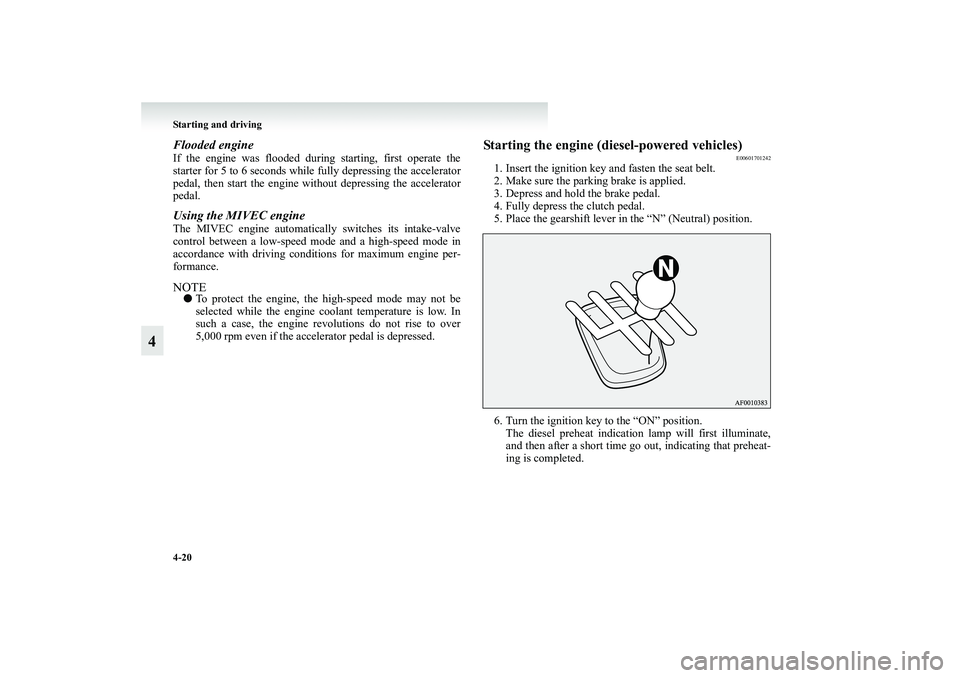
5. Place the gearshift lever in the “N” (Neutral) position.
6. Turn the ignition key to the “ON” position.
The diesel preheat indication lamp will first illuminate,
and then after a short time go out, indicating that preheat-
ing is completed.
BK-XP08E1ENUK.en-uk.book Page 20 Monday, August 13, 2007 2:20 PM
Page 193 of 458

Starting and driving
4-21
4
NOTE●If the engine is cold, the diesel preheat indication lamp is
on for a longer time.
●When the engine has not been started within about 5 sec-
onds after the diesel preheat indication lamp went out,
return the ignition key to the “LOCK” position. Then, turn
the key to the “ON” position to preheat the engine again.
●When the engine is warm, the diesel preheat indication
lamp does not come on even if the ignition key is placed
in the “ON” position.
Start the engine by turning the ignition key right to the
“START” position.
7. Turn the ignition key to the “START” position without
depressing the accelerator pedal, and release it when the
engine starts.NOTE●A ticking noise may be heard after starting the engine.
This is not an abnormal condition. The noise will disap-
pear after a short time of engine running.
If the ticking noise continues after the engine is warmed
up, we recommend you to have your vehicle checked.
Diesel particulate filter (DPF)
*
E00619800069
The diesel particulate filter (DPF) is a device that captures
most of the particulate matter (PM) in the exhaust emissions of
the diesel engine. The DPF automatically burns away trapped
PM during vehicle operation. Under certain driving conditions,
however, the DPF is not able to burn away all of the trapped
PM and, as a result, an excessive amount of PM accumulates
inside.NOTE●To minimize the likelihood of excessive accumulation of
PM, try to avoid driving for long periods at low speeds
and repeatedly driving short distances.
WARNING
!●The DPF reaches very high temperatures. Do not
park your vehicle in areas where combustible mate-
rials such as dry grass or leaves can come in contact
with the hot exhaust system since fire could occur.
CAUTION
!●Do not use any type of fuel or engine oil that is not
specified for your vehicle. Also, do not use any mois-
ture-removing agent or other fuel additive. Such
substances could have a detrimental effect on the
DPF.
Refer to “Fuel selection” on page 2 and “Engine oil”
on page 8-7.
BK-XP08E1ENUK.en-uk.book Page 21 Monday, August 13, 2007 2:20 PM
Page 194 of 458
4-22 Starting and driving
4
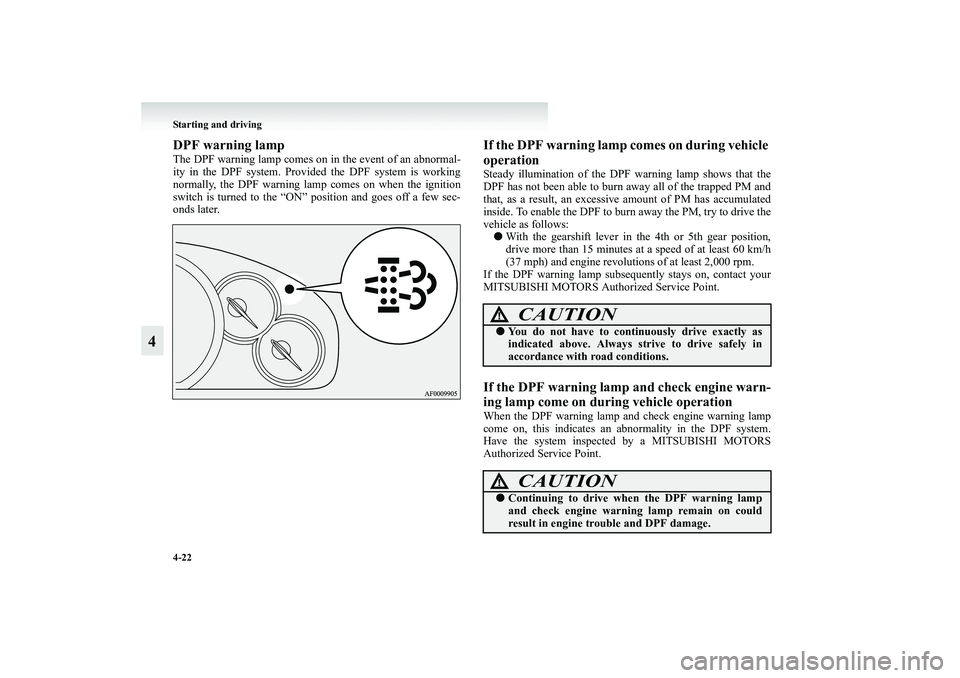
DPF warning lampThe DPF warning lamp comes on in the event of an abnormal-
ity in the DPF system. Provided the DPF system is working
normally, the DPF warning lamp comes on when the ignition
switch is turned to the “ON” position and goes off a few sec-
onds later.
If the DPF warning lamp comes on during vehicle
operationSteady illumination of the DPF warning lamp shows that the
DPF has not been able to burn away all of the trapped PM and
that, as a result, an excessive amount of PM has accumulated
inside. To enable the DPF to burn away the PM, try to drive the
vehicle as follows:
●With the gearshift lever in the 4th or 5th gear position,
drive more than 15 minutes at a speed of at least 60 km/h
(37 mph) and engine revolutions of at least 2,000 rpm.
If the DPF warning lamp subsequently stays on, contact your
MITSUBISHI MOTORS Authorized Service Point.If the DPF warning lamp and check engine warn-
ing lamp come on during vehicle operationWhen the DPF warning lamp and check engine warning lamp
come on, this indicates an abnormality in the DPF system.
Have the system inspected by a MITSUBISHI MOTORS
Authorized Service Point.
CAUTION
!●You do not have to continuously drive exactly as
indicated above. Always strive to drive safely in
accordance with road conditions.
CAUTION
!●Continuing to drive when the DPF warning lamp
and check engine warning lamp remain on could
result in engine trouble and DPF damage.
BK-XP08E1ENUK.en-uk.book Page 22 Monday, August 13, 2007 2:20 PM
Page 195 of 458
Starting and driving
4-23
4 Manual transmission
E00602000173
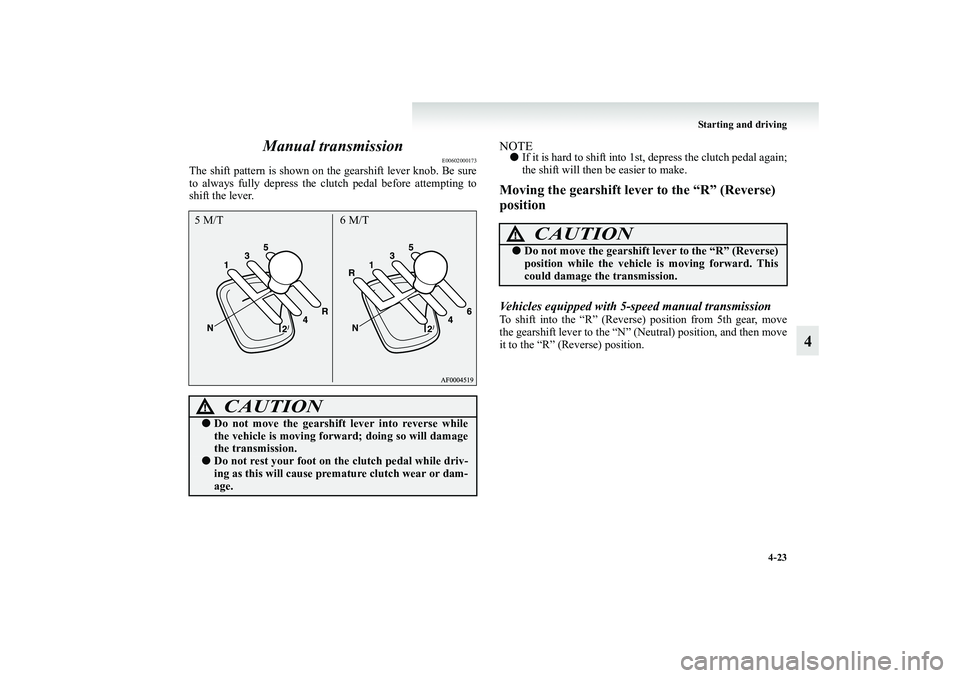
The shift pattern is shown on the gearshift lever knob. Be sure
to always fully depress the clutch pedal before attempting to
shift the lever.
NOTE●If it is hard to shift into 1st, depress the clutch pedal again;
the shift will then be easier to make.Moving the gearshift lever to the “R” (Reverse)
positionVehicles equipped with 5-speed manual transmissionTo shift into the “R” (Reverse) position from 5th gear, move
the gearshift lever to the “N” (Neutral) position, and then move
it to the “R” (Reverse) position.
CAUTION
!●Do not move the gearshift lever into reverse while
the vehicle is moving forward; doing so will damage
the transmission.●Do not rest your foot on the clutch pedal while driv-
ing as this will cause premature clutch wear or dam-
age.5 M/T 6 M/T
CAUTION
!●Do not move the gearshift lever to the “R” (Reverse)
position while the vehicle is moving forward. This
could damage the transmission.
BK-XP08E1ENUK.en-uk.book Page 23 Monday, August 13, 2007 2:20 PM
Page 196 of 458
4-24 Starting and driving
4
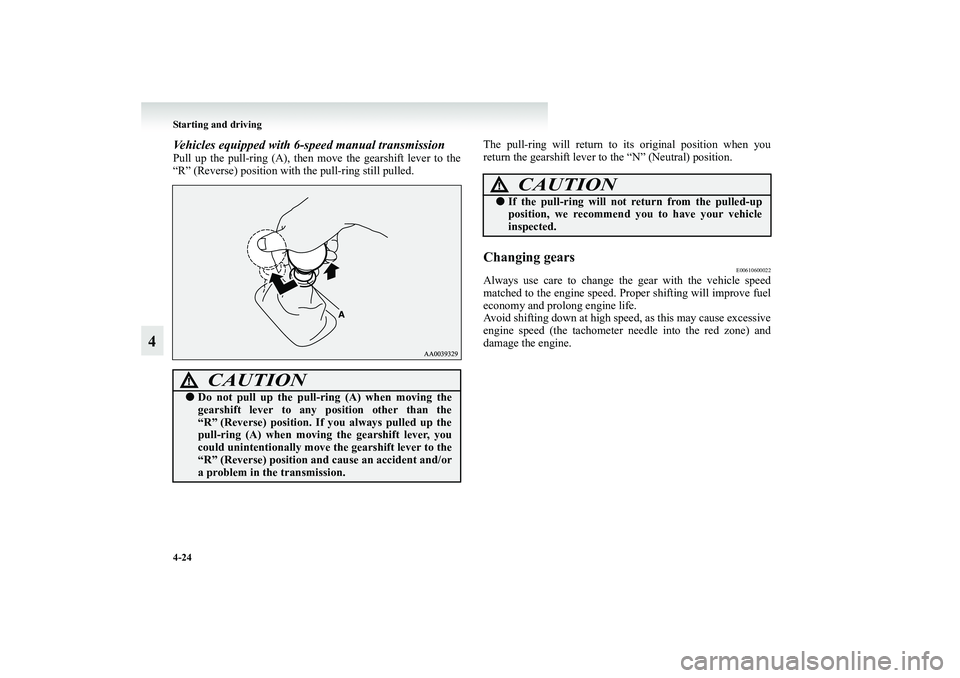
Vehicles equipped with 6-speed manual transmissionPull up the pull-ring (A), then move the gearshift lever to the
“R” (Reverse) position with the pull-ring still pulled.The pull-ring will return to its original position when you
return the gearshift lever to the “N” (Neutral) position.
Changing gears
E00610600022
Always use care to change the gear with the vehicle speed
matched to the engine speed. Proper shifting will improve fuel
economy and prolong engine life.
Avoid shifting down at high speed, as this may cause excessive
engine speed (the tachometer needle into the red zone) and
damage the engine.
CAUTION
!●Do not pull up the pull-ring (A) when moving the
gearshift lever to any position other than the
“R” (Reverse) position. If you always pulled up the
pull-ring (A) when moving the gearshift lever, you
could unintentionally move the gearshift lever to the
“R” (Reverse) position and cause an accident and/or
a problem in the transmission.
CAUTION
!●If the pull-ring will not return from the pulled-up
position, we recommend you to have your vehicle
inspected.
BK-XP08E1ENUK.en-uk.book Page 24 Monday, August 13, 2007 2:20 PM
Page 197 of 458
Starting and driving
4-25
4
Economical driving speed
E00610700443
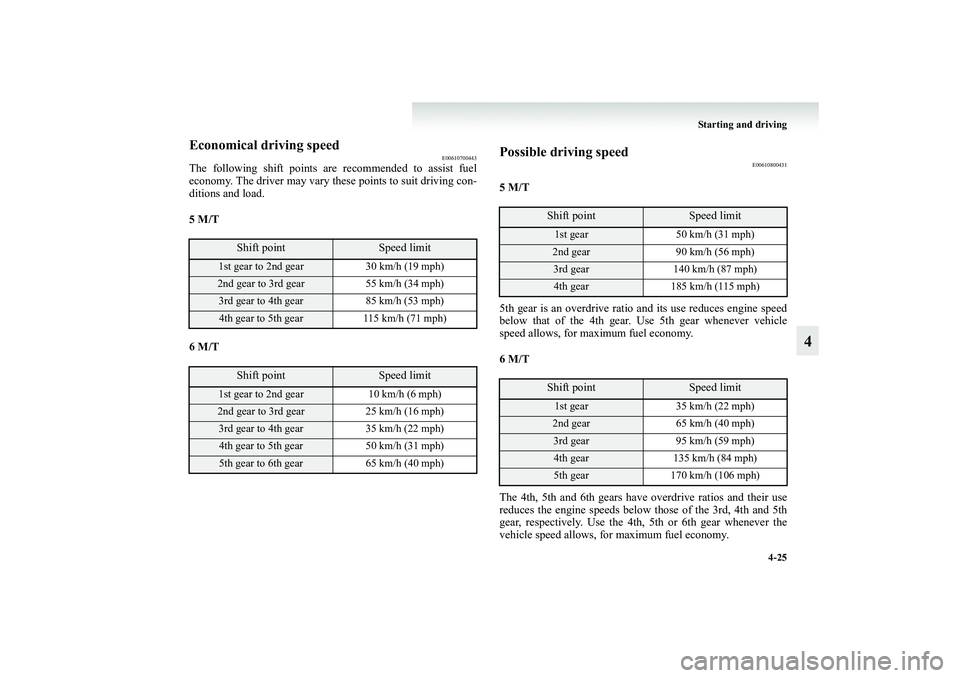
The following shift points are recommended to assist fuel
economy. The driver may vary these points to suit driving con-
ditions and load.
5 M/T
6 M/T
Possible driving speed
E00610800431
5 M/T
5th gear is an overdrive ratio and its use reduces engine speed
below that of the 4th gear. Use 5th gear whenever vehicle
speed allows, for maximum fuel economy.
6 M/T
The 4th, 5th and 6th gears have overdrive ratios and their use
reduces the engine speeds below those of the 3rd, 4th and 5th
gear, respectively. Use the 4th, 5th or 6th gear whenever the
vehicle speed allows, for maximum fuel economy.
Shift point
Speed limit
1st gear to 2nd gear 30 km/h (19 mph)2nd gear to 3rd gear 55 km/h (34 mph)3rd gear to 4th gear 85 km/h (53 mph)4th gear to 5th gear 115 km/h (71 mph)
Shift point
Speed limit
1st gear to 2nd gear 10 km/h (6 mph)2nd gear to 3rd gear 25 km/h (16 mph)3rd gear to 4th gear 35 km/h (22 mph)4th gear to 5th gear 50 km/h (31 mph)5th gear to 6th gear 65 km/h (40 mph)
Shift point
Speed limit
1st gear 50 km/h (31 mph)2nd gear 90 km/h (56 mph)3rd gear 140 km/h (87 mph)4th gear 185 km/h (115 mph)Shift point
Speed limit
1st gear 35 km/h (22 mph)2nd gear 65 km/h (40 mph)3rd gear 95 km/h (59 mph)4th gear 135 km/h (84 mph)5th gear 170 km/h (106 mph)
BK-XP08E1ENUK.en-uk.book Page 25 Monday, August 13, 2007 2:20 PM
Page 198 of 458
4-26 Starting and driving
4Automatic transmission INVECS-II Sports
Mode 4A/T (Intelligent & Innovative
Vehicle Electronic Control System II)
E00603200068
Designed for optimum control and equipped with adaptive con-
trol capabilities, the electronically controlled transmission opti-
mally matches gear shifts to almost all driving and road
conditions.NOTE●During running-in period or immediately after reconnec-
tion of the battery cable, there may be a case where gear
shifts are not made smoothly. This does not indicate a
faulty transmission.
Gear shifts will become smooth after the transmission has
been shifted several times by the electronic control sys-
tem.
Selector lever operation
E00603300131
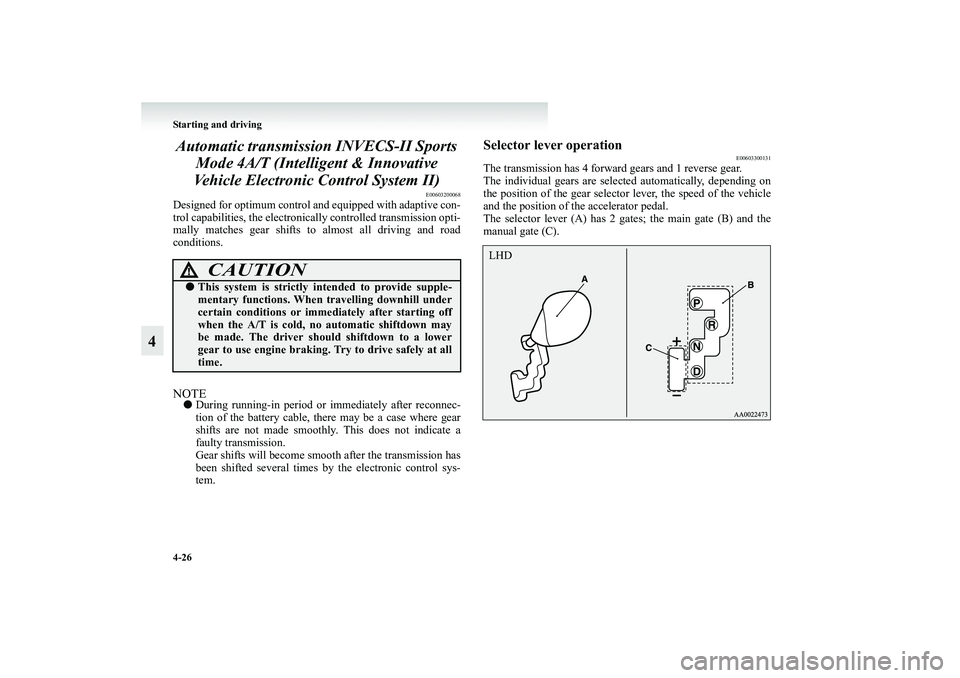
The transmission has 4 forward gears and 1 reverse gear.
The individual gears are selected automatically, depending on
the position of the gear selector lever, the speed of the vehicle
and the position of the accelerator pedal.
The selector lever (A) has 2 gates; the main gate (B) and the
manual gate (C).
CAUTION
!●This system is strictly intended to provide supple-
mentary functions. When travelling downhill under
certain conditions or immediately after starting off
when the A/T is cold, no automatic shiftdown may
be made. The driver should shiftdown to a lower
gear to use engine braking. Try to drive safely at all
time.
LHD
BK-XP08E1ENUK.en-uk.book Page 26 Monday, August 13, 2007 2:20 PM
Page 199 of 458
Starting and driving
4-27
4
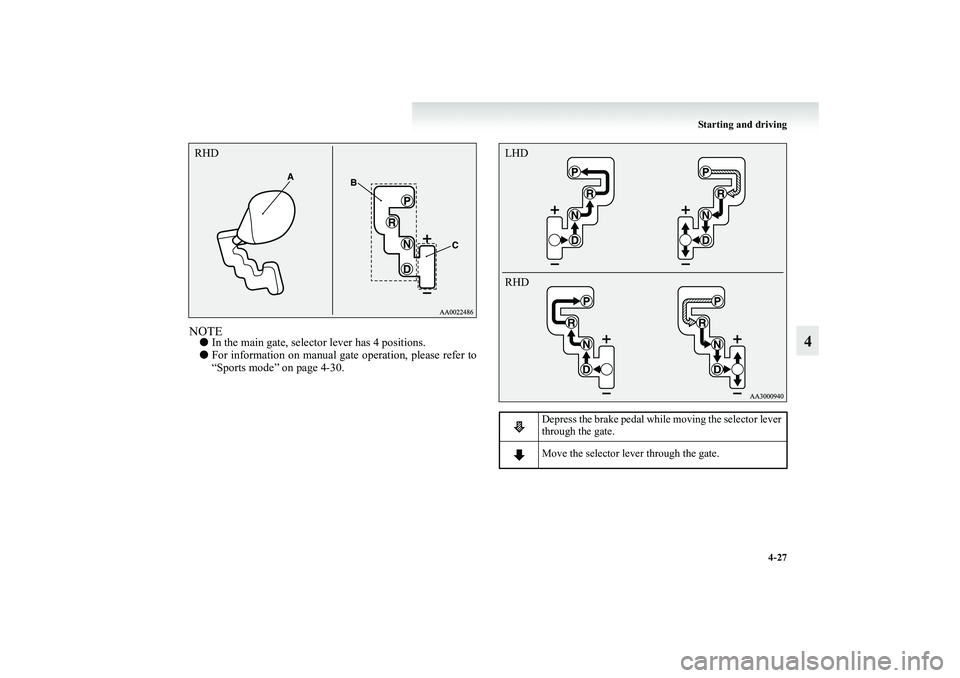
NOTE●In the main gate, selector lever has 4 positions.
●For information on manual gate operation, please refer to
“Sports mode” on page 4-30.RHD
Depress the brake pedal while moving the selector lever
through the gate.
Move the selector lever through the gate.
LHD
RHD
BK-XP08E1ENUK.en-uk.book Page 27 Monday, August 13, 2007 2:20 PM
Page 200 of 458
4-28 Starting and driving
4
NOTE●To avoid erroneous operation, move the selector lever
firmly into each position and briefly hold it there. Always
check the position shown by the selector lever position
indicator lamp after moving the selector lever.
●If the brake pedal is not depressed and held, the shift-lock
device activates to prevent the selector lever from being
moved from the “P” (PARK) position.
●For a shift indicated by in the illustration, depress the
brake pedal before moving the selector lever. If you
attempt to move the selector lever before depressing the
brake pedal, the selector lever may become immovable.
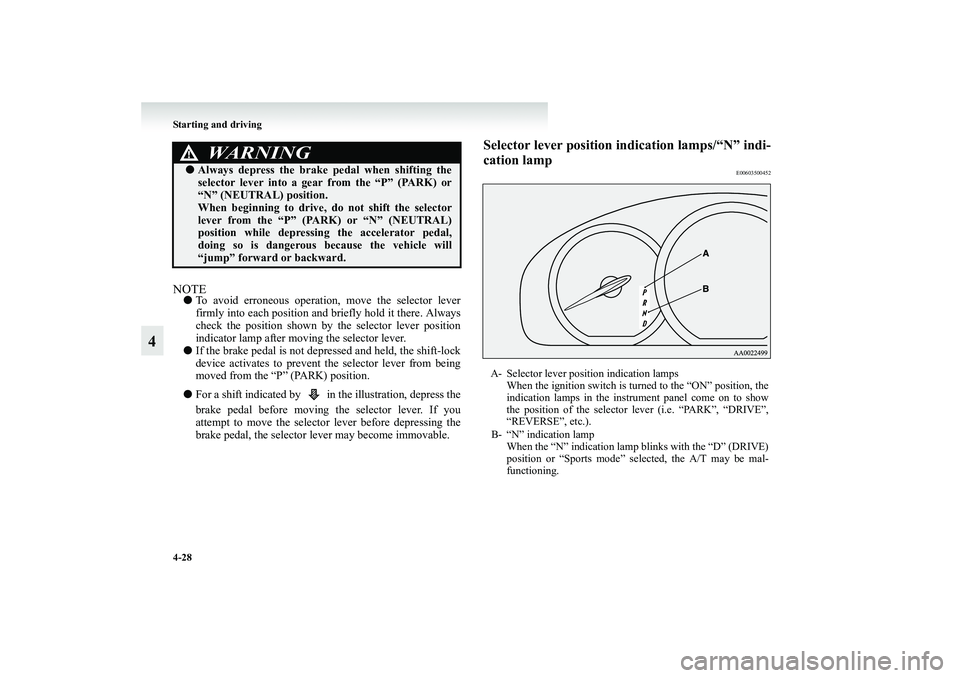
Selector lever position indication lamps/“N” indi-
cation lamp
E00603500452
WARNING
!●Always depress the brake pedal when shifting the
selector lever into a gear from the “P” (PARK) or
“N” (NEUTRAL) position.
When beginning to drive, do not shift the selector
lever from the “P” (PARK) or “N” (NEUTRAL)
position while depressing the accelerator pedal,
doing so is dangerous because the vehicle will
“jump” forward or backward.
A- Selector lever position indication lamps
When the ignition switch is turned to the “ON” position, the
indication lamps in the instrument panel come on to show
the position of the selector lever (i.e. “PARK”, “DRIVE”,
“REVERSE”, etc.).
B- “N” indication lamp
When the “N” indication lamp blinks with the “D” (DRIVE)
position or “Sports mode” selected, the A/T may be mal-
functioning.
BK-XP08E1ENUK.en-uk.book Page 28 Monday, August 13, 2007 2:20 PM