MITSUBISHI GRANDIS 2008 Owner's Manual (in English)
Manufacturer: MITSUBISHI, Model Year: 2008, Model line: GRANDIS, Model: MITSUBISHI GRANDIS 2008Pages: 458, PDF Size: 18.52 MB
Page 231 of 458

Starting and driving
4-59
4
Roof carrier precaution
NOTE●To prevent wind noise or reduction in fuel economy,
remove the roof carrier when not in use.
●Before using an automatic car wash, check with the
attendant to determine if the roof carrier should be
removed.
●Be sure that adequate clearance is maintained for raising
the sunroof (if so equipped) and/or the tailgate when
installing a roof carrier.
CAUTION
!●Make sure that the weight of the luggage does not
exceed the allowable roof load.
If the allowable roof load is exceeded, this may cause
damage to the vehicle.
The roof load is the total allowable load on the roof
(the weight of the roof carrier plus the weight of lug-
gage placed on the roof carrier).
For specific figures, please refer to “Maximum roof
load” on page 9-8.●When luggage is loaded onto the vehicle, please
make sure to drive slowly and avoid excessive
maneuvers such as sudden braking or quick turn-
ing.
In addition, place the luggage on the carrier so that
its weight is distributed evenly with the heaviest
items on the bottom. Do not load items that are
wider than the roof carrier.
The additional weight on the roof could raise the
vehicle’s centre of gravity and affect vehicle han-
dling characteristics.
As a result, driving errors or emergency maneuvers
could lead to a loss of control and result in an acci-
dent.
●Before driving and after travelling a short distance,
always check the load to make sure it is securely fas-
tened to the roof carrier.
Check periodically during your travel that the load
remains secure. If the load is not secure, it could fall
from the vehicle and damage your vehicle, another
vehicle or create road hazard.
CAUTION
!
BK-XP08E1ENUK.en-uk.book Page 59 Monday, August 13, 2007 2:20 PM
Page 232 of 458
4-60 Starting and driving
4Trailer towing
E00610000172
In order to tow a trailer with your vehicle, have a trailer towing
device mounted that meets all relevant regulations in your area.
Consult a MITSUBISHI MOTORS Authorized Service Point.
The regulations concerning the towing of a trailer may differ
from country to country. You are advised to obey the regula-
tions in each area.NOTE●If you are going to tow a trailer, pay careful attention to
the following points.Maximum towable weight with brake and maxi-
mum trailer-nose weightNever exceed the maximum towable weight with brake and the
maximum trailer-nose weight as listed in the specifications.
(Refer to page 9-8)
If you tow a trailer at an altitude of more than 1,000 m above
sea-level, reduce your weight by 10 % of the gross combina-
tion weight for every increase of 1,000 m above sea-level, as
the engine output is lowered owing to decrease in atmospheric
pressure.
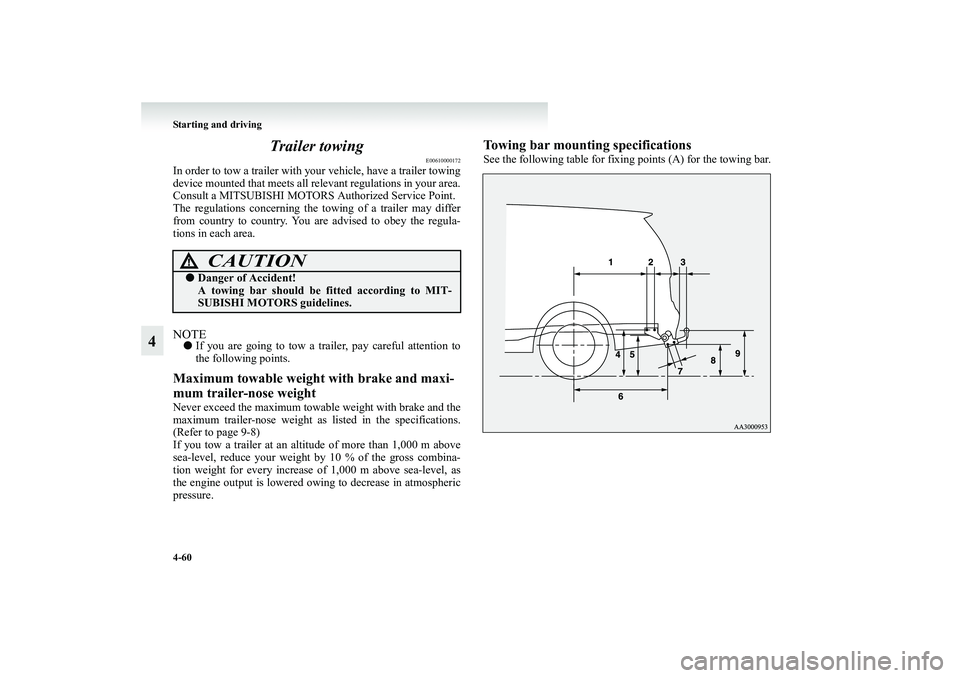
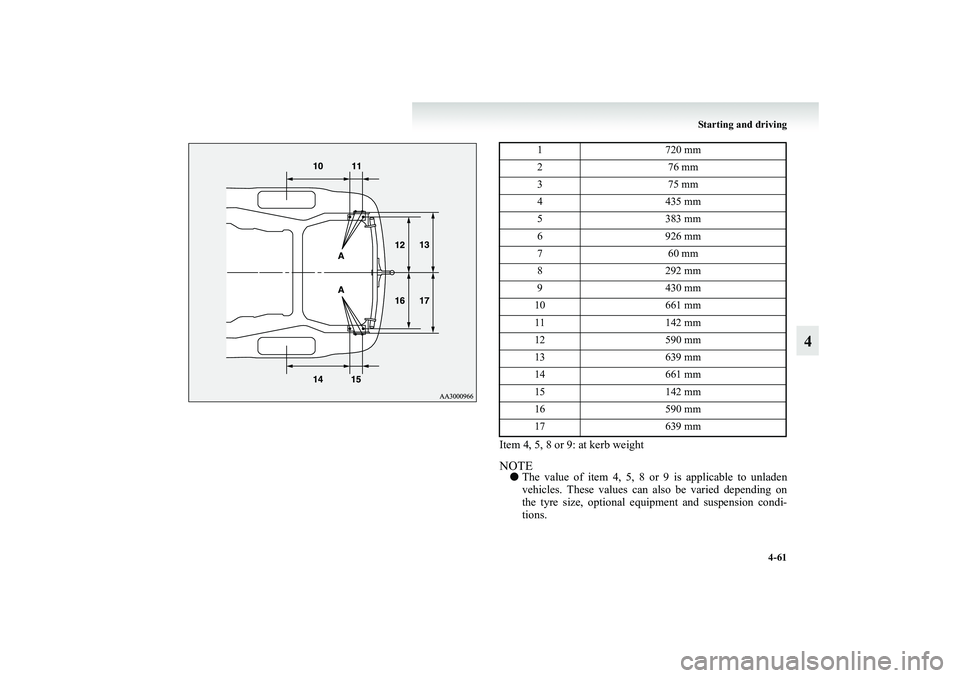
Towing bar mounting specificationsSee the following table for fixing points (A) for the towing bar.
CAUTION
!●Danger of Accident!
A towing bar should be fitted according to MIT-
SUBISHI MOTORS guidelines.
BK-XP08E1ENUK.en-uk.book Page 60 Monday, August 13, 2007 2:20 PM
Page 233 of 458
Starting and driving
4-61
4
Item 4, 5, 8 or 9: at kerb weightNOTE●The value of item 4, 5, 8 or 9 is applicable to unladen
vehicles. These values can also be varied depending on
the tyre size, optional equipment and suspension condi-
tions.
1 720 mm
2 76 mm
3 75 mm
4 435 mm
5 383 mm
6 926 mm
7 60 mm
8 292 mm
9 430 mm
10 661 mm
11 142 mm
12 590 mm
13 639 mm
14 661 mm
15 142 mm
16 590 mm
17 639 mm
BK-XP08E1ENUK.en-uk.book Page 61 Monday, August 13, 2007 2:20 PM
Page 234 of 458
4-62 Starting and driving
4
Operating hints●Do not let the clutch slip (vehicles with M/T only) and do
not increase the engine speed more than necessary when
starting.
●Be sure that the driving speed does not exceed the
100 km/h (62 mph) for trailer operation.
It is also recommended that you obey the local regulations
in case driving speed with a trailer is limited to less than
100 km/h (62 mph).
●To prevent shocks from the overrun brake, depress the
brake pedal lightly at first and then more strongly.
●To make full use of engine braking, change to a lower
gear before descending a slope.
●The body, brakes, clutch, and chassis will be under addi-
tional strain when towing a trailer.
●The heavier weight and higher rolling and air resistance
will increase fuel consumption.Additional precautions for vehicles equipped with A/TThe 2nd gear (in sports mode) is recommended on slopes or at
low speed. Use the 1st gear (in sports mode) in mountainous
areas in order to make better use of engine braking and to assist
the brake system. However, be sure that the speed does not
exceed the maximum speed limit for the selected gear.BK-XP08E1ENUK.en-uk.book Page 62 Monday, August 13, 2007 2:20 PM
Page 235 of 458
5
For pleasant driving
Ventilators . . . . . . . . . . . . . . . . . . . . . . . . . . . . . . .5- 2
Front automatic air conditioning . . . . . . . . . . . . . .5- 7
Rear heater*/Rear cooler* . . . . . . . . . . . . . . . . . . .5- 15
Rear automatic air conditioning* . . . . . . . . . . . . . .5- 16
Important operation tips for the air conditioning . .5- 19
Air purifier (with deodorizing function) . . . . . . . .5- 20
LW/MW/FM electronic tuning radio with
CD player . . . . . . . . . . . . . . . . . . . . . . . . . . . . . .5- 21
Error codes . . . . . . . . . . . . . . . . . . . . . . . . . . . . . . .5- 47
Handling of compact discs . . . . . . . . . . . . . . . . . . .5- 49
Antenna . . . . . . . . . . . . . . . . . . . . . . . . . . . . . . . . .5- 52
Sun visors . . . . . . . . . . . . . . . . . . . . . . . . . . . . . . . .5- 52
Vanity mirror . . . . . . . . . . . . . . . . . . . . . . . . . . . . .5- 53
Ashtray . . . . . . . . . . . . . . . . . . . . . . . . . . . . . . . . . .5- 54
Cigarette lighter* . . . . . . . . . . . . . . . . . . . . . . . . . .5- 55
Accessory socket* . . . . . . . . . . . . . . . . . . . . . . . . .5- 57
Interior lamps . . . . . . . . . . . . . . . . . . . . . . . . . . . . .5- 58
Storage spaces . . . . . . . . . . . . . . . . . . . . . . . . . . . .5- 63
Cup holder . . . . . . . . . . . . . . . . . . . . . . . . . . . . . . .5- 68
Bottle holder. . . . . . . . . . . . . . . . . . . . . . . . . . . . . .5- 69
Card holder*. . . . . . . . . . . . . . . . . . . . . . . . . . . . . .5- 72
Personal table . . . . . . . . . . . . . . . . . . . . . . . . . . . . .5- 72
Tonneau cover* . . . . . . . . . . . . . . . . . . . . . . . . . . .5- 73Coat hooks . . . . . . . . . . . . . . . . . . . . . . . . . . . . . . . 5- 77
Luggage hooks . . . . . . . . . . . . . . . . . . . . . . . . . . . 5- 77
Cargo net . . . . . . . . . . . . . . . . . . . . . . . . . . . . . . . . 5- 78
Warning triangle retaining bands . . . . . . . . . . . . . 5- 78
● For details on a vehicle equiped with a Multi Display
Station (MDS), refer to a separate operation manual.
BK-XP08E1ENUK.en-uk.book Page 1 Monday, August 13, 2007 2:20 PM
Page 236 of 458
5-2 For pleasant driving
5Ventilators
E00700100461
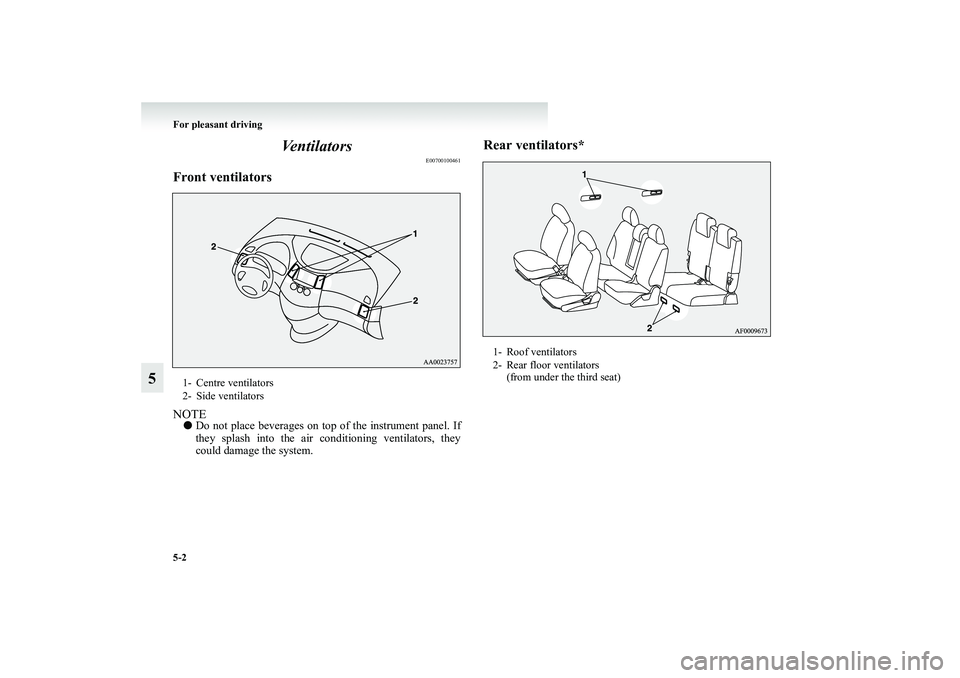
Front ventilatorsNOTE●Do not place beverages on top of the instrument panel. If
they splash into the air conditioning ventilators, they
could damage the system.
Rear ventilators*
1- Centre ventilators
2- Side ventilators
1- Roof ventilators
2- Rear floor ventilators
(from under the third seat)
BK-XP08E1ENUK.en-uk.book Page 2 Monday, August 13, 2007 2:20 PM
Page 237 of 458

For pleasant driving
5-3
5
Air flow and direction adjustments
E00700200101
Front ventilatorsThe ventilator can be opened and closed with the dial (A).
() - Open
( ) - Close
Adjust the direction of the air flow by moving the knob (B).
Rear ventilators (roof ventilators only)Adjust the direction of the air flow by moving the knob (A).NOTE●The cool air from the ventilators may appear as a mist.
This is due to moist air being suddenly cooled by the air
conditioning. This will clear after a few moments.
BK-XP08E1ENUK.en-uk.book Page 3 Monday, August 13, 2007 2:20 PM
Page 238 of 458
5-4 For pleasant driving
5
Changing the front mode selection
E00700300522
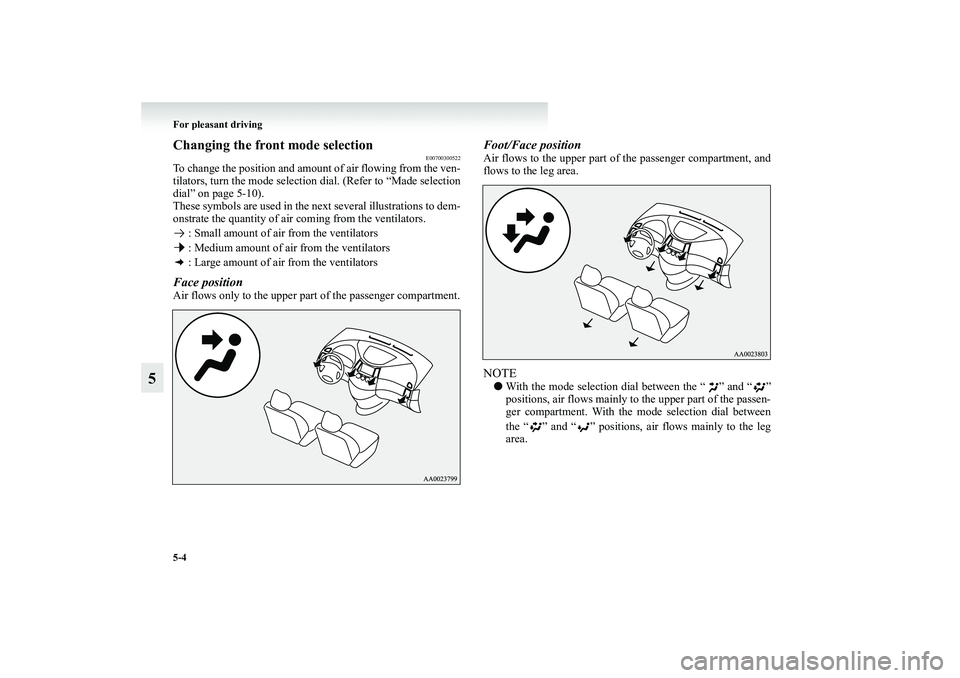
To change the position and amount of air flowing from the ven-
tilators, turn the mode selection dial. (Refer to “Made selection
dial” on page 5-10).
These symbols are used in the next several illustrations to dem-
onstrate the quantity of air coming from the ventilators.
: Small amount of air from the ventilators
: Medium amount of air from the ventilators
: Large amount of air from the ventilatorsFace positionAir flows only to the upper part of the passenger compartment.
Foot/Face positionAir flows to the upper part of the passenger compartment, and
flows to the leg area.NOTE●With the mode selection dial between the “ ” and “ ”
positions, air flows mainly to the upper part of the passen-
ger compartment. With the mode selection dial between
the “ ” and “ ” positions, air flows mainly to the leg
area.
BK-XP08E1ENUK.en-uk.book Page 4 Monday, August 13, 2007 2:20 PM
Page 239 of 458
For pleasant driving
5-5
5
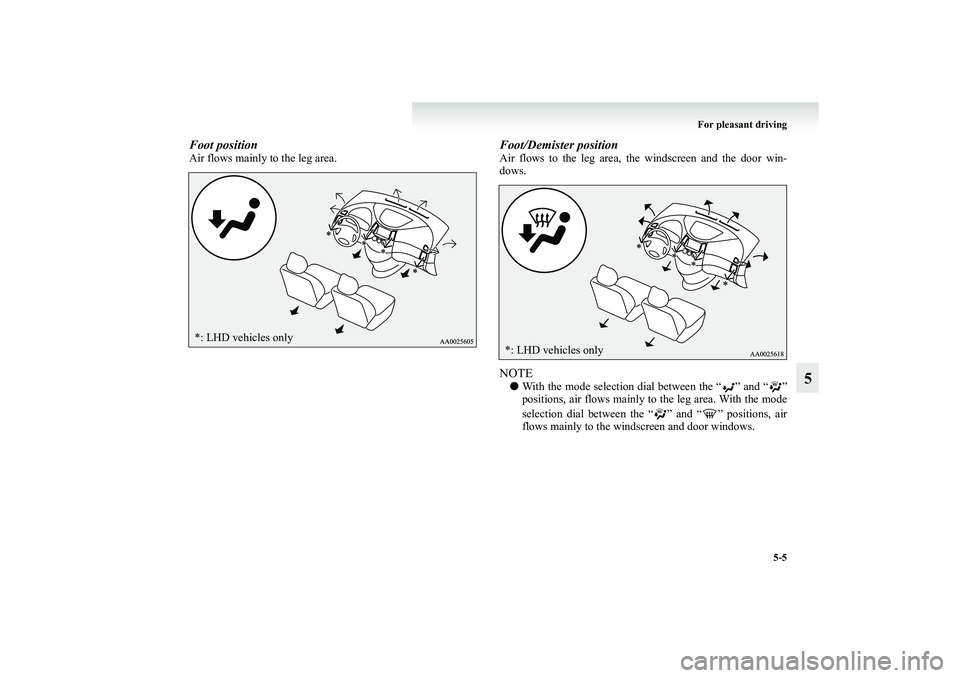
Foot positionAir flows mainly to the leg area.
Foot/Demister positionAir flows to the leg area, the windscreen and the door win-
dows.NOTE●With the mode selection dial between the “ ” and “ ”
positions, air flows mainly to the leg area. With the mode
selection dial between the “ ” and “ ” positions, air
flows mainly to the windscreen and door windows.
*: LHD vehicles only
*: LHD vehicles only
BK-XP08E1ENUK.en-uk.book Page 5 Monday, August 13, 2007 2:20 PM
Page 240 of 458
5-6 For pleasant driving
5
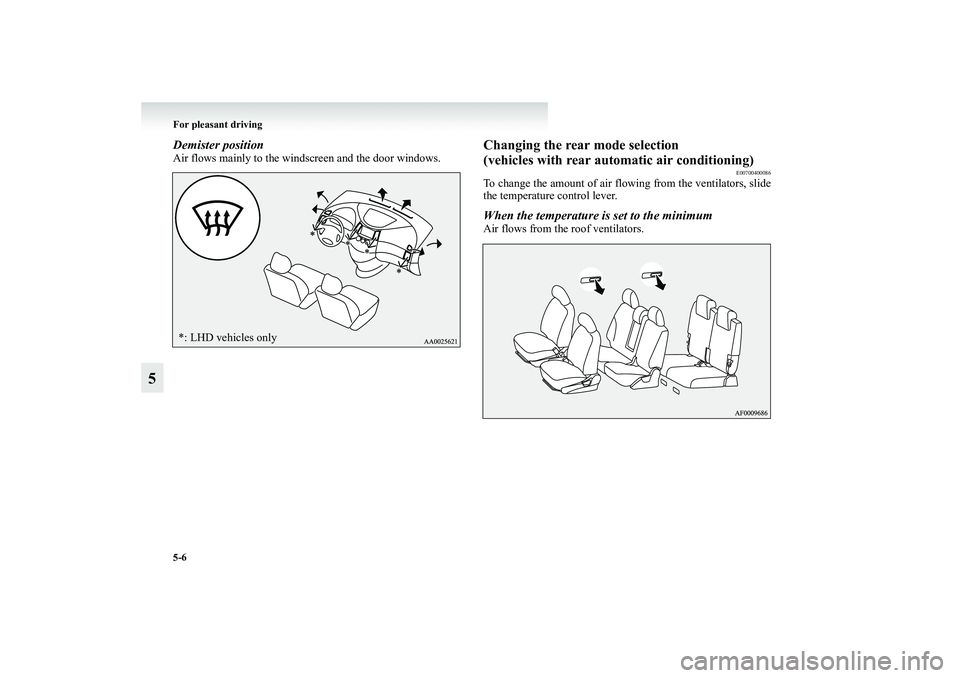
Demister positionAir flows mainly to the windscreen and the door windows.
Changing the rear mode selection
(vehicles with rear automatic air conditioning)
E00700400086
To change the amount of air flowing from the ventilators, slide
the temperature control lever.When the temperature is set to the minimumAir flows from the roof ventilators.
*: LHD vehicles onlyBK-XP08E1ENUK.en-uk.book Page 6 Monday, August 13, 2007 2:20 PM