MITSUBISHI iMiEV 2016 1.G Owners Manual
Manufacturer: MITSUBISHI, Model Year: 2016, Model line: iMiEV, Model: MITSUBISHI iMiEV 2016 1.GPages: 296, PDF Size: 7.79 MB
Page 261 of 296
Tires
Vehicle care and maintenance 9-15
9
N00939700170
The following maintenance steps are recom- mended: Check tire pressures regularly. Have regular maintenance done on the wheel balance and front
and rear suspen-
sion alignment.
N00939800214
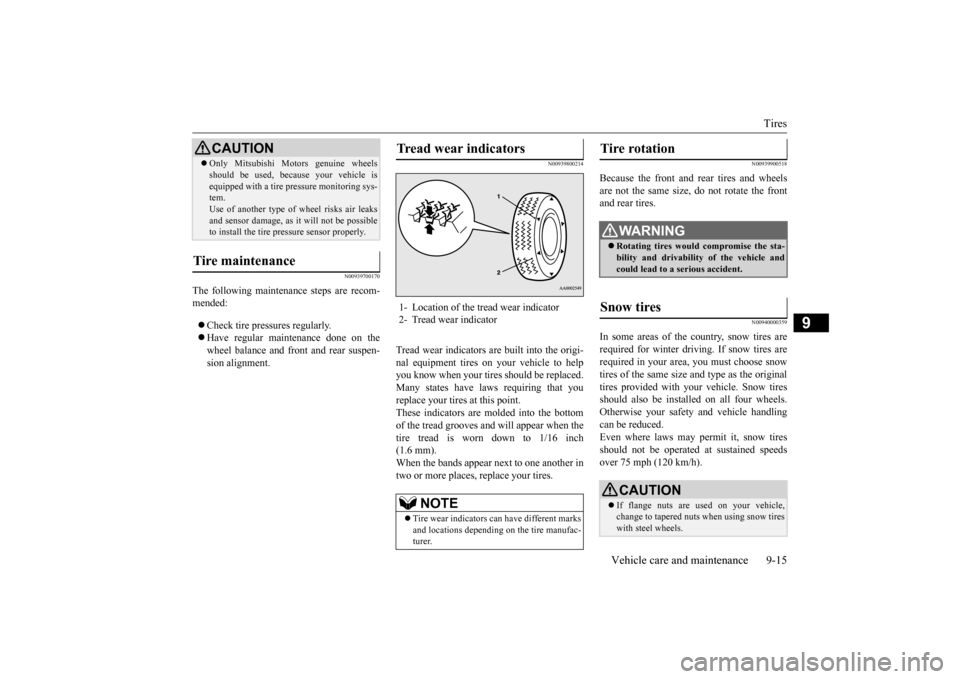
Tread wear indicators are built into the origi-nal equipment tires on your vehicle to helpyou know when your tires should be replaced. Many states have la
ws requiring that you
replace your tires at this point.These indicators are molded into the bottom of the tread grooves and will appear when the tire tread is worn down to 1/16 inch(1.6 mm). When the bands appear next to one another in two or more places,
replace your tires.
N00939900518
Because the front and
rear tires and wheels
are not the same size, do not rotate the front and rear tires.
N00940000359
In some areas of the country, snow tires arerequired for winter driving. If snow tires arerequired in your area, you must choose snow tires of the same size
and type as the original
tires provided with your
vehicle. Snow tires
should also be
installed on all four wheels.
Otherwise your safety
and vehicle handling
can be reduced.Even where laws may permit it, snow tires should not be operated
at sustained speeds
over 75 mph (120 km/h).
Only Mitsubishi Motors genuine wheels should be used, beca
use your vehicle is
equipped with a tire pr
essure monitoring sys-
tem. Use of another type of wheel risks air leaks and sensor damage, as it
will not be possible
to install the tire pressure sensor properly.
Tire maintenance
CAUTION
Tread wear indicators 1- Location of the tread wear indicator 2- Tread wear indicator
NOTE
Tire wear indicators ca
n have different marks
and locations depending on the tire manufac- turer.
Tire rotation
WA R N I N G Rotating tires would compromise the sta- bility and drivabilit
y of the vehicle and
could lead to a
serious accident.
Snow tires
CAUTIONIf flange nuts are used on your vehicle, change to tapered nuts
when using snow tires
with steel wheels.
BK0220401US.book 15 ページ 2015年6月3日 水曜日 午前7時42分
Page 262 of 296
Brake pedal free play 9-16 Vehicle care and maintenance
9
N00940100129 N00940300310
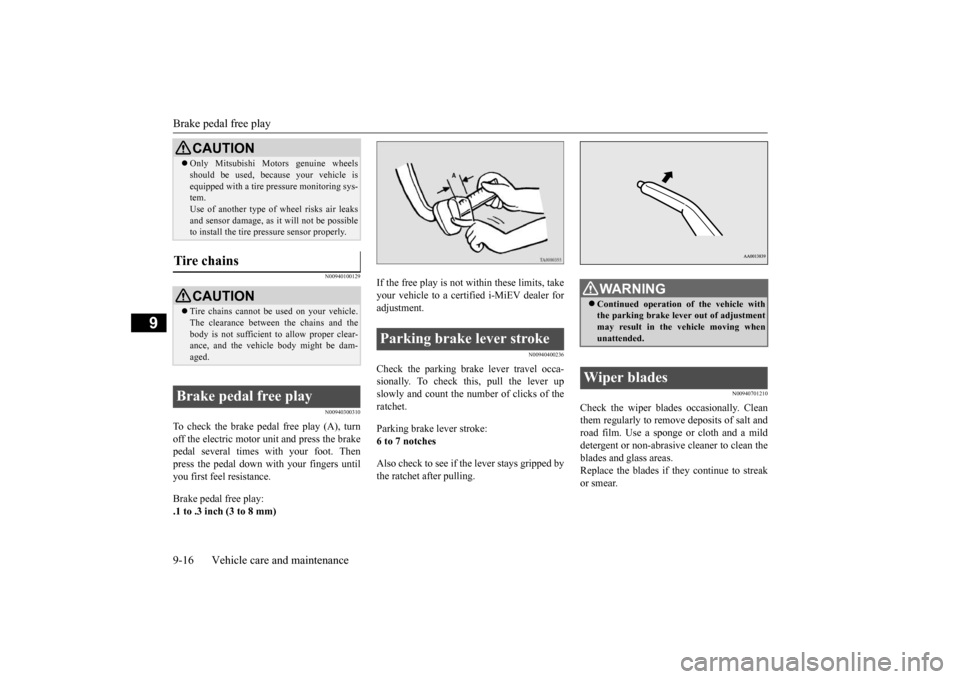
To check the brake pedal free play (A), turn off the electric motor unit and press the brakepedal several times
with your foot. Then
press the pedal down wi
th your fingers until
you first feel resistance. Brake pedal free play: .1 to .3 inch (3 to 8 mm)
If the free play is not within these limits, take your vehicle to a certified i-MiEV dealer for adjustment.
N00940400236
Check the parking brake lever travel occa- sionally. To check this, pull the lever upslowly and count the number of clicks of the ratchet. Parking brake lever stroke: 6 to 7 notches Also check to see if the lever stays gripped by the ratchet after pulling.
N00940701210
Check the wiper blades occasionally. Cleanthem regularly to remove
deposits of salt and
road film. Use a sponge or cloth and a mild detergent or non-abrasive
cleaner to clean the
blades and glass areas. Replace the blades if th
ey continue to streak
or smear.
Only Mitsubishi Motors genuine wheels should be used, beca
use your vehicle is
equipped with a tire pr
essure monitoring sys-
tem. Use of another type of
wheel risks air leaks
and sensor damage, as
it will not be possible
to install the tire pressure sensor properly.
Tire chains
CAUTION Tire chains cannot be used on your vehicle. The clearance between
the chains and the
body is not sufficient to allow proper clear- ance, and the vehicle body might be dam- aged.
Brake pedal free play
CAUTION
Parking brake lever stroke
WA R N I N G Continued operation
of the vehicle with
the parking brake leve
r out of adjustment
may result in the
vehicle moving when
unattended.
Wiper blades
BK0220401US.book 16 ページ 2015年6月3日 水曜日 午前7時42分
Page 263 of 296
General maintenance
Vehicle care and maintenance 9-17
9
If the blades are frozen to the windshield or rear window, do not operate the wipers until the ice has melted and the blades are freed,otherwise the wiper mo
tor may be damaged.
N00941500289
The next pages list th
e maintenance service
recommended by Mitsubishi Motors Corpo- ration. In addition to the general maintenancethat needs to be performed at the times listed, there are other parts which do not usually need regular maintenance.But, if any of these parts stops working prop- erly, your vehicle performance could suffer. Have these items checked if you notice a problem with them. See a certified i-MiEV dealer for assistance, if you have any questions.
N00941600033
Good brakes are essential to safe driving. Check the brake pads and brake linings for wear and check the rear wheel cylinders forleaks. For good braking performance, replace the brake pads with the same type pads as the originals.
N00941700047
Brake hoses and tubing should be checked for: Severe surface cracki
ng, scuffing or worn
spots. If the fabric casing of the hose isshowing through any cracks or worn spots in the rubber hose cover, the hose should be replaced. The brakes can fail if the hose wears through. Improper installation may cause twisting, or wheel, tire or
chassis interference.
N00941800077
Check the following parts for damage and grease leaks: Ball joint boots of the front suspension and steering linkage Bellows on both ends of the drive shaft
N00942500114
The hood lock release mechanism and hood safety catch should be
checked, cleaned, and
oiled when needed for easy movement and to
NOTE
Do not run the wipers on dry glass for a long time. This wears out the rubber and canscratch the glass.
During cold weather
NOTE
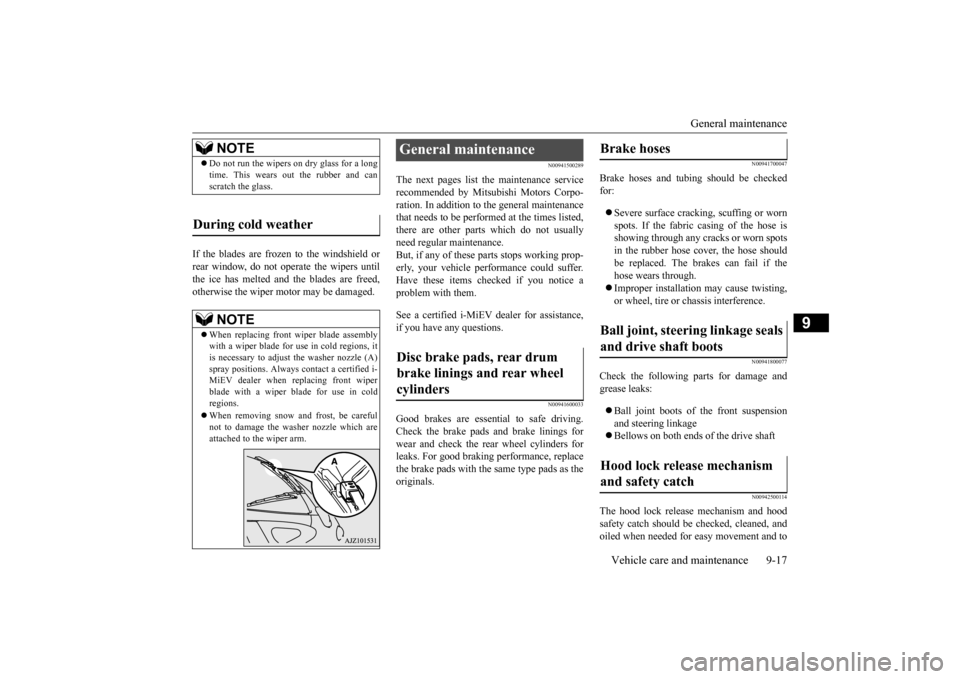
When replacing front wiper blade assembly with a wiper blade for use in cold regions, it is necessary to adjust the washer nozzle (A)
contact a certified i-
MiEV dealer when re
placing front wiper
blade with a wiper blade for use in cold regions. When removing snow and frost, be careful not to damage the wash
er nozzle which are
attached to the wiper arm.
General maintenance Disc brake pads, rear drum brake linings and rear wheel cylinders
Brake hoses Ball joint, steering linkage seals and drive shaft boots Hood lock release mechanism and safety catch
BK0220401US.book 17 ページ 2015年6月3日 水曜日 午前7時42分
Page 264 of 296
For cold and snowy weather 9-18 Vehicle care and maintenance
9
stop rust and wear. Us
e Multipurpose Grease
NLGI Grade 2 sparingly for all sliding partsof the hood latch and release lever. Work the grease into the hood lock mechanism until all the movable surfaces are covered.Also, put a light coat
of the same grease on
the safety catch wherever moving parts touch.
N00942600131
The ventilation slots in
front of the wind-
shield should be brushed clear after a heavysnowfall so that the operation of the heating and ventilation
systems will not be impaired.
To prevent freezing of the weatherstripping on the doors, hood, etc., they should be treated with silicone grease.
It is a good idea to carry a shovel or a short- handled spade in the vehicle during the win- ter so that you can clear away snow if you get stranded. A small hand-brush for sweepingsnow off the vehicle a
nd a plastic scraper for
the windshield, side a
nd rear window are also
useful.
N00942700321
The fusible links will melt to prevent a fire ifa large current attempts to flow through cer- tain electrical systems. In case of a melted fusi
ble link, see a certified
i-MiEV dealer for in
spection and replace-
ment. For the fusible links, please refer to “Fuseload capacities” on page 9-19.
N00942800885 N00901000107
To prevent damage to the electrical system from short-circuiting
or overloading, each
individual circui
t is equipped with a fuse.
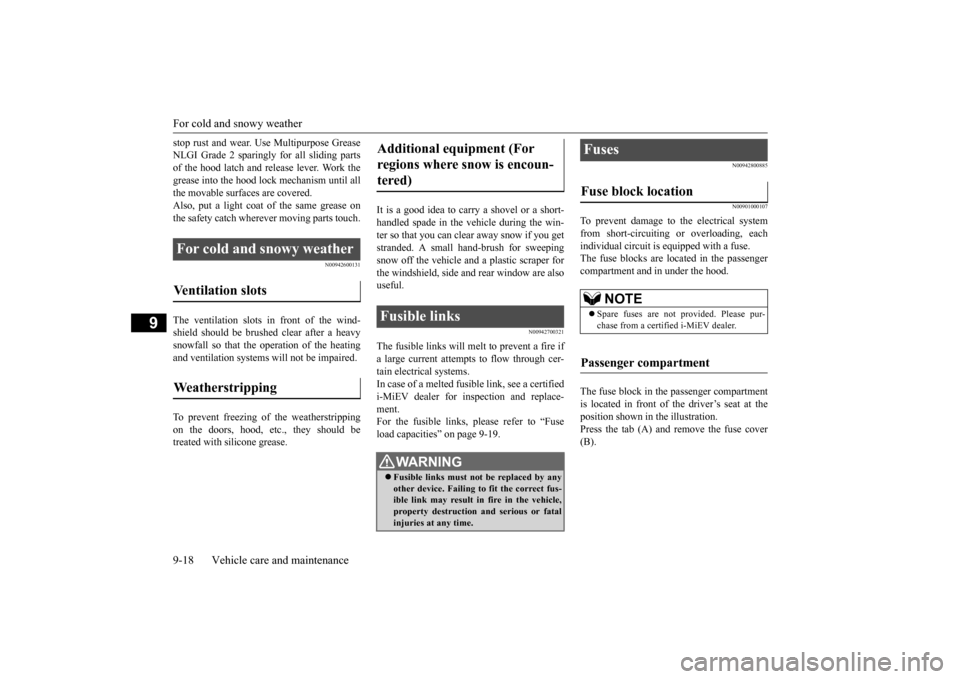
The fuse blocks are lo
cated in the passenger
compartment and in under the hood. The fuse block in the
passenger compartment
is located in front of the driver’s seat at theposition shown in the illustration. Press the tab (A) and remove the fuse cover (B).
For cold and snowy weather Ventilation slots Weatherstripping
Additional equipment (For regions where snow is encoun-tered) Fusible links
WA R N I N G Fusible links must not be replaced by any other device. Failing to fit the correct fus- ible link may result in fire in the vehicle, property destruction and serious or fatalinjuries at any time.
Fuses Fuse block location
NOTE
Spare fuses are not provided. Please pur- chase from a certified i-MiEV dealer.
Passenger compartment
BK0220401US.book 18 ページ 2015年6月3日 水曜日 午前7時42分
Page 265 of 296
Fuses
Vehicle care and maintenance 9-19
9
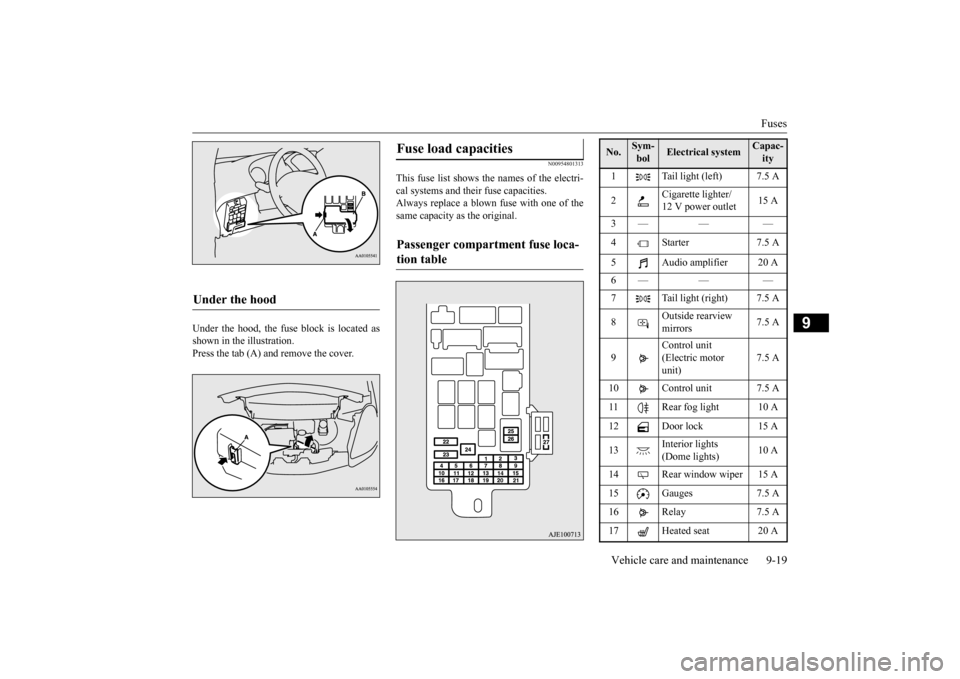
Under the hood, the fuse
block is located as
shown in the illustration. Press the tab (A) and remove the cover.
N00954801313
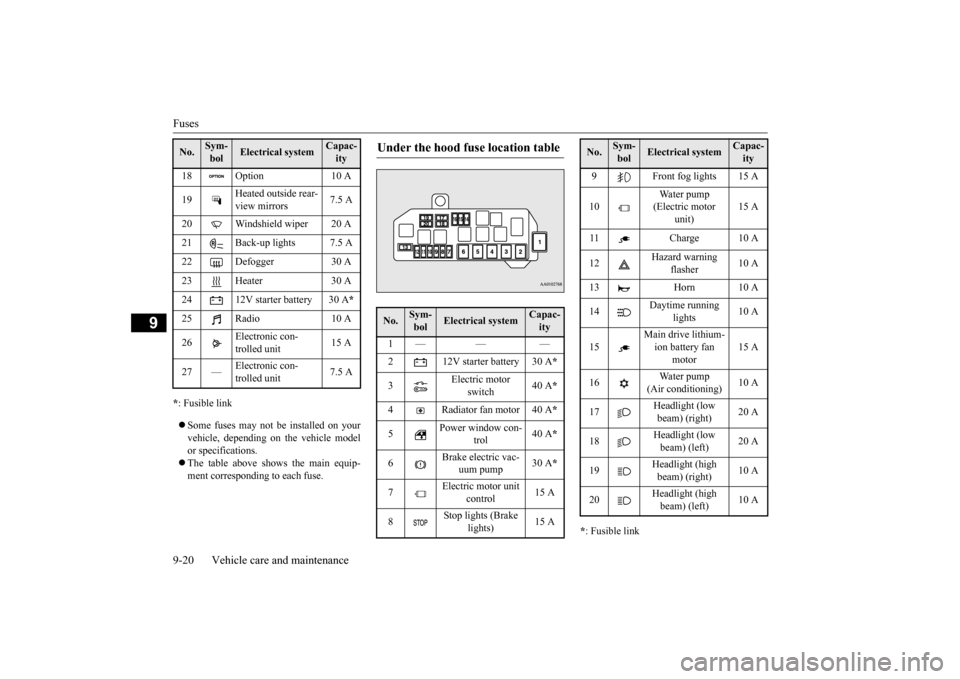
This fuse list shows the names of the electri-cal systems and their fuse capacities. Always replace a blown fuse with one of thesame capacity as the original.
Under the hood
Fuse load capacities Passenger compartment fuse loca- tion table
No.
Sym- bol
Electrical system
Capac-ity
1 Tail light (left) 7.5 A 2
Cigarette lighter/ 12 V power outlet
15 A
3 — — — 4 Starter 7.5 A 5 Audio amplifier 20 A 6— — — 7 Tail light (right) 7.5 A 8
Outside rearview mirrors
7.5 A
9
Control unit (Electric motor unit)
7.5 A
10 Control unit 7.5 A 11 Rear fog light 10 A12 Door lock 15 A 13
Interior lights (Dome lights)
10 A
14 Rear window wiper 15 A 15 Gauges 7.5 A 16 Relay 7.5 A 17 Heated seat 20 A
BK0220401US.book 19 ページ 2015年6月3日 水曜日 午前7時42分
Page 266 of 296
Fuses 9-20 Vehicle care and maintenance
9
* : Fusible link Some fuses may not be installed on your vehicle, depending on the vehicle model or specifications. The table above shows the main equip- ment corresponding to each fuse.
* : Fusible link
18 Option 10 A 19
Heated outside rear- view mirrors
7.5 A
20 Windshield wiper 20 A 21 Back-up lights 7.5 A 22 Defogger 30 A23 Heater 30 A24 12V starter battery 30 A
*
25 Radio 10 A 26
Electronic con- trolled unit
15 A
27 —
trolled unit
7.5 A
No.
Sym- bol
Electrical system
Capac-ity
Under the hood fuse location table No.
Sym- bol
Electrical system
Capac-ity
1— — — 2 12V starter battery 30 A
*
3
Electric motor
switch
40 A
*
4 Radiator fan motor 40 A
*
5
Power window con-
trol
40 A
*
6
Brake electric vac-
uum pump
30 A
*
7
Electric motor unit
control
15 A
8
Stop lights (Brake
lights)
15 A
9 Front fog lights 15 A 10
Water pump (Electric motor
unit)
15 A
11 Charge 10 A 12
Hazard warning
flasher
10 A
13 Horn 10 A 14
Daytime running
lights
10 A
15
Main drive lithium- ion battery fan
motor
15 A
16
Water pump
(Air conditioning)
10 A
17
Headlight (low beam) (right)
20 A
18
Headlight (low beam) (left)
20 A
19
Headlight (high beam) (right)
10 A
20
Headlight (high beam) (left)
10 A
No.
Sym- bol
Electrical system
Capac-ity
BK0220401US.book 20 ページ 2015年6月3日 水曜日 午前7時42分
Page 267 of 296
Replacement of light bulbs
Vehicle care and maintenance 9-21
9
Some fuses may not be installed on your vehicle, depending on
the vehicle model
or specifications. The table above show
s the main equip-
ment corresponding to each fuse.
N00901100078 N00954900115
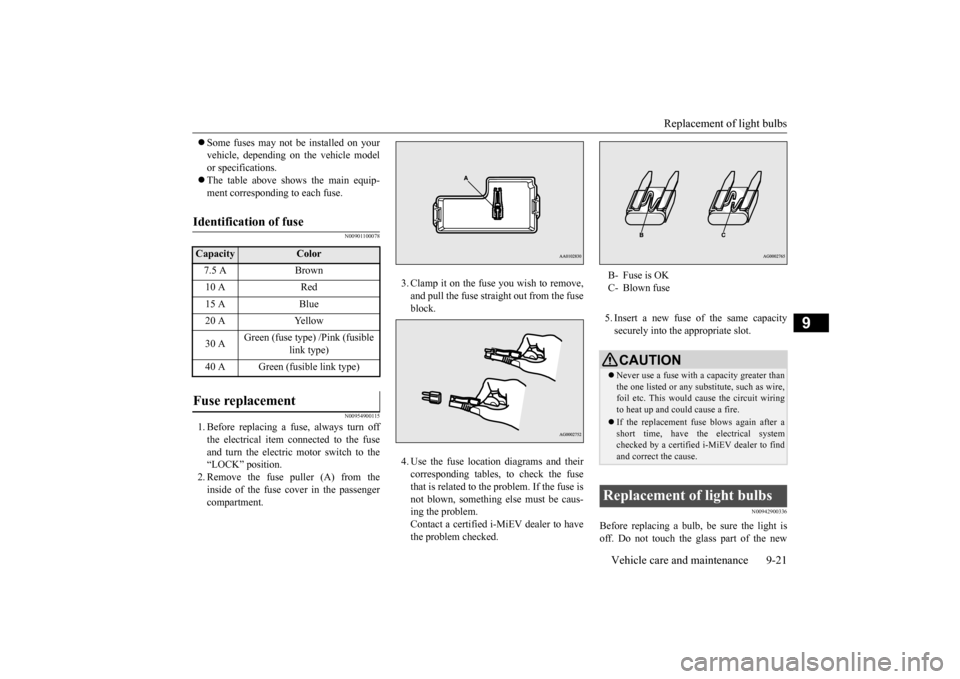
1. Before replacing a fuse, always turn off the electrical item connected to the fuse and turn the electric motor switch to the “LOCK” position.2. Remove the fuse puller (A) from the inside of the fuse cover in the passenger compartment.
3. Clamp it on the fuse you wish to remove, and pull the fuse straight out from the fuseblock. 4. Use the fuse location diagrams and their corresponding tables, to check the fuse that is related to the problem. If the fuse is not blown, something
else must be caus-
ing the problem.Contact a certified i-MiEV dealer to have the problem checked.
5. Insert a new fuse of the same capacity securely into the appropriate slot.
N00942900336
Before replacing a bulb,
be sure the light is
off. Do not touch the glass part of the new
Identification of fuse Capacity
Color
7.5 A Brown 10 A Red 15 A Blue 20 A Yellow 30 A
Green (fuse type) /Pink (fusible
link type)
40 A Green (fusible link type)
Fuse replacement
B- Fuse is OK C- Blown fuseCAUTION Never use a fuse with a capacity greater than the one listed or any substitute, such as wire, foil etc. This would
cause the circuit wiring
to heat up and could cause a fire. If the replacement fuse blows again after a short time, have the electrical systemchecked by a certified i-MiEV dealer to find and correct the cause.
Replacement of light bulbs
BK0220401US.book 21 ページ 2015年6月3日 水曜日 午前7時42分
Page 268 of 296
Replacement of light bulbs 9-22 Vehicle care and maintenance
9
bulb with your bare fingers; the oil from your skin will stay on the glass and dim or destroythe bulb when it gets hot.
N00943000099
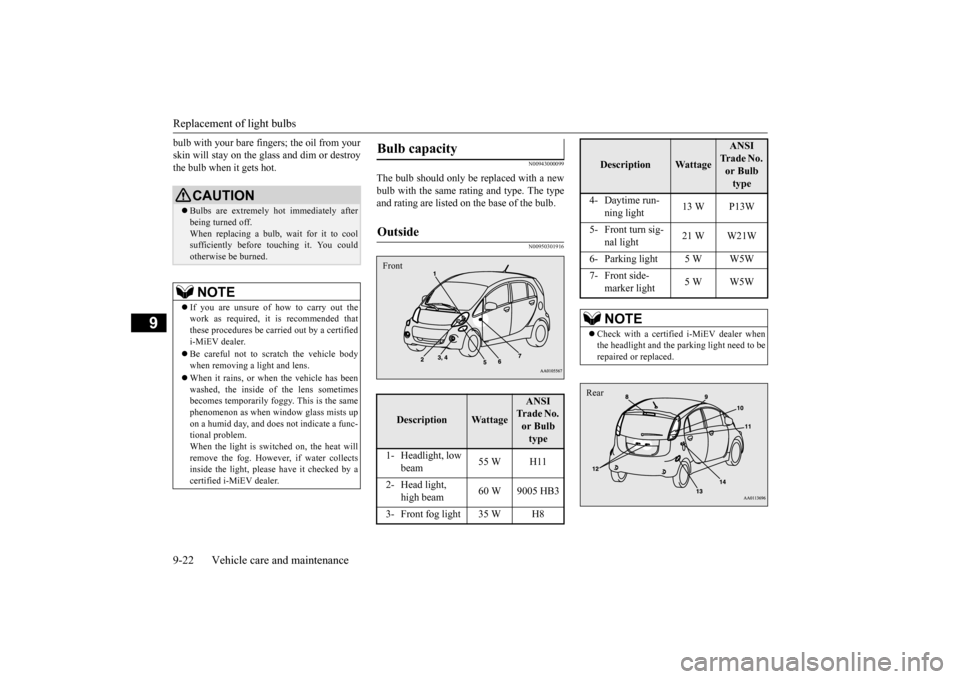
The bulb should only be replaced with a new bulb with the same rating and type. The type and rating are listed on the base of the bulb.
N00950301916
CAUTION Bulbs are extremely hot immediately after being turned off.When replacing a bulb, wait for it to cool sufficiently before t
ouching it. You could
otherwise be burned.NOTE
If you are unsure of how to carry out the work as required, it is recommended that these procedures be ca
rried out by
a certified
i-MiEV dealer. Be careful not to scratch the vehicle body when removing a light and lens. When it rains, or wh
en the vehicle has been
washed, the inside of the lens sometimesbecomes temporarily foggy. This is the same phenomenon as when window glass mists up on a humid day, and does not indicate a func-tional problem. When the light is switched on, the heat will remove the fog. However, if water collectsinside the light, please
have it checked by a
certified i-MiEV dealer.
Bulb capacity Outside
Description
Wattage
ANSI Tr a d e N o . or Bulb type
1- Headlight, low
beam
55 W H11
2- Head light,
high beam
60 W 9005 HB3
3- Front fog light 35 W H8Front
4- Daytime run-
ning light
13 W P13W
5- Front turn sig-
nal light
21 W W21W
6- Parking light 5 W W5W 7- Front side-
marker light
5 W W5W
NOTE
Check with a certified i-MiEV dealer when the headlight and the parking light need to be repaired or replaced.Description
Wattage
ANSI Tr a d e N o . or Bulb type
Rear
BK0220401US.book 22 ページ 2015年6月3日 水曜日 午前7時42分
Page 269 of 296
Replacement of light bulbs
Vehicle care and maintenance 9-23
9
N00950400617 N00943200349
The alignment of th
e headlights should be
checked by a certified i-MiEV dealer.
N00915501184
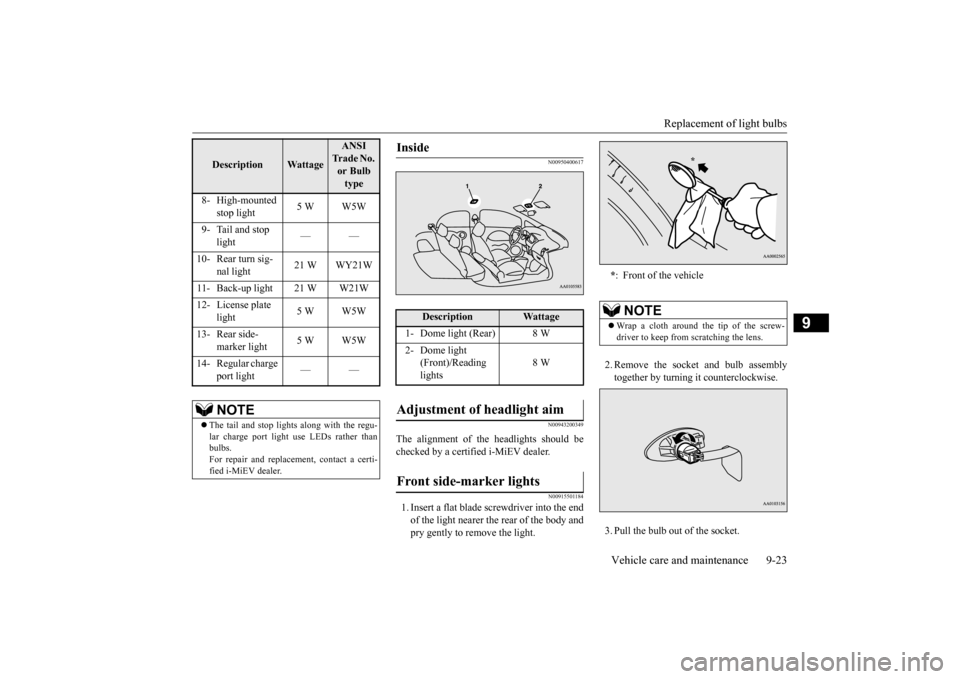
1. Insert a flat blade sc
rewdriver into the end
of the light nearer the rear of the body and pry gently to remove the light.
2. Remove the socket and bulb assembly together by turning it counterclockwise. 3. Pull the bulb out of the socket.
Description
Wattage
ANSI Tr a d e N o . or Bulb type
8- High-mounted
stop light
5 W W5W
9- Tail and stop
light
——
10- Rear turn sig-
nal light
21 W WY21W
11- Back-up light 21 W W21W 12- License plate
light
5 W W5W
13- Rear side-
marker light
5 W W5W
14- Regular charge
port light
——
NOTE
The tail and stop lights along with the regu- lar charge port light use LEDs rather thanbulbs. For repair and replacem
ent, contact a certi-
fied i-MiEV dealer.
Inside
Description
Wattage
1- Dome light (Rear) 8 W 2- Dome light
(Front)/Reading lights
8 W
Adjustment of
headlight aim
Front side-marker lights
* : Front of the vehicleNOTE
Wrap a cloth around the tip of the screw- driver to keep from scratching the lens.
*
BK0220401US.book 23 ページ 2015年6月3日 水曜日 午前7時42分
Page 270 of 296
Replacement of light bulbs 9-24 Vehicle care and maintenance
9
4. To install the bulb, perform the removal steps in reverse.
N00943401407
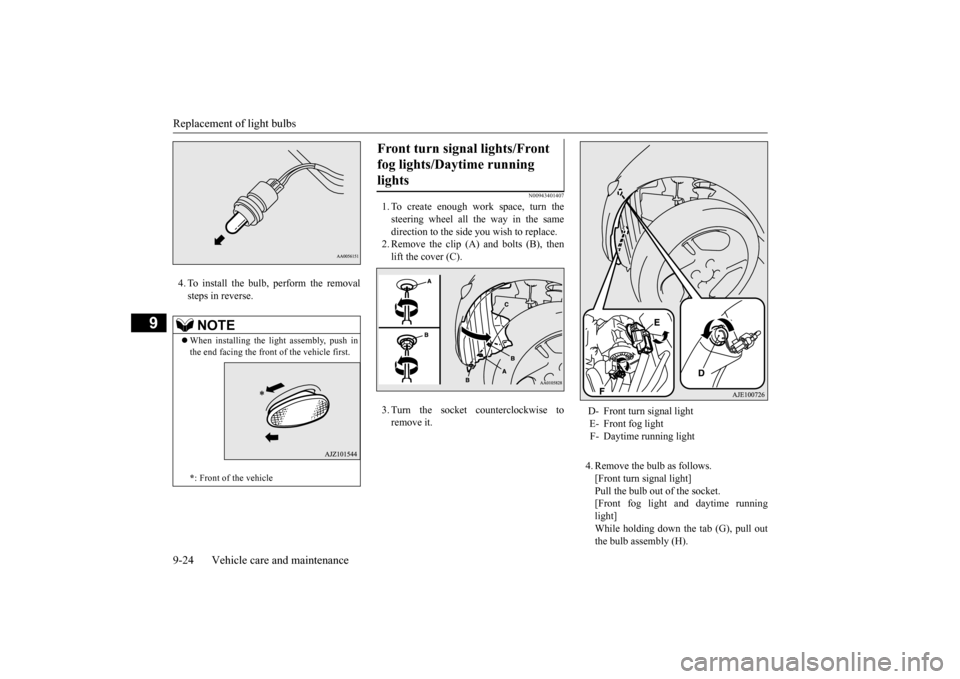
1. To create enough work space, turn thesteering wheel all the way in the same direction to the side
you wish to replace.
2. Remove the clip (A) and bolts (B), thenlift the cover (C). 3. Turn the socket counterclockwise to remove it.
4. Remove the bulb as follows. [Front turn signal light] Pull the bulb out of the socket.[Front fog light
and daytime running
light] While holding down the tab (G), pull outthe bulb assembly (H).
NOTE
When installing the light assembly, push in the end facing the front of the vehicle first. * : Front of the vehicle
Front turn signal lights/Front fog lights/Daytime running lights
D- Front turn signal light E- Front fog light F- Daytime running light
BK0220401US.book 24 ページ 2015年6月3日 水曜日 午前7時42分