MITSUBISHI L200 2004 Owner's Manual (in English)
Manufacturer: MITSUBISHI, Model Year: 2004, Model line: L200, Model: MITSUBISHI L200 2004Pages: 264, PDF Size: 4.14 MB
Page 211 of 264
FOR EMERGENCIES
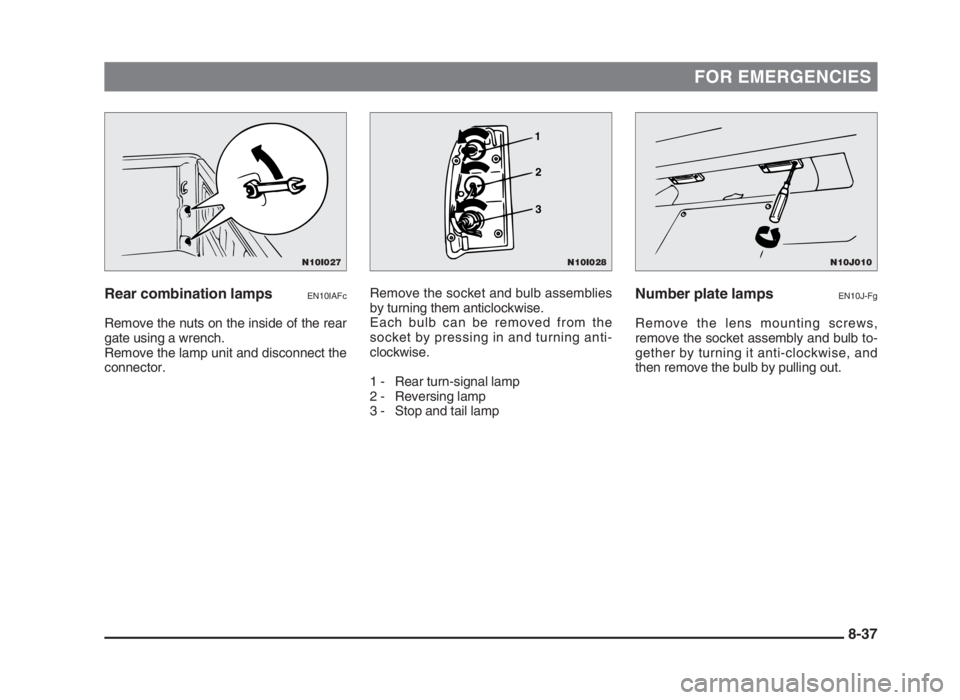
Rear combination lampsEN10IAFc
Remove the nuts on the inside of the rear
gate using a wrench.
Remove the lamp unit and disconnect the
connector.
Number plate lampsEN10J-Fg
Remove the lens mounting screws,
remove the socket assembly and bulb to-
gether by turning it anti-clockwise, and
then remove the bulb by pulling out. Remove the socket and bulb assemblies
by turning them anticlockwise.
Each bulb can be removed from the
socket by pressing in and turning anti-
clockwise.
1 - Rear turn-signal lamp
2 - Reversing lamp
3 - Stop and tail lamp
8-37
N10J010N10I028
1
2
3
N10I027
08engL2_240082_4 22-01-2004 13:11 Page 8-37
Page 212 of 264
FOR EMERGENCIES
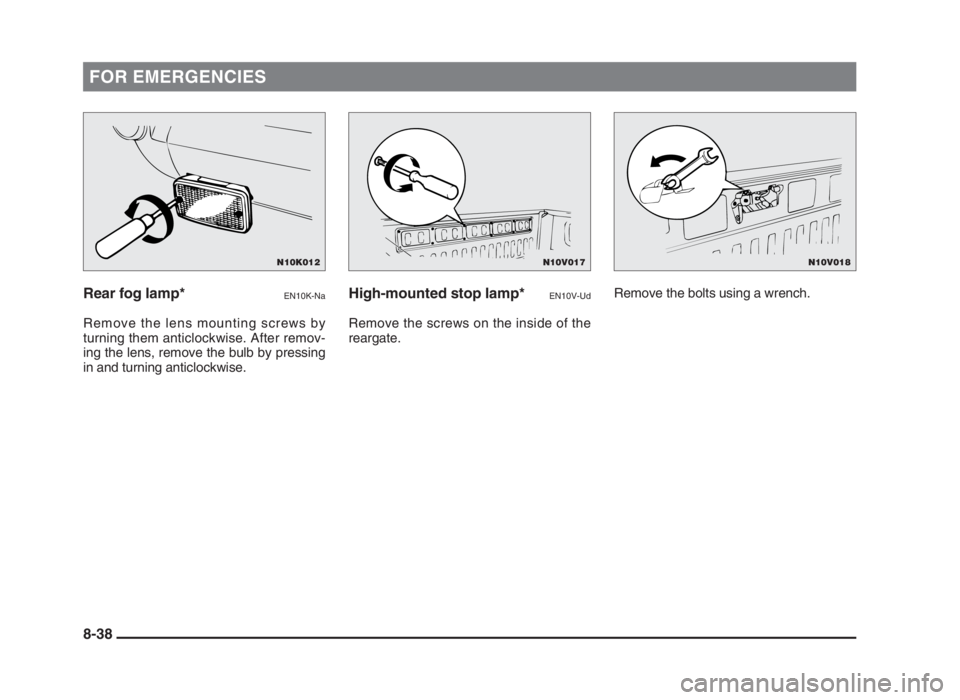
Rear fog lamp*EN10K-Na
Remove the lens mounting screws by
turning them anticlockwise. After remov-
ing the lens, remove the bulb by pressing
in and turning anticlockwise.
High-mounted stop lamp*EN10V-Ud
Remove the screws on the inside of the
reargate.Remove the bolts using a wrench.
8-38
N10V017N10V018N10K012
08engL2_240082_4 22-01-2004 13:11 Page 8-38
Page 213 of 264
FOR EMERGENCIES
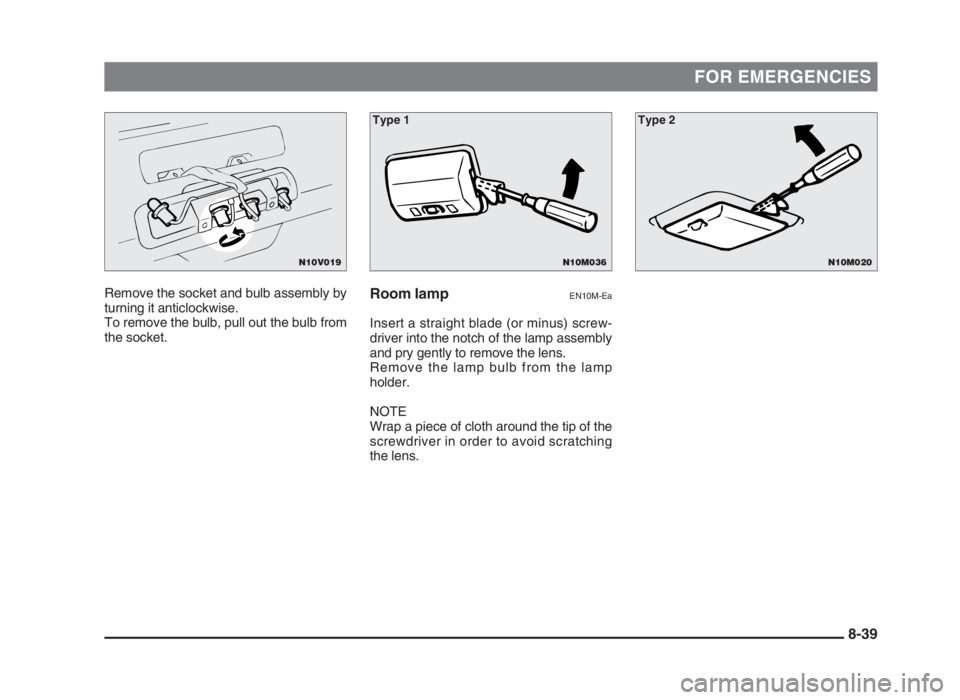
Remove the socket and bulb assembly by
turning it anticlockwise.
To remove the bulb, pull out the bulb from
the socket.Room lampEN10M-Ea
Insert a straight blade (or minus) screw-
driver into the notch of the lamp assembly
and pry gently to remove the lens.
Remove the lamp bulb from the lamp
holder.
NOTE
Wrap a piece of cloth around the tip of the
screwdriver in order to avoid scratching
the lens.
8-39
N10M020
Type 2
N10M036
Type 1
N10V019
08engL2_240082_4 22-01-2004 13:11 Page 8-39
Page 214 of 264
FOR EMERGENCIES
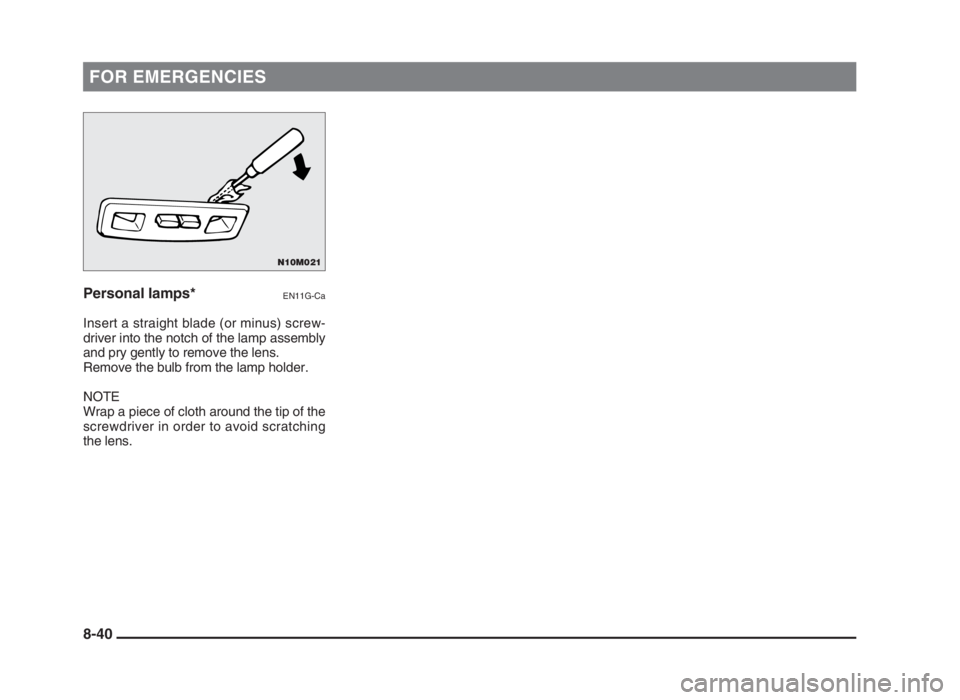
Personal lamps*EN11G-Ca
Insert a straight blade (or minus) screw-
driver into the notch of the lamp assembly
and pry gently to remove the lens.
Remove the bulb from the lamp holder.
NOTE
Wrap a piece of cloth around the tip of the
screwdriver in order to avoid scratching
the lens.
8-40
N10M021
08engL2_240082_4 22-01-2004 13:11 Page 8-40
Page 215 of 264
Engine oil ................................................................ 9-2
Automatic transmission fluid* .............................. 9-4
Engine coolant ....................................................... 9-5
Battery ..................................................................... 9-6
Brake fluid............................................................... 9-8
Power steering fluid* ............................................. 9-9
Clutch fluid* ............................................................ 9-9
Washer fluid............................................................ 9-10
Wheel condition ..................................................... 9-10
Tyre inflation pressure .......................................... 9-11
Tyre rotation ........................................................... 9-11
Snow tyres .............................................................. 9-12
Tyre chains ............................................................. 9-13
Fuel, engine coolant, oil and exhaust gas
leakage ............................................................. 9-14
Exterior and interior lamp operation .................... 9-14
Meter, gauge and indication/warning lamp
operation .......................................................... 9-14
Clutch pedal free play* .......................................... 9-14
Brake pedal free play ............................................. 9-15
Parking brake lever stroke .................................... 9-15
Hinges and latches lubrication ............................. 9-16
Wiper blades ........................................................... 9-16
Ventilation slots ..................................................... 9-17
Weatherstripping.................................................... 9-17
Additional equipment
(For regions where snow is encountered) .... 9-17
Maintenance
9
09engL2_240082_4 22-01-2004 13:12 Page 9-1
Page 216 of 264
MAINTENANCE
EM01A-Hh
Adequate care of your vehicle at regular
intervals serves to preserve the value and
appearance as long as possible.
Some maintenance items can be carried
out by the owner (do it yourself), while
others should be carried out by an author-
ized MITSUBISHI dealer (periodic inspec-
tion and maintenance). This section de-
scribes only those items which can be car-
ried out by the owner. In the event a
malfunction or other problem is disco-
vered, have it corrected by an authorized
MITSUBISHI dealer. This section contains
information on inspection maintenance
procedures that you can do yourself, if you
wish to do so. Follow the instructions and
cautions for each of the various proce-
dures.WARNING(1) When checking or servicing the
inside of the engine compart-
ment, make sure the engine is
switched off and has had a
chance to cool down.
(2) If it is necessary to do work in
the engine compartment with
the engine running, be espe-
cially careful that your clothing,
hair, etc., does not become
caught by the fan, drive belts, or
other moving parts.
(3) Do not smoke, cause sparks or
allow open flames around fuel or
battery. The fumes are flam-
mable.
(4) Be extremely cautious when
working around the battery. It
contains poisonous and cor-
rosive sulphuric acid.
(5) Do not get under your vehicle
with just the body jack support-
ing it. Always use automotive
jack stands.
(6) Improper handling of compo-
nents and materials used in the
vehicle can endanger your
personal safety.
Consult an authorized MITSU-
BISHI dealer for necessary infor-
mation.
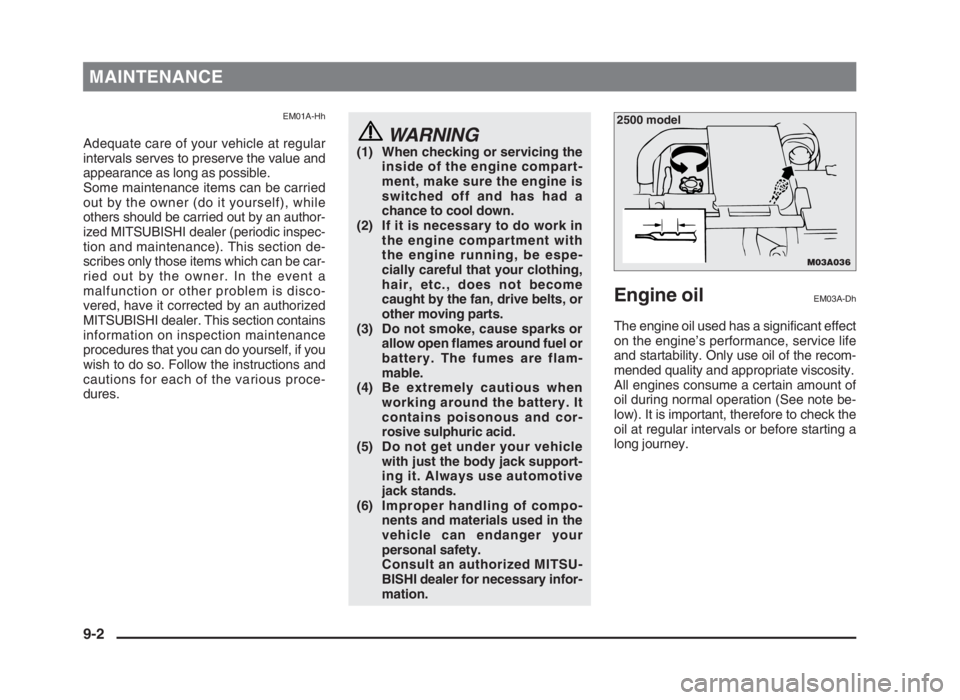
Engine oilEM03A-Dh
The engine oil used has a significant effect
on the engine’s performance, service life
and startability. Only use oil of the recom-
mended quality and appropriate viscosity.
All engines consume a certain amount of
oil during normal operation (See note be-
low). It is important, therefore to check the
oil at regular intervals or before starting a
long journey.
9-2
M03A036
2500 model
09engL2_240082_4 22-01-2004 13:12 Page 9-2
Page 217 of 264
MAINTENANCE
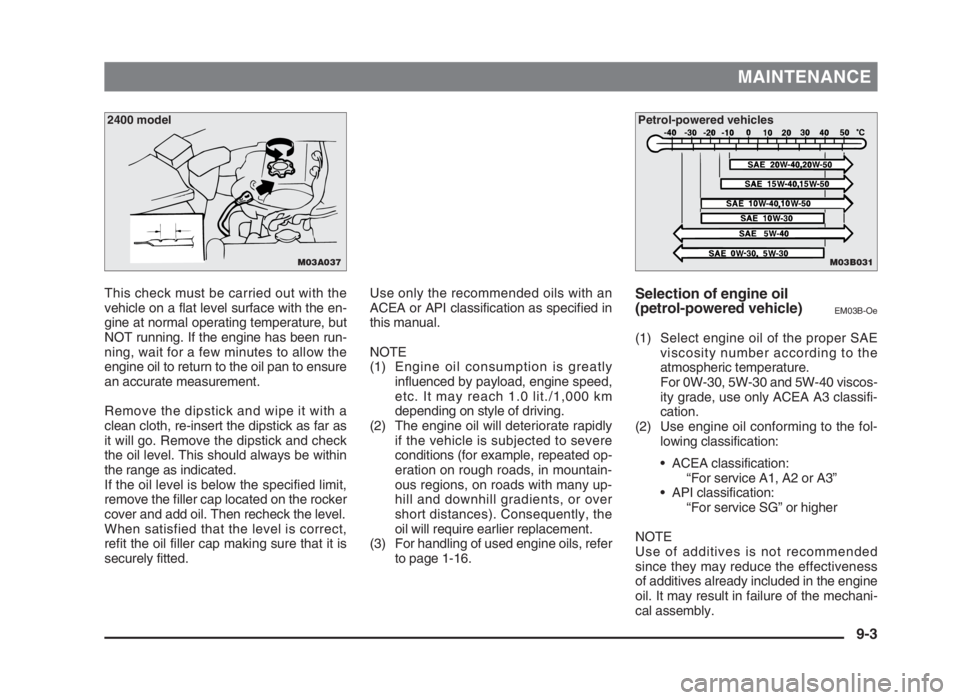
This check must be carried out with the
vehicle on a flat level surface with the en-
gine at normal operating temperature, but
NOT running. If the engine has been run-
ning, wait for a few minutes to allow the
engine oil to return to the oil pan to ensure
an accurate measurement.
Remove the dipstick and wipe it with a
clean cloth, re-insert the dipstick as far as
it will go. Remove the dipstick and check
the oil level. This should always be within
the range as indicated.
If the oil level is below the specified limit,
remove the filler cap located on the rocker
cover and add oil. Then recheck the level.
When satisfied that the level is correct,
refit the oil filler cap making sure that it is
securely fitted.Selection of engine oil
(petrol-powered vehicle)
EM03B-Oe
(1) Select engine oil of the proper SAE
viscosity number according to the
atmospheric temperature.
For 0W-30, 5W-30 and 5W-40 viscos-
ity grade, use only ACEA A3 classifi-
cation.
(2) Use engine oil conforming to the fol-
lowing classification:
• ACEA classification:
“For service A1, A2 or A3”
• API classification:
“For service SG” or higher
NOTE
Use of additives is not recommended
since they may reduce the effectiveness
of additives already included in the engine
oil. It may result in failure of the mechani-
cal assembly. Use only the recommended oils with an
ACEA or API classification as specified in
this manual.
NOTE
(1) Engine oil consumption is greatly
influenced by payload, engine speed,
etc. It may reach 1.0 lit./1,000 km
depending on style of driving.
(2) The engine oil will deteriorate rapidly
if the vehicle is subjected to severe
conditions (for example, repeated op-
eration on rough roads, in mountain-
ous regions, on roads with many up-
hill and downhill gradients, or over
short distances). Consequently, the
oil will require earlier replacement.
(3) For handling of used engine oils, refer
to page 1-16.
9-3
M03A037
2400 model
M03B031
Petrol-powered vehicles
09engL2_240082_4 22-01-2004 13:12 Page 9-3
Page 218 of 264
MAINTENANCE
Selection of engine oil
(diesel-powered vehicle)
EM03BAO
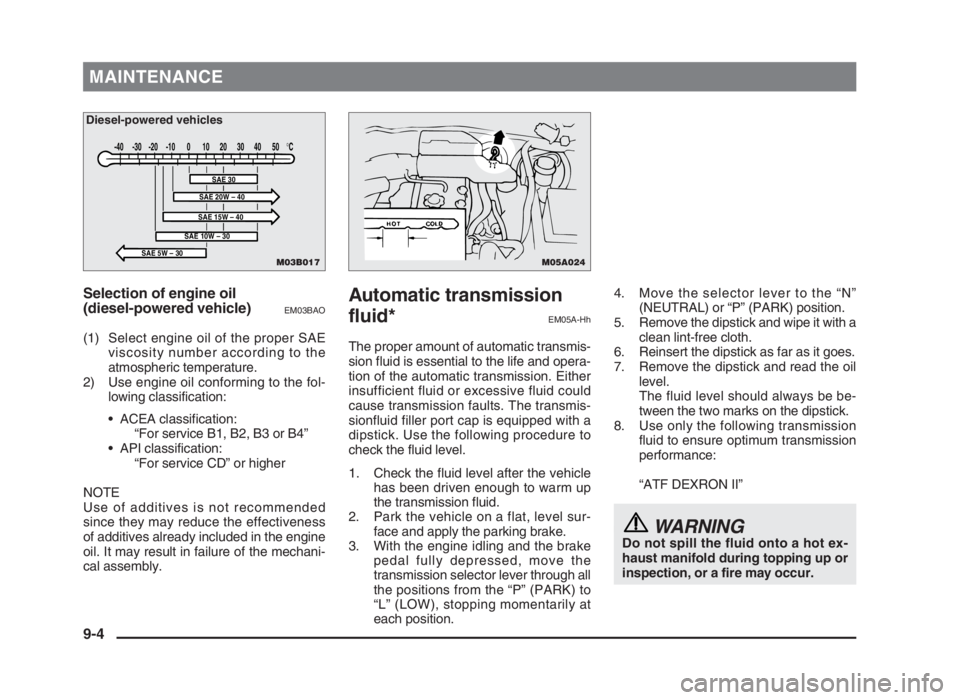
(1) Select engine oil of the proper SAE
viscosity number according to the
atmospheric temperature.
2) Use engine oil conforming to the fol-
lowing classification:
• ACEA classification:
“For service B1, B2, B3 or B4”
• API classification:
“For service CD” or higher
NOTE
Use of additives is not recommended
since they may reduce the effectiveness
of additives already included in the engine
oil. It may result in failure of the mechani-
cal assembly.
Automatic transmission
fluid*
EM05A-Hh
The proper amount of automatic transmis-
sion fluid is essential to the life and opera-
tion of the automatic transmission. Either
insufficient fluid or excessive fluid could
cause transmission faults. The transmis-
sionfluid filler port cap is equipped with a
dipstick. Use the following procedure to
check the fluid level.
1. Check the fluid level after the vehicle
has been driven enough to warm up
the transmission fluid.
2. Park the vehicle on a flat, level sur-
face and apply the parking brake.
3. With the engine idling and the brake
pedal fully depressed, move the
transmission selector lever through all
the positions from the “P” (PARK) to
“L” (LOW), stopping momentarily at
each position.4. Move the selector lever to the “N”
(NEUTRAL) or “P” (PARK) position.
5. Remove the dipstick and wipe it with a
clean lint-free cloth.
6. Reinsert the dipstick as far as it goes.
7. Remove the dipstick and read the oil
level.
The fluid level should always be be-
tween the two marks on the dipstick.
8. Use only the following transmission
fluid to ensure optimum transmission
performance:
“ATF DEXRON II”
WARNINGDo not spill the fluid onto a hot ex-
haust manifold during topping up or
inspection, or a fire may occur.
9-4
M05A024M03B017
-40 -30 -20 -10 0 10 20 30 40 50 °C
SAE 5W – 30SAE 10W – 30
SAE 30
SAE 20W – 40
SAE 15W – 40
Diesel-powered vehicles
09engL2_240082_4 22-01-2004 13:12 Page 9-4
Page 219 of 264
Engine coolantEM36A-Gg
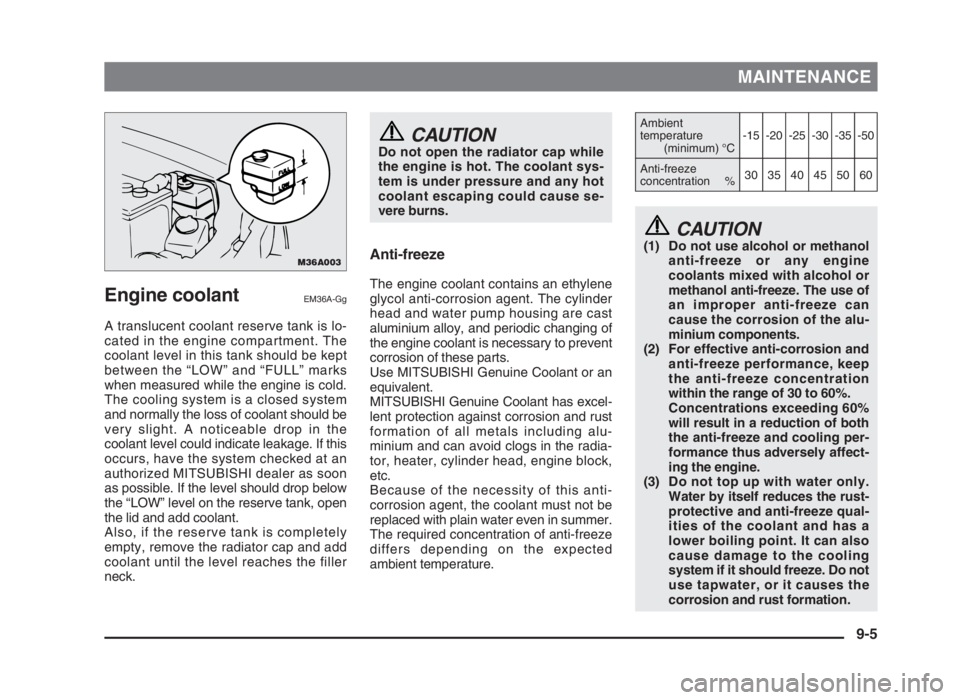
A translucent coolant reserve tank is lo-
cated in the engine compartment. The
coolant level in this tank should be kept
between the “LOW” and “FULL” marks
when measured while the engine is cold.
The cooling system is a closed system
and normally the loss of coolant should be
very slight. A noticeable drop in the
coolant level could indicate leakage. If this
occurs, have the system checked at an
authorized MITSUBISHI dealer as soon
as possible. If the level should drop below
the “LOW” level on the reserve tank, open
the lid and add coolant.
Also, if the reserve tank is completely
empty, remove the radiator cap and add
coolant until the level reaches the filler
neck.
MAINTENANCE
CAUTION(1) Do not use alcohol or methanol
anti-freeze or any engine
coolants mixed with alcohol or
methanol anti-freeze. The use of
an improper anti-freeze can
cause the corrosion of the alu-
minium components.
(2) For effective anti-corrosion and
anti-freeze performance, keep
the anti-freeze concentration
within the range of 30 to 60%.
Concentrations exceeding 60%
will result in a reduction of both
the anti-freeze and cooling per-
formance thus adversely affect-
ing the engine.
(3) Do not top up with water only.
Water by itself reduces the rust-
protective and anti-freeze qual-
ities of the coolant and has a
lower boiling point. It can also
cause damage to the cooling
system if it should freeze. Do not
use tapwater, or it causes the
corrosion and rust formation.
CAUTIONDo not open the radiator cap while
the engine is hot. The coolant sys-
tem is under pressure and any hot
coolant escaping could cause se-
vere burns.
Anti-freeze
The engine coolant contains an ethylene
glycol anti-corrosion agent. The cylinder
head and water pump housing are cast
aluminium alloy, and periodic changing of
the engine coolant is necessary to prevent
corrosion of these parts.
Use MITSUBISHI Genuine Coolant or an
equivalent.
MITSUBISHI Genuine Coolant has excel-
lent protection against corrosion and rust
formation of all metals including alu-
minium and can avoid clogs in the radia-
tor, heater, cylinder head, engine block,
etc.
Because of the necessity of this anti-
corrosion agent, the coolant must not be
replaced with plain water even in summer.
The required concentration of anti-freeze
differs depending on the expected
ambient temperature.
9-5
M36A003
Ambient
temperature
(minimum) °C-15-20-25-30-35-50
Anti-freeze
concentration %303540455060
09engL2_240082_4 22-01-2004 13:12 Page 9-5
Page 220 of 264
MAINTENANCE
During cold weather
If the temperatures in your area drop
below freezing, there is the danger that
the coolant in the engine or radiator could
freeze and cause severe damage to the
engine and/or radiator. Add a sufficient
amount of anti-freeze to the coolant to
prevent it from freezing.
The engine coolant mixture used at the
factory provides protection against freez-
ing for temperatures as low as approxim-
ately –30°C. The concentration should be
checked before the start of cold weather
and anti-freeze added to the system if
necessary.BatteryEM37APD
The condition of the battery is very impor-
tant for quick starting of the engine and
proper functioning of the vehicle’s elec-
trical system. Regular inspection and care
are especially important in cold weather.
NOTE
(1) After replacing the battery, the elec-
tronic control system data for the en-
gine, automatic transmission, etc., will
be erased.
As a result, the engine speed may be-
come unstable and shift shocks may
occur.
If the engine speed becomes unsta-
ble, initial engine adjustments will
need to be performed.
Refer to the section “What to do if the
engine speed becomes unstable after
the battery is replaced” on page 8-30.
Shift shocks will become smoother af-
ter several changes in speed.
(2) Memory data for settings made by the
user may be erased when the battery
is replaced. If this happens, establish
the settings again using the relevant
procedures.
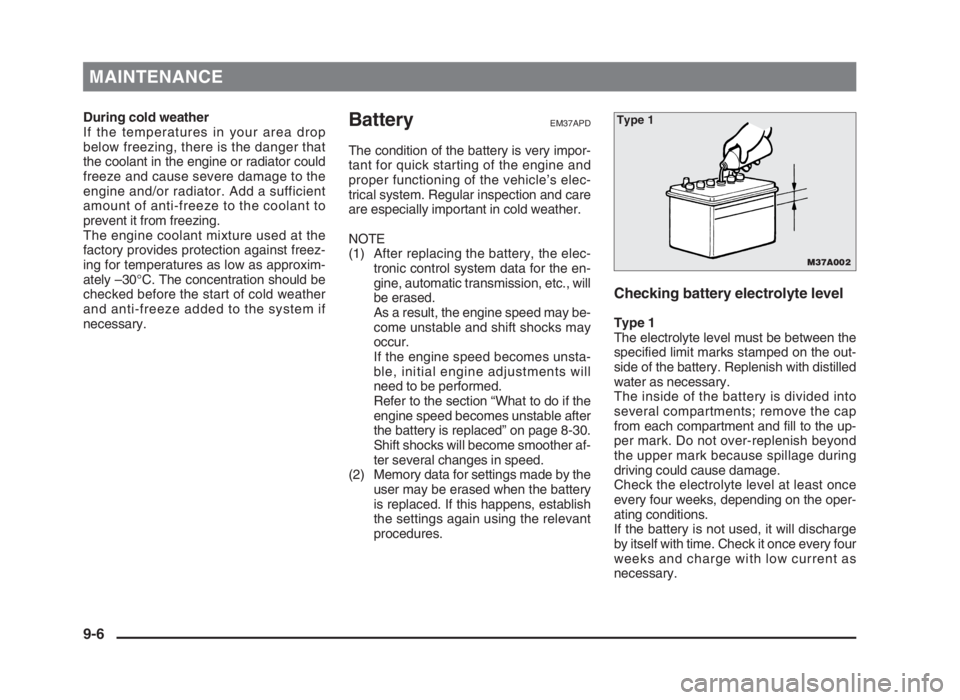
Checking battery electrolyte level
Type 1
The electrolyte level must be between the
specified limit marks stamped on the out-
side of the battery. Replenish with distilled
water as necessary.
The inside of the battery is divided into
several compartments; remove the cap
from each compartment and fill to the up-
per mark. Do not over-replenish beyond
the upper mark because spillage during
driving could cause damage.
Check the electrolyte level at least once
every four weeks, depending on the oper-
ating conditions.
If the battery is not used, it will discharge
by itself with time. Check it once every four
weeks and charge with low current as
necessary.
9-6
M37A002
Type 1
09engL2_240082_4 22-01-2004 13:12 Page 9-6