ECU MITSUBISHI LANCER 2005 Workshop Manual
[x] Cancel search | Manufacturer: MITSUBISHI, Model Year: 2005, Model line: LANCER, Model: MITSUBISHI LANCER 2005Pages: 788, PDF Size: 45.98 MB
Page 511 of 788
TROUBLESHOOTING
HEATER, AIR CONDITIONER AND VENTILATION55-27
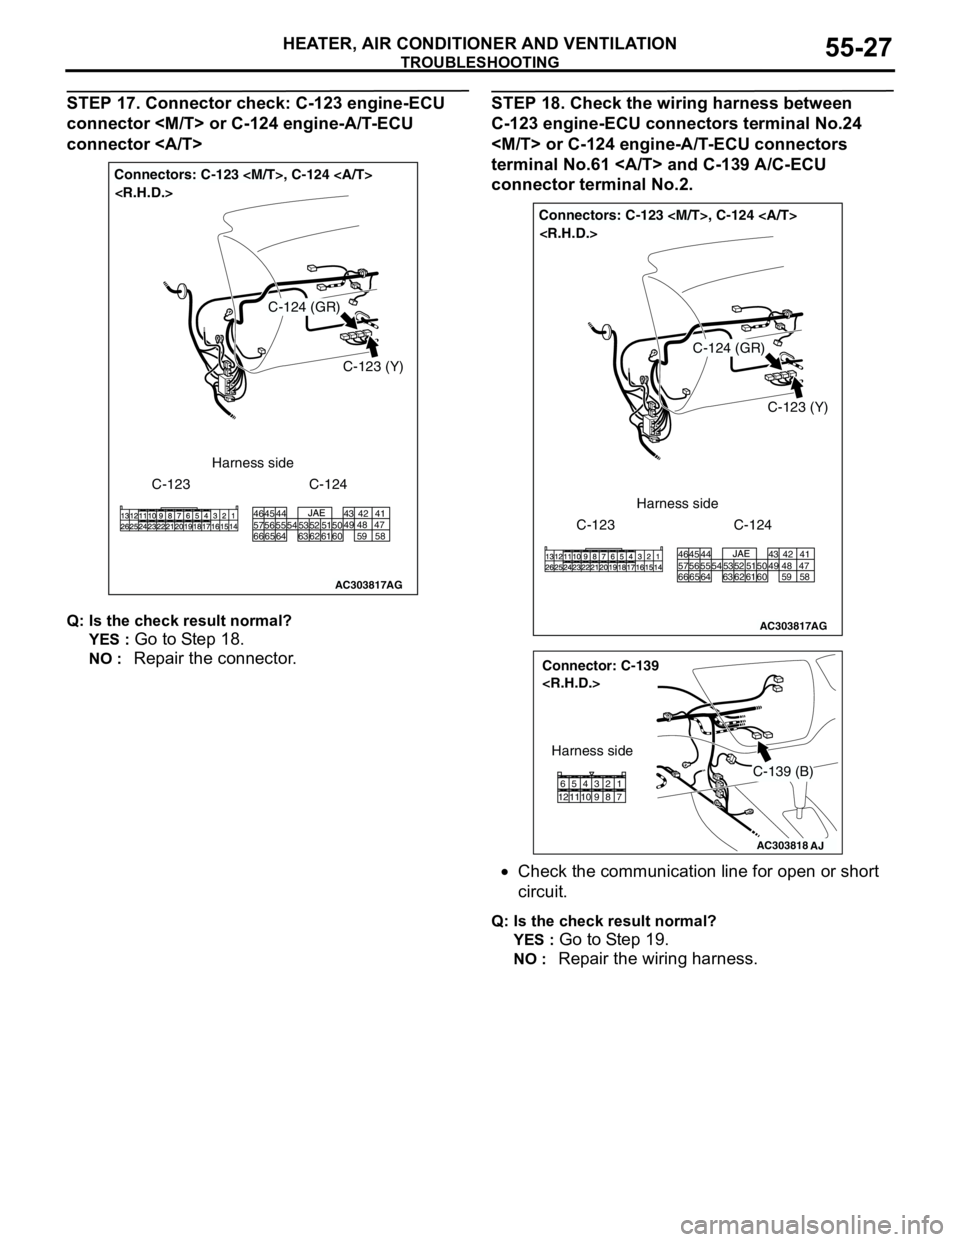
STEP 17. Connector check: C-123 engine-ECU
connector
connector
Q: Is the check result normal?
YES :
Go to Step 18.
NO : Repair the connector.
STEP 18. Check the wiring harness between
C-123 engine-ECU connectors terminal No.24
terminal No.61 and C-139 A/C-ECU
connector terminal No.2.
•Check the communication line for open or short
circuit.
Q: Is the check result normal?
YES :
Go to Step 19.
NO : Repair the wiring harness.
AC303817
Connectors: C-123
AG
C-123 (Y)
C-123Harness side
C-124 (GR)
46 45 44 43 42 41
57 56 55 54 53 52 515049 48 47
66 65 64 63 62 61 60 59 58
C-124
AC303817
Connectors: C-123
AG
C-123 (Y)
C-123Harness side
C-124 (GR)
46 45 44 43 42 41
57 56 55 54 53 52 515049 48 47
66 65 64 63 62 61 60 59 58
C-124
AC303818
Connector: C-139
AJ
Harness side
C-139 (B)
11 12657 8 9 103 421
Page 512 of 788
TROUBLESHOOTING
HEATER, AIR CONDITIONER AND VENTILATION55-28
STEP 19. Check the magnetic clutch operation.
Refer to P.55-93.
Q: Can the sound of the magnetic clutch (click) be
heard?
YES :
Go to Step 20.
NO : Replace the compressor magnet clutch.
STEP 20. Check the refrigerant temperature
switch.
Refer to P.55-95.
Q: Is the refrigerant temperature switch operating
properly?
YES :
Go to Step 21.
NO : Replace the refrigerant temperature switch.
STEP 21. Check the air thermo sensor.
Refer to P.55-90.
Q: Is the air thermo sensor in good condition?
YES :
Go to Step 22.
NO : Replace the air thermo sensor.
STEP 22. Check the refrigerant level.
Refer to P.55-69.
Q: Is the refrigerant level correct?
YES :
Go to Step 23.
NO : Correct the refrigerant level (Refer to
On-vehicle Service P.55-70).
STEP 23. Replace the A/C-ECU.
Check that the air conditioner works normally.
Q: Is the check result normal?
YES :
This diagnosis is complete.
NO : Replace the engine-ECU
engine-A/T-ECU .
Page 526 of 788
TROUBLESHOOTING
HEATER, AIR CONDITIONER AND VENTILATION55-42
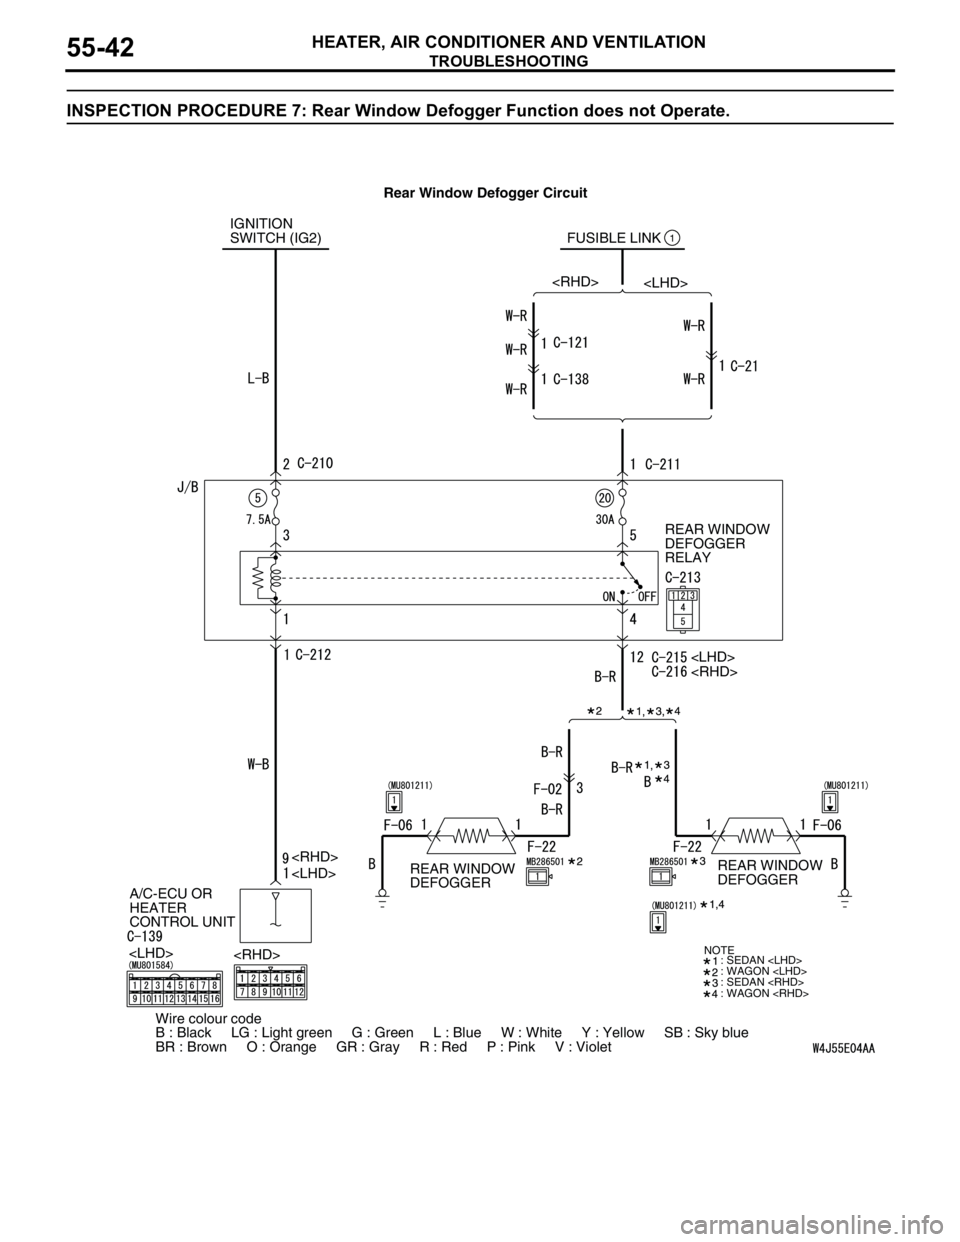
INSPECTION PROCEDURE 7: Rear Window Defogger Function does not Operate.
IGNITION
SWITCH (IG2) FUSIBLE LINK
REAR WINDOW
DEFOGGER
RELAY
A/C-ECU OR
HEATER
CONTROL UNIT1
: SEDAN
: WAGON
: SEDAN
: WAGON
Wire colour code
B : Black LG : Light green G : Green L : Blue W : White Y : Yellow SB : Sky blue
BR : Brown O : Orange GR : Gray R : Red P : Pink V : Violet
NOTE
REAR WINDOW
DEFOGGERREAR WINDOW
DEFOGGER Rear Window Defogger Circuit
Page 527 of 788
TROUBLESHOOTING
HEATER, AIR CONDITIONER AND VENTILATION55-43
COMMENTS ON TROUBLE SYMPTOM
If the rear window defogger does not operate when
the rear window defogger switch is turned on, the
rear window defogger relay system may be
defective.
TROUBLESHOOTING HINTS
•Malfunction of the rear window defogger relay
•Malfunction of the rear window defogger
•Damaged the wiring harness or connectors
•Malfunction of the manual air conditioner control
panel (A/C-ECU) or the heater control unit
DIAGNOSIS
STEP 1. Check the A/C and outside/inside air
selection damper control motor operation.
Q: Do the A/C and outside/inside air selection damper
control motor work normally?
YES :
Go to Step 2.
NO
"Malfunction of the A/C-ECU Power Supply
system
NO
"Malfunction of the A/C-ECU Power Supply
system
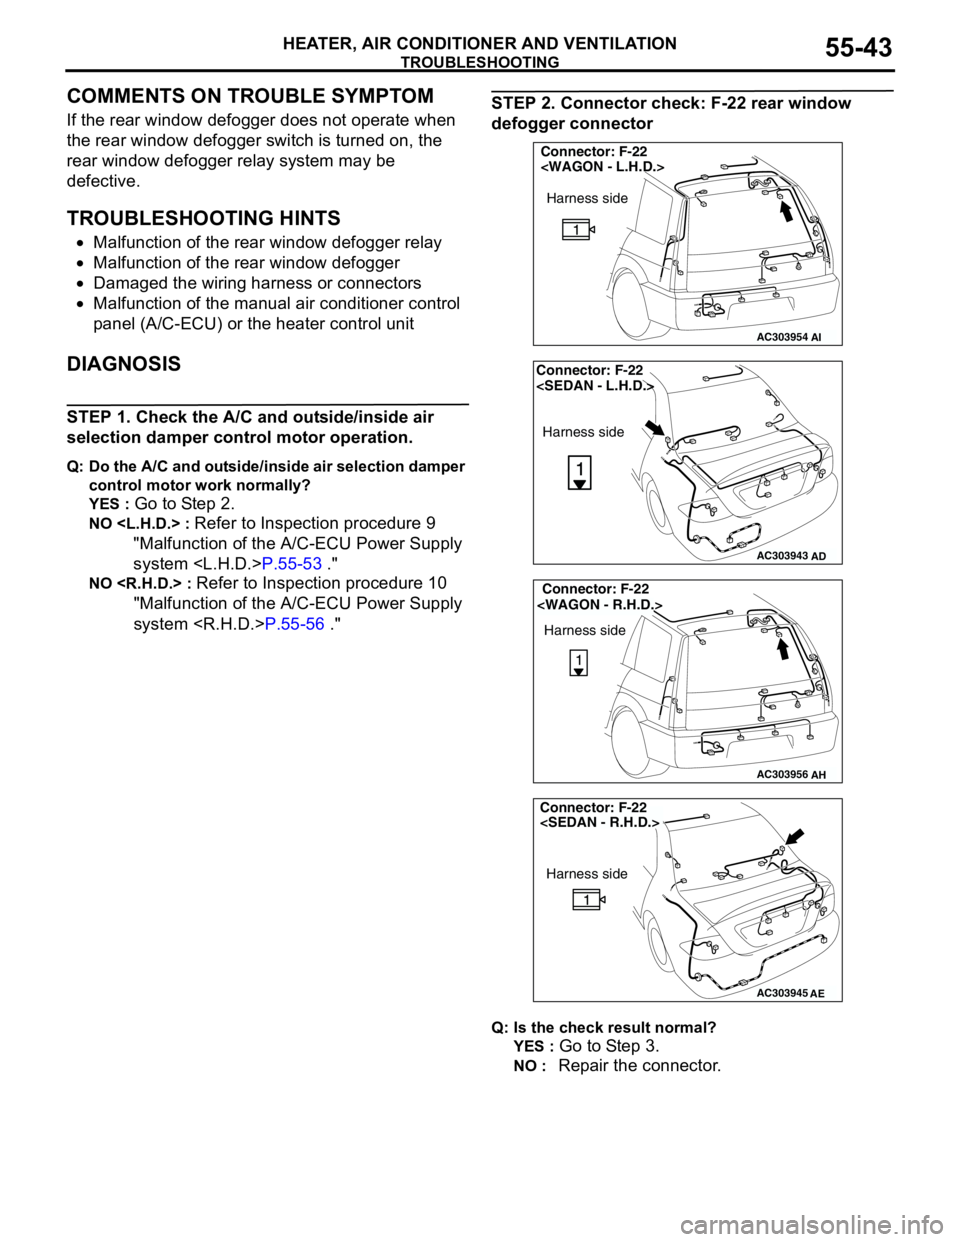
STEP 2. Connector check: F-22 rear window
defogger connector
Q: Is the check result normal?
YES :
Go to Step 3.
NO : Repair the connector.
AC303954
Connector: F-22
AI
Harness side
AC303943
Connector: F-22
Harness side
AD
AC303956
Connector: F-22
Harness side
AH
AC303945
Harness side
AE
Connector: F-22
Page 533 of 788
TROUBLESHOOTING
HEATER, AIR CONDITIONER AND VENTILATION55-49
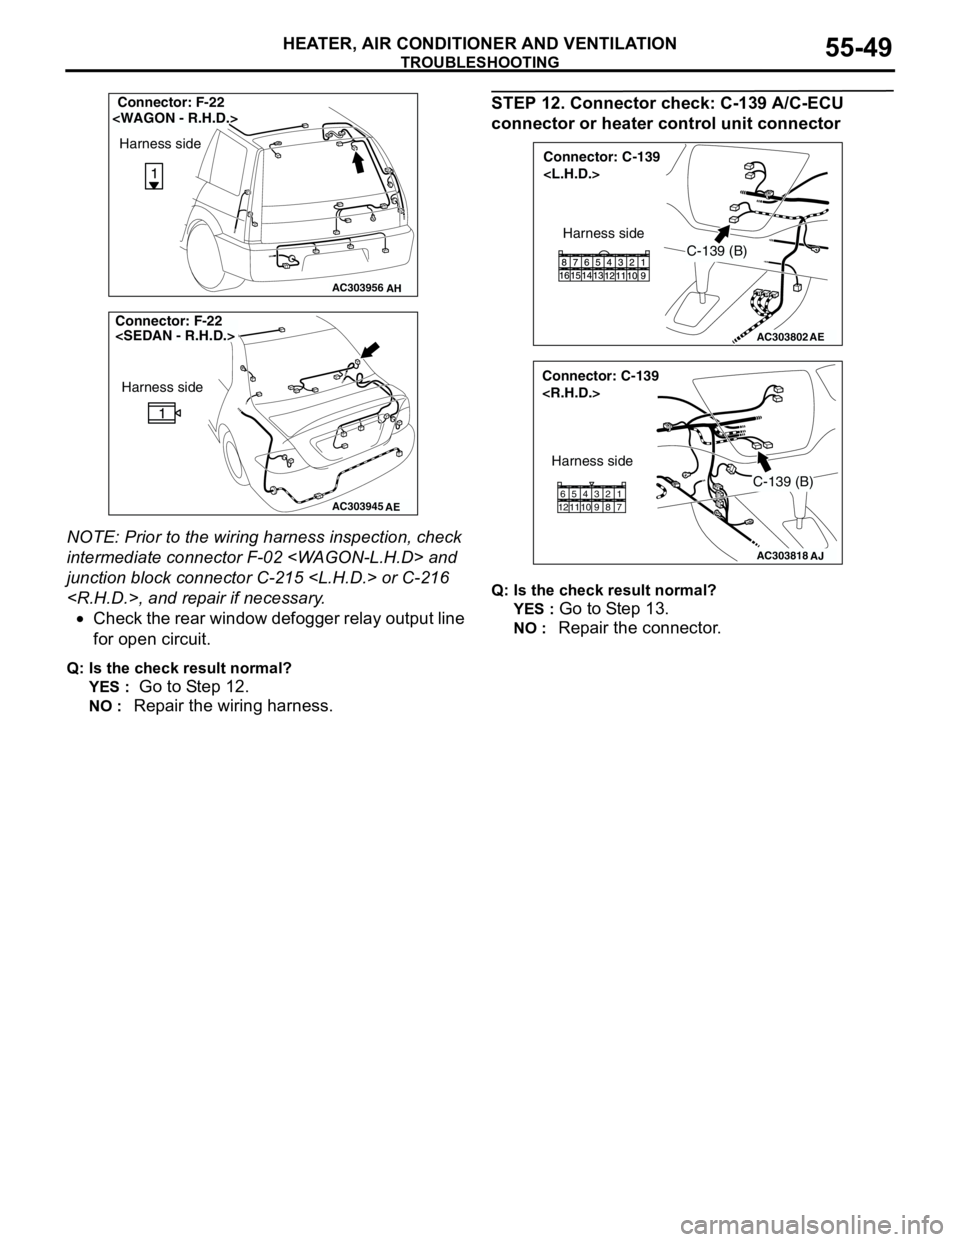
NOTE: Prior to the wiring harness inspection, check
intermediate connector F-02
junction block connector C-215
•Check the rear window defogger relay output line
for open circuit.
Q: Is the check result normal?
YES :
Go to Step 12.
NO : Repair the wiring harness.
STEP 12. Connector check: C-139 A/C-ECU
connector or heater control unit connector
Q: Is the check result normal?
YES :
Go to Step 13.
NO : Repair the connector.
AC303956
Connector: F-22
Harness side
AH
AC303945
Harness side
AE
Connector: F-22
Connector: C-139
AE
C-139 (B)
Harness side
AC303818
Connector: C-139
AJ
Harness side
C-139 (B)
11 12657 8 9 103 421
Page 534 of 788
TROUBLESHOOTING
HEATER, AIR CONDITIONER AND VENTILATION55-50
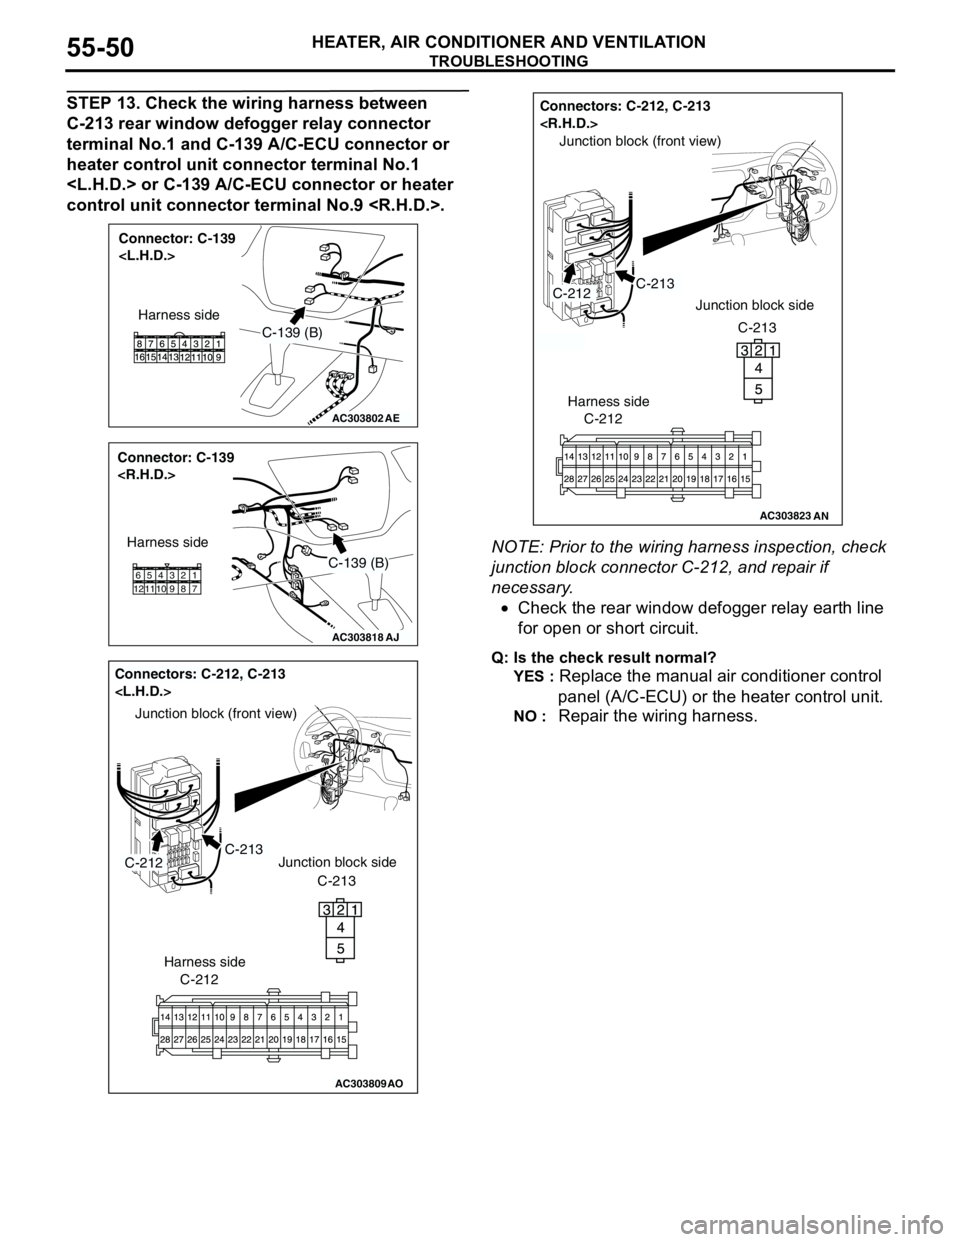
STEP 13. Check the wiring harness between
C-213 rear window defogger relay connector
terminal No.1 and C-139 A/C-ECU connector or
heater control unit connector terminal No.1
control unit connector terminal No.9
NOTE: Prior to the wiring harness inspection, check
junction block connector C-212, and repair if
necessary.
•Check the rear window defogger relay earth line
for open or short circuit.
Q: Is the check result normal?
YES :
Replace the manual air conditioner control
panel (A/C-ECU) or the heater control unit.
NO : Repair the wiring harness.
AC303802
Connector: C-139
AE
C-139 (B)
Harness side
AC303818
Connector: C-139
AJ
Harness side
C-139 (B)
11 12657 8 9 103 421
AC303809
Junction block (front view)
Connectors: C-212, C-213
C-212C-213
AO
C-212
Harness side
Junction block side
C-213
AC303823
Connectors: C-212, C-213
AN
Junction block (front view)
C-213C-212Junction block side
C-213
C-212
Harness side
Page 536 of 788
TROUBLESHOOTING
HEATER, AIR CONDITIONER AND VENTILATION55-52
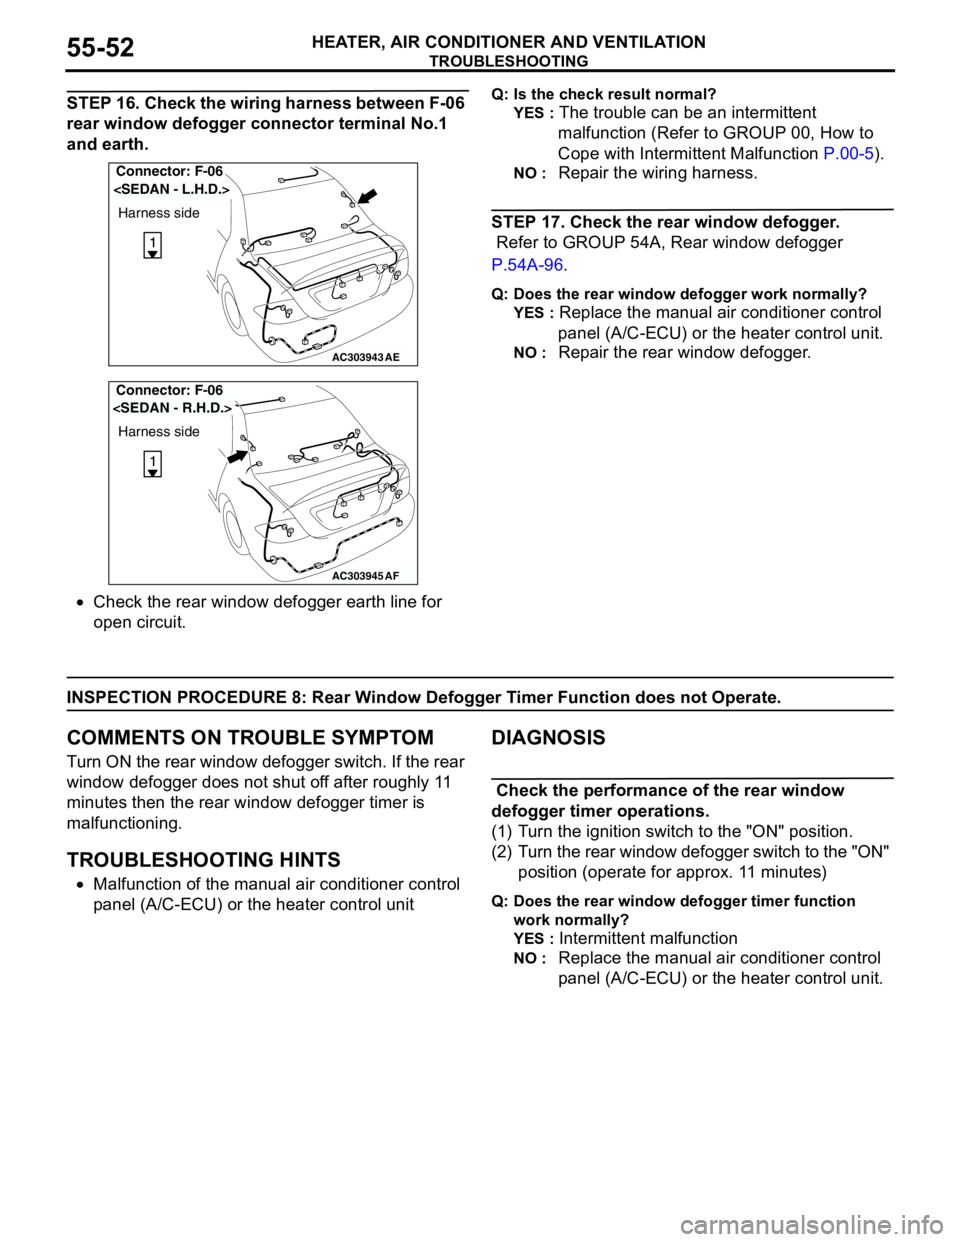
STEP 16. Check the wiring harness between F-06
rear window defogger connector terminal No.1
and earth.
•Check the rear window defogger earth line for
open circuit.Q: Is the check result normal?
YES :
The trouble can be an intermittent
malfunction (Refer to GROUP 00, How to
Cope with Intermittent Malfunction P.00-5).
NO : Repair the wiring harness.
STEP 17. Check the rear window defogger.
Refer to GROUP 54A, Rear window defogger
P.54A-96.
Q: Does the rear window defogger work normally?
YES :
Replace the manual air conditioner control
panel (A/C-ECU) or the heater control unit.
NO : Repair the rear window defogger.
INSPECTION PROCEDURE 8: Rear Window Defogger Timer Function does not Operate.
COMMENTS ON TROUBLE SYMPTOM
Turn ON the rear window defogger switch. If the rear
window defogger does not shut off after roughly 11
minutes then the rear window defogger timer is
malfunctioning.
TROUBLESHOOTING HINTS
•Malfunction of the manual air conditioner control
panel (A/C-ECU) or the heater control unit
DIAGNOSIS
Check the performance of the rear window
defogger timer operations.
(1) Turn the ignition switch to the "ON" position.
(2) Turn the rear window defogger switch to the "ON"
position (operate for approx. 11 minutes)
Q: Does the rear window defogger timer function
work normally?
YES :
Intermittent malfunction
NO : Replace the manual air conditioner control
panel (A/C-ECU) or the heater control unit.
AC303943
Connector: F-06
Harness side
AE
AC303945
Harness side
AF
Connector: F-06
Page 537 of 788
TROUBLESHOOTING
HEATER, AIR CONDITIONER AND VENTILATION55-53
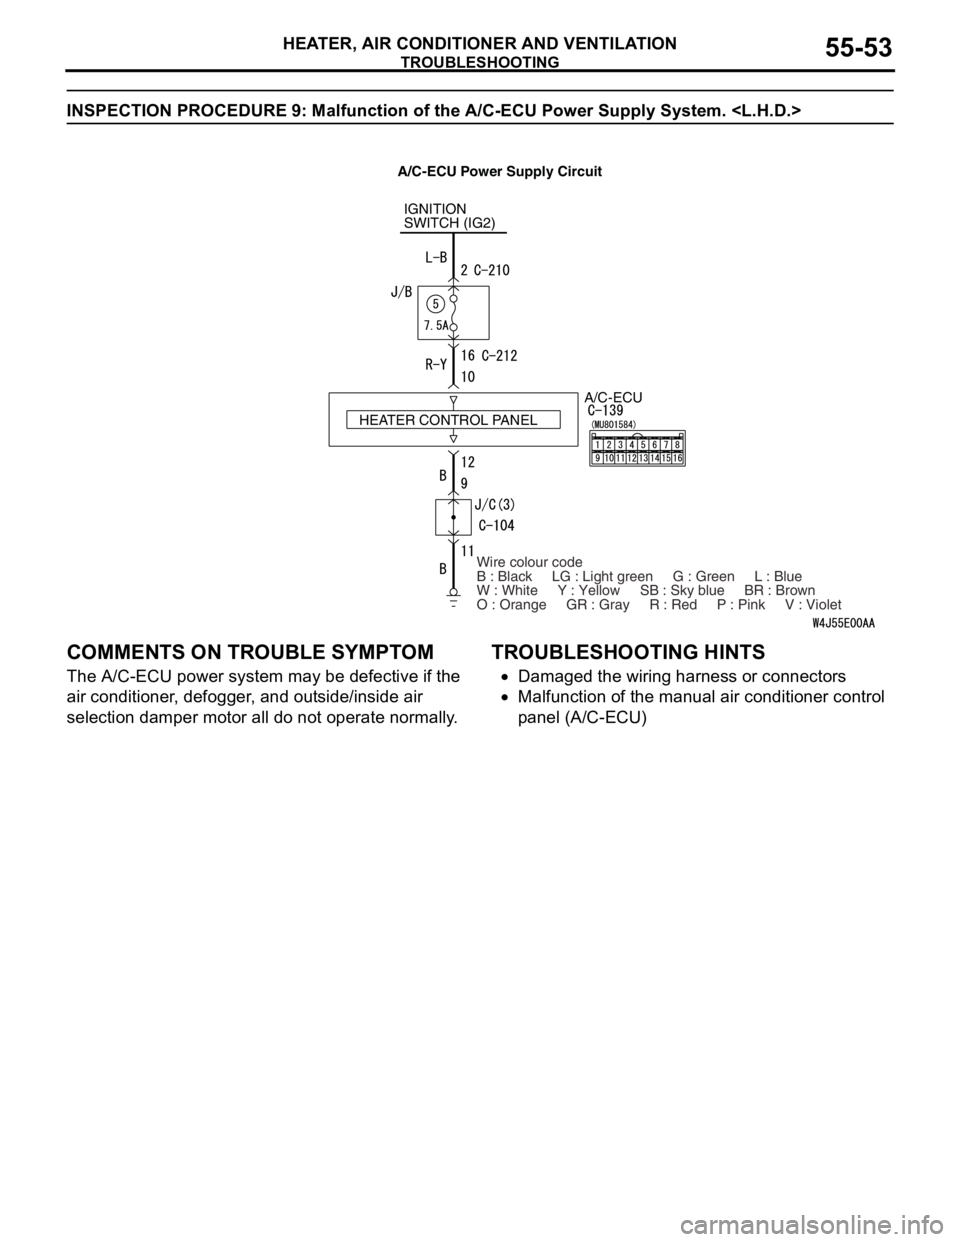
INSPECTION PROCEDURE 9: Malfunction of the A/C-ECU Power Supply System.
COMMENTS ON TROUBLE SYMPTOM
The A/C-ECU power system may be defective if the
air conditioner, defogger, and outside/inside air
selection damper motor all do not operate normally.
TROUBLESHOOTING HINTS
•Damaged the wiring harness or connectors
•Malfunction of the manual air conditioner control
panel (A/C-ECU)
IGNITION
SWITCH (IG2)
A/C-ECU
Wire colour code
B : Black LG : Light green G : Green L : Blue
W : White Y : Yellow SB : Sky blue BR : Brown
O : Orange GR : Gray R : Red P : Pink V : Violet HEATER CONTROL PANEL
A/C-ECU Power Supply Circuit
Page 538 of 788
TROUBLESHOOTING
HEATER, AIR CONDITIONER AND VENTILATION55-54
DIAGNOSIS
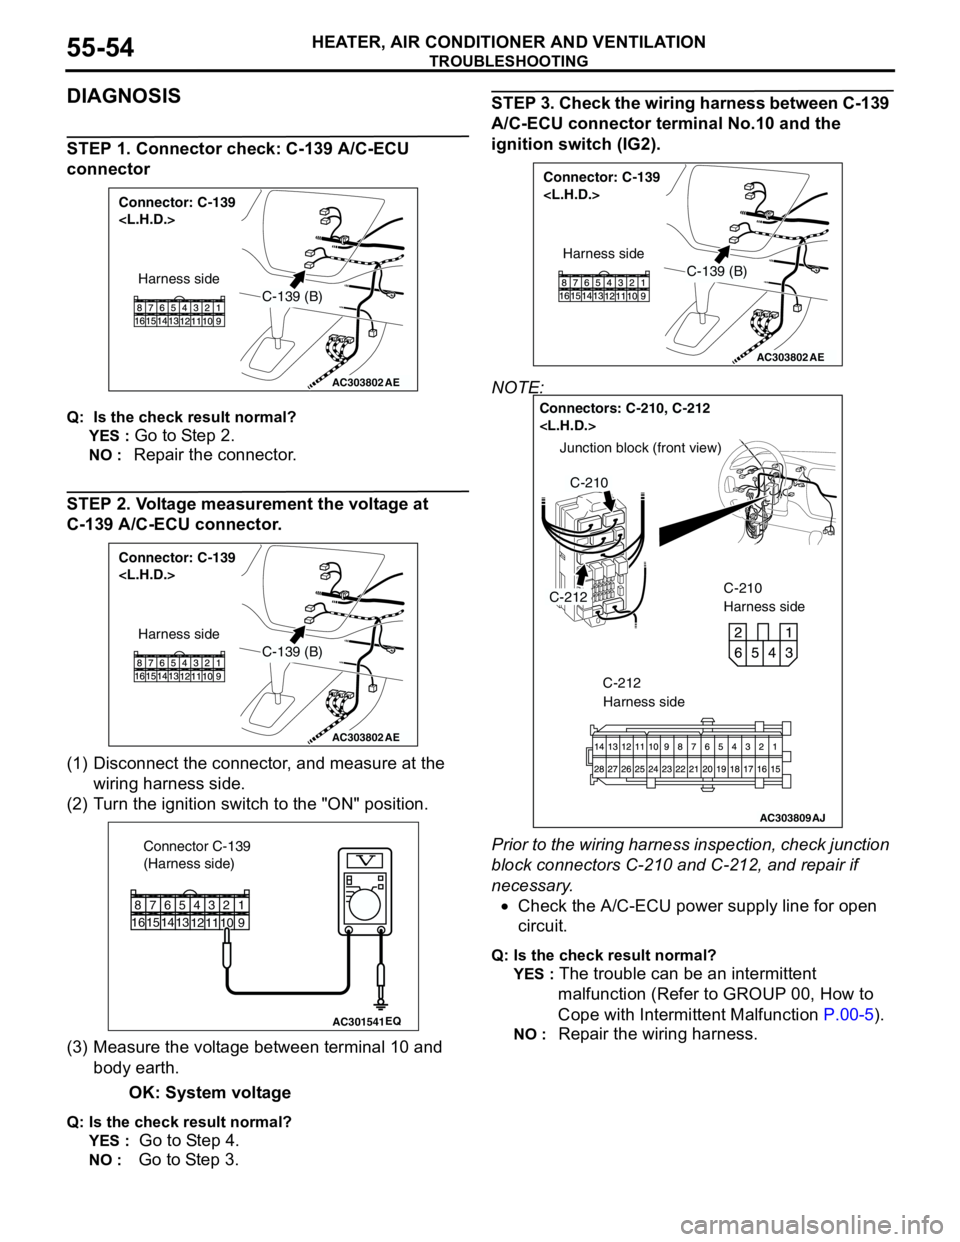
STEP 1. Connector check: C-139 A/C-ECU
connector
Q: Is the check result normal?
YES :
Go to Step 2.
NO : Repair the connector.
STEP 2. Voltage measurement the voltage at
C-139 A/C-ECU connector.
(1) Disconnect the connector, and measure at the
wiring harness side.
(2) Turn the ignition switch to the "ON" position.
(3) Measure the voltage between terminal 10 and
body earth.
OK: System voltage
Q: Is the check result normal?
YES :
Go to Step 4.
NO : Go to Step 3.
STEP 3. Check the wiring harness between C-139
A/C-ECU connector terminal No.10 and the
ignition switch (IG2).
NOTE:
Prior to the wiring harness inspection, check junction
block connectors C-210 and C-212, and repair if
necessary.
•Check the A/C-ECU power supply line for open
circuit.
Q: Is the check result normal?
YES :
The trouble can be an intermittent
malfunction (Refer to GROUP 00, How to
Cope with Intermittent Malfunction P.00-5).
NO : Repair the wiring harness.
AC303802
Connector: C-139
AE
C-139 (B)
Harness side
AC303802
Connector: C-139
AE
C-139 (B)
Harness side
AC301541EQ
Connector C-139
(Harness side)
9
1
1574
12
1110
23
13
5
14616
8
AC303802
Connector: C-139
AE
C-139 (B)
Harness side
AC303809
Junction block (front view)
Connectors: C-210, C-212
C-210
Harness side
C-212
C-210
AJ
C-212
Harness side
Page 539 of 788
TROUBLESHOOTING
HEATER, AIR CONDITIONER AND VENTILATION55-55
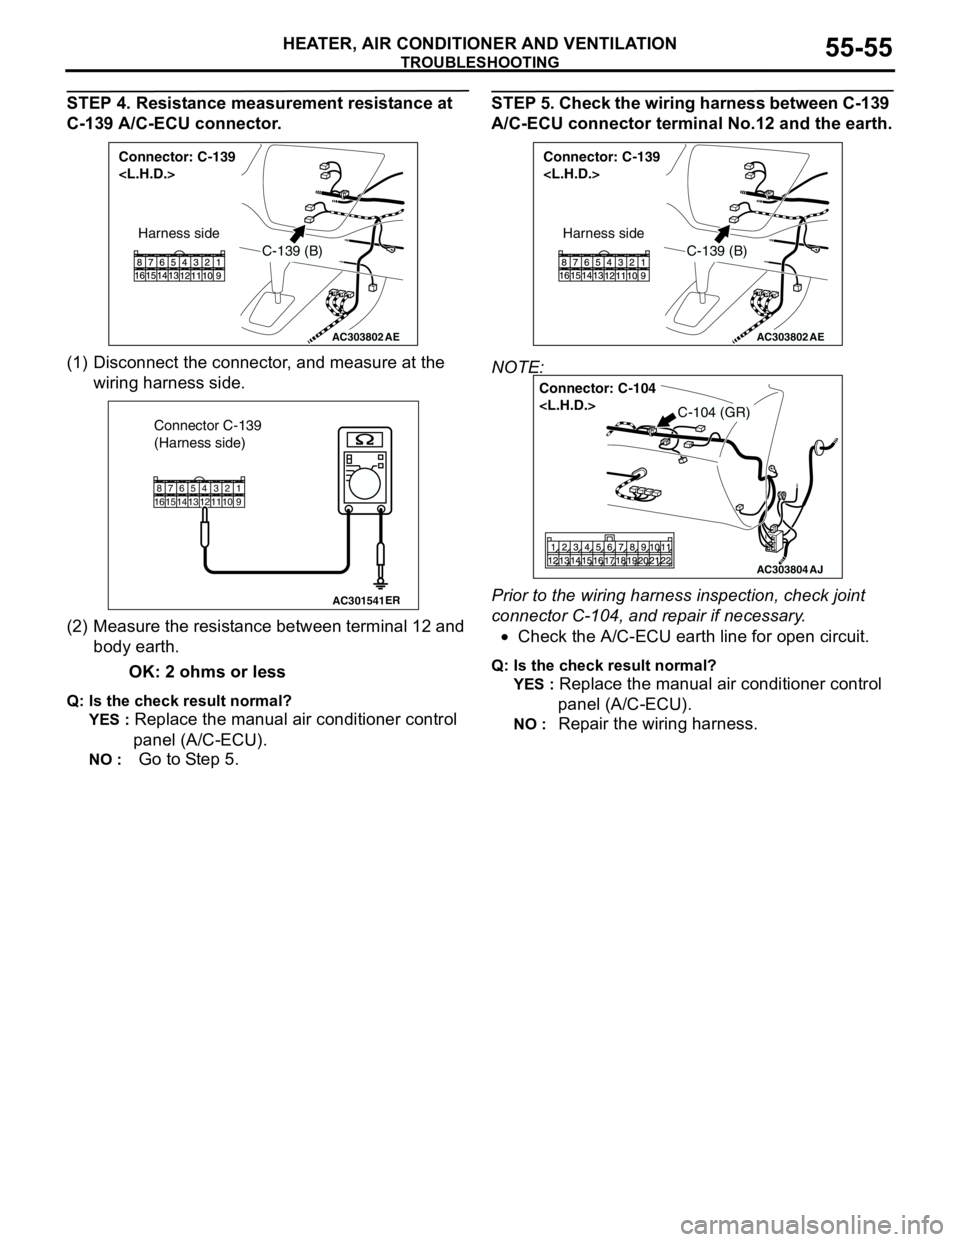
STEP 4. Resistance measurement resistance at
C-139 A/C-ECU connector.
(1) Disconnect the connector, and measure at the
wiring harness side.
(2) Measure the resistance between terminal 12 and
body earth.
OK: 2 ohms or less
Q: Is the check result normal?
YES :
Replace the manual air conditioner control
panel (A/C-ECU).
NO : Go to Step 5.
STEP 5. Check the wiring harness between C-139
A/C-ECU connector terminal No.12 and the earth.
NOTE:
Prior to the wiring harness inspection, check joint
connector C-104, and repair if necessary.
•Check the A/C-ECU earth line for open circuit.
Q: Is the check result normal?
YES :
Replace the manual air conditioner control
panel (A/C-ECU).
NO : Repair the wiring harness.
AC303802
Connector: C-139
AE
C-139 (B)
Harness side
AC301541ER
Connector C-139
(Harness side)
91
1574
12111023135146168
AC303802
Connector: C-139
AE
C-139 (B)
Harness side
AC303804
Connector: C-104
AJ
C-104 (GR)