ECU MITSUBISHI LANCER 2005 Manual Online
[x] Cancel search | Manufacturer: MITSUBISHI, Model Year: 2005, Model line: LANCER, Model: MITSUBISHI LANCER 2005Pages: 788, PDF Size: 45.98 MB
Page 432 of 788
COMBINATION METER ASSEMBLY
CHASSIS ELECTRICAL54A-44
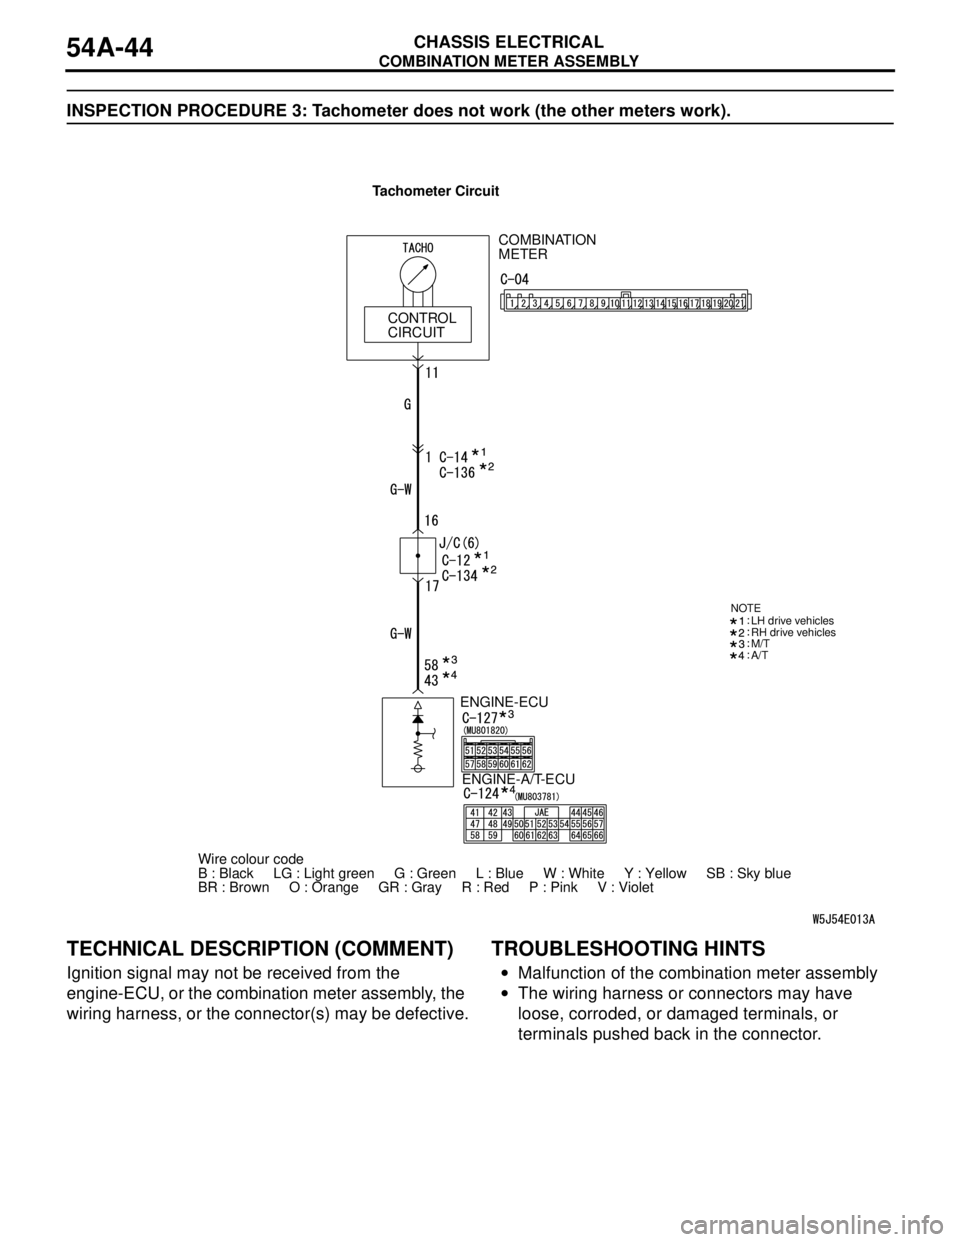
INSPECTION PROCEDURE 3: Tachometer does not work (the other meters work).
TECHNICAL DESCRIPTION (COMMENT)
Ignition signal may not be received from the
engine-ECU, or the combination meter assembly, the
wiring harness, or the connector(s) may be defective.
TROUBLESHOOTING HINTS
•Malfunction of the combination meter assembly
•The wiring harness or connectors may have
loose, corroded, or damaged terminals, or
terminals pushed back in the connector.
ENGINE-ECU
Wire colour code
B : Black LG : Light green G : Green L : Blue W : White Y : Yellow SB : Sky blue
BR : Brown O : Orange GR : Gray R : Red P : Pink V : Violet ENGINE-A/T-ECU
M/T
A/T
NOTELH drive vehicles
RH drive vehicles
COMBINATION
METER
CONTROL
CIRCUIT
Tachometer Circuit
Page 433 of 788
COMBINATION METER ASSEMBLY
CHASSIS ELECTRICAL54A-45
DIAGNOSIS PROCEDURE
STEP 1. Check whether the diagnosis code is
reset.
Q: Is the MPI-related diagnosis code set?
Code No.P0500
Refer to
GROUP 13A − Troubleshooting P.13A-15,
GROUP 13B − Troubleshooting P.13B-15.
NO : Go to Step 2
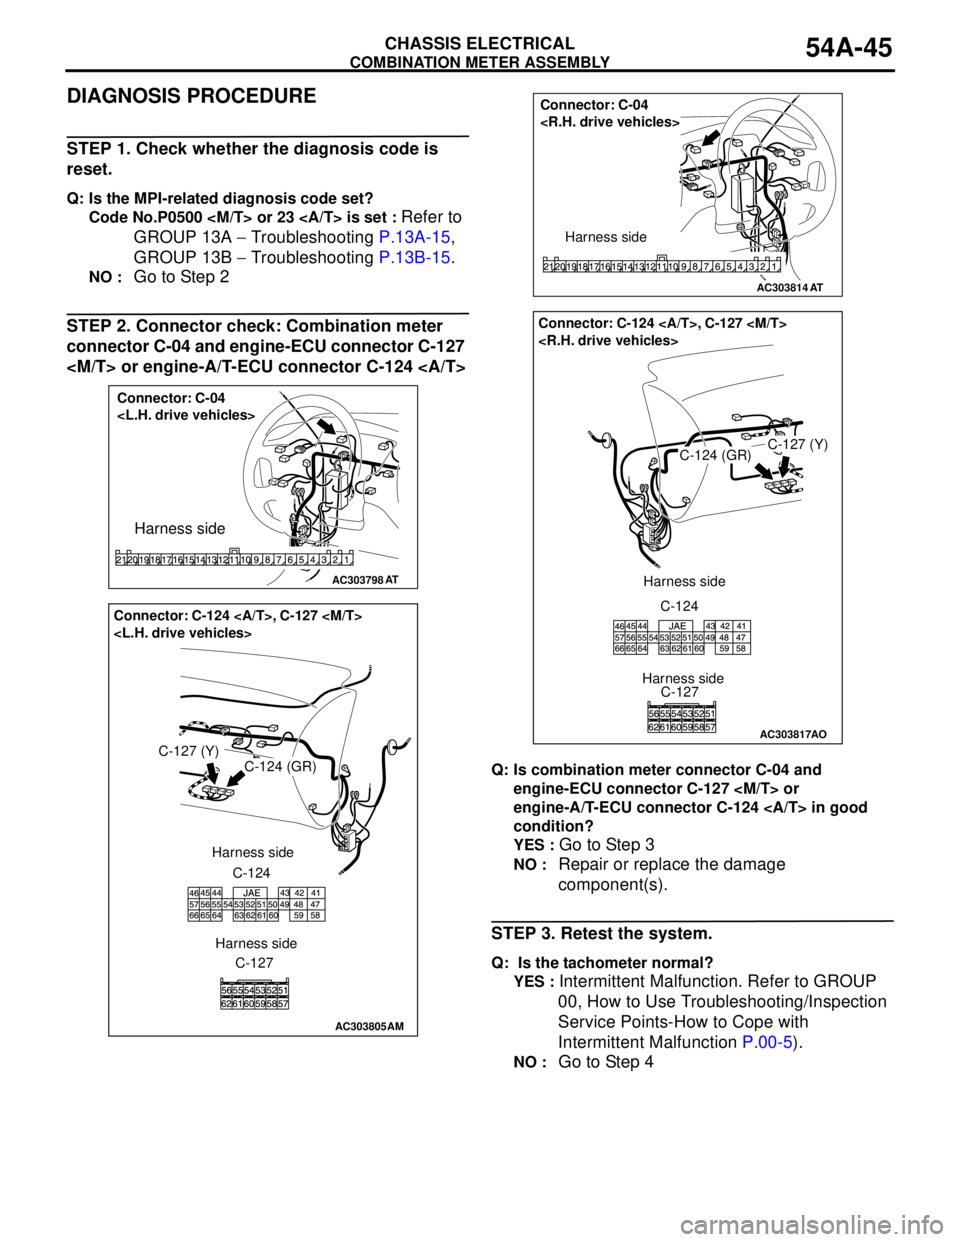
STEP 2. Connector check: Combination meter
connector C-04 and engine-ECU connector C-127
Q: Is combination meter connector C-04 and
engine-ECU connector C-127
engine-A/T-ECU connector C-124 in good
condition?
YES :
Go to Step 3
NO : Repair or replace the damage
component(s).
STEP 3. Retest the system.
Q: Is the tachometer normal?
YES :
Intermittent Malfunction. Refer to GROUP
00, How to Use Troubleshooting/Inspection
Service Points-How to Cope with
Intermittent Malfunction P.00-5).
NO : Go to Step 4
AC303798
Connector: C-04
Harness side
AT
AC303805
Connector: C-124 , C-127
C-124 (GR)
Harness side
C-124
C-127
AM
C-127 (Y)
Harness side
AC303814
Connector: C-04
Harness side
AT
AC303817
Connector: C-124 , C-127
C-127 (Y)C-124 (GR)
C-124
C-127 Harness side
AO
Harness side
Page 434 of 788
COMBINATION METER ASSEMBLY
CHASSIS ELECTRICAL54A-46
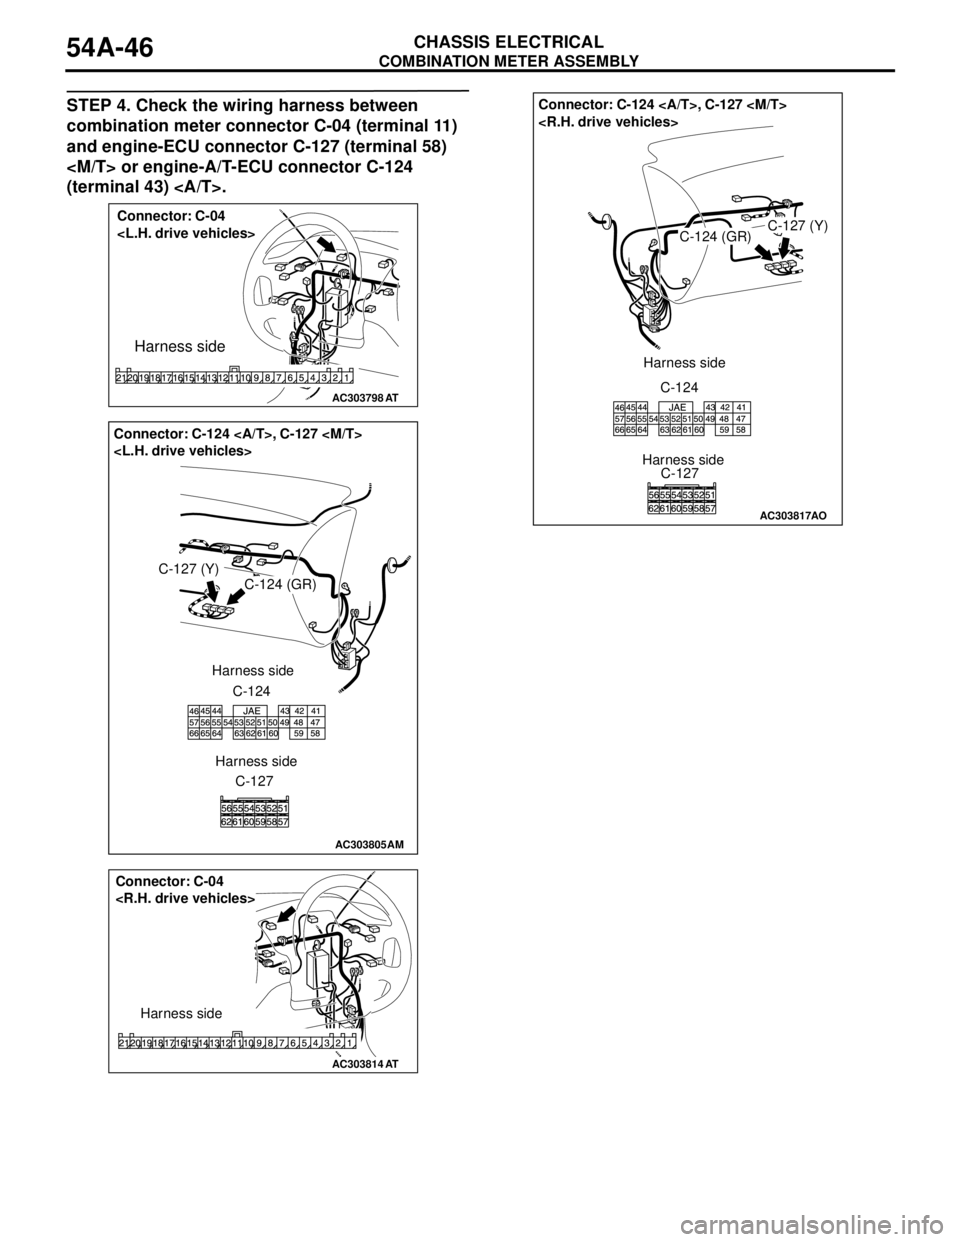
STEP 4. Check the wiring harness between
combination meter connector C-04 (terminal 11)
and engine-ECU connector C-127 (terminal 58)
(terminal 43) .
AC303798
Connector: C-04
Harness side
AT
AC303805
Connector: C-124 , C-127
C-124 (GR)
Harness side
C-124
C-127
AM
C-127 (Y)
Harness side
AC303814
Connector: C-04
Harness side
AT
AC303817
Connector: C-124 , C-127
C-127 (Y)C-124 (GR)
C-124
C-127 Harness side
AO
Harness side
Page 435 of 788
COMBINATION METER ASSEMBLY
CHASSIS ELECTRICAL54A-47
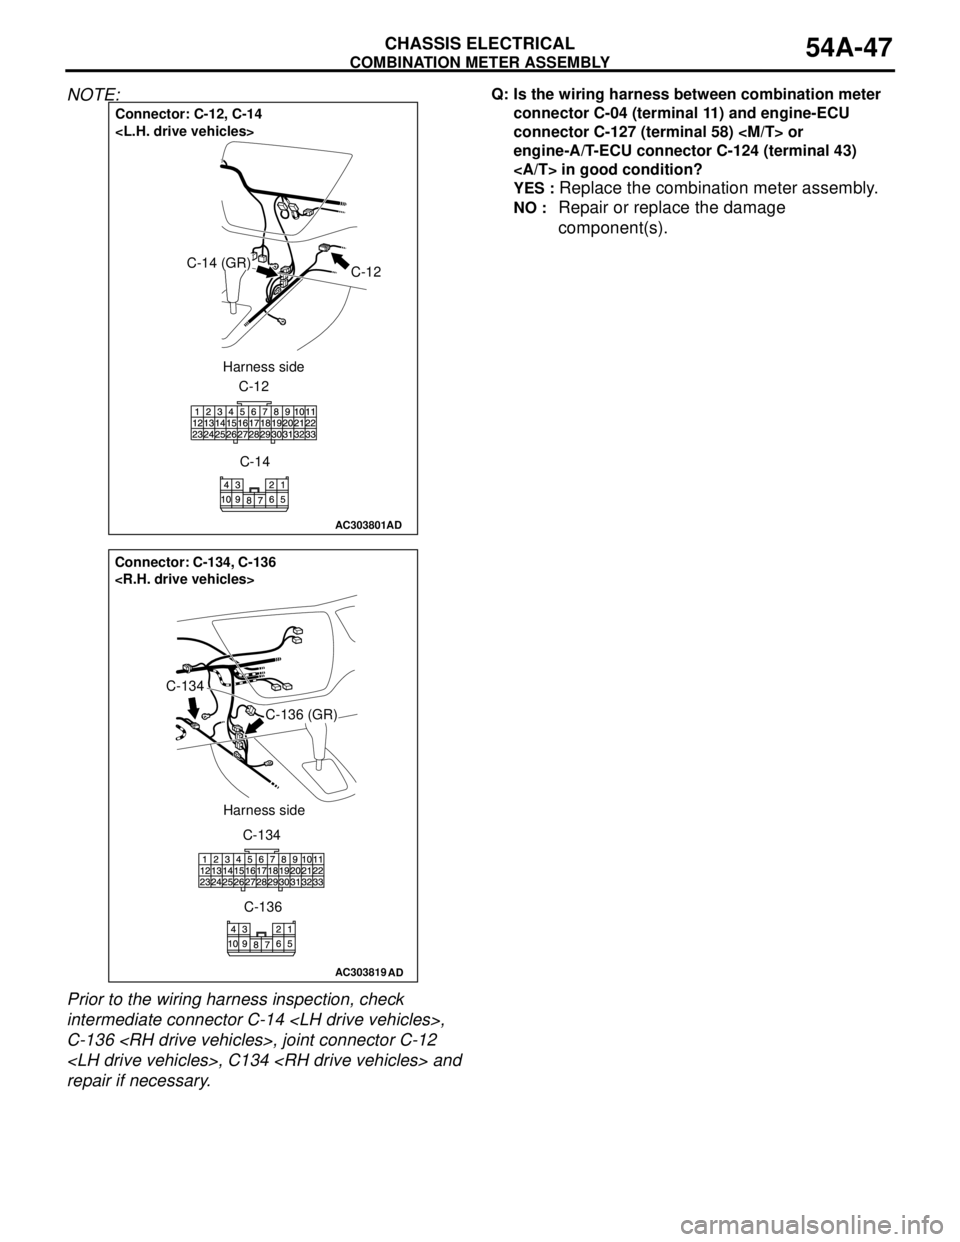
NOTE:
Prior to the wiring harness inspection, check
intermediate connector C-14
C-136
repair if necessary.Q: Is the wiring harness between combination meter
connector C-04 (terminal 11) and engine-ECU
connector C-127 (terminal 58)
engine-A/T-ECU connector C-124 (terminal 43)
in good condition?
YES :
Replace the combination meter assembly.
NO : Repair or replace the damage
component(s).
AC303801
Connector: C-12, C-14
C-12C-14 (GR)
C-12
C-14 Harness side
AD
AC303819
Connector: C-134, C-136
C-136 (GR)
C-134
C-134
C-136 Harness side
AD
Page 448 of 788
COMBINATION METER ASSEMBLY
CHASSIS ELECTRICAL54A-60
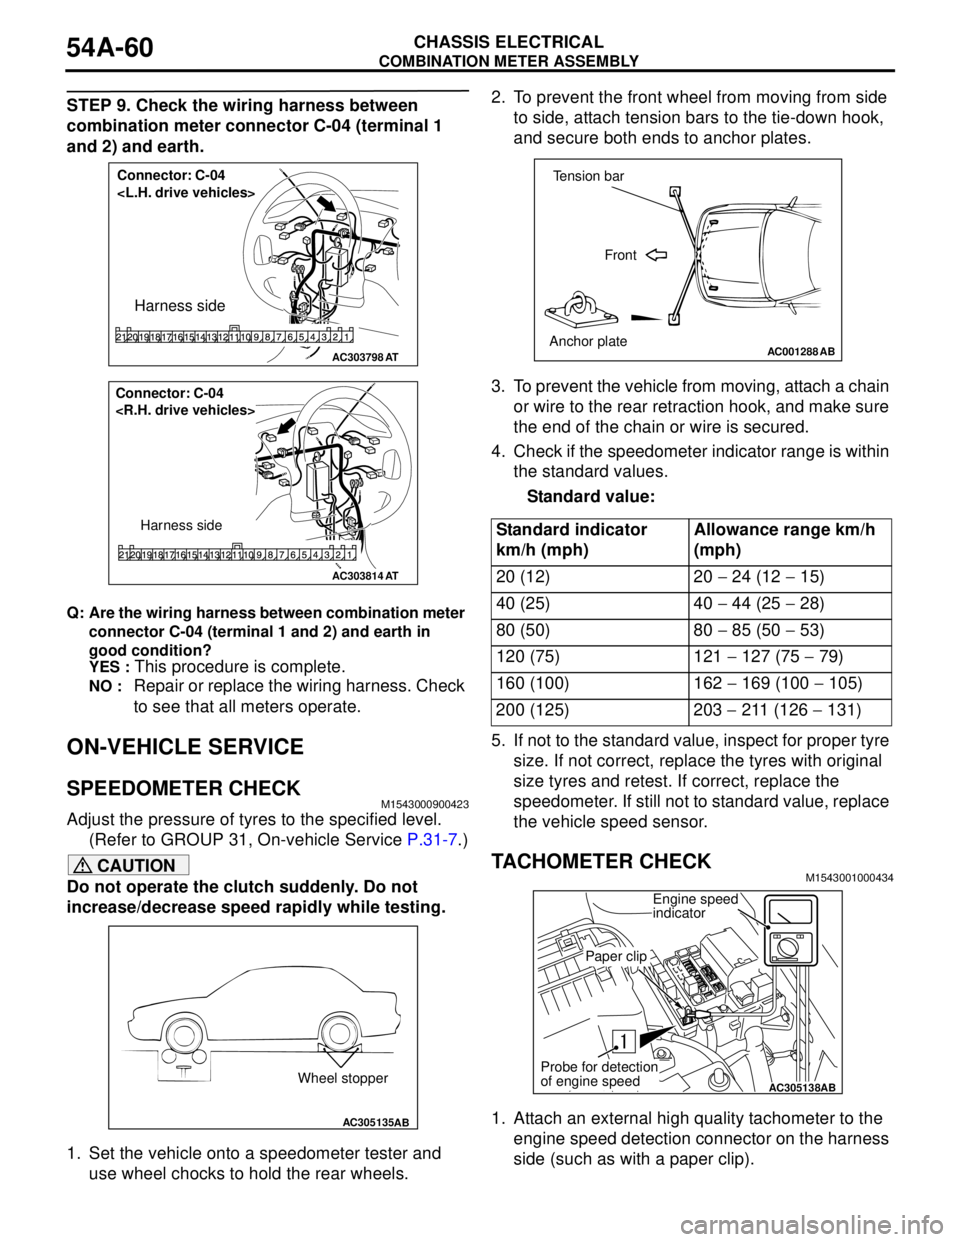
STEP 9. Check the wiring harness between
combination meter connector C-04 (terminal 1
and 2) and earth.
Q: Are the wiring harness between combination meter
connector C-04 (terminal 1 and 2) and earth in
good condition?
YES :
This procedure is complete.
NO : Repair or replace the wiring harness. Check
to see that all meters operate.
ON-VEHICLE SERVICE
SPEEDOMETER CHECKM1543000900423
Adjust the pressure of tyres to the specified level.
(Refer to GROUP 31, On-vehicle Service P.31-7.)
CAUTION
Do not operate the clutch suddenly. Do not
increase/decrease speed rapidly while testing.
1. Set the vehicle onto a speedometer tester and
use wheel chocks to hold the rear wheels.2. To prevent the front wheel from moving from side
to side, attach tension bars to the tie-down hook,
and secure both ends to anchor plates.
3. To prevent the vehicle from moving, attach a chain
or wire to the rear retraction hook, and make sure
the end of the chain or wire is secured.
4. Check if the speedometer indicator range is within
the standard values.
Standard value:
5. If not to the standard value, inspect for proper tyre
size. If not correct, replace the tyres with original
size tyres and retest. If correct, replace the
speedometer. If still not to standard value, replace
the vehicle speed sensor.
TACHOMETER CHECKM1543001000434
1. Attach an external high quality tachometer to the
engine speed detection connector on the harness
side (such as with a paper clip).
AC303798
Connector: C-04
Harness side
AT
AC303814
Connector: C-04
Harness side
AT
AC305135AB
Wheel stopper
Standard indicator
km/h (mph)Allowance range km/h
(mph)
20 (12) 20 − 24 (12 − 15)
40 (25) 40 − 44 (25 − 28)
80 (50) 80 − 85 (50 − 53)
120 (75) 121 − 127 (75 − 79)
160 (100) 162 − 169 (100 − 105)
200 (125) 203 − 211 (126 − 131)
AC001288
Tension bar
Front
Anchor plate
AB
AC305138AB
Engine speed
indicator
Paper clip
Probe for detection
of engine speed
Page 466 of 788
ROOM LAMP
CHASSIS ELECTRICAL54A-78
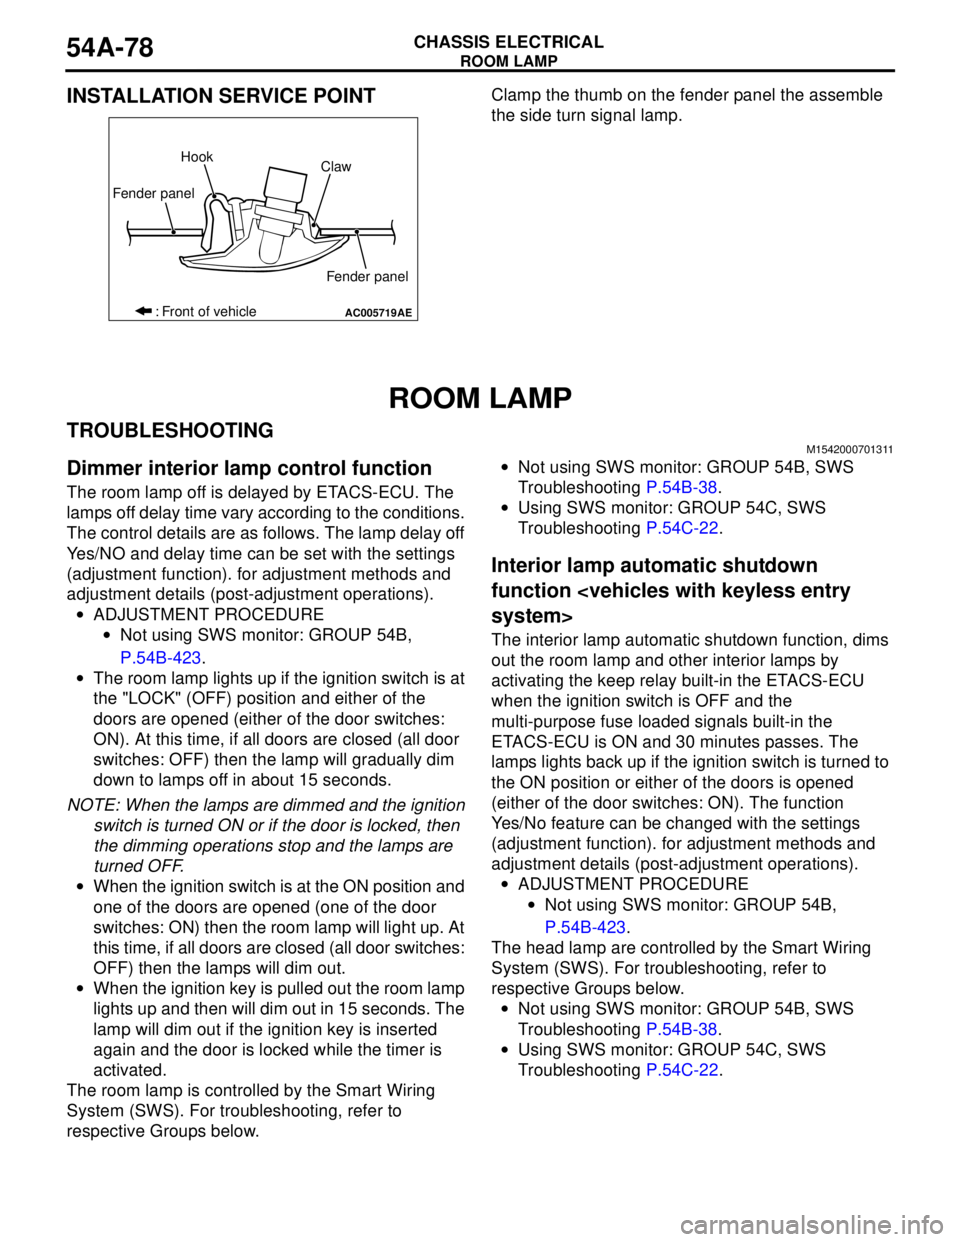
INSTALLATION SERVICE POINTClamp the thumb on the fender panel the assemble
the side turn signal lamp.
ROOM LAMP
TROUBLESHOOTINGM1542000701311
Dimmer interior lamp control function
The room lamp off is delayed by ETACS-ECU. The
lamps off delay time vary according to the conditions.
The control details are as follows. The lamp delay off
Yes/NO and delay time can be set with the settings
(adjustment function). for adjustment methods and
adjustment details (post-adjustment operations).
•ADJUSTMENT PROCEDURE
•Not using SWS monitor: GROUP 54B,
P.54B-423.
•The room lamp lights up if the ignition switch is at
the "LOCK" (OFF) position and either of the
doors are opened (either of the door switches:
ON). At this time, if all doors are closed (all door
switches: OFF) then the lamp will gradually dim
down to lamps off in about 15 seconds.
NOTE: When the lamps are dimmed and the ignition
switch is turned ON or if the door is locked, then
the dimming operations stop and the lamps are
turned OFF.
•When the ignition switch is at the ON position and
one of the doors are opened (one of the door
switches: ON) then the room lamp will light up. At
this time, if all doors are closed (all door switches:
OFF) then the lamps will dim out.
•When the ignition key is pulled out the room lamp
lights up and then will dim out in 15 seconds. The
lamp will dim out if the ignition key is inserted
again and the door is locked while the timer is
activated.
The room lamp is controlled by the Smart Wiring
System (SWS). For troubleshooting, refer to
respective Groups below.•Not using SWS monitor: GROUP 54B, SWS
Troubleshooting P.54B-38.
•Using SWS monitor: GROUP 54C, SWS
Troubleshooting P.54C-22.
Interior lamp automatic shutdown
function
The interior lamp automatic shutdown function, dims
out the room lamp and other interior lamps by
activating the keep relay built-in the ETACS-ECU
when the ignition switch is OFF and the
multi-purpose fuse loaded signals built-in the
ETACS-ECU is ON and 30 minutes passes. The
lamps lights back up if the ignition switch is turned to
the ON position or either of the doors is opened
(either of the door switches: ON). The function
Yes/No feature can be changed with the settings
(adjustment function). for adjustment methods and
adjustment details (post-adjustment operations).
•ADJUSTMENT PROCEDURE
•Not using SWS monitor: GROUP 54B,
P.54B-423.
The head lamp are controlled by the Smart Wiring
System (SWS). For troubleshooting, refer to
respective Groups below.
•Not using SWS monitor: GROUP 54B, SWS
Troubleshooting P.54B-38.
•Using SWS monitor: GROUP 54C, SWS
Troubleshooting P.54C-22.
AC005719
Fender panelHook
Claw
Fender panel
: Front of vehicle
AE
Page 476 of 788
COLUMN SWITCH
CHASSIS ELECTRICAL54A-88
INSPECTIONM1542011200931
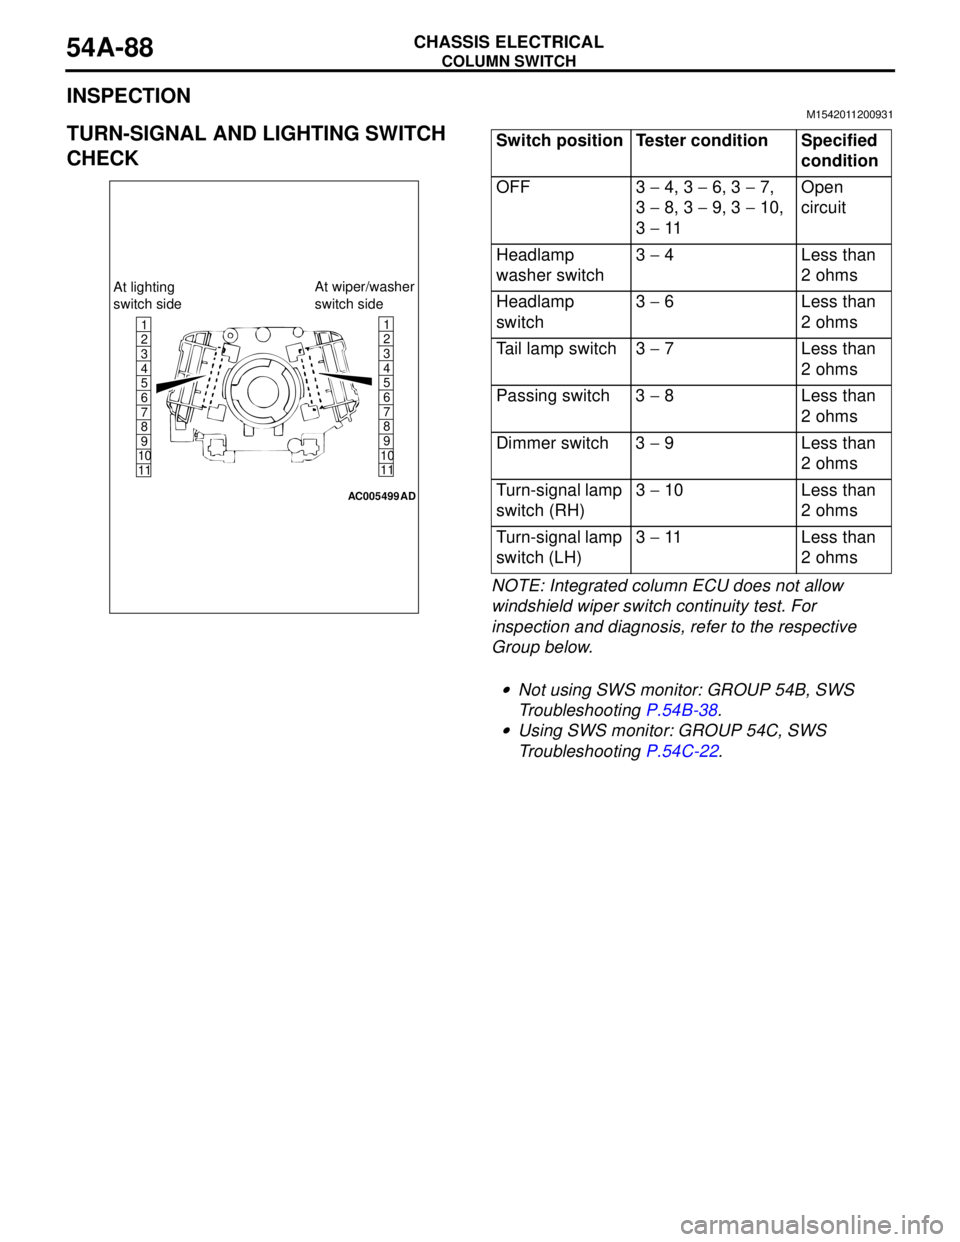
TURN-SIGNAL AND LIGHTING SWITCH
CHECK
NOTE: Integrated column ECU does not allow
windshield wiper switch continuity test. For
inspection and diagnosis, refer to the respective
Group below.
.
•Not using SWS monitor: GROUP 54B, SWS
Troubleshooting P.54B-38.
•Using SWS monitor: GROUP 54C, SWS
Troubleshooting P.54C-22.
1
6
8
11 109 7 5 4 3 21
6
8
11 109 7 5 4
3
2
AC005499
At lighting
switch sideAt wiper/washer
switch side
AD
Switch position Tester condition Specified
condition
OFF 3 − 4, 3 − 6, 3 − 7,
3 − 8, 3 − 9, 3 − 10,
3 − 11Open
circuit
Headlamp
washer switch3 − 4 Less than
2 ohms
Headlamp
switch3 − 6 Less than
2 ohms
Tail lamp switch 3 − 7 Less than
2 ohms
Passing switch 3 − 8 Less than
2 ohms
Dimmer switch 3 − 9 Less than
2 ohms
Turn-signal lamp
switch (RH)3 − 10 Less than
2 ohms
Turn-signal lamp
switch (LH)3 − 11 Less than
2 ohms
Page 483 of 788
REAR WINDOW DEFOGGER
CHASSIS ELECTRICAL54A-95
REAR WINDOW DEFOGGER
GENERAL INFORMATIONM1543000100319
Rear Defogger operation
The defogger relay turns ON if the defogger switch
built-in the A/C-ECU is turned ON when the ignition
switch is in the "ON" position. When the defogger
relay turns ON, power is supplied to the defogger
and the defogger is activated. The defogger comes
with a timer function that causes the defogger switch
to automatically turn OFF in about 11 minutes after
the defogger switch is turned ON.
TROUBLESHOOTINGM1543000701013
The rear window defogger is controlled by the
A/C-ECU. For troubleshooting, refer to GROUP 55-
Troubleshooting P.55-5.
Pre-removal and Post-installation Operation
•Front pillar trim, Centre pillar trim lower, Centre pillar trim
upper, Quarter trim lower, Quarter trim upper (Refer to
GROUP 52A − Trims P.52A-11.)
•Headlining Removal and Installation (Refer to GROUP
52A, Headlining P.52A-21.)
AC305316
AB
1
23
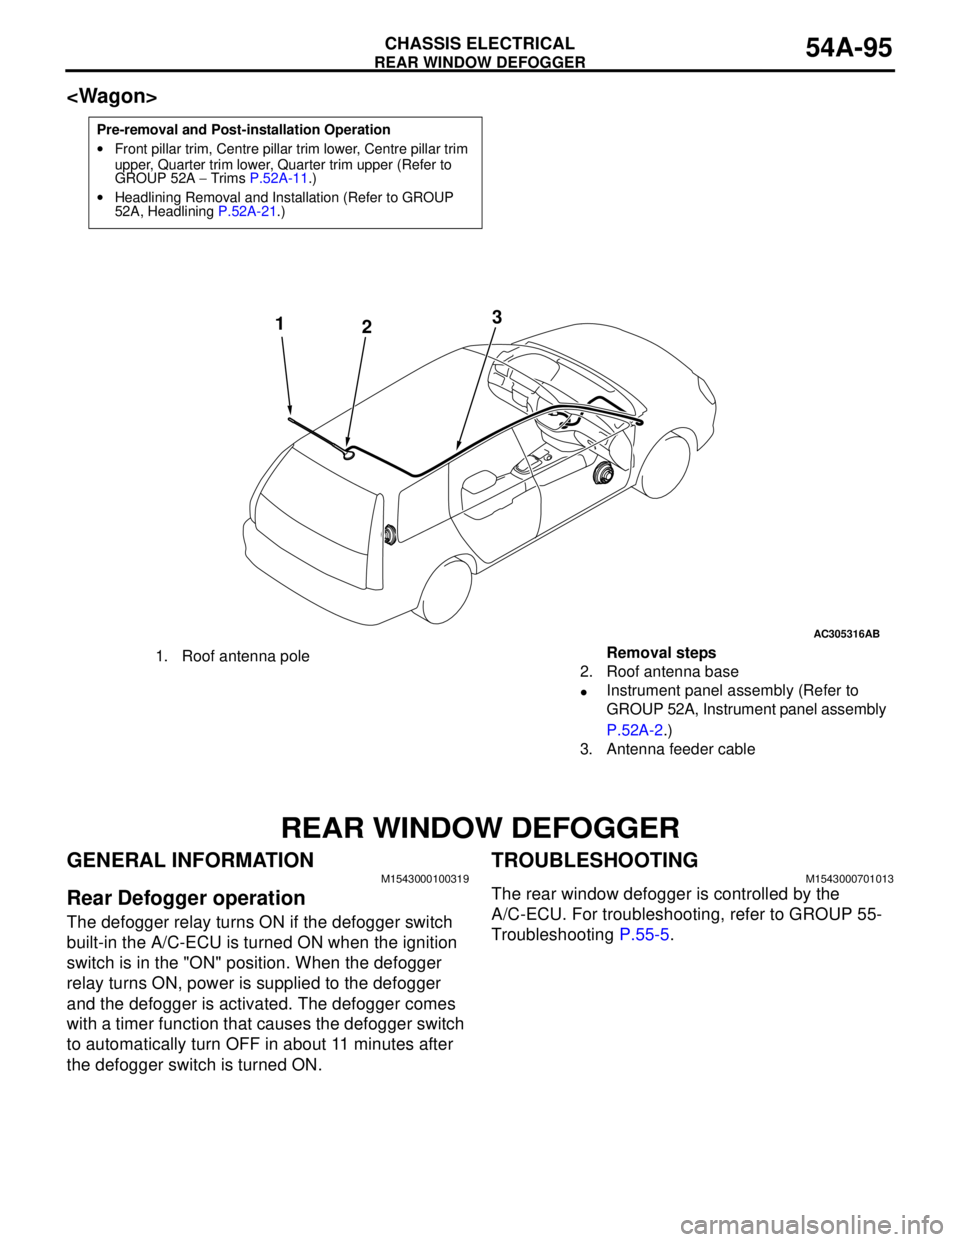
1. Roof antenna poleRemoval steps
2. Roof antenna base
•Instrument panel assembly (Refer to
GROUP 52A, Instrument panel assembly
P.52A-2.)
3. Antenna feeder cable
Page 485 of 788
55-1
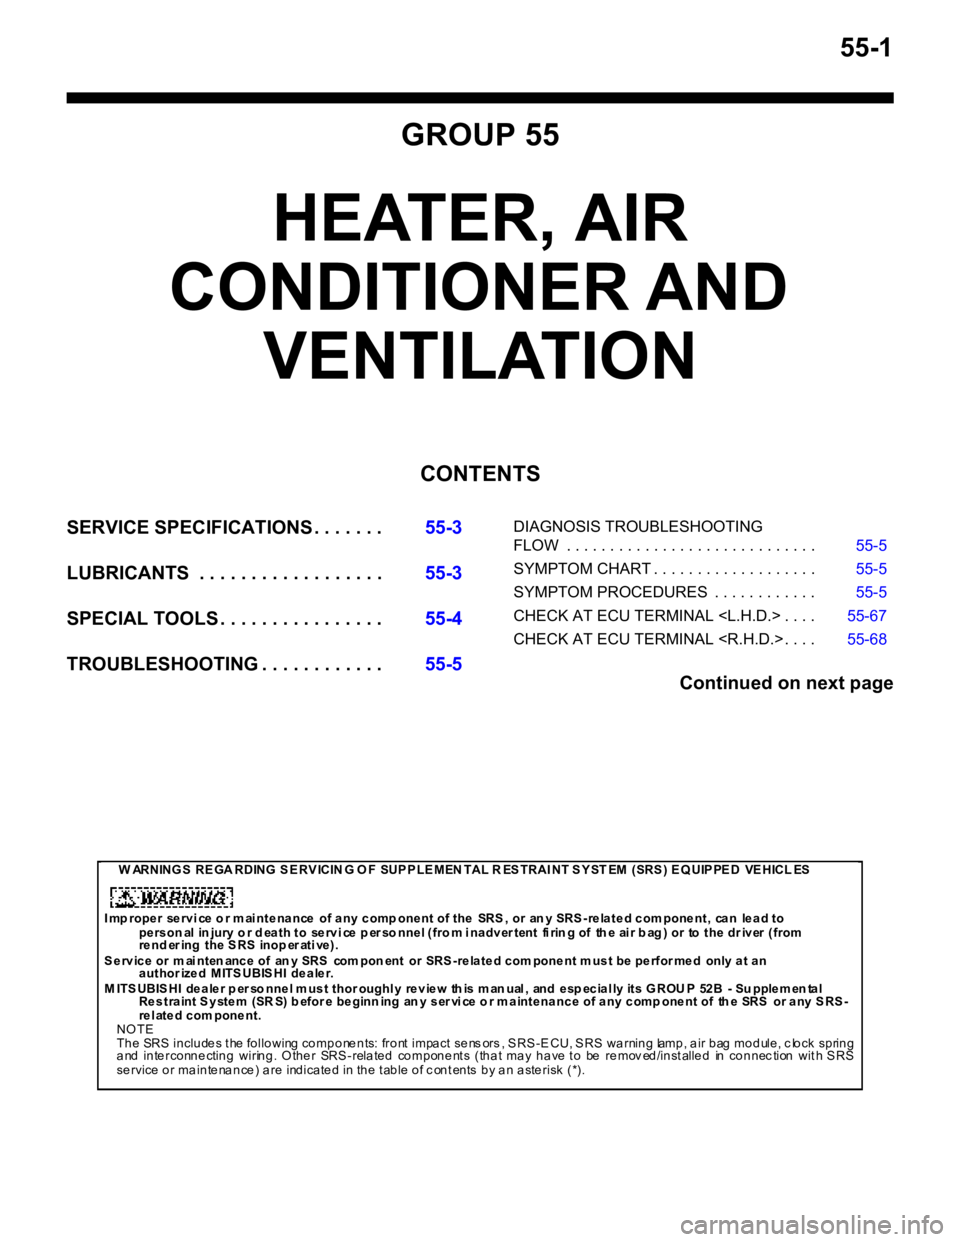
GROUP 55
HEATER, AIR
CONDITIONER AND
VENTILATION
CONTENTS
SERVICE SPECIFICATIONS . . . . . . .55-3
LUBRICANTS . . . . . . . . . . . . . . . . . .55-3
SPECIAL TOOLS . . . . . . . . . . . . . . . .55-4
TROUBLESHOOTING . . . . . . . . . . . .55-5DIAGNOSIS TROUBLESHOOTING
FLOW . . . . . . . . . . . . . . . . . . . . . . . . . . . . . 55-5
SYMPTOM CHART . . . . . . . . . . . . . . . . . . . 55-5
SYMPTOM PROCEDURES . . . . . . . . . . . . 55-5
CHECK AT ECU TERMINAL
CHECK AT ECU TERMINAL
Continued on next page
W ARNING S RE GA RDING S E RV ICIN G O F SUP P LE MEN TAL R ES TRAI NT S Y ST EM (SRS ) E Q UIP PE D VE HICL ES
I mp roper se rvi ce o r m ai nte na nce of a ny c omp onent of the SRS , or an y SRS -re la te d c om pone nt, ca n le a d to
personal injury or death to service personnel (from inadvertent firing of the air bag) or to the driver (from
re nd er ing the S RS inop er ati ve).
S e rvic e or m ai nten anc e of an y SRS com pon ent or SRS -re late d com pone nt m ust be pe rfor me d only a t an
authorized MITSUBISHI dealer.
M ITSUBISHI dealer p erso nnel must thoroughly review th is man ual, and esp ecially its GROU P 52B - Su pplemen tal
Restraint System (SR S) b efore beginn ing an y service o r maintenance of any comp onent of th e SRS or any SRS-
rel ated com ponent.
NOTE
The SRS includes the following components: front impact sens ors , SRS-ECU, SRS warning lamp, air bag module, c lock spring
and interconnecting wiring. Other SRS-related components (that may have to be remov ed/installed in connection with SRS
service or maintenance) are indicated in the table of c ontents by an asterisk (*).
Page 489 of 788
TROUBLESHOOTING
HEATER, AIR CONDITIONER AND VENTILATION55-5
TROUBLESHOOTING
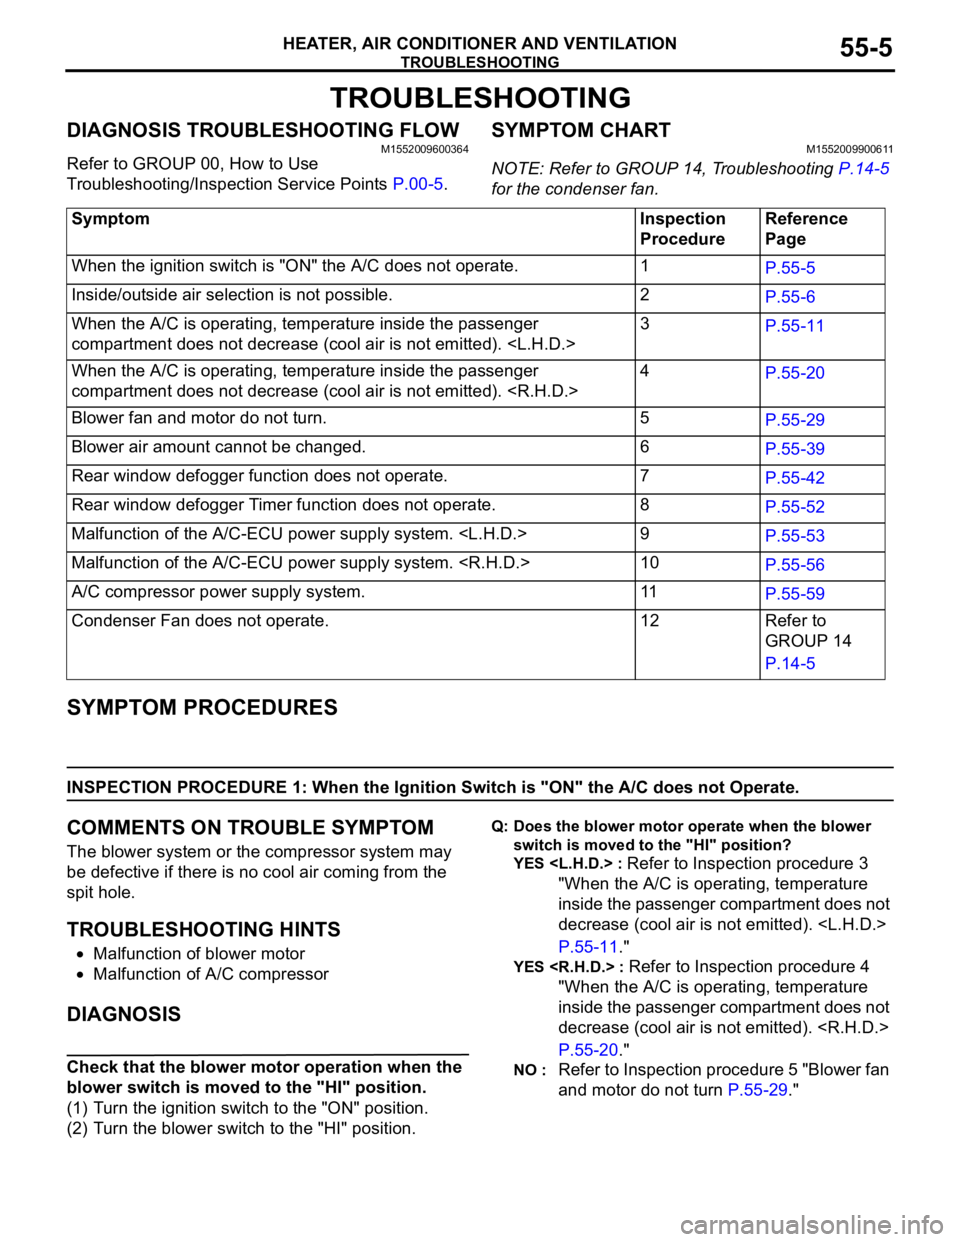
DIAGNOSIS TROUBLESHOOTING FLOWM1552009600364
Refer to GROUP 00, How to Use
Troubleshooting/Inspection Service Points P.00-5.
SYMPTOM CHARTM1552009900611
NOTE: Refer to GROUP 14, Troubleshooting P.14-5
for the condenser fan.
SYMPTOM PROCEDURES
INSPECTION PROCEDURE 1: When the Ignition Switch is "ON" the A/C does not Operate.
COMMENTS ON TROUBLE SYMPTOM
The blower system or the compressor system may
be defective if there is no cool air coming from the
spit hole.
TROUBLESHOOTING HINTS
•Malfunction of blower motor
•Malfunction of A/C compressor
DIAGNOSIS
Check that the blower motor operation when the
blower switch is moved to the "HI" position.
(1) Turn the ignition switch to the "ON" position.
(2) Turn the blower switch to the "HI" position.
Q: Does the blower motor operate when the blower
switch is moved to the "HI" position?
YES
Refer to Inspection procedure 3
"When the A/C is operating, temperature
inside the passenger compartment does not
decrease (cool air is not emitted).
P.55-11."
YES
"When the A/C is operating, temperature
inside the passenger compartment does not
decrease (cool air is not emitted).
P.55-20."
NO : Refer to Inspection procedure 5 "Blower fan
and motor do not turn P.55-29." Symptom Inspection
ProcedureReference
Page
When the ignition switch is "ON" the A/C does not operate. 1
P.55-5
Inside/outside air selection is not possible. 2
P.55-6
When the A/C is operating, temperature inside the passenger
compartment does not decrease (cool air is not emitted).
P.55-11
When the A/C is operating, temperature inside the passenger
compartment does not decrease (cool air is not emitted).
P.55-20
Blower fan and motor do not turn. 5
P.55-29
Blower air amount cannot be changed. 6
P.55-39
Rear window defogger function does not operate. 7
P.55-42
Rear window defogger Timer function does not operate. 8
P.55-52
Malfunction of the A/C-ECU power supply system.
P.55-53
Malfunction of the A/C-ECU power supply system.
P.55-56
A/C compressor power supply system. 11
P.55-59
Condenser Fan does not operate. 12 Refer to
GROUP 14
P.14-5