engine MITSUBISHI LANCER 2005 Workshop Manual
[x] Cancel search | Manufacturer: MITSUBISHI, Model Year: 2005, Model line: LANCER, Model: MITSUBISHI LANCER 2005Pages: 788, PDF Size: 45.98 MB
Page 434 of 788
COMBINATION METER ASSEMBLY
CHASSIS ELECTRICAL54A-46
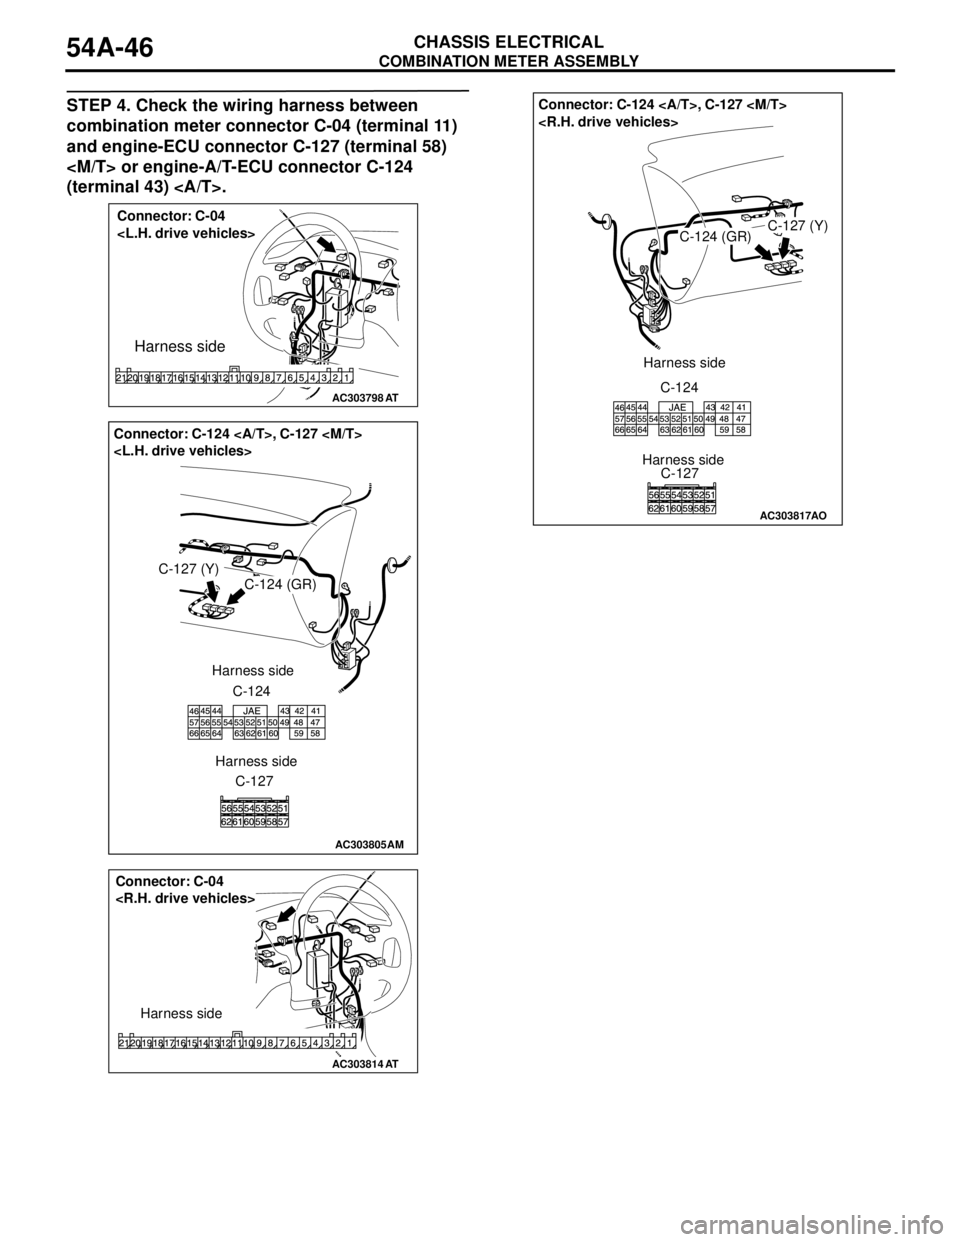
STEP 4. Check the wiring harness between
combination meter connector C-04 (terminal 11)
and engine-ECU connector C-127 (terminal 58)
(terminal 43) .
AC303798
Connector: C-04
Harness side
AT
AC303805
Connector: C-124 , C-127
C-124 (GR)
Harness side
C-124
C-127
AM
C-127 (Y)
Harness side
AC303814
Connector: C-04
Harness side
AT
AC303817
Connector: C-124 , C-127
C-127 (Y)C-124 (GR)
C-124
C-127 Harness side
AO
Harness side
Page 435 of 788
COMBINATION METER ASSEMBLY
CHASSIS ELECTRICAL54A-47
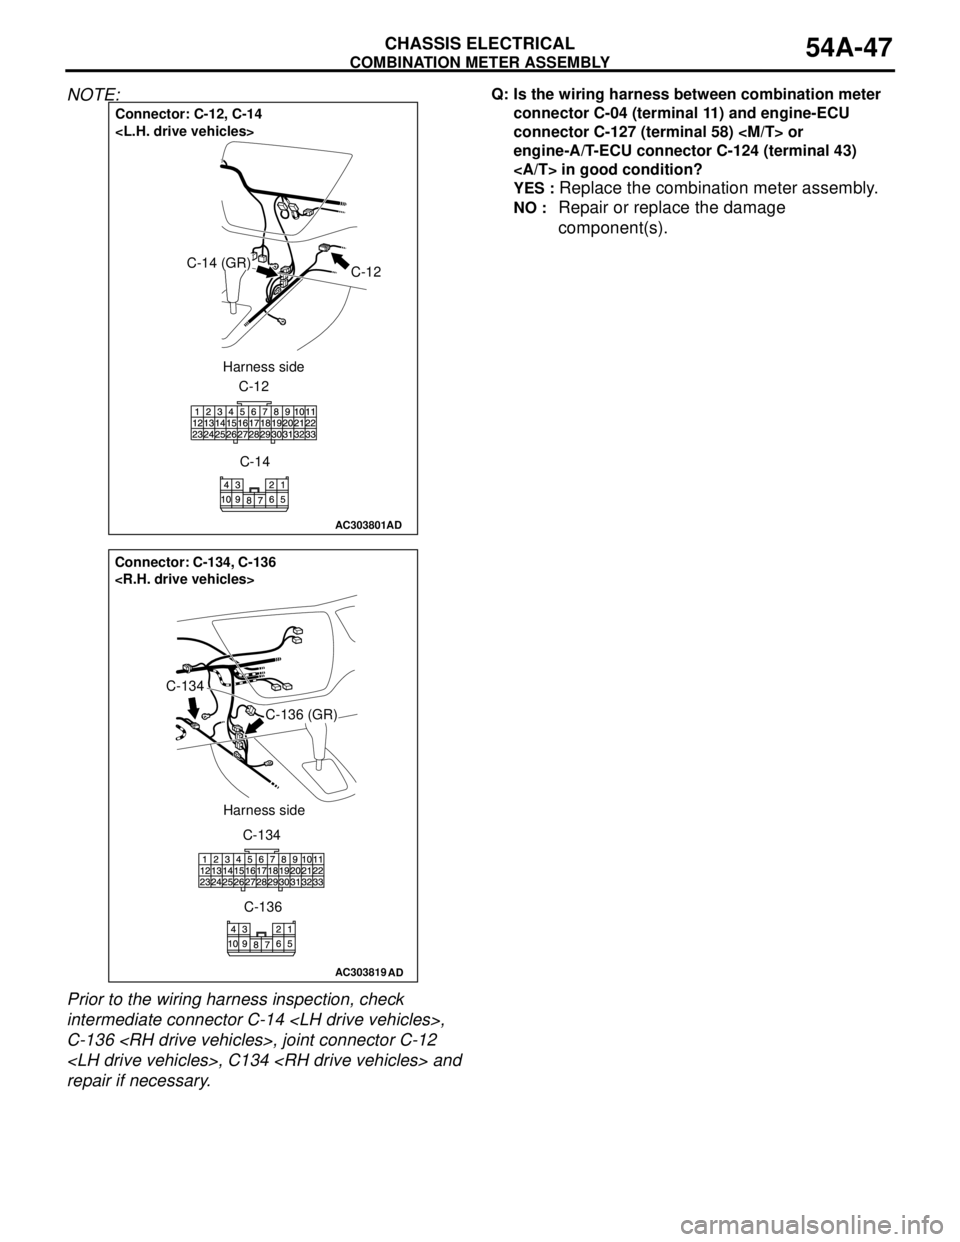
NOTE:
Prior to the wiring harness inspection, check
intermediate connector C-14
C-136
repair if necessary.Q: Is the wiring harness between combination meter
connector C-04 (terminal 11) and engine-ECU
connector C-127 (terminal 58)
engine-A/T-ECU connector C-124 (terminal 43)
in good condition?
YES :
Replace the combination meter assembly.
NO : Repair or replace the damage
component(s).
AC303801
Connector: C-12, C-14
C-12C-14 (GR)
C-12
C-14 Harness side
AD
AC303819
Connector: C-134, C-136
C-136 (GR)
C-134
C-134
C-136 Harness side
AD
Page 439 of 788
COMBINATION METER ASSEMBLY
CHASSIS ELECTRICAL54A-51
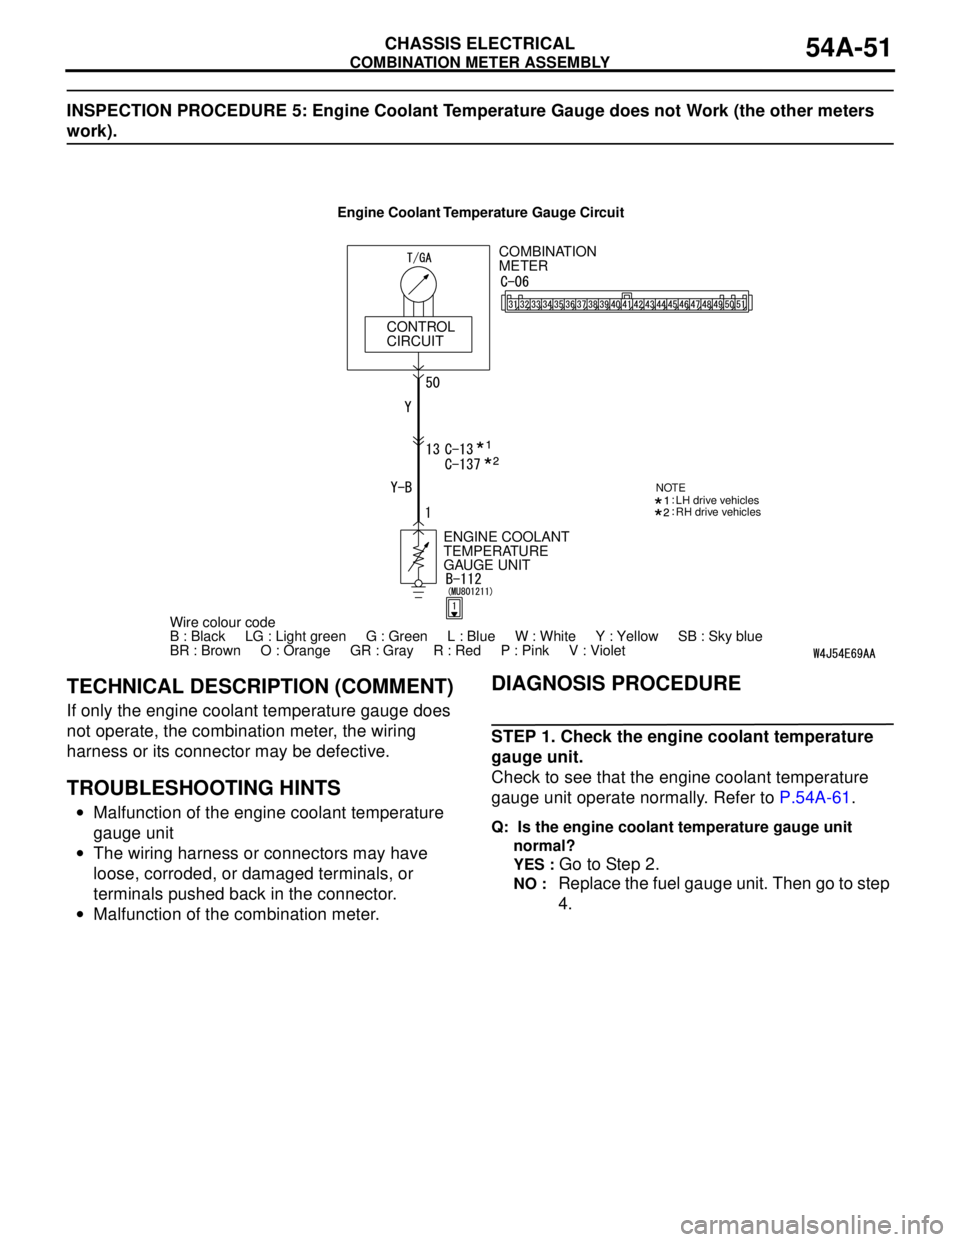
INSPECTION PROCEDURE 5: Engine Coolant Temperature Gauge does not Work (the other meters
work).
TECHNICAL DESCRIPTION (COMMENT)
If only the engine coolant temperature gauge does
not operate, the combination meter, the wiring
harness or its connector may be defective.
TROUBLESHOOTING HINTS
•Malfunction of the engine coolant temperature
gauge unit
•The wiring harness or connectors may have
loose, corroded, or damaged terminals, or
terminals pushed back in the connector.
•Malfunction of the combination meter.
DIAGNOSIS PROCEDURE
STEP 1. Check the engine coolant temperature
gauge unit.
Check to see that the engine coolant temperature
gauge unit operate normally. Refer to P.54A-61.
Q: Is the engine coolant temperature gauge unit
normal?
YES :
Go to Step 2.
NO : Replace the fuel gauge unit. Then go to step
4.
COMBINATION
METER
CONTROL
CIRCUIT
Wire colour code
B : Black LG : Light green G : Green L : Blue W : White Y : Yellow SB : Sky blue
BR : Brown O : Orange GR : Gray R : Red P : Pink V : Violet ENGINE COOLANT
TEMPERATURE
GAUGE UNIT
NOTELH drive vehicles
RH drive vehicles
Engine Coolant Temperature Gauge Circuit
Page 440 of 788

COMBINATION METER ASSEMBLY
CHASSIS ELECTRICAL54A-52
STEP 2. Connector check: Combination meter
connector C-06 and engine coolant temperature
gauge unit connector B-112
Q: Is combination meter connector C-06 and engine
coolant temperature gauge unit connector B-112 in
good condition?
YES :
Go to Step 3.
NO : Repair or replace the damage
component(s).
STEP 3. Check the wiring harness between
combination meter connector C-06 (terminal 50)
and engine coolant temperature gauge unit
connector B-112 (terminal 1).
AC303784
Connector: B-112
<4G1-MPI>
Harness side
B-112 (B)
AF
AC303792
AE
Connector: B-112
<4G6-MPI>
B-112 (B) Harness side
AC303798
Connector: C-06
Harness side
C-06 (L)
31 32 33 34 35 36 37 38 39 40 41 42 43 44 45 46 47 48 49 50 51
AV
AC303814AU
Connector: C-06
Harness side
31 32 33 34 35 36 37 38 39 40 41 42 43 44 45 46 47 48 49 50 51
C-06 (L)
Page 441 of 788
COMBINATION METER ASSEMBLY
CHASSIS ELECTRICAL54A-53
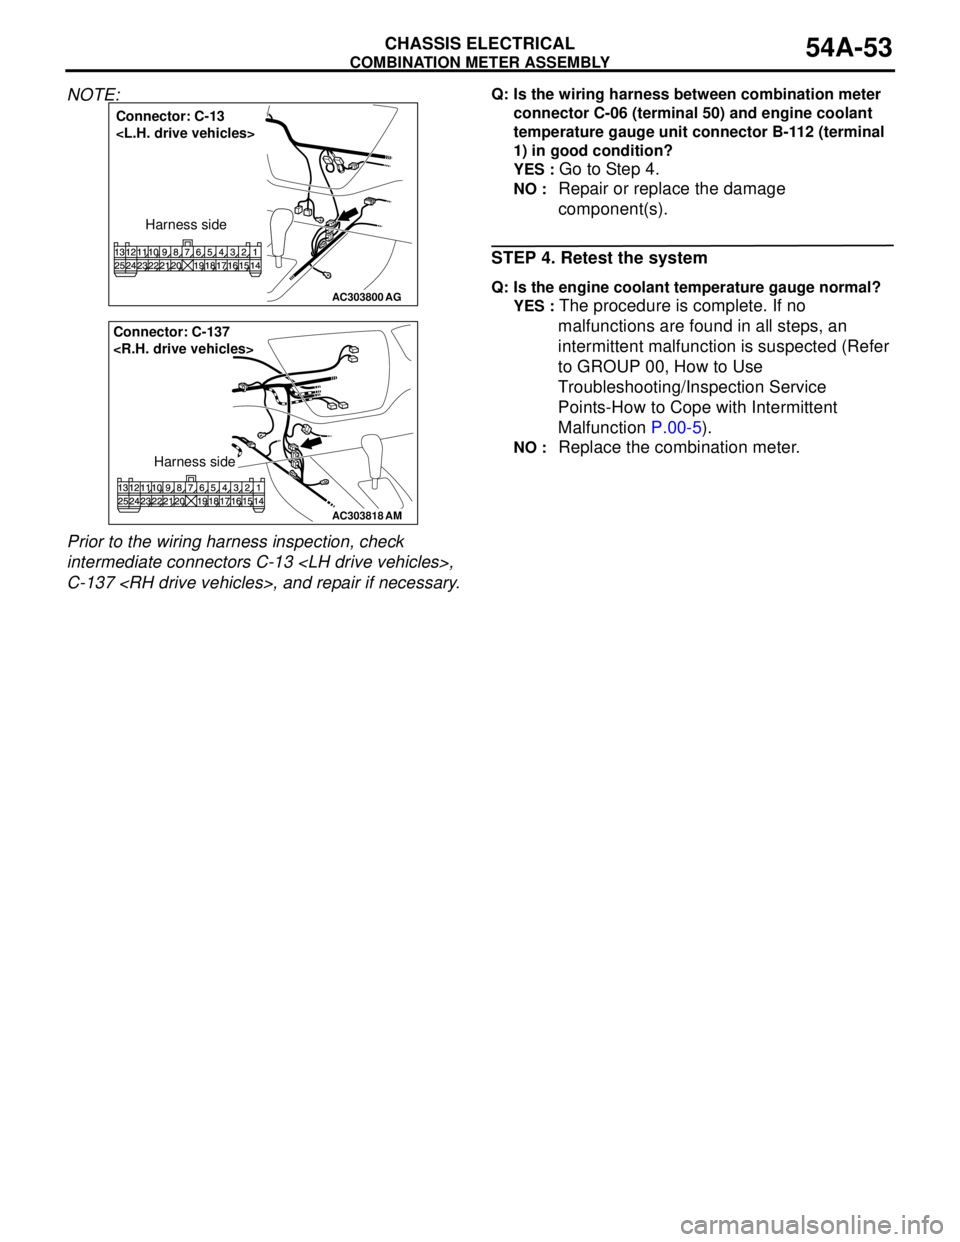
NOTE:
Prior to the wiring harness inspection, check
intermediate connectors C-13
C-137
connector C-06 (terminal 50) and engine coolant
temperature gauge unit connector B-112 (terminal
1) in good condition?
YES :
Go to Step 4.
NO : Repair or replace the damage
component(s).
STEP 4. Retest the system
Q: Is the engine coolant temperature gauge normal?
YES :
The procedure is complete. If no
malfunctions are found in all steps, an
intermittent malfunction is suspected (Refer
to GROUP 00, How to Use
Troubleshooting/Inspection Service
Points-How to Cope with Intermittent
Malfunction P.00-5).
NO : Replace the combination meter.
AC303800
Connector: C-13
Harness side
AG
AC303818
AM
Connector: C-137
Harness side
Page 448 of 788
COMBINATION METER ASSEMBLY
CHASSIS ELECTRICAL54A-60
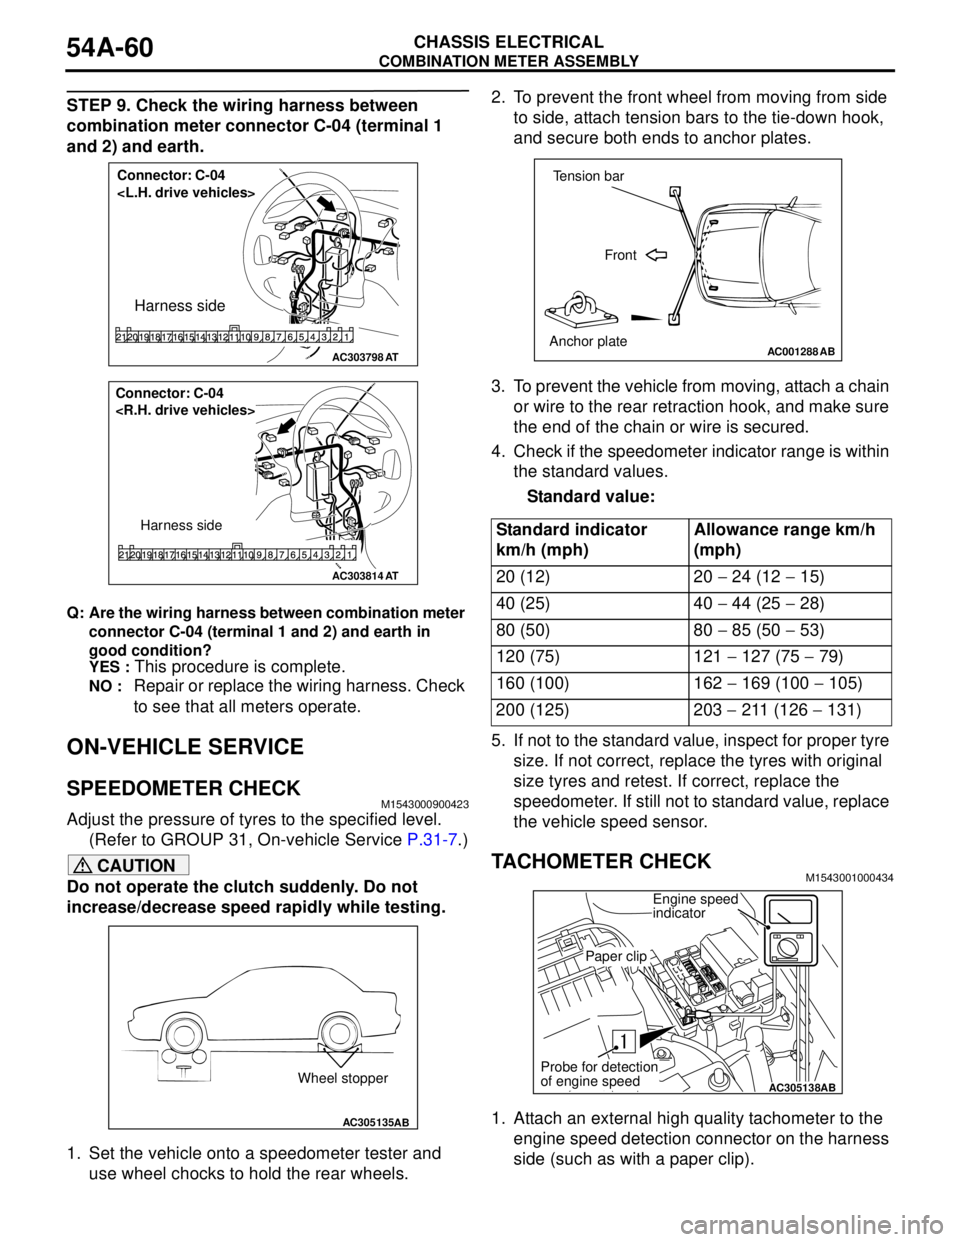
STEP 9. Check the wiring harness between
combination meter connector C-04 (terminal 1
and 2) and earth.
Q: Are the wiring harness between combination meter
connector C-04 (terminal 1 and 2) and earth in
good condition?
YES :
This procedure is complete.
NO : Repair or replace the wiring harness. Check
to see that all meters operate.
ON-VEHICLE SERVICE
SPEEDOMETER CHECKM1543000900423
Adjust the pressure of tyres to the specified level.
(Refer to GROUP 31, On-vehicle Service P.31-7.)
CAUTION
Do not operate the clutch suddenly. Do not
increase/decrease speed rapidly while testing.
1. Set the vehicle onto a speedometer tester and
use wheel chocks to hold the rear wheels.2. To prevent the front wheel from moving from side
to side, attach tension bars to the tie-down hook,
and secure both ends to anchor plates.
3. To prevent the vehicle from moving, attach a chain
or wire to the rear retraction hook, and make sure
the end of the chain or wire is secured.
4. Check if the speedometer indicator range is within
the standard values.
Standard value:
5. If not to the standard value, inspect for proper tyre
size. If not correct, replace the tyres with original
size tyres and retest. If correct, replace the
speedometer. If still not to standard value, replace
the vehicle speed sensor.
TACHOMETER CHECKM1543001000434
1. Attach an external high quality tachometer to the
engine speed detection connector on the harness
side (such as with a paper clip).
AC303798
Connector: C-04
Harness side
AT
AC303814
Connector: C-04
Harness side
AT
AC305135AB
Wheel stopper
Standard indicator
km/h (mph)Allowance range km/h
(mph)
20 (12) 20 − 24 (12 − 15)
40 (25) 40 − 44 (25 − 28)
80 (50) 80 − 85 (50 − 53)
120 (75) 121 − 127 (75 − 79)
160 (100) 162 − 169 (100 − 105)
200 (125) 203 − 211 (126 − 131)
AC001288
Tension bar
Front
Anchor plate
AB
AC305138AB
Engine speed
indicator
Paper clip
Probe for detection
of engine speed
Page 449 of 788
COMBINATION METER ASSEMBLY
CHASSIS ELECTRICAL54A-61
NOTE: For tachometer check, use an external
high quality inductive tachometer.
2. Compare the readings of the vehicle tachometer
and the external tachometer at every engine
speed, and check if the variations are within the
standard values.
Standard values:
FUEL TANK GAUGE UNIT CHECKM1543001200461
Remove the fuel tank gauge unit. (Refer to GROUP
13C, Fuel Tank P.13C-4.)
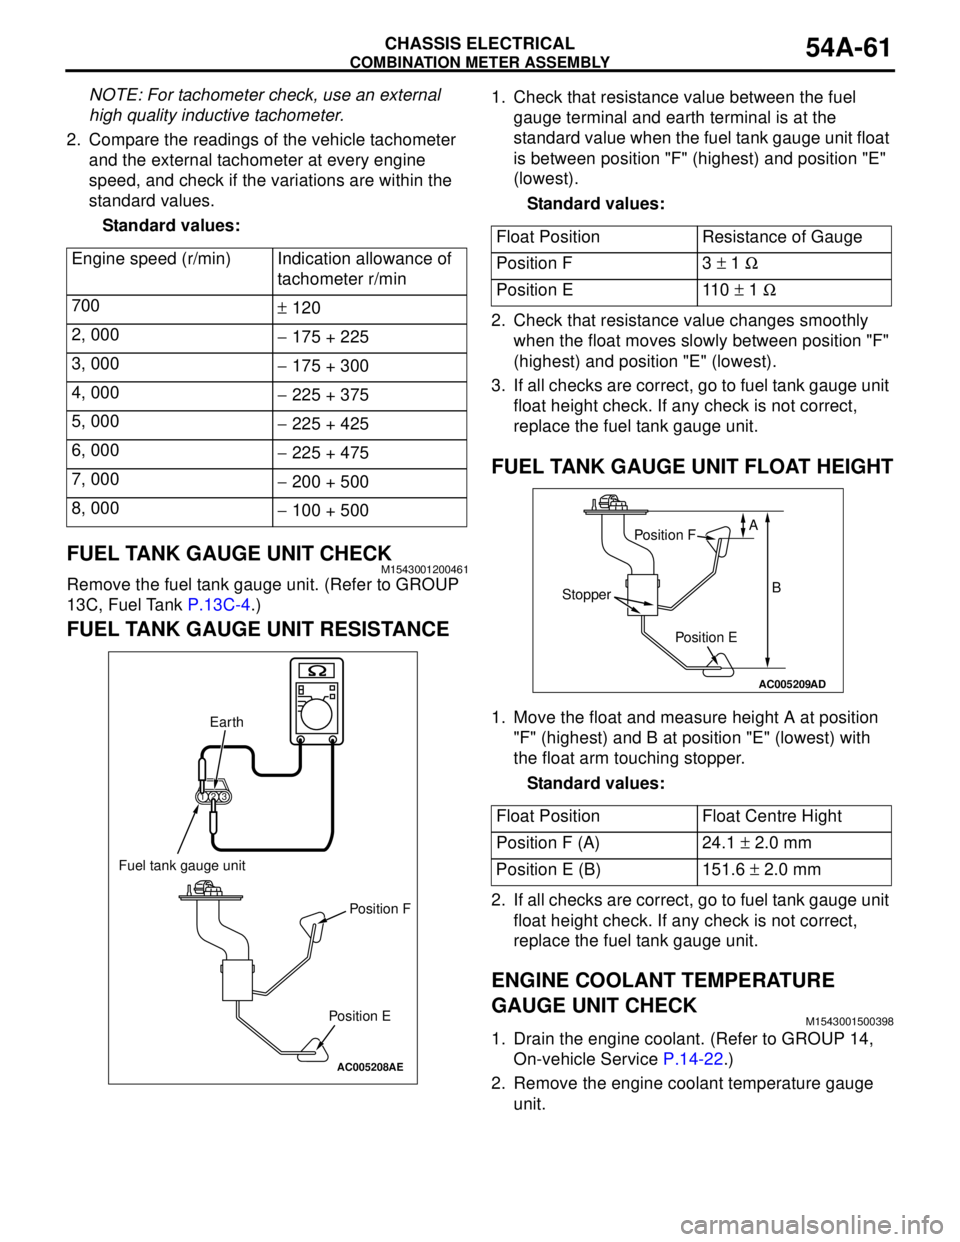
FUEL TANK GAUGE UNIT RESISTANCE
1. Check that resistance value between the fuel
gauge terminal and earth terminal is at the
standard value when the fuel tank gauge unit float
is between position "F" (highest) and position "E"
(lowest).
Standard values:
2. Check that resistance value changes smoothly
when the float moves slowly between position "F"
(highest) and position "E" (lowest).
3. If all checks are correct, go to fuel tank gauge unit
float height check. If any check is not correct,
replace the fuel tank gauge unit.
FUEL TANK GAUGE UNIT FLOAT HEIGHT
1. Move the float and measure height A at position
"F" (highest) and B at position "E" (lowest) with
the float arm touching stopper.
Standard values:
2. If all checks are correct, go to fuel tank gauge unit
float height check. If any check is not correct,
replace the fuel tank gauge unit.
ENGINE COOLANT TEMPERATURE
GAUGE UNIT CHECK
M1543001500398
1. Drain the engine coolant. (Refer to GROUP 14,
On-vehicle Service P.14-22.)
2. Remove the engine coolant temperature gauge
unit. Engine speed (r/min) Indication allowance of
tachometer r/min
700
± 120
2, 000
− 175 + 225
3, 000
− 175 + 300
4, 000
− 225 + 375
5, 000
− 225 + 425
6, 000
− 225 + 475
7, 000
− 200 + 500
8, 000
− 100 + 500
AC005208
123
AE
Fuel tank gauge unit
Earth
Position F
Position E
Float Position Resistance of Gauge
Position F 3 ± 1 Ω
Position E 110 ± 1 Ω
Float Position Float Centre Hight
Position F (A) 24.1 ± 2.0 mm
Position E (B) 151.6 ± 2.0 mm
AC005209
AD
Position F
Position E
Stopper
A
B
Page 450 of 788
COMBINATION METER ASSEMBLY
CHASSIS ELECTRICAL54A-62
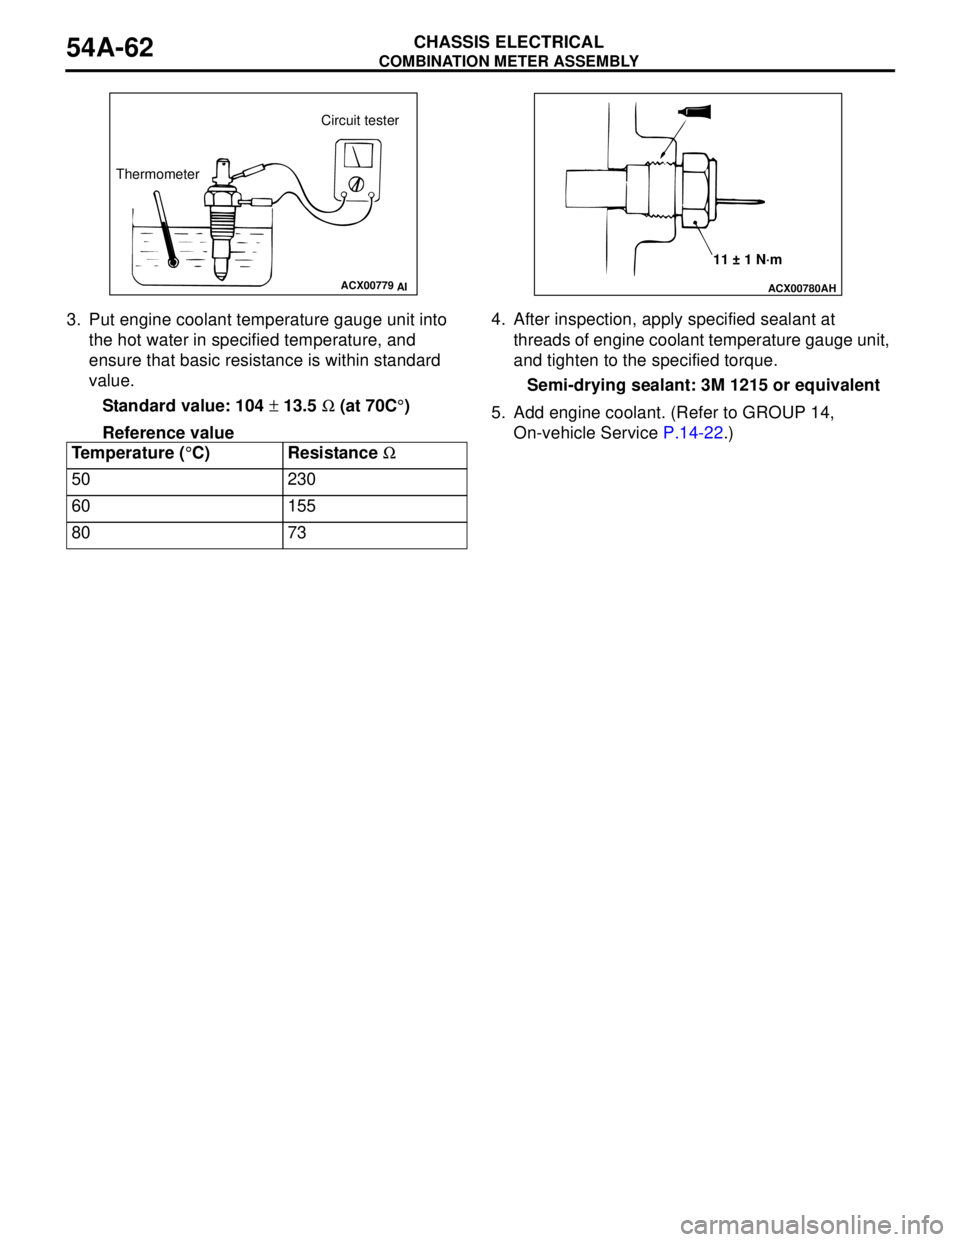
3. Put engine coolant temperature gauge unit into
the hot water in specified temperature, and
ensure that basic resistance is within standard
value.
Standard value: 104 ± 13.5 Ω (at 70C°)
Reference value4. After inspection, apply specified sealant at
threads of engine coolant temperature gauge unit,
and tighten to the specified torque.
Semi-drying sealant: 3M 1215 or equivalent
5. Add engine coolant. (Refer to GROUP 14,
On-vehicle Service P.14-22.)
Temperature (°C) Resistance Ω
50 230
60 155
80 73
ACX00779
AI
Circuit tester
Thermometer
ACX00780
AH
11 ± 1 N·m
Page 452 of 788
COMBINATION METER ASSEMBLY
CHASSIS ELECTRICAL54A-64
INSPECTIONM1543019502407
VEHICLE SPEED SENSOR CHECK
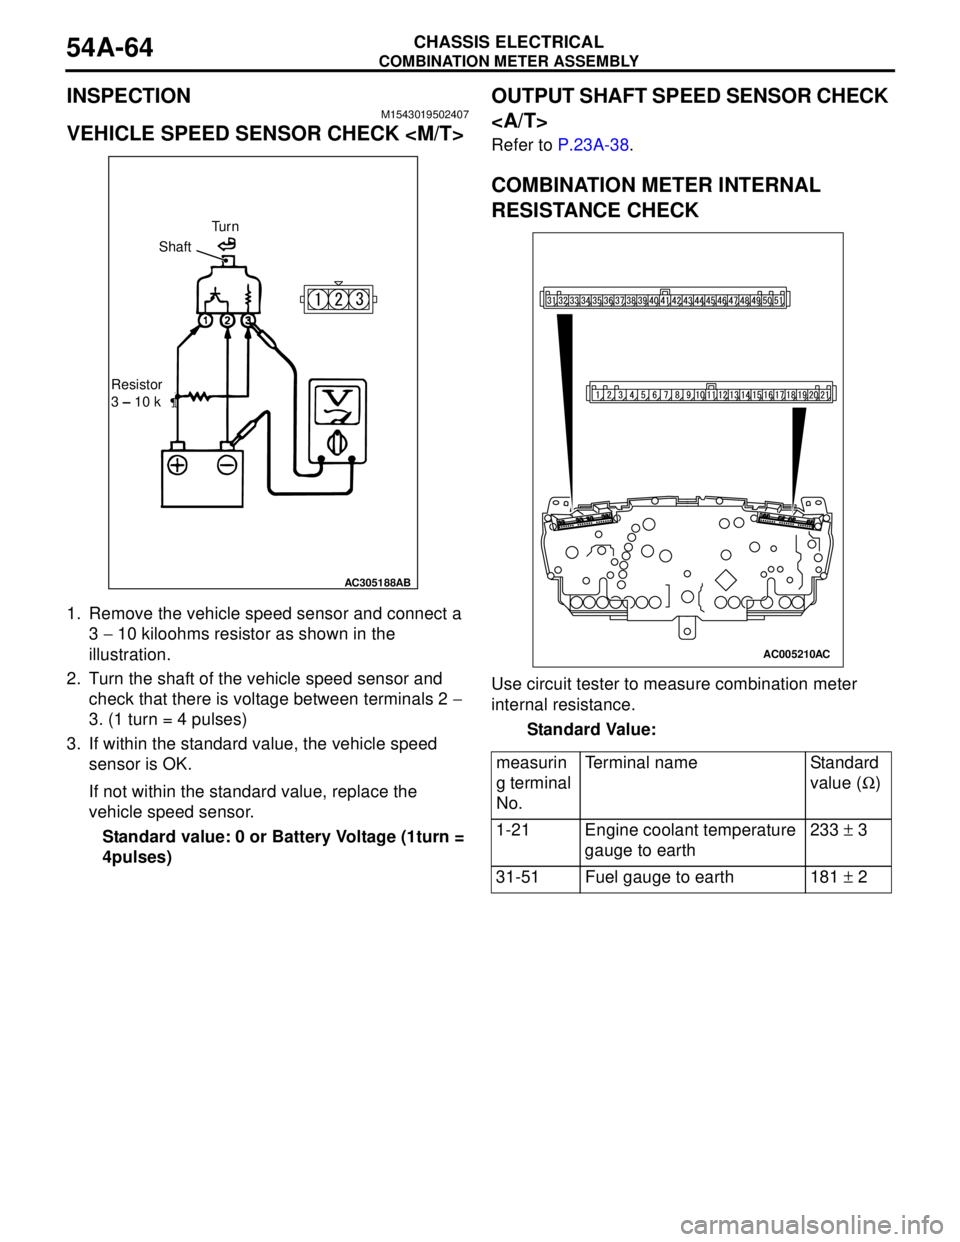
1. Remove the vehicle speed sensor and connect a
3 − 10 kiloohms resistor as shown in the
illustration.
2. Turn the shaft of the vehicle speed sensor and
check that there is voltage between terminals 2 −
3. (1 turn = 4 pulses)
3. If within the standard value, the vehicle speed
sensor is OK.
If not within the standard value, replace the
vehicle speed sensor.
Standard value: 0 or Battery Voltage (1turn =
4pulses)
OUTPUT SHAFT SPEED SENSOR CHECK
Refer to P.23A-38.
COMBINATION METER INTERNAL
RESISTANCE CHECK
Use circuit tester to measure combination meter
internal resistance.
Standard Value:
AC305188AB
Tu r n
Shaft
Resistor
3 – 10 k
measurin
g terminal
No.Terminal name Standard
value (Ω)
1-21 Engine coolant temperature
gauge to earth233 ± 3
31-51 Fuel gauge to earth 181 ± 2
AC005210AC
Page 455 of 788
HEADLAMP
CHASSIS ELECTRICAL54A-67
NOTE: Height from the floor to the centre of
the headlamps (Reference value): 840 mm
(3) Measure the distance from the centre line of
the vehicle to the centre of each headlamp.
Transfer the measurement to the screen.
Vertical tape or mark on the screen with
reference to the centre line of each headlamp
bulb.
HEADLAMP ADJUSTMENT
CAUTION
•Do not cover a headlamp for more than three
minutes to prevent the plastic headlamp lens
deformation.
•When adjusting one headlamp beam, make
sure that another headlamp is off by
disconnecting the connector from it. When
reconnecting the connector, make sure that
the headlamp beam is not disturbed
accidentally.
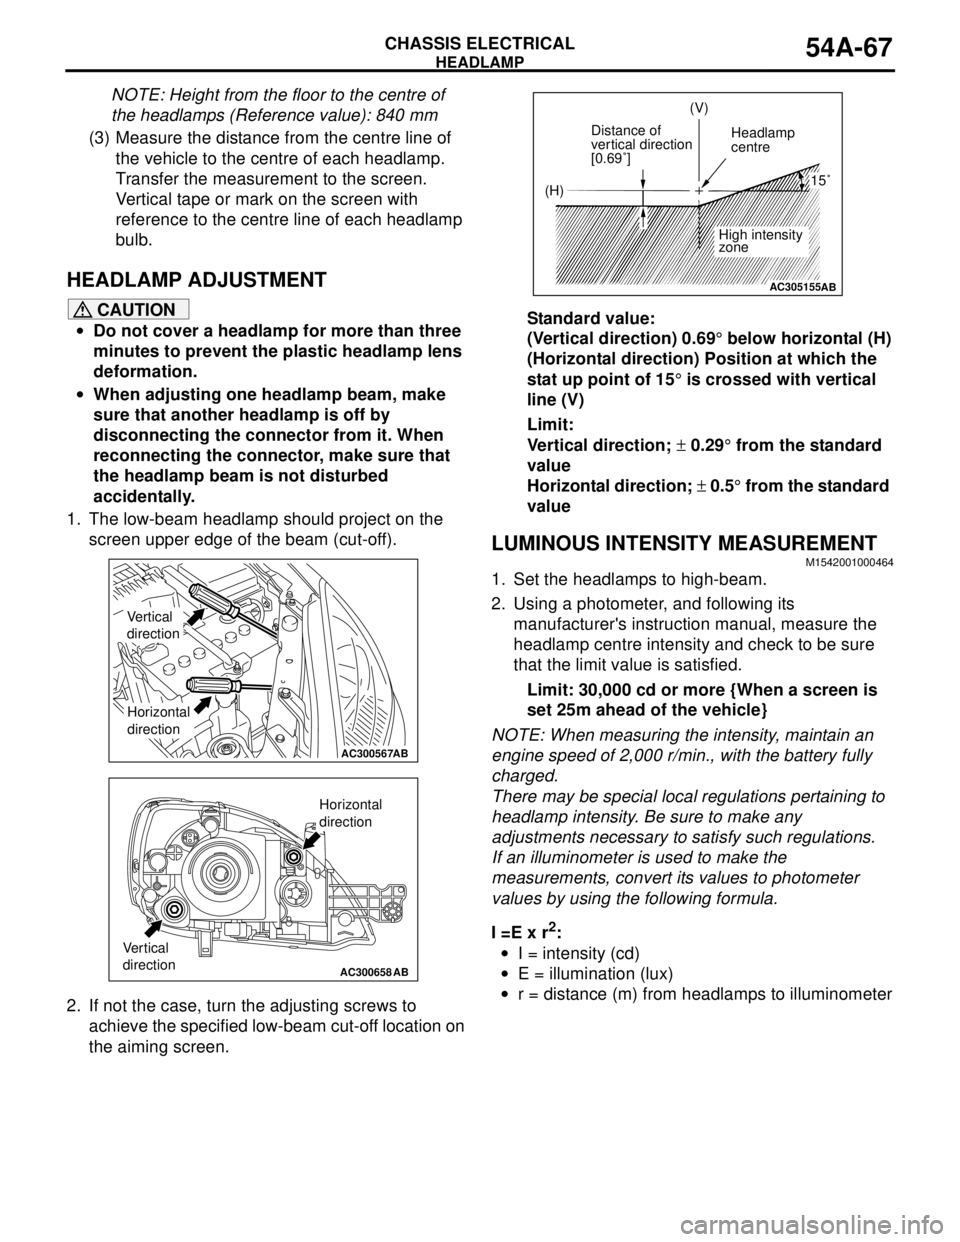
1. The low-beam headlamp should project on the
screen upper edge of the beam (cut-off).
2. If not the case, turn the adjusting screws to
achieve the specified low-beam cut-off location on
the aiming screen.Standard value:
(Vertical direction) 0.69° below horizontal (H)
(Horizontal direction) Position at which the
stat up point of 15° is crossed with vertical
line (V)
Limit:
Vertical direction; ± 0.29° from the standard
value
Horizontal direction; ± 0.5° from the standard
value
LUMINOUS INTENSITY MEASUREMENTM1542001000464
1. Set the headlamps to high-beam.
2. Using a photometer, and following its
manufacturer's instruction manual, measure the
headlamp centre intensity and check to be sure
that the limit value is satisfied.
Limit: 30,000 cd or more {When a screen is
set 25m ahead of the vehicle}
NOTE: When measuring the intensity, maintain an
engine speed of 2,000 r/min., with the battery fully
charged.
There may be special local regulations pertaining to
headlamp intensity. Be sure to make any
adjustments necessary to satisfy such regulations.
If an illuminometer is used to make the
measurements, convert its values to photometer
values by using the following formula.
I =E x r
2:
•I = intensity (cd)
•E = illumination (lux)
•r = distance (m) from headlamps to illuminometer
AC300567AB
Vertical
direction
Horizontal
direction
AC300658AB
Vertical
direction
Horizontal
direction
AC305155
(H)(V)
Distance of
vertical direction
[0.69˚]Headlamp
centre
High intensity
zone
15˚
AB