engine MITSUBISHI LANCER 2005 Workshop Manual
[x] Cancel search | Manufacturer: MITSUBISHI, Model Year: 2005, Model line: LANCER, Model: MITSUBISHI LANCER 2005Pages: 788, PDF Size: 45.98 MB
Page 459 of 788
FOG LAMP
CHASSIS ELECTRICAL54A-71
FOG LAMP
SERVICE SPECIFICATIONM1542000300343
SPECIAL TOOLM1542000600894
TROUBLESHOOTINGM1542000701292
When the front fog lamp switch is turned to ON with
the tail lamp or the headlamp on (the tail lamp switch
or the headlamp switch is ON), the fog lamp relay
turns on, and the fog lamps will illuminate.
If the tail lamps or the headlamps are turned off with
the lighting switch OFF while the fog lamps are on,
the front fog lamps turn off at the same time to
prevent unattended operation.
If the tail lamps are turned off by the headlamp
automatic shutdown function, the fog lamps turn off
at the same time. However, if the tail lamps illuminate
again, the fog lamps do not.
The front fog lamps are controlled by the Smart
Wiring System (SWS). For troubleshooting, refer to
respective Groups below.
•Not using SWS monitor: GROUP 54B, SWS
Troubleshooting P.54B-38.
•Using SWS monitor: GROUP 54C, SWS
Troubleshooting P.54C-22.
ON-VEHICLE SERVICE
FRONT FOG LAMP AIMING CHECKM1542001100438
After setting the vehicles to the following condition,
adjust the front fog lamp aiming.
•Check that the tyre inflation pressure is at the
value indicated on the tyre pressure labels.
•Set the vehicle to the unladen condition and park
it on a level surface.
•Have a single person (approximately 75 kg) sit in
the driver’s seat.•Run the engine at a speed of 2000 r/min to fully
charge the battery.
Turn on the front fog lamps and check that the
illumination is within the standard value range.
Standard value: Illuminates to within 40
metres
CAUTION
For the fog lamp which is not being measured,
disconnect that fog lamp’s connector if possible
so that it does not illuminate while carrying out
the adjustment. Furthermore, make sure that the
light axis does not get shifted when
re-connecting the connector.
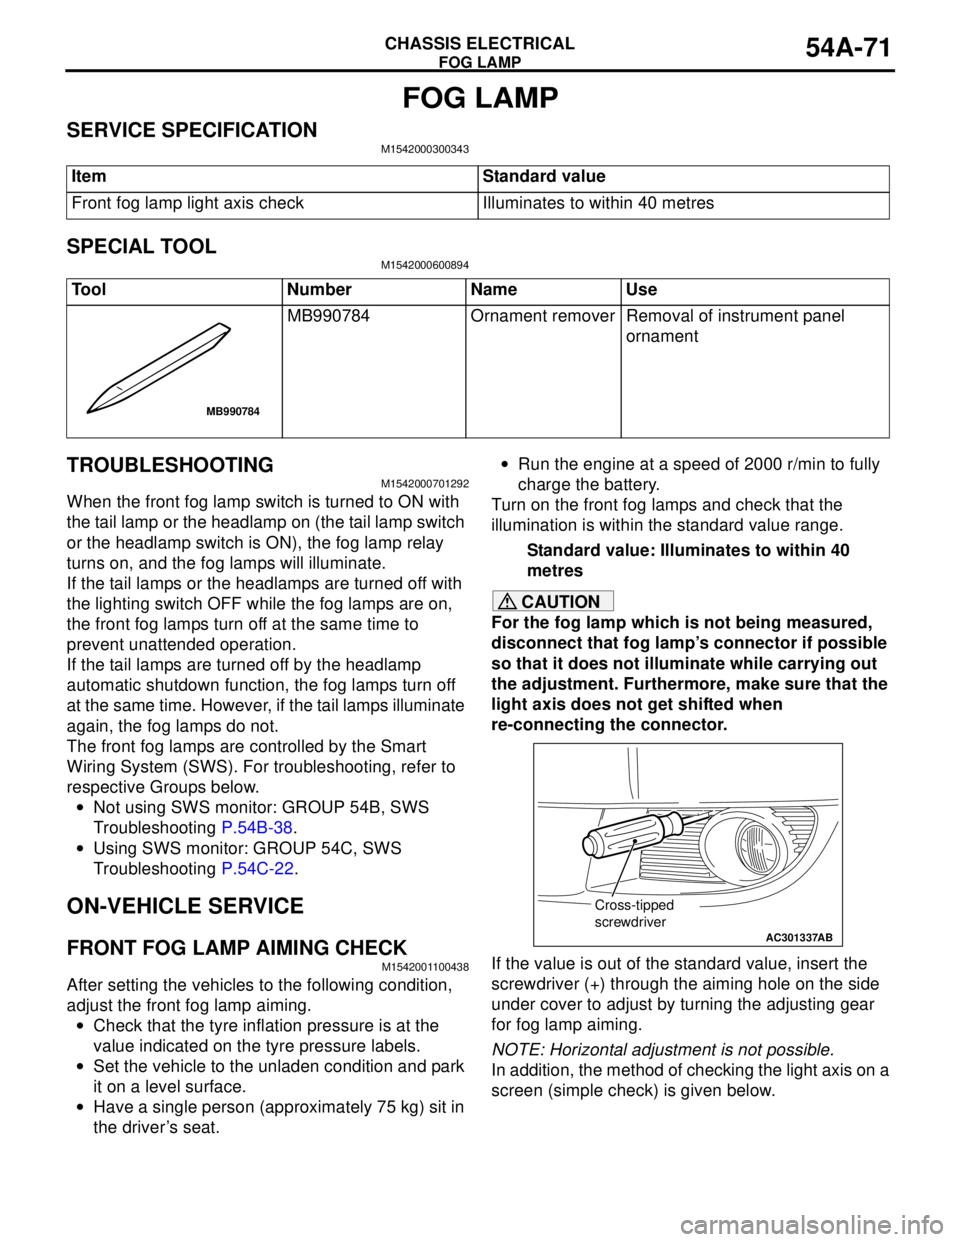
If the value is out of the standard value, insert the
screwdriver (+) through the aiming hole on the side
under cover to adjust by turning the adjusting gear
for fog lamp aiming.
NOTE: Horizontal adjustment is not possible.
In addition, the method of checking the light axis on a
screen (simple check) is given below. Item Standard value
Front fog lamp light axis check Illuminates to within 40 metres
Tool Number Name Use
MB990784 Ornament remover Removal of instrument panel
ornament
MB990784
AC301337
Cross-tipped
screwdriver
AB
Page 484 of 788
REAR WINDOW DEFOGGER
CHASSIS ELECTRICAL54A-96
ON-VEHICLE SERVICE
PRINTED HEATER LINES CHECKM1543001800311
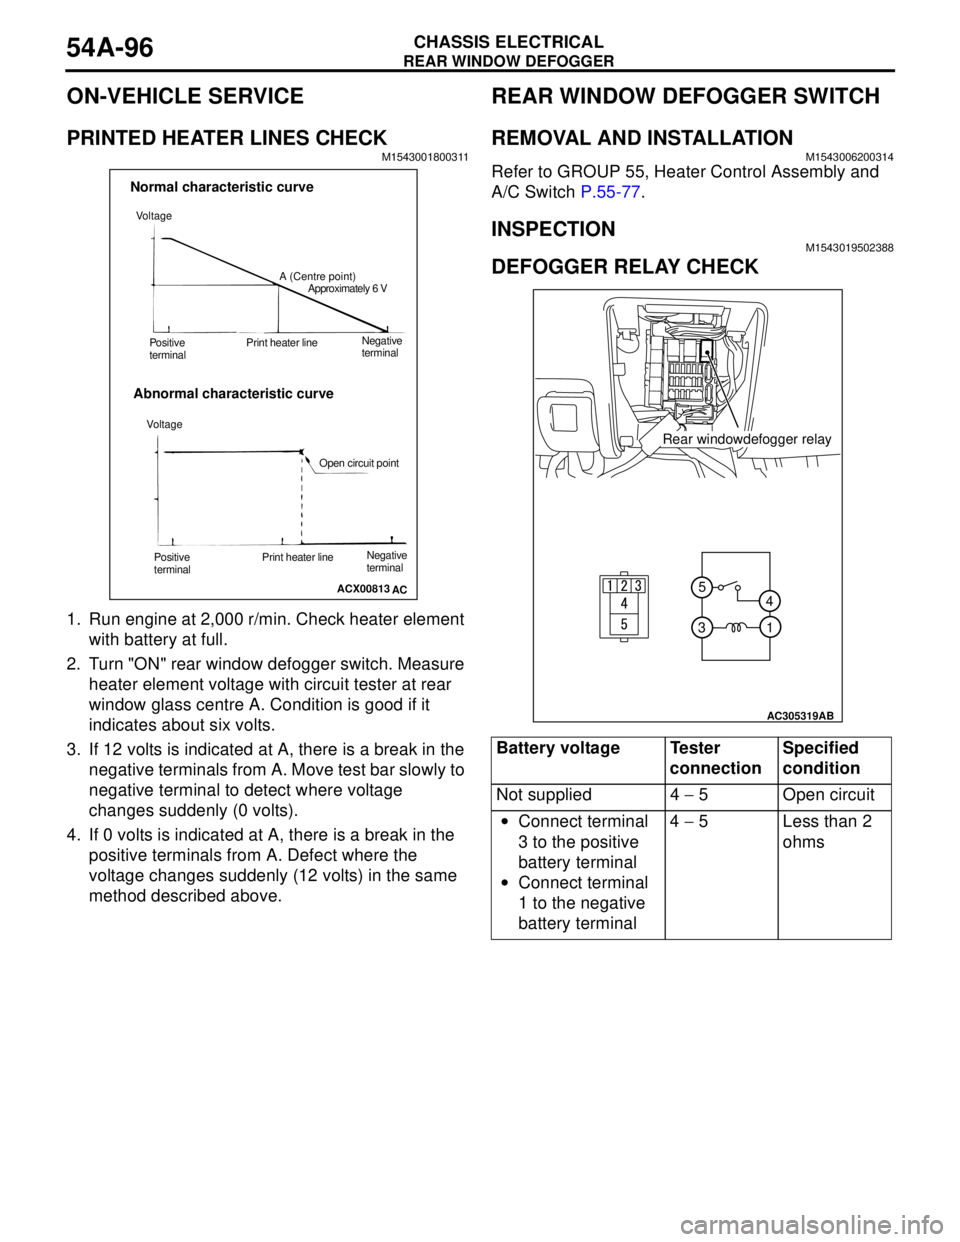
1. Run engine at 2,000 r/min. Check heater element
with battery at full.
2. Turn "ON" rear window defogger switch. Measure
heater element voltage with circuit tester at rear
window glass centre A. Condition is good if it
indicates about six volts.
3. If 12 volts is indicated at A, there is a break in the
negative terminals from A. Move test bar slowly to
negative terminal to detect where voltage
changes suddenly (0 volts).
4. If 0 volts is indicated at A, there is a break in the
positive terminals from A. Defect where the
voltage changes suddenly (12 volts) in the same
method described above.
REAR WINDOW DEFOGGER SWITCH
REMOVAL AND INSTALLATIONM1543006200314
Refer to GROUP 55, Heater Control Assembly and
A/C Switch P.55-77.
INSPECTIONM1543019502388
DEFOGGER RELAY CHECK
ACX00813
Normal characteristic curve
Abnormal characteristic curve
A (Centre point)
Approximately 6 V
Negative
terminal Print heater line
Positive
terminal
Open circuit point Voltage
AC Voltage
Negative
terminal Print heater line
Positive
terminal
Battery voltage Tester
connectionSpecified
condition
Not supplied 4 − 5 Open circuit
•Connect terminal
3 to the positive
battery terminal
•Connect terminal
1 to the negative
battery terminal4 − 5 Less than 2
ohms
1 5
4
3
AC305319
AB
Rear windowdefogger relay
Page 495 of 788
TROUBLESHOOTING
HEATER, AIR CONDITIONER AND VENTILATION55-11
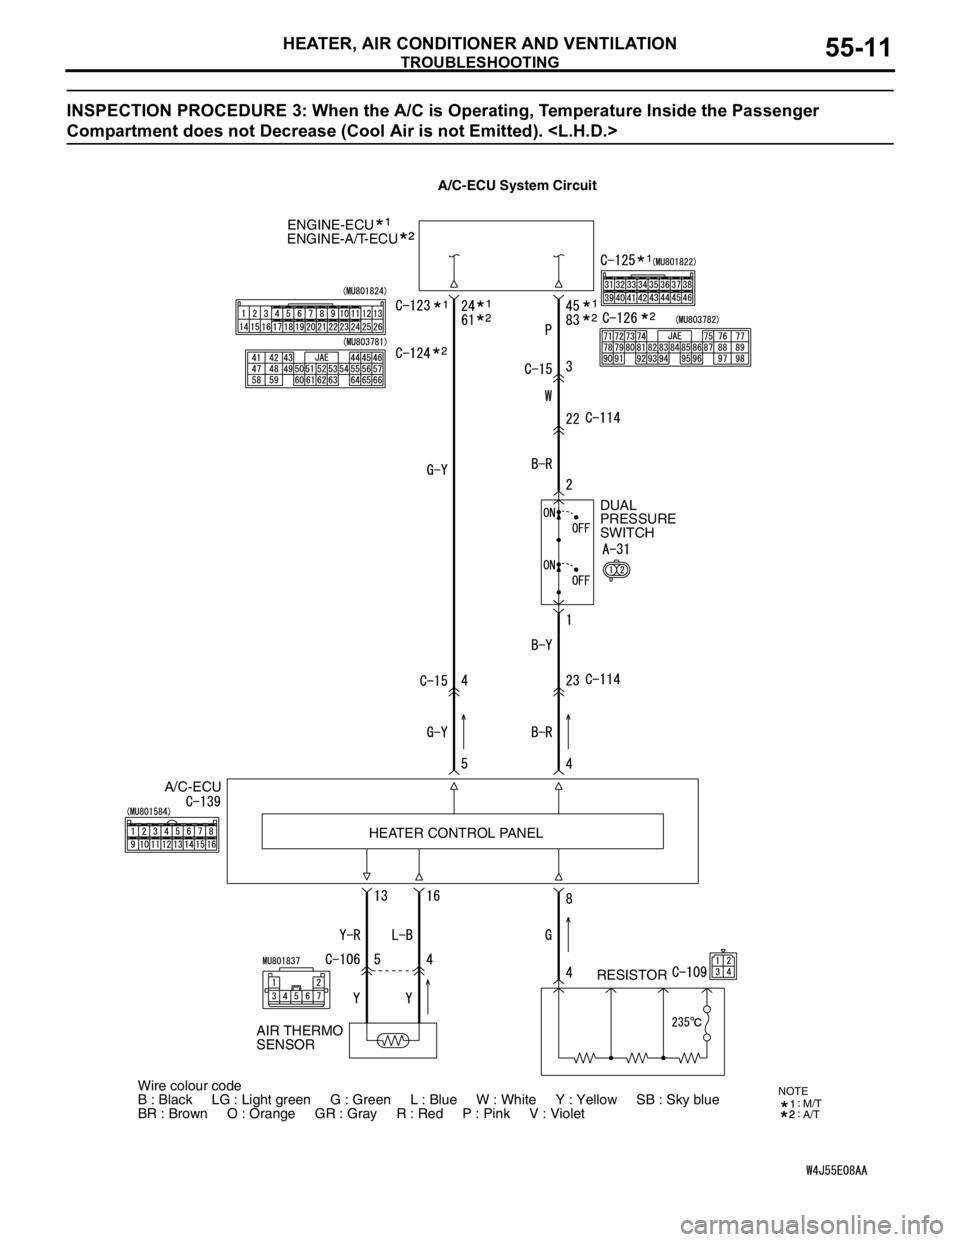
INSPECTION PROCEDURE 3: When the A/C is Operating, Temperature Inside the Passenger
Compartment does not Decrease (Cool Air is not Emitted).
ENGINE-ECU
A/C-ECUDUAL
PRESSURE
SWITCH
RESISTOR ENGINE-A/T-ECU
HEATER CONTROL PANEL
Wire colour code
B : Black LG : Light green G : Green L : Blue W : White Y : Yellow SB : Sky blue
BR : Brown O : Orange GR : Gray R : Red P : Pink V : Violet
AIR THERMO
SENSOR
NOTEM/T
A/T
A/C-ECU System Circuit
Page 496 of 788
TROUBLESHOOTING
HEATER, AIR CONDITIONER AND VENTILATION55-12
COMMENTS ON TROUBLE SYMPTOM
If cool air is not distributed when the A/C switch is on,
the air thermo sensor or the A/C compressor relay
system may be defective.
TROUBLESHOOTING HINTS
•Improper amount of refrigerant
•Malfunction of the air thermo sensor
•Malfunction of the dual pressure switch
•Malfunction of the A/C compressor relay
•Malfunction of the A/C refrigerant temperature
switch
•Malfunction of the magnetic clutch
•Malfunction of the manual air conditioner control
panel (A/C-ECU)
•Damaged the wiring harness or connectors
•Malfunction of the engine-ECU
engine-A/T-ECU
DIAGNOSIS
STEP 1. Check the defogger and outside/inside
air selection damper control motor operation.
Q: Do the defogger and outside/inside air selection
damper control motor work normally?
YES :
Go to Step 2.
NO : Refer to Inspection procedure 9
"Malfunction of the A/C-ECU power supply
system
STEP 2. Check the blower motor operation.
Q: Does the blower motor work normally?
YES :
Go to Step 3.
NO : Refer to Inspection procedure 5 "Blower fan
and motor do not turn P.55-29."
STEP 3. Check the A/C compressor.
Check the A/C compressor for compressor oil leaks.
Q: Is the check result satisfactory?
YES :
Go to Step 4.
NO : Replace the A/C compressor or the
expansion valve.
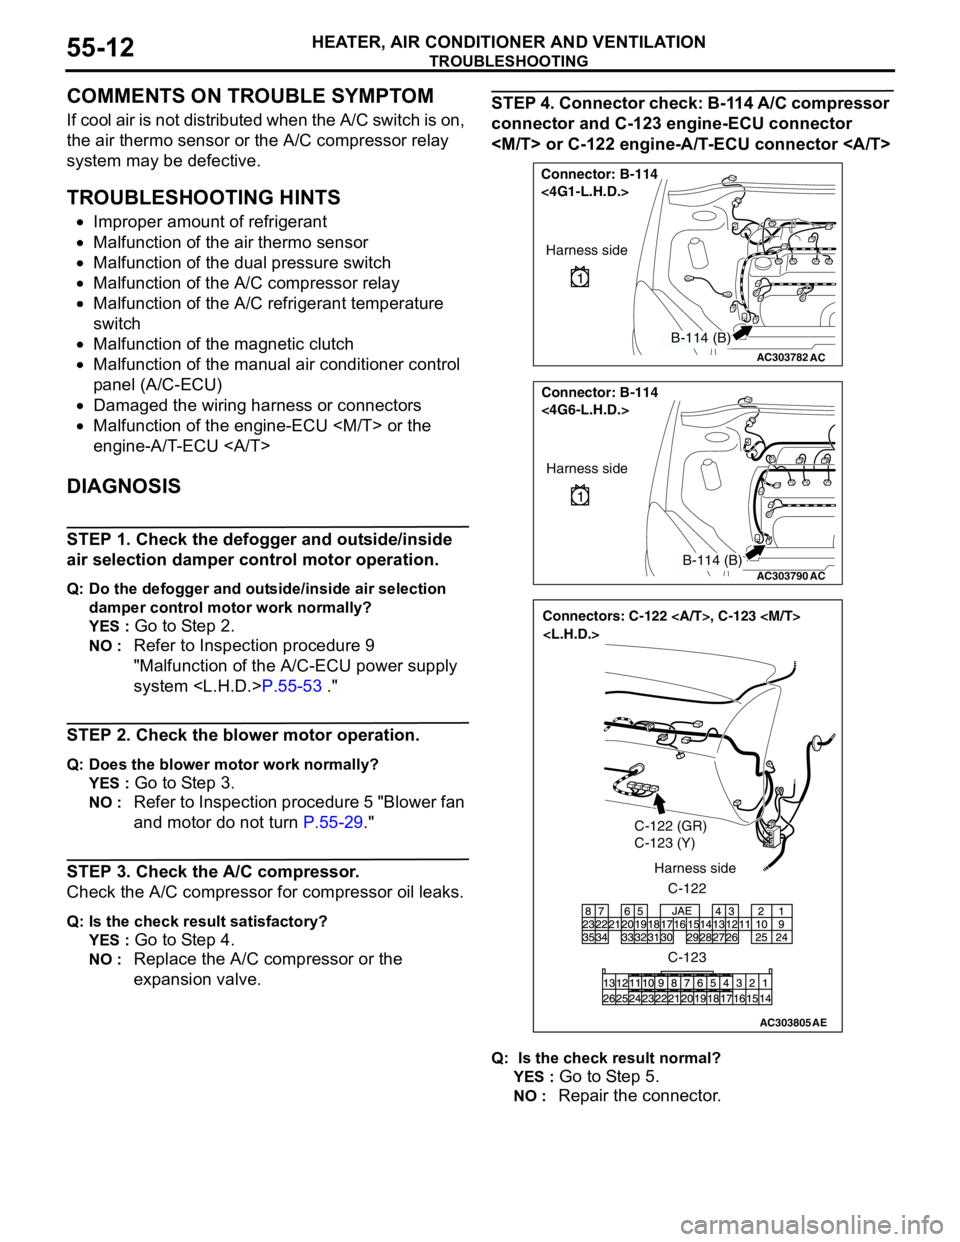
STEP 4. Connector check: B-114 A/C compressor
connector and C-123 engine-ECU connector
Q: Is the check result normal?
YES :
Go to Step 5.
NO : Repair the connector.
AC303782
Connector: B-114
<4G1-L.H.D.>
AC
Harness side
B-114 (B)
AC303790
Connector: B-114
<4G6-L.H.D.>
AC
Harness side
B-114 (B)
AC303805
Connectors: C-122 , C-123
C-122 (GR)
C-123 (Y)
C-122 Harness side
C-123
AE
Page 497 of 788
TROUBLESHOOTING
HEATER, AIR CONDITIONER AND VENTILATION55-13
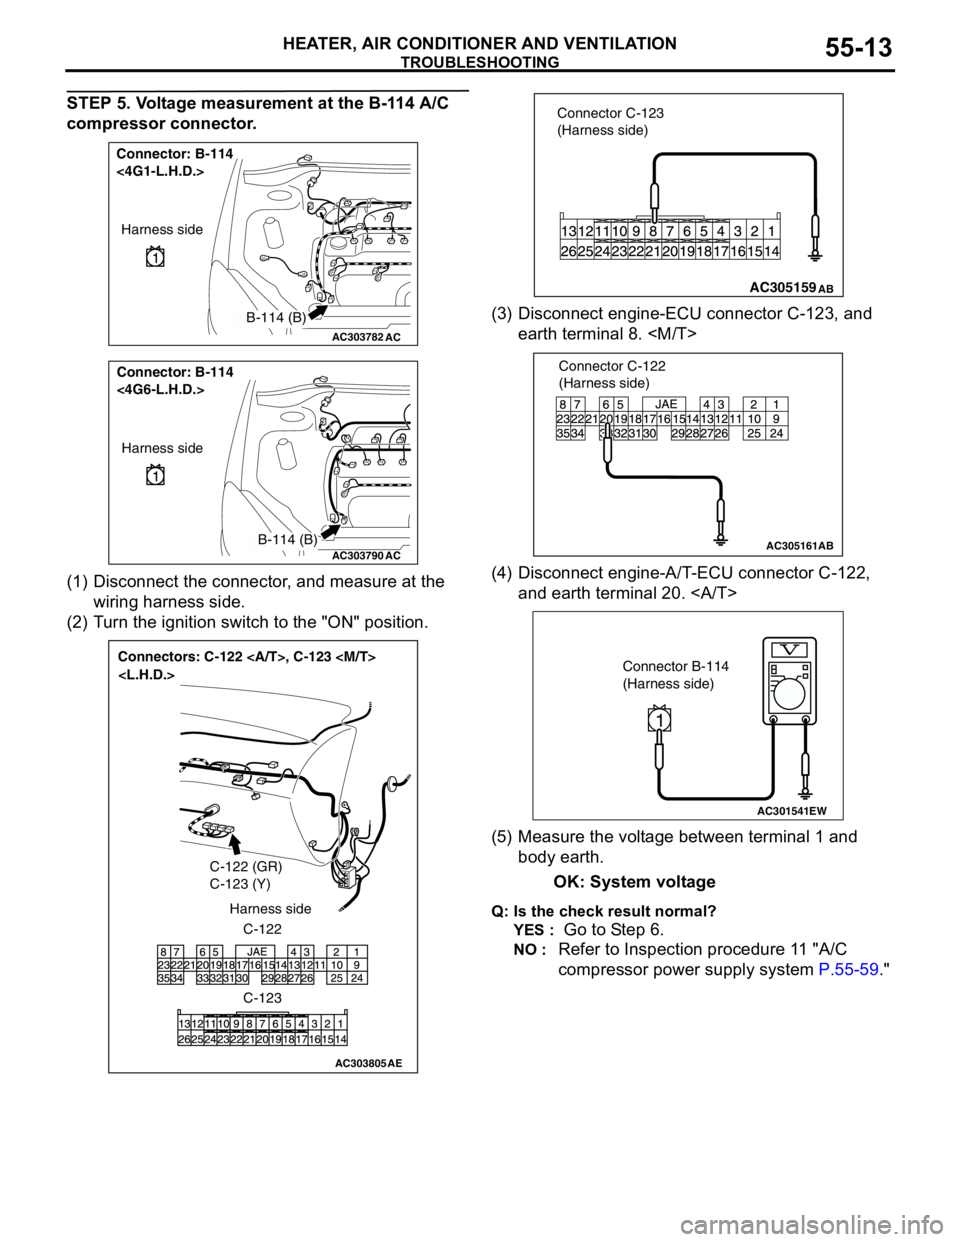
STEP 5. Voltage measurement at the B-114 A/C
compressor connector.
(1) Disconnect the connector, and measure at the
wiring harness side.
(2) Turn the ignition switch to the "ON" position.(3) Disconnect engine-ECU connector C-123, and
earth terminal 8.
(4) Disconnect engine-A/T-ECU connector C-122,
and earth terminal 20.
(5) Measure the voltage between terminal 1 and
body earth.
OK: System voltage
Q: Is the check result normal?
YES :
Go to Step 6.
NO : Refer to Inspection procedure 11 "A/C
compressor power supply system P.55-59."
AC303782
Connector: B-114
<4G1-L.H.D.>
AC
Harness side
B-114 (B)
AC303790
Connector: B-114
<4G6-L.H.D.>
AC
Harness side
B-114 (B)
AC303805
Connectors: C-122 , C-123
C-122 (GR)
C-123 (Y)
C-122 Harness side
C-123
AE
AC305159 Connector C-123
(Harness side)AB
AC305161
Connector C-122
(Harness side)
AB
AC301541EW
Connector B-114
(Harness side)
1
Page 500 of 788
TROUBLESHOOTING
HEATER, AIR CONDITIONER AND VENTILATION55-16
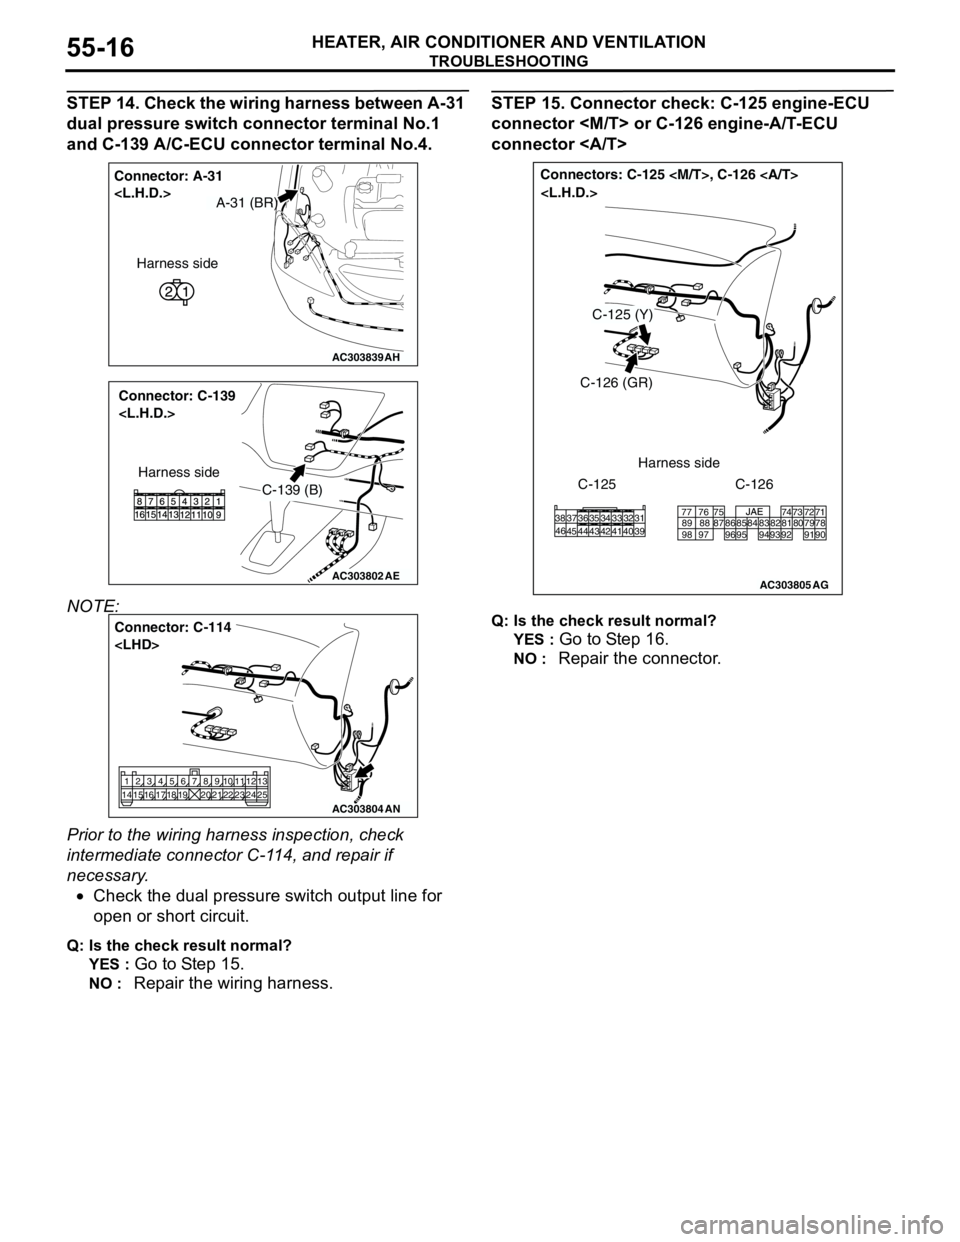
STEP 14. Check the wiring harness between A-31
dual pressure switch connector terminal No.1
and C-139 A/C-ECU connector terminal No.4.
NOTE:
Prior to the wiring harness inspection, check
intermediate connector C-114, and repair if
necessary.
•Check the dual pressure switch output line for
open or short circuit.
Q: Is the check result normal?
YES :
Go to Step 15.
NO : Repair the wiring harness.
STEP 15. Connector check: C-125 engine-ECU
connector
connector
Q: Is the check result normal?
YES :
Go to Step 16.
NO : Repair the connector.
AC303839
Connector: A-31
AH
Harness side
A-31 (BR)
AC303802
Connector: C-139
AE
C-139 (B)
Harness side
AC303804
Connector: C-114
AN183
161514121745 8
20196721 2291025
1324 2312 11
AC303805
Connectors: C-125
AG
C-126 (GR)
C-125Harness side
C-125 (Y)
C-126
38
46
45 44 43 42 41 40 3937 36 35 34 33 32 3177 76 75 74 73 72 71
78 79 80 81 82 83 84 85 86 87 88 89
90 98 97 96 95 94 93 92 91
Page 501 of 788
TROUBLESHOOTING
HEATER, AIR CONDITIONER AND VENTILATION55-17
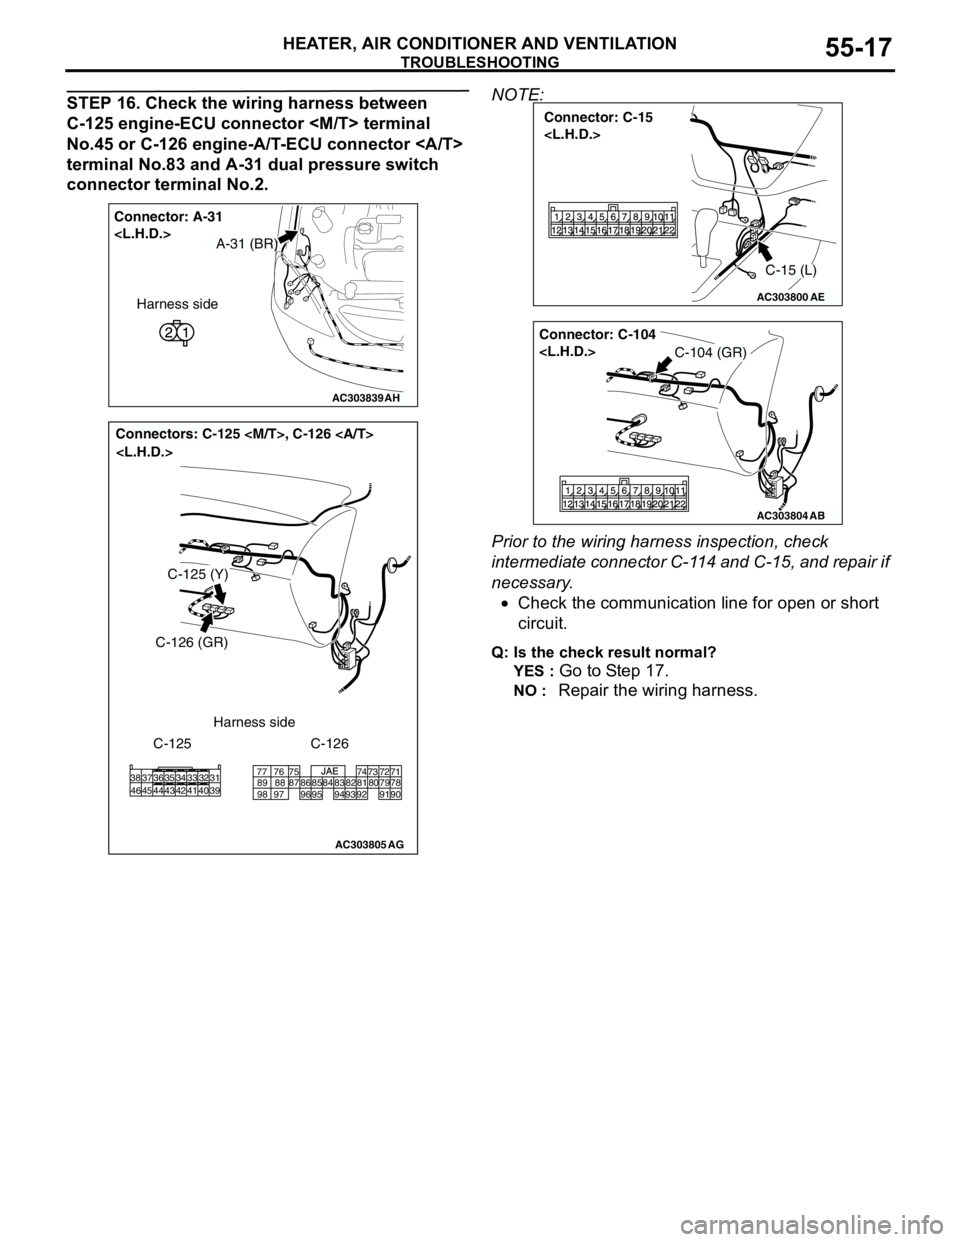
STEP 16. Check the wiring harness between
C-125 engine-ECU connector
No.45 or C-126 engine-A/T-ECU connector
terminal No.83 and A-31 dual pressure switch
connector terminal No.2.NOTE:
Prior to the wiring harness inspection, check
intermediate connector C-114 and C-15, and repair if
necessary.
•Check the communication line for open or short
circuit.
Q: Is the check result normal?
YES :
Go to Step 17.
NO : Repair the wiring harness.
AC303839
Connector: A-31
AH
Harness side
A-31 (BR)
AC303805
Connectors: C-125
AG
C-126 (GR)
C-125Harness side
C-125 (Y)
C-126
38
46
45 44 43 42 41 40 3937 36 35 34 33 32 3177 76 75 74 73 72 71
78 79 80 81 82 83 84 85 86 87 88 89
90 98 97 96 95 94 93 92 91
AC303800
Connector: C-15
AE
C-15 (L)
AC303804
Connector: C-104
AB
C-104 (GR)
Page 502 of 788
TROUBLESHOOTING
HEATER, AIR CONDITIONER AND VENTILATION55-18
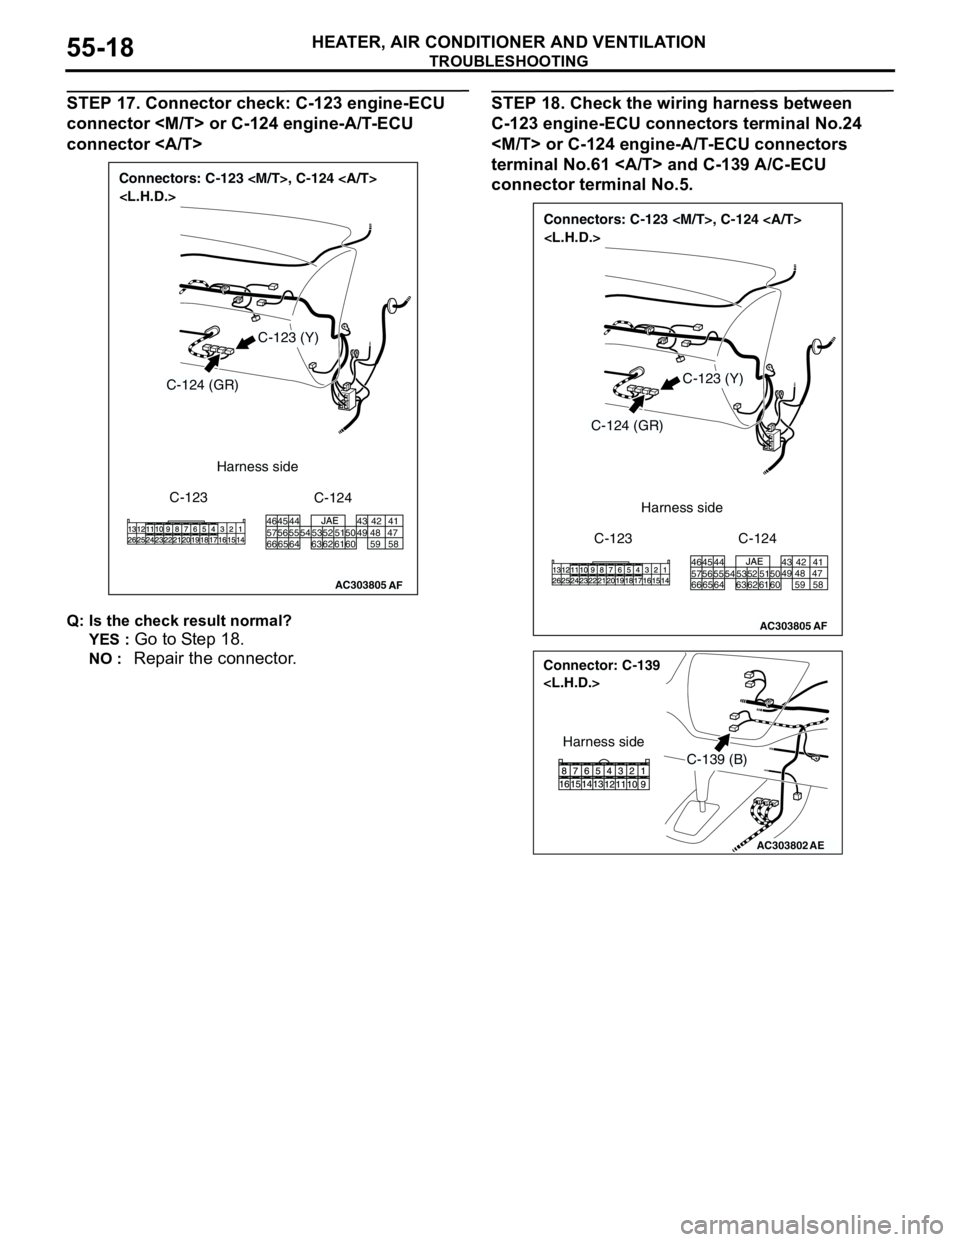
STEP 17. Connector check: C-123 engine-ECU
connector
connector
Q: Is the check result normal?
YES :
Go to Step 18.
NO : Repair the connector.
STEP 18. Check the wiring harness between
C-123 engine-ECU connectors terminal No.24
terminal No.61 and C-139 A/C-ECU
connector terminal No.5.
AC303805
Connectors: C-123
C-124 Harness side
C-123
AF
C-124 (GR)
C-123 (Y)
46 45 44 43 42 41
57 56 55 54 53 52 515049 48 47
66 65 64 63 62 61 60 59 58
AC303805
Connectors: C-123
C-124 Harness side
C-123
AF
C-124 (GR)
C-123 (Y)
46 45 44 43 42 41
57 56 55 54 53 52 515049 48 47
66 65 64 63 62 61 60 59 58
AC303802
Connector: C-139
AE
C-139 (B)
Harness side
Page 503 of 788
TROUBLESHOOTING
HEATER, AIR CONDITIONER AND VENTILATION55-19
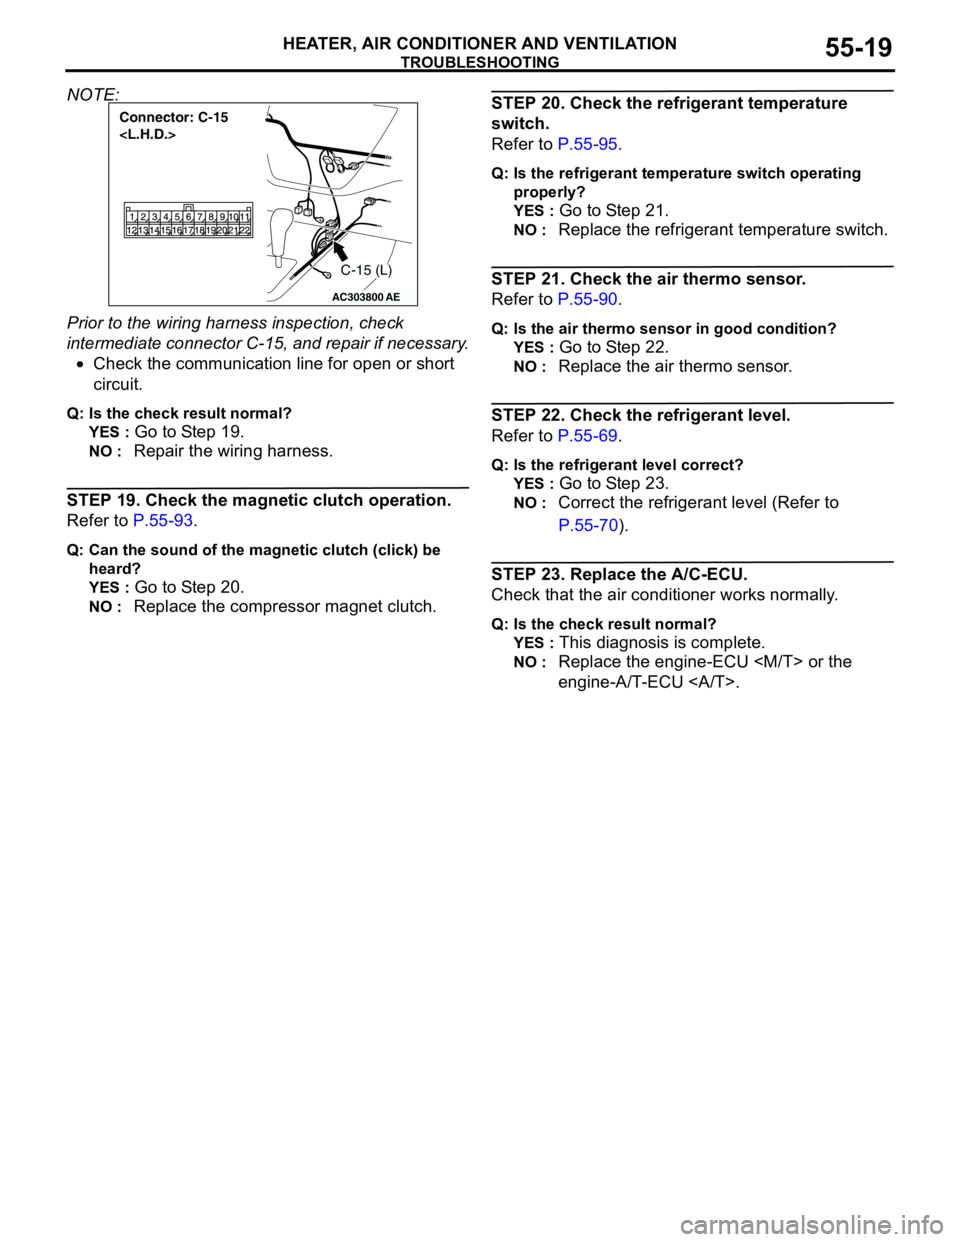
NOTE:
Prior to the wiring harness inspection, check
intermediate connector C-15, and repair if necessary.
•Check the communication line for open or short
circuit.
Q: Is the check result normal?
YES :
Go to Step 19.
NO : Repair the wiring harness.
STEP 19. Check the magnetic clutch operation.
Refer to P.55-93.
Q: Can the sound of the magnetic clutch (click) be
heard?
YES :
Go to Step 20.
NO : Replace the compressor magnet clutch.
STEP 20. Check the refrigerant temperature
switch.
Refer to P.55-95.
Q: Is the refrigerant temperature switch operating
properly?
YES :
Go to Step 21.
NO : Replace the refrigerant temperature switch.
STEP 21. Check the air thermo sensor.
Refer to P.55-90.
Q: Is the air thermo sensor in good condition?
YES :
Go to Step 22.
NO : Replace the air thermo sensor.
STEP 22. Check the refrigerant level.
Refer to P.55-69.
Q: Is the refrigerant level correct?
YES :
Go to Step 23.
NO : Correct the refrigerant level (Refer to
P.55-70).
STEP 23. Replace the A/C-ECU.
Check that the air conditioner works normally.
Q: Is the check result normal?
YES :
This diagnosis is complete.
NO : Replace the engine-ECU
engine-A/T-ECU .
AC303800
Connector: C-15
AE
C-15 (L)
Page 504 of 788
TROUBLESHOOTING
HEATER, AIR CONDITIONER AND VENTILATION55-20
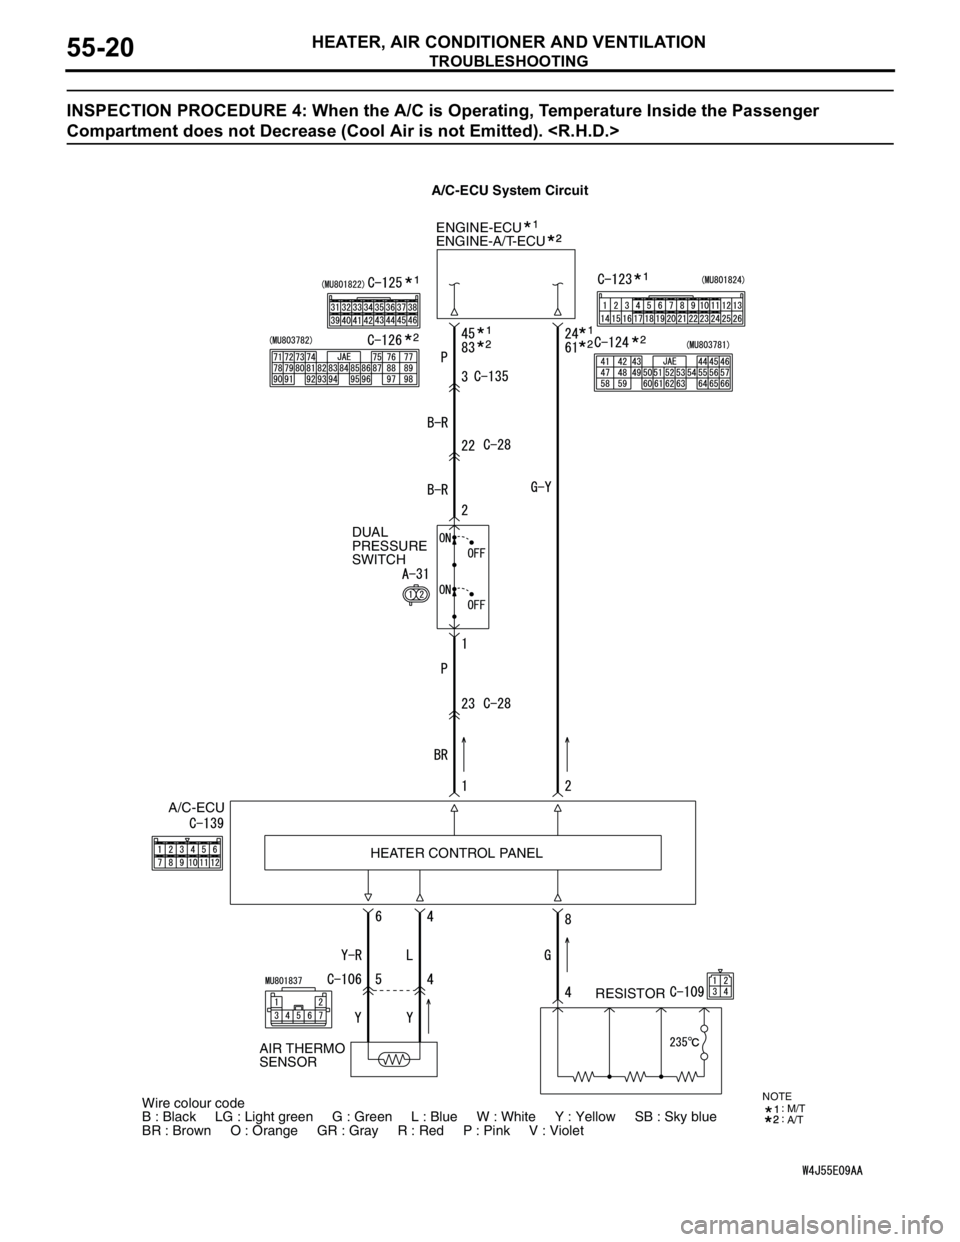
INSPECTION PROCEDURE 4: When the A/C is Operating, Temperature Inside the Passenger
Compartment does not Decrease (Cool Air is not Emitted).
ENGINE-ECU
A/C-ECUDUAL
PRESSURE
SWITCH
RESISTOR ENGINE-A/T-ECU
HEATER CONTROL PANEL
Wire colour code
B : Black LG : Light green G : Green L : Blue W : White Y : Yellow SB : Sky blue
BR : Brown O : Orange GR : Gray R : Red P : Pink V : Violet
AIR THERMO
SENSOR
NOTEM/T
A/T
A/C-ECU System Circuit