Wheel MITSUBISHI LANCER 2005 Repair Manual
[x] Cancel search | Manufacturer: MITSUBISHI, Model Year: 2005, Model line: LANCER, Model: MITSUBISHI LANCER 2005Pages: 788, PDF Size: 45.98 MB
Page 254 of 788
STEERING WHEEL
POWER STEERING37-20
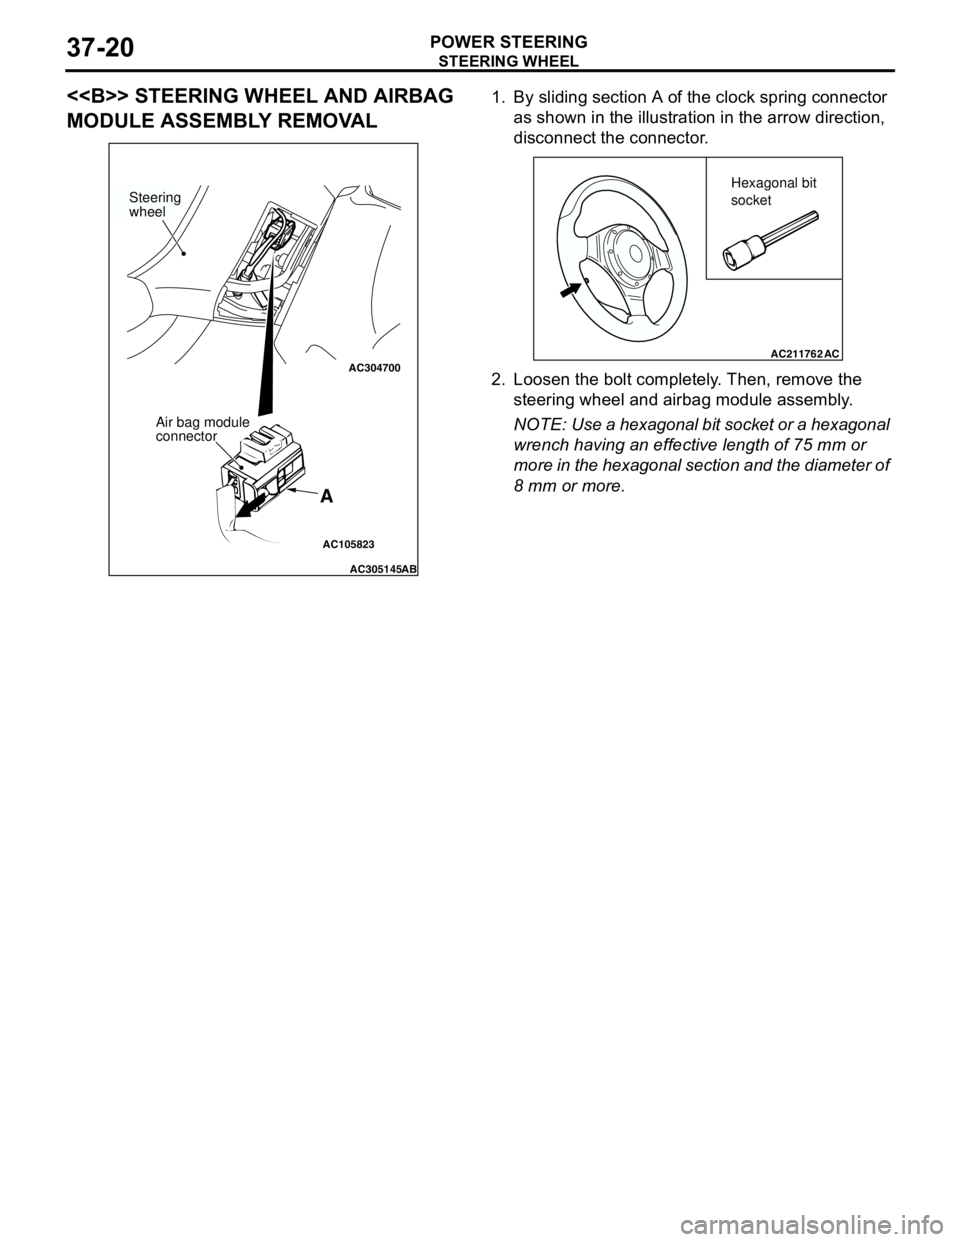
<> STEERING WHEEL AND AIRBAG
MODULE ASSEMBLY REMOVAL1. By sliding section A of the clock spring connector
as shown in the illustration in the arrow direction,
disconnect the connector.
2. Loosen the bolt completely. Then, remove the
steering wheel and airbag module assembly.
NOTE: Use a hexagonal bit socket or a hexagonal
wrench having an effective length of 75 mm or
more in the hexagonal section and the diameter of
8 mm or more.
AC105823
AC304700
AC305145AB
A
Steering
wheel
Air bag module
connector
AC211762AC
Hexagonal bit
socket
Page 255 of 788
STEERING SHAFT
POWER STEERING37-21
STEERING SHAFT
REMOVAL AND INSTALLATIONM1372011500113
WARNING
Before removing the steering wheel and air bag module assembly, refer to GROUP 52B,
Service Precautions (P.52B-5) and Air Bag Module and Clock Spring (P.52B-210).
REMOVAL SERVICE POINT
<> STEERING COLUMN SHAFT
ASSEMBLY REMOVAL
CAUTION
The tilt lever should be held in the lock position
until the steering column shaft is installed to the
vehicle. If the steering column is removed with
the tilt lever released, or the tilt lever is released
after the steering column shaft was removed from the vehicle, the steering column can not be
reinstalled correctly. If the steering column is
installed incorrectly, the collision energy
absorbing mechanism may be damaged.
1. Ensure that the tilt lever is in the lock position, and
remove the steering column mounting bolts.
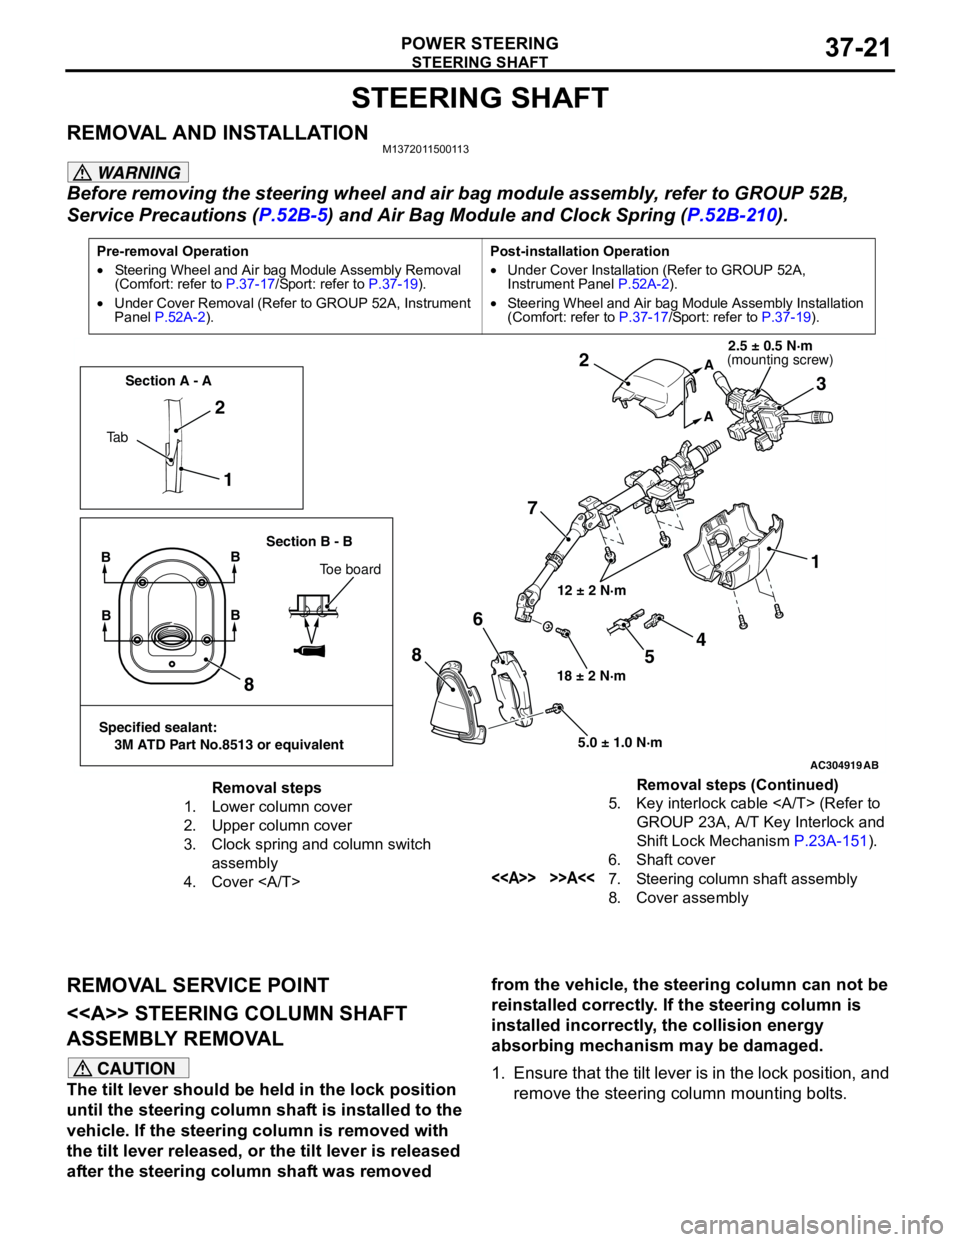
Pre-removal Operation
•Steering Wheel and Air bag Module Assembly Removal
(Comfort: refer to P.37-17/Sport: refer to P.37-19).
•Under Cover Removal (Refer to GROUP 52A, Instrument
Panel P.52A-2).Post-installation Operation
•Under Cover Installation (Refer to GROUP 52A,
Instrument Panel P.52A-2).
•Steering Wheel and Air bag Module Assembly Installation
(Comfort: refer to P.37-17/Sport: refer to P.37-19).
AC304919AB
12 ± 2 N·m
18 ± 2 N·m
5.0 ± 1.0 N·m
1 2
73 2
1
8
86
A
A
Ta bSection A - A
Section B - B
BB
Toe board
Specified sealant:
3M ATD Part No.8513 or equivalent
BB
4
5
(mounting screw)2.5 ± 0.5 N·m
Removal steps
1. Lower column cover
2. Upper column cover
3. Clock spring and column switch
assembly
4. Cover 5. Key interlock cable (Refer to
GROUP 23A, A/T Key Interlock and
Shift Lock Mechanism P.23A-151).
6. Shaft cover
<> >>A<<7. Steering column shaft assembly
8. Cover assemblyRemoval steps (Continued)
Page 258 of 788
POWER STEERING GEAR BOX AND LINKAGE
POWER STEERING37-24
POWER STEERING GEAR BOX AND LINKAGE
REMOVAL AND INSTALLATIONM1372010900237
WARNING
Before removing the steering gear, refer to GROUP 52B, Service Precautions (P.52B-5) and
Air Bag Module and Clock Spring (P.52B-210). Centre the front wheels. Failure to do so may
damage the SRS clock spring and render the SRS system inoperative, risking serious injury.
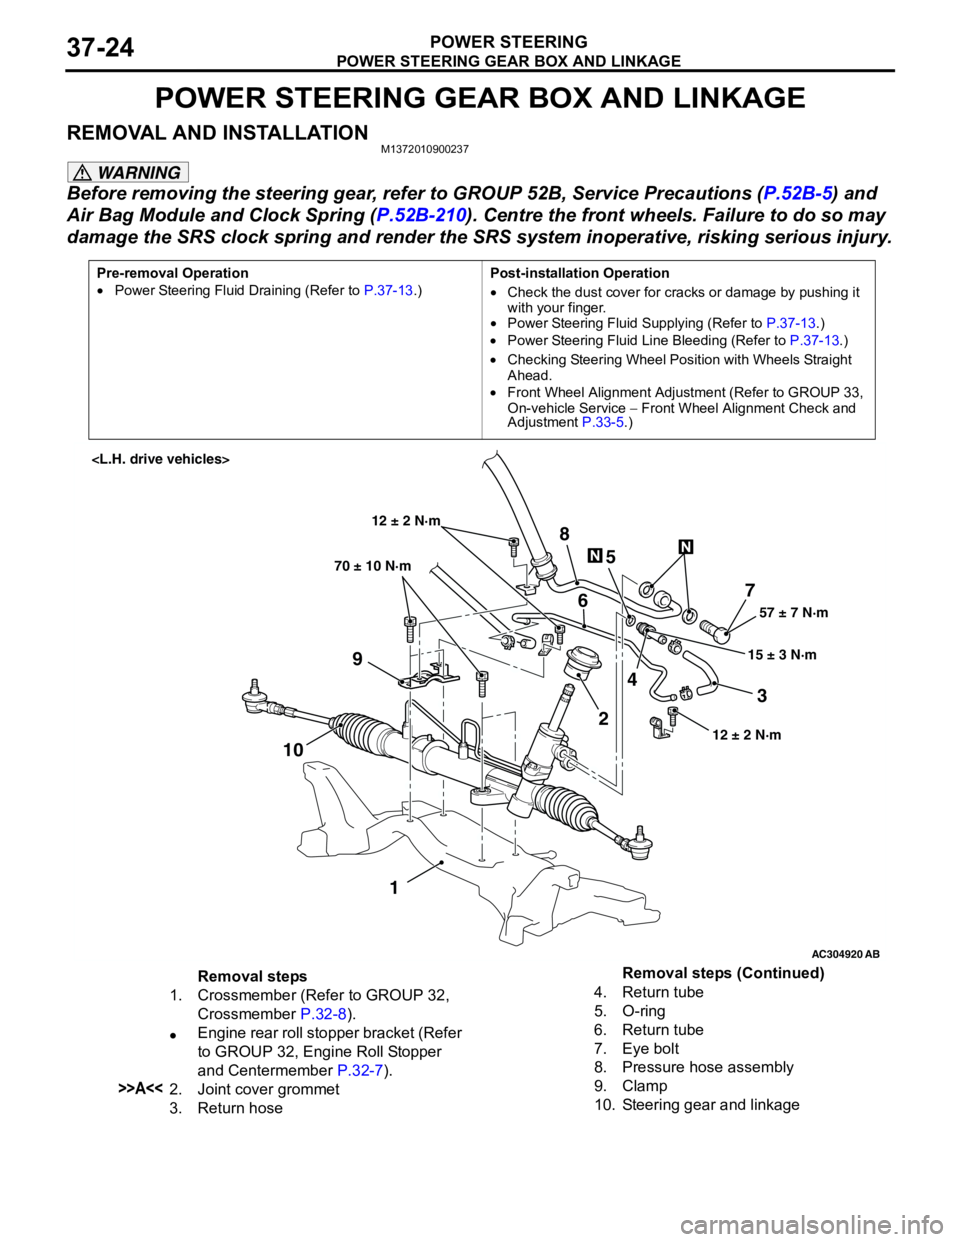
Pre-removal Operation
•Power Steering Fluid Draining (Refer to P.37-13.)Post-installation Operation
•Check the dust cover for cracks or damage by pushing it
with your finger.
•Power Steering Fluid Supplying (Refer to P.37-13.)
•Power Steering Fluid Line Bleeding (Refer to P.37-13.)
•Checking Steering Wheel Position with Wheels Straight
Ahead.
•Front Wheel Alignment Adjustment (Refer to GROUP 33,
On-vehicle Service − Front Wheel Alignment Check and
Adjustment P.33-5.)
AC304920
AB
57 ± 7 N·m
15 ± 3 N·m 70 ± 10 N·m
7
3 8
5
6
9
1024
1
12 ± 2 N·m
12 ± 2 N·m
Removal steps
1. Crossmember (Refer to GROUP 32,
Crossmember P.32-8).
•Engine rear roll stopper bracket (Refer
to GROUP 32, Engine Roll Stopper
and Centermember P.32-7).
>>A<<2. Joint cover grommet
3. Return hose4. Return tube
5. O-ring
6. Return tube
7. Eye bolt
8. Pressure hose assembly
9. Clamp
10. Steering gear and linkageRemoval steps (Continued)
Page 276 of 788
POWER STEERING HOSES
POWER STEERING37-42
POWER STEERING HOSES
REMOVAL AND INSTALLATIONM1372005700679
CAUTION
•Before removing the clock spring, refer to GROUP 52B, Service Precautions (P.52B-5) and Air Bag
Module and Clock Spring (P.52B-210). Also, put the front wheels in straight-ahead position.
Failure to do so may damage the SRS clock spring and render the SRS air bag inoperative, which
results serious driver injury.
•
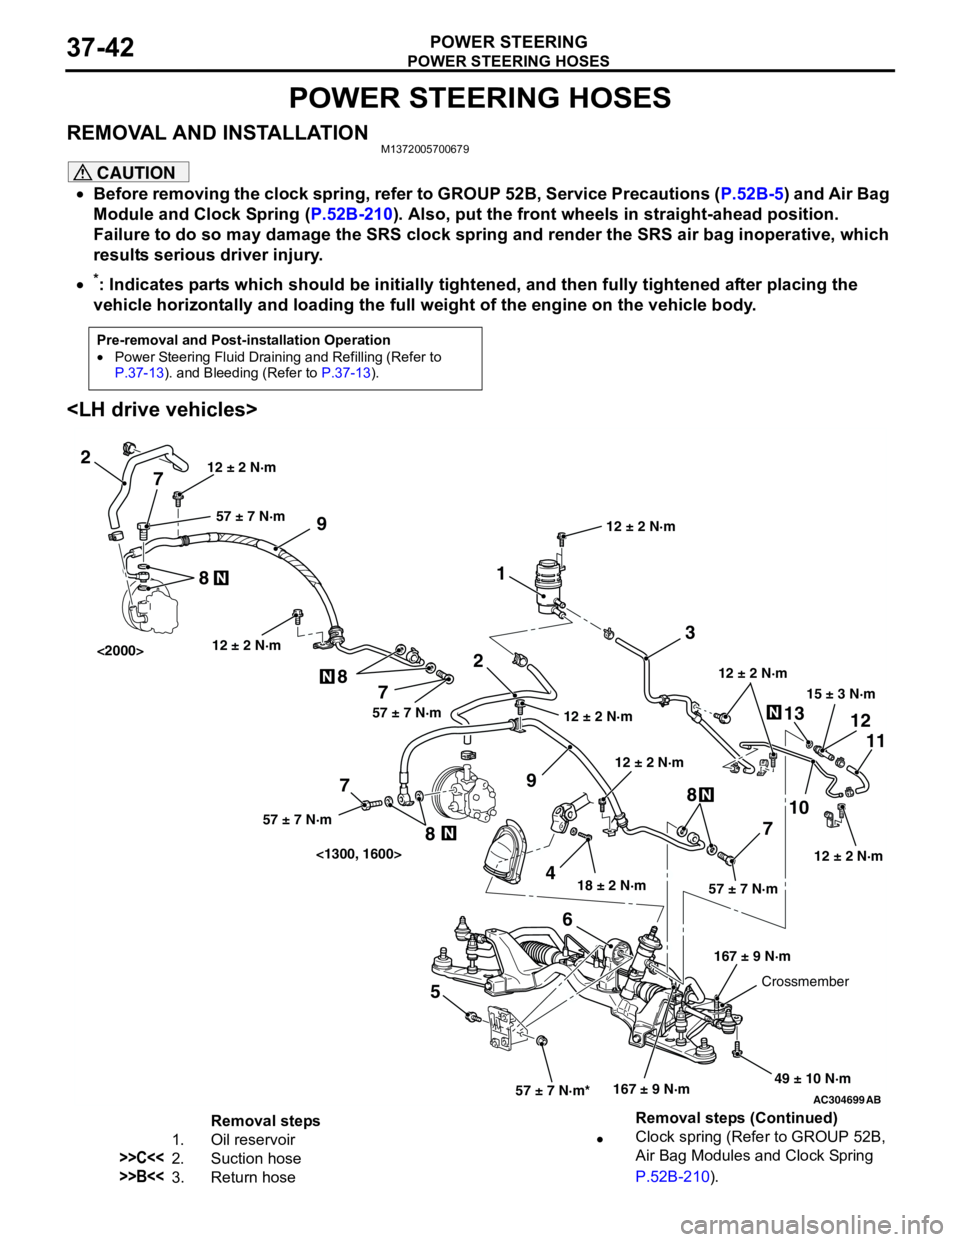
*: Indicates parts which should be initially tightened, and then fully tightened after placing the
vehicle horizontally and loading the full weight of the engine on the vehicle body.
Pre-removal and Post-installation Operation
•Power Steering Fluid Draining and Refilling (Refer to
P.37-13). and Bleeding (Refer to P.37-13).
AC304699AB
15 ± 3 N·m
18 ± 2 N·m
167 ± 9 N·m 12 ± 2 N·m
49 ± 10 N·m 12 ± 2 N·m
57 ± 7 N·m*57 ± 7 N·m
3 1
2
9
13
10
711 12
568
12 ± 2 N·m12 ± 2 N·m
2
9
4 7 8
7 8
7
8
57 ± 7 N·m57 ± 7 N·m 57 ± 7 N·m
12 ± 2 N·m
167 ± 9 N·m
Crossmember 12 ± 2 N·m
<1300, 1600> <2000>
12 ± 2 N·m
Removal steps
1. Oil reservoir
>>C<<2. Suction hose
>>B<<3. Return hose•Clock spring (Refer to GROUP 52B,
Air Bag Modules and Clock Spring
P.52B-210). Removal steps (Continued)
Page 415 of 788
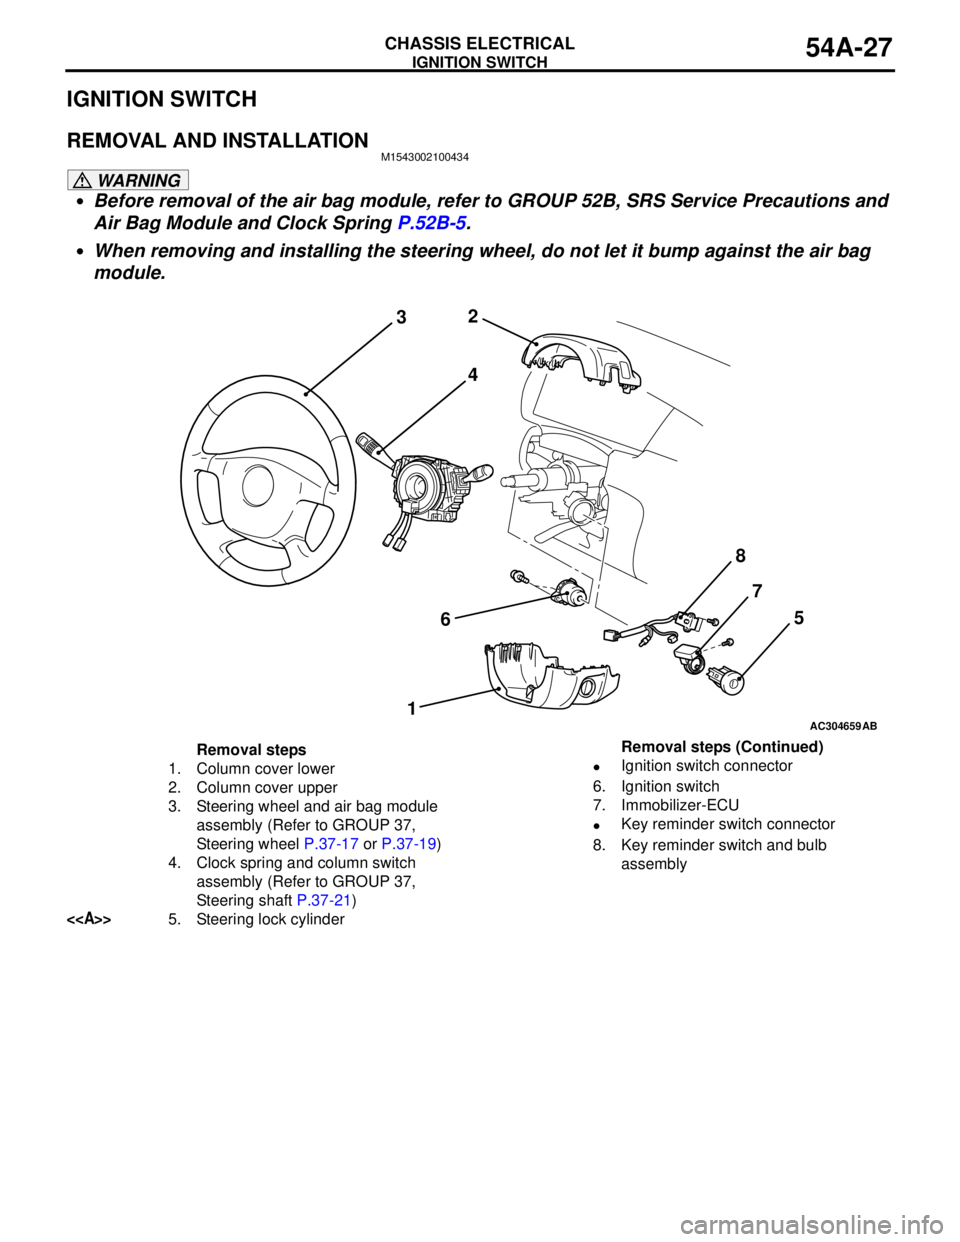
IGNITION SWITCH
CHASSIS ELECTRICAL54A-27
IGNITION SWITCH
REMOVAL AND INSTALLATIONM1543002100434
WARNING
•Before removal of the air bag module, refer to GROUP 52B, SRS Service Precautions and
Air Bag Module and Clock Spring P.52B-5.
•When removing and installing the steering wheel, do not let it bump against the air bag
module.
AC304659
2
3
4
67
15
AB
8
Removal steps
1. Column cover lower
2. Column cover upper
3. Steering wheel and air bag module
assembly (Refer to GROUP 37,
Steering wheel P.37-17 or P.37-19)
4. Clock spring and column switch
assembly (Refer to GROUP 37,
Steering shaft P.37-21)
<>5. Steering lock cylinder•Ignition switch connector
6. Ignition switch
7. Immobilizer-ECU
•Key reminder switch connector
8. Key reminder switch and bulb
assembly Removal steps (Continued)
Page 448 of 788
COMBINATION METER ASSEMBLY
CHASSIS ELECTRICAL54A-60
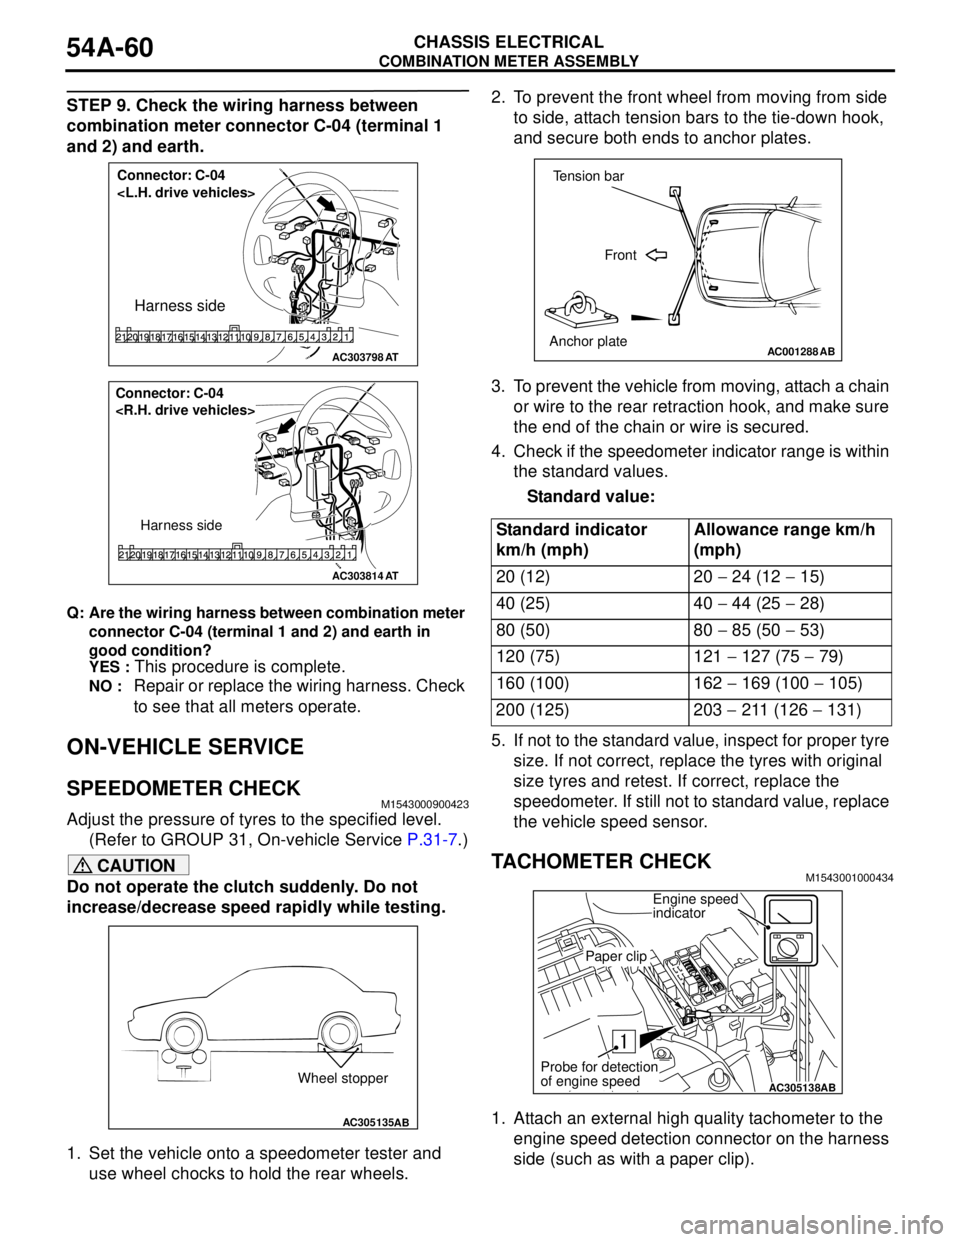
STEP 9. Check the wiring harness between
combination meter connector C-04 (terminal 1
and 2) and earth.
Q: Are the wiring harness between combination meter
connector C-04 (terminal 1 and 2) and earth in
good condition?
YES :
This procedure is complete.
NO : Repair or replace the wiring harness. Check
to see that all meters operate.
ON-VEHICLE SERVICE
SPEEDOMETER CHECKM1543000900423
Adjust the pressure of tyres to the specified level.
(Refer to GROUP 31, On-vehicle Service P.31-7.)
CAUTION
Do not operate the clutch suddenly. Do not
increase/decrease speed rapidly while testing.
1. Set the vehicle onto a speedometer tester and
use wheel chocks to hold the rear wheels.2. To prevent the front wheel from moving from side
to side, attach tension bars to the tie-down hook,
and secure both ends to anchor plates.
3. To prevent the vehicle from moving, attach a chain
or wire to the rear retraction hook, and make sure
the end of the chain or wire is secured.
4. Check if the speedometer indicator range is within
the standard values.
Standard value:
5. If not to the standard value, inspect for proper tyre
size. If not correct, replace the tyres with original
size tyres and retest. If correct, replace the
speedometer. If still not to standard value, replace
the vehicle speed sensor.
TACHOMETER CHECKM1543001000434
1. Attach an external high quality tachometer to the
engine speed detection connector on the harness
side (such as with a paper clip).
AC303798
Connector: C-04
Harness side
AT
AC303814
Connector: C-04
Harness side
AT
AC305135AB
Wheel stopper
Standard indicator
km/h (mph)Allowance range km/h
(mph)
20 (12) 20 − 24 (12 − 15)
40 (25) 40 − 44 (25 − 28)
80 (50) 80 − 85 (50 − 53)
120 (75) 121 − 127 (75 − 79)
160 (100) 162 − 169 (100 − 105)
200 (125) 203 − 211 (126 − 131)
AC001288
Tension bar
Front
Anchor plate
AB
AC305138AB
Engine speed
indicator
Paper clip
Probe for detection
of engine speed
Page 560 of 788
ON-VEHICLE SERVICE
HEATER, AIR CONDITIONER AND VENTILATION55-76
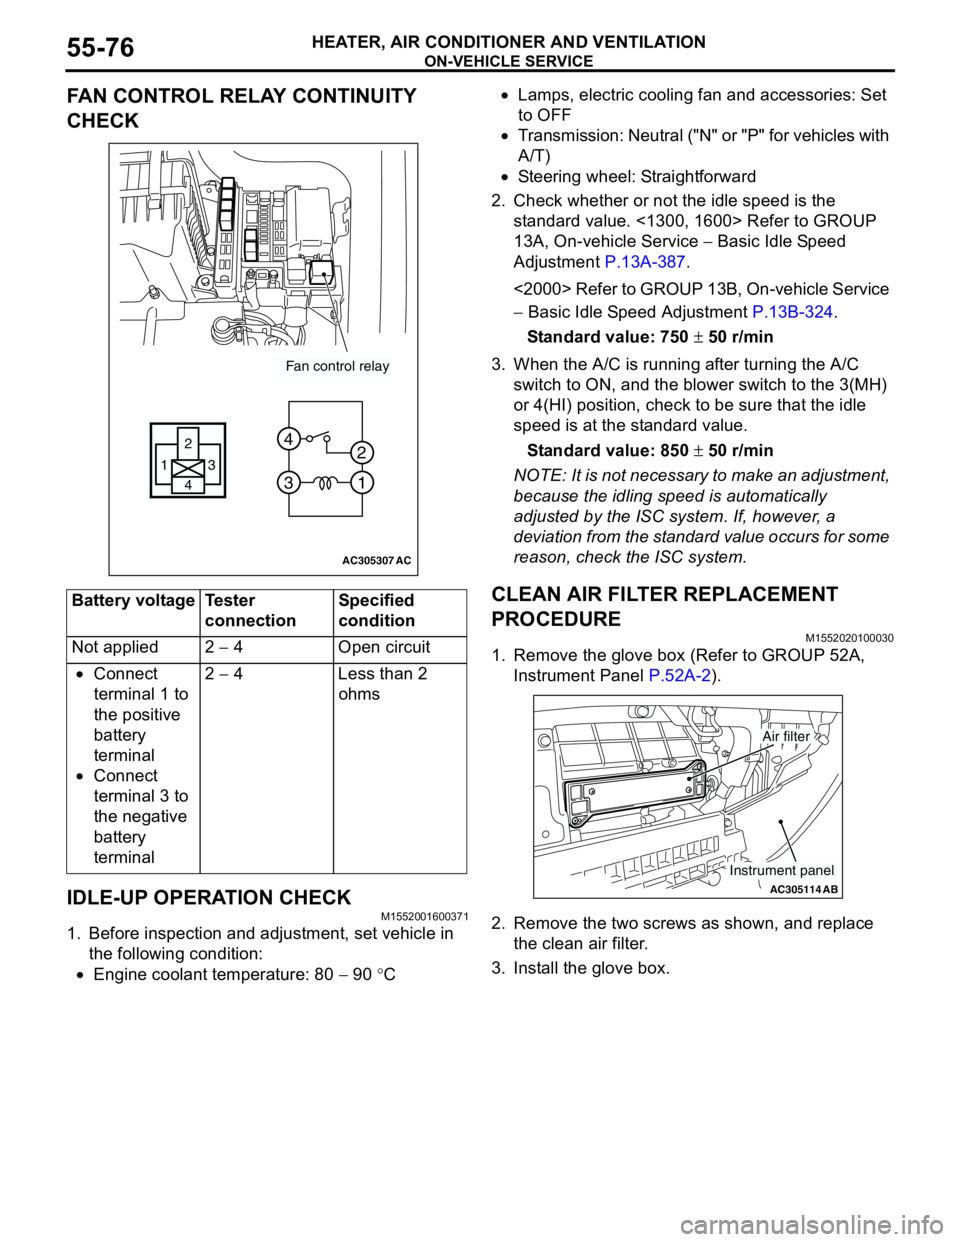
FAN CONTROL RELAY CONTINUITY
CHECK
IDLE-UP OPERATION CHECK
M1552001600371
1. Before inspection and adjustment, set vehicle in
the following condition:
•Engine coolant temperature: 80 − 90 °C•Lamps, electric cooling fan and accessories: Set
to OFF
•Transmission: Neutral ("N" or "P" for vehicles with
A/T)
•Steering wheel: Straightforward
2. Check whether or not the idle speed is the
standard value. <1300, 1600> Refer to GROUP
13A, On-vehicle Service − Basic Idle Speed
Adjustment P.13A-387.
<2000> Refer to GROUP 13B, On-vehicle Service
− Basic Idle Speed Adjustment P.13B-324.
Standard value: 750 ± 50 r/min
3. When the A/C is running after turning the A/C
switch to ON, and the blower switch to the 3(MH)
or 4(HI) position, check to be sure that the idle
speed is at the standard value.
Standard value: 850 ± 50 r/min
NOTE: It is not necessary to make an adjustment,
because the idling speed is automatically
adjusted by the ISC system. If, however, a
deviation from the standard value occurs for some
reason, check the ISC system.
CLEAN AIR FILTER REPLACEMENT
PROCEDURE
M1552020100030
1. Remove the glove box (Refer to GROUP 52A,
Instrument Panel P.52A-2).
2. Remove the two screws as shown, and replace
the clean air filter.
3. Install the glove box. Battery voltage Tester
connectionSpecified
condition
Not applied 2 − 4 Open circuit
•Connect
terminal 1 to
the positive
battery
terminal
•Connect
terminal 3 to
the negative
battery
terminal2 − 4 Less than 2
ohms
AC305307
Fan control relay
13
4 2
3 4
1 2
AC
AC305114AB
Air filter
Instrument panel
Page 592 of 788
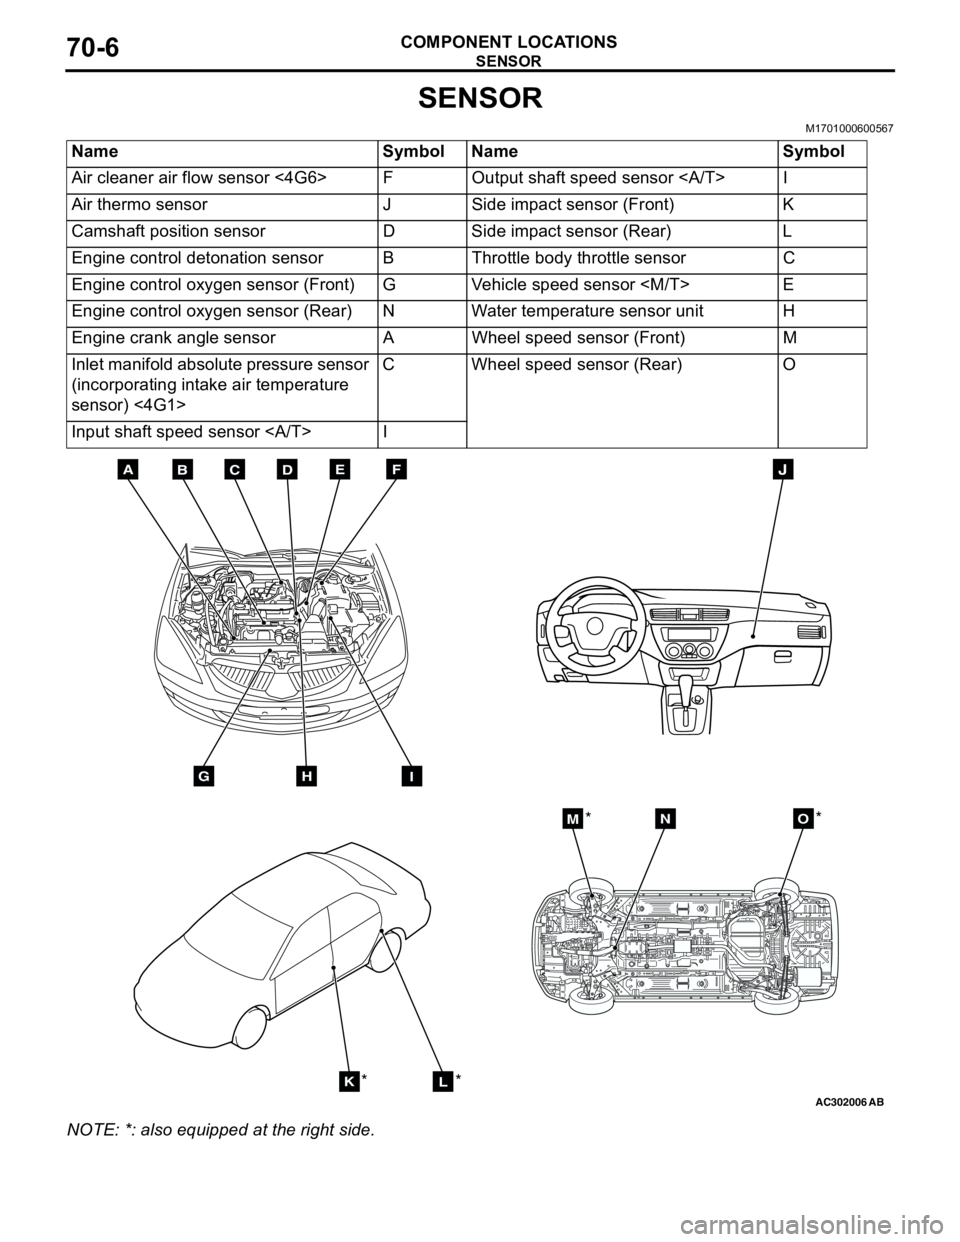
SENSOR
COMPONENT LOCATIONS70-6
SENSOR
M1701000600567
NOTE: *: also equipped at the right side.Name Symbol Name Symbol
Air cleaner air flow sensor <4G6> F Output shaft speed sensor I
Air thermo sensor J Side impact sensor (Front) K
Camshaft position sensor D Side impact sensor (Rear) L
Engine control detonation sensor B Throttle body throttle sensor C
Engine control oxygen sensor (Front) G Vehicle speed sensor
Engine control oxygen sensor (Rear) N Water temperature sensor unit H
Engine crank angle sensor A Wheel speed sensor (Front) M
Inlet manifold absolute pressure sensor
(incorporating intake air temperature
sensor) <4G1>C Wheel speed sensor (Rear) O
Input shaft speed sensor I
AC302006AB
BDCFEA
GHI
J
KL
MNO
*
***
Page 595 of 788
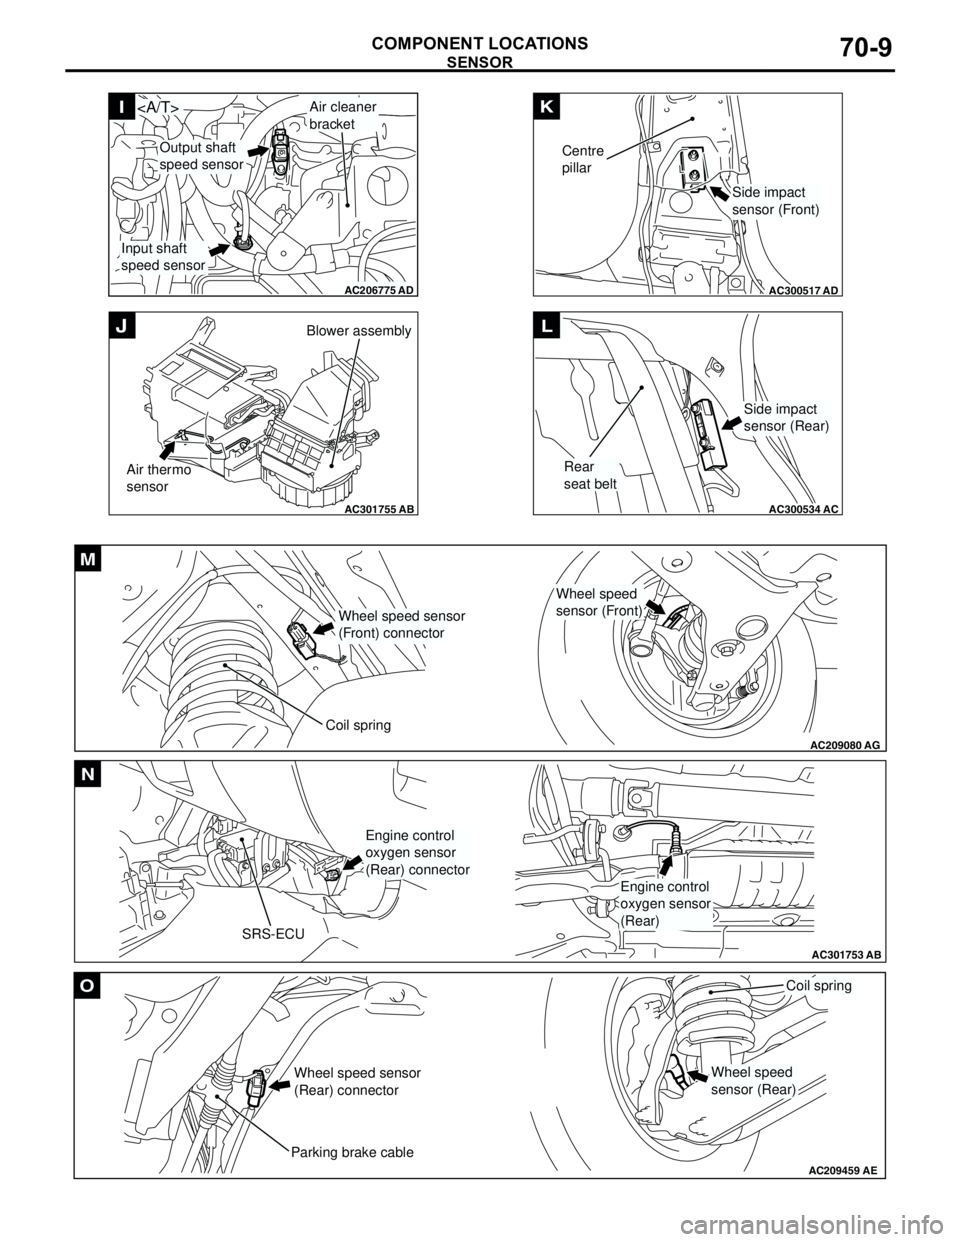
Page 612 of 788
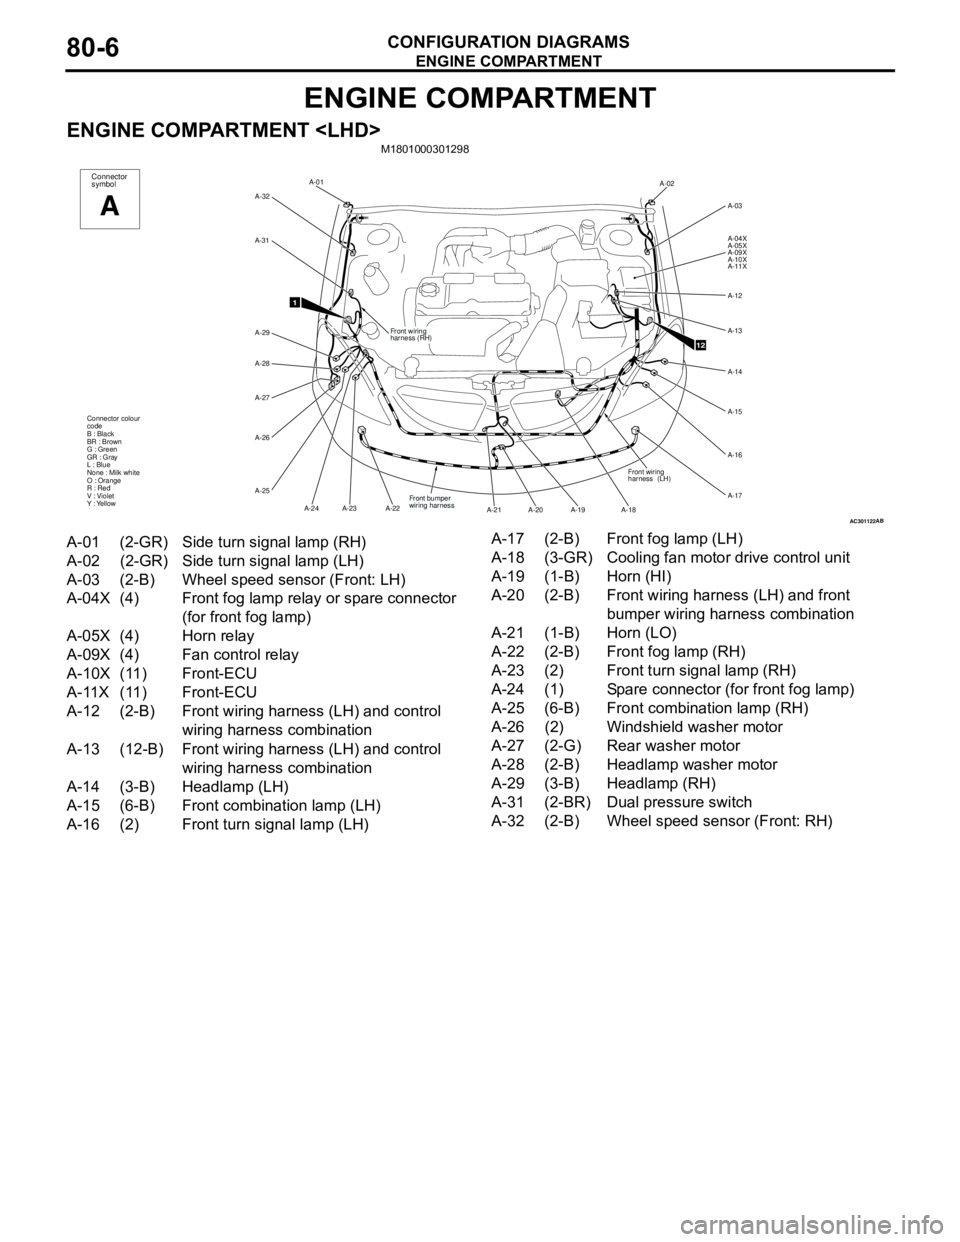
ENGINE COMPARTMENT
CONFIGURATION DIAGRAMS80-6
ENGINE COMPARTMENT
ENGINE COMPARTMENT
AC301122AB
A-02
A-03
A-04X
A-05X
A-09X
A-10X
A-11X
A-12
A-13
A-14
A-15
A-16
A-17
A-18 A-19 A-20 A-21Front wiring
harness (LH)
12Front wiring
harness (RH) A-01
A-32
A-31
A-29
A-28
A-27
A-26
A-25
A-23 A-24 A-22
1
Front bumper
wiring harness Connector colour
code
B : Black
BR : Brown
G : Green
GR : Gray
L : Blue
None : Milk white
O : Orange
R : Red
V : Violet
Y : Yellow
Connector
symbol
A
A-01 (2-GR) Side turn signal lamp (RH)
A-02 (2-GR) Side turn signal lamp (LH)
A-03 (2-B) Wheel speed sensor (Front: LH)
A-04X (4) Front fog lamp relay or spare connector
(for front fog lamp)
A-05X (4) Horn relay
A-09X (4) Fan control relay
A-10X (11) Front-ECU
A-11X (11) Front-ECU
A-12 (2-B) Front wiring harness (LH) and control
wiring harness combination
A-13 (12-B) Front wiring harness (LH) and control
wiring harness combination
A-14 (3-B) Headlamp (LH)
A-15 (6-B) Front combination lamp (LH)
A-16 (2) Front turn signal lamp (LH)A-17 (2-B) Front fog lamp (LH)
A-18 (3-GR) Cooling fan motor drive control unit
A-19 (1-B) Horn (HI)
A-20 (2-B) Front wiring harness (LH) and front
bumper wiring harness combination
A-21 (1-B) Horn (LO)
A-22 (2-B) Front fog lamp (RH)
A-23 (2) Front turn signal lamp (RH)
A-24 (1) Spare connector (for front fog lamp)
A-25 (6-B) Front combination lamp (RH)
A-26 (2) Windshield washer motor
A-27 (2-G) Rear washer motor
A-28 (2-B) Headlamp washer motor
A-29 (3-B) Headlamp (RH)
A-31 (2-BR) Dual pressure switch
A-32 (2-B) Wheel speed sensor (Front: RH)