body MITSUBISHI LANCER 2006 Repair Manual
[x] Cancel search | Manufacturer: MITSUBISHI, Model Year: 2006, Model line: LANCER, Model: MITSUBISHI LANCER 2006Pages: 800, PDF Size: 45.03 MB
Page 287 of 800
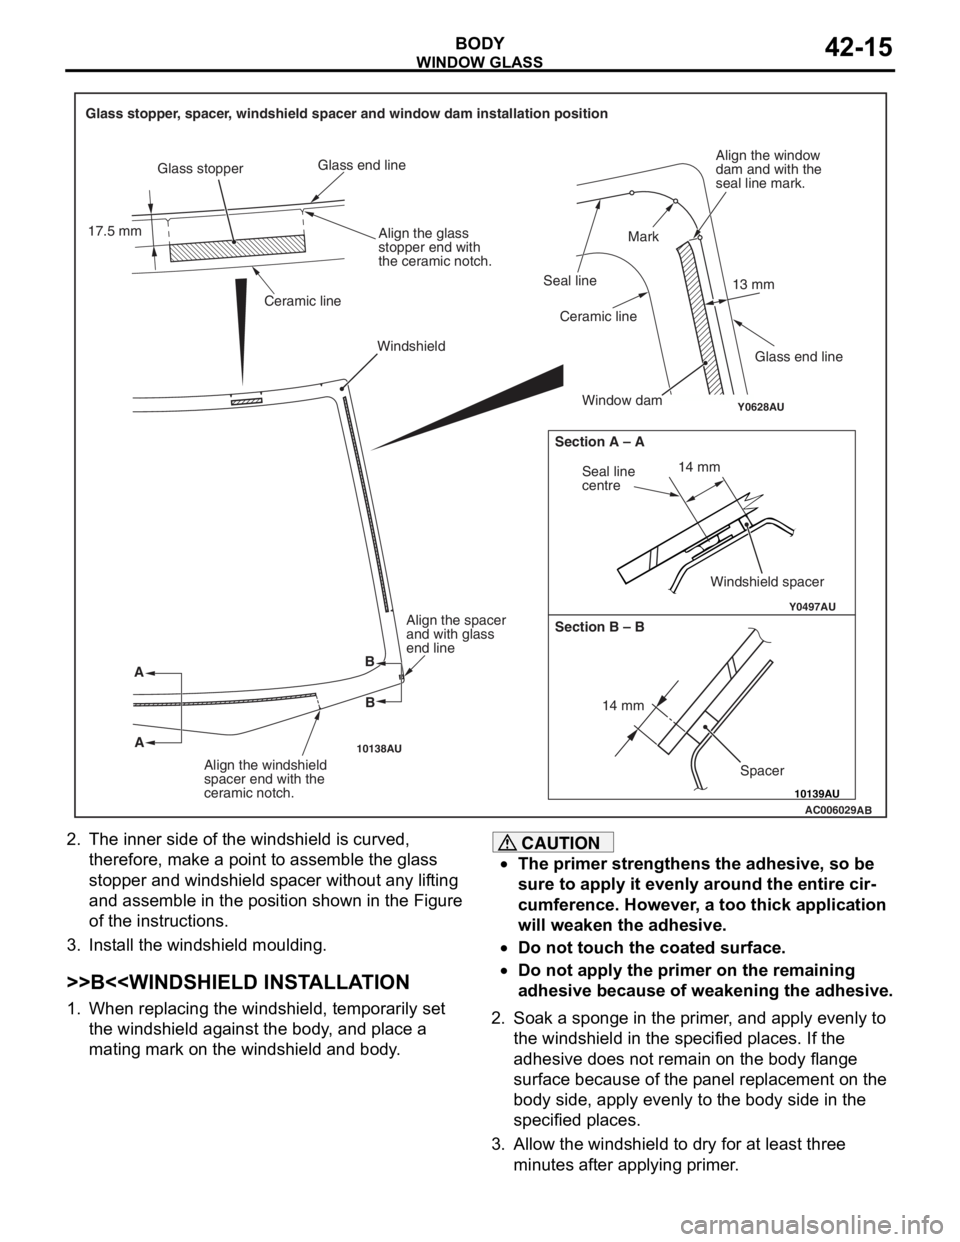
Y0628AU
AC006029
10138AU
10139AU
Y0497AU
Glass stopper, spacer, windshield spacer and window dam installation position17.5 mm Glass stopper
Glass end line
Ceramic line
Align the glass
stopper end with
the ceramic notch.
Align the window
dam and with the
seal line mark.
13 mm
Glass end line
Mark
Seal line
Ceramic line Window dam
AB
AA Windshield
Seal line
centre
14 mm
Windshield spacer
Section A – A
Section B – B
BB 14 mm
Spacer
Align the spacer
and with glass
end line
Align the windshield
spacer end with the
ceramic notch.
WI NDOW GLASS
BO D Y42-15
2.Th e inn e r side of the wind shield is curve d ,
th erefore, make a p o int t o assemble th e gla s s
stoppe r and windsh i eld sp acer withou t any lif ting
an d assemble in the positio n sho w n in th e Fig u re
of the instru ctio ns.
3.In st all the win d shield moulding .
>>B<
th e windshie l d ag ainst the b ody , an d pla c e a
matin g ma rk on the wind shield a nd bod y .
CAUTION
•The primer strengthens the adhesive, so be
sure to apply it evenly around the entire cir
-
cumference. However, a too thick application
will weaken the adhesive.
•Do not touch the coated surface.
•Do not apply the primer on the remaining
adhesive because of weakening the adhesive.
2. Soak a sponge in the primer, and apply evenly to the windshield in the specified places. If the
adhesive does not remain on the body flange
surface because of the panel replacement on the
body side, apply evenly to the body side in the
specified places.
3. Allow the windshield to dry for at least three minutes after applying primer.
Page 288 of 800
ACX00480
10 mm15 mm
AB
WI ND OW GLAS S
BODY42-16
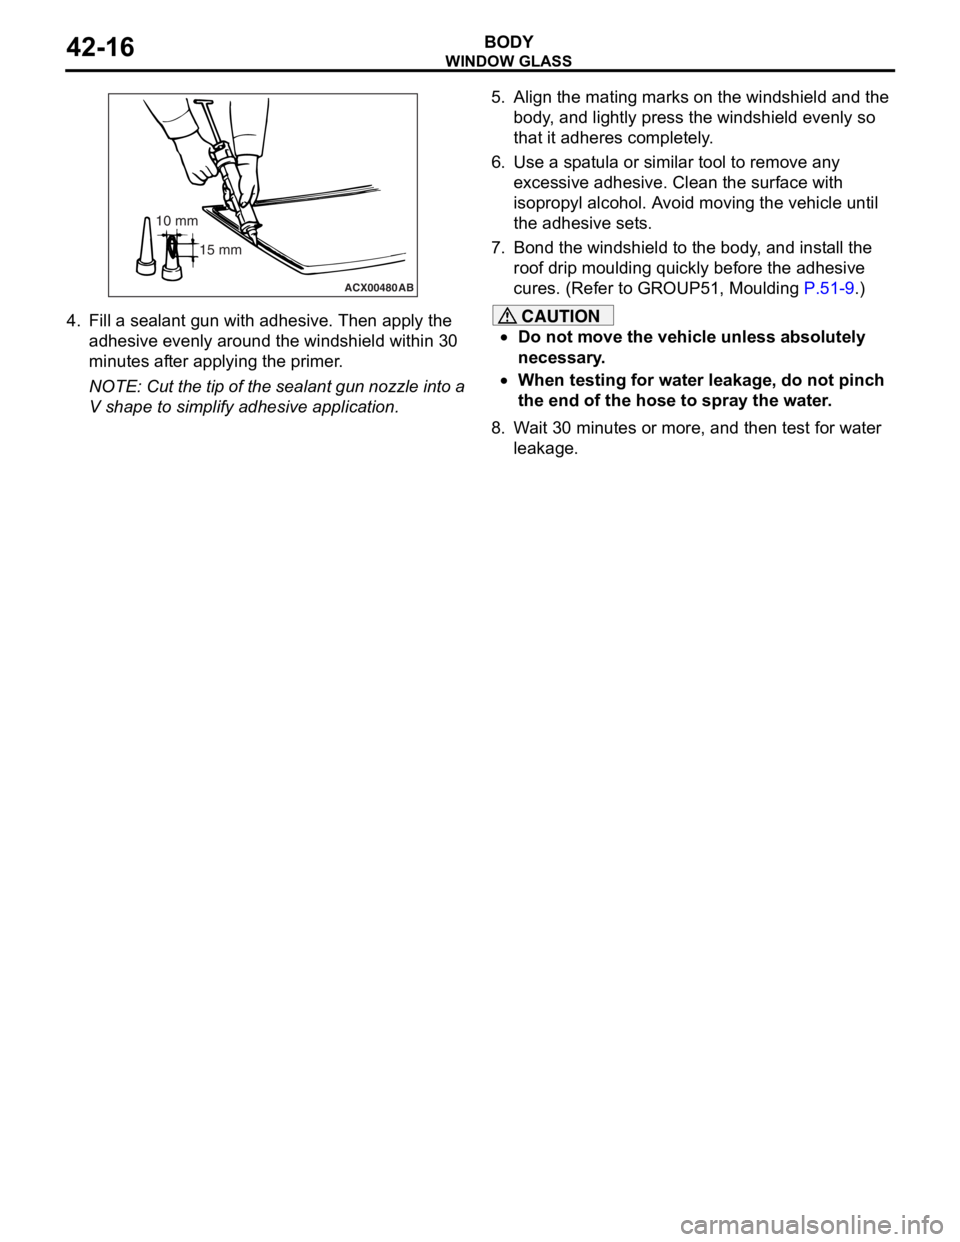
4.Fill a sea l ant gun with adhe sive. The n apply th e
ad hesive even ly a r ound the wind shield within 3 0
minut es af ter applying the pr ime r .
NOTE: Cut the tip of t he seala n t gu n nozzle into a
V shape to simplify adhesive app licatio n.
5.Align t he mating ma rks on th e windshie l d a nd the
b ody , and lig htly press the windshield evenly so
th at it adheres co mpletely .
6.Use a sp a t ula o r similar tool to re move any
e xce ssive adhesive. Clean the surface with
isopr opyl alcohol. A v o i d moving the veh i cle unt il
th e adhe sive set s .
7.Bon d the windsh i eld to the body , a nd in st all the
ro of drip mou l din g quickly b e fore t he adh esive
cures. (Refer to GROUP51, Mou l din g
P.51-9.)
CAUTION
•Do not move the vehicle unless absolutely
necessary.
•When testing for water leakage, do not pinch
the end of the hose to spray the water.
8. Wait 30 minutes or more, and then test for water leakage.
Page 289 of 800
WINDOW GLASS
BODY42-17
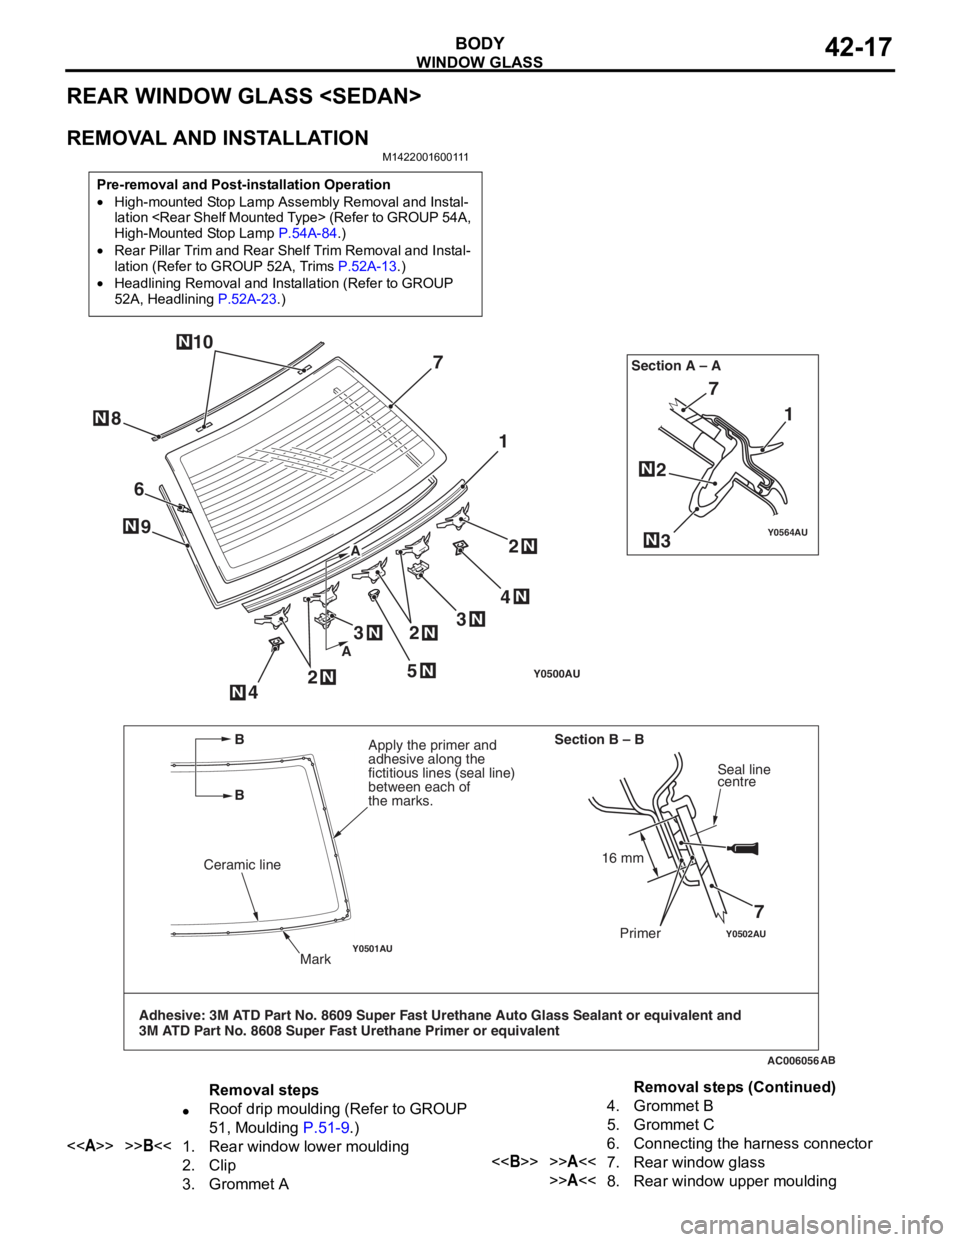
REAR WINDOW GLASS
REMOVAL AND INSTALLATION
M1422001600111
Pre-removal and Post-installation Operation
•High-mounted Stop Lamp Assembly Removal and Instal-lation
High-Mounted Stop Lamp
P.54A-84.)
•Rear Pillar Trim and Rear Shelf Trim Removal and Instal-
lation (Refer to GROUP 52A, Trims P.52A-13.)
•Headlining Removal and Installation (Refer to GROUP
52A, Headlining
P.52A-23.)
Y0500AU
Y0502AUY0501AU
Y0564AU
AC006056
1 1
7
7
AB
6
25
4
9
7
3
N
2N
2N
N
4N
N
3N3N
NN
2N
Ceramic line
Mark
Apply the primer and
adhesive along the
fictitious lines (seal line)
between each of
the marks. Section A – A
Section B – B
Seal line
centre
Primer
8N
10N
Adhesive: 3M ATD Part No. 8609 Super Fast Urethane Auto Glass Sealant or equivalent and
3M ATD Part No. 8608 Super Fast Urethane Primer or equivalent
16 mm
A
A
B
B
Removal steps
•Roof drip moulding (Refer to GROUP
51, Moulding
P.51-9.)
<>>>B<<1.Rear window lower moulding
2.Clip
3.Grommet A
4.Grommet B
5.Grommet C
6.Connecting the harness connector
<>>>A<<7.Rear window glass
>>A<<8.Rear window upper moulding
Removal steps (Continued)
Page 290 of 800
Page 291 of 800
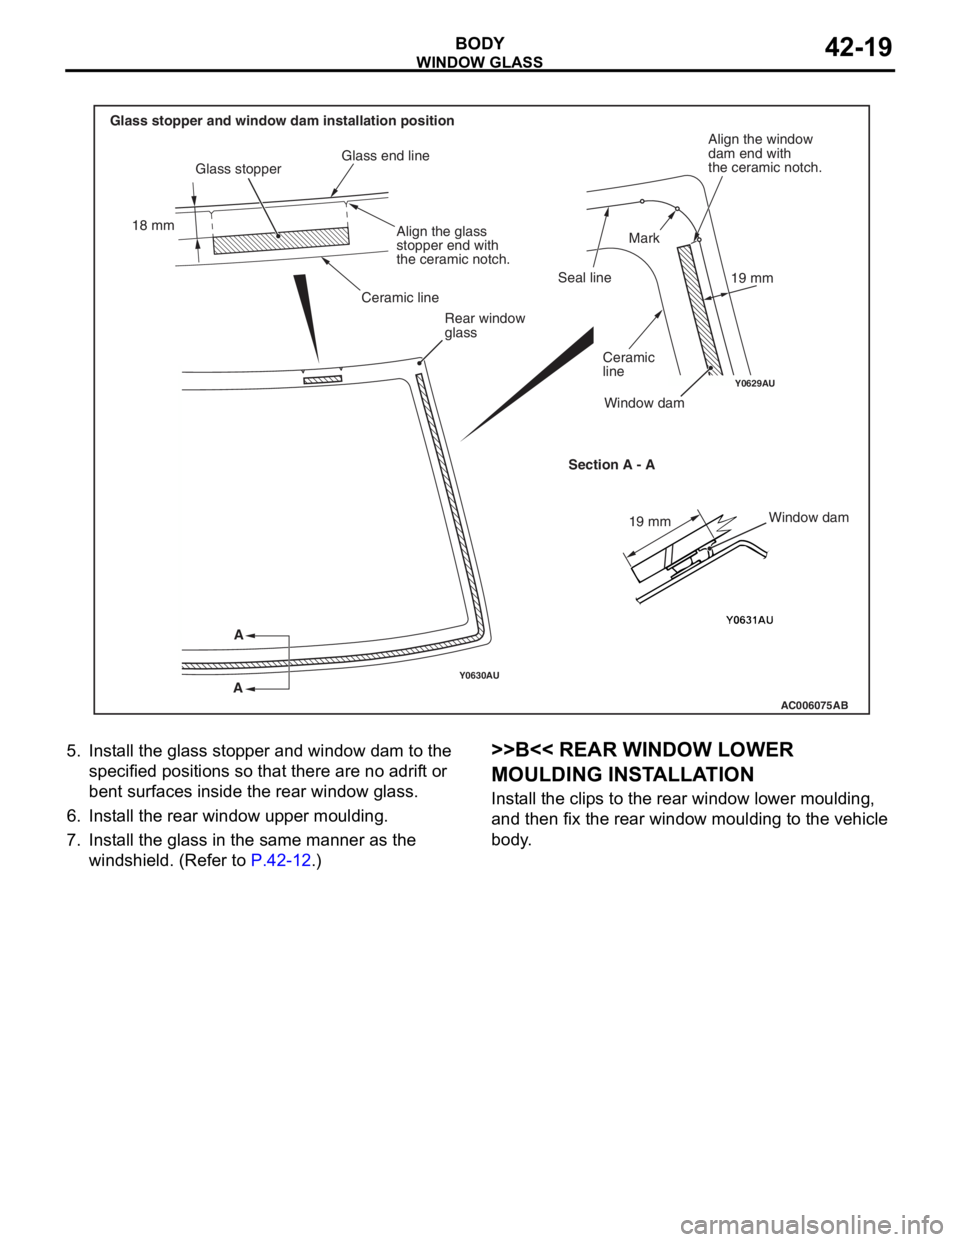
Y0630AU
Y0629AU
AC006075
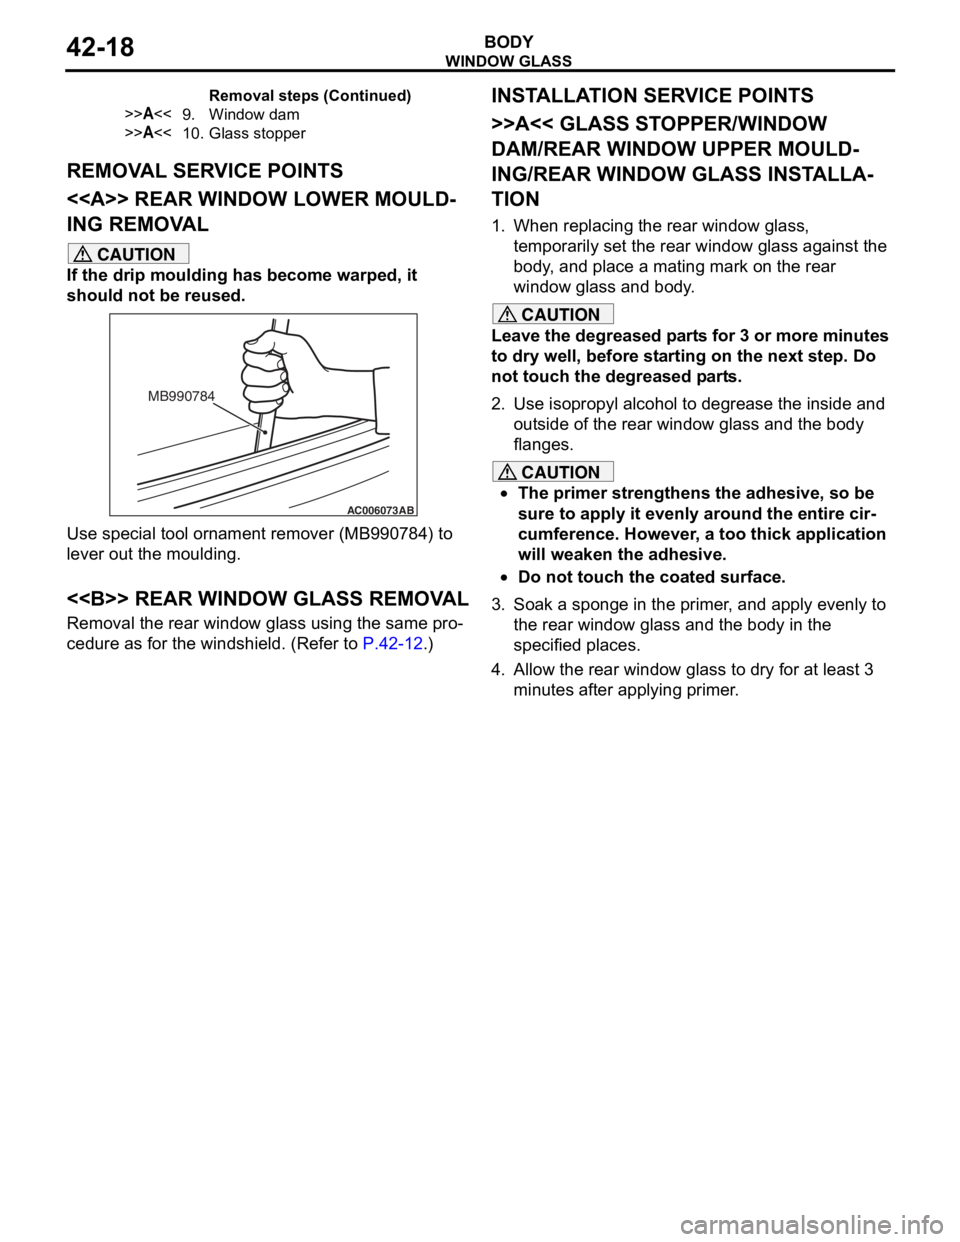
Glass stopper and window dam installation positionGlass stopper
18 mm
Glass end line
Align the glass
stopper end with
the ceramic notch.
Ceramic line Rear window
glass
A
A Section A - A
19 mm
Window dam
Align the window
dam end with
the ceramic notch.
Mark
Seal line
Ceramic
lineWindow dam
19 mm
AB
W I NDOW GLASS
BO D Y42-19
5.In st all the glass sto pper a nd wind ow dam to the
specifie d positio ns so tha t there are no a d rif t or
be nt su rface s insid e the rear wind ow glass.
6.In st all the rea r window u pper mould i ng.
7.In st all the glass in the same mann er as the
win d shield . (Refer to
P.42-12.)
>>B< < REAR WINDOW LOWER
MOULDING INST
ALLA TION
Install the clip s to th e rear window lo we r mouldin g ,
and the
n fix the rear wind ow mouldin g to th e veh i cle
body
.
Page 292 of 800
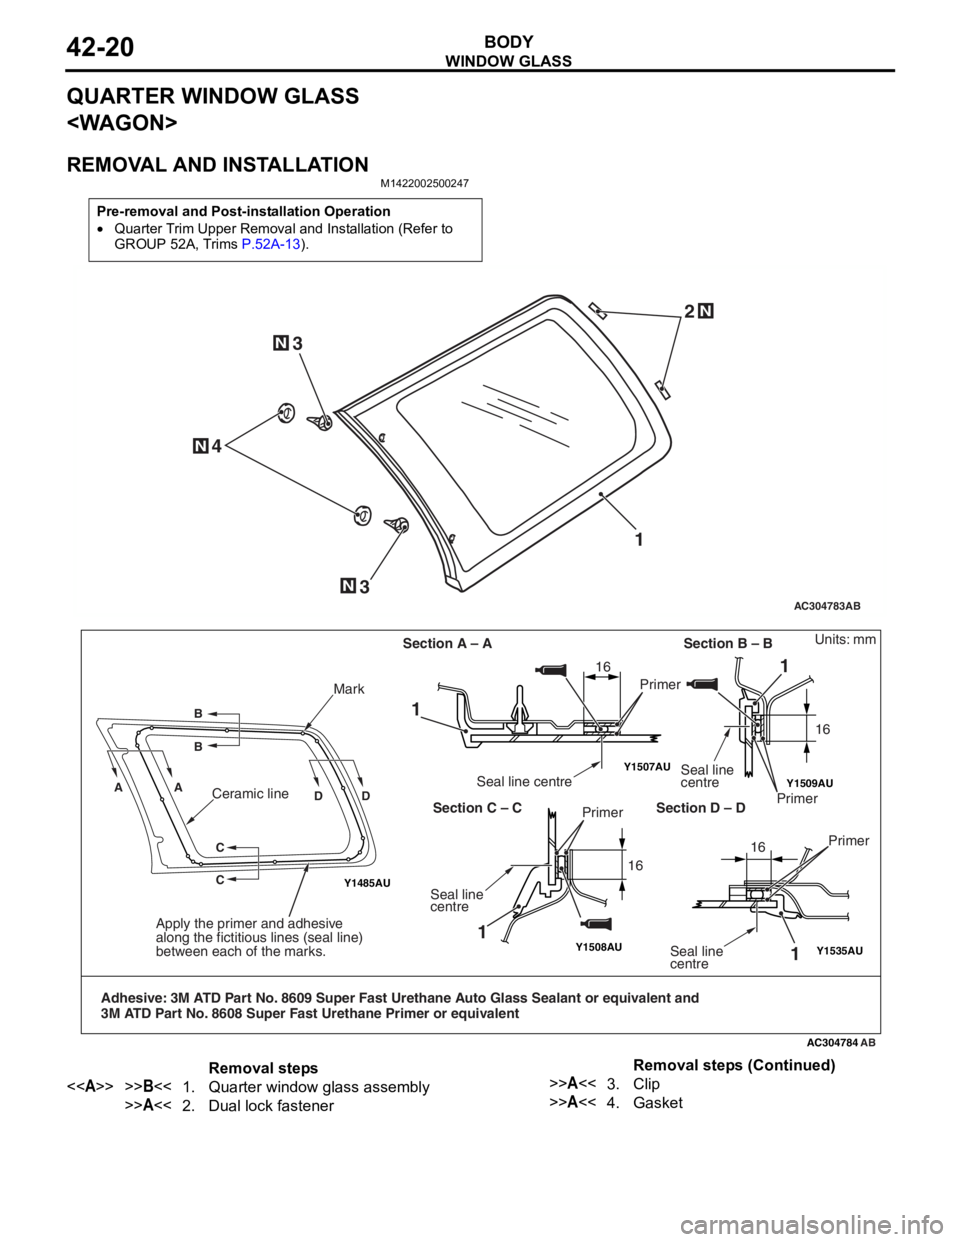
WINDOW GLASS
BODY42-20
QUARTER WINDOW GLASS
REMOVAL AND INSTALLATION
M1422002500247
Pre-removal and Post-installation Operation
•Quarter Trim Upper Removal and Installation (Refer to
GROUP 52A, Trims
P.52A-13).
AC304783
N
N
N
12
3
N3
4
AB
Y1509AU
Y1508AU
Y1507AU
Y1485AU
Y1535AU
AC304784
AA B B
DD
C
C
Mark
Apply the primer and adhesive
along the fictitious lines (seal line)
between each of the marks.
Adhesive: 3M ATD Part No. 8609 Super Fast Urethane Auto Glass Sealant or equivalent and
3M ATD Part No. 8608 Super Fast Urethane Primer or equivalent
1
1
1
Seal line centrePrimer
Section A – A Section B – BSeal line
centre
Primer
Section C – C Section D – D
Seal line
centre Primer
1Seal line
centre
Units: mm
Primer
16
16 1616
Ceramic line
AB
Removal steps
<>>>B<<1.Quarter window glass assembly
>>A<<2.Dual lock fastener
>>A<<3.Clip
>>A<<4.Gasket
Removal steps (Continued)
Page 293 of 800
Page 294 of 800
WINDOW GLASS
BODY42-22
INSTALLATION SERVICE POINTS
>>A<< GASKET/CLIP/DUAL LOCK FAS-
TENER INSTALLATION
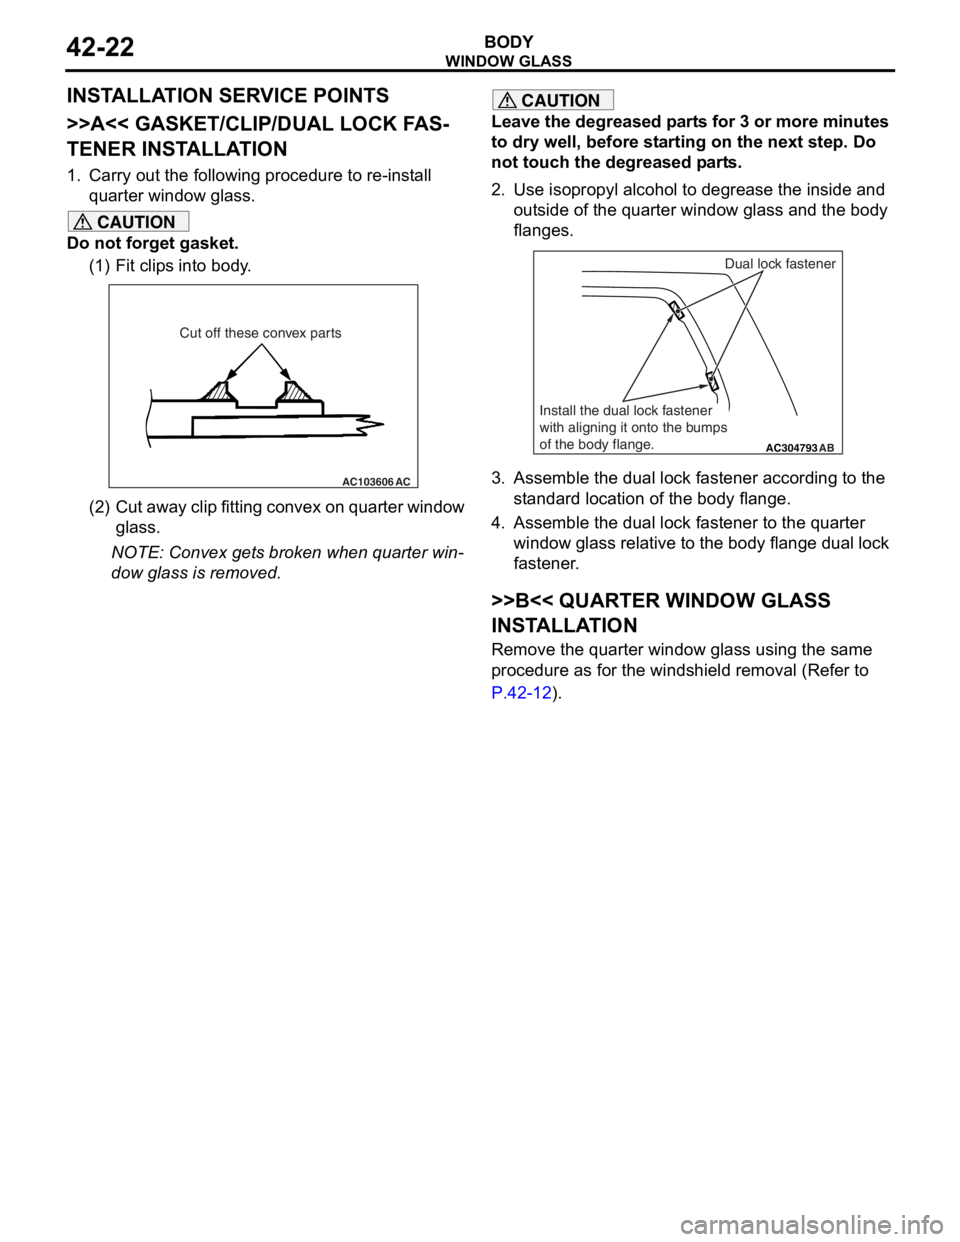
1. Carry out the following procedure to re-install quarter window glass.
CAUTION
Do not forget gasket.
(1) Fit clips into body.
AC103606 AC
Cut off these convex parts
(2) Cut away clip fitting convex on quarter window
glass.
NOTE: Convex gets broken when quarter win-
dow glass is removed.
CAUTION
Leave the degreased parts for 3 or more minutes
to dry well, before starting on the next step. Do
not touch the degreased parts.
2. Use isopropyl alcohol to degrease the inside and
outside of the quarter window glass and the body
flanges.
AC304793AB
Dual lock fastener
Install the dual lock fastener
with aligning it onto the bumps
of the body flange.
3. Assemble the dual lock fastener according to the standard location of the body flange.
4. Assemble the dual lock fastener to the quarter window glass relative to the body flange dual lock
fastener.
>>B<< QUARTER WINDOW GLASS
INSTALLATION
Remove the quarter window glass using the same
procedure as for the windshield removal (Refer to
P.42-12).
Page 295 of 800
WINDOW GLASS
BODY42-23
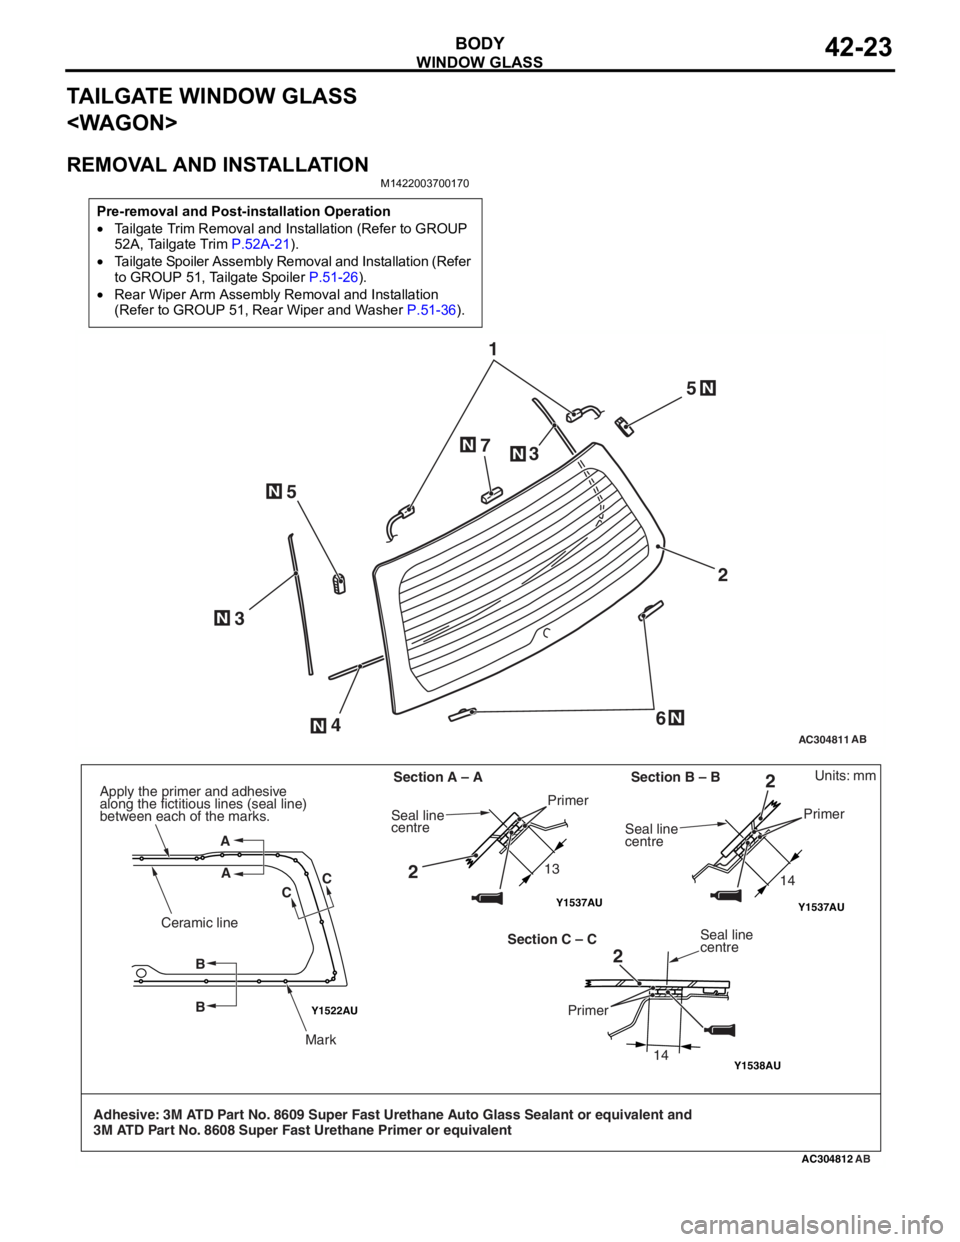
TAILGATE WINDOW GLASS
REMOVAL AND INSTALLATION
M1422003700170
Pre-removal and Post-installation Operation
•Tailgate Trim Removal and Installation (Refer to GROUP
52A, Tailgate Trim
P.52A-21).
•Tailgate Spoiler Assembly Removal and Installation (Refer
to GROUP 51, Tailgate Spoiler
P.51-26).
•Rear Wiper Arm Assembly Removal and Installation
(Refer to GROUP 51, Rear Wiper and Washer
P.51-36).
AC304811
12
6
5
5
4
3 3
7
AB
N
NN
N
N
N
N
Y1522AU
Y1538AU
AC304812
Y1537AUY1537AU
AB
Units: mm
Adhesive: 3M ATD Part No. 8609 Super Fast Urethane Auto Glass Sealant or equivalent and
3M ATD Part No. 8608 Super Fast Urethane Primer or equivalent Section A – A
13 14
14
Section B – B
Section C – C
A
A CC
B B
Ceramic line
Mark
Apply the primer and adhesive
along the fictitious lines (seal line)
between each of the marks.
Seal line
centre
Primer
Seal line
centre Primer
Seal line
centre
Primer
2 2
2
Page 296 of 800
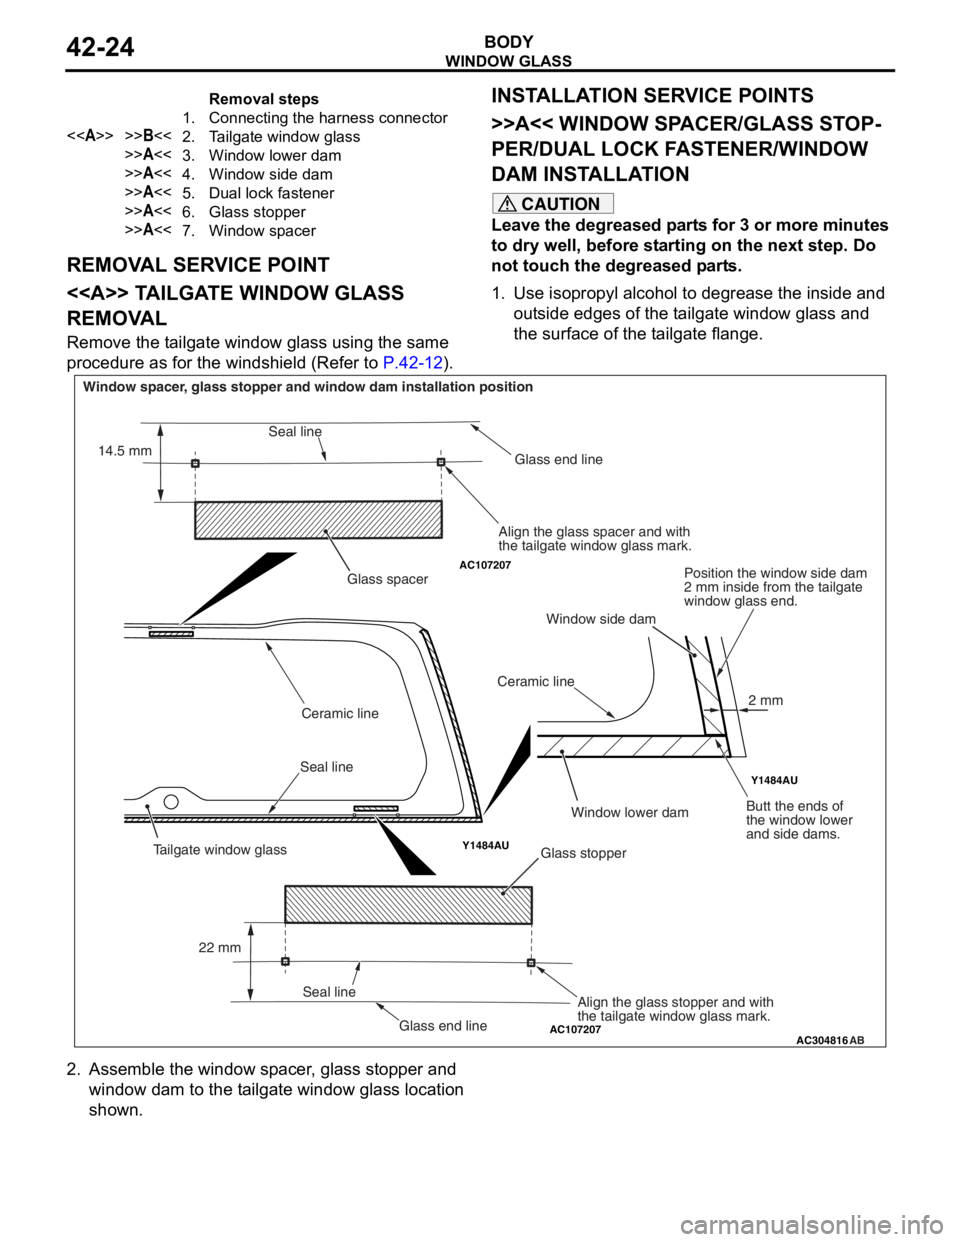
Removal steps
1.Connecting the harness connector
<>>>B<<2.Tailgate window glass
>>A<<3.Window lower dam
>>A<<4.Window side dam
>>A<<5.Dual lock fastener
>>A<<6.Glass stopper
>>A<<7.Window spacer
WI ND OW GLAS S
BODY42-24
REMOVA L SER V ICE POINT
<> TA ILGA TE WINDOW GLASS
REMOV
A L
Remove the t a ilgate window g l ass using the same
proce
dure as for th e windshie l d (Refe r to
P.42-12).
INSTALLA T ION SER VICE POINTS
>>A<< WI NDOW SP ACER/GLASS ST OP-
PER/DUAL LOCK FA STENER/WINDOW
DAM INST
ALLA TION
CAUTION
Leave the degreased parts for 3 or more minutes
to dry well, before starting on the next step. Do
not touch the degreased parts.
1. Use isopropyl alcohol to degrease the inside and outside edges of the tailgate window glass and
the surface of the tailgate flange.
AC107207
AC107207
Y1484AU Y1484AU
AC304816
AB
Glass stopper
Glass spacer
Seal line Ceramic line
Ceramic lineGlass end line
Glass end line
Window spacer, glass stopper and window dam installation position
Align the glass spacer and with
the tailgate window glass mark.Position the window side dam
2 mm inside from the tailgate
window glass end.
Butt the ends of
the window lower
and side dams.
Align the glass stopper and with
the tailgate window glass mark.
Seal line
Seal line
22 mm
14.5 mm
2 mm
Tailgate window glass
Window lower dam
Window side dam
2. Assemble the window spacer, glass stopper and
window dam to the tailgate window glass location
shown.