engine oil MITSUBISHI LANCER EVOLUTION X 2008 Workshop Manual
[x] Cancel search | Manufacturer: MITSUBISHI, Model Year: 2008, Model line: LANCER EVOLUTION X, Model: MITSUBISHI LANCER EVOLUTION X 2008Pages: 241, PDF Size: 8.26 MB
Page 46 of 241

GENERAL DESCRIPTION
ENGINE MECHANICAL11A-2
GENERAL DESCRIPTIONM2112000101162
This model is equipped with a newly developed 4B11
engine. It is a 4-cylinder, double overhead camshaft
(DOHC) engine with a 2.0-L cylinder displacement.
This engine has adopted the following features:
•MIVEC (MITSUBISHI INNOVATIVE VALVE TIM-
ING ELECTRONIC CONTROL SYSTEM) for
both the intake and exhaust valves
•Cylinder block made of an aluminum alloy
•Valve train with direct-acting valve tappets
•Silent timing chain
MAIN SPECIFICATIONS
DescriptionsSpecifications
Engine type4B11
Bore × stroke mm (in)86 (3.4) × 86 (3.4)
Total displacement cm3 (cu in)1,998 (121.9)
Combustion chamberPent-roof type
Number of cylinders4
Valve mechanismTy p eDOHC
Intake valve8
Exhaust valve8
Compression ratio10.0
Va l v e t i m i n gIntake valveOpens (BTDC)3° − 28°
0° − 25°
Closes (ABDC)45° − 20°
48° − 23°
Exhaust valveOpens (BBDC)41° − 21°
44° − 24°
Closes (ATDC)3° − 23°
0° − 20°
Maximum output kW/r/min (HP/r/min)107/6,000 (143/6,000)
113/6,000 (152/6,000)
Maximum torque N⋅m/r/min (lbs-ft/r/min)194/4,250 (143/4,250)
198/4,250 (146/4,250)
Fuel injection system typeElectronic control MPI
Ignition system typeElectronic spark-advance control type (4-coil
type)
Generator typeAlternating current system (with built-in IC
regulator)
Starter motor typeReduction drive type
Page 48 of 241
BASE ENGINE
ENGINE MECHANICAL11A-4
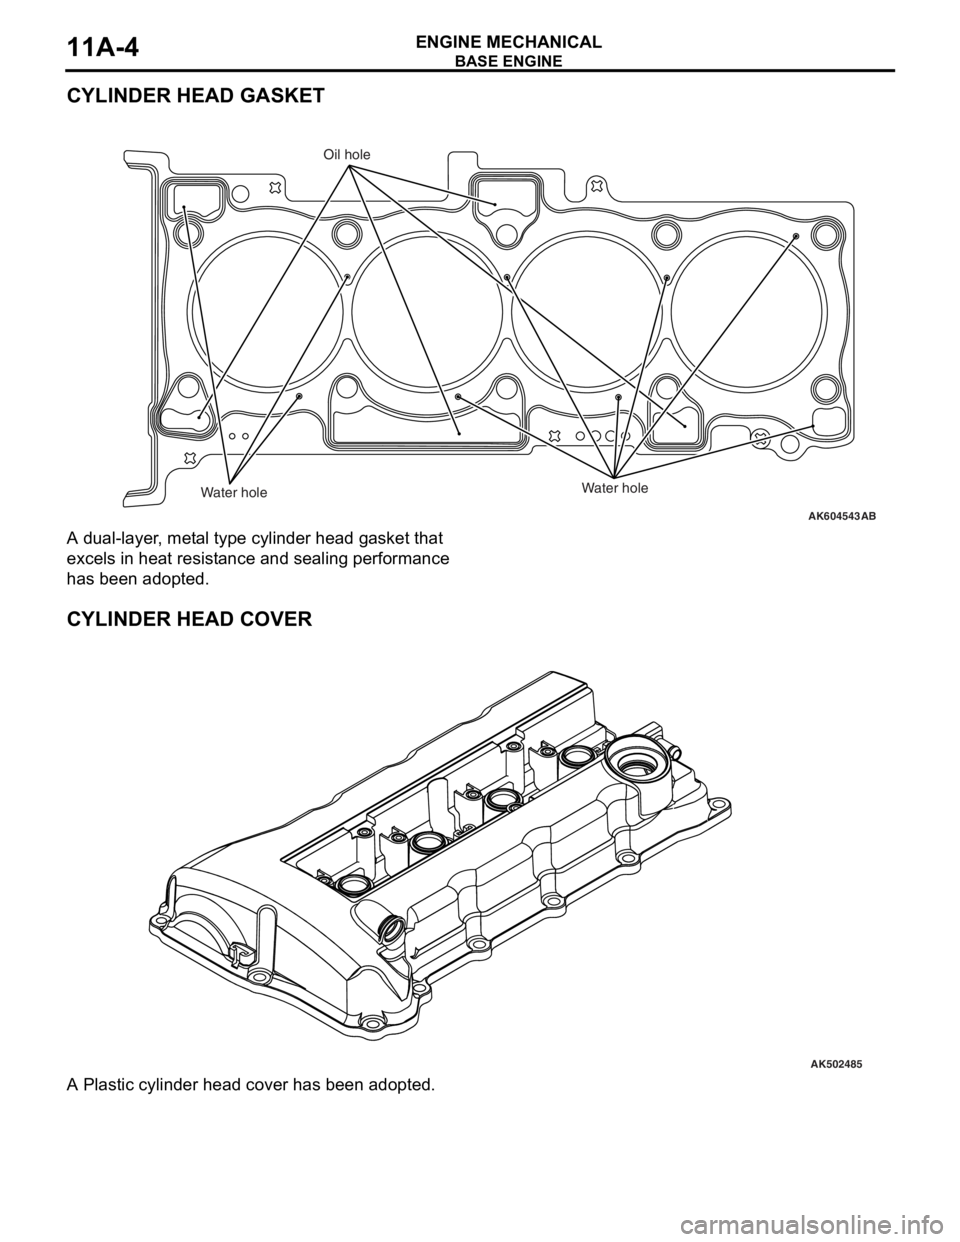
CYLINDER HEAD GASKET
A dual-layer, metal type cylinder head gasket that
excels in heat resistance and sealing performance
has been adopted.
CYLINDER HEAD COVER
A Plastic cylinder head cover has been adopted.
AK604543
Oil hole
Water hole
Water hole
AB
AK502485
Page 49 of 241
BASE ENGINE
ENGINE MECHANICAL11A-5
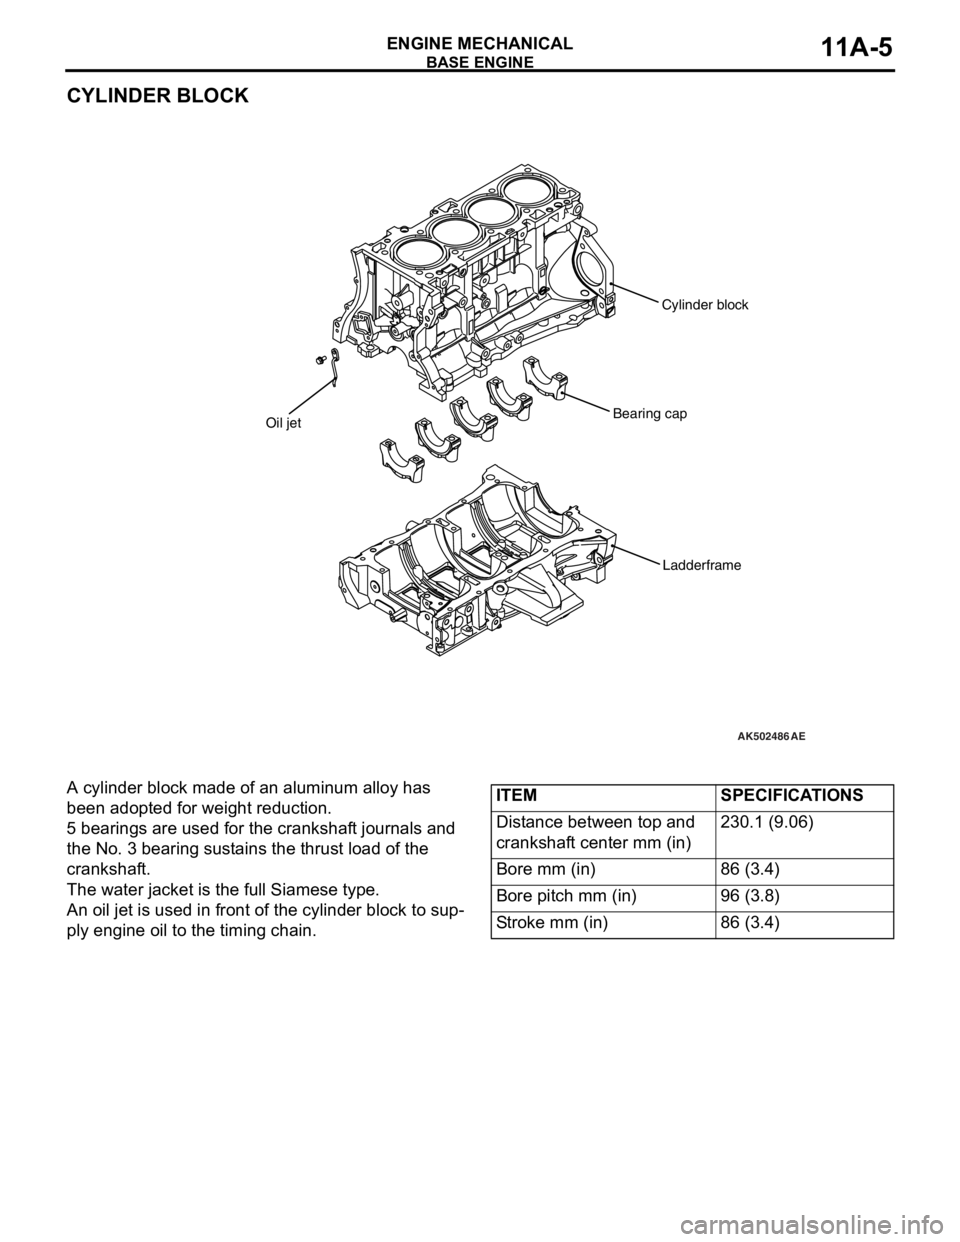
CYLINDER BLOCK
A cylinder block made of an aluminum alloy has
been adopted for weight reduction.
5 bearings are used for the crankshaft journals and
the No. 3 bearing sustains the thrust load of the
crankshaft.
The water jacket is the full Siamese type.
An oil jet is used in front of the cylinder block to sup-
ply engine oil to the timing chain.
AK502486
Oil jetCylinder blockBearing cap
AE
Ladderframe
ITEMSPECIFICATIONS
Distance between top and
crankshaft center mm (in)230.1 (9.06)
Bore mm (in)86 (3.4)
Bore pitch mm (in)96 (3.8)
Stroke mm (in)86 (3.4)
Page 50 of 241
BASE ENGINE
ENGINE MECHANICAL11A-6
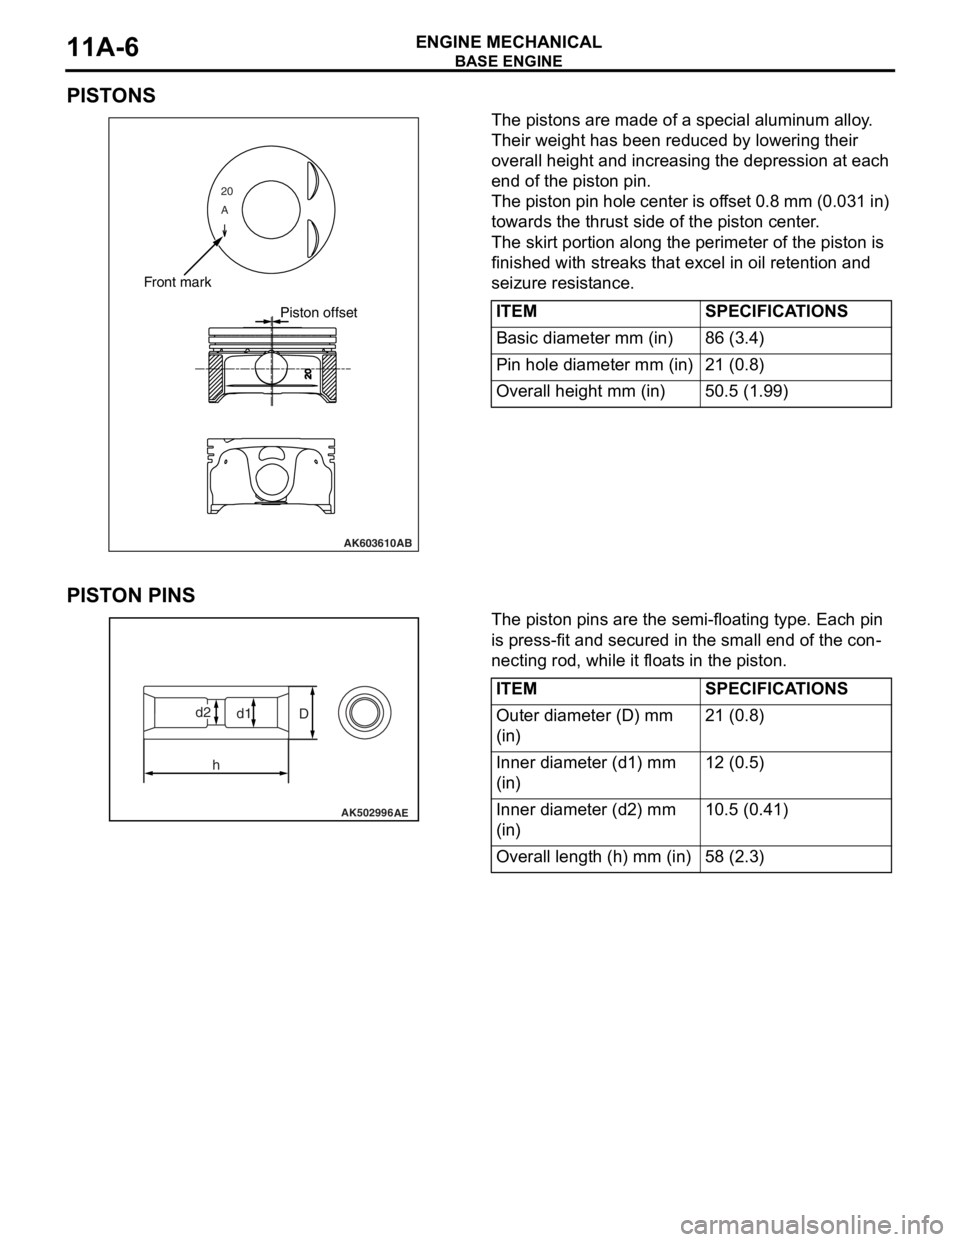
PISTONS
The pistons are made of a special aluminum alloy.
Their weight has been reduced by lowering their
overall height and increasing the depression at each
end of the piston pin.
The piston pin hole center is offset 0.8 mm (0.031 in)
towards the thrust side of the piston center.
The skirt portion along the perimeter of the piston is
finished with streaks that excel in oil retention and
seizure resistance.
PISTON PINS
The piston pins are the semi-floating type. Each pin
is press-fit and secured in the small end of the con
-
necting rod, while it floats in the piston.
20
A
AK603610
Front mark
Piston offset
AB
ITEMSPECIFICATIONS
Basic diameter mm (in)86 (3.4)
Pin hole diameter mm (in)21 (0.8)
Overall height mm (in)50.5 (1.99)
AK502996AE
D
hd1d2
ITEMSPECIFICATIONS
Outer diameter (D) mm
(in)21 (0.8)
Inner diameter (d1) mm
(in)12 (0.5)
Inner diameter (d2) mm
(in)10.5 (0.41)
Overall length (h) mm (in)58 (2.3)
Page 51 of 241
BASE ENGINE
ENGINE MECHANICAL11A-7
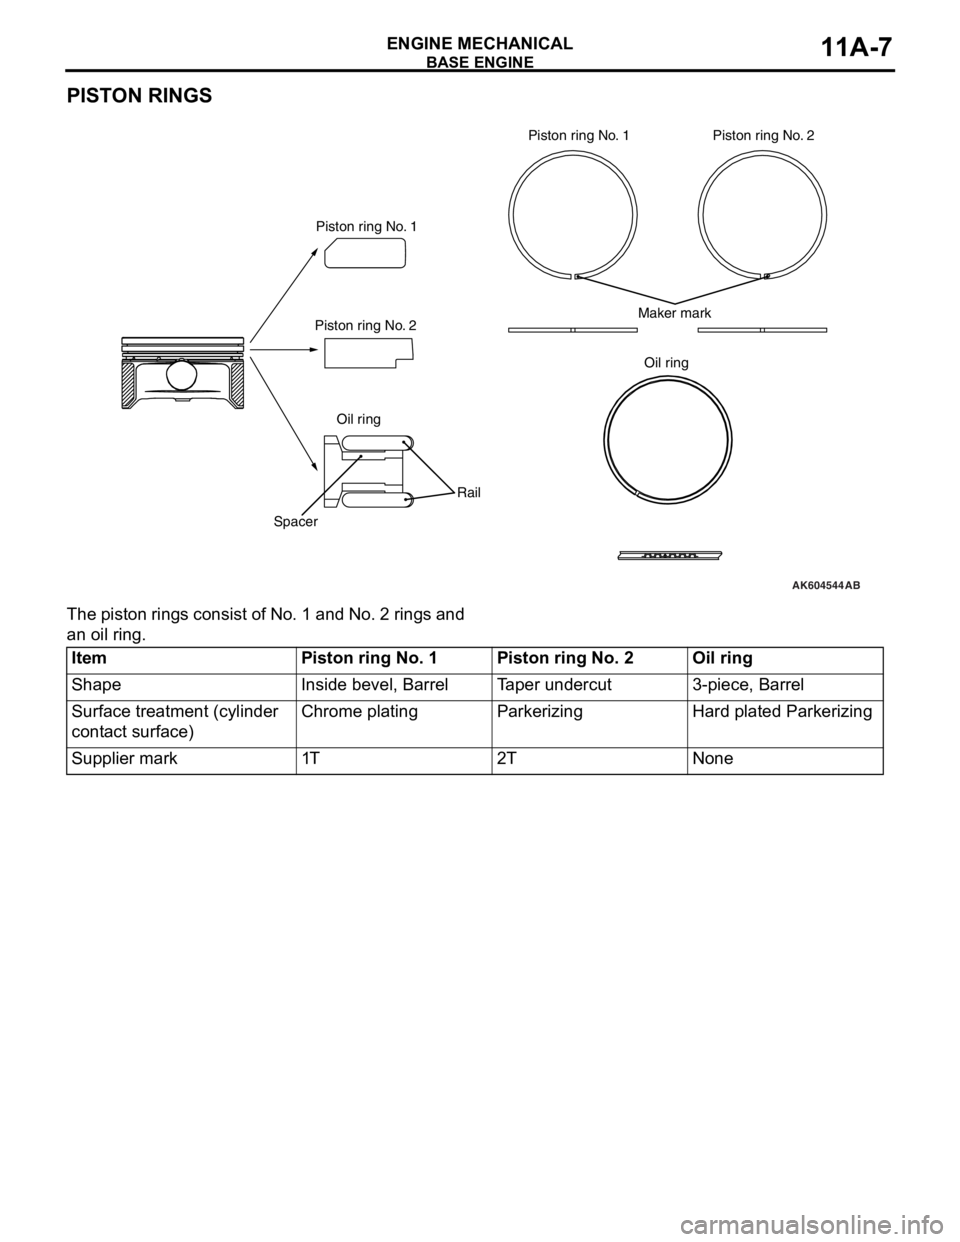
PISTON RINGS
The piston rings consist of No. 1 and No. 2 rings and
an oil ring.
AK604544
Oil ring
SpacerRailMaker mark
AB
Oil ring Piston ring No. 1Piston ring No. 1
Piston ring No. 2Piston ring No. 2
ItemPiston ring No. 1Piston ring No. 2Oil ring
ShapeInside bevel, BarrelTaper undercut3-piece, Barrel
Surface treatment (cylinder
contact surface)Chrome platingParkerizingHard plated Parkerizing
Supplier mark1T2TNone
Page 52 of 241
BASE ENGINE
ENGINE MECHANICAL11A-8
CONNECTING RODS
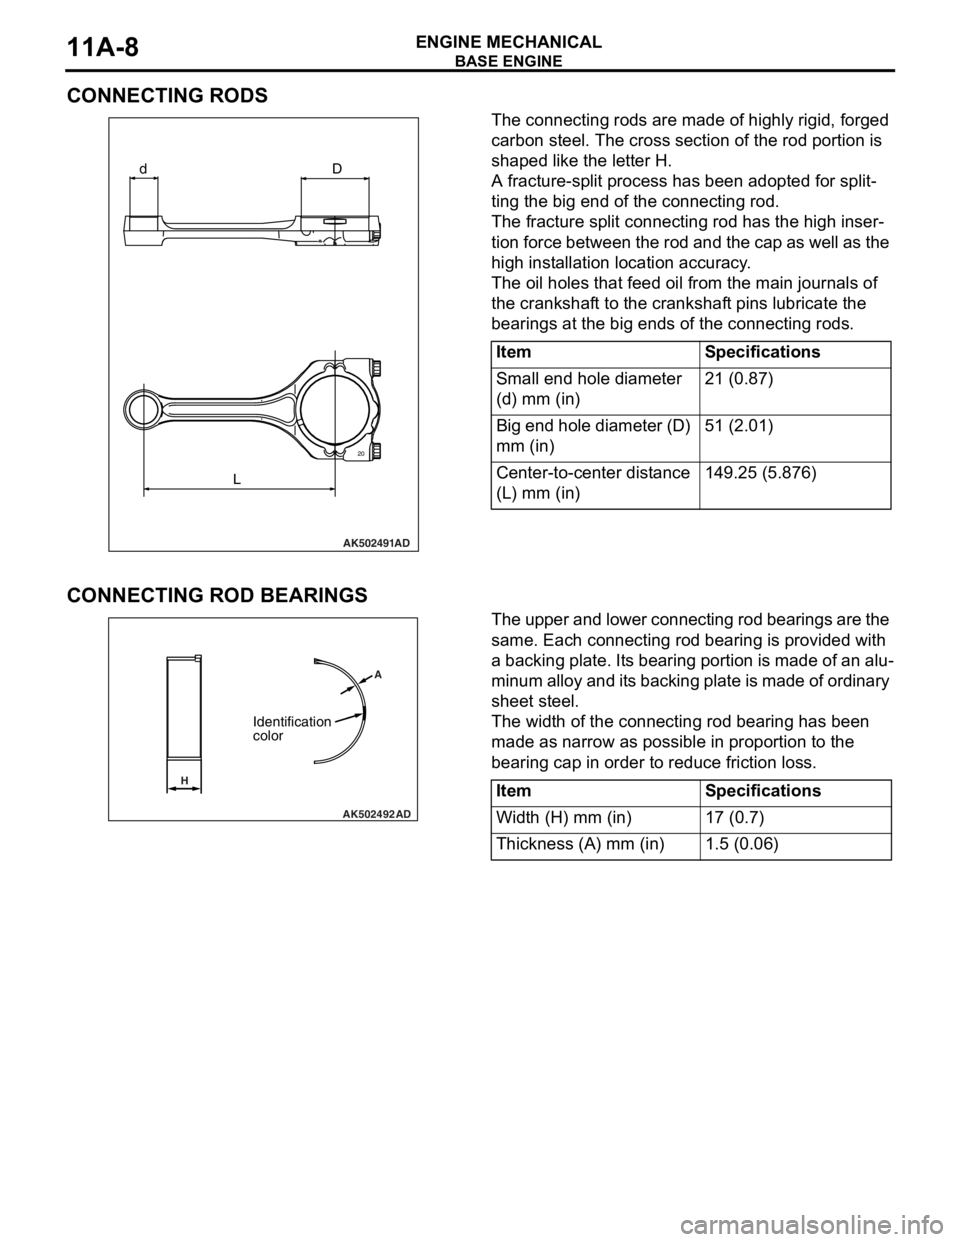
The connecting rods are made of highly rigid, forged
carbon steel. The cross section of the rod portion is
shaped like the letter H.
A fracture-split process has been adopted for split-
ting the big end of the connecting rod.
The fracture split connecting rod has the high inser-
tion force between the rod and the cap as well as the
high installation location accuracy.
The oil holes that feed oil from the main journals of
the crankshaft to the crankshaft pins lubricate the
bearings at the big ends of the connecting rods.
CONNECTING ROD BEARINGS
The upper and lower connecting rod bearings are the
same. Each connecting rod bearing is provided with
a backing plate. Its bearing portion is made of an alu
-
minum alloy and its backing plate is made of ordinary
sheet steel.
The width of the connecting rod bearing has been
made as narrow as possible in proportion to the
bearing cap in order to reduce friction loss.
24
AK502491
D
L d
AD
20
ItemSpecifications
Small end hole diameter
(d) mm (in)21 (0.87)
Big end hole diameter (D)
mm (in)51 (2.01)
Center-to-center distance
(L) mm (in)149.25 (5.876)
AK502492AD A
H
Identification
color
ItemSpecifications
Width (H) mm (in)17 (0.7)
Thickness (A) mm (in)1.5 (0.06)
Page 53 of 241
BASE ENGINE
ENGINE MECHANICAL11A-9
CRANKSHAFT
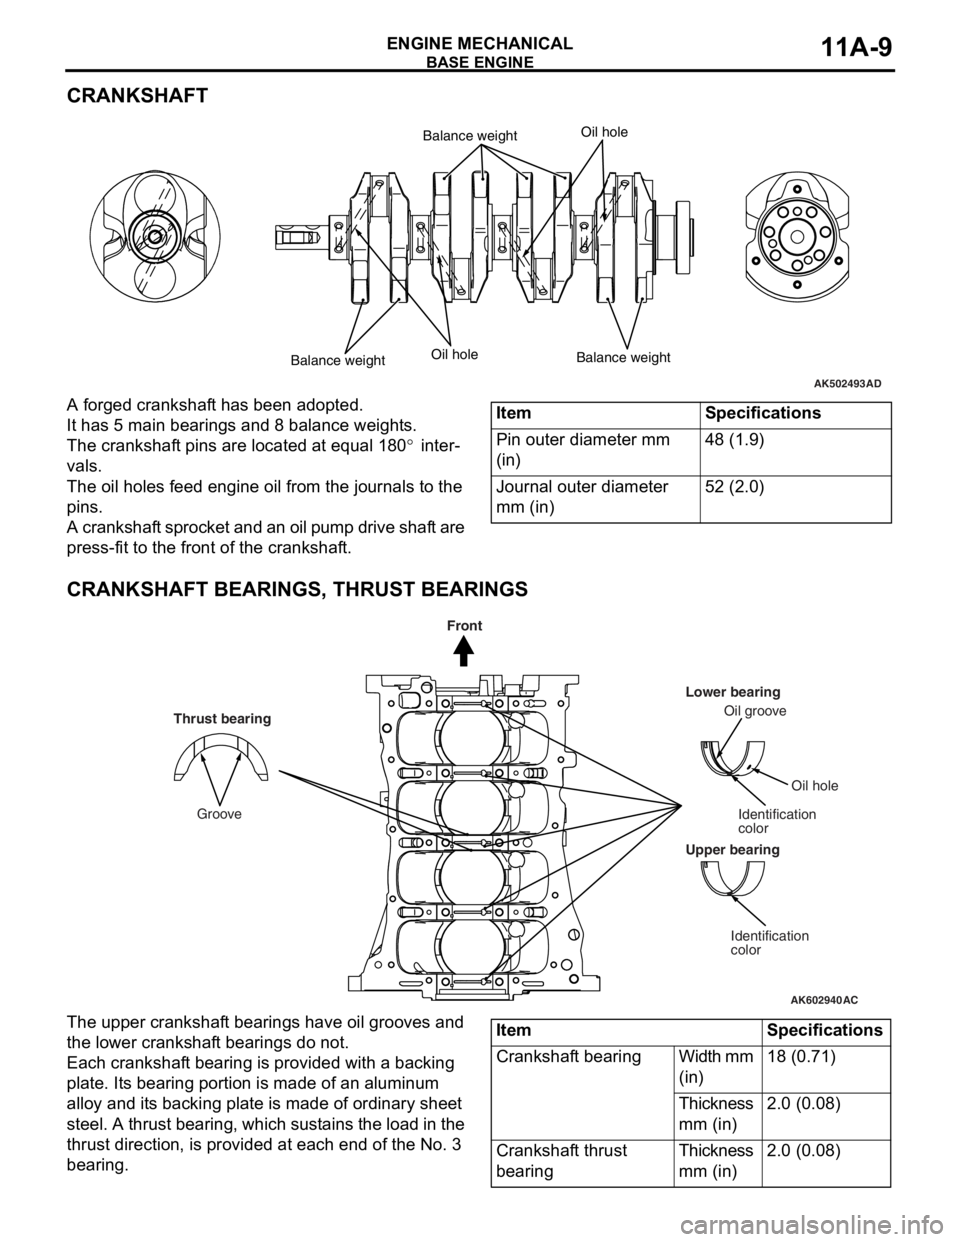
A forged crankshaft has been adopted.
It has 5 main bearings and 8 balance weights.
The crankshaft pins are located at equal 180° inter-
vals.
The oil holes feed engine oil from the journals to the
pins.
A crankshaft sprocket and an oil pump drive shaft are
press-fit to the front of the crankshaft.
CRANKSHAFT BEARINGS, THRUST BEARINGS
The upper crankshaft bearings have oil grooves and
the lower crankshaft bearings do not.
Each crankshaft bearing is provided with a backing
plate. Its bearing portion is made of an aluminum
alloy and its backing plate is made of ordinary sheet
steel. A thrust bearing, which sustains the load in the
thrust direction, is provided at each end of the No. 3
bearing.
AK502493AD
Balance weight
Balance weightBalance weightOil hole
Oil hole
ItemSpecifications
Pin outer diameter mm
(in)48 (1.9)
Journal outer diameter
mm (in)52 (2.0)
AK602940AC
Groove
Front
Thrust bearing
Upper bearingLower bearing
Oil groove
Oil hole
Identification
colorIdentification
color
ItemSpecifications
Crankshaft bearingWidth mm
(in)18 (0.71)
Thickness
mm (in)2.0 (0.08)
Crankshaft thrust
bearingThickness
mm (in)2.0 (0.08)
Page 57 of 241
BASE ENGINE
ENGINE MECHANICAL11A-13
VA LV E S
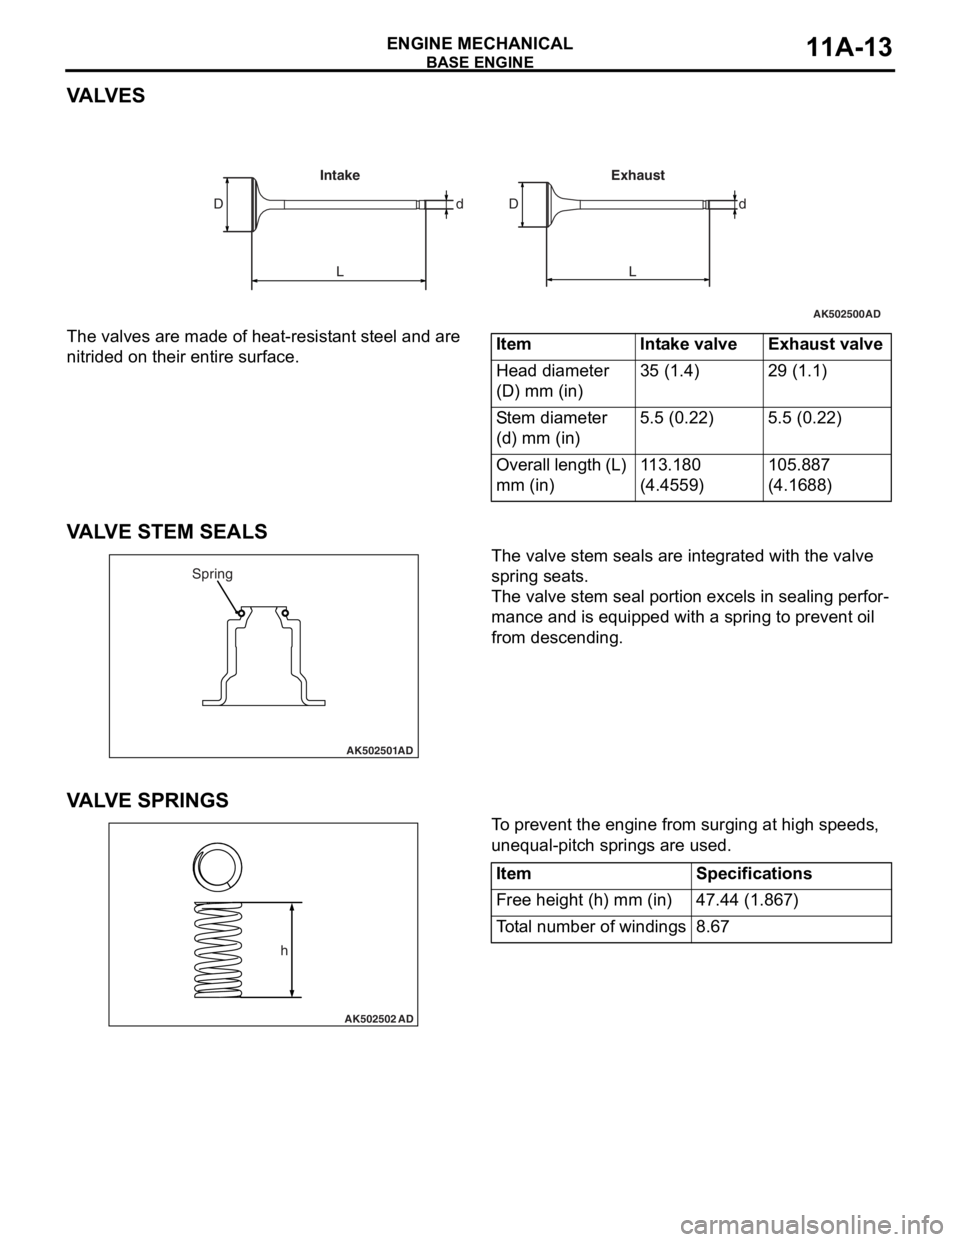
The valves are made of heat-resistant steel and are
nitrided on their entire surface.
VALVE STEM SEALS
The valve stem seals are integrated with the valve
spring seats.
The valve stem seal portion excels in sealing perfor-
mance and is equipped with a spring to prevent oil
from descending.
VA LV E S P R I N G S
To prevent the engine from surging at high speeds,
unequal-pitch springs are used.
AK502500
LL Dd dD
AD
Intake Exhaust
ItemIntake valveExhaust valve
Head diameter
(D) mm (in)35 (1.4)29 (1.1)
Stem diameter
(d) mm (in)5.5 (0.22)5.5 (0.22)
Overall length (L)
mm (in)113.180
(4.4559)105.887
(4.1688)
AK502501
Spring
AD
AK502502
h
AD
ItemSpecifications
Free height (h) mm (in)47.44 (1.867)
Total number of windings8.67
Page 58 of 241
BASE ENGINE
ENGINE MECHANICAL11A-14
VALVE TAPPETS
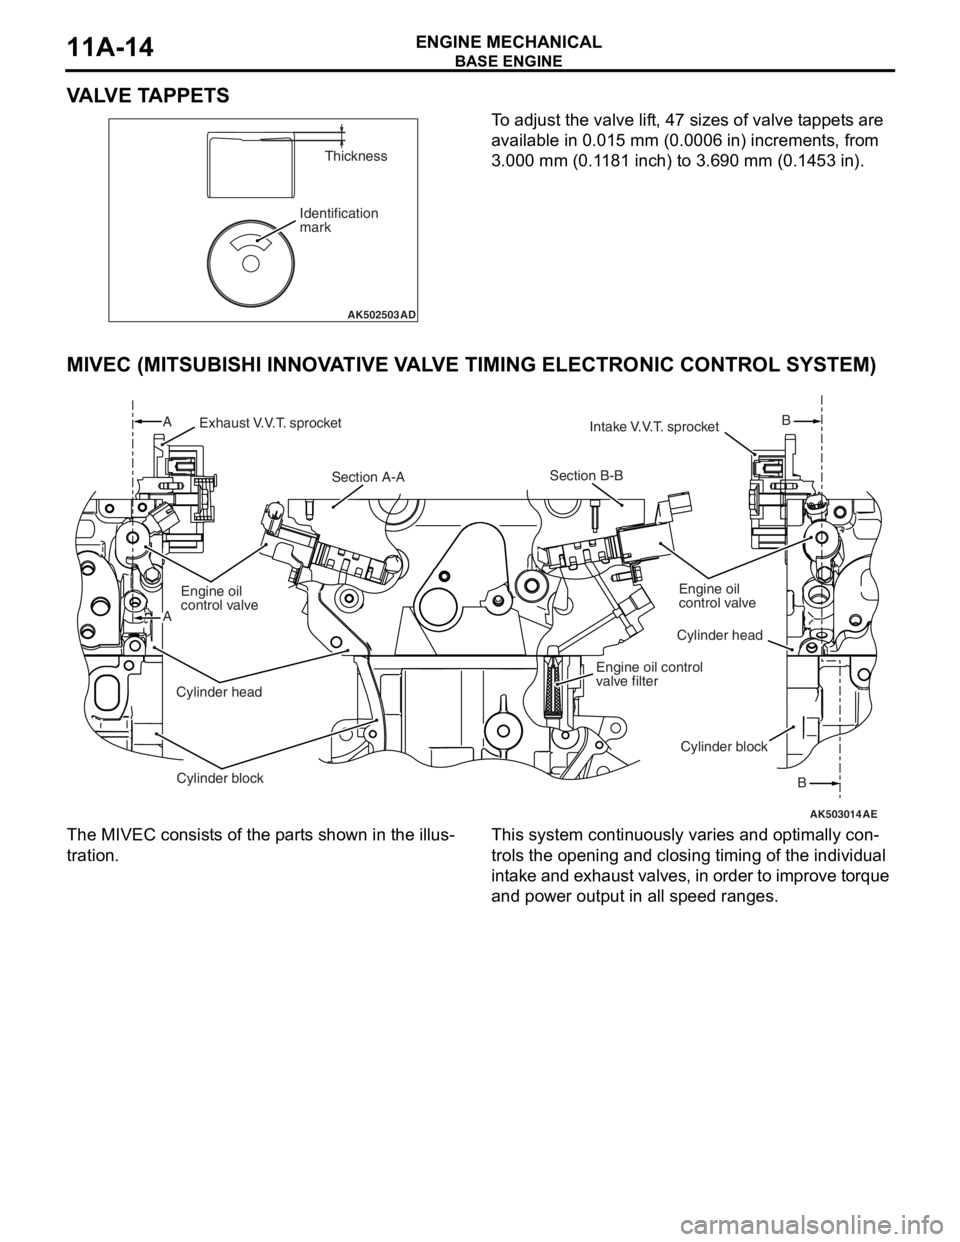
To adjust the valve lift, 47 sizes of valve tappets are
available in 0.015 mm (0.0006 in) increments, from
3.000 mm (0.1181 inch) to 3.690 mm (0.1453 in).
MIVEC (MITSUBISHI INNOVATIVE VALVE TIMING ELECTRONIC CONTROL SYSTEM)
The MIVEC consists of the parts shown in the illus-
tration.
This system continuously varies and optimally con-
trols the opening and closing timing of the individual
intake and exhaust valves, in order to improve torque
and power output in all speed ranges.
AK502503
Identification
markThickness
AD
AK503014
Exhaust V.V.T. sprocket
Section A-ASection B-B
Engine oil control
valve filter
Intake V.V.T. sprocket
Cylinder head
Cylinder blockB
B
Engine oil
control valve
Cylinder head
Cylinder block A
A
AE
Engine oil
control valve
Page 59 of 241
BASE ENGINE
ENGINE MECHANICAL11A-15
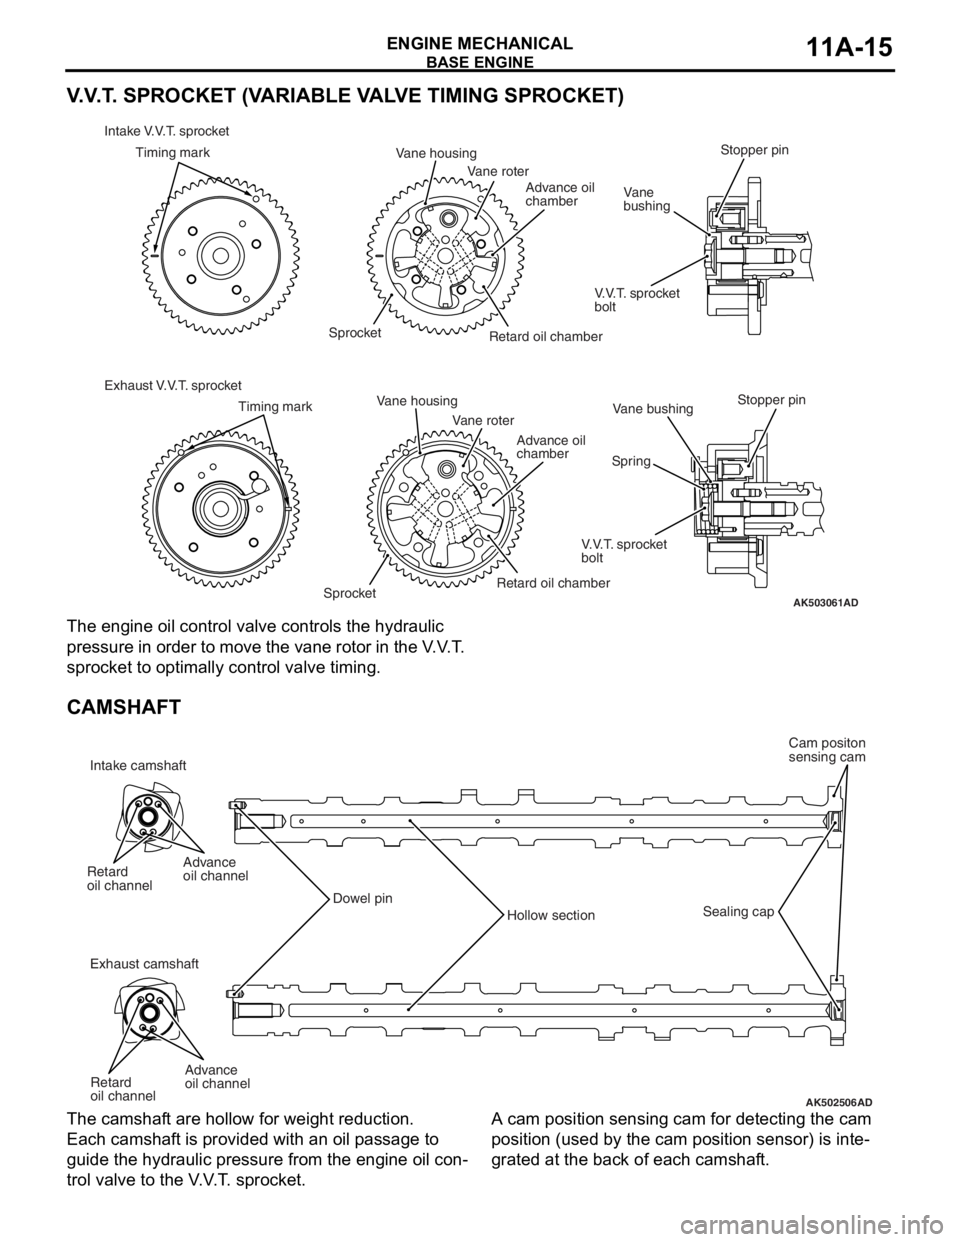
V.V.T. SPROCKET (VARIABLE VALVE TIMING SPROCKET)
The engine oil control valve controls the hydraulic
pressure in order to move the vane rotor in the V.V.T.
sprocket to optimally control valve timing.
CAMSHAFT
The camshaft are hollow for weight reduction.
Each camshaft is provided with an oil passage to
guide the hydraulic pressure from the engine oil con
-
trol valve to the V.V.T. sprocket.
A cam position sensing cam for detecting the cam
position (used by the cam position sensor) is inte
-
grated at the back of each camshaft.
AK503061
Timing mark
Vane housing
Vane housing
Sprocket
SprocketRetard oil chamberRetard oil chamber
Vane roter
Vane roter
Advance oil
chamber
Advance oil
chamber
Stopper pin
Stopper pin
V.V.T. sprocket
bolt
V.V.T. sprocket
boltVane
bushing
Vane bushing
Spring Intake V.V.T. sprocket
Exhaust V.V.T. sprocketTiming mark
AD
AK502506
Intake camshaft
Exhaust camshaft Retard
oil channel
Retard
oil channelAdvance
oil channel
Advance
oil channelDowel pin
Hollow sectionSealing capCam positon
sensing cam
AD