engine MITSUBISHI LANCER SPORTBACK 2014 8.G Owners Manual
[x] Cancel search | Manufacturer: MITSUBISHI, Model Year: 2014, Model line: LANCER SPORTBACK, Model: MITSUBISHI LANCER SPORTBACK 2014 8.GPages: 422, PDF Size: 55.11 MB
Page 353 of 422
Engine hood 9-4 Vehicle care and maintenance
9
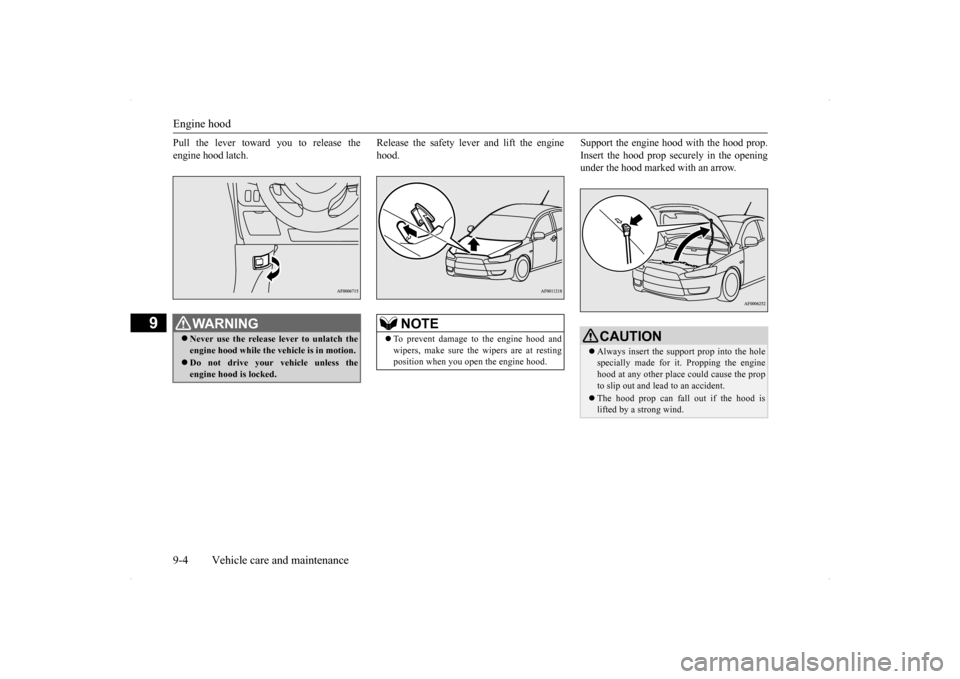
Pull the lever toward you to release the engine hood latch.
Release the safety lever and lift the engine hood.
Support the engine hood with the hood prop. Insert the hood prop securely in the opening under the hood marked with an arrow.
WA R N I N G Never use the release lever to unlatch the engine hood while the vehicle is in motion. Do not drive your vehicle unless the engine hood is locked.
NOTE
To prevent damage to the engine hood and wipers, make sure the wipers are at restingposition when you open the engine hood.
CAUTION Always insert the support prop into the hole specially made for it. Propping the engine hood at any other place could cause the propto slip out and lead to an accident. The hood prop can fall out if the hood is lifted by a strong wind.
BK0200700US.bo
ok 4 ページ 2013年2月15日 金曜日 午後12時17分
Page 354 of 422
View of the engine compartment
Vehicle care and maintenance 9-5
9
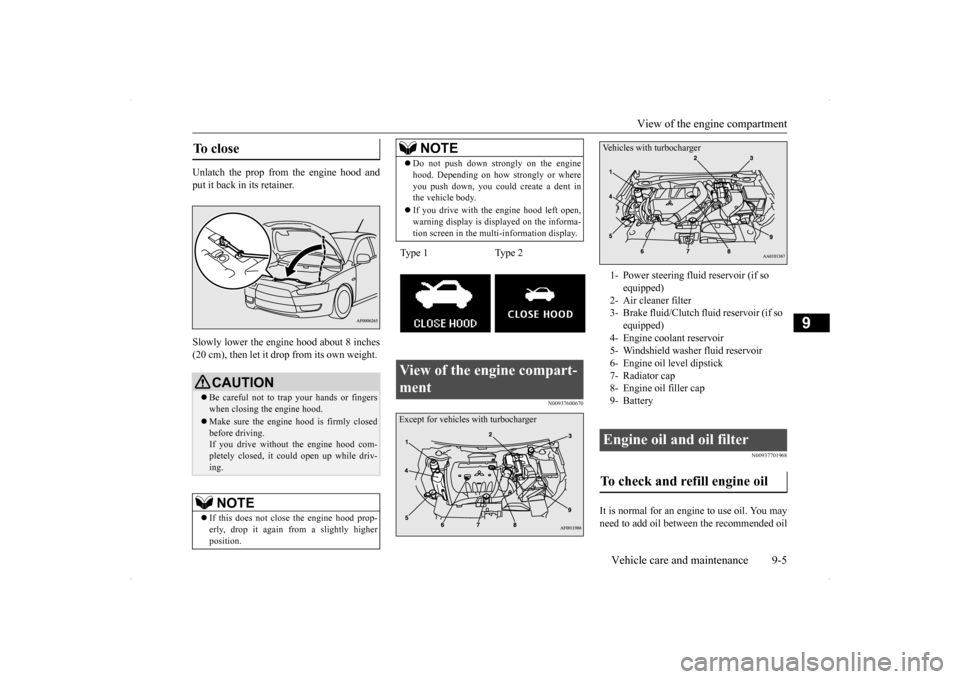
Unlatch the prop from the engine hood and put it back in its retainer. Slowly lower the engine hood about 8 inches (20 cm), then let it drop from its own weight.
N00937600670
N00937701968
It is normal for an engi
ne to use oil. You may
need to add oil between the recommended oil
To close
CAUTION Be careful not to trap your hands or fingers when closing the engine hood. Make sure the engine hood is firmly closed before driving. If you drive without the engine hood com-pletely closed, it could open up while driv- ing.NOTE
If this does not close the engine hood prop- erly, drop it again from a slightly higher position.
Do not push down strongly on the engine hood. Depending on how strongly or where you push down, you could create a dent in the vehicle body. If you drive with the engine hood left open, warning display is displayed on the informa- tion screen in the multi-information display.
Type 1 Type 2View of the engine compart- ment
NOTE
Except for vehicles with turbocharger
1- Power steering fluid reservoir (if so
equipped)
2- Air cleaner filter 3- Brake fluid/Clutch fluid reservoir (if so
equipped)
4- Engine coolant reservoir 5- Windshield washer fluid reservoir6- Engine oil level dipstick7- Radiator cap 8- Engine oil filler cap 9- Battery Engine oil and oil filter To check and refill engine oil Vehicles with turbocharger
BK0200700US.bo
ok 5 ページ 2013年2月15日 金曜日 午後12時17分
Page 355 of 422
Engine oil and oil filter 9-6 Vehicle care and maintenance
9
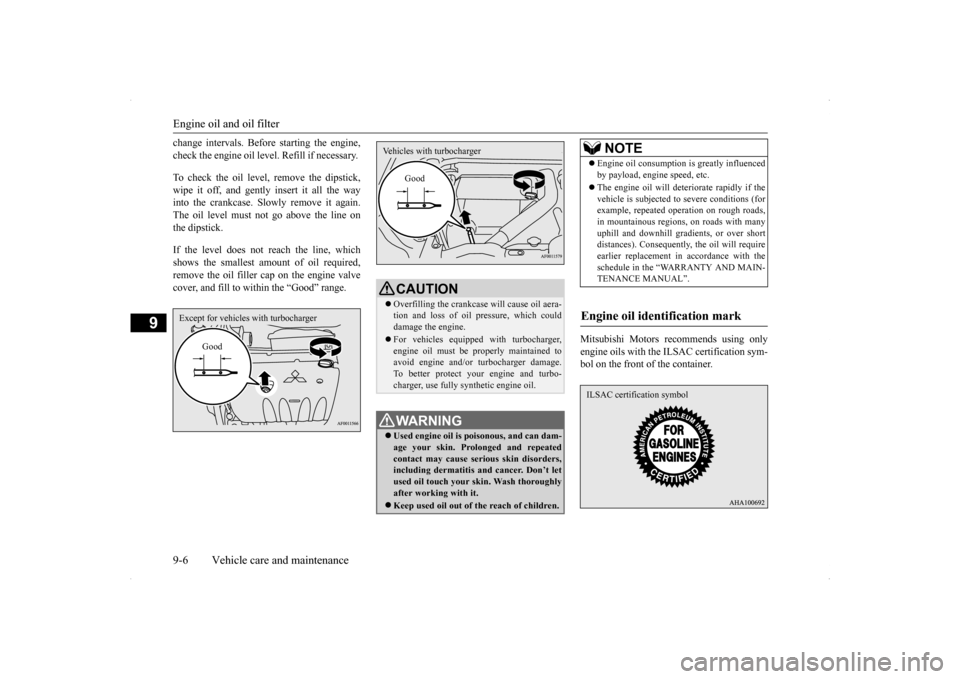
change intervals. Before starting the engine, check the engine oil level. Refill if necessary. To check the oil level, remove the dipstick, wipe it off, and gently insert it all the way into the crankcase. Slowly remove it again.The oil level must not go above the line on the dipstick. If the level does not reach the line, which shows the smallest amount of oil required,remove the oil filler cap on the engine valvecover, and fill to within the “Good” range.
Mitsubishi Motors recommends using only engine oils with the ILSAC certification sym- bol on the front of the container.
Except for vehicles with turbocharger
Good
CAUTION Overfilling the crankcase will cause oil aera- tion and loss of oil pressure, which could damage the engine. For vehicles equipped with turbocharger, engine oil must be properly maintained to avoid engine and/or turbocharger damage.To better protect your engine and turbo- charger, use fully synthetic engine oil.WA R N I N G Used engine oil is poisonous, and can dam- age your skin. Prolonged and repeated contact may cause serious skin disorders, including dermatitis and cancer. Don’t letused oil touch your skin. Wash thoroughly after working with it. Keep used oil out of the reach of children.Vehicles with turbocharger
Good
NOTE
Engine oil consumption is greatly influenced by payload, engine speed, etc. The engine oil will deteriorate rapidly if the vehicle is subjected to severe conditions (forexample, repeated operation on rough roads, in mountainous regions, on roads with many uphill and downhill gradients, or over shortdistances). Consequently, the oil will require earlier replacement in accordance with the schedule in the “WARRANTY AND MAIN-TENANCE MANUAL”.
Engine oil identification mark ILSAC certification symbol
BK0200700US.bo
ok 6 ページ 2013年2月15日 金曜日 午後12時17分
Page 356 of 422
Engine oil and oil filter
Vehicle care and maintenance 9-7
9
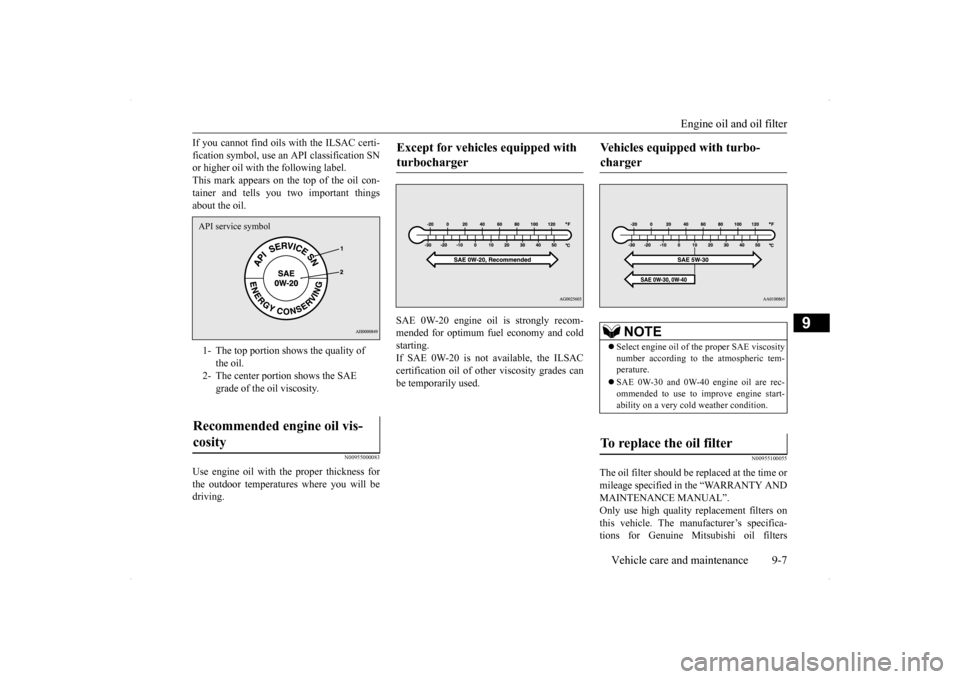
If you cannot find oils with the ILSAC certi- fication symbol, use an API classification SN or higher oil with the following label. This mark appears on th
e top of the oil con-
tainer and tells you two important things about the oil.
N00955000083
Use engine oil with the proper thickness for the outdoor temperatures where you will be driving.
SAE 0W-20 engine oil is strongly recom- mended for optimum fuel economy and cold starting. If SAE 0W-20 is not available, the ILSACcertification oil of other viscosity grades can be temporarily used.
N00955100055
The oil filter should be
replaced at the time or
mileage specified in the “WARRANTY AND MAINTENANCE MANUAL”. Only use high quality replacement filters onthis vehicle. The manufacturer’s specifica- tions for Genuine Mitsubishi oil filters
1- The top portion shows the quality of
the oil.
2- The center portion shows the SAE
grade of the oil viscosity.
Recommended engine oil vis- cosity API service symbol
Except for vehicles equipped with turbocharger
Vehicles equipped with turbo-charger
NOTE
Select engine oil of the proper SAE viscosity number according to the atmospheric tem- perature. SAE 0W-30 and 0W-40 engine oil are rec- ommended to use to improve engine start- ability on a very cold weather condition.
To replace the oil filter
BK0200700US.bo
ok 7 ページ 2013年2月15日 金曜日 午後12時17分
Page 357 of 422
Engine coolant 9-8 Vehicle care and maintenance
9
require that the filter can withstand a pressure of 256 psi (1.8 MPa). A Genuine Mitsubishi oil filter is the best replacement filter. Follow the installation
instructions printed on
the filter.
N00937800555
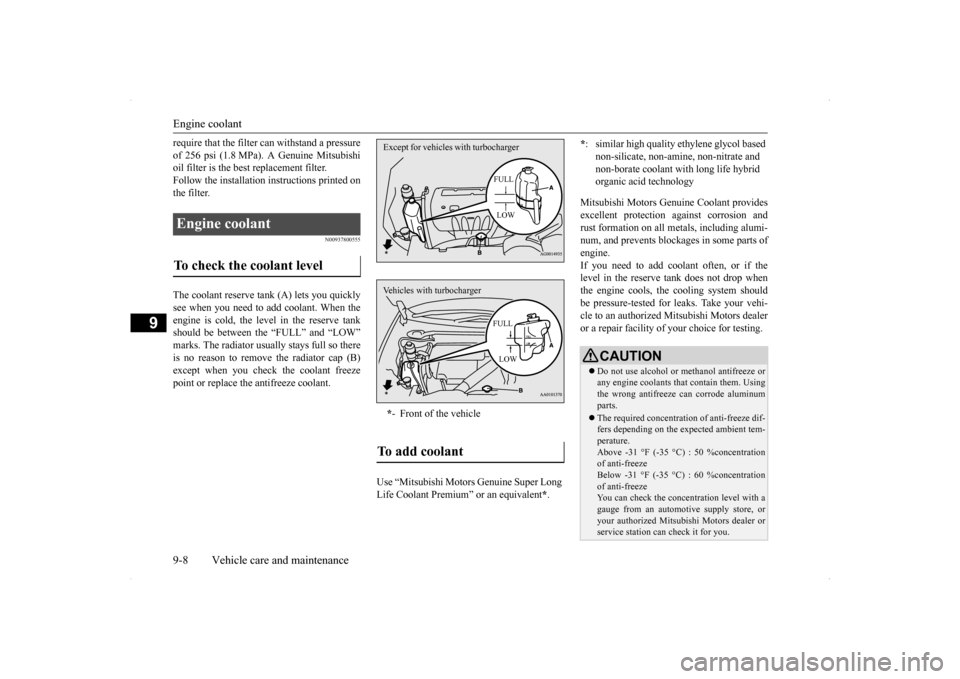
The coolant reserve tank (A) lets you quicklysee when you need to add coolant. When theengine is cold, the level in the reserve tank should be between the “FULL” and “LOW” marks. The radiator usually stays full so thereis no reason to remove the radiator cap (B) except when you check the coolant freeze point or replace the antifreeze coolant.
Mitsubishi Motors Genuine Coolant provides excellent protection against corrosion and rust formation on all metals, including alumi- num, and prevents blockages in some parts ofengine. If you need to add co
olant often, or if the
level in the reserve tank does not drop whenthe engine cools, the cooling system shouldbe pressure-tested for leaks. Take your vehi- cle to an authorized
Mitsubishi Motors dealer
or a repair facility of your choice for testing.
Engine coolant To check the coolant level
* - Front of the vehicle
To add coolant Use “Mitsubishi Motors Genuine Super Long Life Coolant Premium” or an equivalent
*.
Except for vehicles with turbocharger
FULL LOW
Vehicles with turbocharger
FULL LOW
*: similar high quality et
hylene glycol based
non-silicate, non-amine, non-nitrate and non-borate coolant with long life hybrid organic acid technologyCAUTION Do not use alcohol or methanol antifreeze or any engine coolants that contain them. Using the wrong antifreeze can corrode aluminumparts. The required concentration of anti-freeze dif- fers depending on the expected ambient tem- perature. Above -31 °F (-35 °C) : 50 %concentration of anti-freeze Below -31 °F (-35 °C) : 60 %concentrationof anti-freeze You can check the concentration level with a gauge from an automotive supply store, oryour authorized Mitsubishi Motors dealer or service station can check it for you.
BK0200700US.bo
ok 8 ページ 2013年2月15日 金曜日 午後12時17分
Page 358 of 422
Air cleaner filter
Vehicle care and maintenance 9-9
9
The radiator cap must be tight sealed to pre- vent losing coolant which may result in engine damage. Only use a Genuine Mitsubi-shi Parts radiator cap, or an approved equiva- lent. Do not overfill the reserve tank.
Your vehicle uses a special radiator cap that stays sealed and lets the coolant flow from the reserve tank back to the radiator when the engine cools down. If you needto change the cap, use the exact same kind. Check the coolant freeze point in the radi- ator with the proper gauge, and only when it is safe. If you add antifreeze, the con- tents of the reserve tank must be protectedagainst freezing. Keep the front of the radiator and con- denser clean. If the temperature of the engine coolant does not rise after th
e engine is warmed-
up, take your vehicle to an authorized Mitsubishi Motors dealer or a repair facil-ity of your choice to have the thermostat checked, and replaced if necessary.
N00937901436
The air cleaner filter w
ill get dirty and dusty
from use and not filter properly. Replace it with a new filter using the schedule in the“WARRANTY AND MAINTENANCE MANUAL”.
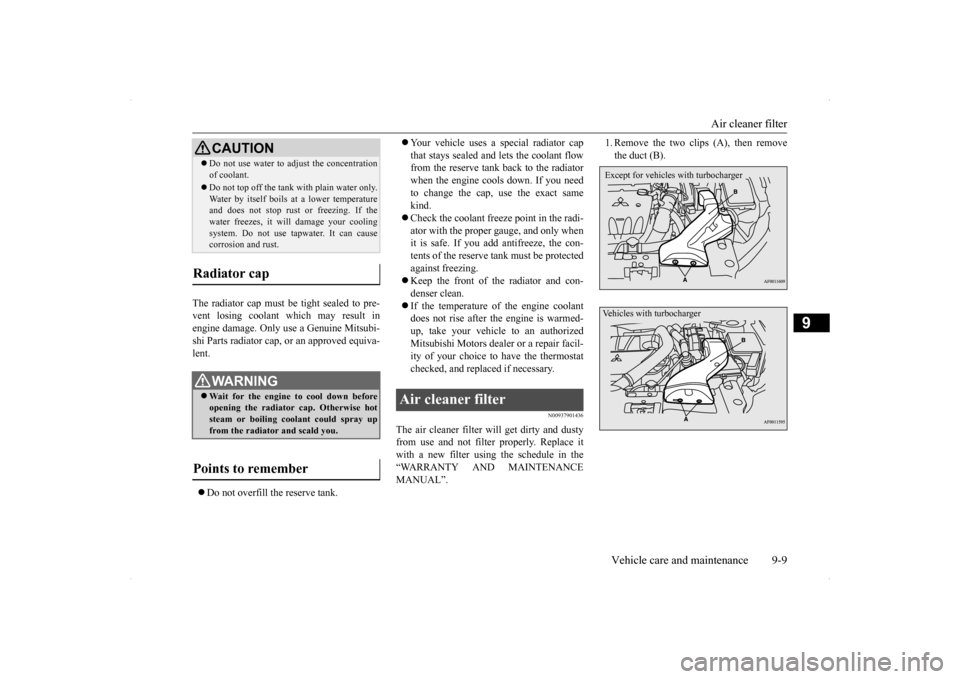
1. Remove the two clips (A), then remove the duct (B).
Do not use water to adjust the concentration of coolant. Do not top off the tank with plain water only. Water by itself boils at a lower temperatureand does not stop rust
or freezing. If the
water freezes, it will damage your cooling system. Do not use tapwater. It can causecorrosion and rust.
Radiator cap
WA R N I N G Wait for the engine to cool down before opening the radiator cap. Otherwise hotsteam or boiling coolant could spray up from the radiator and scald you.
Points to remember
CAUTION
Air cleaner filter
Except for vehicles with turbochargerVehicles with turbocharger
BK0200700US.bo
ok 9 ページ 2013年2月15日 金曜日 午後12時17分
Page 361 of 422
AWC control fluid (if so equipped) 9-12 Vehicle care and maintenance
9
N00915300042
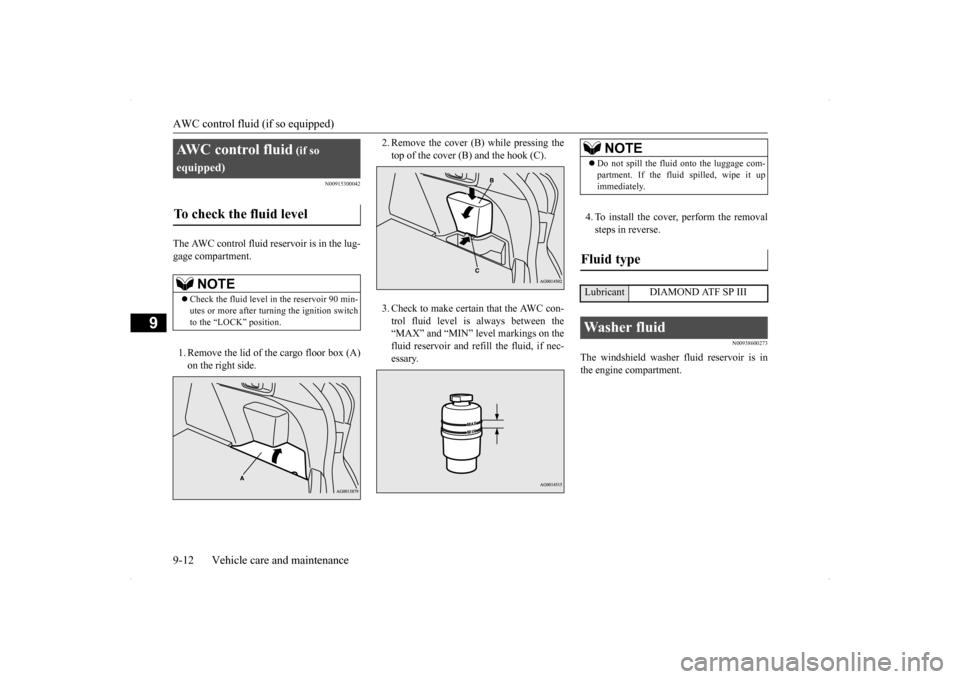
The AWC control fluid reservoir is in the lug- gage compartment. 1. Remove the lid of the cargo floor box (A) on the right side.
2. Remove the cover (B) while pressing the top of the cover (B) and the hook (C). 3. Check to make certain that the AWC con- trol fluid level is always between the “MAX” and “MIN” level markings on the fluid reservoir and refill the fluid, if nec-essary.
4. To install the cover, perform the removal steps in reverse.
N00938600273
The windshield washer fluid reservoir is inthe engine compartment.
AWC control fluid
(if so
equipped)To check the fluid level
NOTE
Check the fluid level in the reservoir 90 min- utes or more after turning the ignition switch to the “LOCK” position.
NOTE
Do not spill the fluid onto the luggage com- partment. If the fluid spilled, wipe it up immediately.
Fluid type
Lubricant DIAMOND ATF SP IIIWasher fluid
BK0200700US.bo
ok 12 ページ 2013年2月15日 金曜日 午後12時17分
Page 362 of 422
Brake fluid/Clutch fluid (if so equipped) Vehicle care and maintenance 9-13
9
Check the washer fluid level at regular inter- vals and add washer fluid to reservoir if nec- essary. Open the reservoir cap and check the fluidlevel with the dipstick. When freezing weather is anticipated, flush out the water in the reservoir by operating thepump. Fill the reservoir with windshield anti- freeze (not radiator antifreeze), and operate the system for a few seconds to flush out theresidual water.
N00938700216
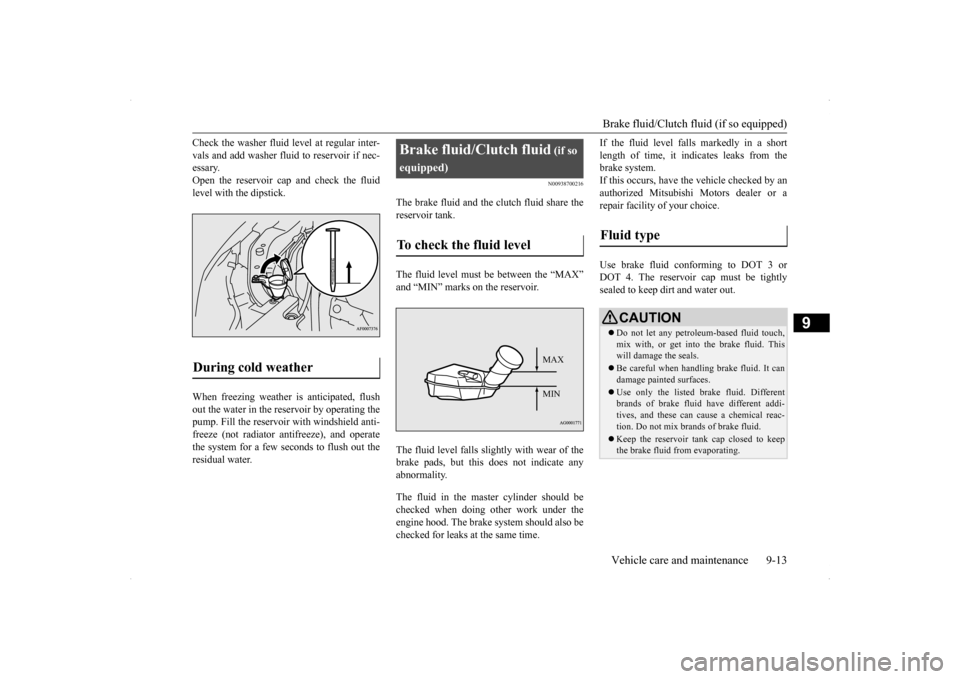
The brake fluid and the clutch fluid share thereservoir tank. The fluid level must be between the “MAX” and “MIN” marks on the reservoir. The fluid level falls slightly with wear of the brake pads, but this does not indicate any abnormality. The fluid in the master cylinder should be checked when doing other work under the engine hood. The brake
system should also be
checked for leaks at the same time.
If the fluid level falls markedly in a short length of time, it indicates leaks from the brake system. If this occurs, have the vehicle checked by anauthorized Mitsubishi Motors dealer or a repair facility of your choice. Use brake fluid conforming to DOT 3 or DOT 4. The reservoir cap must be tightly sealed to keep dirt and water out.
During cold weather
Brake fluid/Clutch fluid
(if so
equipped)To check the fluid level
MAX MIN
Fluid type
CAUTION Do not let any petroleum-based fluid touch, mix with, or get into
the brake fluid. This
will damage the seals. Be careful when handling brake fluid. It can damage painted surfaces. Use only the listed brake fluid. Different brands of brake fluid have different addi- tives, and these can cause a chemical reac- tion. Do not mix bra
nds of brake fluid.
Keep the reservoir tank cap closed to keep the brake fluid from evaporating.
BK0200700US.bo
ok 13 ページ 2013年2月15日 金曜日 午後12時17分
Page 363 of 422
Power steering fluid (if so equipped) 9-14 Vehicle care and maintenance
9
N00939000388
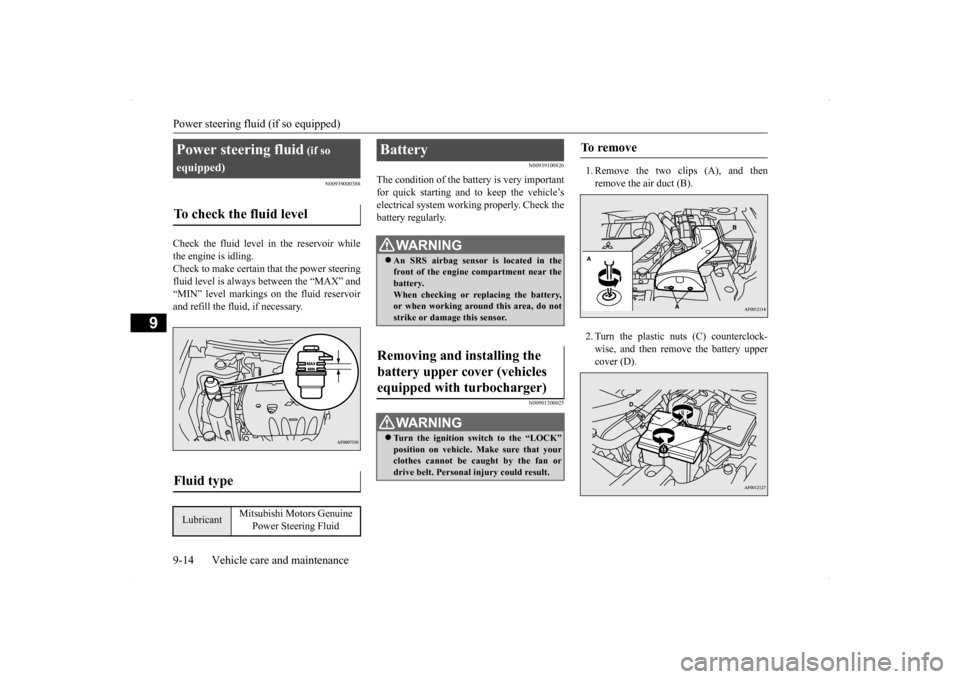
Check the fluid level in the reservoir while the engine is idling. Check to make certain that the power steering fluid level is always between the “MAX” and“MIN” level markings on the fluid reservoirand refill the fluid, if necessary.
N00939100826
The condition of the battery is very importantfor quick starting and to keep the vehicle’selectrical system working properly. Check the battery regularly.
N00901300025
1. Remove the two clips (A), and thenremove the air duct (B). 2. Turn the plastic nuts (C) counterclock- wise, and then remove the battery uppercover (D).
Power steering fluid
(if so
equipped)To check the fluid level
Fluid type
Lubricant
Mitsubishi Motors Genuine
Power Steering Fluid
Battery
WA R N I N G An SRS airbag sensor is located in the front of the engine compartment near the battery. When checking or replacing the battery,or when working around this area, do not strike or damage this sensor.
Removing and installing the battery upper cover (vehicles equipped with turbocharger)
WA R N I N G Turn the ignition switch to the “LOCK” position on vehicle. Make sure that your clothes cannot be caught by the fan or drive belt. Personal injury could result.
To remove
BK0200700US.bo
ok 14 ページ 2013年2月15日 金曜日 午後12時17分
Page 364 of 422
Battery
Vehicle care and maintenance 9-15
9
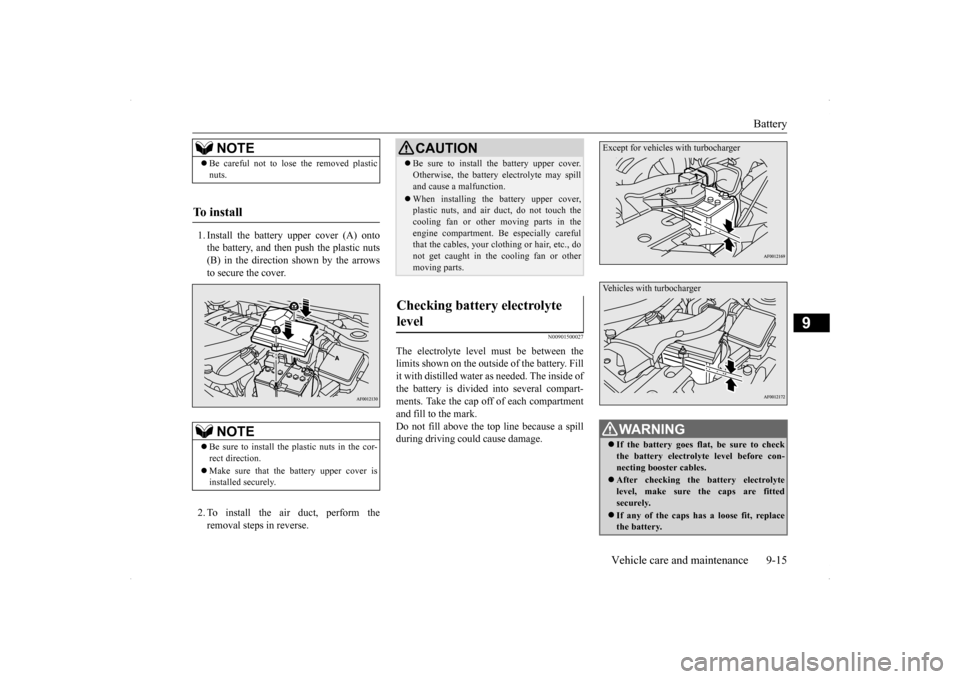
1. Install the battery upper cover (A) onto the battery, and then push the plastic nuts (B) in the direction shown by the arrows to secure the cover. 2. To install the air duct, perform the removal steps in reverse.
N00901500027
The electrolyte level must be between thelimits shown on the outside of the battery. Fill it with distilled water as needed. The inside ofthe battery is divided into several compart- ments. Take the cap off of each compartment and fill to the mark.Do not fill above the top line because a spill during driving could cause damage.
NOTE
Be careful not to lose the removed plastic nuts.
To install
NOTE
Be sure to install the plastic nuts in the cor- rect direction. Make sure that the battery upper cover is installed securely.
CAUTION Be sure to install the battery upper cover. Otherwise, the battery electrolyte may spill and cause a malfunction. When installing the battery upper cover, plastic nuts, and air
duct, do not touch the
cooling fan or other moving parts in the engine compartment. Be especially carefulthat the cables, your clothing or hair, etc., do not get caught in the cooling fan or other moving parts.
Checking battery electrolyte level
WA R N I N G If the battery goes flat, be sure to check the battery electrolyte level before con- necting booster cables. After checking the battery electrolyte level, make sure the caps are fittedsecurely. If any of the caps has a loose fit, replace the battery.
Except for vehicles with turbochargerVehicles with turbocharger
BK0200700US.bo
ok 15 ページ 2013年2月15日 金曜日 午後12時17分