MITSUBISHI MIRAGE 2014 6.G MMCS Manual
Manufacturer: MITSUBISHI, Model Year: 2014, Model line: MIRAGE, Model: MITSUBISHI MIRAGE 2014 6.GPages: 135, PDF Size: 26.9 MB
Page 91 of 135
91
10. CONTROLS
CAUTION
When not updating the map data, do not
remove the map SD memory card. If you
remove the map SD memory card, the
unit will not start.
When removing the SD memory card
to update the map data, make sure the
vehicle is set to ACC-OFF.
Do not edit any data on the map SD
memory card or connect the map SD
memory card to a personal computer,
etc. This may cause errors.
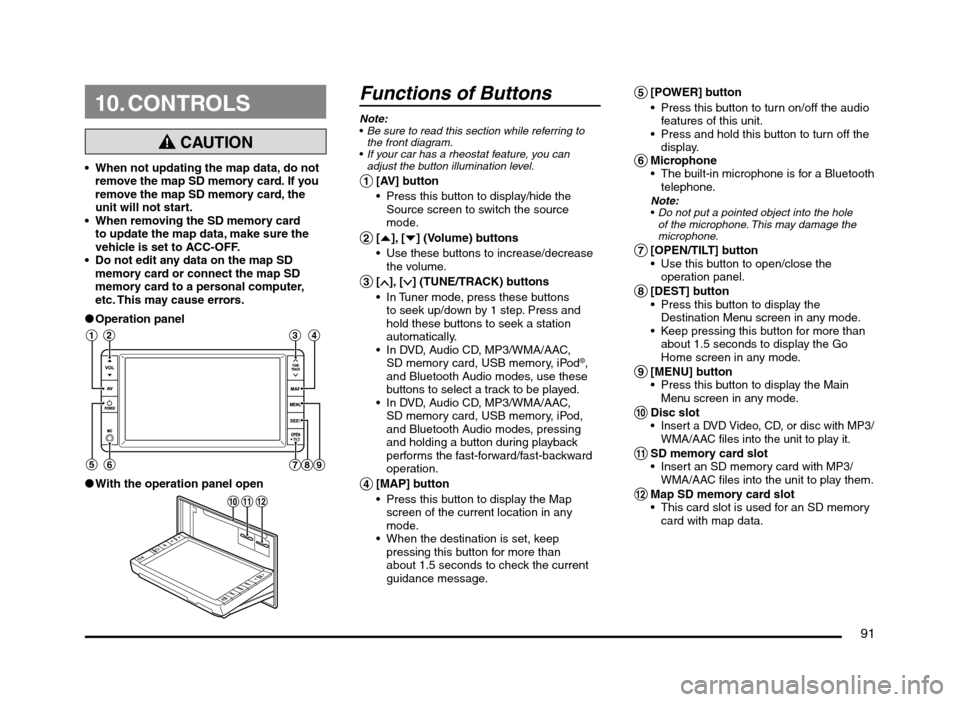
lOperation panel
12 3 4
56
789
lWith the operation panel open
!
@ 0
Functions of Buttons
Note:
Be sure to read this section while referring to
the front diagram.
If your car has a rheostat feature, you can
adjust the button illumination level.
1 [AV] button
Press this button to display/hide the
Source screen to switch the source
mode.
2 [{], [}] (Volume) buttons
Use these buttons to increase/decrease
the volume.
3 [], [] (TUNE/TRACK) buttons
In Tuner mode, press these buttons
to seek up/down by 1 step. Press and
hold these buttons to seek a station
automatically.
In DVD, Audio CD, MP3/WMA/AAC,
SD memory card, USB memory, iPod
®,
and Bluetooth Audio modes, use these
buttons to select a track to be played.
In DVD, Audio CD, MP3/WMA/AAC,
SD memory card, USB memory, iPod,
and Bluetooth Audio modes, pressing
and holding a button during playback
performs the fast-forward/fast-backward
operation.
4 [MAP] button
Press this button to display the Map
screen of the current location in any
mode.
When the destination is set, keep
pressing this button for more than
about 1.5 seconds to check the current
guidance message.
5 [POWER] button
Press this button to turn on/off the audio
features of this unit.
Press and hold this button to turn off the
display.
6 Microphone
The built-in microphone is for a Bluetooth
telephone.
Note:
Do not put a pointed object into the hole
of the microphone. This may damage the
microphone.
7 [OPEN/TILT] button
Use this button to open/close the
operation panel.
8 [DEST] button
Press this button to display the
Destination Menu screen in any mode.
Keep pressing this button for more than
about 1.5 seconds to display the Go
Home screen in any mode.
9 [MENU] button
Press this button to display the Main
Menu screen in any mode.
0 Disc slot Insert a DVD Video, CD, or disc with MP3/
WMA/AAC files into the unit to play it.
! SD memory card slot
Insert an SD memory card with MP3/
WMA/AAC files into the unit to play them.
@ Map SD memory card slot
This card slot is used for an SD memory
card with map data.
205-0010-00_QY-7375M-A_EN.indb 91205-0010-00_QY-7375M-A_EN.indb 913/12/2013 9:57:26 AM3/12/2013 9:57:26 AM
Page 92 of 135
92
Outline of Button and
Touchkey Operation
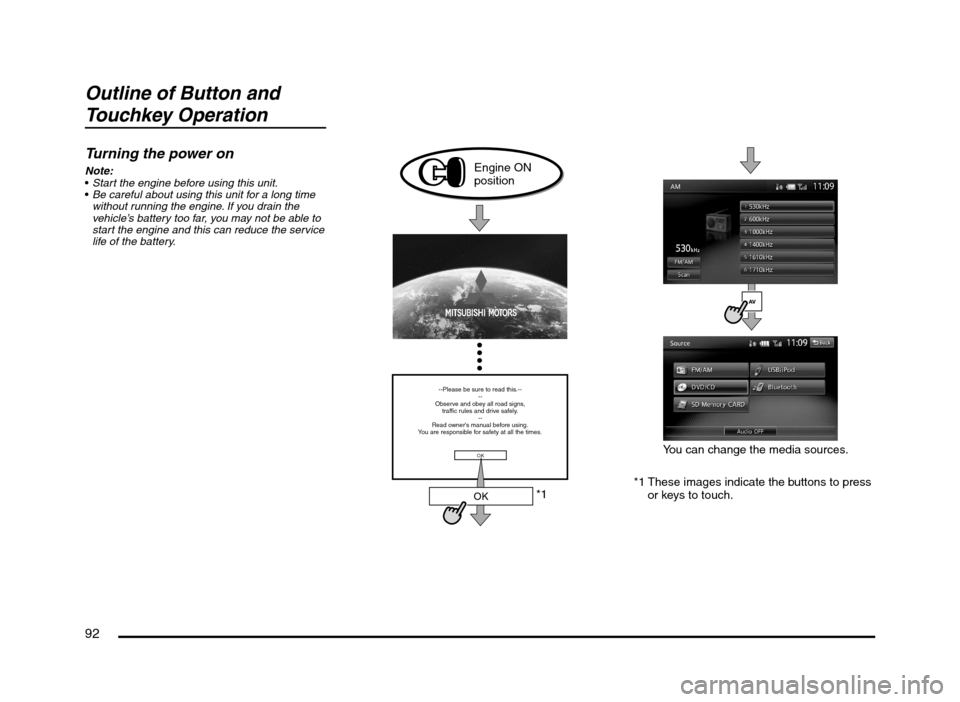
Turning the power on
Note:
Start the engine before using this unit.
Be careful about using this unit for a long time
without running the engine. If you drain the
vehicle’s battery too far, you may not be able to
start the engine and this can reduce the service
life of the battery.
*1
--Please be sure to read this.--
--
Observe and obey all road signs,
traffic rules and drive safely.
--
Read owner's manual before using.
You are responsible for safety at all the times.
OK
OK
Engine ON
position
*1 These images indicate the buttons to press
or keys to touch.You can change the media sources.
205-0010-00_QY-7375M-A_EN.indb 92205-0010-00_QY-7375M-A_EN.indb 923/12/2013 9:57:26 AM3/12/2013 9:57:26 AM
Page 93 of 135
93
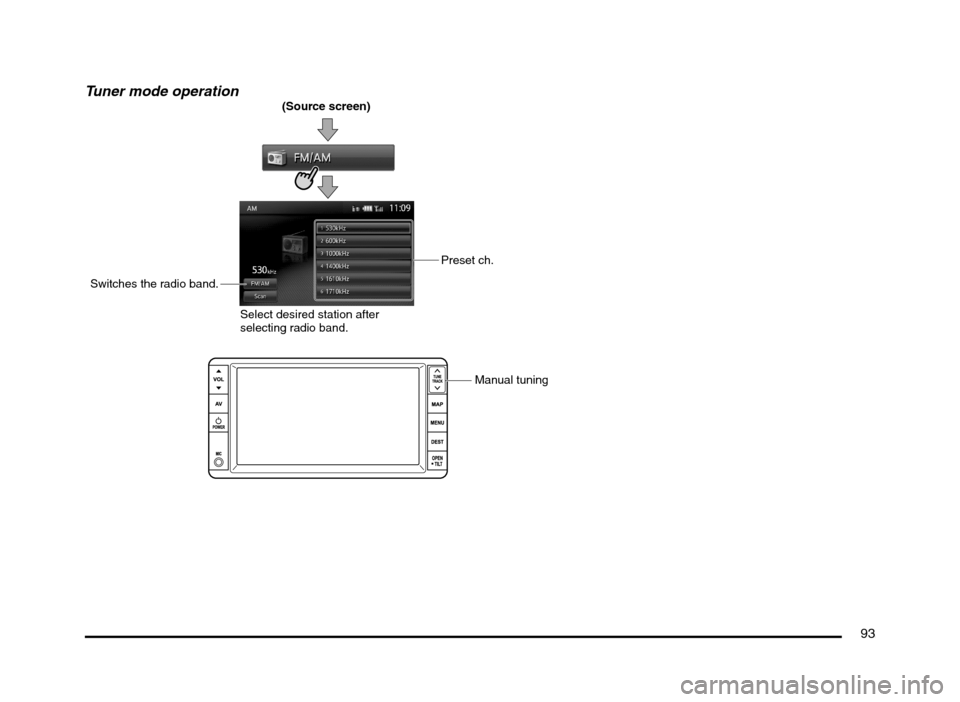
Tuner mode operation(Source screen)
Preset ch.
Switches the radio band.
Select desired station after
selecting radio band.
Manual tuning
205-0010-00_QY-7375M-A_EN.indb 93205-0010-00_QY-7375M-A_EN.indb 933/12/2013 9:57:26 AM3/12/2013 9:57:26 AM
Page 94 of 135
94
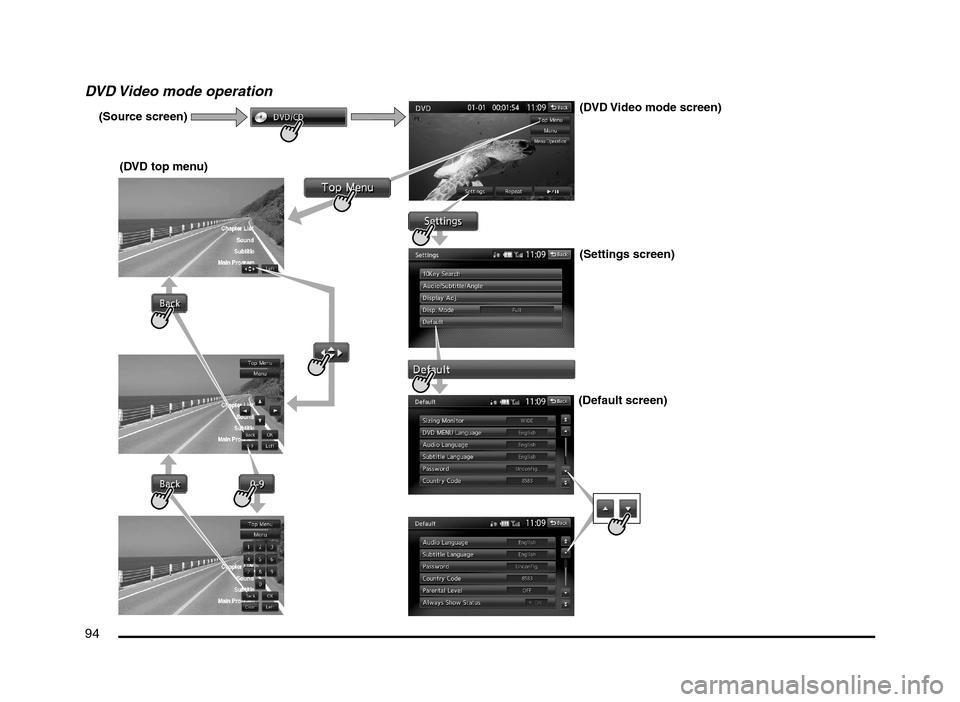
DVD Video mode operation
(Source screen)
(DVD top menu)(DVD Video mode screen)
(Settings screen)
(Default screen)
205-0010-00_QY-7375M-A_EN.indb 94205-0010-00_QY-7375M-A_EN.indb 943/12/2013 9:57:26 AM3/12/2013 9:57:26 AM
Page 95 of 135
95
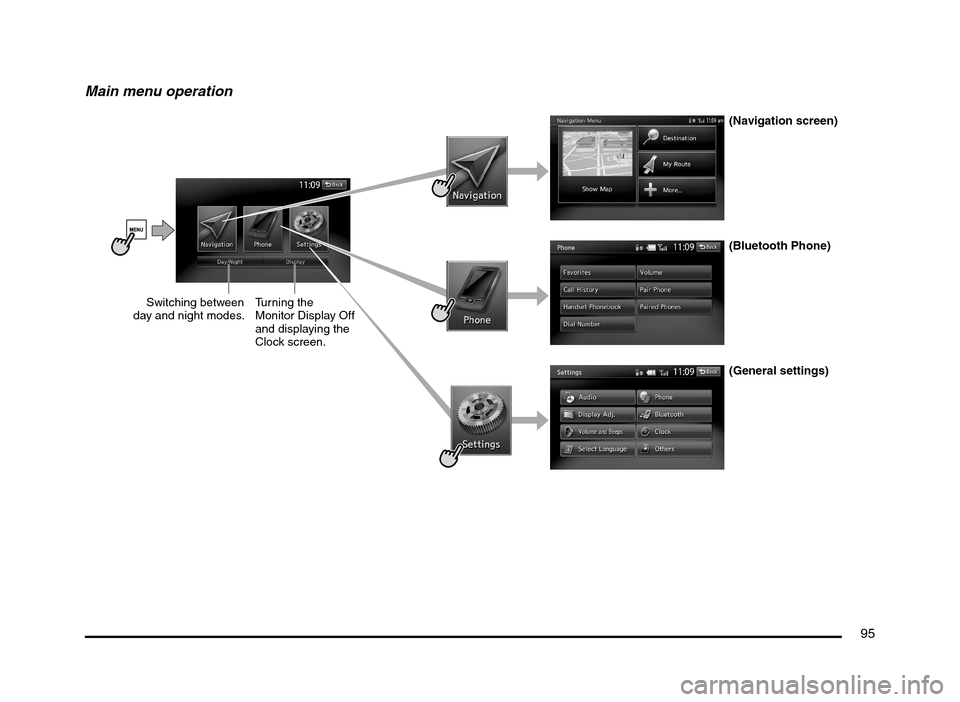
Main menu operation
(Navigation screen)
(Bluetooth Phone)
(General settings) Switching between
day and night modes.Turning the
Monitor Display Off
and displaying the
Clock screen.
205-0010-00_QY-7375M-A_EN.indb 95205-0010-00_QY-7375M-A_EN.indb 953/12/2013 9:57:26 AM3/12/2013 9:57:26 AM
Page 96 of 135
96
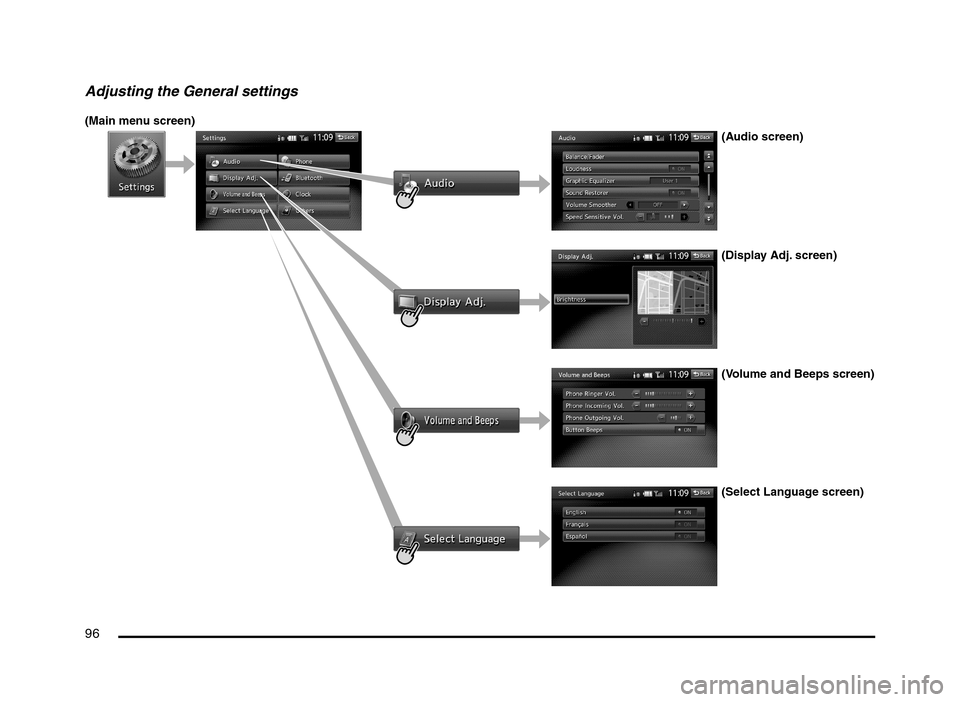
Adjusting the General settings
(Main menu screen)
(Audio screen)
(Display Adj. screen)
(Volume and Beeps screen)
(Select Language screen)
205-0010-00_QY-7375M-A_EN.indb 96205-0010-00_QY-7375M-A_EN.indb 963/12/2013 9:57:27 AM3/12/2013 9:57:27 AM
Page 97 of 135
97
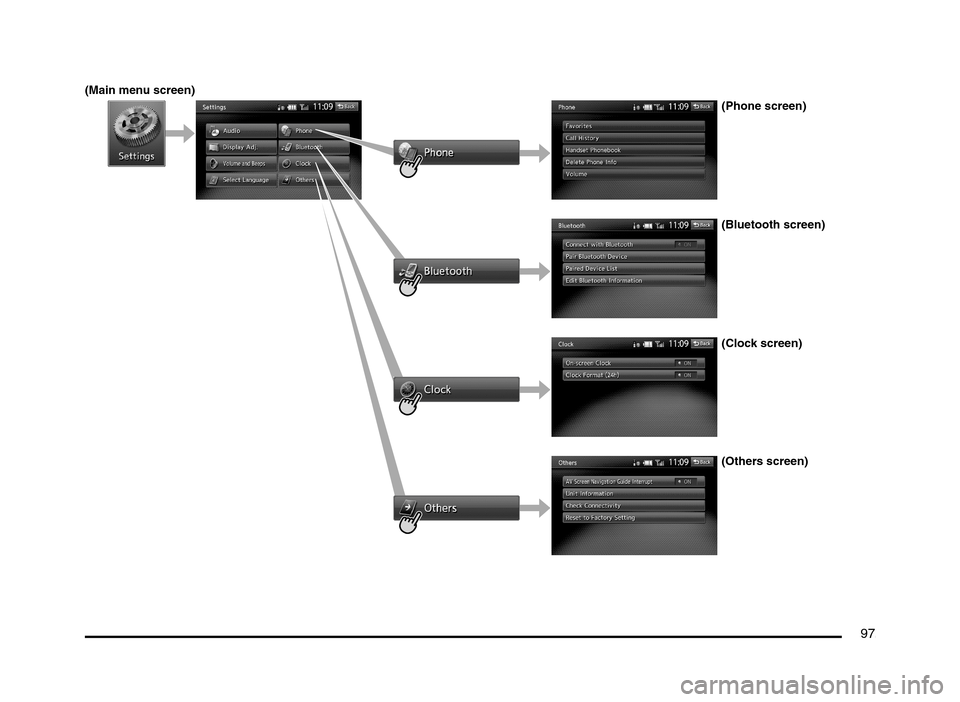
(Main menu screen)
(Phone screen)
(Bluetooth screen)
(Clock screen)
(Others screen)
205-0010-00_QY-7375M-A_EN.indb 97205-0010-00_QY-7375M-A_EN.indb 973/12/2013 9:57:27 AM3/12/2013 9:57:27 AM
Page 98 of 135
98
11. BASIC
OPERATIONS
Note:
Be sure to read this chapter while referring to
“Controls” (page 91).
Turning the Power On/Off
Note:
Start the engine before using this unit.
Be careful about using this unit for a long time
without running the engine. If you drain the
vehicle’s battery too far, you may not be able to
start the engine and this can reduce the service
life of the battery.
qTurning the power on
1. Start the engine. The power is
automatically turned on and the startup
screen is displayed.
Note:
The power is turned on even when the ignition
switch is set to the ACC ON position.
2. The startup screen automatically changes
to the caution screen. Touch the [OK] key.
The system resumes from its status when
the power was turned off.
The navigation system does not operate until
the [OK] key is touched.
Some audio features are available even if
the [OK] key is not touched.
qTurning the power off
1. Turn the ignition switch to the OFF position.
Opening the Operation
Panel and Adjusting the
Angle
The operation panel can be opened/closed to
insert/eject a disc or memory card. The angle
of the operation panel can be adjusted to suit
the mounting angle of the unit or light coming
into the vehicle.
WARNING
To prevent the battery from going
dead, operate this unit with the engine
running if possible.
When the operation panel is operating,
be careful not to get your hand or
finger caught between the panel and
main unit or the instrument panel of
the vehicle.
Do not move the operation panel by
hand.
qOpening/closing the
operation panel
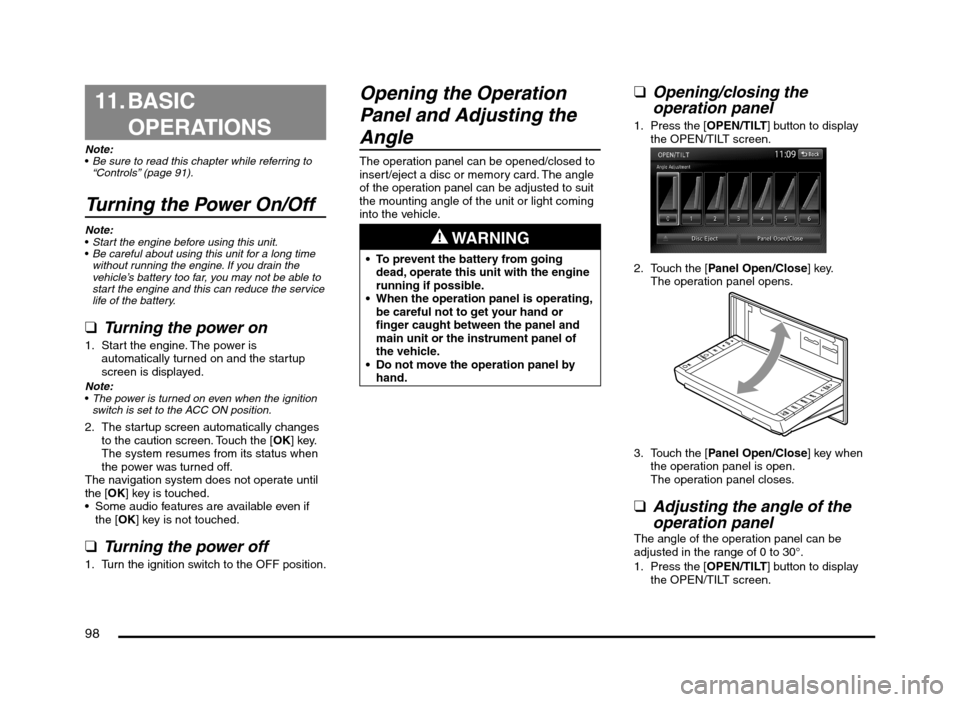
1. Press the [OPEN/TILT] button to display
the OPEN/TILT screen.
2. Touch the [Panel Open/Close] key.
The operation panel opens.
3. Touch the [Panel Open/Close] key when
the operation panel is open.
The operation panel closes.
qAdjusting the angle of the
operation panel
The angle of the operation panel can be
adjusted in the range of 0 to 30°.
1. Press the [OPEN/TILT] button to display
the OPEN/TILT screen.
205-0010-00_QY-7375M-A_EN.indb 98205-0010-00_QY-7375M-A_EN.indb 983/12/2013 9:57:27 AM3/12/2013 9:57:27 AM
Page 99 of 135
![MITSUBISHI MIRAGE 2014 6.G MMCS Manual 99
2. Select the angle from [0] to [6] in Angle
Adjustment.
The selected angle is stored in memory.
Once you select the angle of the operation
panel, the operation panel returns to the
selected an MITSUBISHI MIRAGE 2014 6.G MMCS Manual 99
2. Select the angle from [0] to [6] in Angle
Adjustment.
The selected angle is stored in memory.
Once you select the angle of the operation
panel, the operation panel returns to the
selected an](/img/19/7509/w960_7509-98.png)
99
2. Select the angle from [0] to [6] in Angle
Adjustment.
The selected angle is stored in memory.
Once you select the angle of the operation
panel, the operation panel returns to the
selected angle even after it is opened/
closed.
Returning the operation panel to
the original angle
1. Press the [OPEN/TILT] button to display
the OPEN/TILT screen.
2. Touch the [0] key in Angle Adjustment.
The operation panel moves and stops at
0°.
Adjusting the Display and
Audio
qTurning the Monitor Display
Off
You can turn off the monitor display, and
change it to a black screen.
1. Press the [MENU] button and touch the
[Display] key to display the Display screen.
2. Touch the [Screen Display OFF] key.
The monitor display turns off.
Turning the monitor display on
1. Touch the monitor display.
You can also turn on the monitor display
by pressing the [AV], [MAP], [MENU],
[DEST], or [OPEN/TILT] button, or any
button on the Steering Wheel Audio
Remote Control (if so equipped).
q
Switching between day and
night modes
You can switch the screen brightness setting
between day and night modes.
1. Press the [MENU] button and touch the
[Day/Night] key.
The display dims or brightens.
qAdjusting the Volume
1. Press the [{], [
}] (Volume) buttons to
adjust the volume.
[{] button: Increases the volume.
[
}] button: Decreases the volume.
The volume level has a range of 0 (min.)
to 31 (max.).
qTurning the Audio Off
1. Press the [POWER] button.Note:
You can also turn off the audio features by
pressing the [AV] button once or twice until the
Source screen is displayed, and then touching
the [Audio OFF] key.
Turning the Audio features on
1. Press the [POWER] button.Note:
You can also turn on the audio features by
pressing the [AV] button once or twice until the
Source screen is displayed, and then touching
one of the source keys.
CAUTION
While driving, keep the volume at a level at
which external sounds can be heard.
205-0010-00_QY-7375M-A_EN.indb 99205-0010-00_QY-7375M-A_EN.indb 993/12/2013 9:57:27 AM3/12/2013 9:57:27 AM
Page 100 of 135
![MITSUBISHI MIRAGE 2014 6.G MMCS Manual 100
Switching the Operation
Mode
qSwitching to the Source
screen, Navigation screen,
and Main Menu screen
To switch to the Source screen from the
Navigation screen, press the [AV] button once
o MITSUBISHI MIRAGE 2014 6.G MMCS Manual 100
Switching the Operation
Mode
qSwitching to the Source
screen, Navigation screen,
and Main Menu screen
To switch to the Source screen from the
Navigation screen, press the [AV] button once
o](/img/19/7509/w960_7509-99.png)
100
Switching the Operation
Mode
qSwitching to the Source
screen, Navigation screen,
and Main Menu screen
To switch to the Source screen from the
Navigation screen, press the [AV] button once
or twice. To switch to the Navigation screen
from the Source screen, press the [MAP]
button.
Note:
You can also access the Navigation screen from
the Main Menu screen.
É “Main Menu Operations” (page 100)
qSelecting a Media SourceYou can change the media source to be
played from the Source screen.
1. Press the [AV] button once or twice to
display the Source screen.
2. Touch the corresponding key for the
desired Source.
The system switches to the corresponding
source mode.
When [Audio OFF] is not enabled,
pressing the [AV] button from the Source
screen displays the current mode screen.
Note:
You can also change the source mode by using
the Steering Wheel Audio Remote Control (if so
equipped).
É “Steering Wheel Audio Remote Control
Operations” (page 103)
Available media sources
Key name Corresponding
source modeRefer to
FM/AM Tuner mode P. 105
DVD/CD*
1Audio CD mode P. 111
MP3/WMA/AAC
modeP. 112
DVD Video mode P. 106
SD Memory
CARDSD memory card
modeP. 115
USB/iPod*
2USB memory
modeP. 115
iPod mode P. 117
Bluetooth Bluetooth Audio
modeP. 120
*1 The source mode differs depending on the
data format of the disc inserted into the CD
player.
When no disc is inserted into the CD
player, “No disc.” is displayed.
*2 The source mode differs depending on
the device connected. When no device
is connected, “No USB memory.” is
displayed.
q
Main Menu Operations
Selecting Navigation Mode
1. Press the [MENU] button and touch the
[Navigation] key to display the Navigation
screen.
Selecting Telephone mode
1. Press the [MENU] button and touch the
[Phone] key to display the Phone screen.
Note:
Even in Telephone mode, the previous Source
mode continues operating.
É “Telephone Operations” (page 122)
Displaying the Clock ScreenYou can change the screen to display only the
digital clock on a dark background.
1. Press the [MENU] button and touch the
[Display] key to display the Display screen.
2. Touch the [Clock Screen Display] key.
The Clock screen is displayed.
To return to the mode you were previously
using, touch the monitor screen.
You can also exit the Clock screen by
pressing the [AV], [MAP], [MENU],
[DEST], or [OPEN/TILT] button.
205-0010-00_QY-7375M-A_EN.indb 100205-0010-00_QY-7375M-A_EN.indb 1003/12/2013 9:57:27 AM3/12/2013 9:57:27 AM