MITSUBISHI MIRAGE 2015 6.G Owners Manual
Manufacturer: MITSUBISHI, Model Year: 2015, Model line: MIRAGE, Model: MITSUBISHI MIRAGE 2015 6.GPages: 300, PDF Size: 43.44 MB
Page 221 of 300
Handling of compact discs 7-40 Comfort controls
7
N00734100340
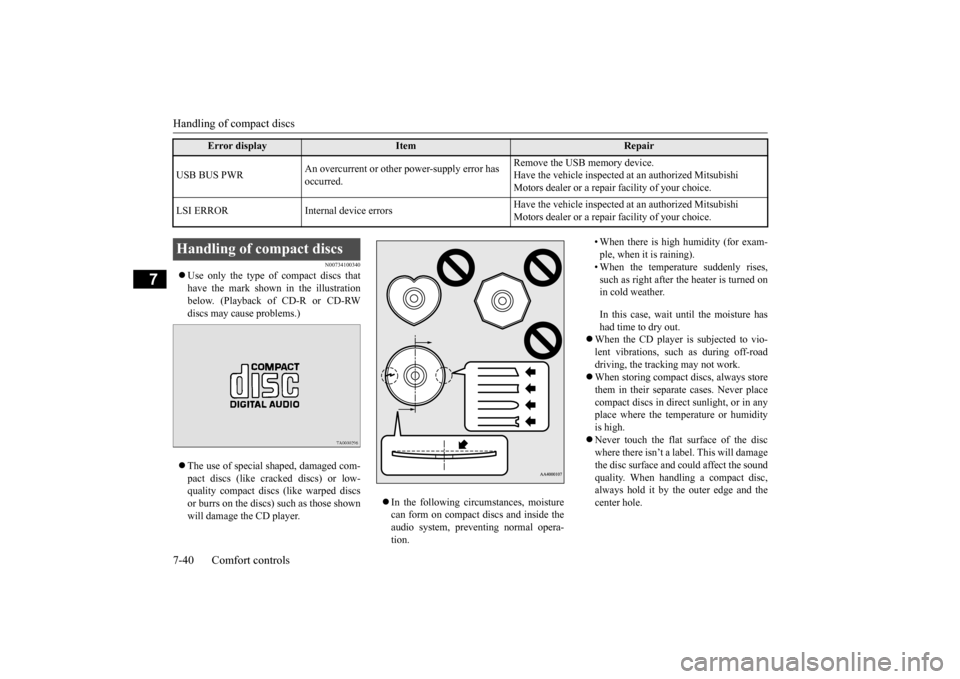
Use only the type of compact discs that have the mark shown in the illustrationbelow. (Playback of CD-R or CD-RW discs may cause problems.) The use of special shaped, damaged com- pact discs (like crac
ked discs) or low-
quality compact discs (like warped discsor burrs on the discs) such as those shown will damage the CD player.
In the following circumstances, moisture can form on compact discs and inside the audio system, preventing normal opera- tion.
• When there is high humidity (for exam- ple, when it is raining). • When the temperature suddenly rises, such as right after the heater is turned onin cold weather. In this case, wait until the moisture has had time to dry out.
When the CD player is subjected to vio- lent vibrations, such as during off-road driving, the tracking may not work. When storing compact discs, always store them in their separate
cases. Never place
compact discs in direct sunlight, or in any place where the temperature or humidityis high. Never touch the flat
surface of the disc
where there isn’t a label. This will damagethe disc surface and
could affect the sound
quality. When handli
ng a compact disc,
always hold it by the outer edge and thecenter hole.
USB BUS PWR
An overcurrent or other power-supply error has occurred.
Remove the USB memory device. Have the vehicle inspected at an authorized Mitsubishi Motors dealer or a repair
facility of your choice.
LSI ERROR Internal
device errors
Have the vehicle inspected at an authorized Mitsubishi Motors dealer or a repair
facility of your choice.
Error display
Item
Repair
Handling of compact discs BK0212400US.book 40 ページ 2014年4月1日 火曜日 午後2時21分
Page 222 of 300
Antenna
Comfort controls 7-41
7
To clean a disc, use a soft, clean, dry cloth. Wipe directly
from the center hole
toward the outer edge. Do not wipe in a circle. Never use any chemicals such as benzine, paint thi
nner, a disc spray
cleaner, or an anti-static agent on the disc. Do not use a ball point
pen, felt pen, pen-
cil, etc. to write on the label surface of thedisc. Do not put additional la
bels or stickers on
compact discs. Also, do not use any com- pact disc on which a label or sticker has started to peel off or any compact disc thathas stickiness or ot
her contamination left
by a peeled-off label or sticker. If you use such a compact disc, the CD player maystop working properly and you may not be able to eject the compact disc.
N00751900066
You may have trouble playing back some CD-R/RW discs recorded on CD record- ers (CD-R/RW drives), either due to theirrecording characterist
ics or dirt, finger-
prints, scratches, etc.
on the disc surface.
CD-R/RW discs are less resistant to high temperatures and high humidity than ordi- nary music CDs and can therefore be damaged and rendered unplayable if leftinside your vehicle for a long time.
Depending on the combination of the writing software, the CD recorder (CD-R/RW drive), and the di
sc used to create a
CD-R/RW, the disc might not play suc- cessfully. This player cannot play the CD-R/RW discs if the sessi
on is not closed.
This player cannot play CD-R/RW discs which contain data other than CD-DA or MP3 data (Video CD, etc.). Be sure to observe
the handling instruc-
tions for the CD-R/RW disc.
N00734201508
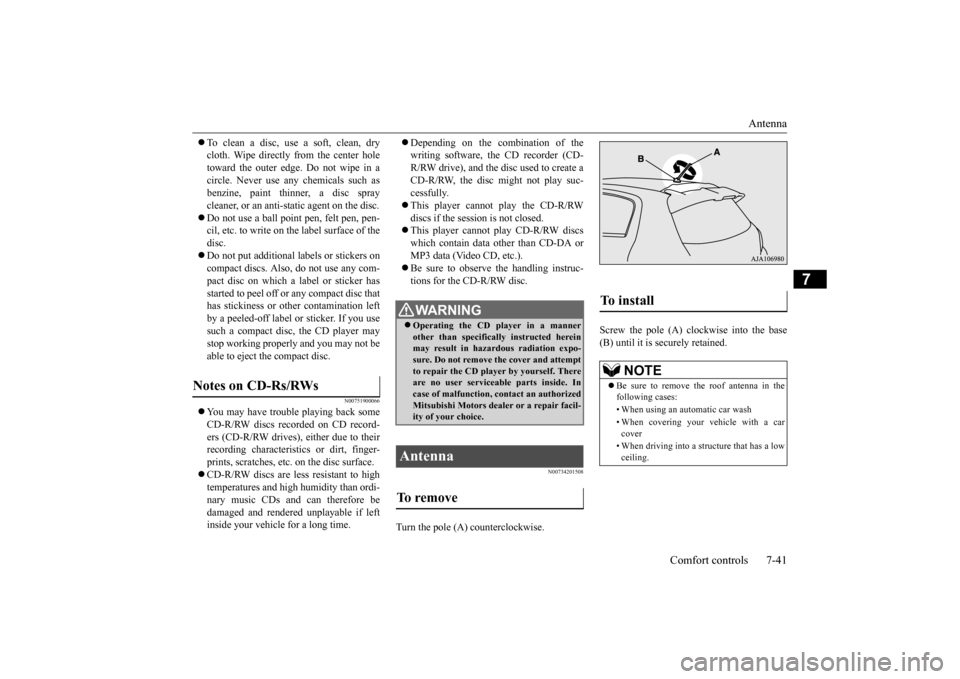
Turn the pole (A) counterclockwise.
Screw the pole (A) clockwise into the base (B) until it is securely retained.
Notes on CD-Rs/RWs
WA R N I N G Operating the CD player in a manner other than specifically instructed hereinmay result in hazardous radiation expo- sure. Do not remove the cover and attempt to repair the CD player by yourself. Thereare no user serviceable parts inside. In case of malfunction,
contact an authorized
Mitsubishi Motors dealer or a repair facil-ity of your choice.
Antenna To remove
To install
NOTE
Be sure to remove the roof antenna in the following cases: • When using an automatic car wash• When covering your ve
hicle with a car
cover • When driving into a structure that has a low ceiling.
BK0212400US.book 41 ページ 2014年4月1日 火曜日 午後2時21分
Page 223 of 300
General information about your radio 7-42 Comfort controls
7
N00733900455
Your vehicle’s radio receives both AM and FM stations. The quality of your reception is affected bydistance, obstacles, an
d signal interference.
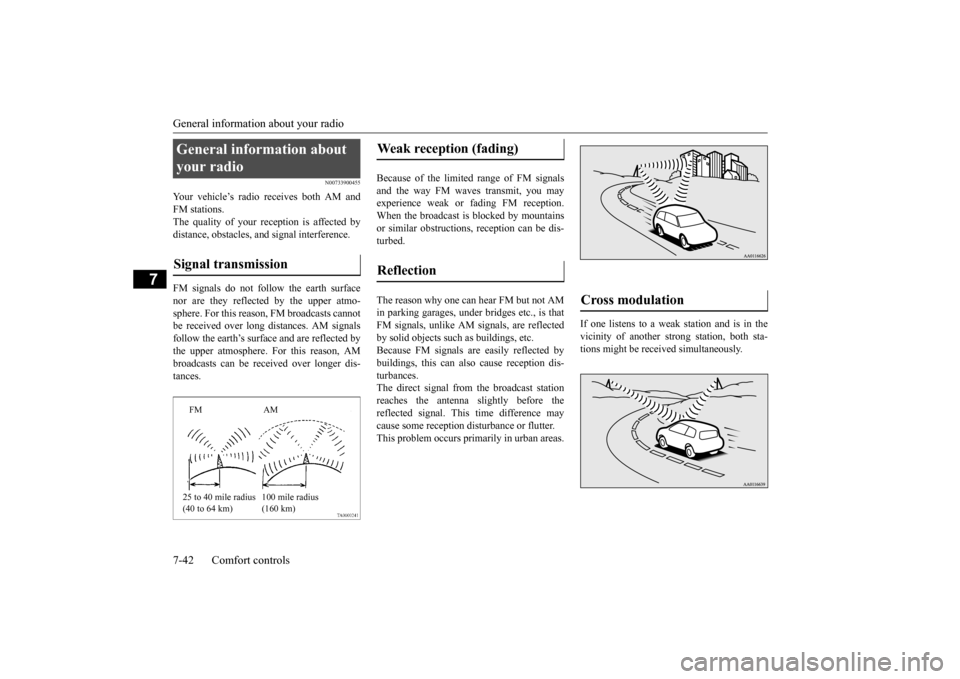
FM signals do not foll
ow the earth surface
nor are they reflected by the upper atmo- sphere. For this reason,
FM broadcasts cannot
be received over long di
stances. AM signals
follow the earth’s surfa
ce and are reflected by
the upper atmosphere. For this reason, AM broadcasts can be rece
ived over longer dis-
tances.
Because of the limited
range of FM signals
and the way FM waves transmit, you may experience weak or fading FM reception.When the broadcast is blocked by mountains or similar obstructions,
reception can be dis-
turbed. The reason why one can hear FM but not AM in parking garages, under
bridges etc., is that
FM signals, unlike AM
signals, are reflected
by solid objects such
as buildings, etc.
Because FM signals ar
e easily reflected by
buildings, this can also cause reception dis- turbances.The direct signal from
the broadcast station
reaches the antenna slightly before the reflected signal. This time difference maycause some reception disturbance or flutter. This problem occurs primarily in urban areas.
If one listens to a weak
station and is in the
vicinity of another st
rong station, both sta-
tions might be receiv
ed simultaneously.
General information about your radio Signal transmission
FM AM 25 to 40 mile radius (40 to 64 km)
100 mile radius (160 km)
Weak reception (fading) Reflection
Cross modulation
BK0212400US.book 42 ページ 2014年4月1日 火曜日 午後2時21分
Page 224 of 300
General information about your radio
Comfort controls 7-43
7
Stereo reception re
quires a high quality
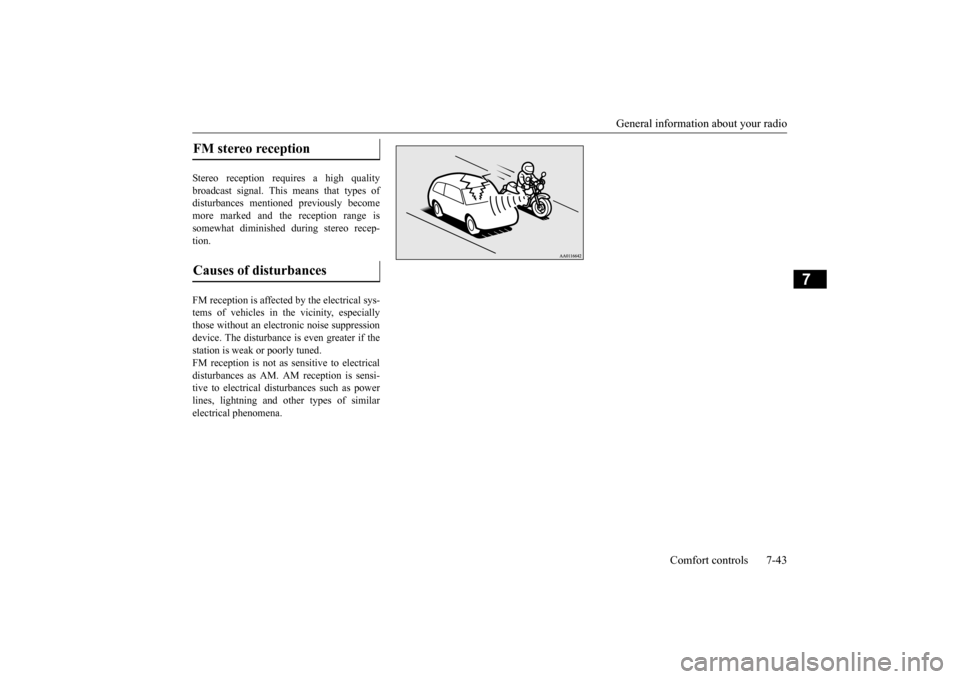
broadcast signal. This means that types of disturbances mentioned previously becomemore marked and the reception range is somewhat diminished during stereo recep- tion. FM reception is affected by the electrical sys- tems of vehicles in
the vicinity, especially
those without an elec
tronic noise suppression
device. The disturbance is even greater if thestation is weak or poorly tuned. FM reception is not as
sensitive to electrical
disturbances as AM. AM
reception is sensi-
tive to electrical dist
urbances such as power
lines, lightning and ot
her types of similar
electrical phenomena.FM stereo reception Causes of disturbances
BK0212400US.book 43 ページ 2014年4月1日 火曜日 午後2時21分
Page 225 of 300

BK0212400US.book 44 ページ 2014年4月1日 火曜日 午後2時21分
Page 226 of 300
8
For emergenciesIf the vehicle breaks down ...............................................................8-2 Jump-starting the engine ..................................................................8-2 Engine overheating ..........................................................................8-4Jack and tools ...................................................................................8-5 Tire repair kit (if so equipped) ..........................................................8-6 How to change a tire (Vehicles equipped with spare tire) ............. 8-11Towing ...........................................................................................8-17 Operation under adverse driving conditions
...........
.........
.........
.....8-18
Fuel Pump Shut-off System ...........................................................8-20
BK0212400US.book 1 ページ 2014年4月1日 火曜日 午後2時21分
Page 227 of 300
If the vehicle breaks down 8-2 For emergencies
8
N00836300233
If your vehicle breaks down on the road, move to the shoulder and turn on the hazard warning flashers. If there is no shoulder, orthe shoulder is not safe, drive in the right lane slowly with the haza
rd lights flashing until
you come to a safe stopping place. Keep theflashers flashing. If the engine stops, there will be no power assist to the steering and brakes, making these difficult to use. The brake booster will not work, so the brakes will not grip well. The brake pedal will be harder to press than usual. Since there is no power steering assist, the steering wheel will be hard to turn.
Get help from your passengers, bystanders, etc. to push the vehicle
and move it to a safe
area.
N00836400768
If the engine cannot be started because the battery is weak or de
ad, you can start it with
the battery from anothe
r vehicle using jumper
cables. 1. Take off any metal jewelry such as watch bands or bracelets th
at might create an
accidental electrical contact. 2. Position the vehi
cles close enough
together so that the jumper cables canreach, but be sure the vehicles aren’t touching each other.
3. You could be injured if the vehicles move. Set the parking brake firmly on each vehi- cle. Put an automatic transaxle or CVT in “P” (PARK) or a manual transaxle in “N”(Neutral). 4. Turn the ignition switch to the “OFF” position or put the operation mode inOFF. 5. Make sure your battery electrolyte is at the proper level. (Refer to “Battery” on page 9-10.)
If the vehicle breaks down If the engine stops/fails When the engine fails at the intersection
Jump-starting the engine
WA R N I N G To reduce the risk of igniting flammable gas that may be emitted from the battery,carefully read this section before jump- starting the vehicle. Do not try to start you
r vehicle by pushing
or towing. This can cause an accident resulting in serious
injury or death and
can damage the vehicle.NOTE
Do not use jumper cables if they have dam- age or corrosion.
CAUTION Check the other vehicle.
It must have a 12-
volt battery. If the other system isn’t 12-volt,both systems can be damaged.NOTE
Turn off all lights, heat
er, and othe
r electrical
loads. This will avoid sparks and help save both batteries.WA R N I N G If the electrolyte fluid is not visible, or looks frozen, DO NOT ATTEMPT JUMPSTARTING!! The battery might spli
t open or explode if
the temperature is below the freezingpoint or if it is not filled to the proper level.
BK0212400US.book 2 ページ 2014年4月1日 火曜日 午後2時21分
Page 228 of 300
Jump-starting the engine For emergencies 8-3
8
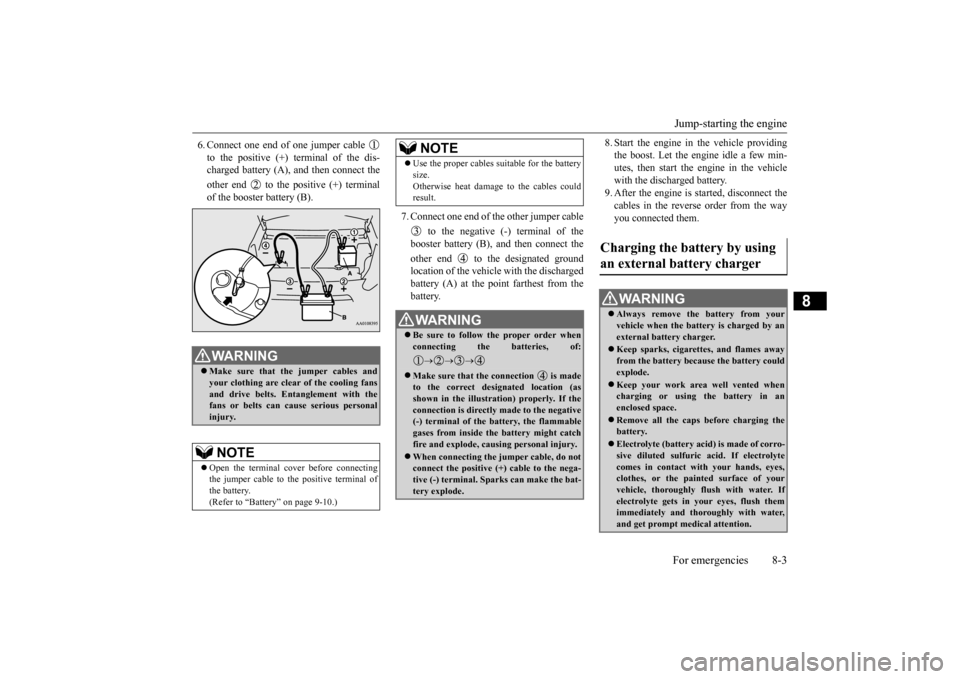
6. Connect one end of one jumper cable to the positive (+) terminal of the dis- charged battery (A),
and then connect the
other end to the positive (+) terminal of the booster battery (B).
7. Connect one end of the other jumper cable
to the negative (-) terminal of the booster battery (B), and then connect the other end to the designated ground location of the vehicle with the dischargedbattery (A) at the point farthest from the battery.
8. Start the engine in the vehicle providing the boost. Let the engine idle a few min-utes, then start the engine in the vehicle with the discharged battery. 9. After the engine is
started, disconnect the
cables in the reverse order from the way you connected them.
WA R N I N G Make sure that the jumper cables and your clothing are clear of the cooling fansand drive belts. Entanglement with the fans or belts can cause serious personal injury.NOTE
Open the terminal co
ver before connecting
the jumper cable to the positive terminal ofthe battery. (Refer to “Battery” on page 9-10.)
Use the proper cables suitable for the battery size.Otherwise heat damage
to the cables could
result.WA R N I N G Be sure to follow the proper order when connecting the batteries, of:
Make sure that the connection is made to the correct designated location (asshown in the illustration) properly. If the connection is directly made to the negative (-) terminal of the battery, the flammablegases from inside the battery might catch fire and explode, caus
ing personal injury.
When connecting the jumper cable, do not connect the positive (+) cable to the nega- tive (-) terminal. Sparks can make the bat-tery explode.NOTE
Charging the battery by using an external battery charger
WA R N I N G Always remove the battery from your vehicle when the battery is charged by an external battery charger. Keep sparks, cigarettes, and flames away from the battery because the battery couldexplode. Keep your work area well vented when charging or using
the battery in an
enclosed space. Remove all the caps
before charging the
battery. Electrolyte (battery acid) is made of corro- sive diluted sulfuric acid. If electrolyte comes in contact with your hands, eyes,clothes, or the pain
ted surface of your
vehicle, thoroughly flush with water. If electrolyte gets in your eyes, flush themimmediately and thoroughly with water, and get prompt medical attention.
BK0212400US.book 3 ページ 2014年4月1日 火曜日 午後2時21分
Page 229 of 300
Engine overheating 8-4 For emergencies
8
If you drive your vehicle with a low battery charge after the engine has been started byusing jumper cables, the engine may misfire. This can cause the an
ti-lock braking system
warning light to blink on and off. This is onlydue to the low battery voltage. It is not a problem with the brak
e system. If this hap-
pens, fully charge the battery and ensure thecharging system is operating properly.
N00836500365
If the high coolant temperature warning lightilluminates during the engine is running, the engine may be overheating. If this happens: 1. Stop the vehicle in a safe place. Turn on the hazard warning flashers.2. With the engine st
ill running, carefully
raise the engine hood to vent the engine compartment.
3. Check that the cooling fan is running. If the fan is not turning, stop the engineimmediately and contact an authorized Mitsubishi Motors dealer or a repair facil- ity of your choice for assistance. 4. If you see steam or spray coming from under the hood, turn off the engine. 5. If you do not see stea
m or spray coming
from under the hood, leave the engine onuntil the high coolant temperature warn- ing light goes off. After the high coolant temperature warning light has gone off,you can start driving again. If the high coolant temperature warning light stays on, turn off the engine.
6. When you do not see any more steam or spray, open the hood. Look for obviousleaks, such as a split radiator hose. Be careful as components will be hot. Any leak source must be repaired.7. If there is no obvious leak source, check the coolant level in the engine coolant reserve tank. If there is none, or if it is toolow, slowly add coolant. 8. If the engine coolant reserve tank needs coolant, you will probably also need to add coolant to the radiator. Do not loosen or remove the radiator cap until the enginehas cooled down. 9. Start the engine, and slowly add coolant, up to the bottom of the filler neck. Use plain water if you have to (and replace itwith the right coolant as soon as possible).
Always wear protective clothing and gog- gles when working near the battery. Keep the battery out of the reach of chil- dren.
As your vehicle has anti-lock brakes Engine overheating
WA R N I N G
WA R N I N G To avoid personal injury
, keep hands, hair,
jewelry and clothes aw
ay from the cooling
fan. The cooling fan ca
n start at any time.
WA R N I N GBefore raising the engine hood, check to see if there is steam or spray coming fromunder the hood. Steam or spray comingfrom an overheated en
gine could seriously
scald you. Do not open the hood until there is nosteam or spray.
WA R N I N G Removing the radiat
or cap could scald
you with escaping hot water or steam. When checking the radiator level, coverthe cap with a cloth before trying to remove it. Turn it slowly counterclock- wise, without pressing down, to the firstnotch. The pressure in the system will then be let out. When the pressure is COM- PLETELY LET OUT, press down andkeep turning the cap counterclockwise until it comes off.
BK0212400US.book 4 ページ 2014年4月1日 火曜日 午後2時21分
Page 230 of 300
Jack and tools
For emergencies 8-5
8
10. Replace the radiator
cap and tighten it
fully. Check the coolant temperaturewarning light. You can start driving again when the high coolant temperature warn- ing light does not come on.
11. Have the system in
spected by your autho-
rized Mitsubishi Motors dealer or a repair facility of your choice.
N00836600379
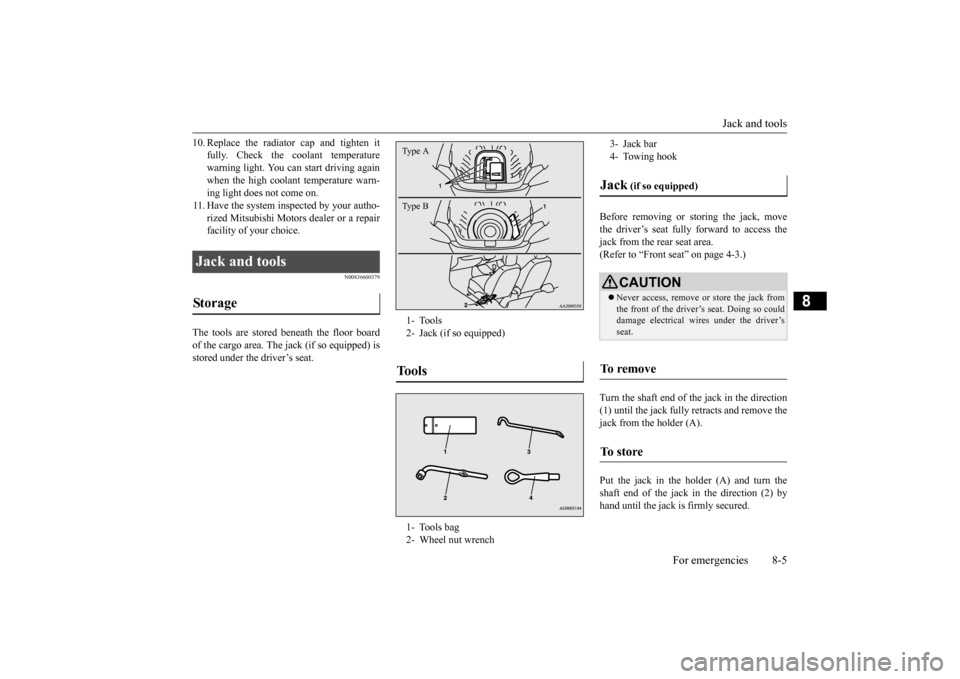
The tools are stored beneath the floor boardof the cargo area. The jack (if so equipped) is stored under the driver’s seat.
Before removing or storing the jack, move the driver’s seat fully forward to access the jack from the rear seat area. (Refer to “Front seat” on page 4-3.) Turn the shaft end of the jack in the direction (1) until the jack fully retracts and remove the jack from the holder (A). Put the jack in the holder (A) and turn the shaft end of the jack in the direction (2) byhand until the jack is firmly secured.
Jack and tools Storage
1- Tools 2- Jack (if so equipped)Tools 1- Tools bag 2- Wheel nut wrenchType A Type B
3- Jack bar 4- Towing hookJack
(if so equipped)CAUTION Never access, remove or store the jack from the front of the driver’s seat. Doing so could damage electr
ical wires under the driver’s
seat.
To remove
To s t o r e
BK0212400US.book 5 ページ 2014年4月1日 火曜日 午後2時21分