MITSUBISHI MONTERO 2000 Service Repair Manual
MONTERO 2000
MITSUBISHI
MITSUBISHI
https://www.carmanualsonline.info/img/19/57331/w960_57331-0.png
MITSUBISHI MONTERO 2000 Service Repair Manual
Trending: cooling, fuel pump, fuses, change wheel, warning light, oil viscosity, charging
Page 151 of 1839
C
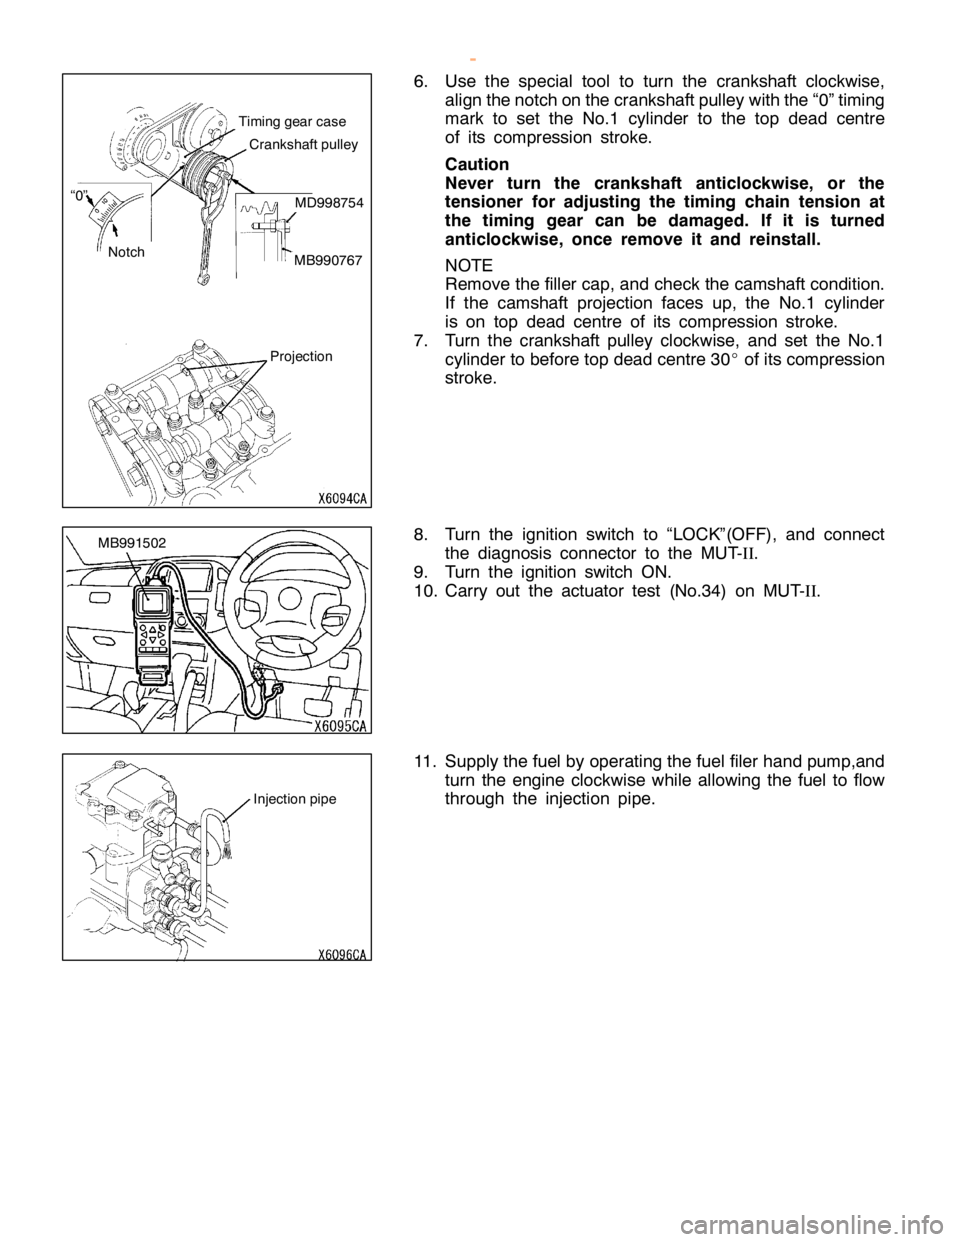
ra nksh aft p ulle y N
otc h
“
0 ” M
D998754 M
B990767 P
ro je ctio n M
B991502 I
n je ctio n pip e
w
ww.W ork sh opM an uals .c o .u k
P urc h ased f r o m w ww.W ork sh opM an uals .c o .u k
Page 152 of 1839
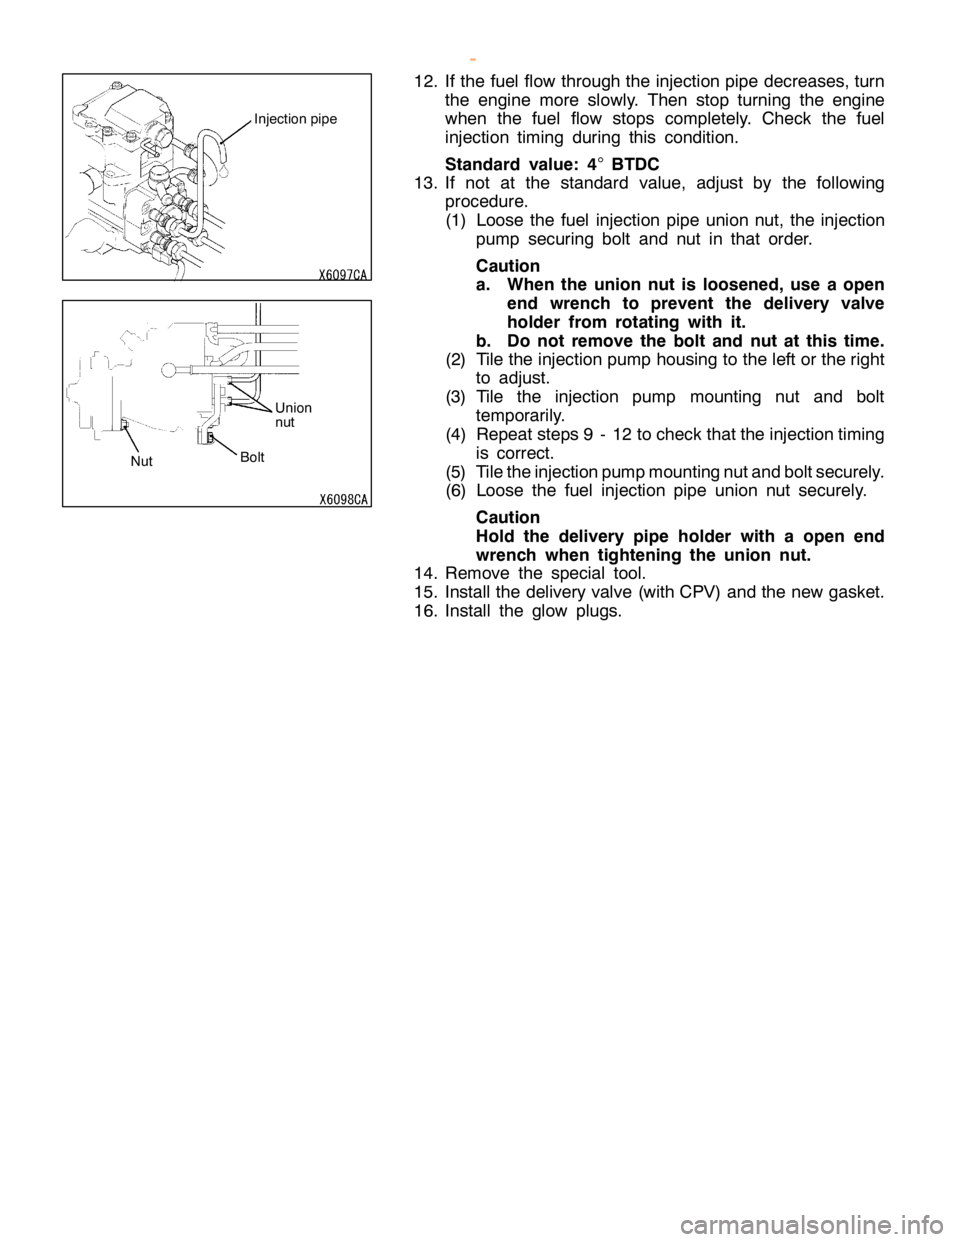
U
nio n
n ut B
olt N
ut w
ww.W ork sh opM an uals .c o .u k
P urc h ased f r o m w ww.W ork sh opM an uals .c o .u k
Page 153 of 1839
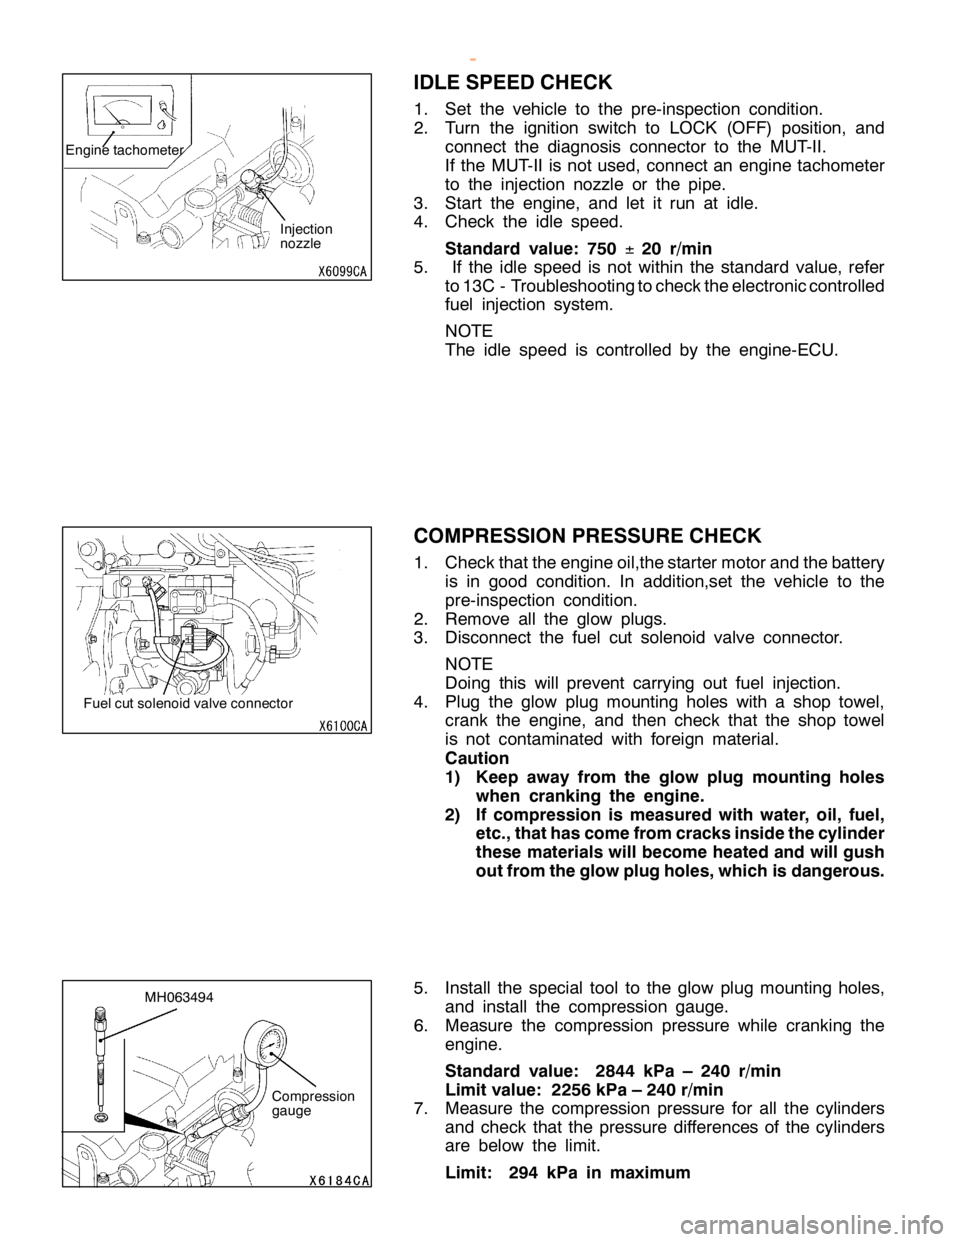
F
uelc u t so le noid va lv e co nnecto r M
H063494 C
om pre ssio n
g auge
w
ww.W ork sh opM an uals .c o .u k
P urc h ased f r o m w ww.W ork sh opM an uals .c o .u k
Page 154 of 1839
ENGINE <4M4> -On-vehicle Service11C-13
8. If there is a cylinder which compression or compression
difference is outside the limit, pour a small amount of
engine oil through the glow plug hole, and repeat the
operations in steps 6 - 7.
(1) If the compression increases after the oil is added,
the cause of the malfunction is a worn or damaged
piston ring and /or cylinder inner surface.
(2) If the compression does not rise after the oil is added,
the cause is a burnt or defective valve seat, or pressure
is leaking from the gasket.
9. Connect the fuel cut solenoid valve connector.
10. Install the glow plugs.
www.WorkshopManuals.co.uk
Purchased from www.WorkshopManuals.co.uk
Page 155 of 1839
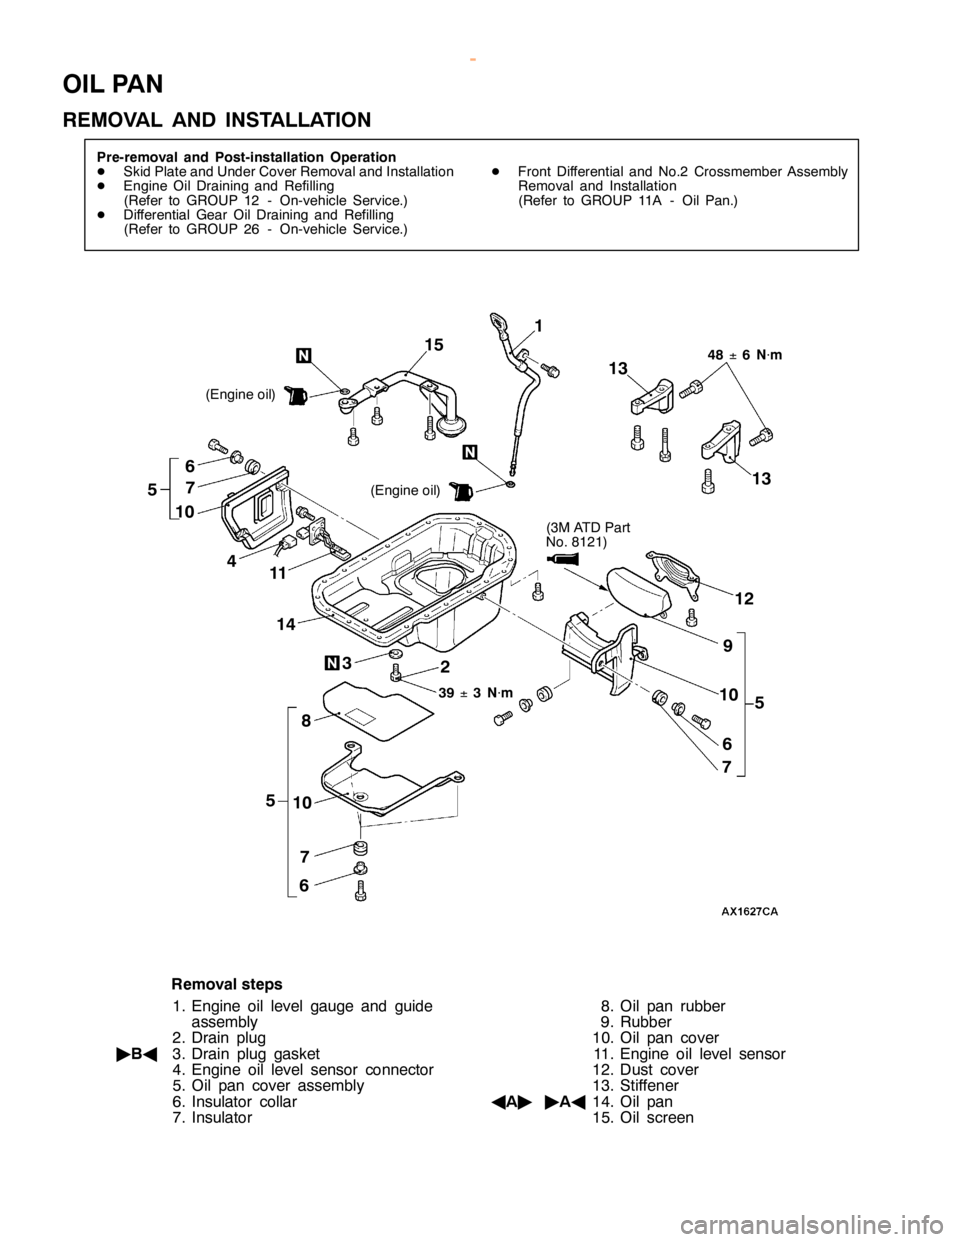
O
IL PA N
R EM OVA L AND IN STA LLA TIO N 6
7
5
7 6
5
14
6
3 1
21
3 1
5
Page 156 of 1839
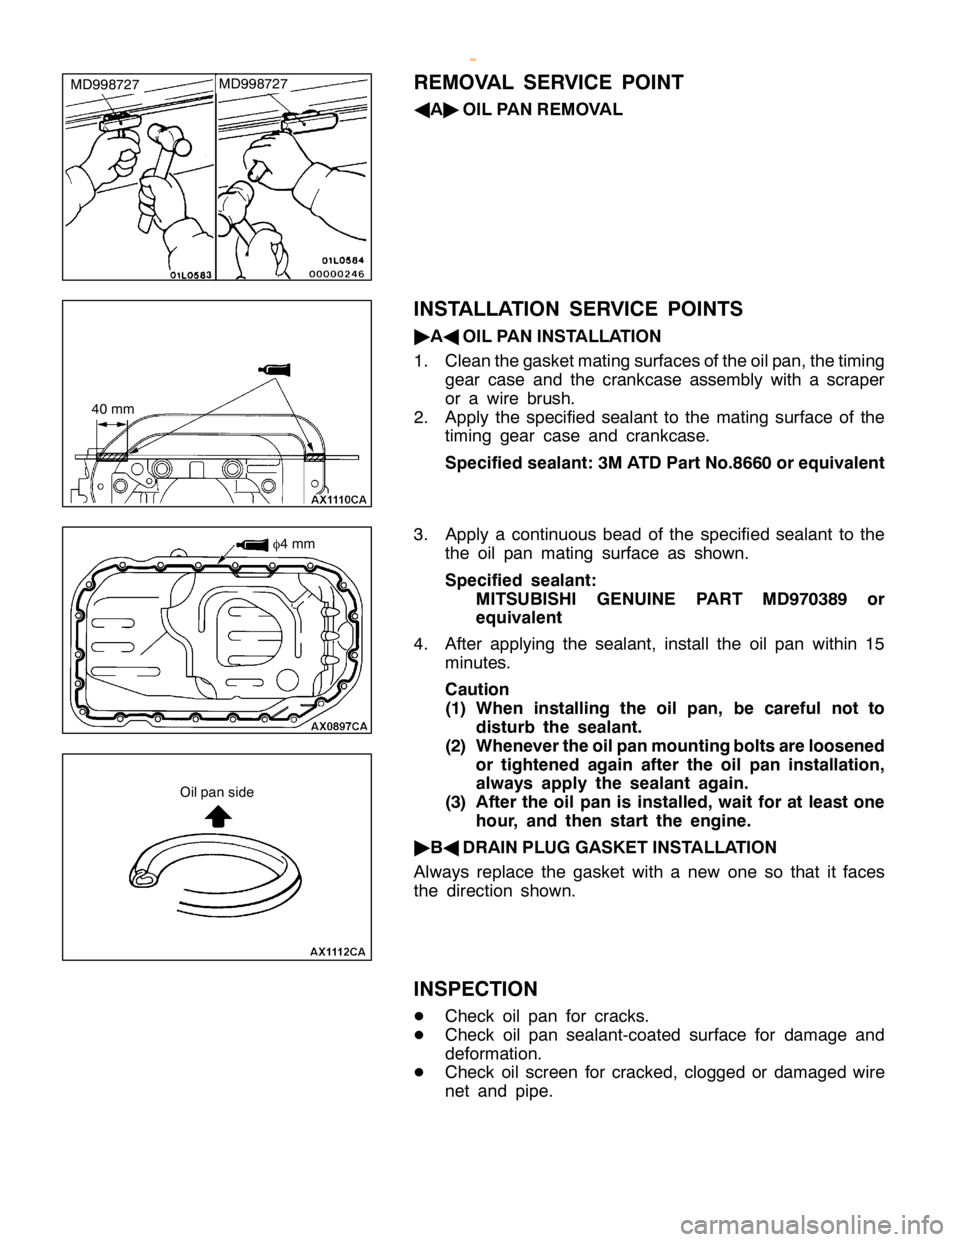
M
D998727 4
0 mm O
il p an sid e
w
ww.W ork sh opM an uals .c o .u k
P urc h ased f r o m w ww.W ork sh opM an uals .c o .u k
Page 157 of 1839
V
A CUUM PU M P
R EM OVA L AND IN STA LLA TIO N (
E ngin e
o il)
2 5
1 9
(E ngin e oil)
4
6
R em oval ste p s
1 . P ow er ste erin g oil pre ssu re sw it c h
c o nnecto r
A A"
2. P ow er ste erin g oil pum p asse m bly
3 . Vacu um hose
< E xce pt R.H . driv e ve hic le s wit h out
A BS>
4 . Vacu um hose
< R .H . driv e ve hic le s wit h out ABS> 5
. Vacu um hose co nnectio n
6 . B ra ke booste r va cu um hose
c o nnectio n
< L.H . driv e ve hic le s wit h out ABS>
7 . Vacu um pum p oil pip e
8 . Vacu um pum p oil pip e gaske t
9 . Vacu um pum p asse m bly
R EM OVA L SER VIC E PO IN T
A A"
PO W ER STE ER IN G OIL PU M P ASSEM BLY
R EM OVA L
1 . Rem ove th e pow er ste erin g oil pum p asse m bly fr o m th e
t im in g gear ca se wit h it s hose s still atta ch ed.
2 . Support th e oil pum p asid e wit h a co rd .
w
ww.W ork sh opM an uals .c o .u k
P urc h ased f r o m w ww.W ork sh opM an uals .c o .u k
Page 158 of 1839
T
IM IN G CHAIN
R EM OVA L AND IN STA LLA TIO N (
E ngin e oil)
2
3
1
3
23
±3
2 N
×m
5
6
4
7
8
9 1
0 1
6 1
7
2 3
±2
N
×m
11
1
2 1
3
14
1 5
Page 159 of 1839
P
iv o t bolt Bw
ww.W ork sh opM an uals .c o .u k
P urc h ased f r o m w ww.W ork sh opM an uals .c o .u k
Page 160 of 1839
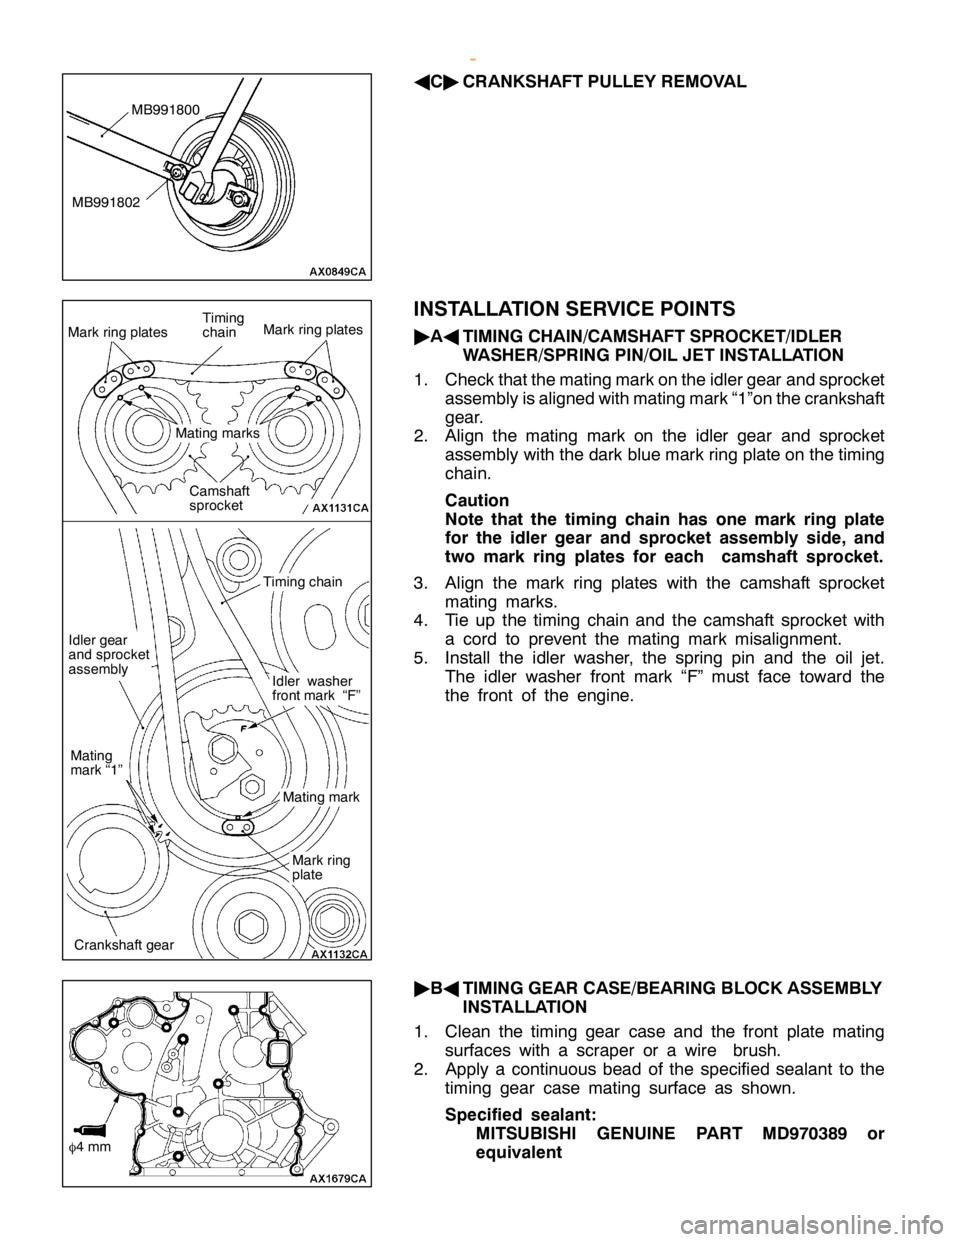
M
B991802 M
ark rin g pla te s C
am sh aft
s p ro cke t T
im in g
c h ain M
ark rin g pla te s M
atin g mark s M
ark rin g
p la te M
atin g mark I
d le r wash er
f r o ntm ark “F ” I
d le r gear
a nd sp ro cke t
a sse m bly M
atin g
m ark “1 ” C
ra nksh aft g ear T
im in g ch ain
Trending: parking, wheel, clock setting, airbag, wheel alignment, window, recommended oil
