flat tire MITSUBISHI OUTLANDER 2014 3.G Owner's Manual
[x] Cancel search | Manufacturer: MITSUBISHI, Model Year: 2014, Model line: OUTLANDER, Model: MITSUBISHI OUTLANDER 2014 3.GPages: 451, PDF Size: 49.08 MB
Page 378 of 451
How to change a tire 8-12 For emergencies
8
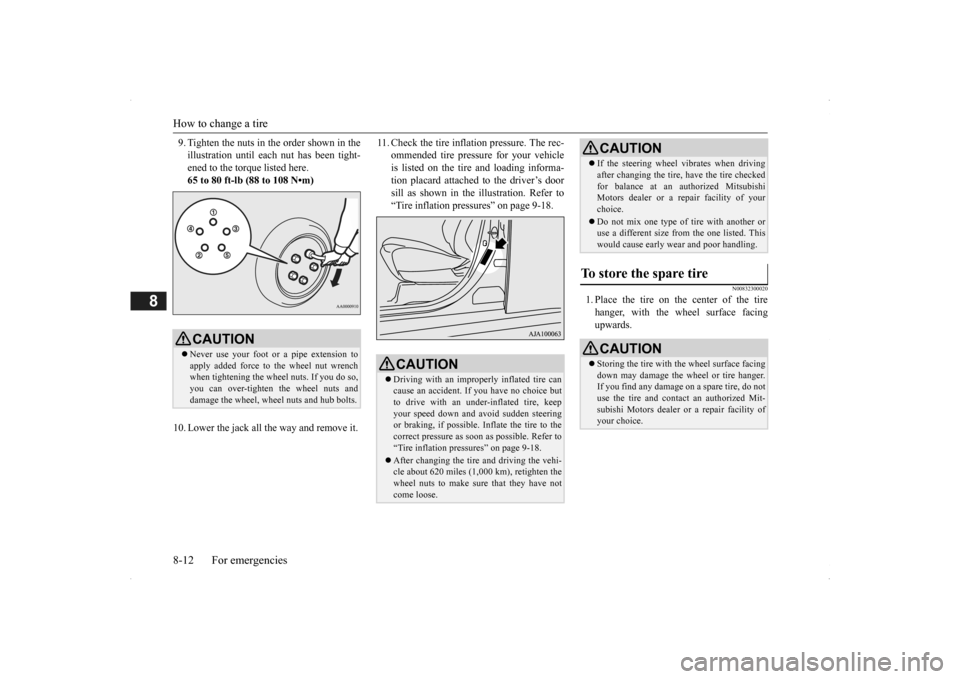
9. Tighten the nuts in the order shown in the illustration until each
nut has been tight-
ened to the torque listed here. 65 to 80 ft-lb (88 to 108 N•m)
10. Lower the jack all th
e way and remove it.
11. Check the tire inflation pressure. The rec-
ommended tire pressure for your vehicleis listed on the tire and loading informa- tion placard attached to the driver’s door sill as shown in the illustration. Refer to“Tire inflation pressures” on page 9-18.
N00832300020
1. Place the tire on the center of the tirehanger, with the wheel surface facing upwards.
CAUTION Never use your foot or a pipe extension to apply added force to the wheel nut wrench when tightening the wheel nuts. If you do so,you can over-tighten the wheel nuts and damage the wheel, wheel nuts and hub bolts.
CAUTION Driving with an improperly inflated tire can cause an accident. If
you have no choice but
to drive with an under-inflated tire, keep your speed down and avoid sudden steering or braking, if possible. Inflate the tire to thecorrect pressure as s
oon as possible. Refer to
“Tire inflation pressures” on page 9-18. After changing the tire
and driving the vehi-
cle about 620 miles (1,000 km), retighten the wheel nuts to make sure that they have notcome loose.
If the steering wheel vibrates when driving after changing th
e tire, have the tire checked
for balance at an authorized MitsubishiMotors dealer or a repair facility of your choice. Do not mix one type of
tire with another or
use a different size from the one listed. This would cause early we
ar and poor handling.
To store the spare tire
CAUTIONStoring the tire with the wheel surface facing down may damage the wheel or tire hanger. If you find any damage
on a spare tire, do not
use the tire and contact an authorized Mit-subishi Motors dealer or a repair facility of your choice.CAUTION
BK0200500US.book 12 ページ 2013年2月12日 火曜日 午前9時46分
Page 379 of 451
How to change a tire
For emergencies 8-13
8
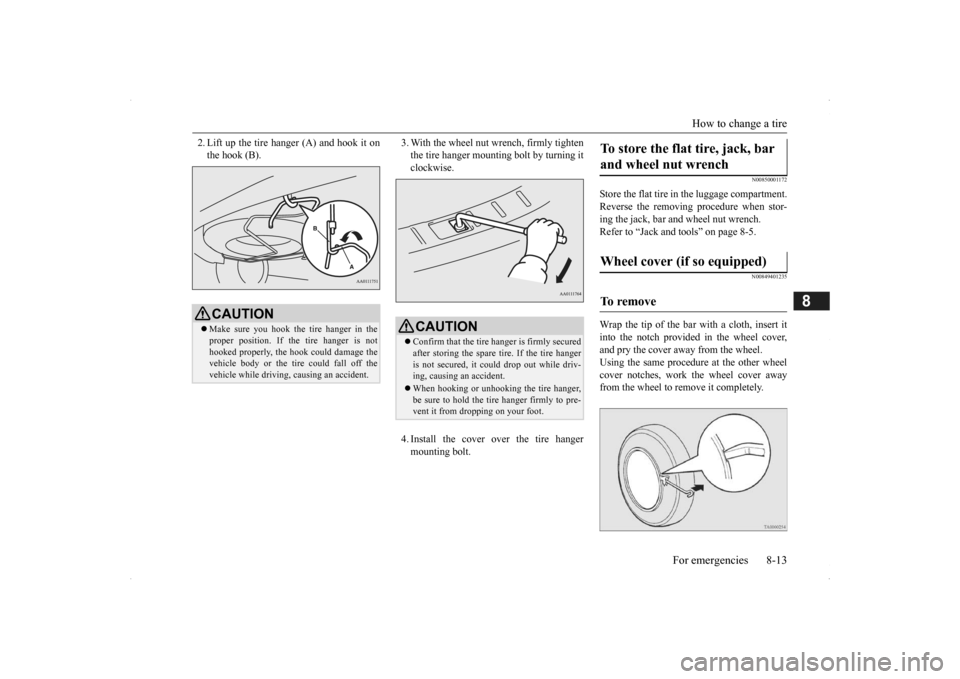
2. Lift up the tire hanger (A) and hook it on the hook (B).
3. With the wheel nut wrench, firmly tighten the tire hanger mounting bolt by turning itclockwise. 4. Install the cover over the tire hanger mounting bolt.
N00850001172
Store the flat tire in the luggage compartment. Reverse the removing procedure when stor-ing the jack, bar and wheel nut wrench. Refer to “Jack and tools” on page 8-5.
N00849401235
Wrap the tip of the bar with a cloth, insert itinto the notch provided in the wheel cover, and pry the cover away from the wheel.Using the same procedur
e at the other wheel
cover notches, work the wheel cover away from the wheel to remove it completely.
CAUTION Make sure you hook the tire hanger in the proper position. If the tire hanger is not hooked properly, the hook could damage the vehicle body or the tire
could fall off the
vehicle while driving,
causing an accident.
CAUTIONConfirm that the tire hanger is firmly secured after storing the spare
tire. If the tire hanger
is not secured, it coul
d drop out while driv-
ing, causing an accident. When hooking or unhooking the tire hanger, be sure to hold the tire hanger firmly to pre- vent it from dropping on your foot.
To store the flat tire, jack, bar and wheel nut wrench Wheel cover (if so equipped) To remove
BK0200500US.book 13 ページ 2013年2月12日 火曜日 午前9時46分
Page 383 of 451

Operation under adverse driving conditions
For emergencies 8-17
8
After parking on snowy or icy roads, it may be difficult to move your vehicle dueto the brake being frozen. Depress the accelerator pedal little by little to move the vehicle when safe to do so. Drive as slow as pos
sible when driving on
bumpy, rutted roads or over potholes.CAUTION Do not depress the acce
lerator pedal rapidly.
The vehicle could start moving when it breaks free from the
ice, possibly resulting in
an accident.
On a bumpy or rutted road
CAUTION Driving on bumpy, rutted roads or over pot- holes can damage th
e tires and wheels.
Wheels with low-profiles tires or under-inflated tires are especially at risk for dam- age.
BK0200500US.book 17 ページ 2013年2月12日 火曜日 午前9時46分
Page 398 of 451
Tires 9-14 Vehicle care and maintenance
9
N00939201589
It is important to familiarize yourself with the following terms: Cold tire pressure: • The measured pressure after the vehicle has been parked for
at least three hours,
or• The measured pressure when the vehicle is driven less than 1 mile (1.6 km) after having been parked for three hours.
Maximum pressure: the maximum per- missible cold tire inflation pressure for this tire.
WA R N I N G Never disconnect the battery while the engine is running, or you could damagethe vehicle’s electrical parts. Never short-circuit the battery. This could cause it to overheat and be damaged. Keep sparks, cigarette
s, and flames away
from the battery because the battery couldexplode. Electrolyte (battery acid) is made of corro- sive diluted sulfuric acid. If it spills on nearby parts, it can crack, stain, or dis- color them. And if it gets on your skin orin your eyes, it can cause burns or blind- ness. Please observe the following han- dling instructions:• If electrolyte gets on plastic parts orother nearby parts, wipe it off with a softcloth or chamois soak
ed in a solution of
water and neutral detergent then imme- diately rinse the affected parts withplenty of water.• If electrolyte gets on your hands orclothes, rinse thoroughly with water. If electrolyte gets in
your eyes, flush them
with water immediately and get immedi-ate medical attention.
Open doors and wind
ows in any closed
space where you may be charging or working with the battery. Always wear protective clothing and gog- gles when working with the battery, or have a skilled automobi
le technician do it.
If you are quick-charging your battery, first disconnect the battery cables. In order to prevent a short-circuit, be sure to disconnect the negative (-) terminal first, and reconnect it last. If the electrolyte level
is very low, have the
battery checked at an
authorized Mitsubi-
shi Motors dealer or
a repair facility of
your choice. Battery posts, termin
als and related acces-
sories contain lead
and lead compounds.
Wash hands after handling.NOTE
Check each battery terminal for corrosion. You can prevent further corrosion by wash-ing with a solution of
baking soda and water.
Grease the posts and cl
amps after cleaning or
tightening them. Ensure the battery is securely installed and cannot be moved. Also
check each terminal
for tightness. If you will not be driv
ing your vehicle for a
long period of time, re
move the battery and
store it in a place where the battery fluid will not freeze. The batter
y only should be stored
with a full charge. Before cleaning the ba
ttery, tighten all the
filler port caps to keep
dirt and moisture out.
WA R N I N G
Tires
WA R N I N GDriving with tires that are worn, damaged or improperly inflated is dangerous.These type tire conditions will adversely affect vehicle performance. These type tire conditions can also cause atread separation or blowout which may result in an accide
nt causing serious
injury or death. Tires, including spar
e tire, degrade over
time with age even when they are notbeing used. It is recommended that tires over 6 years generally be replaced even if damage isnot obvious.
BK0200500US.book 14 ページ 2013年2月12日 火曜日 午前9時46分
Page 399 of 451

Tires
Vehicle care and maintenance 9-15
9
Recommended inflation pressure: the inflation pressure for optimum tire perfor-mance. Intended outboard sidewall: • The sidewall that c
ontains a whitewall,
bears white letteri
ng or bears manufac-
turer, brand, and/or model name molding that is higher or deeper than the samemolding on the other sidewall of the tire, or • The outward facing si
dewall of an asym-
metrical tire that has a particular side that must always face outward whenmounted on a vehicle.
Passenger car tire: a
tire intended for use
on passenger cars, multipurpose passen-ger vehicles, and trucks that have a gross vehicle weight rati
ng (GVWR) of 10,000
pounds or less. Light truck (LT) tire: a tire designated by its manufacturer as primarily intended for use on lightweight truc
ks or multipurpose
passenger vehicles. Tread: portion of a tire that comes into contact with the road. Tread rib: a tread se
ction running circum-
ferentially around a tire. Tread separation: pulling away of the tread from the tire carcass. Carcass: the tire structure, except tread and sidewall rubber which, when inflated,bears the load.
Sidewall: portion of a tire between the tread and bead. Section width: the line
ar distance between
the exteriors of the sidewalls of an inflated tire, excluding elevations due tolabeling, decoration, or protective bands. Bead: the part of the tire that is made of steel wires, wrapped
or reinforced by ply
cords and that is shaped to fit the rim. Ply: a layer of rubber-coated parallel cords. Cord: the strands forming the plies in the tire. Rim: a metal support for a tire or a tire and tube assembly upon which the tire beads are seated. Rim diameter: nominal diameter of the bead seat. Groove: the space between two adjacent tread ribs.
EXAMPLE: P215/65R15Tire Markings Size Designation P
Passenger car tire size based on U.S.A. design standards
215
Section width in millimeters (mm)
65
Aspect ratio in percent (%) Ratio of section height to sec- tion width of tire.
BK0200500US.book 15 ページ 2013年2月12日 火曜日 午前9時46分
Page 402 of 451
Tires 9-18 Vehicle care and maintenance
9
The temperature grades are A (the highest), B and C, representing the tire’s resistance to thegeneration of heat and
its ability to dissipate
heat when tested under controlled conditions on a specified indoor la
boratory test wheel.
Sustained high temper
ature can cause the
material of the tire to
degenerate and reduce
tire life, and excessive temperature can leadto sudden tire failure. The grade C corre- sponds to a level of performance which all passenger car tires must meet under the Fed- eral Motor Vehicle Safety Standard No. 109. Grades B and A represent higher levels ofperformance on the labora
tory test wheel than
the minimum required by law.
N00939300815
Proper tire inflation pres
sure is essential for
the safe and satisfactory operation of your vehicle. The wrong tire
pressure will cause
problems in three major areas: Safety Too little pressure increases flexing in the tire and can cause tire failure. Too muchpressure can cause a tire to lose its ability to cushion shock. Objects on the road and potholes could then cause tire damage thatmay result in tire failure.
Economy The wrong tire pressu
re can cause uneven
wear patterns in the tire tread. These abnormal wear patter
ns will reduce the
tread life, and the tire will have to bereplaced sooner. Too little pressure also
makes it harder for
the tire to roll, and this uses up more fuel. Ride comfort and vehicle stability The superior riding e
xperience built into
your vehicle partly depends on the correct tire pressure. Too much pressure gives an uncomfortable and ja
rring ride. Too little
pressure feels as if
your vehicle is slow to
respond. Unequal tire pressure
s can make steering
your vehicle uneven and unpredictable.
The tire pressure for your vehicle under nor- mal driving conditions is listed on the placard attached to the driver’s door sill.(Refer to “Tire and loading information plac- ard” on page 11-3.) The recommended infl
ation pressures under
normal driving conditions should be used for the tires listed below.
Tire pressures should be checked, and adjusted if necessary, at least once a month.Pressures should be checked more often whenever weather temperatures change severely, becaus
e tire pressures change with
outdoor temperatures. The pressures listed are always “cold in
flation pressure”.
Cold inflation pressure is measured after thevehicle has been parked
for at least three
hours or is driven less than 1 mile (1.6 km) after having been parked for three hours. Cold inflation pressure must not go above the maximum values molded into the tire side-wall. After driving seve
ral miles, your tire
inflation pressure may increase 2 to 6 psi (14 to 41 kPa) from the cold inflation pressure.Do not let air out of the tires to get back to the specified cold pressure, or your tires will be too low.Check your tires each time you refuel. If one tire looks lower than the others, check the pressure for all of them.You should also take the following safety pre- cautions:
TemperatureTire inflation pressures
Item
Tire size
Front
Rear
Normal tire
P215/70R16 P225/55R18
240 KPA, 35 PSI
240 KPA, 35 PSI
Compact spare wheel
T155/90D16
420 KPA, 60
PSI
Item
Tire size
Front
Rear
BK0200500US.book 18 ページ 2013年2月12日 火曜日 午前9時46分
Page 403 of 451
Tires
Vehicle care and maintenance 9-19
9
Keep your tires inflated to the recom- mended pressures. (See the tire and load-ing information placard attached to the driver’s door sill.) Stay within the recommended load limits. Make sure that the weight of any load in your vehicle is evenly distributed. Drive at safe speeds. After filling your tires to the correct pres- sure, check them for damage and air leaks. Be sure to reinstall the caps on the valve stems.
N00939600241
N00939700141
The following maintenance steps are recom- mended: Check tire pressures regularly. Have regular maintenance done on the wheel balance and front
and rear suspen-
sion alignment. Rotate your tires regularly as described in the “Tire rotation” se
ction on page 9-20.
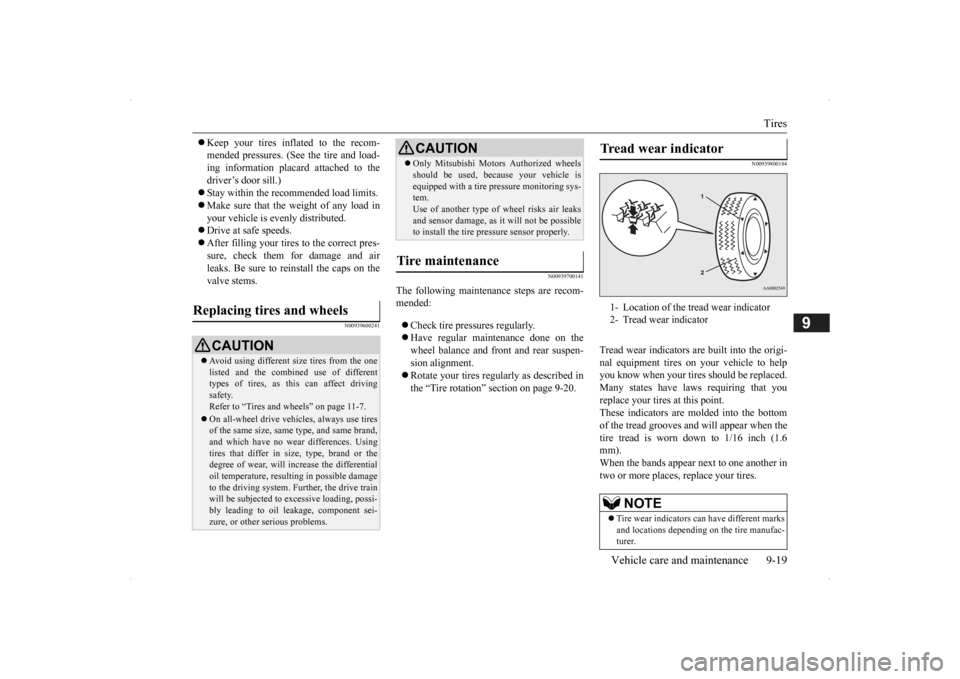
N00939800184
Tread wear indicators ar
e built into the origi-
nal equipment tires on
your vehicle to help
you know when your tires should be replaced. Many states have la
ws requiring that you
replace your tires at this point.These indicators are molded into the bottom of the tread grooves and will appear when the tire tread is worn down to 1/16 inch (1.6mm). When the bands appear next to one another in two or more places
, replace your tires.
Replacing tires and wheels
CAUTIONAvoid using different size tires from the one listed and the combined use of different types of tires, as this can affect driving safety.Refer to “Tires and wheels” on page 11-7. On all-wheel drive vehi
cles, always use tires
of the same size, same
type, and same brand,
and which have no wear differences. Using tires that differ in si
ze, type, brand or the
degree of wear, will increase the differential oil temperature, resulting in possible damage to the driving system. Further, the drive trainwill be subjected to ex
cessive loading, possi-
bly leading to oil leakage, component sei- zure, or other serious problems.
Only Mitsubishi Motors Authorized wheels should be used, beca
use your vehicle is
equipped with a tire pr
essure monitoring sys-
tem. Use of another type of
wheel risks air leaks
and sensor damage, as
it will not be possible
to install the tire pressure sensor properly.
Tire maintenance
CAUTION
Tread wear indicator 1- Location of the tread wear indicator 2- Tread wear indicator
NOTE
Tire wear indicators ca
n have different marks
and locations dependi
ng on the tire manufac-
turer.
BK0200500US.book 19 ページ 2013年2月12日 火曜日 午前9時46分
Page 430 of 451

Consumer information (For vehicles sold in U.S.A.) 10-2 Customer assistance/Re
porting Safety Defects
10
N01047100171
This information is provided in compliance with the requirements of the National High- way Traffic Safety Ad
ministration, Depart-
ment of Transportation. It provides the purchasers and/or prospective purchasers with information on repor
ting safety defects.
DOT quality grades - Al
l passenger vehicle
tires must conform to
Federal Safety Require-
ments in addition to these grades. The spe- cific grade rating in each grade category isshown on the side wall of the tires on your vehicle. The treadwear grade is a comparative rating based on the wear rate of
the tire when tested
under controlled conditions on a specifiedgovernment test course
. For example, a tire
graded 150 would wear one and one-half (11/2) times as well on the government course
as a tire graded 100.
The relative performance
of tires depends upon the actual conditions of
their use, however, and may depart signifi- cantly from the norm due to variations indriving habits, service practices and differ- ences in road characteristics and climate. The traction grades, from highest to lowest, are AA, A, B and C. Those grades represent the tire’s ability to
stop on wet pavement as
measured under controlled conditions on specified government te
st surfaces of asphalt
and concrete. A tire marked C may have poor traction performance. The temperature grades are A (the highest), B and C, representing the ti
re’s resistance to the
generation of heat and it
s ability to dissipate
heat when tested un
der controlled conditions
on a specified indoor
laboratory test wheel.
Sustained high temperature can cause the
material of the tire to
degenerate and reduce
tire life, and excessive temperature can leadto sudden tire failure. The grade C corre- sponds to a level of performance which all passenger car tires must meet under the Fed-eral Motor Vehicle Safety Standard No. 109. Grades B and A represent higher levels of performance on the labora
tory test wheel than
the minimum required by law.
N01047201498
If you believe that your vehicle has a defect which could cause a crash or could cause injury or death, you should immediately inform theNational Highway Traffic Safety Administration (NHTSA) in addi- tion to notifying Mitsubishi MotorsCorporation.
Consumer information (For vehicles sold in U.S.A.) Uniform tire quality grading Treadwear
Traction AA, A, B, C
WA R N I N G The traction grade assi
gned to this tire is
based on straight-ahead braking tractiontests, and does not include acceleration, cornering, hydroplani
ng, or peak traction
characteristics.
Temperature A, B, C
WA R N I N G The temperature grade for this tire is established for a tire that is properlyinflated and not overloaded. Excessive speed, underinflation
, or excessive load-
ing, either separately
or in combination,
can cause heat buildup and possible tire failure.
Reporting Safety Defects
BK0200500US.book 2 ページ 2013年2月12日 火曜日 午前9時46分
Page 446 of 451
Alphabetical index 12-4
12
Multi information display - Type 1
.....
5-121
Multi information display - Type 2
.....
5-140
O
Octane rating
........................................
3-2
Oil
Engine oil
......................................
11-7
Rear axle oil
...................................
11-7
Transfer oil
....................................
11-7
Operation under adverse driving conditions
...
8-16 Outside rearview mirrors
.....................
5-55
Overheating
.........................................
8-4
P
Parking
................................................
6-6
Parking brake
.................................
5-52
Parking lights
Bulb capacity
.................................
9-30
Replacement
..................................
9-35
Polishing
............................................
9-42
Power brakes
......................................
5-85
Power liftgate
.....................................
5-37
Power outlet
.....................................
5-211
Power windows
..................................
5-48
Puncture (Tire changing)
.......................
8-6
R
Radiator cap
........................................
9-9
Radio
.................................................
7-15
General information
about your radio 7-48
Reading lights
Bulb capacity
..................................
9-32
Rear axle oil
..............................
9-12
, 11-7
Rear combination lights
Bulb capacity
..................................
9-30
Replacement
...................................
9-37
Rear side-marker lights
Bulb capacity
..................................
9-30
Rear turn signal light
Bulb capacity
..................................
9-30
Replacement
...................................
9-37
Rear-view camera
.............................
5-118
Rearview mirror
Inside rearview mirror
.....................
5-54
Outside rearview mirrors
.................
5-55
Replacement of light bulbs
...................
9-29
Replacing tires and wheels
...................
9-19
Reporting Safety Defects
.....................
10-2
Roof antenna
......................................
7-47
S
Safe driving techniques
.........................
6-4
S-AWC (Super-All Wheel Control)
......
5-78
Seat belt
.............................................
4-17
Adjustable seat belt shoulder anchor
.4-23
Child restraint systems
....................
4-25
Front passenger seat belt warning light
.....
4-22Maintenance and inspection
.............
4-33
Seat belt extender
...........................
4-24
Seat belt force limitter
.....................
4-25
Seat belt pr
e-tensioners
...................
4-24
Seat belt use
during pregnancy
.........
4-24
Seats
....................................................
4-2
Arm rest
..........................................
4-9
Front seats
.......................................
4-4
Head restraints
...............................
4-10
Heated seat
......................................
4-7
Making a cargo area
........................
4-12
Making a flat seat
...........................
4-16
Seat arrangement
..............................
4-3
Seats and restraint systems
................
4-4
Second row seats
..............................
4-8
Third row seats
...............................
4-10
Service brake
......................................
5-84
Service precautions
...............................
9-2
Side turn-signal light
Bulb capacity
.................................
9-30
Snow tires
..........................................
9-20
Spark plugs
........................................
9-22
Starting the engine
.....................
5-23
, 5-58
Steering
Steering wheel height and reach adjustment
BK0200500US.book 4 ページ 2013年2月12日 火曜日 午前9時46分
Page 447 of 451
Alphabetical index
12-5
12
5-53 Wheel lock
............................
5-22
, 5-58
Stop lights
Bulb capacity
.................................
9-30
Replacement
..................................
9-37
Storage spaces
..................................
5-215
Sun visors
........................................
5-210
Sunroof
..............................................
5-50
Super-all wheel control (S-AWC)
S-AWC control mode display
..........
5-79
S-AWC control mode switch
...........
5-79
S-AWC operation display
................
5-80
Supplemental Re
straint System
............
4-33
How the Supplemental Restraint System works
..........................................
4-36
Maintenance service
........................
4-48
T
Tail light
Bulb capacity
.................................
9-30
Replacement
..................................
9-37
Tank capacity
.....................................
11-7
Theft-alarm system
.............................
5-44
Time Setting
.......................................
7-44
Timing belt
........................................
9-24
Tire
...................................................
9-14
Inflation pressure
............................
9-18
Maintenance
...................................
9-19
Quality grading
...............................
10-2
Replacing tires and wheels
..............
9-19
Rotation
........................................
9-20
Size (tire and wheel)
.......................
11-7
Snow tires
.....................................
9-20
Tire and loading information placard 11-3Tire chains
.....................................
9-21
To change a tire
................................
8-6
Tread wear indicator
.......................
9-19
Tire pressure monitoring system
.........
5-114
Tools
...................................................
8-6
Storage
............................................
8-5
Towing
..............................................
8-14
Trailer towing
....................................
6-11
Transfer oil
................................
9-11
, 11-7
Turn signal light
Indicators
.....................................
5-166
Lever
...........................................
5-176
U
USB input terminal
............................
5-207
How to connect a USB memory device
....
5-207 How to connect an iPod
.................
5-208
V
Vanity mirror
....................................
5-210
Vanity mirror lights
Bulb capacity
.................................
9-32
Vehicle care precautions
.....................
9-39
Vehicle dimensions
.............................
11-4
Vehicle labeling
..................................
11-2
Vehicle preparation before driving
..........
6-4
Vehicle weights
..................................
11-5
Vents
...................................................
7-2
W
Warning lights
..................................
5-167
Washer
Fluid
.....................................
9-12
, 11-7
Rear window washer
.....................
5-183
Switch
.........................................
5-182
Washing
.............................................
9-41
Waxing
..............................................
9-42
Weights
.............................................
11-5
Wheel
Covers
...........................................
8-13
Specification
..................................
11-7
Wiper
Rear window wiper
.......................
5-183
Switch
.........................................
5-179
Wiper blades
..................................
9-21
BK0200500US.book 5 ページ 2013年2月12日 火曜日 午前9時46分