wheel NISSAN ALMERA N15 1995 Owner's Manual
[x] Cancel search | Manufacturer: NISSAN, Model Year: 1995, Model line: ALMERA N15, Model: NISSAN ALMERA N15 1995Pages: 1701, PDF Size: 82.27 MB
Page 293 of 1701

Pistonbootretainer (AD22VF only)
Piston boot
Piston seal
FRONT
DISCBRAKE
Inspection -Caliper (Cont'd)
PISTON
Check pistonforscore, rust,wear, damage orpresence offor-
eign objects. Replace ifany ofthe above conditions are
observed.
CAUTION:
Piston sliding surface isplated. Donot polish withemery paper
even ifrust orforeign objects arestuck tosliding surface.
SLIDE PIN,PINBOLT ANDPINBOOT
Check forwear, cracks, rustorother damage. Replaceifany of
the above conditions areobserved.
Inspection -Rotor
RUNOUT
1: Secure rotortowheel hubwith atleast twonuts (M12 x
1.25).
2. Check runout usingadial indicator.
Make surethatwheel bearing axialendplay iswithin thespec-
ifications beforemeasuring. RefertoFA section ("FrontWheel
Bearing", "ON-VEHICLE SERVICE").
Maximum runout:
SBR936A 0.07mm(0.0028 in)
3.
If
the runout isout ofspecification, findminimum runout
position asfollows:
a. Remove nutsandrotor fromwheel hub.
b. Shift therotor onehole andsecure rotortowheel hub
with nuts.
c. Measure runout.
d. Repeat stepsa.to c.so that minimum runoutposition can
be found.
4. Ifthe runout isstill outofspecification, turnrotor withon-car
brake lathe("MAD, DL-8700", "AMMCO700and 705" or•••
equivalent).
THICKNESS Thickness variation(Atleast 8positions):
Maximum 0.02mm(0.0008 in)
If thickness variationexceedsthespecification, turnrotor with
on-car brakelathe.
Rotor repair limit:
CL22VD andCL22VE 16.0mm(0.630 in)
CL22VF 24.0mm(0.945 in)
SBR944A Assembly
1. With piston bootfitted topiston, insertpiston bootinto
groove oncylinder bodyandinstall piston.
2. Properly securepistonboot.
3. Secure pistonbootwithretainer.
(AD22VF modelonly)
Piston
SBR777B BR-23
Page 295 of 1701

SEC.441
REAR
DRUM BRAKE
Front
m,W.
Rubber greasePOint
• .Brake grease point
~ :N.m (kg-m, f1-lb)
/il.
N.m(kg-m, in-Ib)
SBR772BC
Cl)
Wheel
cylinder assembly
(J)
Return spring
@
Shoe hold-down spring
@
Boot
@
Adjuster
@
Toggle lever
@
Piston
@
Shoe
@
Washer
@
Piston cup
@)
Adjuster lever
@
Retainer ring
@
Cylinder body
@
Adjuster spring
@
Shoe hold-down pin
@
Spring
@
Retainer
@
Plug
Removal
WARNING:
Clean brakeliningwithavacuum dustcollector tominimize the
hazard ofairborne particles orother materials.
CAUTION: Make sureparking brakeleverisreleased completely.
BR-25
•
Page 296 of 1701

Bolts
(M8
x
1.25) Wheel
cylinder
Adjuster
SBR280B
SBR020A REAR
DRUM BRAKE
Removal (Cont'd)
1. Release parkingbrakeleverfully,thenremove drum.
If drum ishard toremove, thefollowing procedures shouldbe
carried out.
a. Remove plug.Thenshorten adjuster tomake clearance
between brakeshoeanddrum asshown.
b. Tighten thetwo bolts gradually.
SBR785BA
2.
After removing retainer,removespringbyrotating shoes.
• Becareful nottodamage wheelcylinder pistonboots.
• Becareful nottodamage parkingbrakecablewhensepa-
rating it.
3. Remove adjuster.
4. Disconnect parkingbrakecablefromtoggle lever.
5. Remove retainerringwith asuitable tool.Then separate
toggle leverandbrake shoe.
Inspection -Wheel Cylinder
• Check wheelcylinder forleakage.
• Check forwear, damage andloose conditions.
Replace ifany such condition exists.
BR-26
Page 297 of 1701

SBR215BREAR
DRUM BRAKE
Wheel Cylinder Overhaul
• Check allinternal partsforwear, rustanddamage. Replace
if necessary.
• Pay attention soasnot toscratch cylinder wheninstalling
pistons.
SBR022A Inspection
-Drum
Maximum innerdiameter:
181 mm (7.13 in)
Out-of-roundness: 0.03 mm(0.0012 in)orless
• Contact surfaceshouldbefine finished withNo.120to150
emery paper.
• Using adrum lathe, lathebrake drumifitshows scoring,
partial wearorstepped wear.
• After brake drumhasbeen completely reconditioned or
replaced, checkdrumandshoes forproper contact pattern.
•
A
SBR021AInspection
-Lining
Check liningthickness.
Standard liningthickness:
4.0 mm (0.157 in)
Lining wearlimit(A):
1.5 mm (0.059 in)
Installation
Always perform shoeclearance adjustment. Referto
"Adjustment" in"PARKING BRAKECONTROL", BR.37.
1. Fittoggle levertobrake shoewithretainer ring.
BR-27
Page 298 of 1701

SBR216B
~ ~Vohi'" 'COol
DepreSSi~~
"
~
/
SBR217B
SBR279B
REAR
DRUM BRAKE
Installation (Cont'd)
2. Apply brake grease tothe contact areasshown atleft.
3. Shorten adjuster byrotating it.
• Pay attention todirection ofadjuster.
Wheel Screw Depression
Left Left-handthread
Yes
Right Right-handthread No
4. Connect parkingbrakecabletotoggle
lever.
5. Install allparts.
Be careful nottodamage wheelcylinder pistonboots.
6. Check allparts areinstalled properly.
Pay attention todirection ofadjuster assembly.
7. Install brakedrum.
8. When installing newwheel cylinder oroverhauling wheel
cylinder, bleedair.Refer to"Bleeding procedure", BR-6.
9. Adjust parking brake.RefertoBR-37.
BR-28
Page 303 of 1701
SBR847
SBR247B REAR
DISCBRAKE
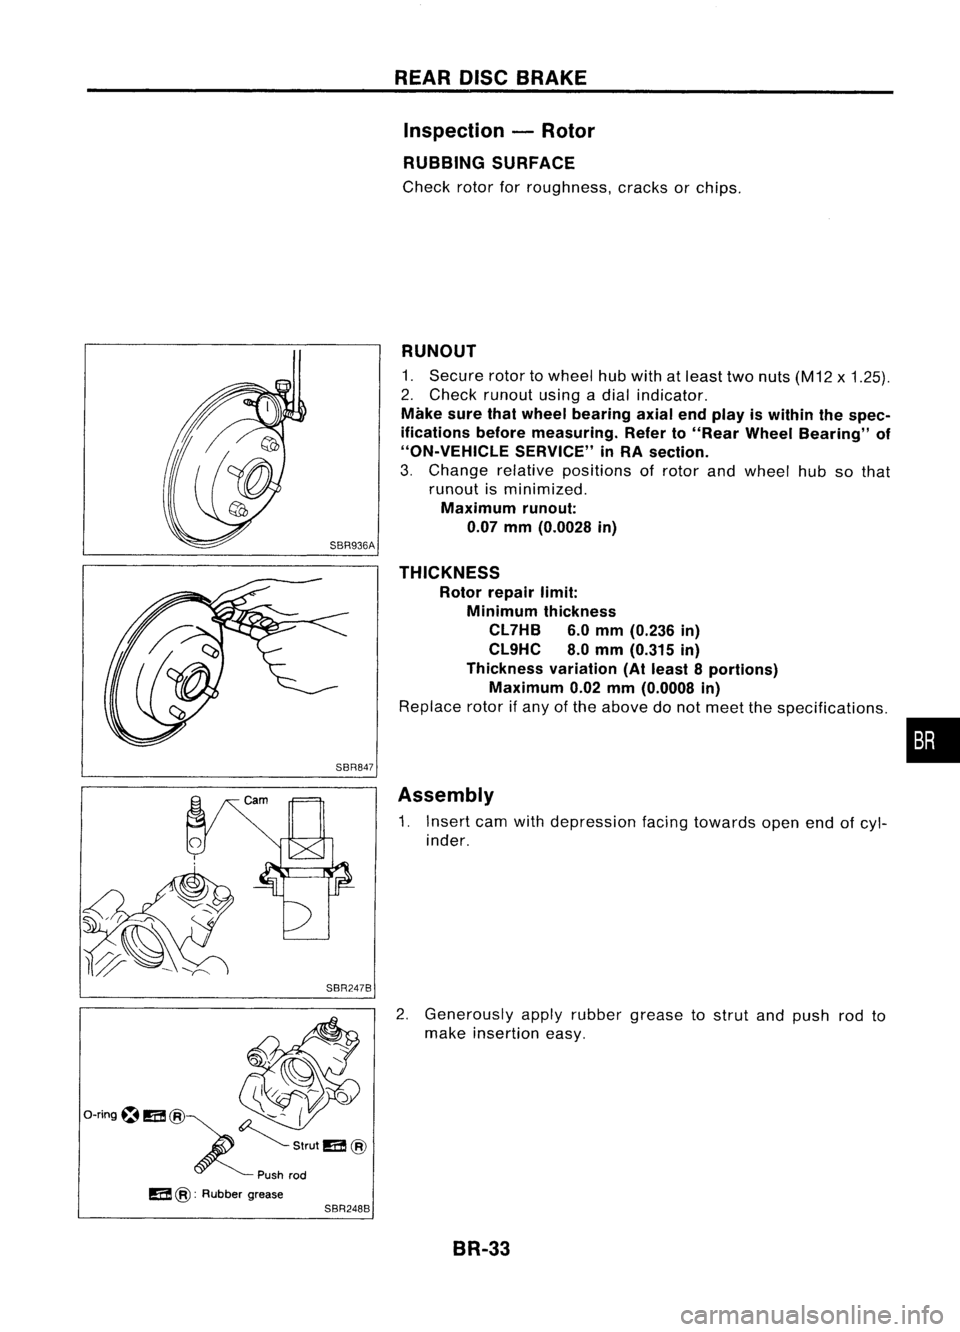
Inspection -Rotor
RUBBING SURFACE
Check rotorforroughness, cracksorchips.
RUNOUT
1. Secure rotortowheel hubwith atleast twonuts (M12 x1.25).
2. Check runout usingadial indicator.
Make surethatwheel bearing axialendplay iswithin thespec-
ifications beforemeasuring. Referto"Rear Wheel Bearing" of
"ON-VEHICLE SERVICE"inRA section.
3. Change relativepositions ofrotor andwheel hubsothat
runout isminimized.
Maximum runout:
0.07 mm(0.0028 in)
THICKNESS Rotor repair limit:
Minimum thickness
CL7HB 6.0mm (0.236 in)
CL9HC 8.0mm (0.315 in)
Thickness variation(Atleast 8portions)
Maximum 0.02mm(0.0008 in)
Replace rotorifany ofthe above donot meet thespecifications .
Assembly
1. Insert camwithdepression facingtowards openendofcyl-
inder.
2. Generously applyrubber grease tostrut andpush rodto
make insertion easy.
BR-33
•
Page 308 of 1701
ANTI-LOCKBRAKESYSTEM
Purpose
The Anti-Lock BrakeSystem (ABS)consists ofelectronic andhydraulic components. Itallows forcon-
trol ofbraking forcesothat locking ofthe wheels canbeavoided.
The ABS:
1) Improves propertracking performance throughsteering wheeloperation.
2) Eases obstacles tobe avoided throughsteering wheeloperation.
3) Improves vehiclestability bypreventing flatspins.
Operation
• When thevehicle speedisless than 10km/h (6MPH) thissystem doesnotwork.
• The Anti-Lock BrakeSystem (ABS)hasself-test capabilities. Thesystem turnsonthe ABS warning
light for1second afterturning theignition switchON.The system performs anothertestthefirst time
the vehicle reaches 6km/h (4MPH). Amechanical noisemaybeheard asthe ABS performs aself-
test. This isanormal partofthe self-test feature.Ifa malfunction isfound during thischeck, theABS
warning lightwillcome on.
• During ABSoperation, amechanical noisemaybeheard. Thisisanormal condition.
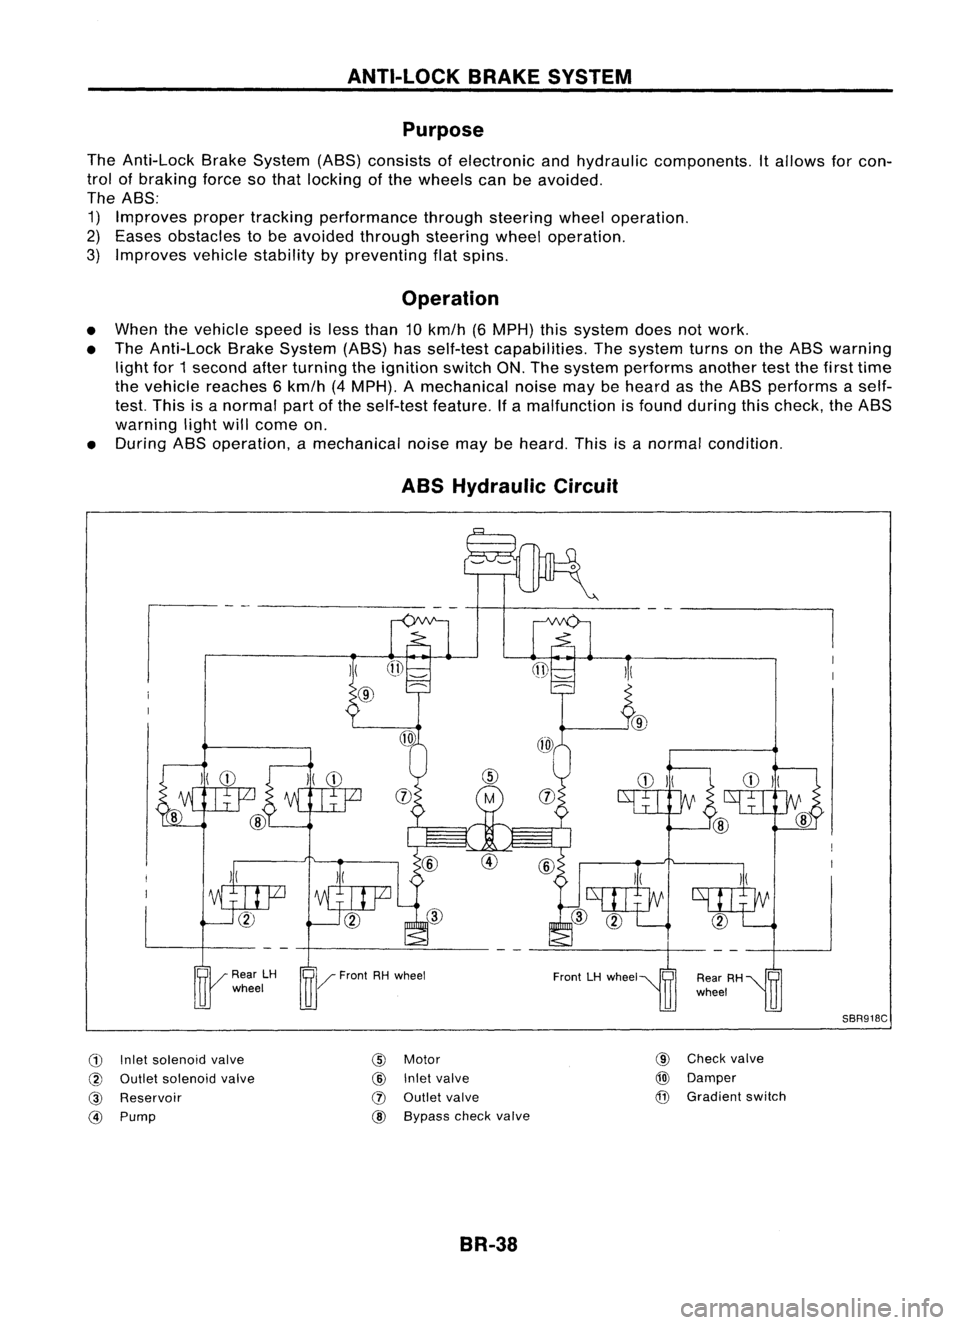
ABS Hydraulic Circuit
G)
Inletsolenoid valve
@
Outlet solenoid valve
@
Reservoir
@)
Pump
)(
@
@
Motor
@
Inletvalve
(J)
Outlet valve
@ Bypass checkvalve
BR-38 @
Check valve
@)
Damper
@
Gradient switch
SBR918C
Page 309 of 1701

ANTI-LOCKBRAKESYSTEM
System Components
Dual proportioning
valve
Rearwheel sensors
For LHD models, controlunit
is located onthe opposite side.
SBR048DB
Control unit
s::';o~'~W.
r
I .I
Tooth~ Sensorrotor
/ ~m~f onetooth
v:~-- System
Description
SENSOR
The sensor unitconsists ofagear-shaped sensorrotoranda
sensor element. Theelement contains abar magnet around
which acoil iswound. Thesensor isinstalled onthe back side
of the brake rotor.Sine-wave currentisgenerated bythe sen-
sor asthe wheel rotates. Thefrequency andvoltage increase(s) •
as the rotating speedincreases. :•
V: Induced electromotive force
SBR124B
SBR049DA CONTROL
UNIT
The control unitcomputes thewheel rotating speedbythe sig-
nal current sentfrom thesensor. Thenitsupplies aDC current
to the actuator solenoid valve.Italso controls ON-OFFopera-
tion ofthe valve relayandmotor relay.Ifany electrical malfunc-
tion should bedetected inthe system, thecontrol unitcauses
the warning lamptolight up.Inthis condition, theASS willbe
deactivated bythe control unit,andthevehicle's brakesystem
reverts tonormal operation.
BR-39
Page 310 of 1701
ANTI-LOCKBRAKESYSTEM
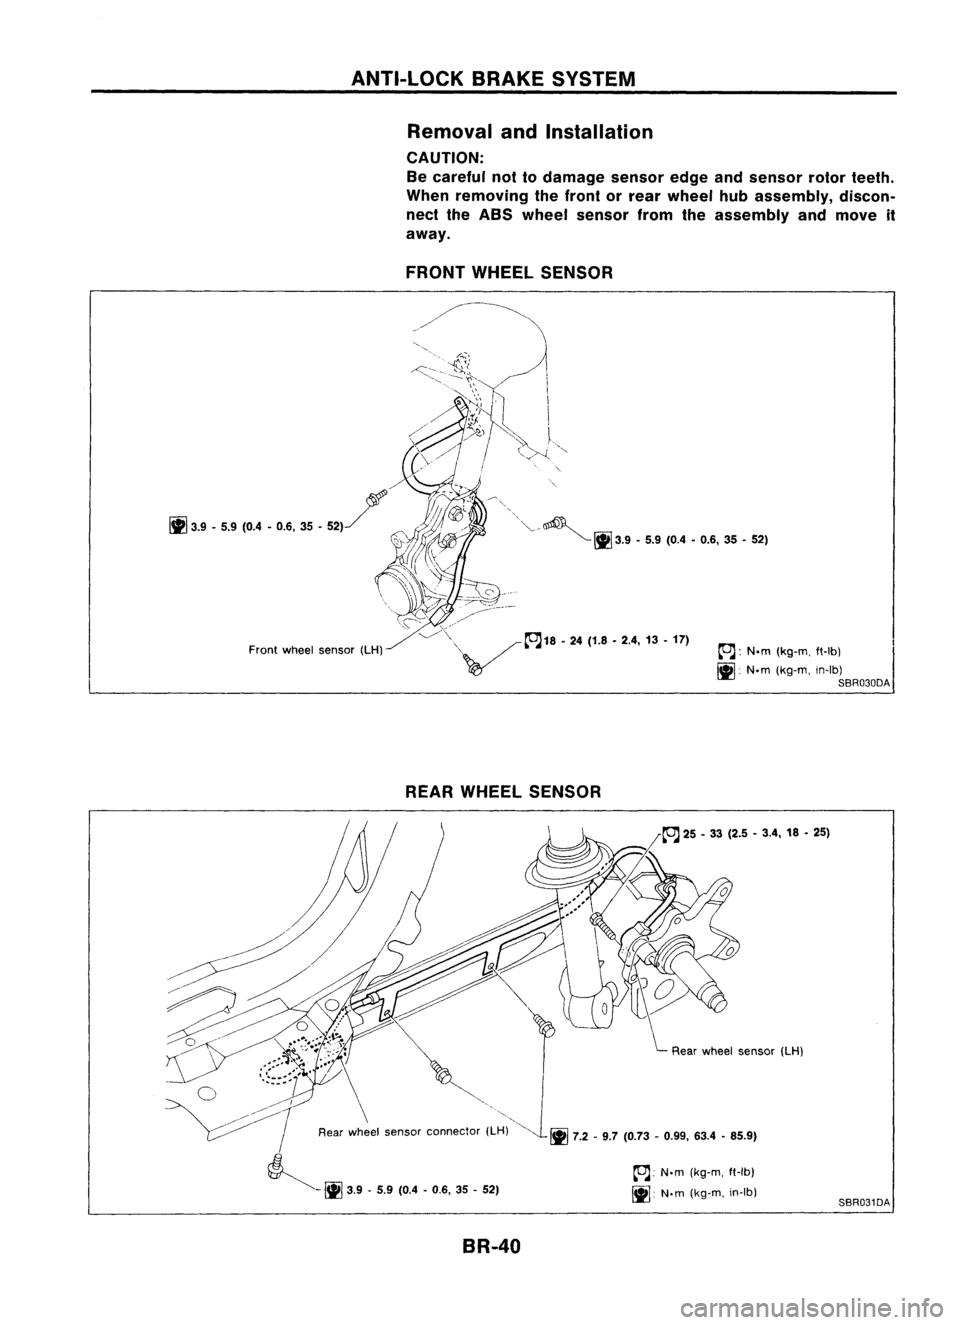
Removal andInstallation
CAUTION: Be careful nottodamage sensoredgeandsensor rotorteeth.
When removing thefront orrear wheel hubassembly, discon-
nect theABS wheel sensor fromtheassembly andmove it
away.
FRONT WHEEL SENSOR
Front wheel sensor (LH) ~!Ii
3.9-5.9 (0.4 -0.6, 35-52)
~: Nom (kg-m, ft-lb)
~: Nom(kg-m, in-Ib)
SBR030DA
REAR WHEEL SENSOR
BR-40
\
L
Rear wheel sensor (LH)
~: Nom (kg-m, ft-Ib)
~: Nom(kg-m, in-Ib)
SBR031DA
Page 311 of 1701
ANTI-LOCKBRAKESYSTEM
Removal andInstallation (Cont'd)
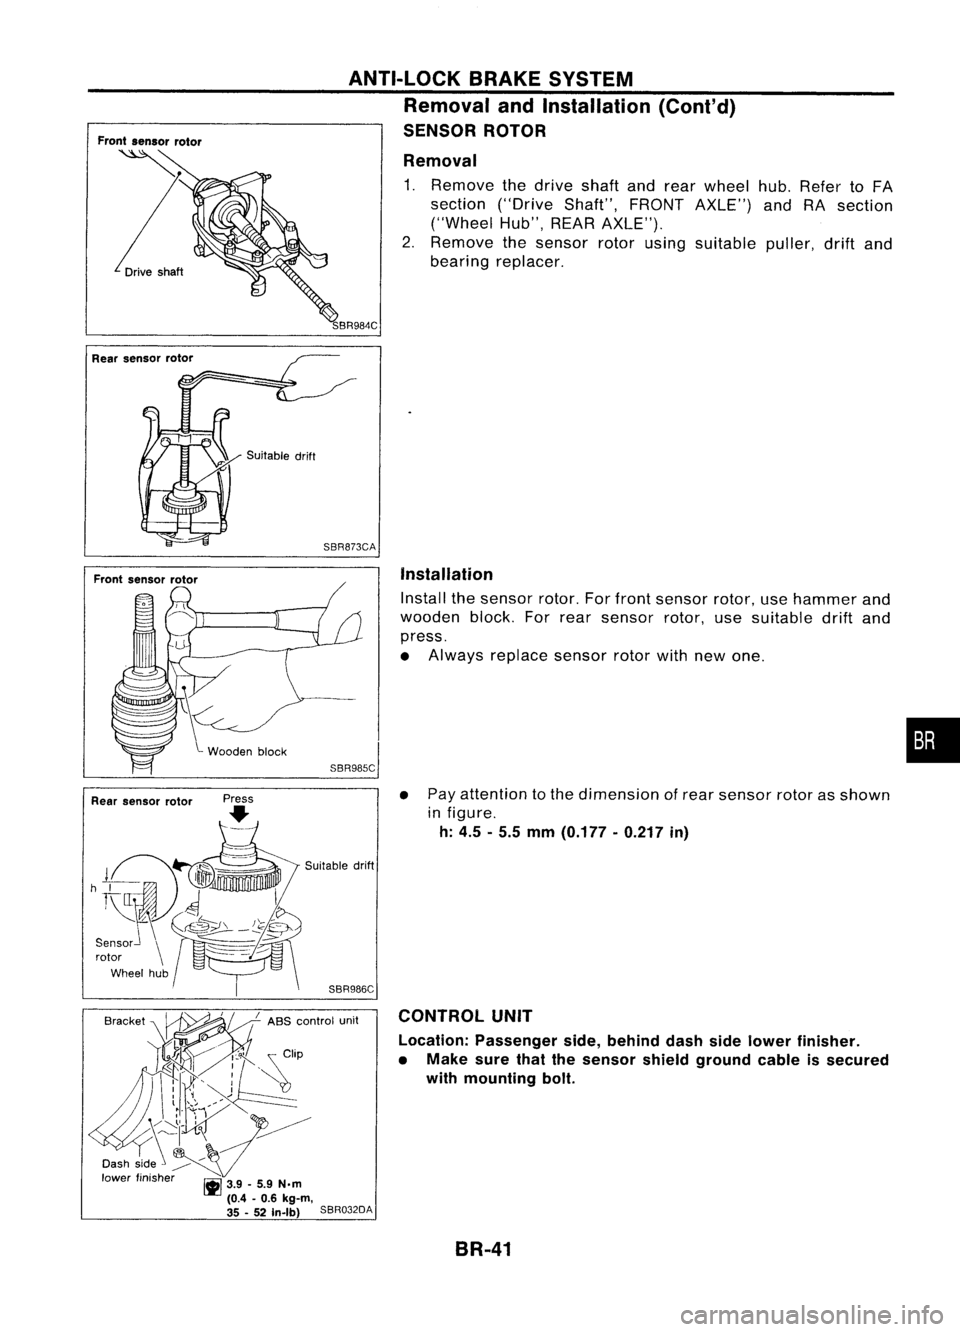
SENSOR ROTOR
Removal
1. Remove thedrive shaftandrear wheel hub.Refer toFA
section ("DriveShaft",FRONTAXLE") andRAsection
("Wheel Hub",REARAXLE").
2. Remove thesensor rotorusing suitable puller,driftand
bearing replacer.
Suitable drift
SBR873CA
Installation
Install thesensor rotor.Forfront sensor rotor,usehammer and
wooden block.Forrear sensor rotor,usesuitable driftand
press.
• Always replace sensorrotorwithnewone.
SBR985C
•
• Pay attention tothe dimension ofrear sensor rotorasshown
in figure.
h: 4.5 -5.5 mm (0.177 -0.217 in)
CONTROL UNIT
Location: Passenger side,behind dashsidelower finisher.
• Make surethatthesensor shieldground cableissecured
with mounting bolt.
SBR986C
Suitable
drift
B,.,k" ~ ABS
.'0"'" ","
Dash side ~
lower finisher ~3.9_5.9 N.m
(0.4 -0.6 kg-m,
35 -52 In-Ib)
SBR032DA
Rear
sensor rotor
BR-41