NISSAN ALMERA TINO 2001 Service Repair Manual
ALMERA TINO 2001
NISSAN
NISSAN
https://www.carmanualsonline.info/img/5/57352/w960_57352-0.png
NISSAN ALMERA TINO 2001 Service Repair Manual
Trending: spare wheel, manual transmission, hood release, load capacity, maintenance schedule, diagram, keyless entry
Page 1821 of 3051
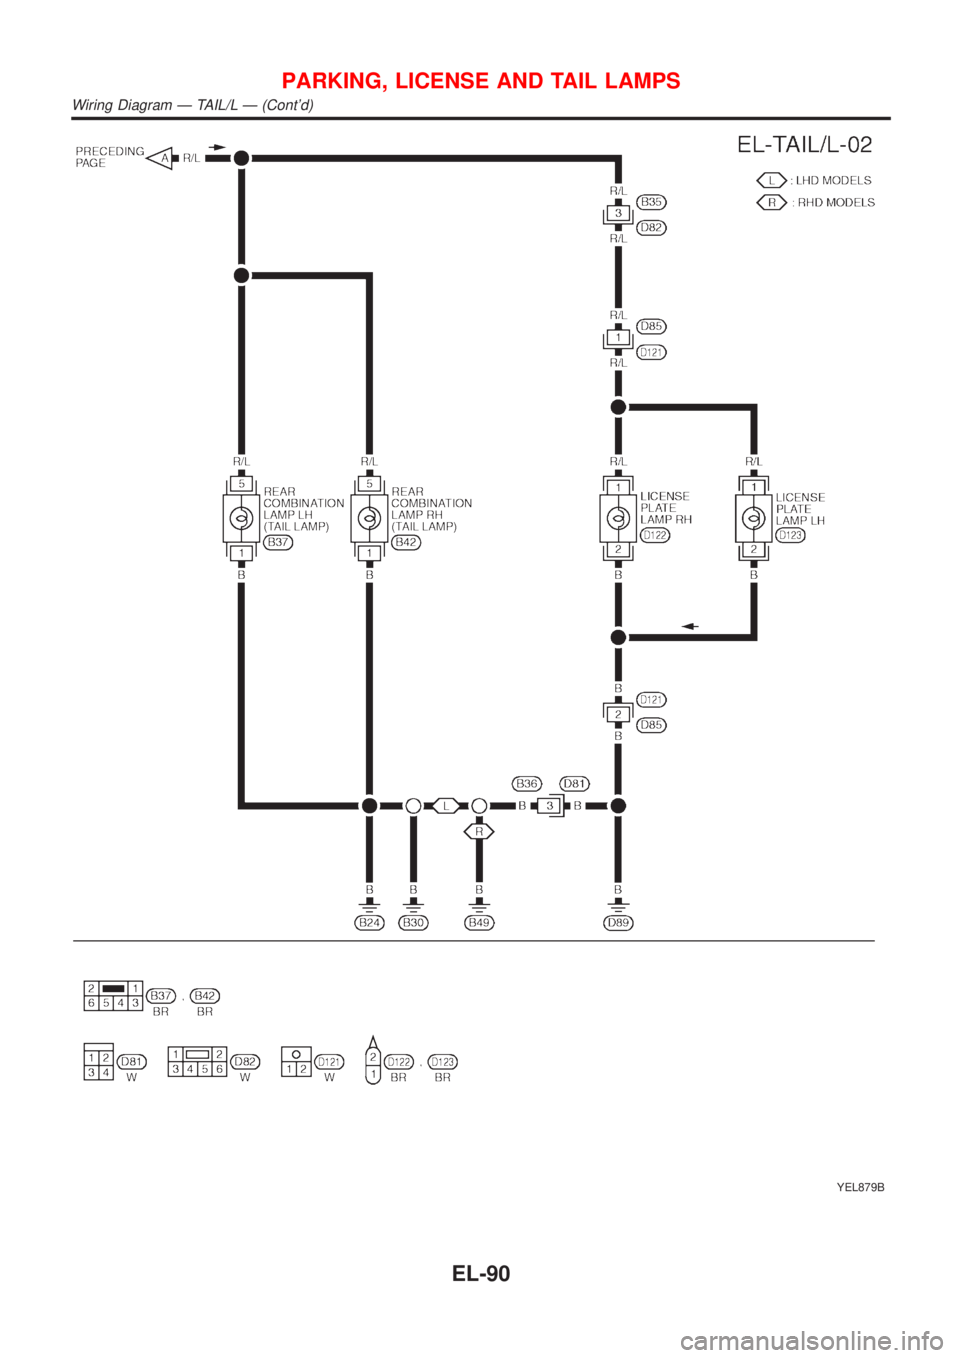
YEL879B
PARKING, LICENSE AND TAIL LAMPS
Wiring Diagram Ð TAIL/L Ð (Cont'd)
EL-90
Page 1822 of 3051
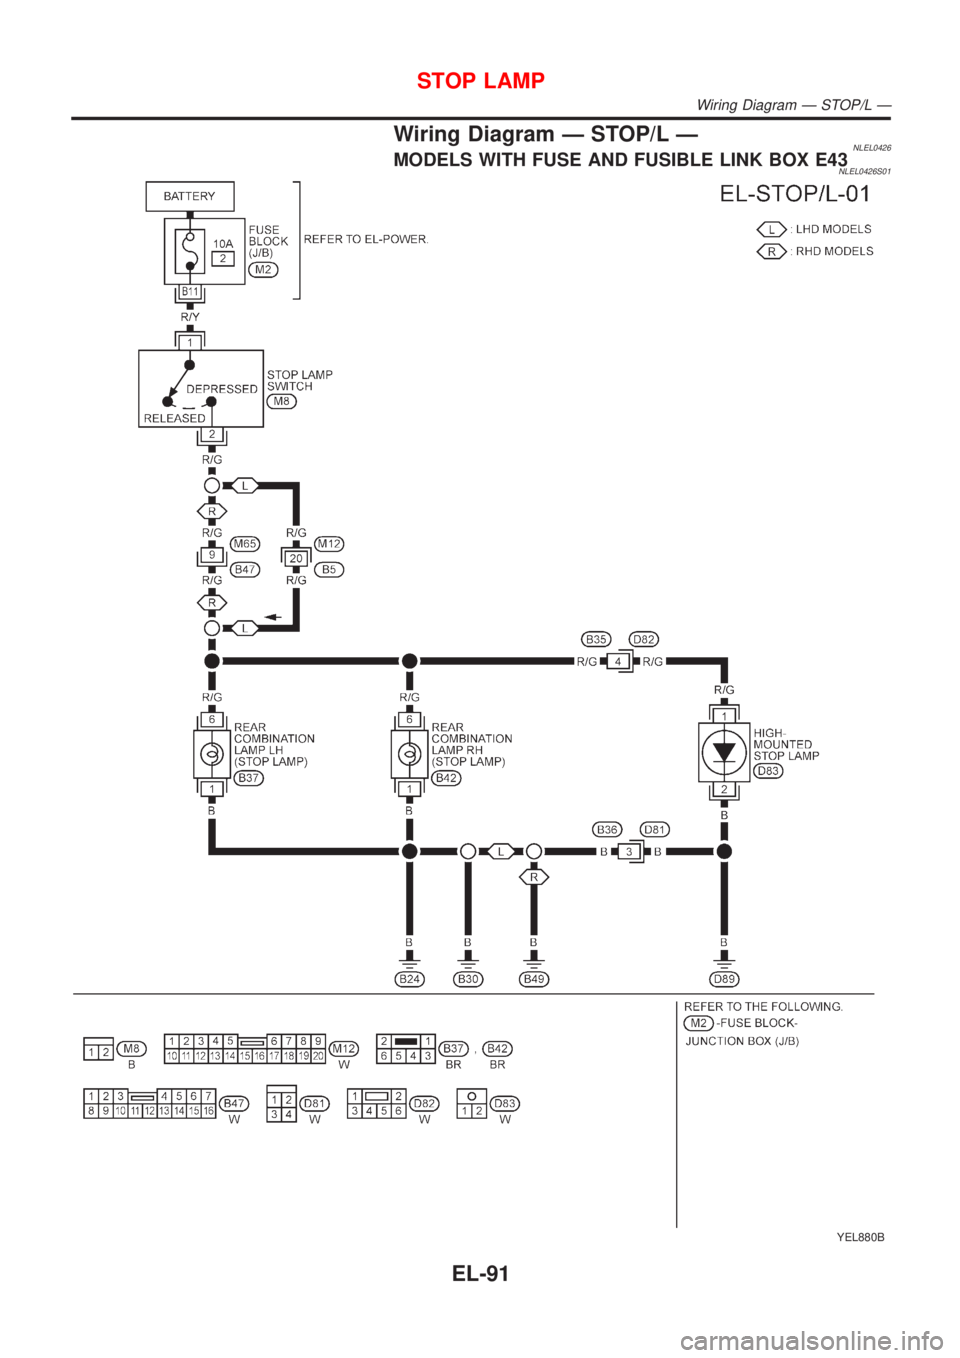
Wiring Diagram Ð STOP/L ÐNLEL0426MODELS WITH FUSE AND FUSIBLE LINK BOX E43NLEL0426S01
YEL880B
STOP LAMP
Wiring Diagram Ð STOP/L Ð
EL-91
Page 1823 of 3051
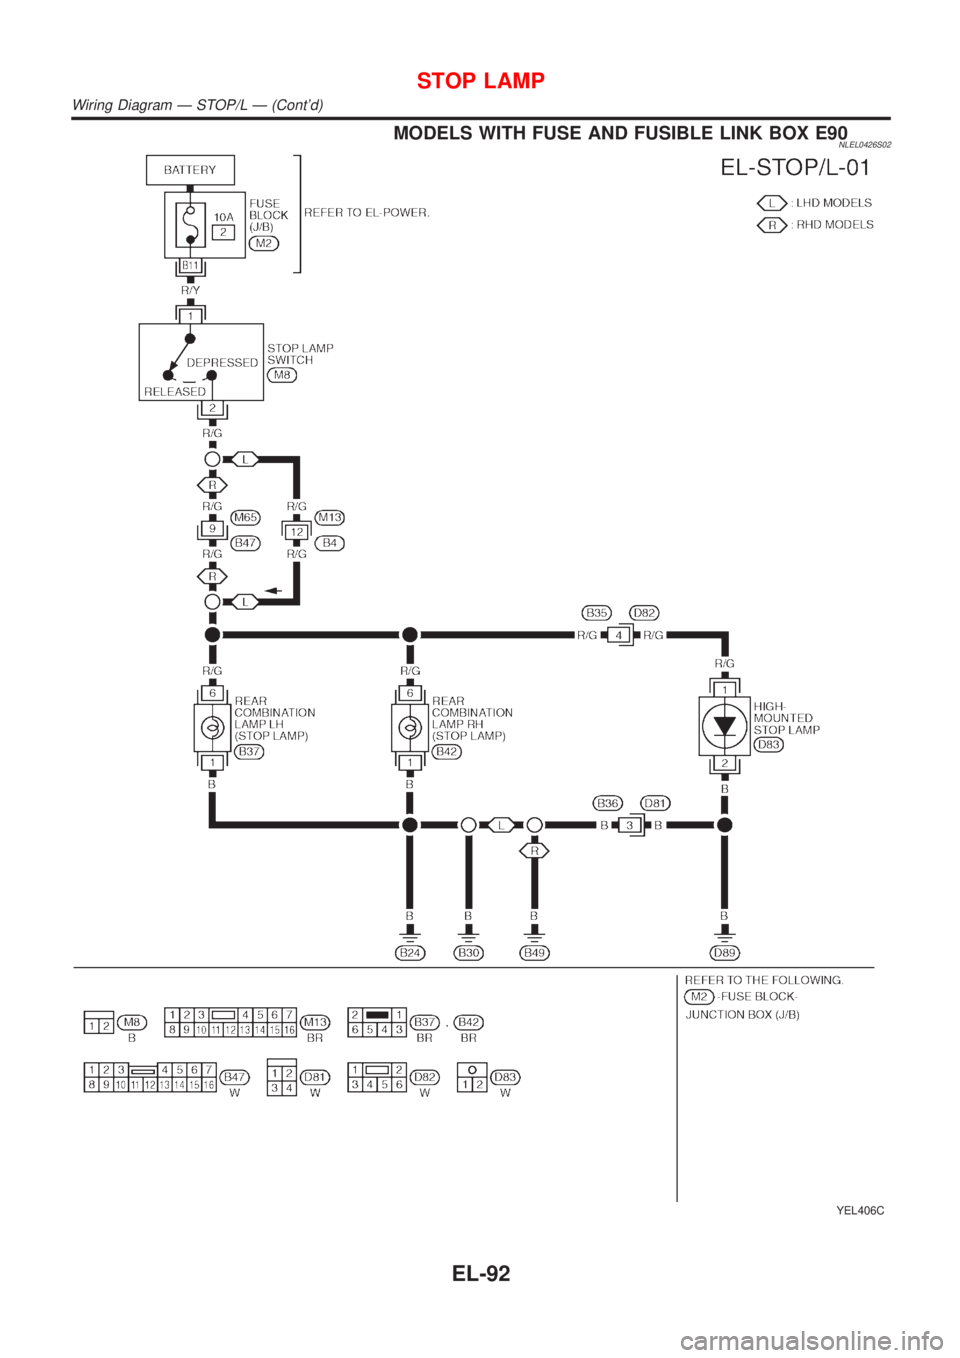
MODELS WITH FUSE AND FUSIBLE LINK BOX E90NLEL0426S02
YEL406C
STOP LAMP
Wiring Diagram Ð STOP/L Ð (Cont'd)
EL-92
Page 1824 of 3051
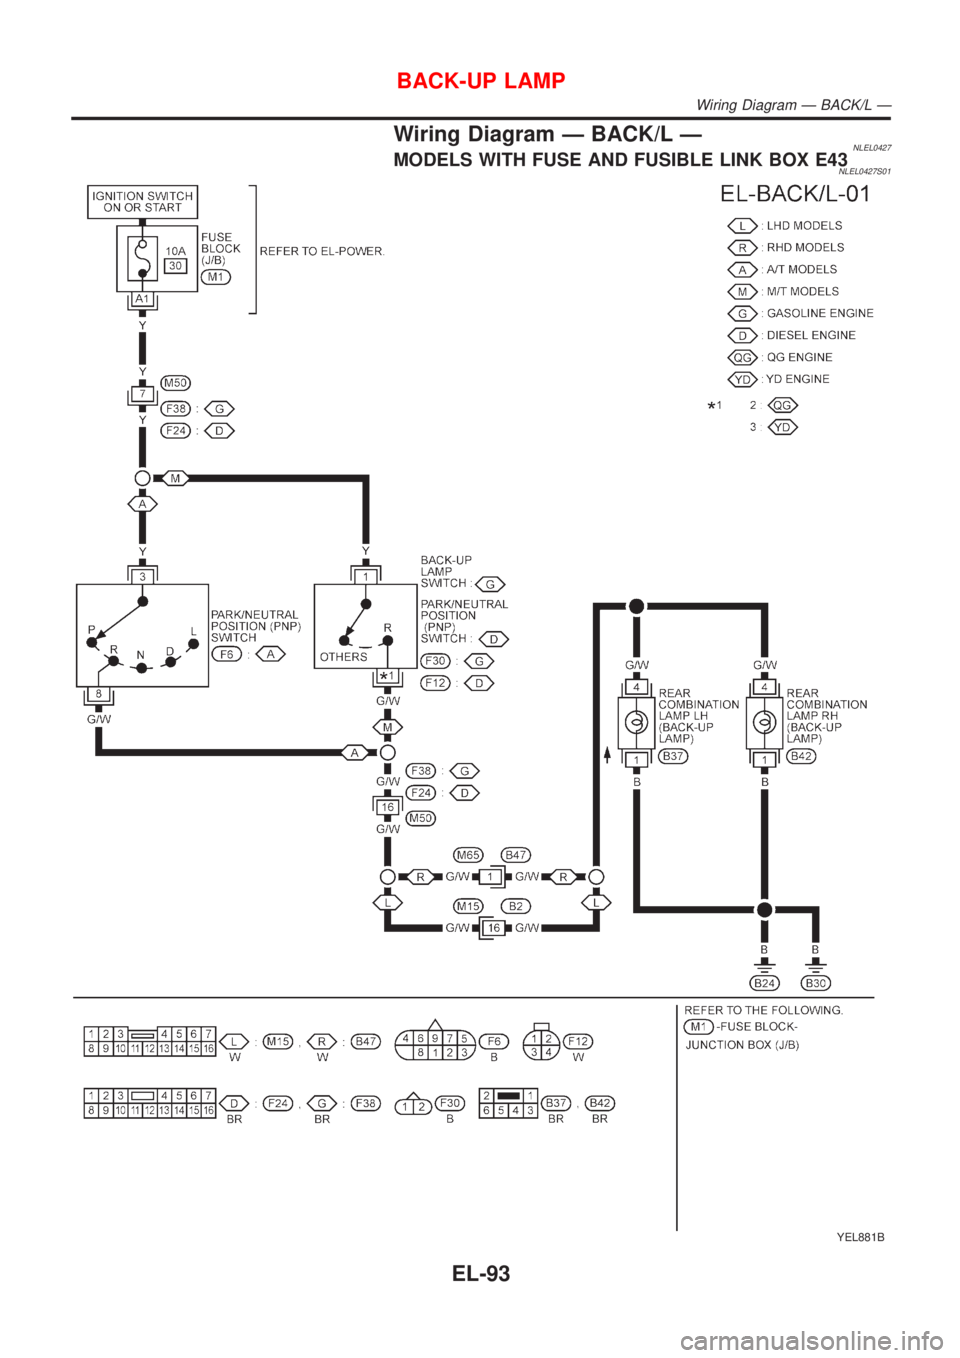
Wiring Diagram Ð BACK/L ÐNLEL0427MODELS WITH FUSE AND FUSIBLE LINK BOX E43NLEL0427S01
YEL881B
BACK-UP LAMP
Wiring Diagram Ð BACK/L Ð
EL-93
Page 1825 of 3051
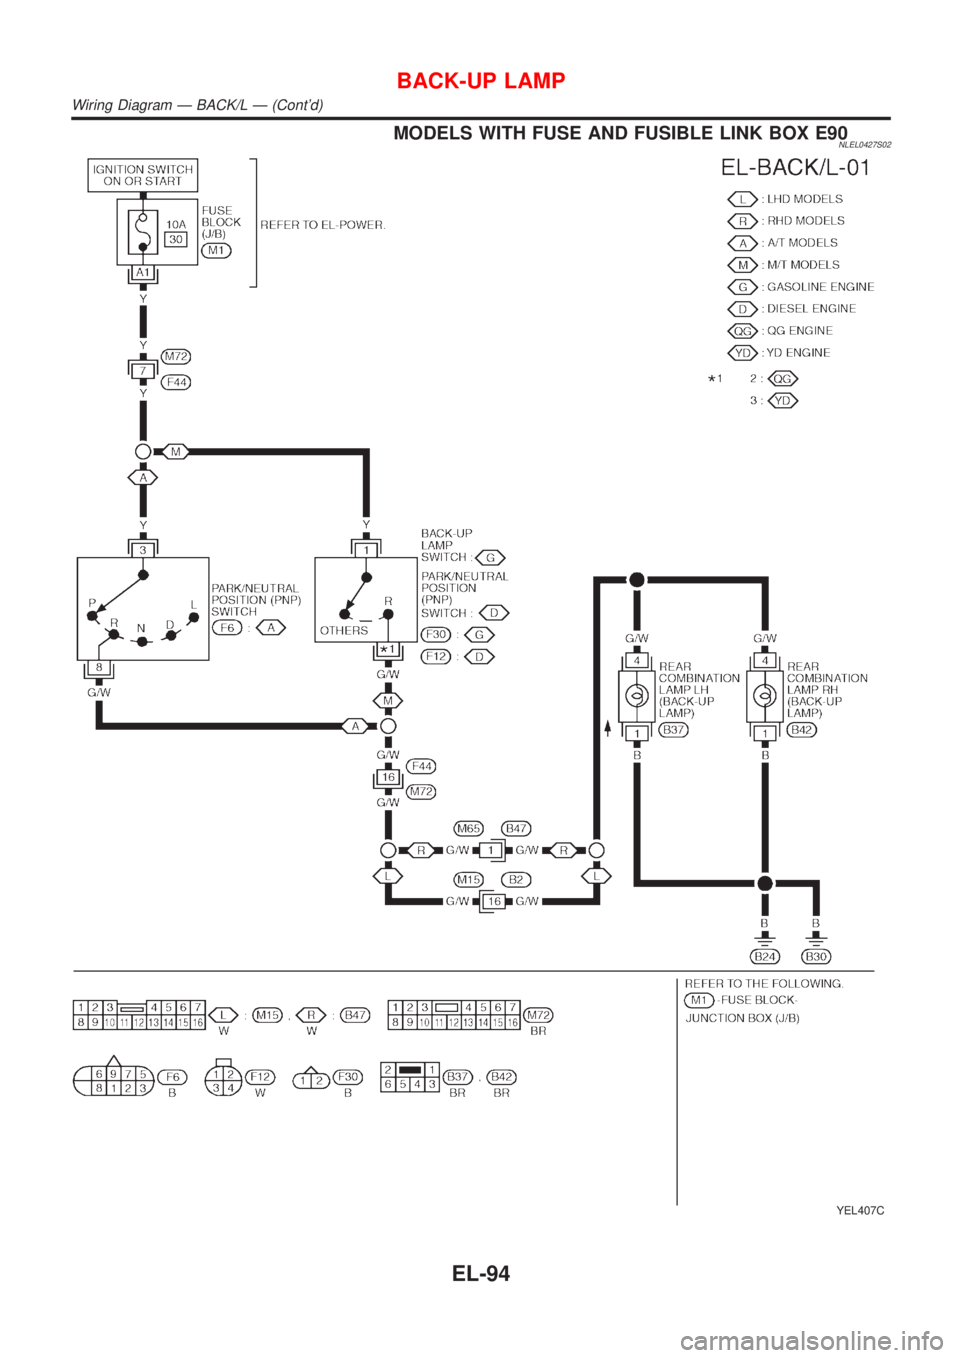
MODELS WITH FUSE AND FUSIBLE LINK BOX E90NLEL0427S02
YEL407C
BACK-UP LAMP
Wiring Diagram Ð BACK/L Ð (Cont'd)
EL-94
Page 1826 of 3051
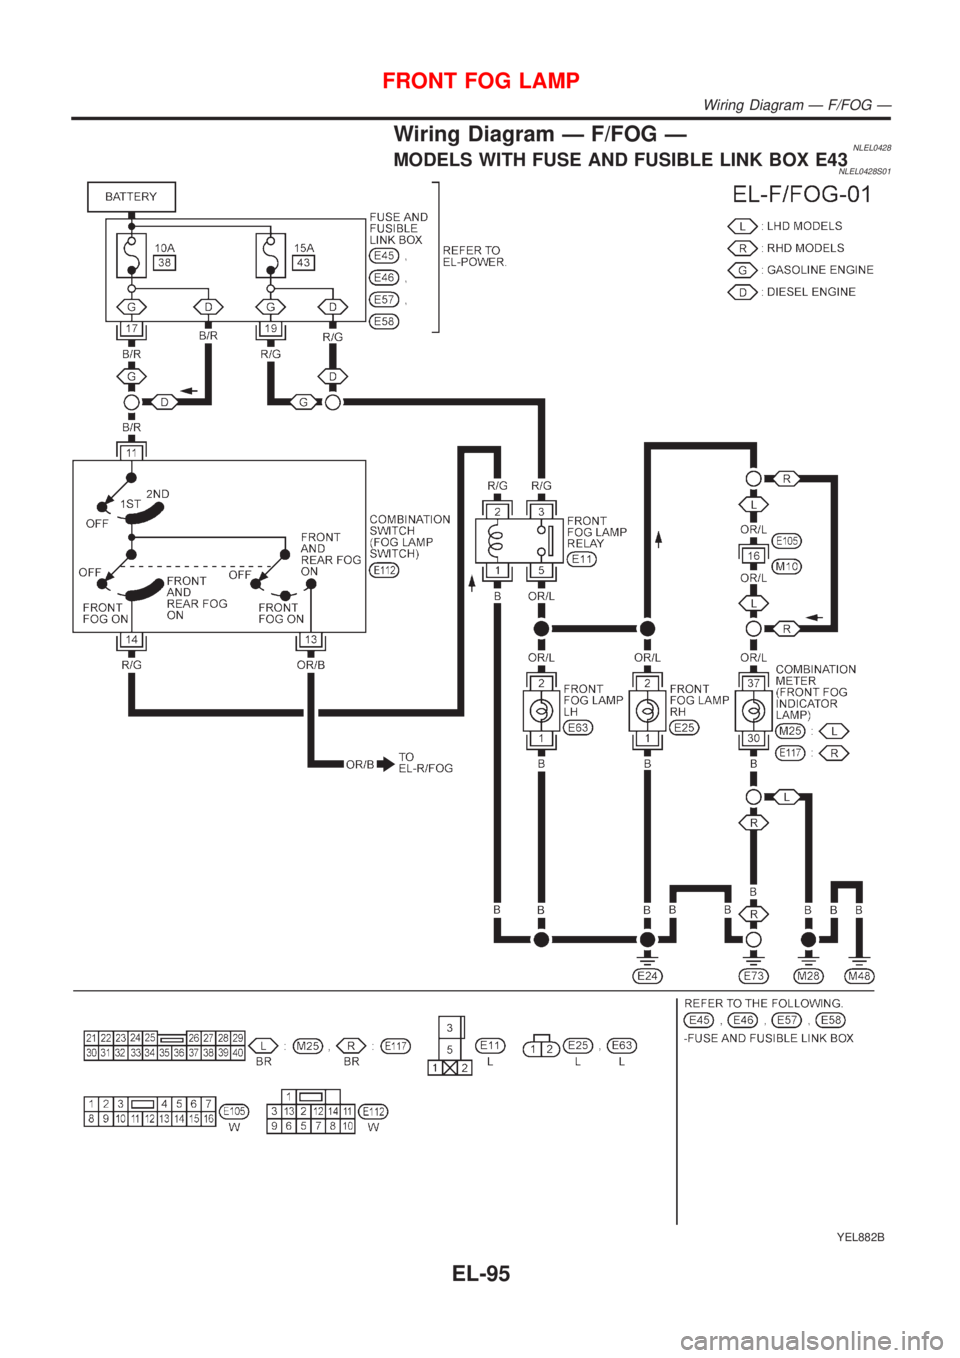
Wiring Diagram Ð F/FOG ÐNLEL0428MODELS WITH FUSE AND FUSIBLE LINK BOX E43NLEL0428S01
YEL882B
FRONT FOG LAMP
Wiring Diagram Ð F/FOG Ð
EL-95
Page 1827 of 3051
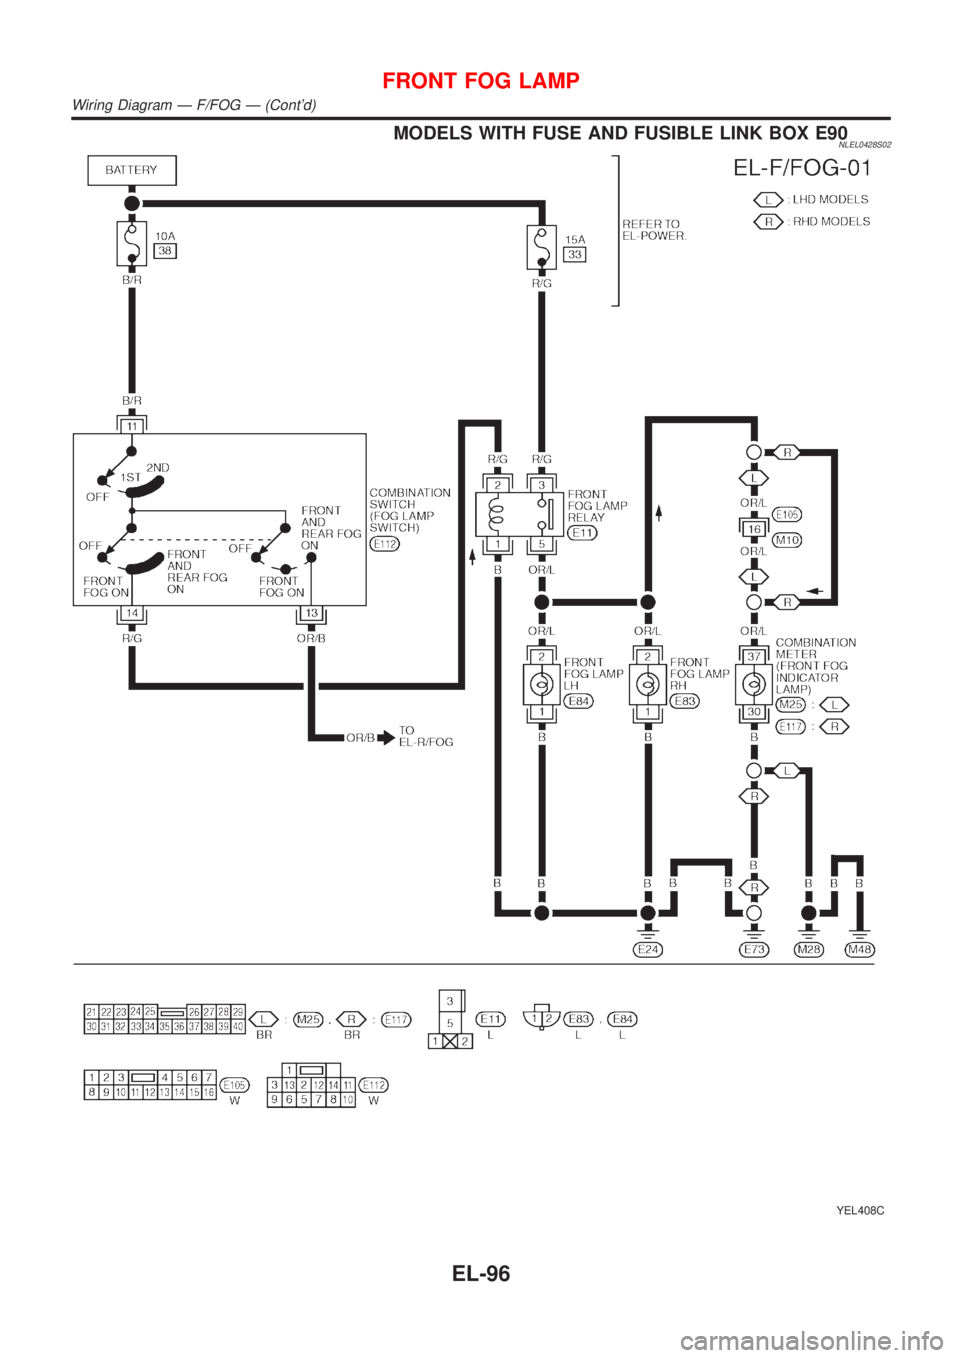
MODELS WITH FUSE AND FUSIBLE LINK BOX E90NLEL0428S02
YEL408C
FRONT FOG LAMP
Wiring Diagram Ð F/FOG Ð (Cont'd)
EL-96
Page 1828 of 3051
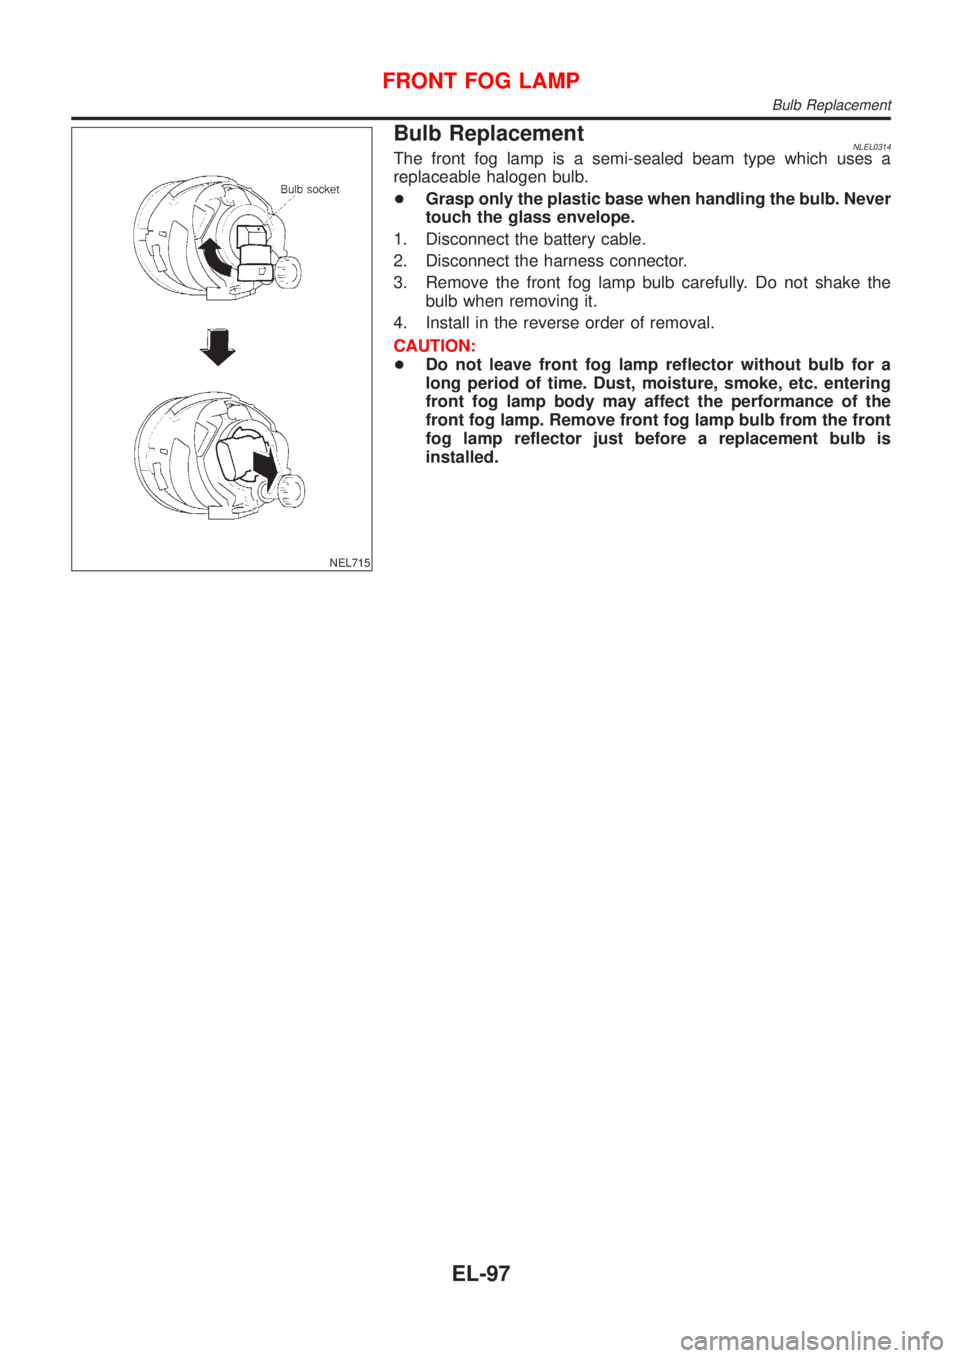
NEL715
Bulb ReplacementNLEL0314The front fog lamp is a semi-sealed beam type which uses a
replaceable halogen bulb.
+Grasp only the plastic base when handling the bulb. Never
touch the glass envelope.
1. Disconnect the battery cable.
2. Disconnect the harness connector.
3. Remove the front fog lamp bulb carefully. Do not shake the
bulb when removing it.
4. Install in the reverse order of removal.
CAUTION:
+Do not leave front fog lamp reflector without bulb for a
long period of time. Dust, moisture, smoke, etc. entering
front fog lamp body may affect the performance of the
front fog lamp. Remove front fog lamp bulb from the front
fog lamp reflector just before a replacement bulb is
installed.
FRONT FOG LAMP
Bulb Replacement
EL-97
Page 1829 of 3051
NEL714
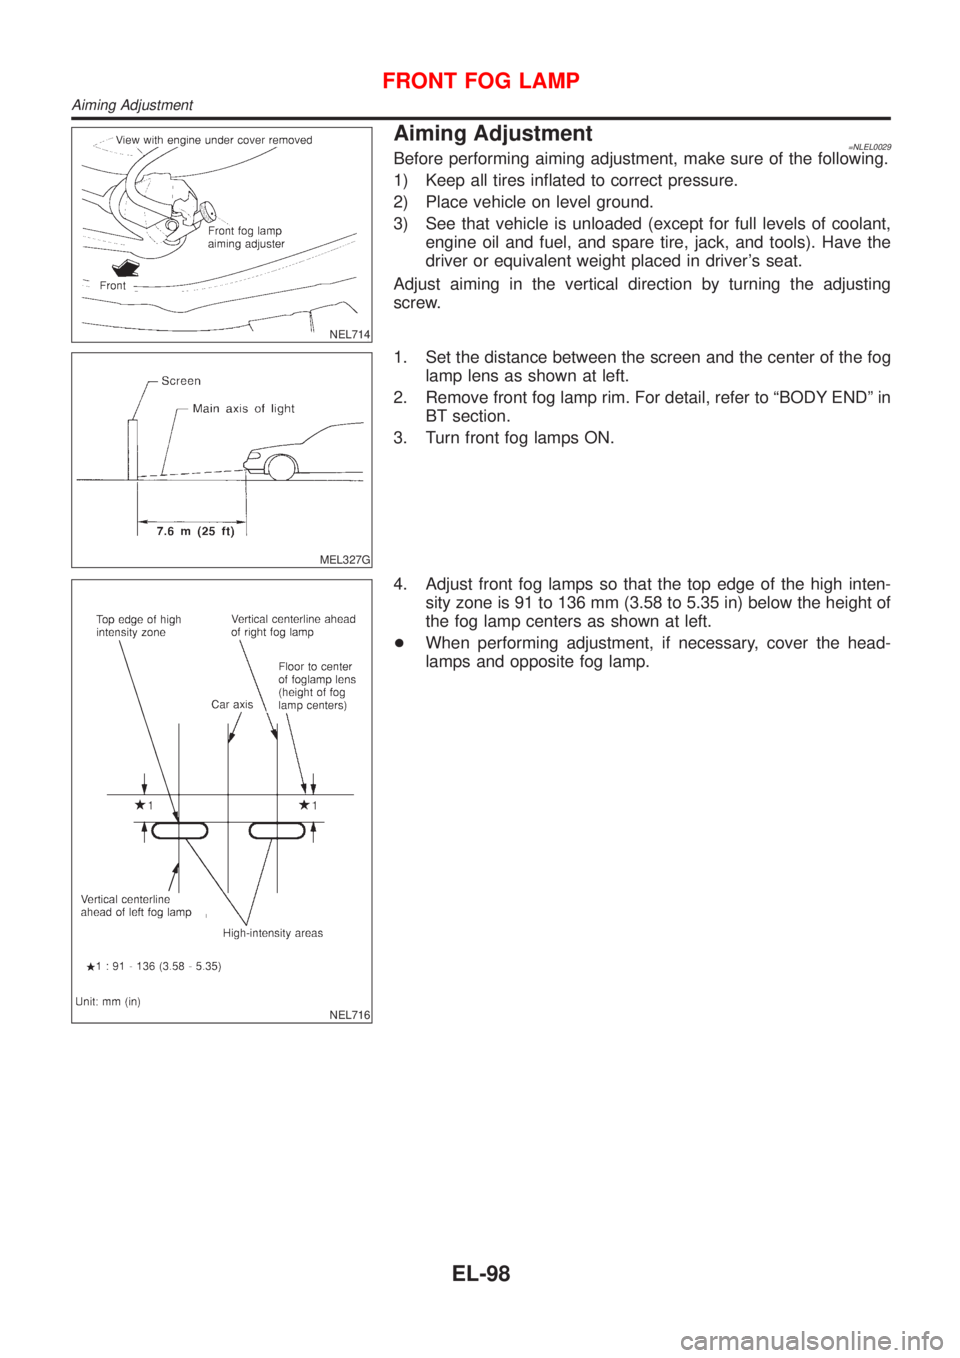
Aiming Adjustment=NLEL0029Before performing aiming adjustment, make sure of the following.
1) Keep all tires inflated to correct pressure.
2) Place vehicle on level ground.
3) See that vehicle is unloaded (except for full levels of coolant,
engine oil and fuel, and spare tire, jack, and tools). Have the
driver or equivalent weight placed in driver's seat.
Adjust aiming in the vertical direction by turning the adjusting
screw.
MEL327G
1. Set the distance between the screen and the center of the fog
lamp lens as shown at left.
2. Remove front fog lamp rim. For detail, refer to ªBODY ENDº in
BT section.
3. Turn front fog lamps ON.
NEL716
4. Adjust front fog lamps so that the top edge of the high inten-
sity zone is 91 to 136 mm (3.58 to 5.35 in) below the height of
the fog lamp centers as shown at left.
+When performing adjustment, if necessary, cover the head-
lamps and opposite fog lamp.
FRONT FOG LAMP
Aiming Adjustment
EL-98
Page 1830 of 3051
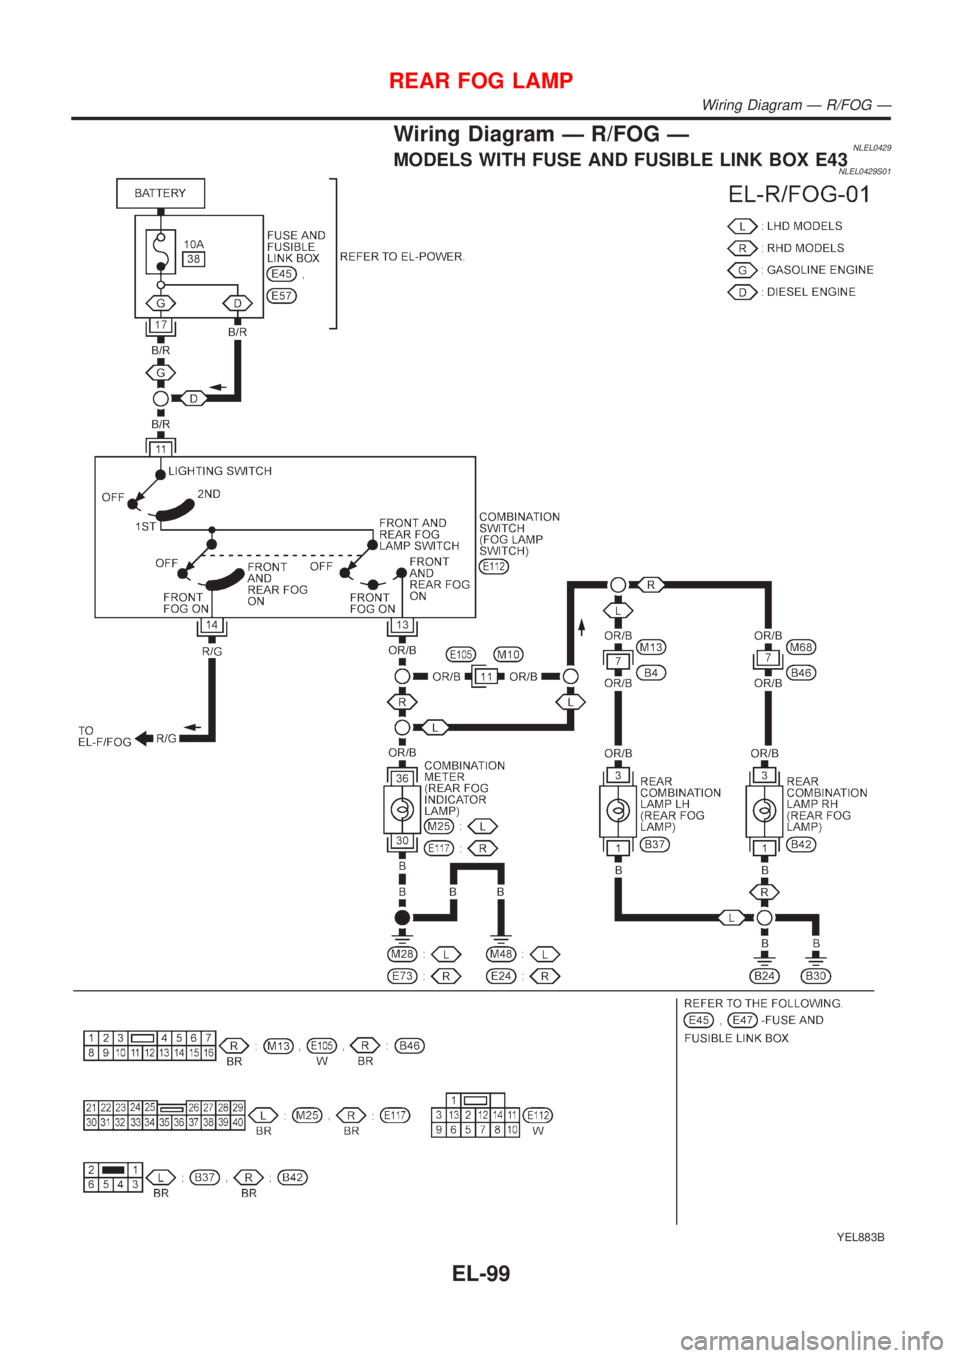
Wiring Diagram Ð R/FOG ÐNLEL0429MODELS WITH FUSE AND FUSIBLE LINK BOX E43NLEL0429S01
YEL883B
REAR FOG LAMP
Wiring Diagram Ð R/FOG Ð
EL-99
Trending: interior lights, fuel cap release, tow, BT-20, heater, child lock, brake rotor
