sensor NISSAN LATIO 2009 Service Repair Manual
[x] Cancel search | Manufacturer: NISSAN, Model Year: 2009, Model line: LATIO, Model: NISSAN LATIO 2009Pages: 4331, PDF Size: 58.04 MB
Page 4129 of 4331

SB
N
O P
REMOVAL OF SEAT BELT RETRACTOR
1. Disconnect both the negative and positive battery te rminals, then wait at least three minutes.
2. Remove the adjuster cover and D-ring anchor bolt.
3. Remove both the center pillar upper and lower garnish. Refer to EI-39 .
WARNING:
Do not reuse center pillar upper garnish if removed.
4. Pull the floor trim away from center pillar.
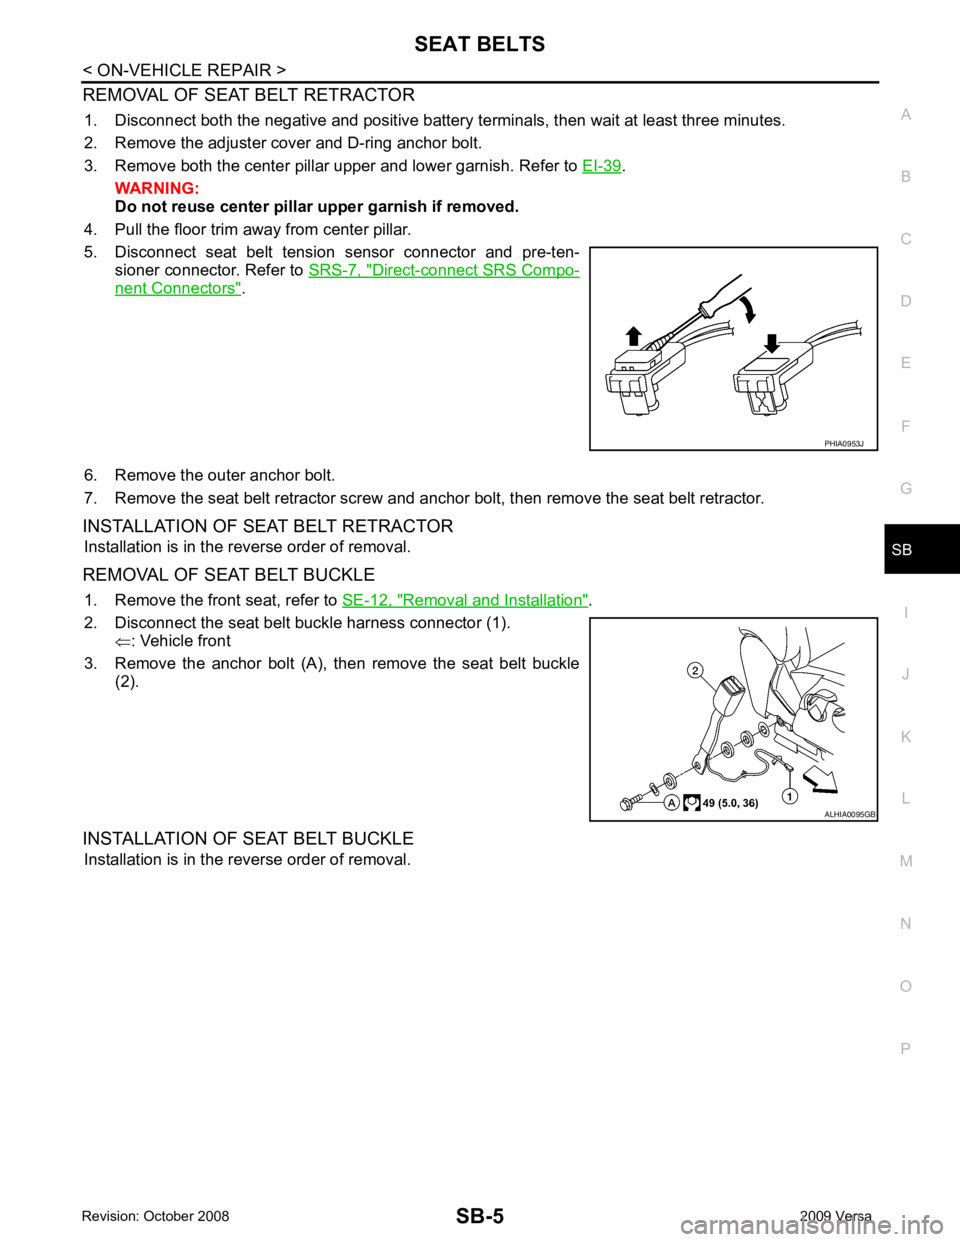
5. Disconnect seat belt tension sensor connector and pre-ten- sioner connector. Refer to SRS-7, " Direct-connect SRS Compo-
nent Connectors " .
6. Remove the outer anchor bolt.
7. Remove the seat belt retractor screw and anchor bolt, then remove the seat belt retractor.
INSTALLATION OF SEAT BELT RETRACTOR Installation is in the reverse order of removal.
REMOVAL OF SEAT BELT BUCKLE 1. Remove the front seat, refer to SE-12, " Removal and Installation " .
2. Disconnect the seat belt buckle harness connector (1). ⇐: Vehicle front
3. Remove the anchor bolt (A), then remove the seat belt buckle (2).
INSTALLATION OF SEAT BELT BUCKLE Installation is in the reverse order of removal.
Page 4176 of 4331

SE
N
O P
1. Disconnect the negative and positive battery term
inals, then wait at least three minutes.
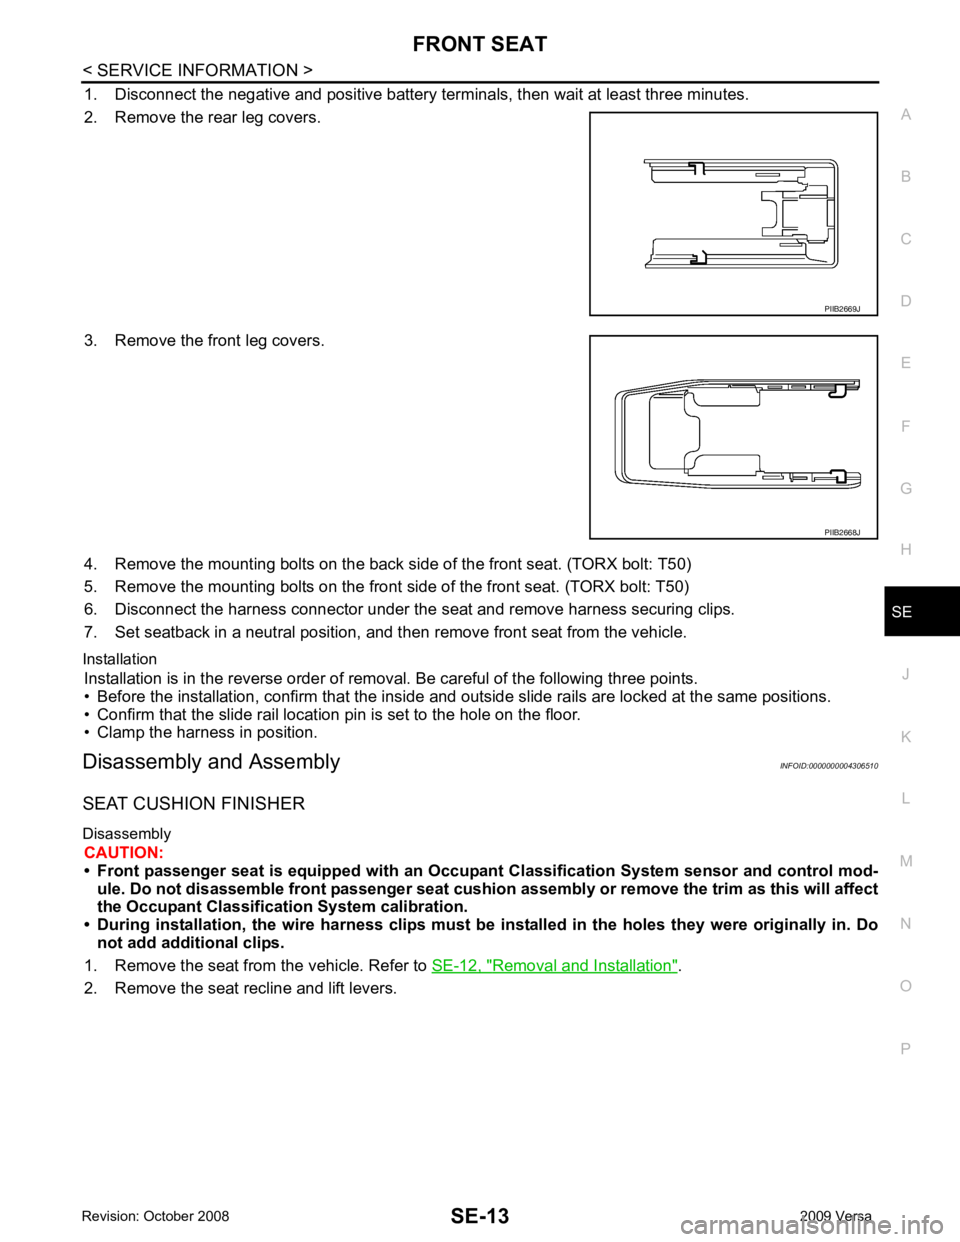
2. Remove the rear leg covers.
3. Remove the front leg covers.
4. Remove the mounting bolts on the back si de of the front seat. (TORX bolt: T50)
5. Remove the mounting bolts on the front side of the front seat. (TORX bolt: T50)
6. Disconnect the harness connector under the seat and remove harness securing clips.
7. Set seatback in a neutral position, and t hen remove front seat from the vehicle.
Installation Installation is in the reverse order of removal. Be careful of the following three points.
• Before the installation, confirm that the inside and outside slide rails are locked at the same positions.
• Confirm that the slide rail location pin is set to the hole on the floor.
• Clamp the harness in position.
Disassembly and Assembly INFOID:0000000004306510
SEAT CUSHION FINISHER
Disassembly CAUTION:
• Front passenger seat is equipped with an Occu pant Classification System sensor and control mod-
ule. Do not disassemble front passenger seat cushion assembly or remove the trim as this will affect
the Occupant Classificatio n System calibration.
• During installation, the wire harn ess clips must be installed in the holes they were originally in. Do
not add additional clips.
1. Remove the seat from the vehicle. Refer to SE-12, " Removal and Installation " .
2. Remove the seat recline and lift levers. PIIB2668J
Page 4191 of 4331

SRS
N
O P
CONTENTS
SUPPLEMENTAL RESTRAINT SYSTEM (SRS)
PRECAUTION ....... ........................................2
PRECAUTIONS .............................................. .....2
Precaution for Supplemental Restraint System
(SRS) "AIR BAG" and "SEAT BELT PRE-TEN-
SIONER" ............................................................. ......
2
Precaution for SRS "AIR BAG" and "SEAT BELT
PRE-TENSIONER" Service ................................ ......
2
Precaution Necessary fo r Steering Wheel Rota-
tion After Battery Disconnect ............................... ......
2
Occupant Classification System Precaution ....... ......3
SYMPTOM DIAGNOSIS ..... ..........................4
SUPPLEMENTAL RESTRAINT SYSTEM
(SRS) .............................................................. .....
4
SRS Configuration .............................................. ......4
Driver Air Bag Module ......................................... ......5
Front Passenger Air Bag Module ..............................5
Front Side Air Bag ............................................... ......5
Side Curtain Air Bag ............................................ ......5
Front Seat Belt Pre-tensioner with Load Limiter . ......6
Occupant Classification System (OCS) .............. ......6
Direct-connect SRS Component Connectors ...... ......7
TROUBLE DIAGNOSIS ................................. .....8
Trouble Diagnosis Introduction ........................... ......8
SRS Component Parts Location ......................... ....10
Schematic ........................................................... ....11
Wiring Diagram - SRS- ........................................ ....12
CONSULT-III Function (AIR BAG) ...................... ....17
Self-Diagnosis Function (Without CONSULT-III) .... 18
SRS Operation Check ......................................... ....19
Trouble Diagnosis with CONSULT-III ................. ....20
Trouble Diagnosis without CONSULT-III ............ ....28
Trouble Diagnosis: "AIR BAG" Warning Lamp
Does Not Turn Off ............................................... ....
31 Trouble Diagnosis: "AIR BAG" Warning Lamp
Does Not Turn On ............................................... ....
32
ON-VEHICLE REPAIR ..... ............................34
DRIVER AIR BAG MODULE ............................ 34
Removal and Installation ..................................... ....34
SPIRAL CABLE ................................................ 37
Removal and Installation ..................................... ....37
FRONT PASSENGER AIR BAG MODULE ...... 39
Removal and Installation ..................................... ....39
SIDE CURTAIN AIR BAG MODULE ................ 40
Component .......................................................... ....40
Removal and Installation ..................................... ....40
CRASH ZONE SEN SOR ................................... 42
Removal and Installation ..................................... ....42
SIDE AIR BAG (SATELLITE) SENSOR ........... 43
Removal and Installation ..................................... ....43
FRONT SEAT BELT PRE-TENSIONER ........... 44
Removal and Installation ..................................... ....44
DIAGNOSIS SENSOR UNIT ............................. 45
Removal and Installation ..................................... ....45
OCCUPANT CLASSIFICATION SYSTEM
CONTROL UNIT ................................................ 46
Removal and Installation ..................................... ....46
COLLISION DIAGNOSIS .................................. 47
For Frontal Collision ............................................ ....47
For Side and Rollover Colli sion ...............................48
Page 4196 of 4331

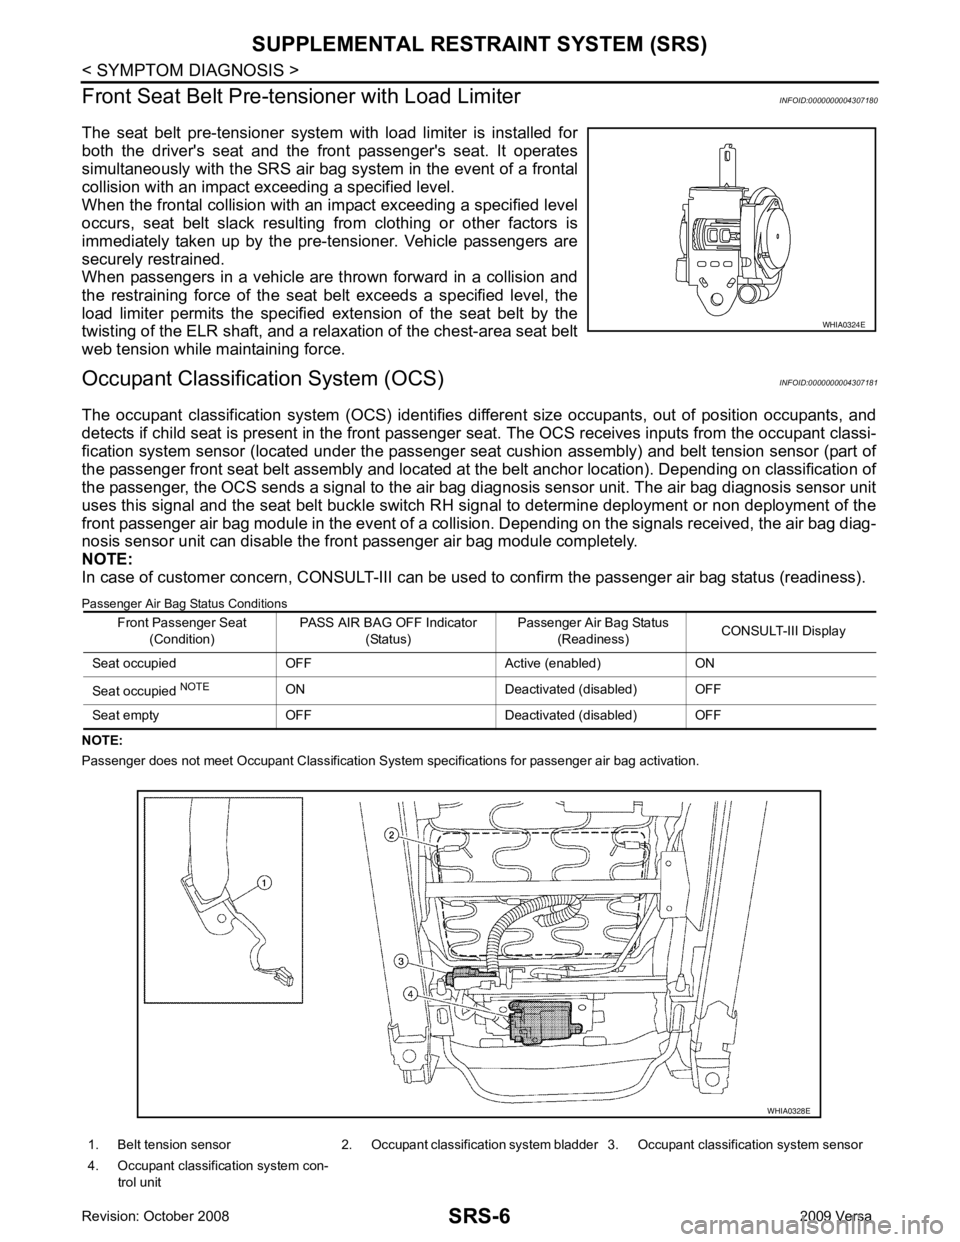
1. Belt tension sensor 2. Occupant classification system bladder 3. Occupant classification system sensor
4. Occupant classification system con- trol unit
Page 4210 of 4331

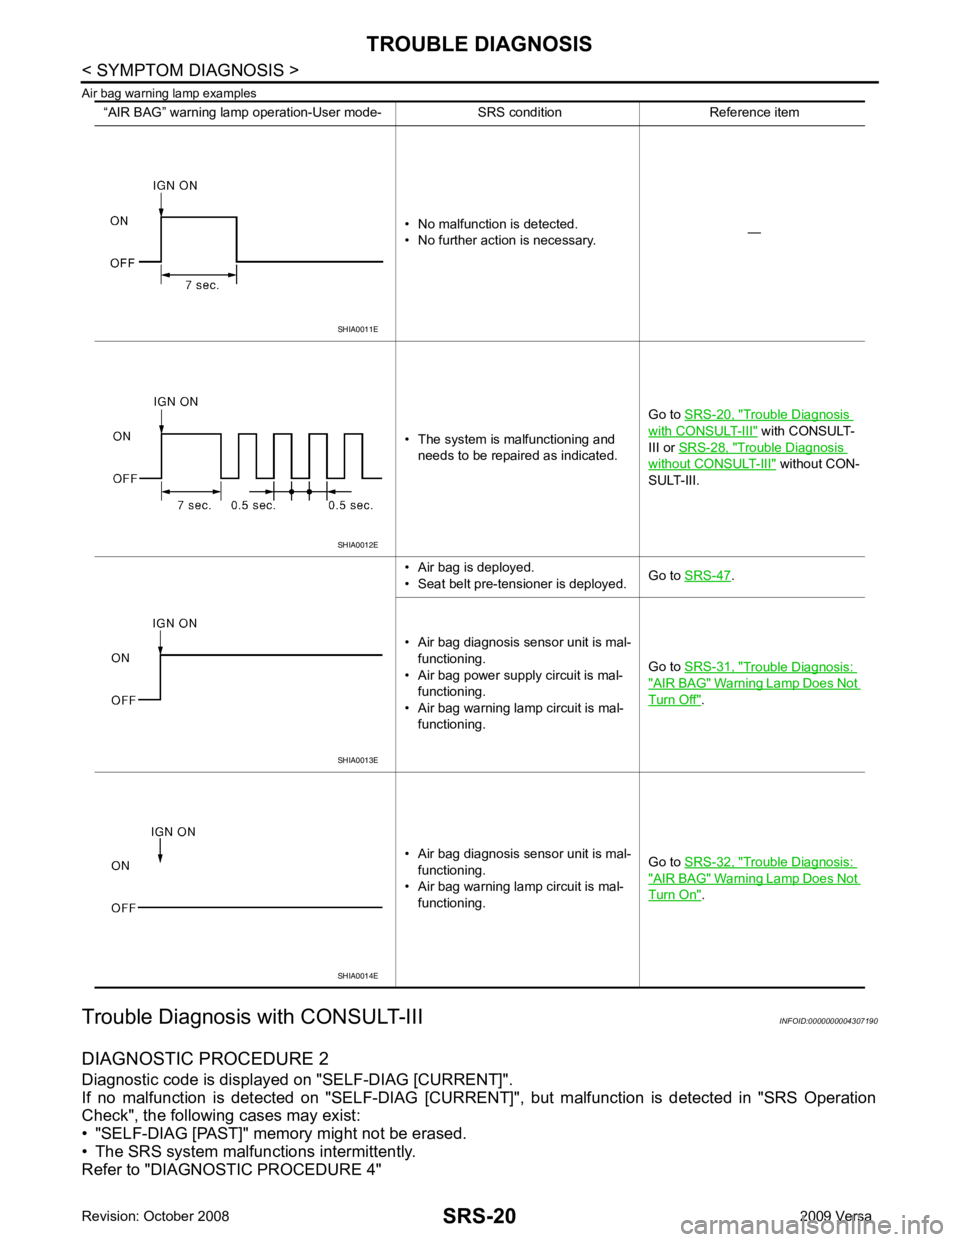
Trouble Diagnosis
with CONSULT-III " with CONSULT-
III or SRS-28, " Trouble Diagnosis
without CONSULT-III " without CON-
SULT-III.
• Air bag is deployed.
• Seat belt pre-tensioner is deployed. Go to
SRS-47 .
• Air bag diagnosis sensor unit is mal- functioning.
• Air bag power supply circuit is mal- functioning.
• Air bag warning lamp circuit is mal- functioning. Go to
SRS-31, " Trouble Diagnosis:
"AIR BAG" Warning Lamp Does Not
Turn Off " .
• Air bag diagnosis sensor unit is mal- functioning.
• Air bag warning lamp circuit is mal- functioning. Go to
SRS-32, " Trouble Diagnosis:
"AIR BAG" Warning Lamp Does Not
Turn On " .
Page 4211 of 4331
![NISSAN LATIO 2009 Service Repair Manual SRS
N
O P
CONSULT-III Diagnostic Code
Chart ("SELF-DIAG [CURRENT]")
Diagnostic item Explanation Repair order
Recheck SRS at each replacement
NO DTC IS DETECTED Malfunction is indicat-
ed by the “AI NISSAN LATIO 2009 Service Repair Manual SRS
N
O P
CONSULT-III Diagnostic Code
Chart ("SELF-DIAG [CURRENT]")
Diagnostic item Explanation Repair order
Recheck SRS at each replacement
NO DTC IS DETECTED Malfunction is indicat-
ed by the “AI](/img/5/57359/w960_57359-4210.png)
SRS
N
O P
CONSULT-III Diagnostic Code
Chart ("SELF-DIAG [CURRENT]")
Diagnostic item Explanation Repair order
Recheck SRS at each replacement
NO DTC IS DETECTED Malfunction is indicat-
ed by the “AIR BAG”
warning lamp in User
mode. Low battery voltage (Less than 9V) 1. Go to
SC-5 2. Go to "DIAGNOSTIC PROCE-
DURE 3" .
“SELF-DIAG [PAST]” memory might
not be erased. Go to "DIAGNOSTIC PROCEDURE 4"
.
Intermittent malfunction has been
detected in the past. Go to "DIAGNOSTIC PROCEDURE 5"
.
No malfunction is detected in User mode. —
DRIVER AIRBAG MODULE [OPEN]
[B1049] or [B1054] Driver air bag module circuit is open (including the spiral ca-
ble). 1. Visually check the wiring harness
connection.
2. Replace the harness if it has visi- ble damage.
3. Replace driver air bag module.
4. Replace the spiral cable.
5. Replace the air bag diagnosis sensor unit.
6. Replace the related harness.
DRIVER AIRBAG MODULE
[VB-SHORT]
[B1050] or [B1055] Driver air bag module circuit is shorted to some power supply
circuit (including the spiral cable).
DRIVER AIRBAG MODULE [GND-SHORT]
[B1051] or [B1056] Driver air bag module circuit is shorted to ground (including
the spiral cable).
DRIVER AIRBAG MODULE [SHORT]
[B1052] or [B1057] Driver air bag module circuits are shorted to each other.
ASSIST A/B MODULE [OPEN]
[B1065] or [B1070] Front passenger air bag module circuit is open. 1. Visually check the wiring harness
connection.
2. Replace the harness if it has visi-
ble damage.
3. Replace front passenger air bag module.
4. Replace the air bag diagnosis sensor unit.
5. Replace the related harness.
ASSIST A/B MODULE
[VB-SHORT]
[B1066] or [B1071] Front passenger air bag module circuit is shorted to some
power supply circuit.
ASSIST A/B MODULE [GND-SHORT]
[B1067] or [B1072] Front passenger air bag module circuit is shorted to ground.
ASSIST A/B MODULE [SHORT]
[B1068] or [B1073] Front passenger air bag module circuits are shorted to each
other.
CRASH ZONE SEN [UNIT FAIL]
[B1033] or [B1034]
CRASH ZONE SEN
[COMM FAIL][B1035] Crash zone sensor 1. Visually check the wiring harness
connection.
2. Replace the harness if it has visi- ble damage.
3. Replace the crash zone sensor.
4. Replace the air bag diagnosis sensor unit.
5. Replace the related harness.
SIDE MODULE LH [OPEN][B1134] Front LH side air bag module circuit is open. 1. Visually check the wiring harness
connection.
2. Replace the harness if it has visi- ble damage.
3. Replace front LH seat back as- sembly (front LH side air bag
module).
4. Replace the air bag diagnosis sensor unit.
5. Replace the related harness.
SIDE MODULE LH
[VB-SHORT]
[B1135] Front LH side air bag module circuit is shorted to some power
supply circuit.
SIDE MODULE LH [GND-SHORT] [B1136] Front LH side air bag module circuit is shorted to ground.
SIDE MODULE LH [SHORT][B1137] Front LH side air bag module circuits are shorted to each oth-
er.
Page 4213 of 4331
![NISSAN LATIO 2009 Service Repair Manual SRS
N
O P
CURTAIN MODULE LH
[OPEN][B1150] The LH side curtain air bag module circuit is open. 1. Visually check the wiring harness
connection.
2. Replace the harness if it has visi- ble damage.
3. Re NISSAN LATIO 2009 Service Repair Manual SRS
N
O P
CURTAIN MODULE LH
[OPEN][B1150] The LH side curtain air bag module circuit is open. 1. Visually check the wiring harness
connection.
2. Replace the harness if it has visi- ble damage.
3. Re](/img/5/57359/w960_57359-4212.png)
SRS
N
O P
CURTAIN MODULE LH
[OPEN][B1150] The LH side curtain air bag module circuit is open. 1. Visually check the wiring harness
connection.
2. Replace the harness if it has visi- ble damage.
3. Replace LH side curtain air bag module.
4. Replace the air bag diagnosis
sensor unit.
5. Replace the related harness.
CURTAIN MODULE LH
[VB-SHORT]
[B1151] The LH side curtain air bag module circuit is shorted to some
power supply circuits.
CURTAIN MODULE LH [GND-SHORT][B1152] The LH side curtain air bag module circuit is shorted to
ground.
CURTAIN MODULE LH [SHORT][B1153] The circuits for the LH side curtain air bag module are shorted
to each other.
CURTAIN MODULE RH [OPEN]
[B1145] The RH side curtain air bag module circuit is open. 1. Visually check the wiring harness
connection.
2. Replace the harness if it has visi- ble damage.
3. Replace RH side curtain air bag
module.
4. Replace the air bag diagnosis sensor unit.
5. Replace the related harness.
CURTAIN MODULE RH
[VB-SHORT][B1146] The RH side curtain air bag module circuit is shorted to some
power supply circuits.
CURTAIN MODULE RH [GND-SHORT][B1147] The RH side curtain air bag module circuit is shorted to
ground.
CURTAIN MODULE RH [SHORT]
[B1148] The circuits for the RH side curtain air bag module are shorted
to each other.
CONTROL UNIT [B1XXX] Air bag diagnosis sensor unit is malfunctioning. 1. Visually check the wiring harness
connection.
2. Replace the air bag diagnosis
sensor unit.
OCCUPANT SENS C/U [UNIT FAIL]
[B1017], [B1020] or [B1021] Occupant classification system is malfunctioning. 1. Replace RH front seat cushion/
occupant classification system
control unit assembly.
OCCUPANT SENS C/U [COMM FAIL][B1022] Communication between the occupant classification system
control unit and air bag diagnosis sensor unit is interrupted. 1. Visually check the wiring harness
connection.
2. Replace the harness if it has visi- ble damage.
3. Replace RH front seat cushion/ occupant classification system
control unit assembly.
4. Replace the air bag diagnosis
sensor unit.
5. Replace the related harness.
OCCUPANT SENS [UNIT FAIL]
[B1018] Occupant classification sensor is malfunctioning. 1. Replace RH front seat cushion/
occupant classification system
control unit assembly.
BELT TENSION SENS [UNIT FAIL][B1019] Belt tension sensor is malfunctioning. 1. Visually check the wiring harness
connection.
2. Replace the harness if it has visi-
ble damage.
3. Replace RH front seat belt as- sembly.
4. Replace RH front seat cushion/ occupant classification system
control unit assembly.
Diagnostic item Explanation
Repair order
Recheck SRS at each replacement
Page 4214 of 4331
![NISSAN LATIO 2009 Service Repair Manual SRS Operation Check " .
DIAGNOSTIC PROCEDURE 4
Check SRS Repair History Yes >> Self-diagnostic result “SELF-DIAG [PAST]” (pre
viously stored in the memory) might not be erased
after repair. Go to NISSAN LATIO 2009 Service Repair Manual SRS Operation Check " .
DIAGNOSTIC PROCEDURE 4
Check SRS Repair History Yes >> Self-diagnostic result “SELF-DIAG [PAST]” (pre
viously stored in the memory) might not be erased
after repair. Go to](/img/5/57359/w960_57359-4213.png)
SRS Operation Check " .
DIAGNOSTIC PROCEDURE 4
Check SRS Repair History Yes >> Self-diagnostic result “SELF-DIAG [PAST]” (pre
viously stored in the memory) might not be erased
after repair. Go to "DIAGNOSTIC PROCEDURE 3".
No >> Go to "DIAGNOSTIC PROCEDURE 2".
DIAGNOSTIC PROCEDURE 5
Check SRS Intermittent Malfuncti on Using CONSULT-III—Diagnosis Mode
1. If diagnostic codes are displayed on “SELF-DIAG [PAST]”, go to step 4. If no malfunction is detected on “SELF-DIAG [PAS T]”, touch “BACK” and go back to “SELECT DIAG
MODE”.
PASS A/B INDCTR CKT
[B1023] Front passenger air bag off indicator is malfunctioning. 1. Visually check the wiring harness
connection.
2. Replace the harness if it has visi- ble damage.
3. Replace front passenger air bag off indicator.
4. Replace the air bag diagnosis
sensor unit.
5. Replace the related harness.
FRONTAL COLLISION DETECTION
[B1209] Driver and front passenger air bag modules are deployed. Refer to
SRS-47 .
SIDE COLLISION DETECTION [B1210] Side or curtain air bag modules are deployed.
Diagnostic item Explanation
Repair order
Recheck SRS at each replacement
Page 4215 of 4331

SRS
N
O P
2. Touch “TROUBLE DIAG RECORD”.
NOTE:
With “TROUBLE DIAG RECORD”, di agnosis results previously erased by a reset operation can be
displayed.
3. Diagnostic code is displayed on “TROUBLE DIAG RECORD”.
4. Touch “PRINT”.
5. Compare diagnostic codes to "CONSULT-III Diagnos tic Code Chart ("SELF-DIAG [PAST]" or "TROUBLE
DIAG RECORD")".
6. Touch “BACK” key of CONSULT- III until “SELECT SYSTEM” appears.
7. Turn ignition switch OFF, then turn off and disconnect CONSULT-III, and both battery cables.
8. Repair the system as outlined by the “Repair orde r” in “Intermittent Malfunction Diagnostic Code Chart”,
that corresponds to the self-diagnostic result. For r eplacement procedure of component parts, refer to the
Removal and Installation procedure for the appropriate component.
9. Go to "DIAGNOSTIC PROCEDURE 3", for final checking.
CONSULT-III Diagnostic Code Chart ("SELF-DI AG [PAST]" or "TROUBLE DIAG RECORD")
Diagnostic item Explanation Repair order
Recheck SRS at each replacement
NO DTC IS DETECTED When malfunction is
indicated by the “AIR
BAG” warning lamp in
User mode. • Low battery voltage (L
ess than 9V) • Go to "DIAGNOSTIC PROCEDURE
3" .
• Self-diagnostic result “SELF-DIAG [PAST]” (previously stored in the
memory) might not be erased after
repair.
• Intermittent malfunction has been detected in the past. • Go to "DIAGNOSTIC PROCEDURE
4" .
• Go to "DIAGNOSTIC PROCEDURE
5" .
• No malfunction is detected. —
DRIVER AIRBAG MODULE [OPEN]
[B1049] or [B1054] Driver air bag module circuit is open (including the spiral ca-
ble). 1. Visually check the wiring harness
connection.
2. Replace the harness if it has visi- ble damage.
3. Replace driver air bag module.
4. Replace the spiral cable.
5. Replace the air bag diagnosis
sensor unit.
6. Replace the related harness.
DRIVER AIRBAG MODULE
[VB-SHORT]
[B1050] or [B1055] Driver air bag module circuit is shorted to some power supply
circuit (including the spiral cable).
DRIVER AIRBAG MODULE [GND-SHORT]
[B1051] or [B1056] Driver air bag module circuit is shorted to ground (including
the spiral cable).
DRIVER AIRBAG MODULE [SHORT]
[B1052] or [B1057] Driver air bag module circuits are shorted to each other.
ASSIST A/B MODULE [OPEN]
[B1065] or [B1070] Front passenger air bag module circuit is open. 1. Visually check the wiring harness
connection.
2. Replace the harness if it has visi-
ble damage.
3. Replace front passenger air bag module.
4. Replace the air bag diagnosis sensor unit.
5. Replace the related harness.
ASSIST A/B MODULE
[VB-SHORT]
[B1066] or [B1071] Front passenger air bag module circuit is shorted to some
power supply circuit.
ASSIST A/B MODULE [GND-SHORT]
[B1067] or [B1072] Front passenger air bag module circuit is shorted to ground.
ASSIST A/B MODULE [SHORT]
[B1068] or [B1073] Front passenger air bag module circuits are shorted to each
other.
Page 4217 of 4331
![NISSAN LATIO 2009 Service Repair Manual SRS
N
O P
PRE-TEN FRONT LH
[OPEN]
[B1086] The circuit for front LH seat belt pre-tensioner is open. 1. Visually check the wiring harness
connections.
2. Replace the harness if it has visi- ble damag NISSAN LATIO 2009 Service Repair Manual SRS
N
O P
PRE-TEN FRONT LH
[OPEN]
[B1086] The circuit for front LH seat belt pre-tensioner is open. 1. Visually check the wiring harness
connections.
2. Replace the harness if it has visi- ble damag](/img/5/57359/w960_57359-4216.png)
SRS
N
O P
PRE-TEN FRONT LH
[OPEN]
[B1086] The circuit for front LH seat belt pre-tensioner is open. 1. Visually check the wiring harness
connections.
2. Replace the harness if it has visi- ble damage.
3. Replace front LH seat belt pre- tensioner.
4. Replace the air bag diagnosis
sensor unit.
5. Replace the related harness.
PRE-TEN FRONT LH
[VB-SHORT]
[B1087] The circuit for front LH seat belt pre-tensioner is shorted to
some power supply circuit.
PRE-TEN FRONT LH [GND-SHORT] [B1088] The circuit for front LH seat belt pre-tensioner is shorted to
ground.
PRE-TEN FRONT LH [SHORT][B1089] The circuits for the front LH seat belt pre-tensioner are shorted
to each other.
PRE-TEN FRONT RH [OPEN]
[B1081] The circuit for front RH seat belt pre-tensioner is open. 1. Visually check the wiring harness
connections.
2. Replace the harness if it has visi- ble damage.
3. Replace front RH seat belt pre-
tensioner.
4. Replace the air bag diagnosis sensor unit.
5. Replace the related harness.
PRE-TEN FRONT RH
[VB-SHORT][B1082] The circuit for front RH seat belt pre-tensioner is shorted to
some power supply circuit.
PRE-TEN FRONT RH [GND-SHORT][B1083] The circuit for front RH seat belt pre-tensioner is shorted to
ground.
PRE-TEN FRONT RH [SHORT]
[B1084] The circuits for the front RH seat belt pre-tensioner are short-
ed to each other.
CURTAIN MODULE LH [OPEN][B1150] The LH side curtain air bag module circuit is open. 1. Visually check the wiring harness
connection.
2. Replace the harness if it has visi-
ble damage.
3. Replace LH side curtain air bag module.
4. Replace the air bag diagnosis sensor unit.
5. Replace the related harness.
CURTAIN MODULE LH
[VB-SHORT][B1151] The LH side curtain air bag module circuit is shorted to some
power supply circuits.
CURTAIN MODULE LH [GND-SHORT]
[B1152] The LH side curtain air bag module circuit is shorted to
ground.
CURTAIN MODULE LH [SHORT][B1153] The circuits for the LH side curtain air bag module are shorted
to each other.
CURTAIN MODULE RH [OPEN]
[B1145] The RH side curtain air bag module circuit is open. 1. Visually check the wiring harness
connection.
2. Replace the harness if it has visi- ble damage.
3. Replace RH side curtain air bag
module.
4. Replace the air bag diagnosis sensor unit.
5. Replace the related harness.
CURTAIN MODULE RH
[VB-SHORT][B1146] The RH side curtain air bag module circuit is shorted to some
power supply circuits.
CURTAIN MODULE RH [GND-SHORT][B1147] The RH side curtain air bag module circuit is shorted to
ground.
CURTAIN MODULE RH [SHORT]
[B1148] The circuits for the RH side curtain air bag module are shorted
to each other.
CONTROL UNIT [B1XXX] Air bag diagnosis sensor unit is malfunctioning. 1. Visually check the wiring harness
connection.
2. Replace the air bag diagnosis
sensor unit.
OCCUPANT SENS C/U [UNIT FAIL]
[B1017], [B1020] or [B1021] Occupant classification system is malfunctioning. 1. Replace RH front seat cushion/
occupant classification system
control unit assembly.
Diagnostic item Explanation
Repair order
Recheck SRS at each replacement