NISSAN MAXIMA 1996 A32 / 4.G Manual Online
Manufacturer: NISSAN, Model Year: 1996, Model line: MAXIMA, Model: NISSAN MAXIMA 1996 A32 / 4.GPages: 197, PDF Size: 1.53 MB
Page 81 of 197

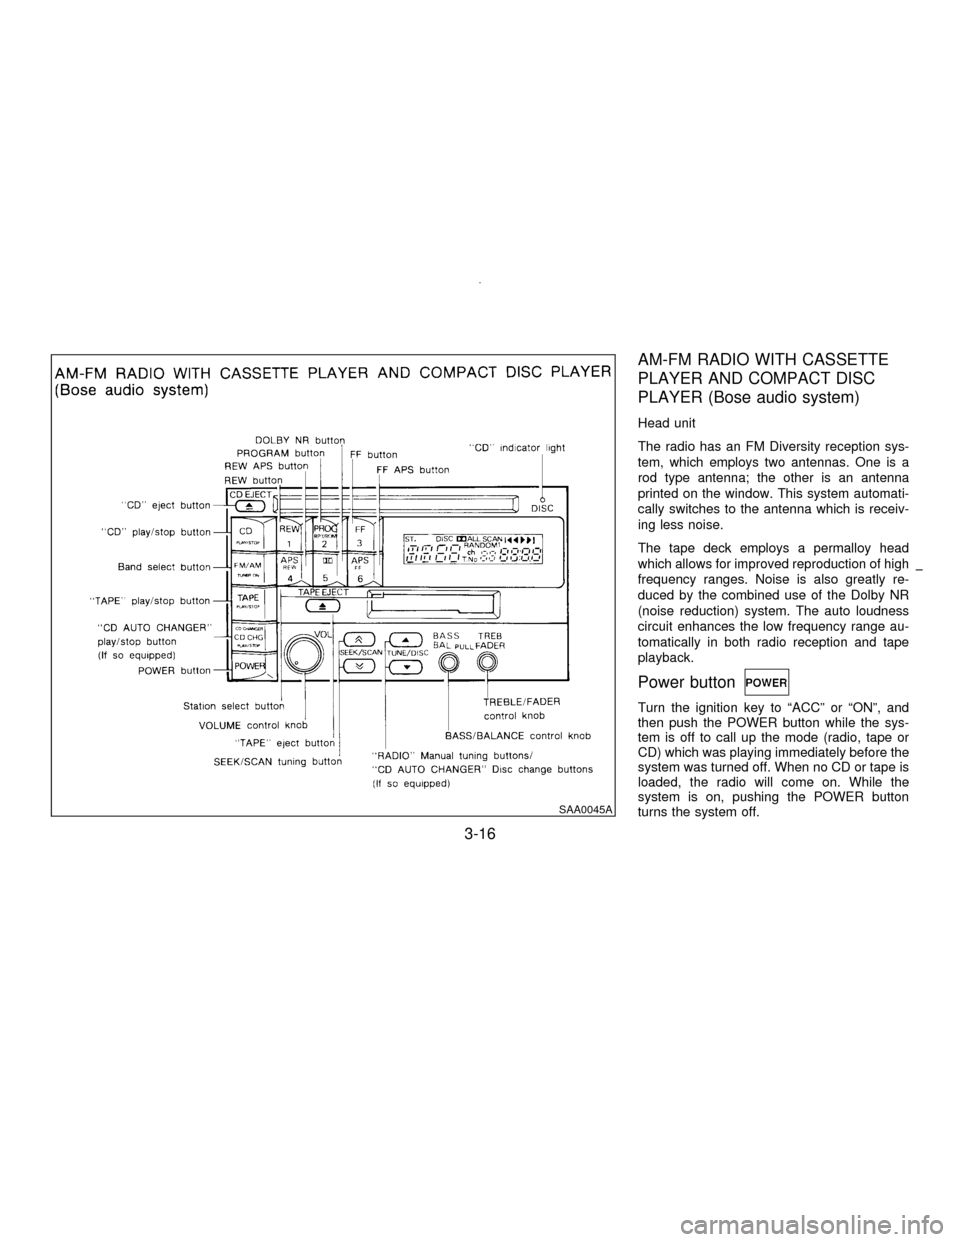
AM-FM RADIO WITH CASSETTE
PLAYER AND COMPACT DISC
PLAYER (Bose audio system)
Head unit
The radio has an FM Diversity reception sys-
tem, which employs two antennas. One is a
rod type antenna; the other is an antenna
printed on the window. This system automati-
cally switches to the antenna which is receiv-
ing less noise.
The tape deck employs a permalloy head
which allows for improved reproduction of high
frequency ranges. Noise is also greatly re-
duced by the combined use of the Dolby NR
(noise reduction) system. The auto loudness
circuit enhances the low frequency range au-
tomatically in both radio reception and tape
playback.
Power button
Turn the ignition key to ªACCº or ªONº, and
then push the POWER button while the sys-
tem is off to call up the mode (radio, tape or
CD) which was playing immediately before the
system was turned off. When no CD or tape is
loaded, the radio will come on. While the
system is on, pushing the POWER button
turns the system off.
SAA0045A
3-16
Z01.2.1/A32-DX
Page 82 of 197

To turn the radio off, press the POWER button.
VOL (volume) control knob
Turn the VOLUME control knob to adjust the
volume.
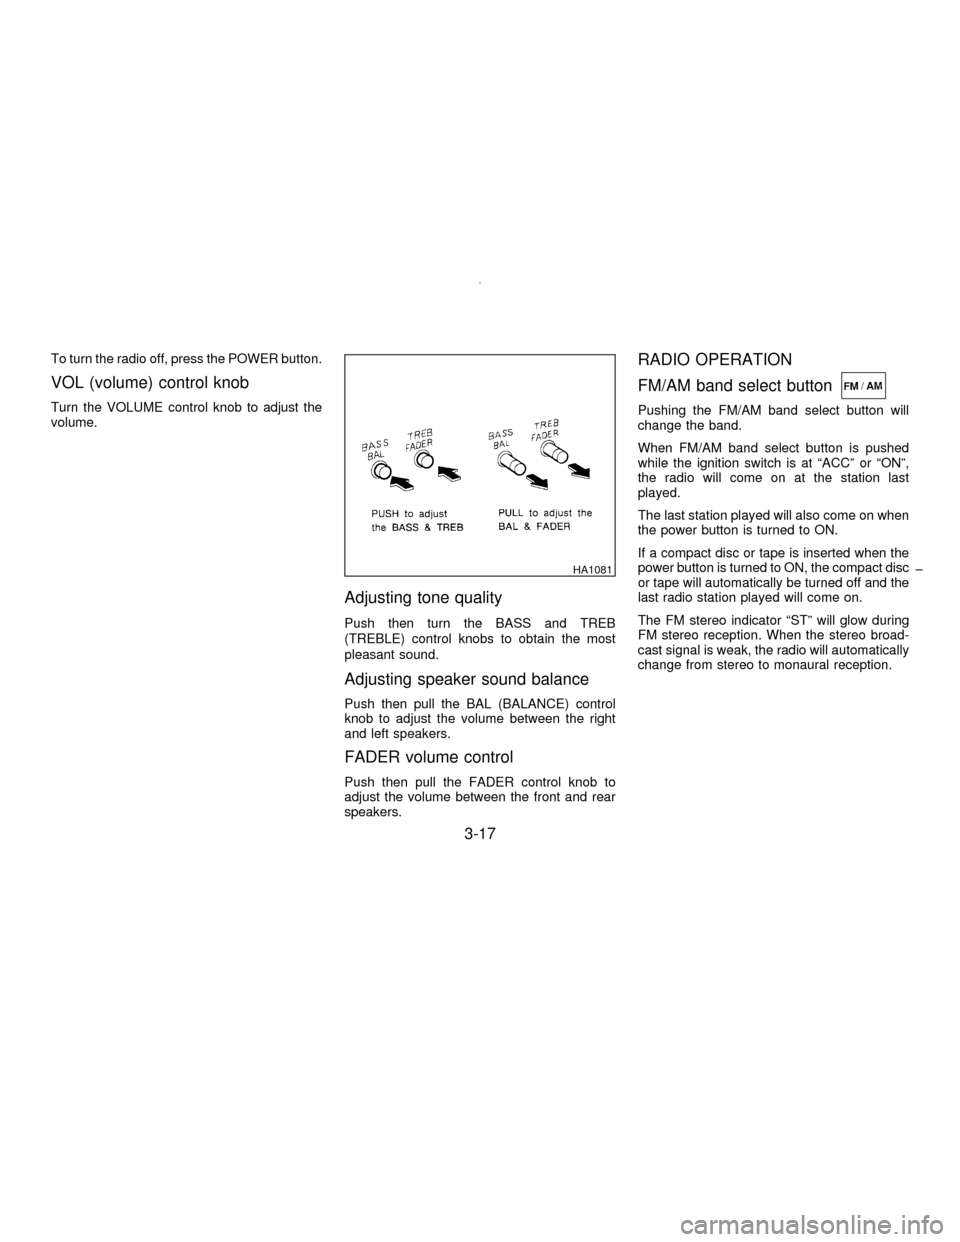
Adjusting tone quality
Push then turn the BASS and TREB
(TREBLE) control knobs to obtain the most
pleasant sound.
Adjusting speaker sound balance
Push then pull the BAL (BALANCE) control
knob to adjust the volume between the right
and left speakers.
FADER volume control
Push then pull the FADER control knob to
adjust the volume between the front and rear
speakers.
RADIO OPERATION
FM/AM band select button
Pushing the FM/AM band select button will
change the band.
When FM/AM band select button is pushed
while the ignition switch is at ªACCº or ªONº,
the radio will come on at the station last
played.
The last station played will also come on when
the power button is turned to ON.
If a compact disc or tape is inserted when the
power button is turned to ON, the compact disc
or tape will automatically be turned off and the
last radio station played will come on.
The FM stereo indicator ªSTº will glow during
FM stereo reception. When the stereo broad-
cast signal is weak, the radio will automatically
change from stereo to monaural reception.
HA1081
3-17
Z01.2.1/A32-DX
Page 83 of 197

TUNE button
The radio should not be tuned while
driving in order that full attention may be
given to the driving operation.
Use these buttons for manual tuning. To move
quickly through the channels, hold either of the
tuning buttons down for more than 0.5 sec-
onds.
SEEK/SCAN buttons
SCAN tuning
Push the SEEK/SCAN tuning button ª
ºor
ªº for more than 1.5 seconds. SCAN
tuning begins from low to high frequencies and
stops at each broadcasting station for five
seconds. Pushing the button again during this
five second period will stop SCAN tuning and
the radio will remain tuned to that station.SEEK tuning
Push the SEEK/SCAN tuning button ª
ºor
ªº for less than 1.5 seconds. SEEK tun-
ing begins from low to high frequencies and
stops at the next broadcasting station.
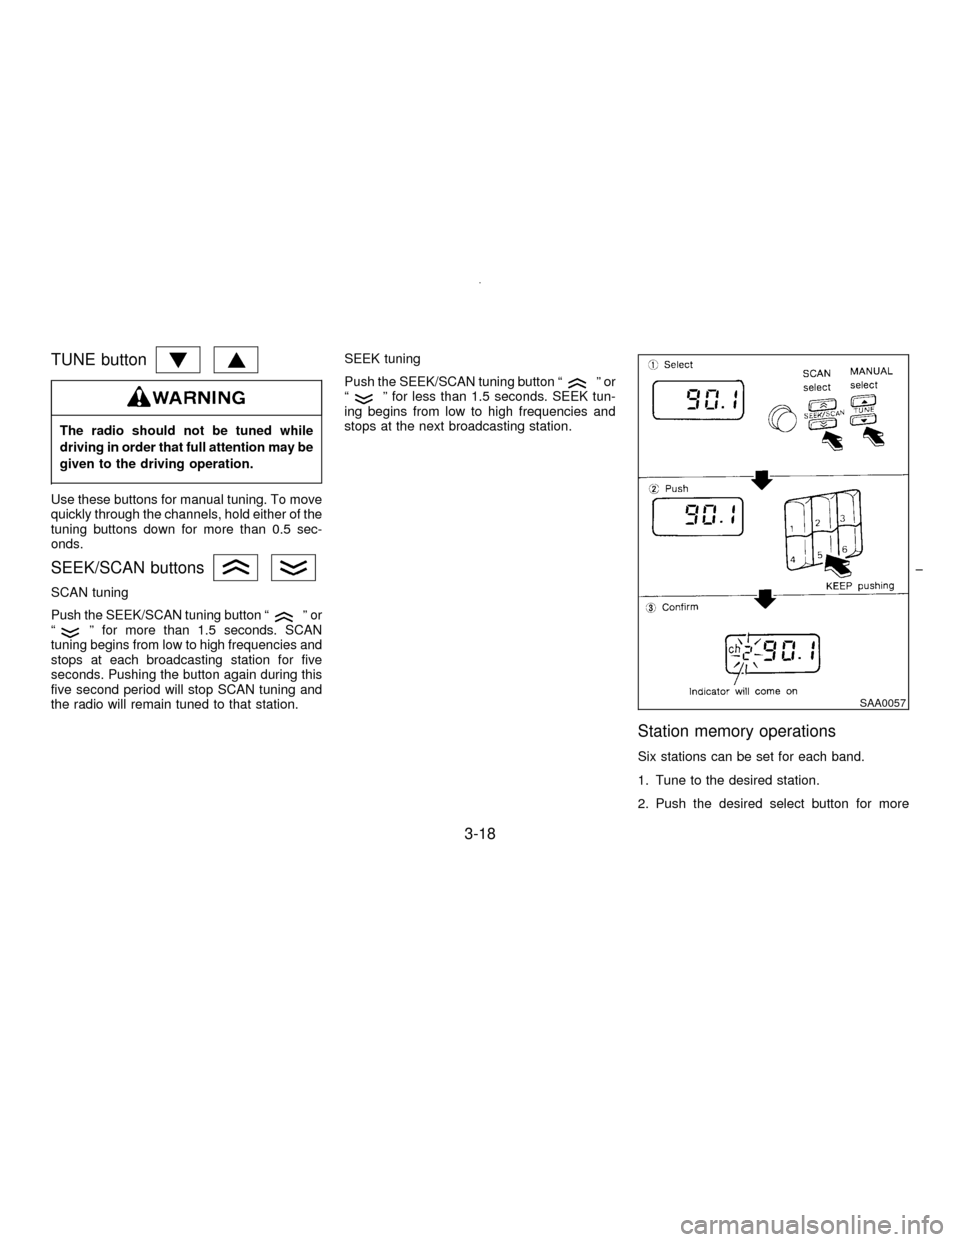
Station memory operations
Six stations can be set for each band.
1. Tune to the desired station.
2. Push the desired select button for more
SAA0057
3-18
Z01.2.1/A32-DX
Page 84 of 197

than 1.5 seconds. (For example, in the
diagram ch2 is to be memorized. The radio
ceases emitting sounds when the select
button is pushed.)
3. The indicator ªch2º will then come on and
the sound will resume. Memorizing is now
complete.
4. Other buttons can be set in the same
manner.
If the battery cable is disconnected, or if the
fuse blows, the radio memory will be can-
celled. In that case, reset the desired stations.
Cassette tape operation
Turn the ignition key to ªACCº or ªONº, and
then lightly insert the cassette tape into the
tape door. The cassette tape will be automati-
cally pulled into the player.
The radio or CD will turn off (if it is on) and the
cassette tape will begin to play.
Do not force the cassette tape into the tape
door.
Pressing strongly could cause player dam-
age.
If the system is turned off by pushing the
ª
º button with the cassette tape still in the
player, the tape will resume playing when thesystem is turned back on.
TAPE button
IWhen this button is pushed with the system
turned off and a tape loaded, the system
will come on and the tape will play.
IWhen this button is pushed with either the
radio or compact disc turned on and the
tape loaded, the compact disc or the radio
will automatically be turned off and the tape
will play.
While the tape is playing, pushing the TAPE
button stops the tape. Pushing the button
again allows the tape to play.
FF (fast forward), REW (rewind)
button
Push the FF (fast forward) button to fast for-
ward the tape. To rewind the tape, push the
REW (rewind) button. Either the indicator light
ª
ºorªº will come on when the FF or
REW function is started.
APS FF, APS REW button
When the APS FF button is pushed while the
tape is being played, the next program will
start to play from the beginning. Push the APS
FF button several times to skip through pro-grams. The tape will advance the number of
times the button is pushed (up to 9 programs).
When the APS REW button is pushed once,
the program being played starts over from the
beginning. Push several times to fast rewind
programs. The tape will go back the number of
times the button is pushed. Either the indicator
light ª
ºorªº will come on when the
APS FF or APS REW function is started.
This system searches at the blank intervals
between selections. If there is a blank interval
within one program or there is no interval
between programs, the system may not stop in
the desired or expected location.
PROG (program) button
Push the PROG (program) button to change
the tape side while the tape is being played.
The cassette tape will automatically change
directions to play the other side when the first
side is completed.
3-19
Z01.2.1/A32-DX
Page 85 of 197

Dolby NR (noise reduction)
button
Push theªDOLBY NRº button for Dolby
NR encoded tapes to reduce high frequency
tape noise. The indicator will come on.
Dolby noise reduction manufactured under li-
cense from Dolby Laboratories Licensing Cor-
poration. ªDOLBYº and the double-D symbol
are trademarks of Dolby Laboratories
Licensing Corporation.
Metal or chrome tape usage
The cassette player will be automatically set to
high performance play when playing a metal or
chrome cassette tape.
TAPE EJECT button
When this button is pushed with the tape
loaded, the tape will be ejected.
When the tape is ejected while it is being
played, the system will be turned off.
Precautions on cassette player
operation
ITo maintain good quality sound,
NISSAN recommends that you use cas-
sette tapes of 60 minutes or shorter in
length.ICassette tapes should be removed from
the player when not in use. Store cas-
settes in their protective cases and away
from direct sunlight, heat, moisture or
magnetic sources.
Direct sunlight can cause the cassette to
become deformed. The use of deformed
cassettes may cause the cassette to jam
in the player.
IDo not use cassettes that have peeling
or loose labels. If used, the label could
jam in the player.
IIf a cassette has loose tape, insert a
pencil through one of the cassette hubs
and rewind the tape firmly. Loose tape
may cause jamming and wavering
sound quality.
IOver a period of time, the playback
head, capstan and pinch roller may
gather a tape coating residue as the tape
passes over the head. This residue ac-
cumulation can cause a weak or waver-
ing sound and should be removed peri-
odically with a head cleaning tape.
If the residue is not removed periodi-
cally, the player may need to be disas-
sembled for cleaning.
3-20
Z01.2.1/A32-DX
Page 86 of 197

COMPACT DISC (CD) PLAYER
OPERATION
Turn the ignition key to the ªACCº or ªONº
position and insert the compact disc into the
slot with the label side facing up. The compact
disc will be guided automatically into the slot
and start playing.
After loading the disc, the number of tracks on
the disc and the play time will appear on the
display.
If the radio or tape is already operating, it will
automatically turn off and the compact disc will
play.
Forcing in the compact disc will damage
the player.
If the system has been turned off while the
compact disc was playing, pushing the
POWER button will start the compact disc.
CD button
When this button is pushed with the system off
and the compact disc loaded, the system will
turn on and the compact disc will start to play.
When this button is pushed with the compact
disc loaded but the tape or the radio playing,
the tape or radio will automatically be turned
off and the compact disc will start to play.When this button is pushed while the compact
disc is playing, the compact disc will stop
playing. When this button is pushed with the
compact disc stopped, the compact disc will
start to play.
FF (fast forward), REW (rewind)
button
When the FF (fast forward) or REW (rewind)
button is pushed while the compact disc is
being played, the compact disc will play while
fast forwarding or rewinding. When the button
is released, the compact disc will return to
normal play speed.
APS FF, APS REW button
When the APS FF button is pushed while the
compact disc is being played, the program
next to the present one will start to play from its
beginning. Push several times to skip through
programs. The compact disc will advance the
number of times the button is pushed. (When
the last program on the compact disc is
skipped through, the first program will be
played.) When the APS REW button is
pushed, the program being played returns to
its beginning. Push several times to skip back
through programs. The compact disc will go
back the number of times the button is pushed.
PROG (program) button
When this button is pushed while the compact
disc is being played, the play pattern will
change as follows:
ALL: All the programs will be played repeat-
edly in sequence.
1: Only one program (the one being played
when the PROG button is pushed) will be
repeated.
RANDOM: Programs will be played at random,
not following the sequence on the compact
disc. The same program may be repeated
twice.
(no mark): All the programs will be played in
sequence and stop when the last program is
finished.
IWhen the compact disc is ejected, the
play pattern will automatically change to
ALL.
3-21
Z01.2.1/A32-DX
Page 87 of 197

CD EJECT button
When the CD EJECT button is pushed with the
compact disc loaded, the compact disc will be
ejected.
When this button is pushed while the compact
disc is being played, the compact disc will
come out and the system will turn off.
If the compact disc comes out and is not
removed, it will be pulled back into the slot
to protect it.
CD (DISC) indicator light
This light comes on when the compact disc is
loaded.
IDuring cold weather or rainy days,
the player may malfunction due to the
humidity. If this occurs, remove the
CD and dehumidify or ventilate the
player completely.
IThe player may skip while driving on
rough roads.
IThe CD player sometimes cannot
function when the compartment tem-
perature is extremely high. Decreasethe temperature before use.
IDo not expose the CD to direct
sunlight.
Power antenna
The antenna will automatically extend when
the radio is turned on, and retract when
switched off. If the radio is left on, the antenna
will retract and extend with the ignition key
ªOFF-ONº operation.
IBefore turning the radio on, make
sure that there is no one near the
antenna outlet and there is enough
space for it to extend.
ITo prevent damage, be sure that an-
tenna is fully retracted before the
vehicle enters an automated car
wash.
IDirt and other foreign matter on the
power antenna rod may interrupt its
operation. Clean the rod periodically
with a damp cloth. This type of clean-
ing is especially important during the
winter seasons in areas where road
salt and other chemicals may be
spread on road surfaces and
splashed onto the antenna rod.
ANTENNA
3-22
Z01.2.1/A32-DX
Page 88 of 197

When installing a CB, ham radio or a car
phone in your NISSAN, be sure to observe the
following cautions, otherwise the new equip-
ment may adversely affect the MFI (Multiport
Fuel Injection) system and other electronic
parts.
IKeep the antenna as far as possible
away from the Engine Control Mod-
ule.
IAlso keep the antenna wire more than
8 inches (20 cm) away from the MFI
harness. Do not route the antenna
wire next to any harness.
IAdjust the antenna standing-wave ra-
tio as recommended by the manufac-
turer.
IConnect the ground wire from the CB
radio chassis to the body.
IFor details, consult a NISSAN dealer.
CB RADIO OR CAR PHONE
3-23
Z01.2.1/A32-DX
Page 89 of 197

MEMO
3-24
Z01.2.1/A32-DX
Page 90 of 197

4 Starting and driving
Precautions when starting and driving ...................... 4-2
Avoiding collision and rollover................................... 4-3
Drinking alcohol/drugs and driving ............................ 4-4
Ignition switch............................................................ 4-4
Before starting the engine ......................................... 4-6
Driving with automatic transmission.......................... 4-6
Driving with manual transmission ............................. 4-9
Starting the engine .................................................. 4-10
Parking brake .......................................................... 4-11
Cruise control .......................................................... 4-12
Break-in schedule ................................................... 4-13
Economy hints......................................................... 4-14
Parking/Parking on hills........................................... 4-15
Precautions when driving ........................................ 4-16
Anti-lock brake system ............................................ 4-17
Cold weather driving cautions ................................. 4-18
Z01.2.1/A32-DX