grease NISSAN NAVARA 2005 Repair Owner's Manual
[x] Cancel search | Manufacturer: NISSAN, Model Year: 2005, Model line: NAVARA, Model: NISSAN NAVARA 2005Pages: 3171, PDF Size: 49.59 MB
Page 886 of 3171
CO-2
PRECAUTIONS
PRECAUTIONS
PFP:00001
Precautions For Liquid GasketEBS01E6J
LIQUID GASKET APPLICATION PROCEDURE
1. Remove old liquid gasket adhering to the liquid gasket application surface and the mating surface.
lRemove liquid gasket completely from the liquid gasket application surface, mounting bolts, and bolt
holes.
2. Wipe the liquid gasket application surface and the mating surface with white gasoline (lighting and heating
use) to remove adhering moisture, grease and foreign materials.
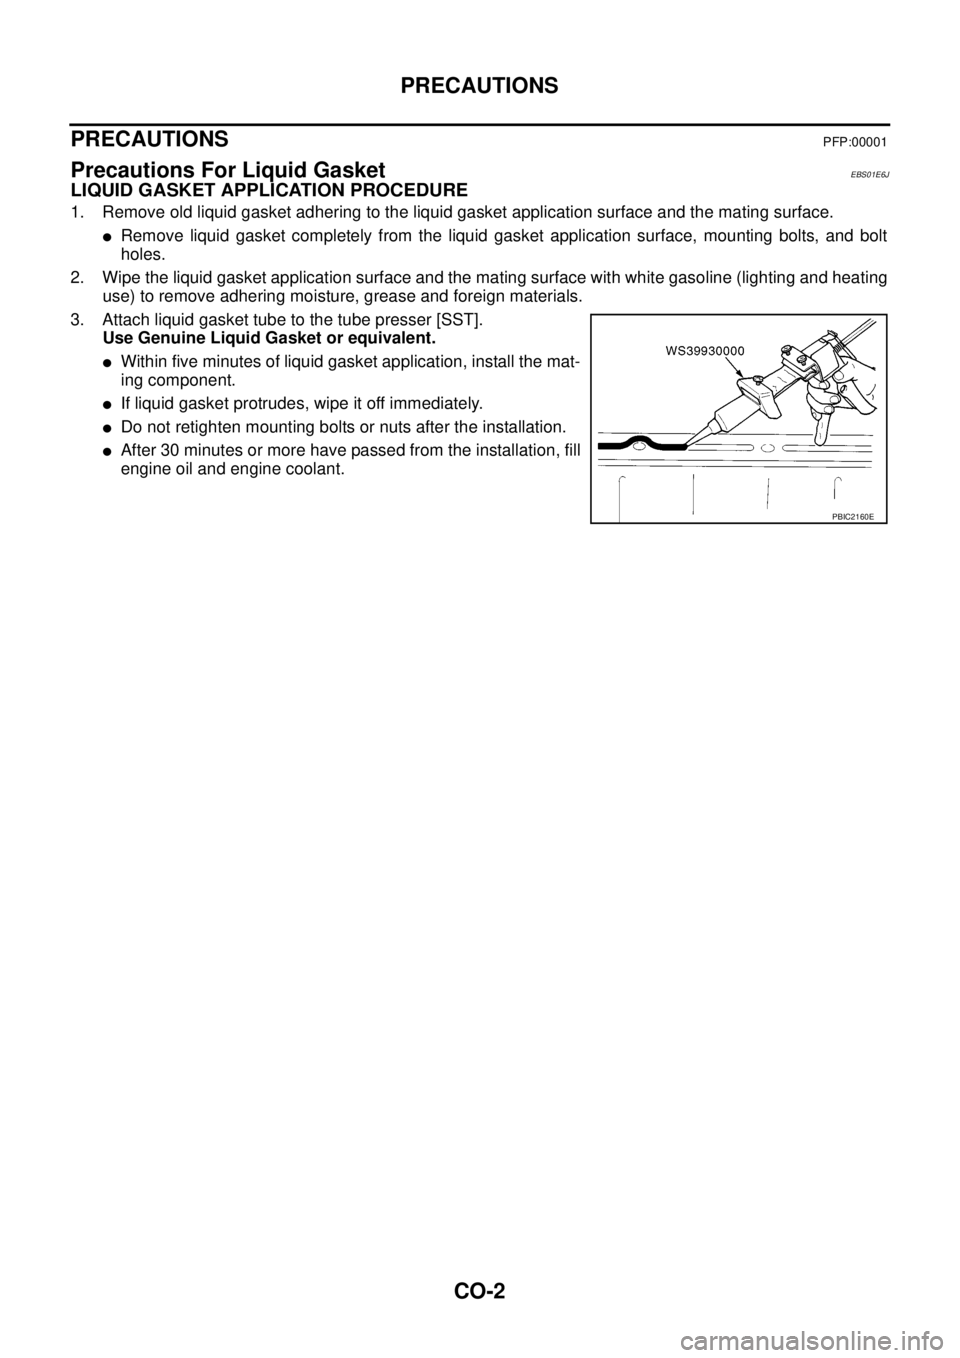
3. Attach liquid gasket tube to the tube presser [SST].
Use Genuine Liquid Gasket or equivalent.
lWithin five minutes of liquid gasket application, install the mat-
ing component.
lIf liquid gasket protrudes, wipe it off immediately.
lDo not retighten mounting bolts or nuts after the installation.
lAfter 30 minutes or more have passed from the installation, fill
engine oil and engine coolant.
PBIC2160E
Page 990 of 3171
EC-10
PRECAUTIONS
PRECAUTIONS
PFP:00001
Precautions for Supplemental Restraint System (SRS) “AIR BAG” and “SEAT
BELT PRE-TENSIONER”
EBS01KC5
The Supplemental Restraint System such as “AIR BAG” and “SEAT BELT PRE-TENSIONER”, used along
with a front seat belt, helps to reduce the risk or severity of injury to the driver and front passenger for certain
types of collision. Information necessary to service the system safely is included in the SRS and SB section of
this Service Manual.
WARNING:
lTo avoid rendering the SRS inoperative, which could increase the risk of personal injury or death
in the event of a collision which would result in air bag inflation, all maintenance must be per-
formed by an authorized NISSAN/INFINITI dealer.
lImproper maintenance, including incorrect removal and installation of the SRS, can lead to per-
sonal injury caused by unintentional activation of the system. For removal of Spiral Cable and Air
Bag Module, see the SRS section.
lDo not use electrical test equipment on any circuit related to the SRS unless instructed to in this
Service Manual. SRS wiring harnesses can be identified by yellow and/or orange harnesses or
harness connectors.
On Board Diagnostic (OBD) System of EngineEBS01KC6
The ECM has an on board diagnostic system. It will light up the malfunction indicator (MI) to warn the driver of
a malfunction causing emission deterioration.
CAUTION:
lBe sure to turn the ignition switch OFF and disconnect the battery negative cable before any
repair or inspection work. The open/short circuit of related switches, sensors, solenoid valves,
etc. will cause the MI to light up.
lBe sure to connect and lock the connectors securely after work. A loose (unlocked) connector will
cause the MI to light up due to the open circuit. (Be sure the connector is free from water, grease,
dirt, bent terminals, etc.)
lCertain systems and components, especially those related to OBD, may use a new style slide-
locking type harness connector. For description and how to disconnect, refer toPG-75, "
HAR-
NESS CONNECTOR".
lBe sure to route and secure the harnesses properly after work. The interference of the harness
with a bracket, etc. may cause the MI to light up due to the short circuit.
lBe sure to connect rubber tubes properly after work. A misconnected or disconnected rubber tube
may cause the MI to light up due to the malfunction of the fuel system, etc.
lBe sure to erase the unnecessary malfunction information (repairs completed) from the ECM
before returning the vehicle to the customer.
PrecautionsEBS01KC7
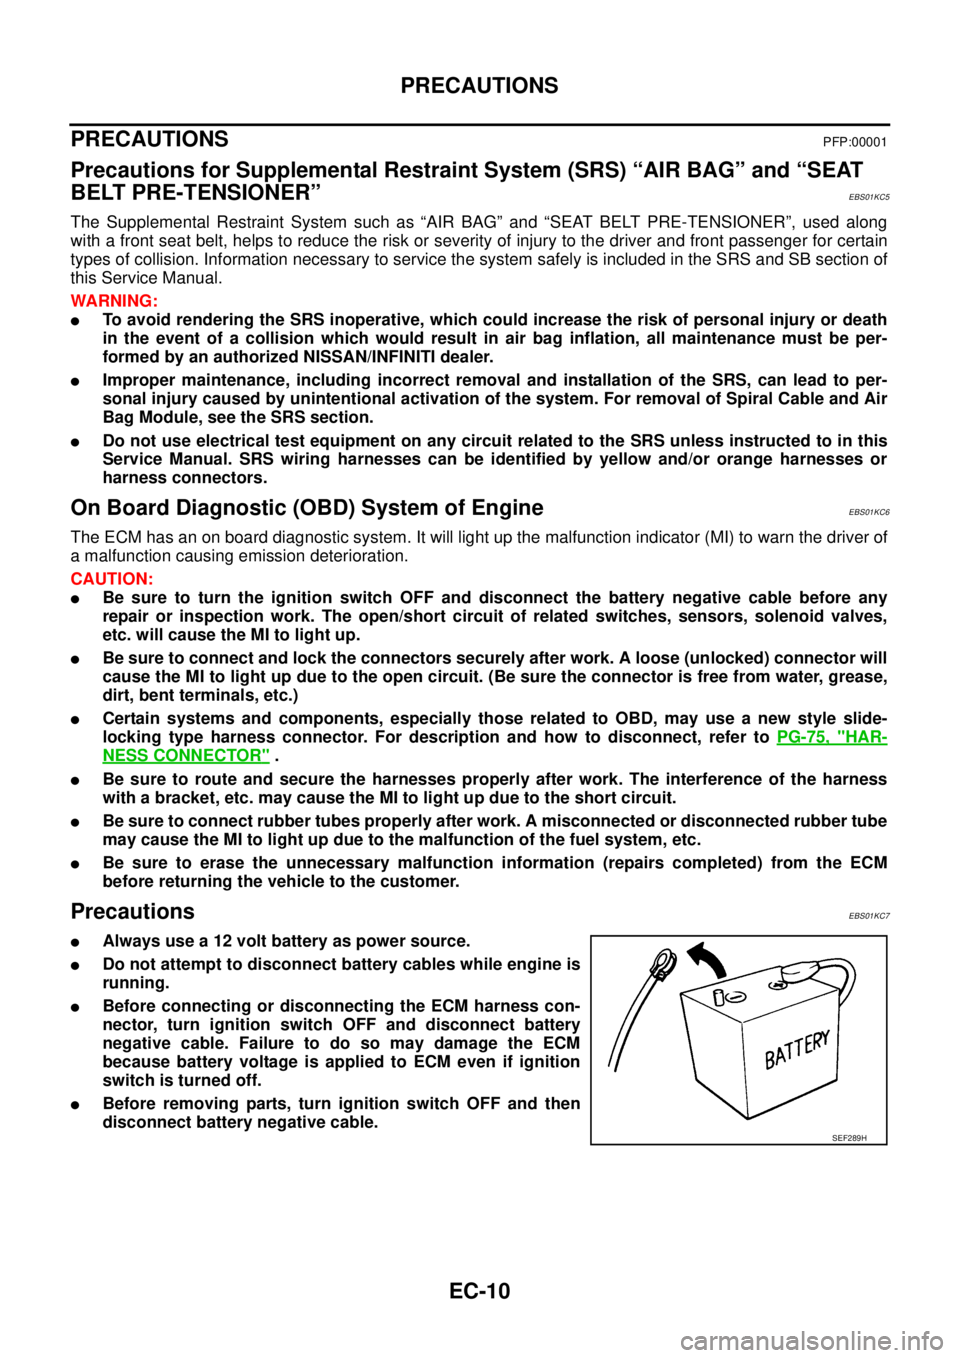
lAlways use a 12 volt battery as power source.
lDo not attempt to disconnect battery cables while engine is
running.
lBefore connecting or disconnecting the ECM harness con-
nector, turn ignition switch OFF and disconnect battery
negative cable. Failure to do so may damage the ECM
because battery voltage is applied to ECM even if ignition
switch is turned off.
lBefore removing parts, turn ignition switch OFF and then
disconnect battery negative cable.
SEF289H
Page 1367 of 3171
SIDE GUARD MOLDING
EI-29
C
D
E
F
G
H
J
K
L
MA
B
EI
REMOVAL
CAUTION:
Never apply tack-paper adhesive remover to body panel surface finished with lacquer-based paints.
lOriginal side guard molding is affixed to body panel with double-faced adhesive tape.
1. Heat molding to between 30°and 40°C(86°to 104°F) with a heat gun.
2. Raise end of molding and cut away tape to remove molding. Remove all traces of tape.
INSTALLATION
lOn vehicles coated with Hard Clear Coat, use double-faced 3M adhesive tape Product No. 4210 or equiv-
alent, after priming with 3M primer Product No. N200, C-100 or equivalent.
lThe repair parts are also affixed with double-faced adhesive tape.
lTo re-use existing molding, clean all traces of double sided tape from the molding and apply new double-
facedtapetothemolding.
1. Clean the panel surface with isopropyl alcohol or equivalent to degrease the surface.
2. Heat the panel and molding tape surface to 30°to 40°C(86°to 104°F).
3. Remove the backing sheet from the tape surface.
lAlign the locating pin into the hole in the outer door.
lContinue aligning the pins into their corresponding holes in the outer door during installation.
4. Press ends by hand and use a roller to apply 5 kg-f (11 lbs-f) to press molding to door surface.
lApply even pressure along molding to insure proper wet out.
CAUTION:
To secure contact, do not wash vehicle for 24 hours after installation.
Page 1387 of 3171
PRECAUTIONS
EM-5
C
D
E
F
G
H
I
J
K
L
MA
EM
Precautions For Liquid GasketEBS01E5N
REMOVAL OF LIQUID GASKET
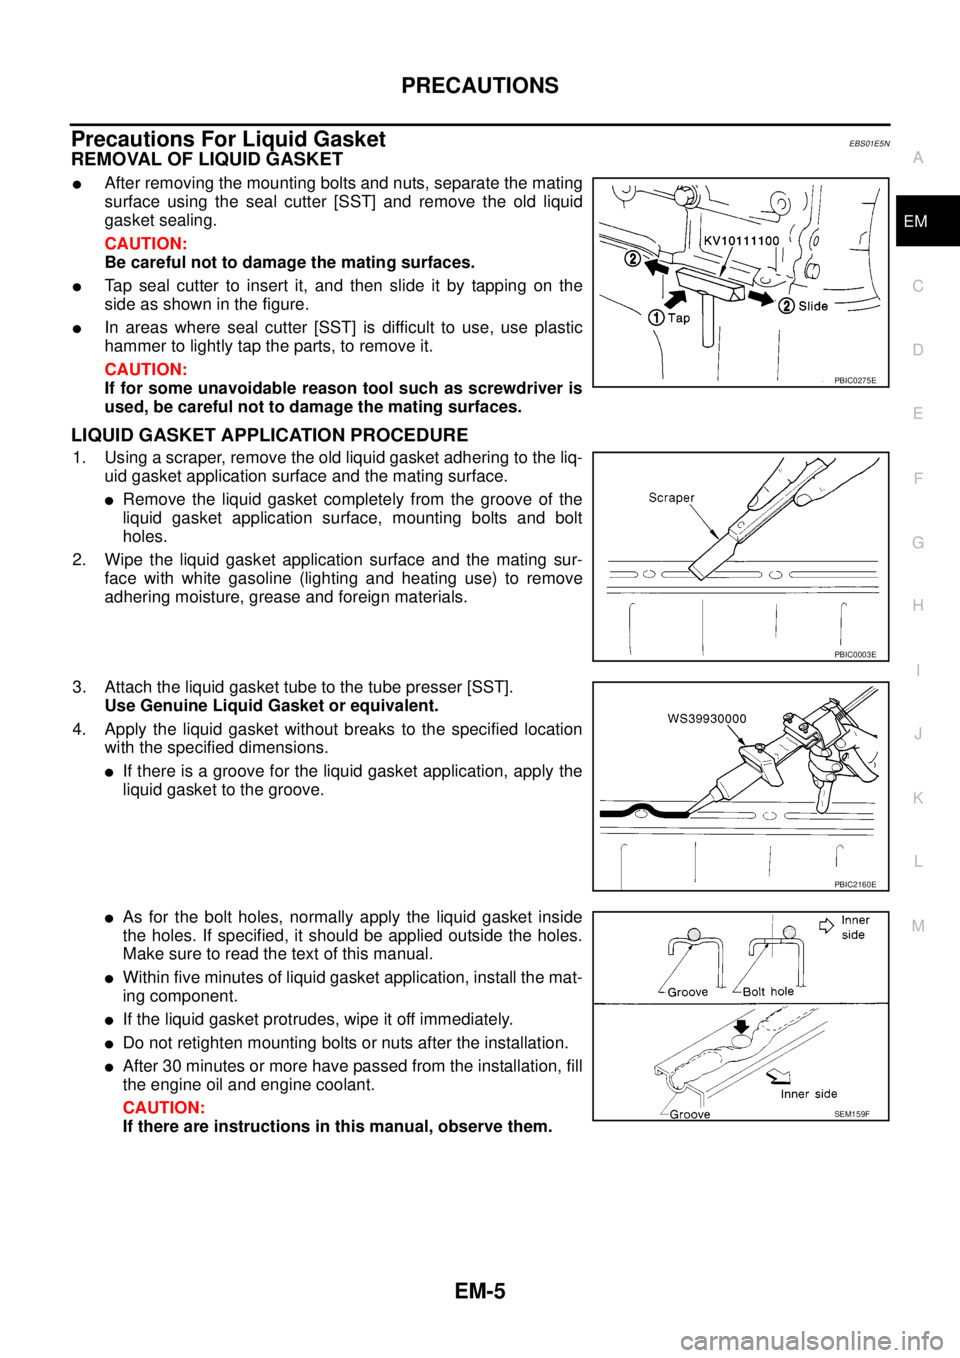
lAfter removing the mounting bolts and nuts, separate the mating
surface using the seal cutter [SST] and remove the old liquid
gasket sealing.
CAUTION:
Be careful not to damage the mating surfaces.
lTap seal cutter to insert it, and then slide it by tapping on the
side as shown in the figure.
lIn areas where seal cutter [SST] is difficult to use, use plastic
hammer to lightly tap the parts, to remove it.
CAUTION:
If for some unavoidable reason tool such as screwdriver is
used, be careful not to damage the mating surfaces.
LIQUID GASKET APPLICATION PROCEDURE
1. Using a scraper, remove the old liquid gasket adhering to the liq-
uid gasket application surface and the mating surface.
lRemove the liquid gasket completely from the groove of the
liquid gasket application surface, mounting bolts and bolt
holes.
2. Wipe the liquid gasket application surface and the mating sur-
face with white gasoline (lighting and heating use) to remove
adhering moisture, grease and foreign materials.
3. Attach the liquid gasket tube to the tube presser [SST].
Use Genuine Liquid Gasket or equivalent.
4. Apply the liquid gasket without breaks to the specified location
with the specified dimensions.
lIf there is a groove for the liquid gasket application, apply the
liquid gasket to the groove.
lAs for the bolt holes, normally apply the liquid gasket inside
the holes. If specified, it should be applied outside the holes.
Make sure to read the text of this manual.
lWithin five minutes of liquid gasket application, install the mat-
ing component.
lIf the liquid gasket protrudes, wipe it off immediately.
lDo not retighten mounting bolts or nuts after the installation.
lAfter 30 minutes or more have passed from the installation, fill
the engine oil and engine coolant.
CAUTION:
If there are instructions in this manual, observe them.
PBIC0275E
PBIC0003E
PBIC2160E
SEM159F
Page 1538 of 3171
FAX-6
WHEEL HUB
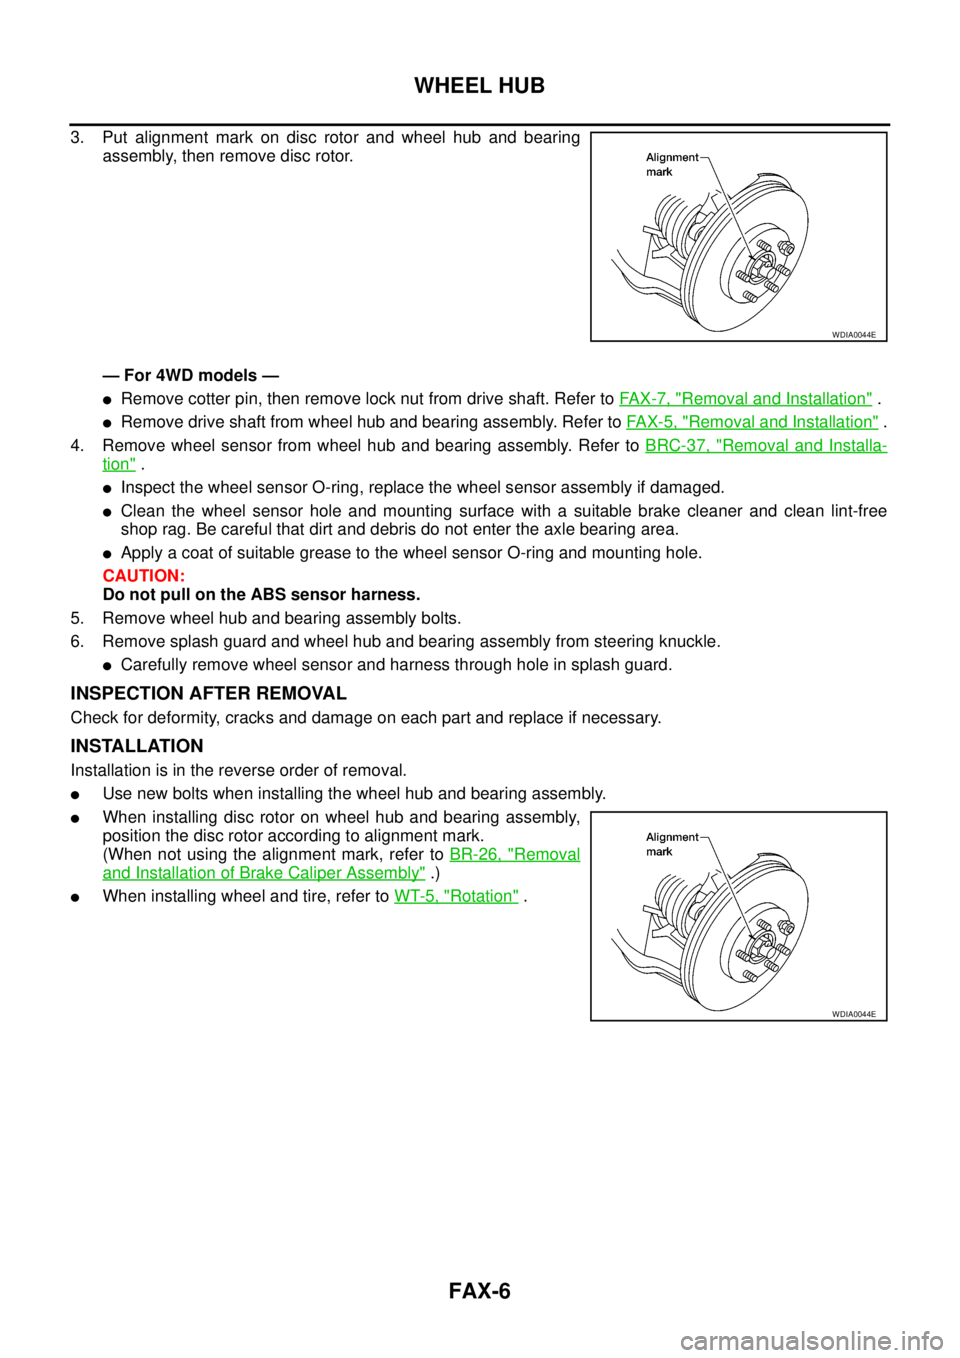
3. Put alignment mark on disc rotor and wheel hub and bearing
assembly, then remove disc rotor.
— For 4WD models —
lRemove cotter pin, then remove lock nut from drive shaft. Refer toFA X - 7 , "Removal and Installation".
lRemove drive shaft from wheel hub and bearing assembly. Refer toFAX-5, "Removal and Installation".
4. Remove wheel sensor from wheel hub and bearing assembly. Refer toBRC-37, "
Removal and Installa-
tion".
lInspect the wheel sensor O-ring, replace the wheel sensor assembly if damaged.
lClean the wheel sensor hole and mounting surface with a suitable brake cleaner and clean lint-free
shop rag. Be careful that dirt and debris do not enter the axle bearing area.
lApply a coat of suitable grease to the wheel sensor O-ring and mounting hole.
CAUTION:
Do not pull on the ABS sensor harness.
5. Remove wheel hub and bearing assembly bolts.
6. Remove splash guard and wheel hub and bearing assembly from steering knuckle.
lCarefully remove wheel sensor and harness through hole in splash guard.
INSPECTION AFTER REMOVAL
Check for deformity, cracks and damage on each part and replace if necessary.
INSTALLATION
Installation is in the reverse order of removal.
lUse new bolts when installing the wheel hub and bearing assembly.
lWhen installing disc rotor on wheel hub and bearing assembly,
position the disc rotor according to alignment mark.
(When not using the alignment mark, refer toBR-26, "
Removal
and Installation of Brake Caliper Assembly".)
lWhen installing wheel and tire, refer toWT-5, "Rotation".
WDIA0044E
WDIA0044E
Page 1539 of 3171
DRIVE SHAFT
FAX-7
C
E
F
G
H
I
J
K
L
MA
B
FA X
DRIVE SHAFTPFP:39100
Removal and InstallationEDS003I9
REMOVAL
1. Remove wheel.
2. Remove ABS sensor harness from mount on knuckle, then disconnect ABS sensor harness connector.
CAUTION:
Do not pull on ABS sensor harness.
3. Remove steering knuckle. Refer toFSU-16, "
Removal and Installation".
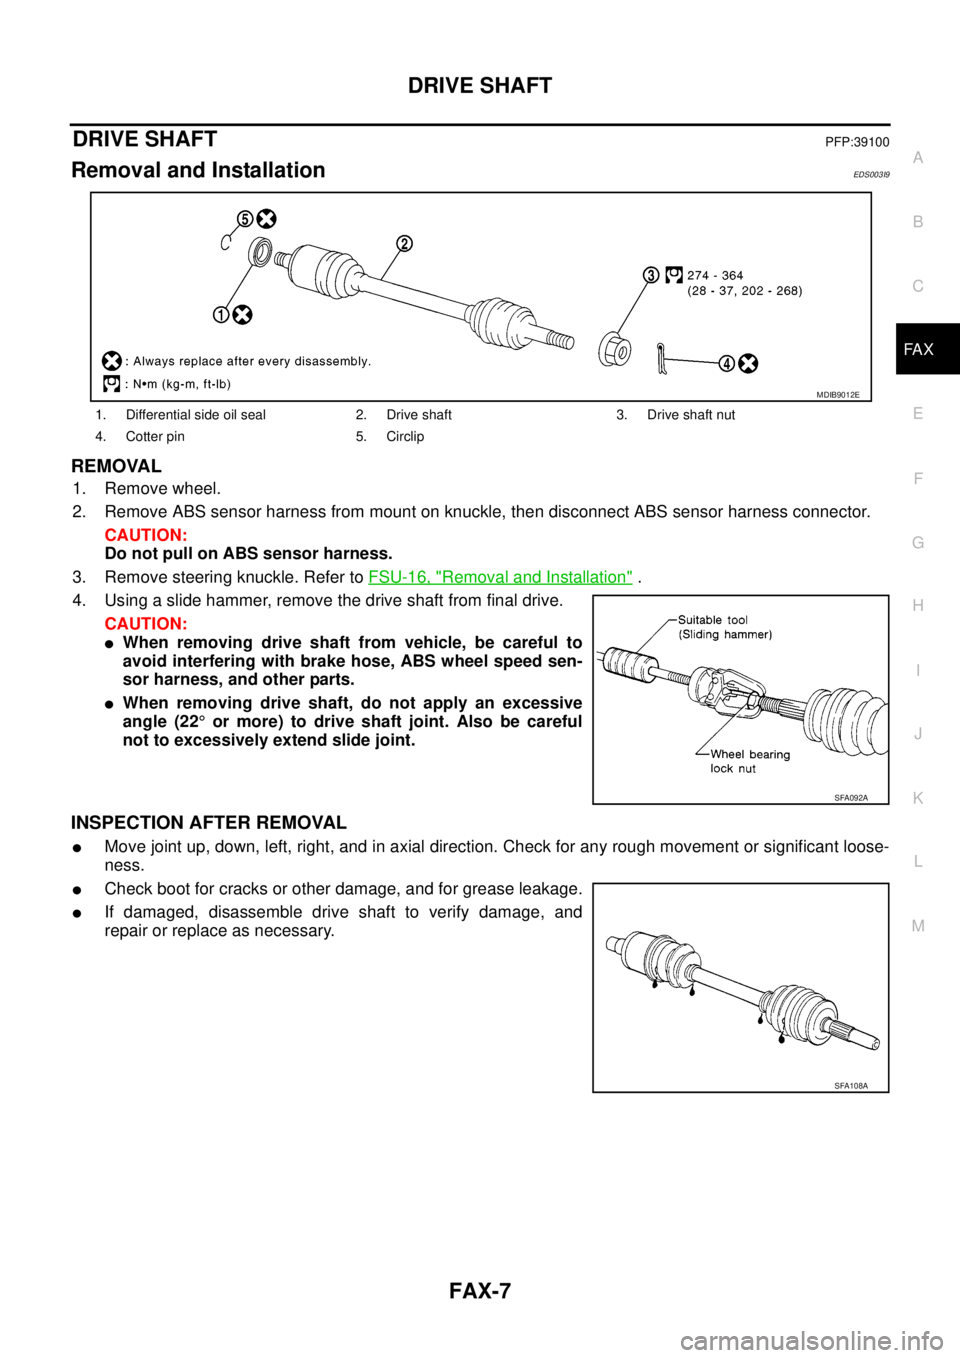
4. Using a slide hammer, remove the drive shaft from final drive.
CAUTION:
lWhen removing drive shaft from vehicle, be careful to
avoid interfering with brake hose, ABS wheel speed sen-
sor harness, and other parts.
lWhen removing drive shaft, do not apply an excessive
angle (22°or more) to drive shaft joint. Also be careful
not to excessively extend slide joint.
INSPECTION AFTER REMOVAL
lMove joint up, down, left, right, and in axial direction. Check for any rough movement or significant loose-
ness.
lCheck boot for cracks or other damage, and for grease leakage.
lIf damaged, disassemble drive shaft to verify damage, and
repair or replace as necessary.
1. Differential side oil seal 2. Drive shaft 3. Drive shaft nut
4. Cotter pin 5. Circlip
MDIB9012E
SFA092A
SFA108A
Page 1541 of 3171
DRIVE SHAFT
FAX-9
C
E
F
G
H
I
J
K
L
MA
B
FA X
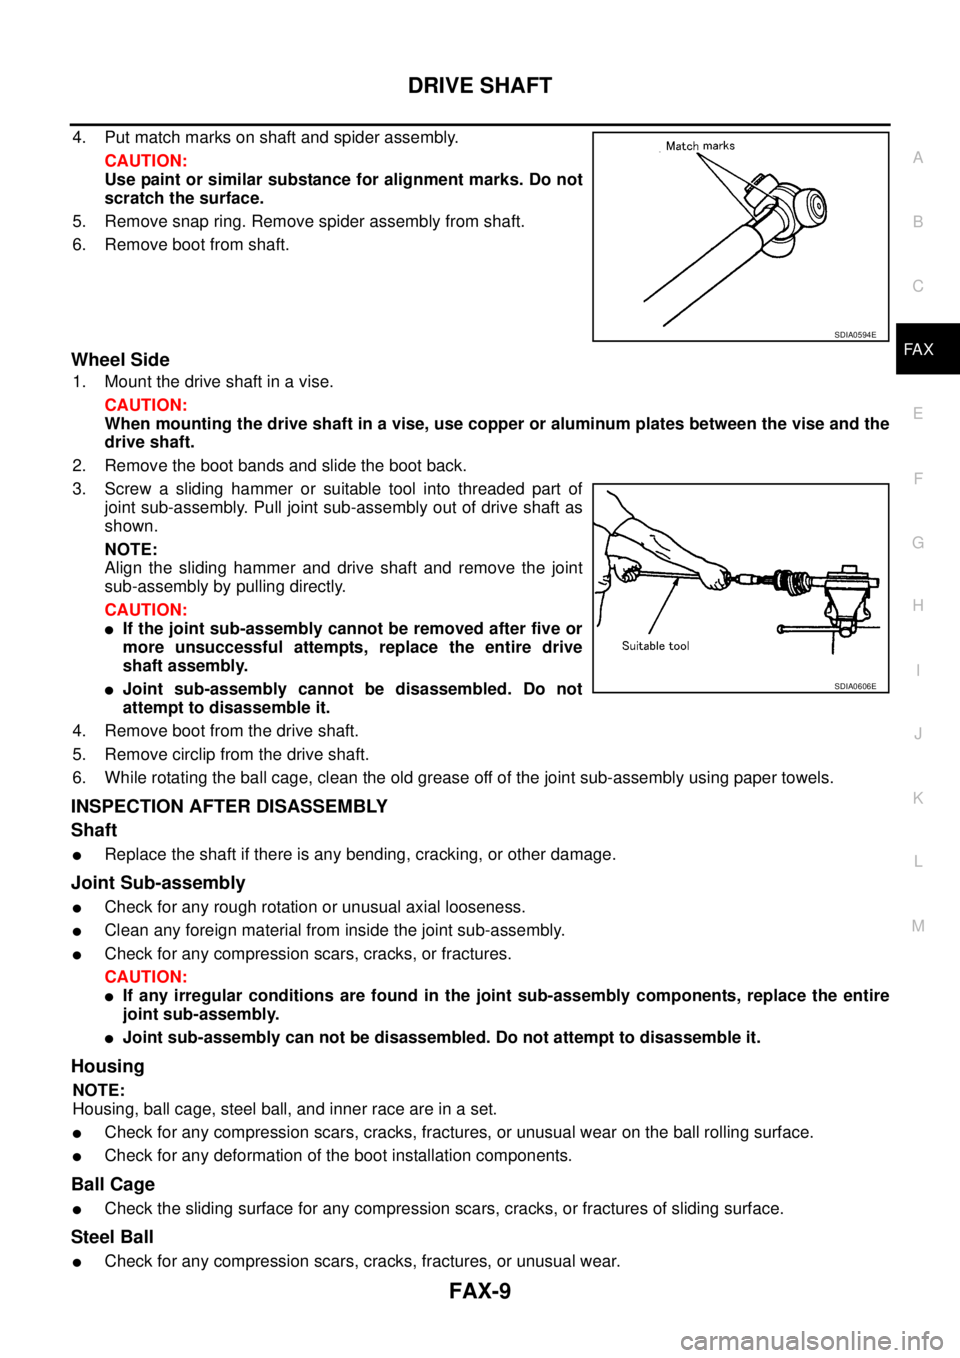
4. Put match marks on shaft and spider assembly.
CAUTION:
Use paint or similar substance for alignment marks. Do not
scratch the surface.
5. Remove snap ring. Remove spider assembly from shaft.
6. Remove boot from shaft.
Wheel Side
1. Mount the drive shaft in a vise.
CAUTION:
When mounting the drive shaft in a vise, use copper or aluminum plates between the vise and the
drive shaft.
2. Remove the boot bands and slide the boot back.
3. Screw a sliding hammer or suitable tool into threaded part of
joint sub-assembly. Pull joint sub-assembly out of drive shaft as
shown.
NOTE:
Align the sliding hammer and drive shaft and remove the joint
sub-assembly by pulling directly.
CAUTION:
lIf the joint sub-assembly cannot be removed after five or
more unsuccessful attempts, replace the entire drive
shaft assembly.
lJoint sub-assembly cannot be disassembled. Do not
attempt to disassemble it.
4. Remove boot from the drive shaft.
5. Remove circlip from the drive shaft.
6. While rotating the ball cage, clean the old grease off of the joint sub-assembly using paper towels.
INSPECTION AFTER DISASSEMBLY
Shaft
lReplace the shaft if there is any bending, cracking, or other damage.
Joint Sub-assembly
lCheck for any rough rotation or unusual axial looseness.
lClean any foreign material from inside the joint sub-assembly.
lCheck for any compression scars, cracks, or fractures.
CAUTION:
lIf any irregular conditions are found in the joint sub-assembly components, replace the entire
joint sub-assembly.
lJoint sub-assembly can not be disassembled. Do not attempt to disassemble it.
Housing
NOTE:
Housing, ball cage, steel ball, and inner race are in a set.
lCheck for any compression scars, cracks, fractures, or unusual wear on the ball rolling surface.
lCheck for any deformation of the boot installation components.
Ball Cage
lCheck the sliding surface for any compression scars, cracks, or fractures of sliding surface.
Steel Ball
lCheck for any compression scars, cracks, fractures, or unusual wear.
SDIA0594E
SDIA0606E
Page 1542 of 3171

FAX-10
DRIVE SHAFT
Inner Race
lCheck the ball sliding surface for any compression scars, cracks, or fractures.
lCheck for any damage to the serrated part.
ASSEMBLY
Final Drive Side
1. Wrap the serrated part of the drive shaft with tape. Install the
boot band and boot to drive shaft.
CAUTION:
Discard the old boot band and boot: replace with new ones.
2. Remove the tape wound around the serrated part of the shaft.
3. Line up alignment marks which were made when spider assem-
bly was removed. Install spider assembly, with serration chamfer
facing drive shaft.
4. Secure spider assembly with snap ring.
CAUTION:
Discard the old snap ring: replace with new ones.
5. Apply Nissan genuine grease or equivalent to spider assembly
and sliding surface.
6. Line up matching marks on shaft and housing, and install sliding
joint housing to spider assembly. Add remaining grease up to
the amount listed below.
7. Install the stopper ring onto the housing.
CAUTION:
lDo not reuse stopper rings.
lMake sure that housing and stopper ring are fully engaged.
SFA800
SDIA0598E
Grease capacity: MT: 134 - 144g (4.73 - 5.08 oz)
AT: 134 - 144g (4.73 - 5.08 oz)
SDIA1446E
Page 1543 of 3171

DRIVE SHAFT
FAX-11
C
E
F
G
H
I
J
K
L
MA
B
FA X
8. Install the boot securely into the grooves (indicated by * marks)
as shown.
CAUTION:
If there is grease on boot mounting surfaces (indicated by *
marks) of shaft and housing, boot may come off. Remove
all grease from surfaces.
9. Check that the boot installation length “L” is the length indicated below. Insert a flat-tip screwdriver or sim-
ilar tool into bigger side of boot. Bleed air from boot to prevent boot deformation.
CAUTION:
lThe boot may break if the boot installation length is less than the specified value.
lDo not to touch the tip of the screwdriver to the inside of the boot.
10. Usingabootbandcrimpingtool,securethesmallendofthe
boot with a new boot band as shown.
CAUTION:
Discard the old boot band and boot: replace with new ones.
lWhen fixing boot band, fix so that the M diameter on the
drawing becomes as follows.
11. Secure the boot big end with a new boot band as shown.
NOTE:
Discard old boot band; replace with new one.
12. After the installation of boot bands, make sure that they stay in the correct position when rotating boot.
Install them with new boot band when the mounting positions become incorrect.
MDIB9037E
Boot installation length “L ” MT: 176 - 178 mm (6.93 - 7.01 in)
AT: 176 - 178 mm (6.93 - 7.01 in)
MDIB9040E
M diameter (big ends): 1.0 - 4.0 mm (0.39 - 1.57 in)
M diameter (small ends): 1.0 - 4.0 mm (0.39 - 1.57 in)
DSF0047D
SFA443B
Page 1544 of 3171
FAX-12
DRIVE SHAFT
13. Install circlip and dust cover to housing.
NOTE:
Do not reuse circlip and dust cover.
Wheel Side
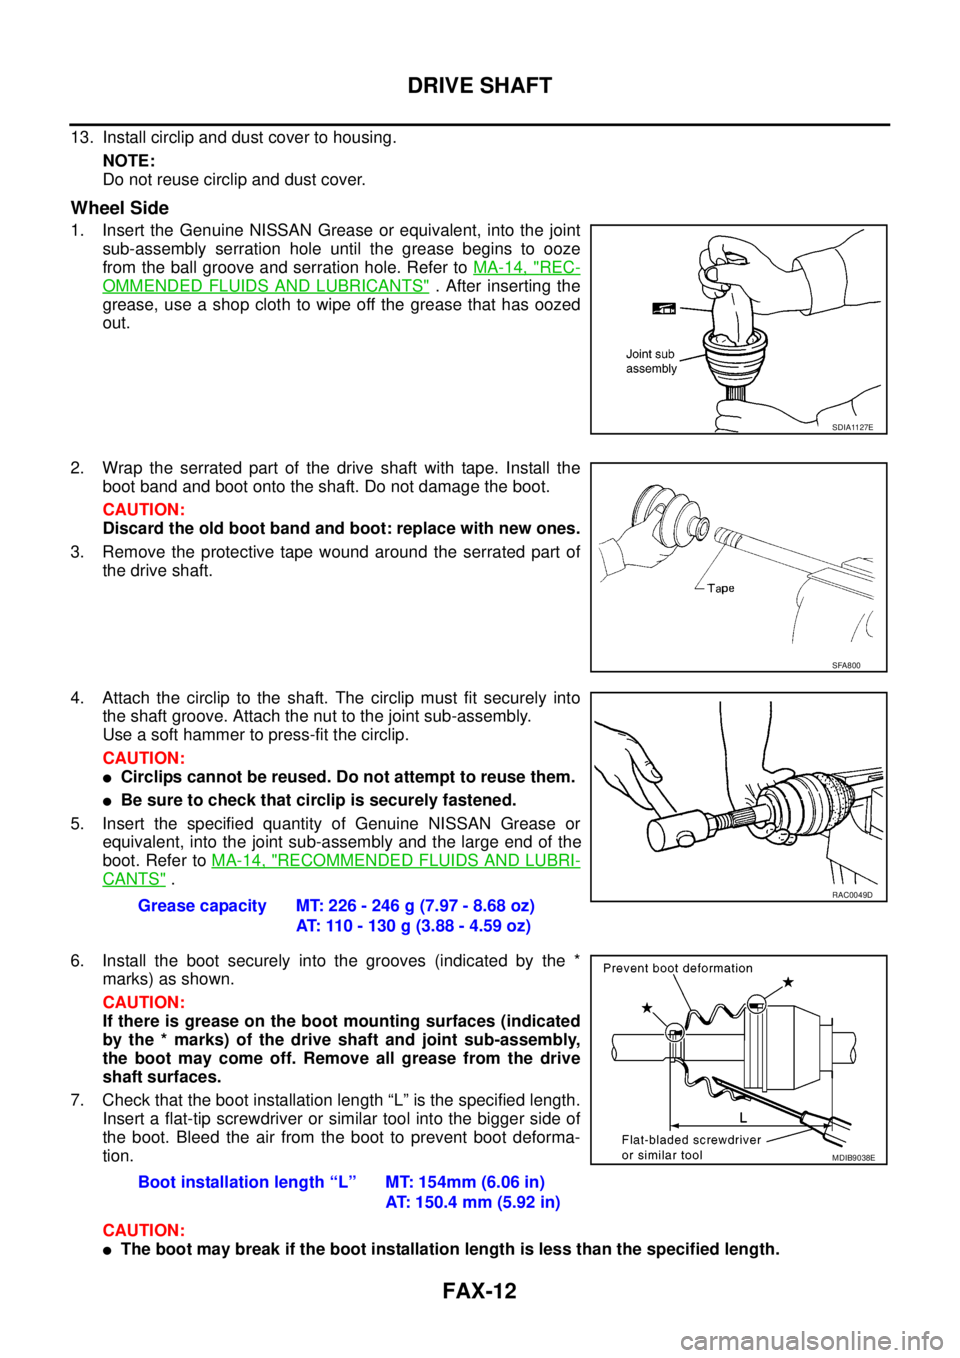
1. Insert the Genuine NISSAN Grease or equivalent, into the joint
sub-assembly serration hole until the grease begins to ooze
from the ball groove and serration hole. Refer toMA-14, "
REC-
OMMENDED FLUIDS AND LUBRICANTS". After inserting the
grease, use a shop cloth to wipe off the grease that has oozed
out.
2. Wrap the serrated part of the drive shaft with tape. Install the
boot band and boot onto the shaft. Do not damage the boot.
CAUTION:
Discard the old boot band and boot: replace with new ones.
3. Remove the protective tape wound around the serrated part of
the drive shaft.
4. Attach the circlip to the shaft. The circlip must fit securely into
the shaft groove. Attach the nut to the joint sub-assembly.
Useasofthammertopress-fitthecirclip.
CAUTION:
lCirclips cannot be reused. Do not attempt to reuse them.
lBe sure to check that circlip is securely fastened.
5. Insert the specified quantity of Genuine NISSAN Grease or
equivalent, into the joint sub-assembly and the large end of the
boot. Refer toMA-14, "
RECOMMENDED FLUIDS AND LUBRI-
CANTS".
6. Install the boot securely into the grooves (indicated by the *
marks) as shown.
CAUTION:
If there is grease on the boot mounting surfaces (indicated
by the * marks) of the drive shaft and joint sub-assembly,
the boot may come off. Remove all grease from the drive
shaft surfaces.
7. Check that the boot installation length “L” is the specified length.
Insert a flat-tip screwdriver or similar tool into the bigger side of
the boot. Bleed the air from the boot to prevent boot deforma-
tion.
CAUTION:
lThe boot may break if the boot installation length is less than the specified length.
SDIA1127E
SFA800
Grease capacity MT: 226 - 246 g (7.97 - 8.68 oz)
AT: 110 - 130 g (3.88 - 4.59 oz)RAC0049D
Boot installation length “L” MT: 154mm (6.06 in)
AT: 150.4 mm (5.92 in)
MDIB9038E