NISSAN NOTE 2016 Service Repair Manual
Manufacturer: NISSAN, Model Year: 2016, Model line: NOTE, Model: NISSAN NOTE 2016Pages: 3641, PDF Size: 28.72 MB
Page 2141 of 3641

CARGO LAMP CONTROL CIRCUITINL-47
< DTC/CIRCUIT DIAGNOSIS >
C
DE
F
G H
I
J
K
M A
B
INL
N
O P
3.CHECK CARGO LAMP SHORT CIRCUIT
1. Disconnect BCM harness connector.
2. Check continuity between BCM harness connector and ground.
With Intelligent Key system
Without Intelligent Key system
Is the inspection result normal?
YES >> Replace BCM after making sure battery saver out put/power supply circuit is not shorted to volt-
age. Refer to BCS-74, "
Removal and Installation" (with Intelligent Key system) or BCS-137,
"Removal and Installation" (without Intelligent Key system).
NO >> Repair or replace the harness or connector.
BCM
GroundContinuity
Connector Terminal
M100 49 No
BCM GroundContinuity
Connector Terminal
M20 70 No
Revision: August 2015 2016 Versa Note
cardiagn.com
Page 2142 of 3641

INL-48
< DTC/CIRCUIT DIAGNOSIS >
PUSH-BUTTON IGNITION SWITCH ILLUMINATION CIRCUIT
PUSH-BUTTON IGNITION SWITCH ILLUMINATION CIRCUIT
DescriptionINFOID:0000000012432748
Provides the power supply and the ground to control the push-button ignition switch illumination.
Component Function CheckINFOID:0000000012432749
1.CHECK PUSH-BUTTON IGNITION SWITCH ILLUMINATION OPERATION
CONSULT
1. Turn the ignition switch ON.
2. Select ENGINE SW ILLUMI of BCM (I NTELLGENT KEY) active test item.
3. While operating the test item, check that the push-button ignition switch illumination turns ON/OFF
Is the inspection result normal?
YES >> Push-button ignition switch illumination circuit is normal.
NO >> Refer to INL-48, "
Diagnosis Procedure".
Diagnosis ProcedureINFOID:0000000012432750
Regarding Wiring Diagram information, refer to INL-28, "Wiring Diagram".
1.CHECK PUSH-BUTTON IGNITION SWITCH ILLUMINATION OPERATION
CONSULT
1. Turn the ignition switch ON.
2. Select ENGINE SW ILLUMI of BCM (INTELLIGENT KEY) active test item.
3. While operating the test item, check voltage bet ween push-button ignition switch connector and ground.
Is the inspection result normal?
YES >> GO TO 4.
NO >> GO TO 2.
2.CHECK PUSH-BUTTON IGNITION SWITCH ILLUMINATION POWER SUPPLY OPEN CIRCUIT
1. Turn the ignition switch OFF.
2. Disconnect BCM connector and push-button ignition switch connector.
3. Check continuity between BCM connector and push-button ignition switch connector.
Is the inspection result normal?
YES >> GO TO 3.
NO >> Repair or replace the harness or connectors. ON : Push-button ignition switch illumination ON
OFF : Push-button ignition
switch illumination OFF
Te r m i n a l s
Te s t i t e m
Vo l ta g e
(+)
(-)
Push-button ignition switch
GroundENGINE SW ILLUMI
Connector Terminal
M25 5 ON
Battery voltage
OFF 0 V
BCM Push-button ignition switch
Continuity
Connector TerminalConnector Terminal
M 989 0M 25 5 Y es
Revision: August 2015 2016 Versa Note
cardiagn.com
Page 2143 of 3641

PUSH-BUTTON IGNITION SWITCH ILLUMINATION CIRCUITINL-49
< DTC/CIRCUIT DIAGNOSIS >
C
DE
F
G H
I
J
K
M A
B
INL
N
O P
3.CHECK PUSH-BUTTON IGNITION SWITCH ILLUMINATION POWER SUPPLY SHORT CIRCUIT
Check continuity between BCM connector M98 terminal 90 and ground.
Is the inspection result normal?
YES >> Replace BCM. Refer to BCS-74, "Removal and Installation".
NO >> Repair or replace the harness or connectors.
4.CHECK PUSH-BUTTON IGNITION SWIT CH ILLUMINATION GROUND CIRCUIT
1. Turn the ignition switch OFF
2. Disconnect push-button ignition switch connector.
3. Check continuity between push-butt on ignition switch connector and ground.
Is the inspection result normal?
YES >> Replace push-button ignition switch. Refer to PCS-77, "Removal and Installation".
NO >> GO TO 5.
5.CHECK PUSH-BUTTON IGNITION SWITCH ILLUMINATION GROUND OPEN CIRCUIT
1. Disconnect combination meter.
2. Check continuity between combination meter connector and push-button ignition switch connector.
Is the inspection result normal?
YES >> Replace combination meter. Refer to MWI-115, "Removal and Installation".
NO >> Repair or replace the harness or connectors.
BCM
GroundContinuity
Connector Terminal
M98 90 No
Push-button ignition switch
GroundContinuity
Connector Terminal
M25 6 Yes
Push-button ignition switchCombination meter
Continuity
Connector TerminalConnector Terminal
M25 6M24 16 Yes
Revision: August 2015 2016 Versa Note
cardiagn.com
Page 2144 of 3641
INL-50
< SYMPTOM DIAGNOSIS >
INTERIOR LIGHTING SYSTEM SYMPTOMS
SYMPTOM DIAGNOSIS
INTERIOR LIGHTING SYSTEM SYMPTOMS
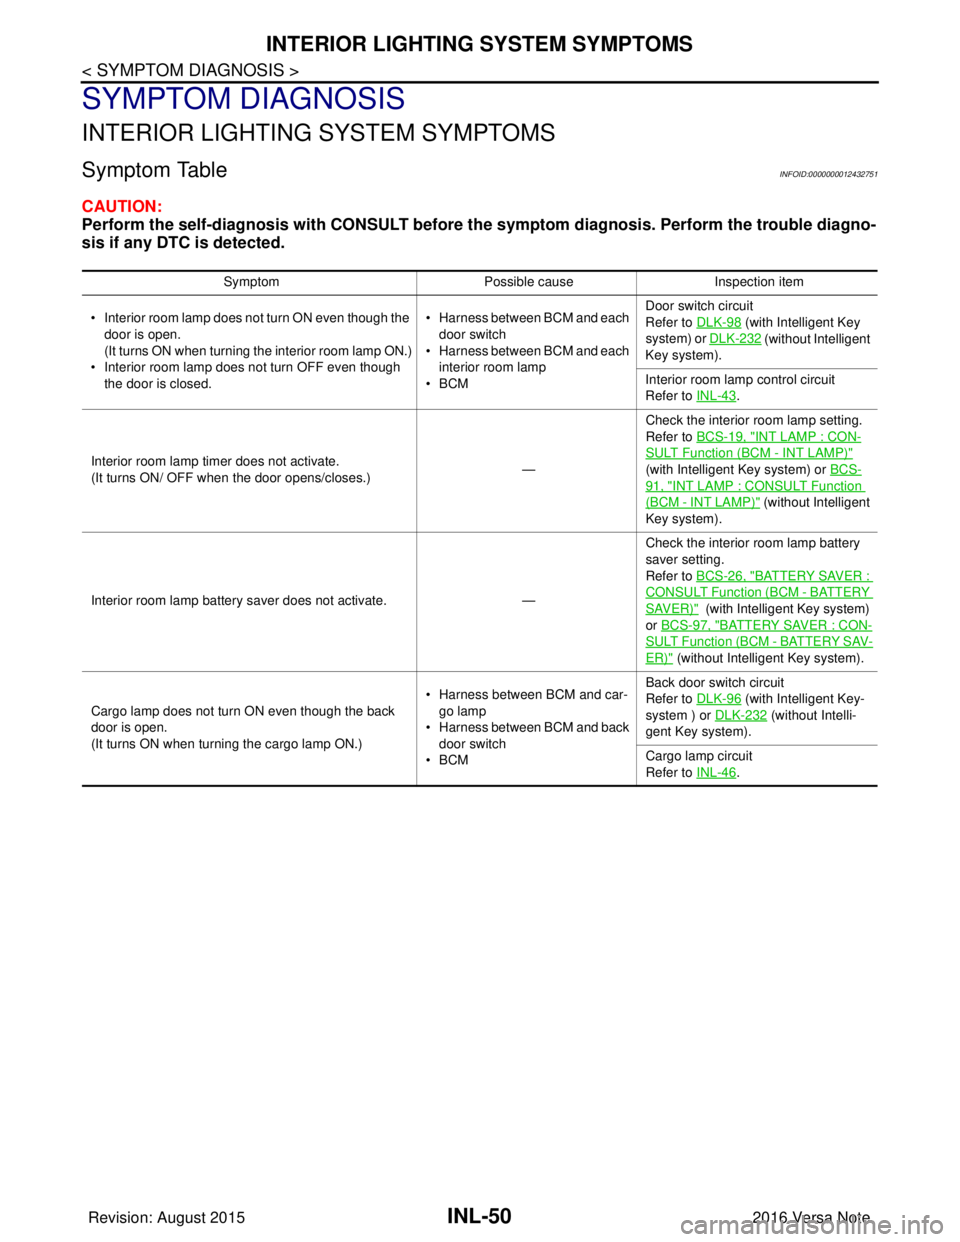
Symptom TableINFOID:0000000012432751
CAUTION:
Perform the self-diagnosis with CONSULT before the symptom diagnosis. Perform the trouble diagno-
sis if any DTC is detected.
Symptom Possible causeInspection item
• Interior room lamp does not turn ON even though the door is open.
(It turns ON when turning the interior room lamp ON.)
• Interior room lamp does not turn OFF even though
the door is closed. • Harness between BCM and each
door switch
• Harness between BCM and each interior room lamp
•BCM Door switch circuit
Refer to DLK-98
(with Intelligent Key
system) or DLK-232
(without Intelligent
Key system).
Interior room lamp control circuit
Refer to INL-43
.
Interior room lamp timer does not activate.
(It turns ON/ OFF when the door opens/closes.) —Check the interior room lamp setting.
Refer to BCS-19, "
INT LAMP : CON-
SULT Function (BCM - INT LAMP)"
(with Intelligent Key system) or BCS-
91, "INT LAMP : CONSULT Function
(BCM - INT LAMP)" (without Intelligent
Key system).
Interior room lamp battery saver does not activate. — Check the interior room lamp battery
saver setting.
Refer to BCS-26, "
BATTERY SAVER :
CONSULT Function (BCM - BATTERY
SAVER)" (with Intelligent Key system)
or BCS-97, "
BATTERY SAVER : CON-
SULT Function (BCM - BATTERY SAV-
ER)" (without Intelligent Key system).
Cargo lamp does not turn ON even though the back
door is open.
(It turns ON when turning the cargo lamp ON.) • Harness between BCM and car-
go lamp
• Harness between BCM and back
door switch
•BCM Back door switch circuit
Refer to DLK-96
(with Intelligent Key-
system ) or DLK-232
(without Intelli-
gent Key system).
Cargo lamp circuit
Refer to INL-46
.
Revision: August 2015 2016 Versa Note
cardiagn.com
Page 2145 of 3641
MAP LAMPINL-51
< REMOVAL AND INSTALLATION >
C
DE
F
G H
I
J
K
M A
B
INL
N
O P
REMOVAL AND INSTALLATION
MAP LAMP
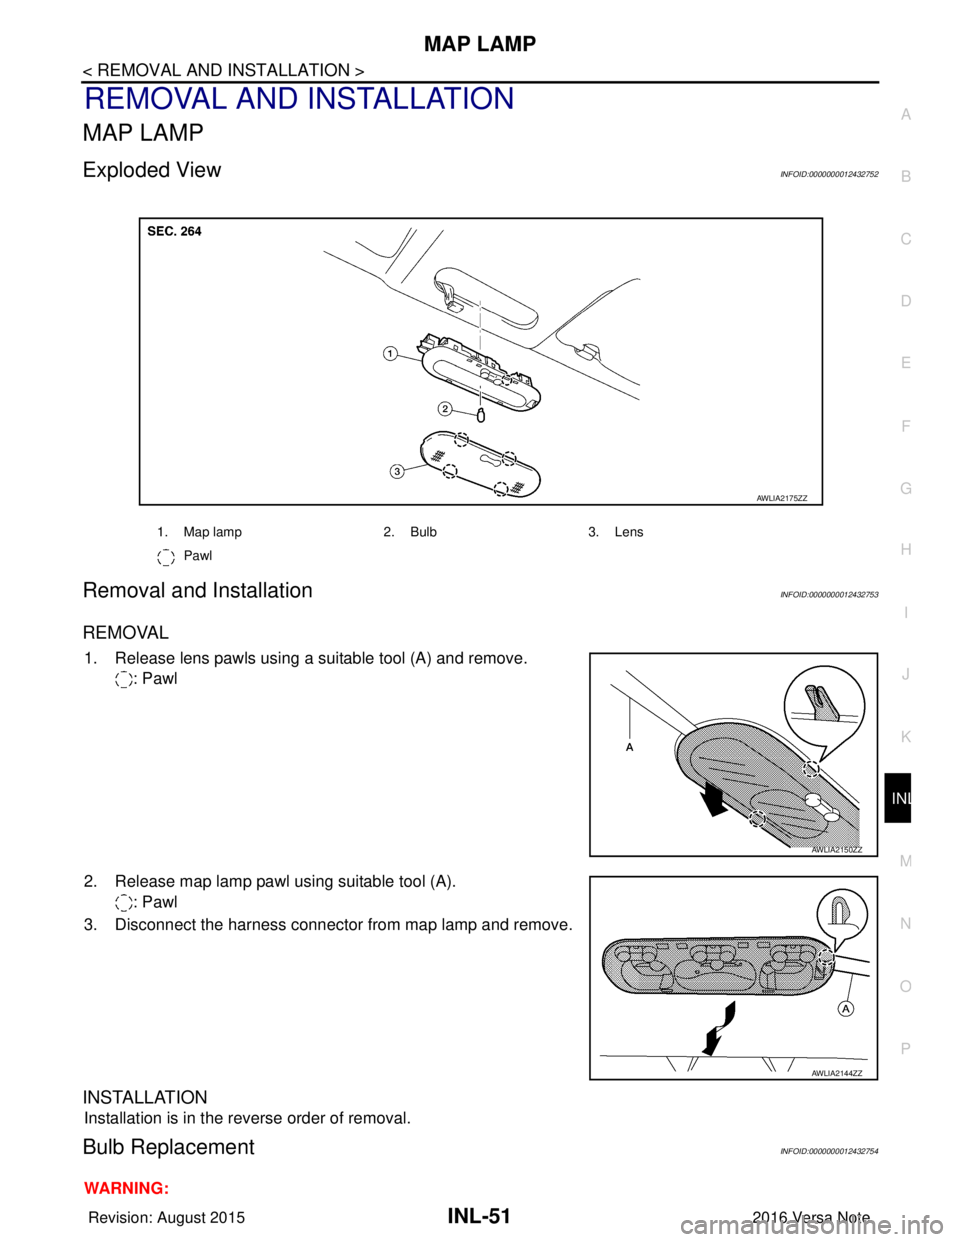
Exploded ViewINFOID:0000000012432752
Removal and InstallationINFOID:0000000012432753
REMOVAL
1. Release lens pawls using a suitable tool (A) and remove. : Pawl
2. Release map lamp pawl using suitable tool (A). : Pawl
3. Disconnect the harness connector from map lamp and remove.
INSTALLATION
Installation is in the reverse order of removal.
Bulb ReplacementINFOID:0000000012432754
WARNING:
1. Map lamp 2. Bulb3. Lens
Pawl
AWLIA2175ZZ
AWLIA2150ZZ
AWLIA2144ZZ
Revision: August 2015 2016 Versa Note
cardiagn.com
Page 2146 of 3641
INL-52
< REMOVAL AND INSTALLATION >
MAP LAMP
Do not touch bulb while it is lit or right after being turned OFF. Burning may result.
CAUTION:
• Do not touch the glass surface of the bulb with bare hands or allow oil or grease to get on it to pre-vent damage to bulb.
• Do not leave bulb out of lamp reflector for a long time because dust, moisture smoke, etc. may affect
the performance of lamp.
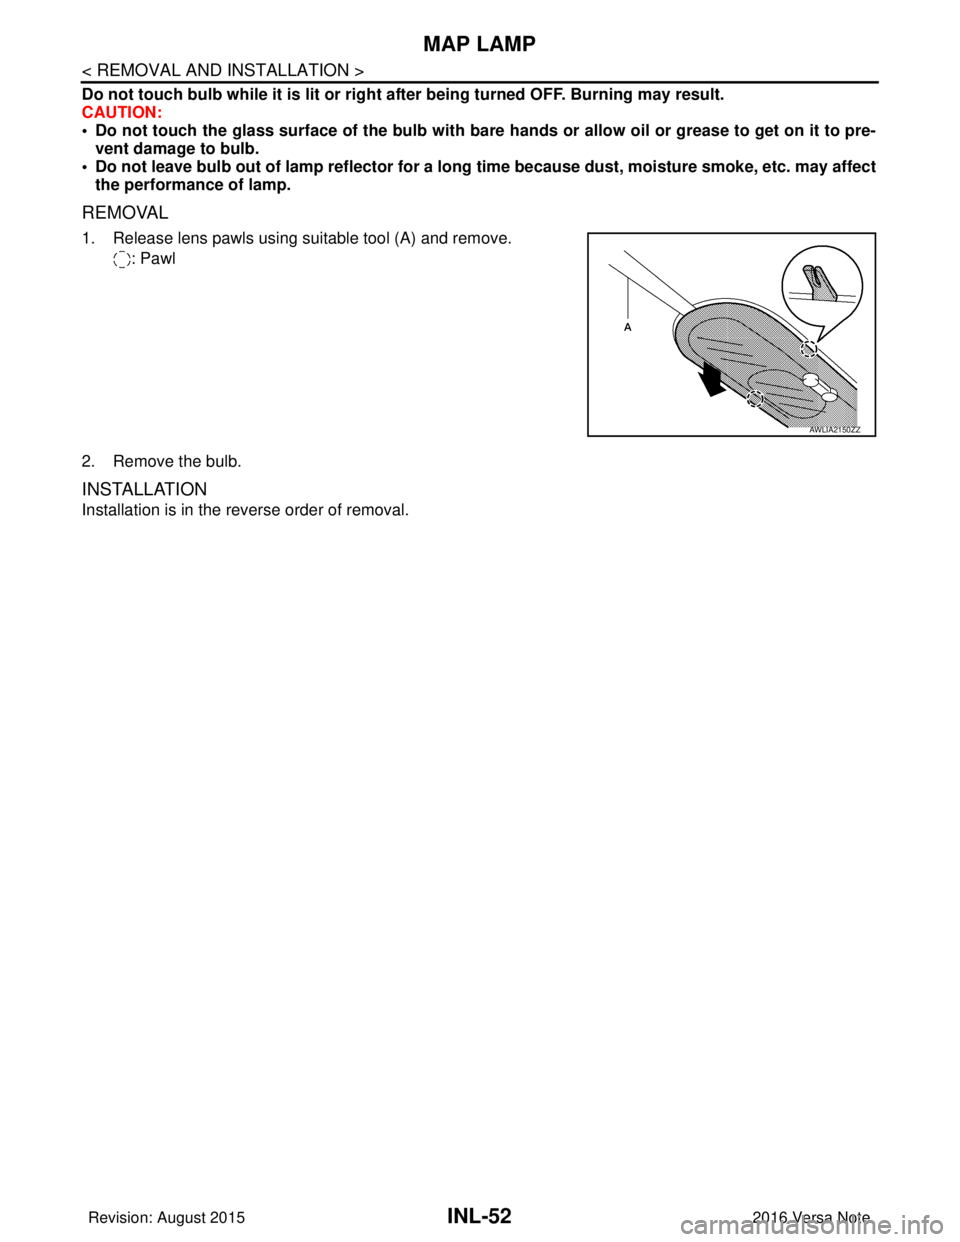
REMOVAL
1. Release lens pawls using suitable tool (A) and remove.
: Pawl
2. Remove the bulb.
INSTALLATION
Installation is in the reverse order of removal.
AWLIA2150ZZ
Revision: August 2015 2016 Versa Note
cardiagn.com
Page 2147 of 3641
INTERIOR ROOM LAMPINL-53
< REMOVAL AND INSTALLATION >
C
DE
F
G H
I
J
K
M A
B
INL
N
O P
INTERIOR ROOM LAMP
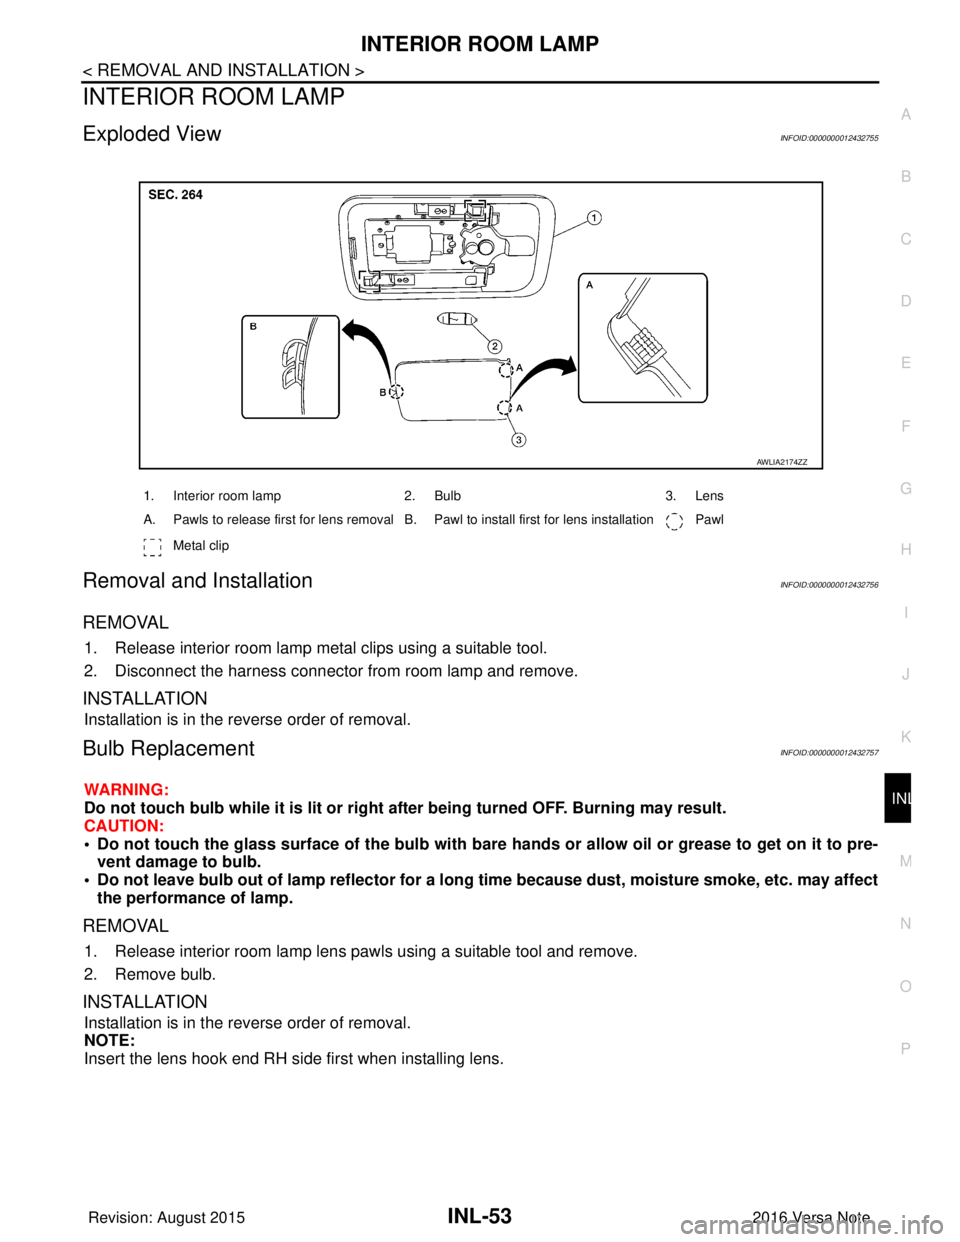
Exploded ViewINFOID:0000000012432755
Removal and InstallationINFOID:0000000012432756
REMOVAL
1. Release interior room lamp metal clips using a suitable tool.
2. Disconnect the harness connector from room lamp and remove.
INSTALLATION
Installation is in the reverse order of removal.
Bulb ReplacementINFOID:0000000012432757
WARNING:
Do not touch bulb while it is lit or right after being turned OFF. Burning may result.
CAUTION:
• Do not touch the glass surface of the bulb with bare hands or allow oi l or grease to get on it to pre-
vent damage to bulb.
• Do not leave bulb out of lamp reflector for a long time because dust, moisture smoke, etc. may affect the performance of lamp.
REMOVAL
1. Release interior room lamp lens pawls using a suitable tool and remove.
2. Remove bulb.
INSTALLATION
Installation is in the reverse order of removal.
NOTE:
Insert the lens hook end RH side first when installing lens.
1. Interior room lamp 2. Bulb3. Lens
A. Pawls to release first for lens removal B. Pawl to install first for lens installation Pawl
Metal clip
AWLIA2174ZZ
Revision: August 2015 2016 Versa Note
cardiagn.com
Page 2148 of 3641
INL-54
< REMOVAL AND INSTALLATION >
CARGO ROOM LAMP
CARGO ROOM LAMP
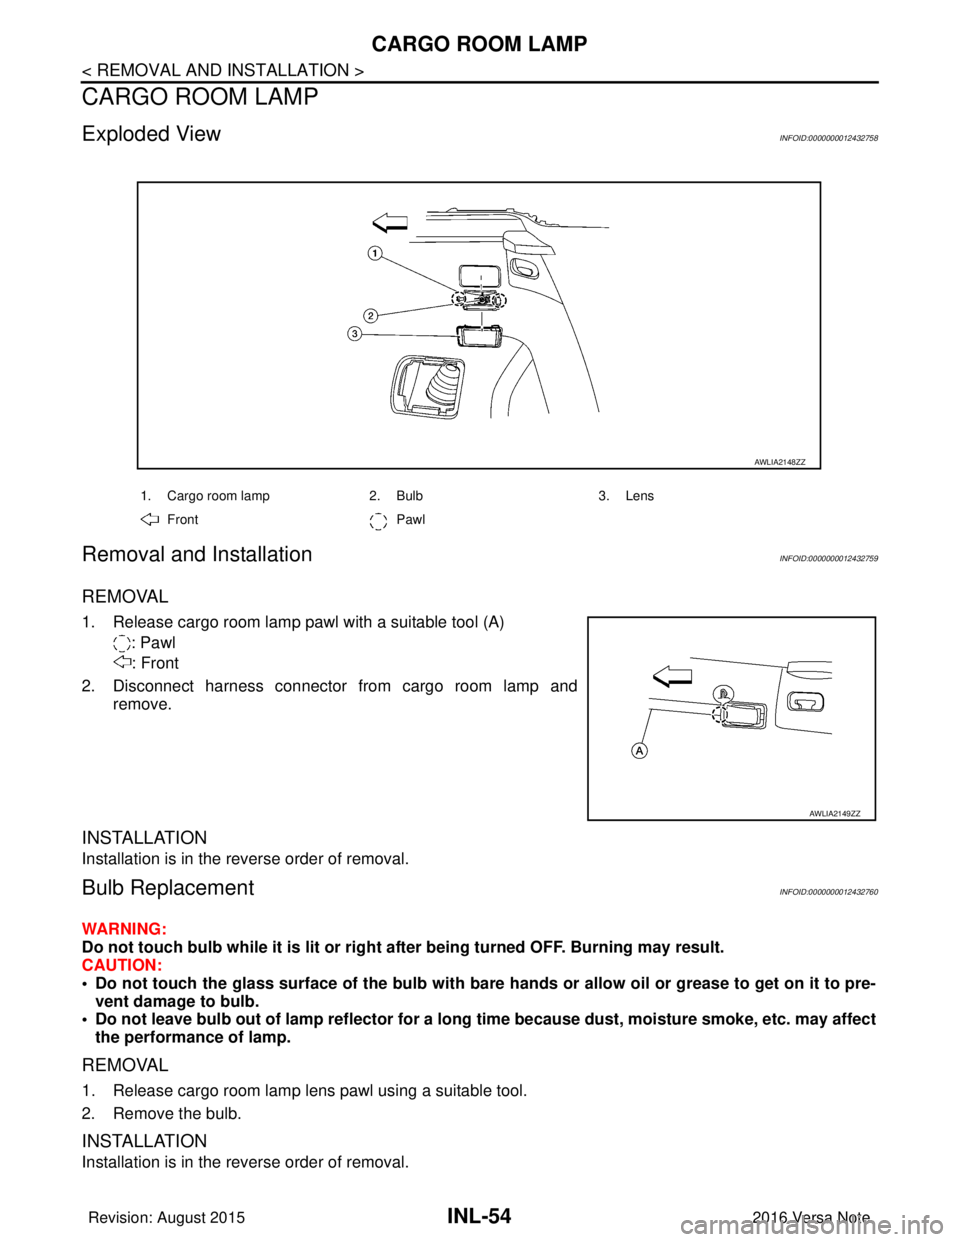
Exploded ViewINFOID:0000000012432758
Removal and InstallationINFOID:0000000012432759
REMOVAL
1. Release cargo room lamp pawl with a suitable tool (A): Pawl: Front
2. Disconnect harness connector from cargo room lamp and remove.
INSTALLATION
Installation is in the reverse order of removal.
Bulb ReplacementINFOID:0000000012432760
WARNING:
Do not touch bulb while it is lit or right after being turned OFF. Burning may result.
CAUTION:
• Do not touch the glass surface of the bulb with bare hands or allow oil or grease to get on it to pre-vent damage to bulb.
• Do not leave bulb out of lamp reflector for a long time because dust, moisture smoke, etc. may affect
the performance of lamp.
REMOVAL
1. Release cargo room lamp lens pawl using a suitable tool.
2. Remove the bulb.
INSTALLATION
Installation is in the reverse order of removal.
1. Cargo room lamp 2. Bulb3. Lens
Front Pawl
AWLIA2148ZZ
AWLIA2149ZZ
Revision: August 2015 2016 Versa Note
cardiagn.com
Page 2149 of 3641
SHIFT SELECTOR LAMPINL-55
< REMOVAL AND INSTALLATION >
C
DE
F
G H
I
J
K
M A
B
INL
N
O P
SHIFT SELECTOR LAMP
Bulb ReplacementINFOID:0000000012432761
WARNING:
Do not touch bulb while it is lit or right after being turned OFF. Burning may result.
CAUTION:
• Do not touch the glass surface of the bulb with bare hands or allow oil or grease to get on it to pro-
tect damage to bulb.
• Do not leave bulb out of lamp reflector for a long time because dust, moisture smoke, etc. may affect
the performance of lamp.
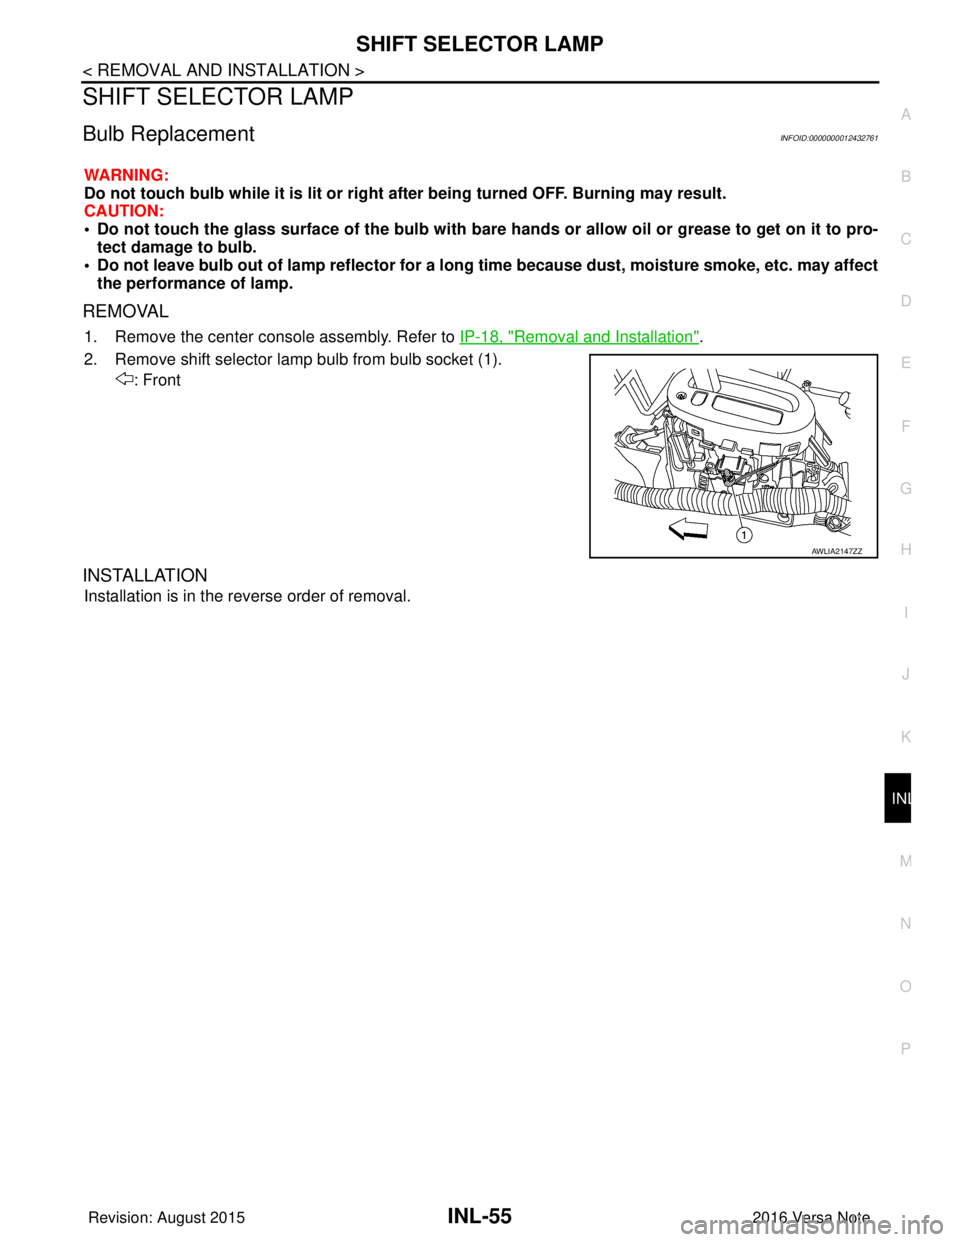
REMOVAL
1. Remove the center console assembly. Refer to IP-18, "Removal and Installation".
2. Remove shift selector lamp bulb from bulb socket (1). : Front
INSTALLATION
Installation is in the reverse order of removal.
AWLIA2147ZZ
Revision: August 2015 2016 Versa Note
cardiagn.com
Page 2150 of 3641

INL-56
< REMOVAL AND INSTALLATION >
ILLUMINATION CONTROL SWITCH
ILLUMINATION CONTROL SWITCH
Removal and InstallationINFOID:0000000012432762
The illumination control switch is part of the combination meter. Refer to MWI-54, "Removal and Installation".
Revision: August 2015 2016 Versa Note
cardiagn.com