check oil NISSAN PATROL 1998 Y61 / 5.G Propeller Shaft And Differential Carrier Workshop Manual
[x] Cancel search | Manufacturer: NISSAN, Model Year: 1998, Model line: PATROL, Model: NISSAN PATROL 1998 Y61 / 5.GPages: 54, PDF Size: 1.85 MB
Page 15 of 54

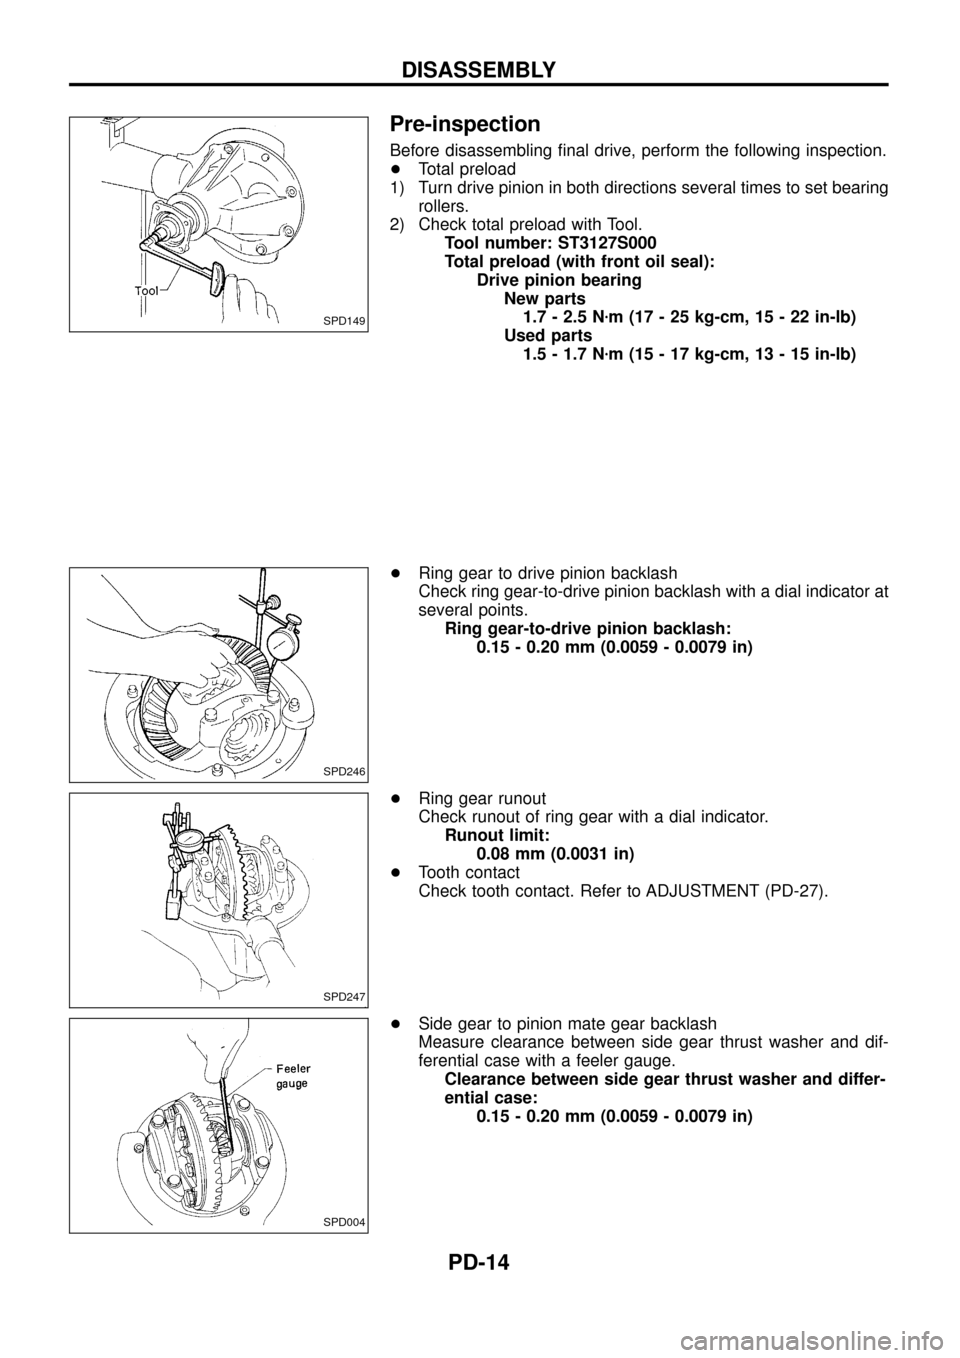
Pre-inspection
Before disassembling ®nal drive, perform the following inspection.
+Total preload
1) Turn drive pinion in both directions several times to set bearing
rollers.
2) Check total preload with Tool.
Tool number: ST3127S000
Total preload (with front oil seal):
Drive pinion bearing
New parts
1.7 - 2.5 Nzm (17 - 25 kg-cm, 15 - 22 in-lb)
Used parts
1.5 - 1.7 Nzm (15 - 17 kg-cm, 13 - 15 in-lb)
+Ring gear to drive pinion backlash
Check ring gear-to-drive pinion backlash with a dial indicator at
several points.
Ring gear-to-drive pinion backlash:
0.15 - 0.20 mm (0.0059 - 0.0079 in)
+Ring gear runout
Check runout of ring gear with a dial indicator.
Runout limit:
0.08 mm (0.0031 in)
+Tooth contact
Check tooth contact. Refer to ADJUSTMENT (PD-27).
+Side gear to pinion mate gear backlash
Measure clearance between side gear thrust washer and dif-
ferential case with a feeler gauge.
Clearance between side gear thrust washer and differ-
ential case:
0.15 - 0.20 mm (0.0059 - 0.0079 in)
SPD149
SPD246
SPD247
SPD004
DISASSEMBLY
PD-14
Page 30 of 54
![NISSAN PATROL 1998 Y61 / 5.G Propeller Shaft And Differential Carrier Workshop Manual Example (H233B):
N = 0.30
H=2
D¢=þ1
S=0
T=Nþ[(HþD¢þ S) x 0.01] + 3.05
= 0.30 þ [{2 þ (þ1) þ 0} x 0.01] + 3.05
(1) H ........................................................................ 2 NISSAN PATROL 1998 Y61 / 5.G Propeller Shaft And Differential Carrier Workshop Manual Example (H233B):
N = 0.30
H=2
D¢=þ1
S=0
T=Nþ[(HþD¢þ S) x 0.01] + 3.05
= 0.30 þ [{2 þ (þ1) þ 0} x 0.01] + 3.05
(1) H ........................................................................ 2](/img/5/625/w960_625-29.png)
Example (H233B):
N = 0.30
H=2
D¢=þ1
S=0
T=Nþ[(HþD¢þ S) x 0.01] + 3.05
= 0.30 þ [{2 þ (þ1) þ 0} x 0.01] + 3.05
(1) H ........................................................................ 2
þD¢................................................................. þ(þ1)
3
þS ...................................................................... þ0
3
(2) 3
x 0.01
0.03
(3) N ................................................................... 0.30
þ0.03
0.27
(4) 0.27
+3.05
3.32
\T = 3.32
7. Select the proper pinion height washer.
Drive pinion height adjusting washer:
Refer to SDS (PD-0, 53).
If you cannot ®nd the desired thickness of washer, use washer
with thickness closest to the calculated value.
Example (H233B):
Calculated value ... T = 3.32 mm
Used washer ... T = 3.33 mm
Tooth Contact
Gear tooth contact pattern check is necessary to verify correct
relationship between ring gear and drive pinion.
Hypoid gear sets which are not positioned properly in relation to
one another may be noisy, or have short life or both. With a pat-
tern check, the most desirable contact for low noise level and long
life can be assured.
1. Thoroughly clean ring gear and drive pinion teeth.
2. Sparingly apply a mixture of powdered ferric oxide and oil or
equivalent to 3 or 4 teeth of ring gear drive side.
SPD005
ADJUSTMENT
Drive Pinion Height (Cont'd)
PD-29
Page 32 of 54

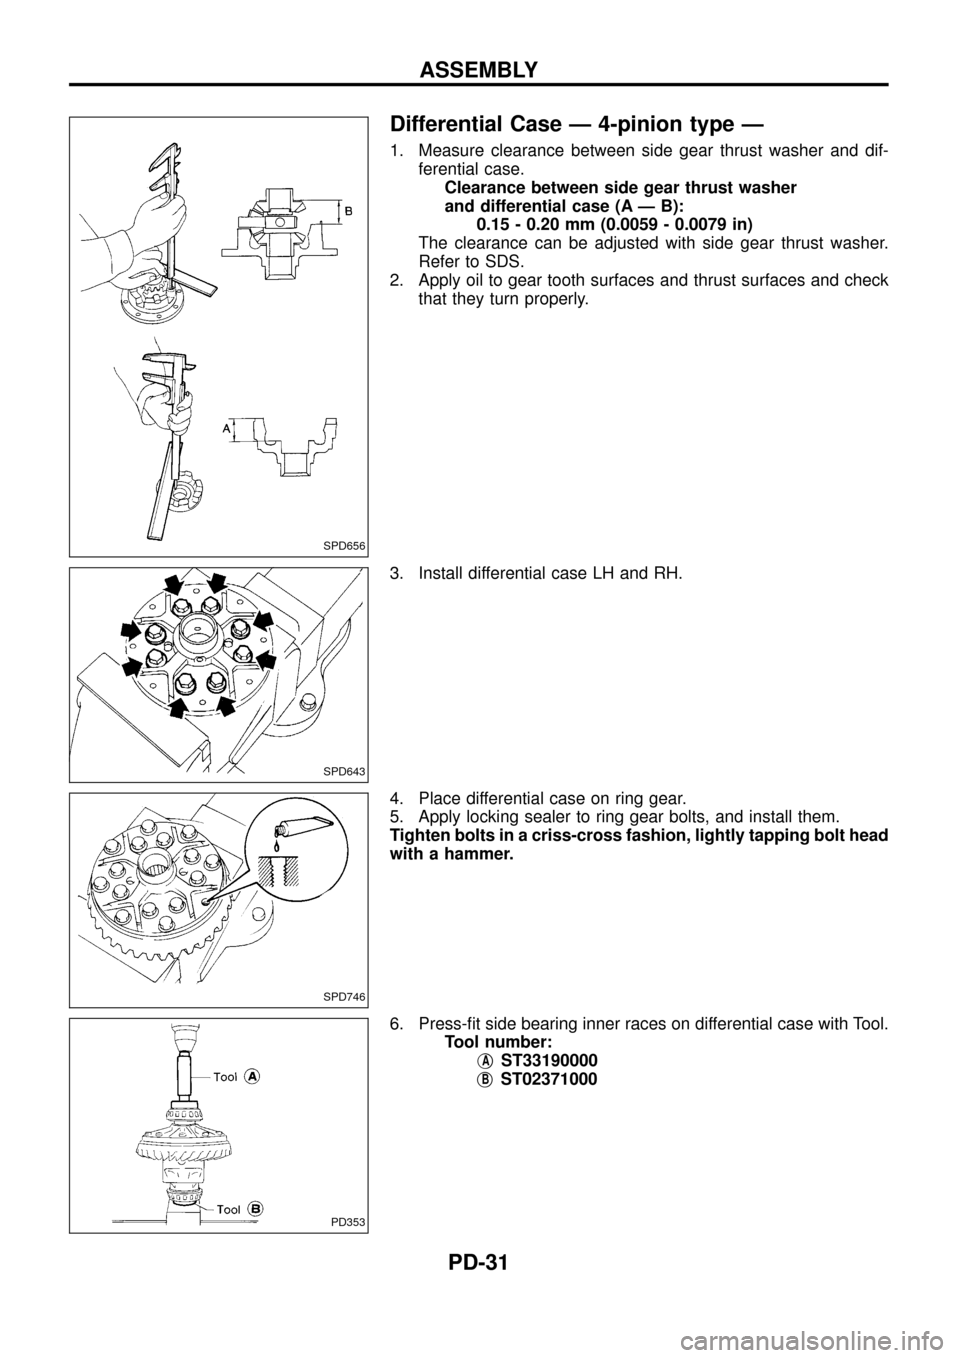
Differential Case Ð 4-pinion type Ð
1. Measure clearance between side gear thrust washer and dif-
ferential case.
Clearance between side gear thrust washer
and differential case (A Ð B):
0.15 - 0.20 mm (0.0059 - 0.0079 in)
The clearance can be adjusted with side gear thrust washer.
Refer to SDS.
2. Apply oil to gear tooth surfaces and thrust surfaces and check
that they turn properly.
3. Install differential case LH and RH.
4. Place differential case on ring gear.
5. Apply locking sealer to ring gear bolts, and install them.
Tighten bolts in a criss-cross fashion, lightly tapping bolt head
with a hammer.
6. Press-®t side bearing inner races on differential case with Tool.
Tool number:
j
AST33190000
j
BST02371000
SPD656
SPD643
SPD746
PD353
ASSEMBLY
PD-31
Page 36 of 54

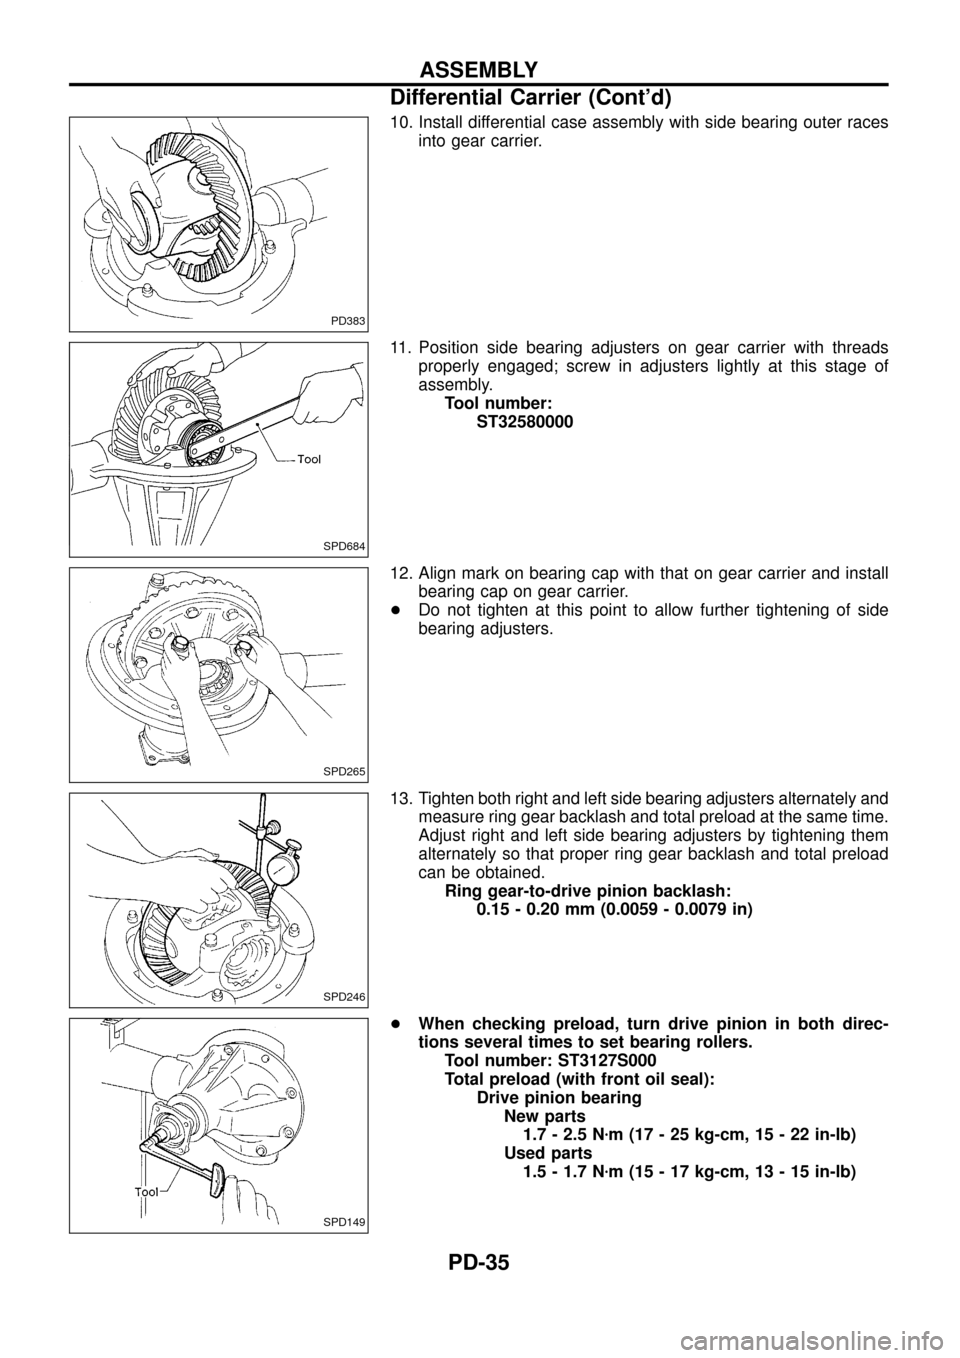
10. Install differential case assembly with side bearing outer races
into gear carrier.
11. Position side bearing adjusters on gear carrier with threads
properly engaged; screw in adjusters lightly at this stage of
assembly.
Tool number:
ST32580000
12. Align mark on bearing cap with that on gear carrier and install
bearing cap on gear carrier.
+Do not tighten at this point to allow further tightening of side
bearing adjusters.
13. Tighten both right and left side bearing adjusters alternately and
measure ring gear backlash and total preload at the same time.
Adjust right and left side bearing adjusters by tightening them
alternately so that proper ring gear backlash and total preload
can be obtained.
Ring gear-to-drive pinion backlash:
0.15 - 0.20 mm (0.0059 - 0.0079 in)
+When checking preload, turn drive pinion in both direc-
tions several times to set bearing rollers.
Tool number: ST3127S000
Total preload (with front oil seal):
Drive pinion bearing
New parts
1.7 - 2.5 Nzm (17 - 25 kg-cm, 15 - 22 in-lb)
Used parts
1.5 - 1.7 Nzm (15 - 17 kg-cm, 13 - 15 in-lb)
PD383
SPD684
SPD265
SPD246
SPD149
ASSEMBLY
Differential Carrier (Cont'd)
PD-35
Page 40 of 54

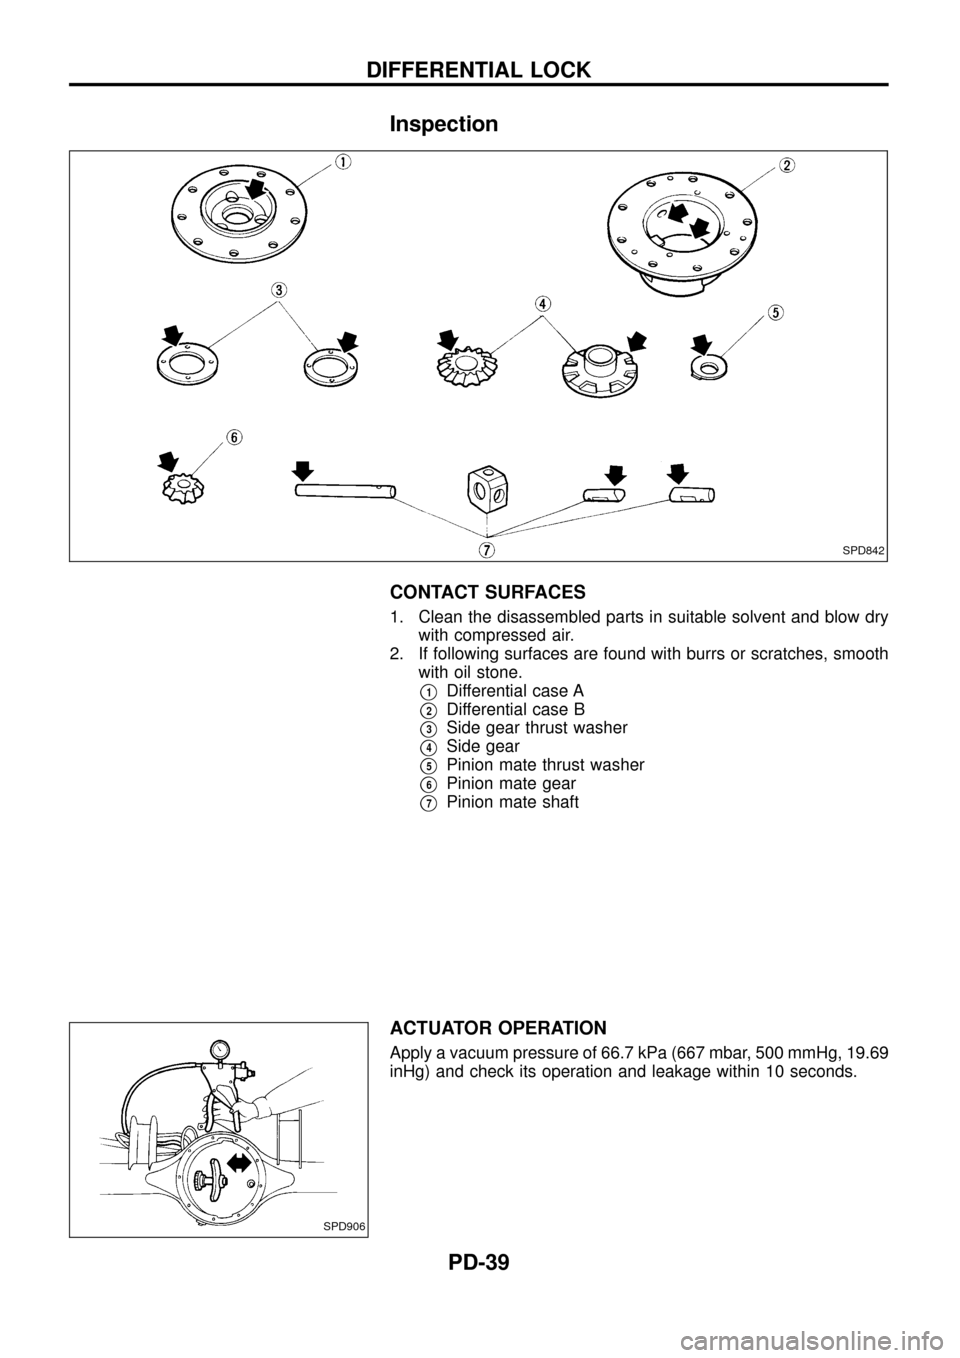
Inspection
CONTACT SURFACES
1. Clean the disassembled parts in suitable solvent and blow dry
with compressed air.
2. If following surfaces are found with burrs or scratches, smooth
with oil stone.
V1Differential case A
V2Differential case B
V3Side gear thrust washer
V4Side gear
V5Pinion mate thrust washer
V6Pinion mate gear
V7Pinion mate shaft
ACTUATOR OPERATION
Apply a vacuum pressure of 66.7 kPa (667 mbar, 500 mmHg, 19.69
inHg) and check its operation and leakage within 10 seconds.
SPD842
SPD906
DIFFERENTIAL LOCK
PD-39