NISSAN PATROL 1998 Y61 / 5.G Steering System User Guide
PATROL 1998 Y61 / 5.G
NISSAN
NISSAN
https://www.carmanualsonline.info/img/5/628/w960_628-0.png
NISSAN PATROL 1998 Y61 / 5.G Steering System User Guide
Trending: wiring, instrument panel, brakes, maintenance, wheel, wheel bolts, stop start
Page 11 of 24
Disassembly and Assembly
V1Combination switch
V2Lock nut
V3Jacket tube assembly
V4Tilt lever
V5Tilt spring
V6Steering column shaft assembly
V7Band
V8Column cover
V9Coupling
+When disassembling and assembling, unlock steering lock with
key.
+Install lock nut on steering column shaft and tighten the nut to
speci®cation.
: 25-34Nzm (2.5 - 3.5 kg-m, 18 - 25 ft-lb)
+Steering lock
a. Break self-shear type screws with a drill or other appropriate
tool.
b. Install new self-shear type screws and then cut off self-shear
type screw heads.
SST760C
SST490C
SST742A
STEERING WHEEL AND STEERING COLUMN
ST-10
Page 12 of 24
Inspection
+When steering wheel does not turn smoothly, check the steer-
ing column as follows and replace damaged parts.
a. Check column bearings for damage and unevenness. Lubricate
with recommended multi-purpose grease or replace steering
column as an assembly, if necessary.
b. Check steering column lower shaft for deformation and break-
age. Replace if necessary.
+When the vehicle comes into a light collision, check length ``L
1''
and ``L
2''.
Steering column length ``L
1'':
679.9 - 681.5 mm (26.77 - 26.83 in)
Steering column lower shaft length ``L
2'':
489.3 - 493.3 mm (19.26 - 19.42 in)
If out of the speci®cations, replace steering column shaft or
steering column as an assembly.
Tilt mechanism
After installing steering column, check tilt mechanism operation.
SST761C
SST582BD
STEERING WHEEL AND STEERING COLUMN
ST-11
Page 13 of 24
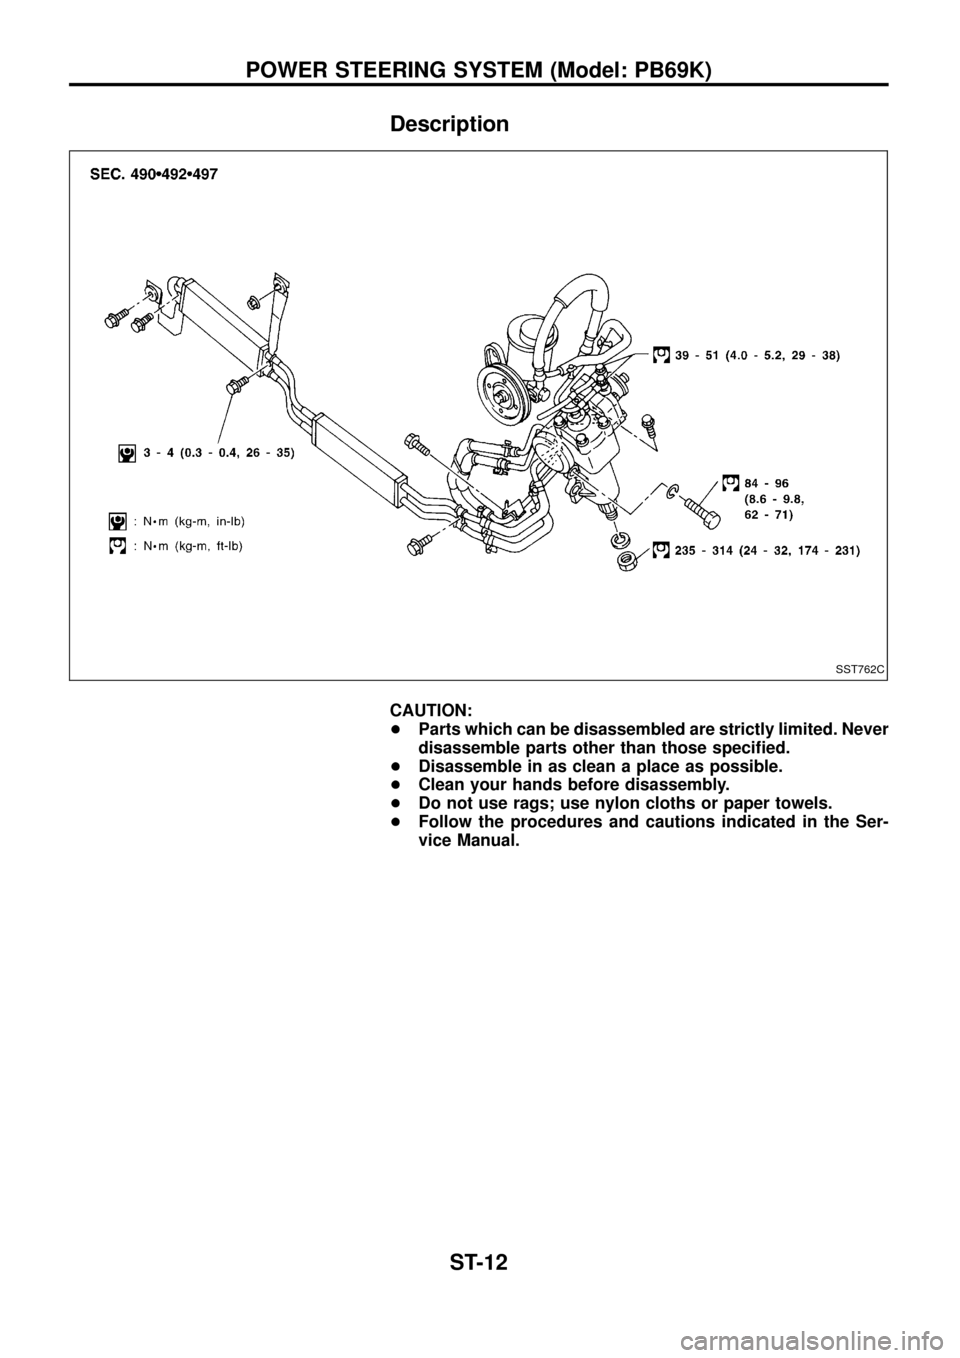
Description
CAUTION:
+Parts which can be disassembled are strictly limited. Never
disassemble parts other than those speci®ed.
+Disassemble in as clean a place as possible.
+Clean your hands before disassembly.
+Do not use rags; use nylon cloths or paper towels.
+Follow the procedures and cautions indicated in the Ser-
vice Manual.
SST762C
POWER STEERING SYSTEM (Model: PB69K)
ST-12
Page 14 of 24
Removal and Installation
Before removal, clean gear housing and oil pump exteriors
using a steam cleaner. Then dry with compressed air.
+Plug openings of gear housing, and securely locate hose con-
nectors at a position higher than oil pump and cover with paper
towels.
+Be extremely careful to prevent entry of foreign matter into
hoses through connectors.
+When installing pitman arm, align four grooves of pitman arm
serrations with four projections of sector shaft serrations, and
install and tighten lock washer and nut.
Inspection
Do not disassemble for power steering gear assembly.
TURNING TORQUE MEASUREMENT
1. Measure turning torque at 360É position.
a. Install steering gear on Tool.
SST774C
SST040-A
POWER STEERING GEAR (Model: PB69K)
ST-13
Page 15 of 24
b. Turn stub shaft all the way to right and left several times.
c. Measure turning torque at 360É position from straight-ahead
position with Tools.
Turning torque at 360É
0.15 - 0.78 Nzm (1.5 - 8.0 kg-cm, 1.3 - 6.9 in-lb)
2. Measure turning torque at straight-ahead position.
Straight-ahead position is a position where stub shaft is
turned 2.14 turns (two full turns and 50É) from lock position.
Turning torque at straight-ahead position:
0.2 - 0.5 Nzm (2 - 5 kg-cm, 1.7 - 4.3 in-lb)
higher than turning torque at 360É
Maximum turning torque:
0.44 - 1.18 Nzm (4.5 - 12 kg-cm, 3.9 - 10.4 in-lb)
3. Check sector shaft end play in neutral position.
End play:
Less than 0.1 mm (0.004 in)
If turning torque and end play are not within speci®cations,
replace power steering gear assembly.
SST652AA
POWER STEERING GEAR (Model: PB69K)
Inspection (Cont'd)
ST-14
Page 16 of 24
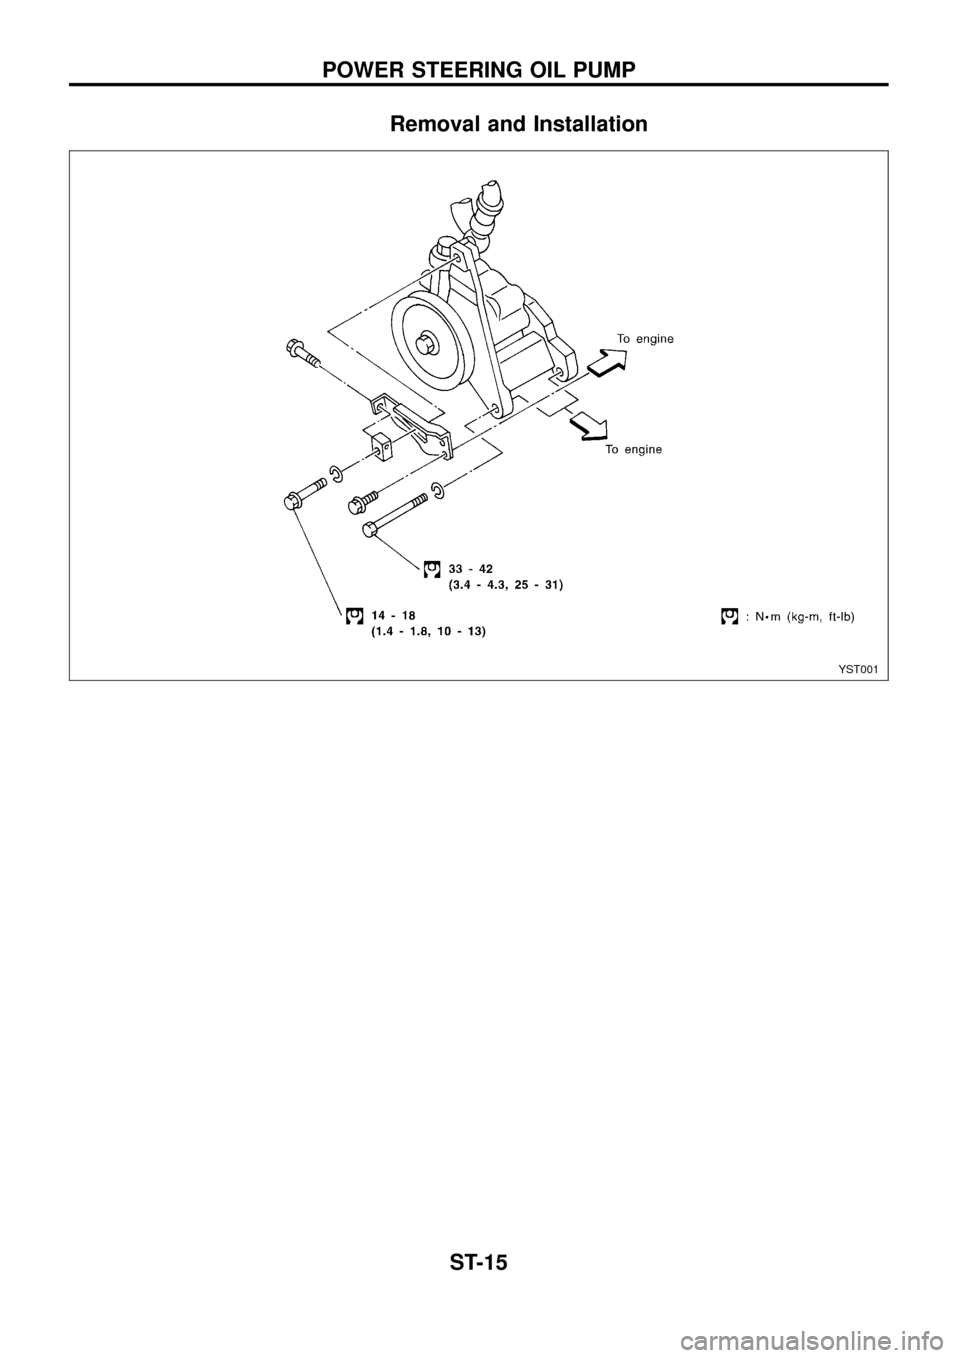
Removal and Installation
YST001
POWER STEERING OIL PUMP
ST-15
Page 17 of 24
Disassembly and Assembly
Pre-disassembly Inspection
Disassemble the power steering oil pump only if the following items
are found.
+Oil leak from any point shown in the ®gure.
+Deformed or damaged pulley.
+Poor performance.
YST002
SST984A
POWER STEERING OIL PUMP
ST-16
Page 18 of 24
Inspection
PULLEY AND PULLEY SHAFT
+If pulley is cracked or deformed, replace it.
+If ¯uid leak is found around the pulley shaft, replace the oil seal.
Disassembly
CAUTION:
+Parts which can be disassembled are strictly limited. Never
disassemble parts other than those speci®ed.
+Disassemble in as clean a place as possible.
+Clean your hands before disassembly.
+Do not use rags; use nylon cloths or paper towels.
+When disassembling and reassembling, do not let foreign
matter enter or contact the parts.
+Remove snap ring, then draw drive shaft out.
+Be careful not to drop drive shaft.
+Remove oil seal.
+Be careful not to damage front housing.
+Remove connector.
+Be careful not to drop control valve.
SST010B
SST034A
SST036AA
POWER STEERING OIL PUMP
ST-17
Page 19 of 24
Assembly
Assemble oil pump, noting the following instructions.
+Make sure O-rings and oil seal are properly installed.
+Always install new O-rings and oil seal.
+Be careful of oil seal direction.
+Cam ring, rotor and vanes must be replaced as a set if neces-
sary.
+When assembling, coat each part with ATF.
+Pay attention to the direction of rotor.
+When assembling vanes to rotor, rounded surfaces of vanes
must face cam ring side.
+Insert pin
V2into pin grooveV1of front housing and front side
plate. Then install cam ring
V3as shown at left.
Cam ring:
D
1is less than D2
SST038A
SST289A
SST843A
SST497A
POWER STEERING OIL PUMP
ST-18
Page 20 of 24
Removal and Installation
+Remove pitman arm with tool.
+Remove steering damper.
+Remove tie-rod and drag link with Tool.
SST766C
SST100-B
SST767C
STEERING LINKAGE
ST-19
Trending: steering wheel adjustment, oil dipstick, automatic transmission fluid, suspension, light, power steering fluid, stop start


