NISSAN PRIMERA 1999 Electronic Repair Manual
Manufacturer: NISSAN, Model Year: 1999, Model line: PRIMERA, Model: NISSAN PRIMERA 1999Pages: 2267, PDF Size: 35.74 MB
Page 2081 of 2267
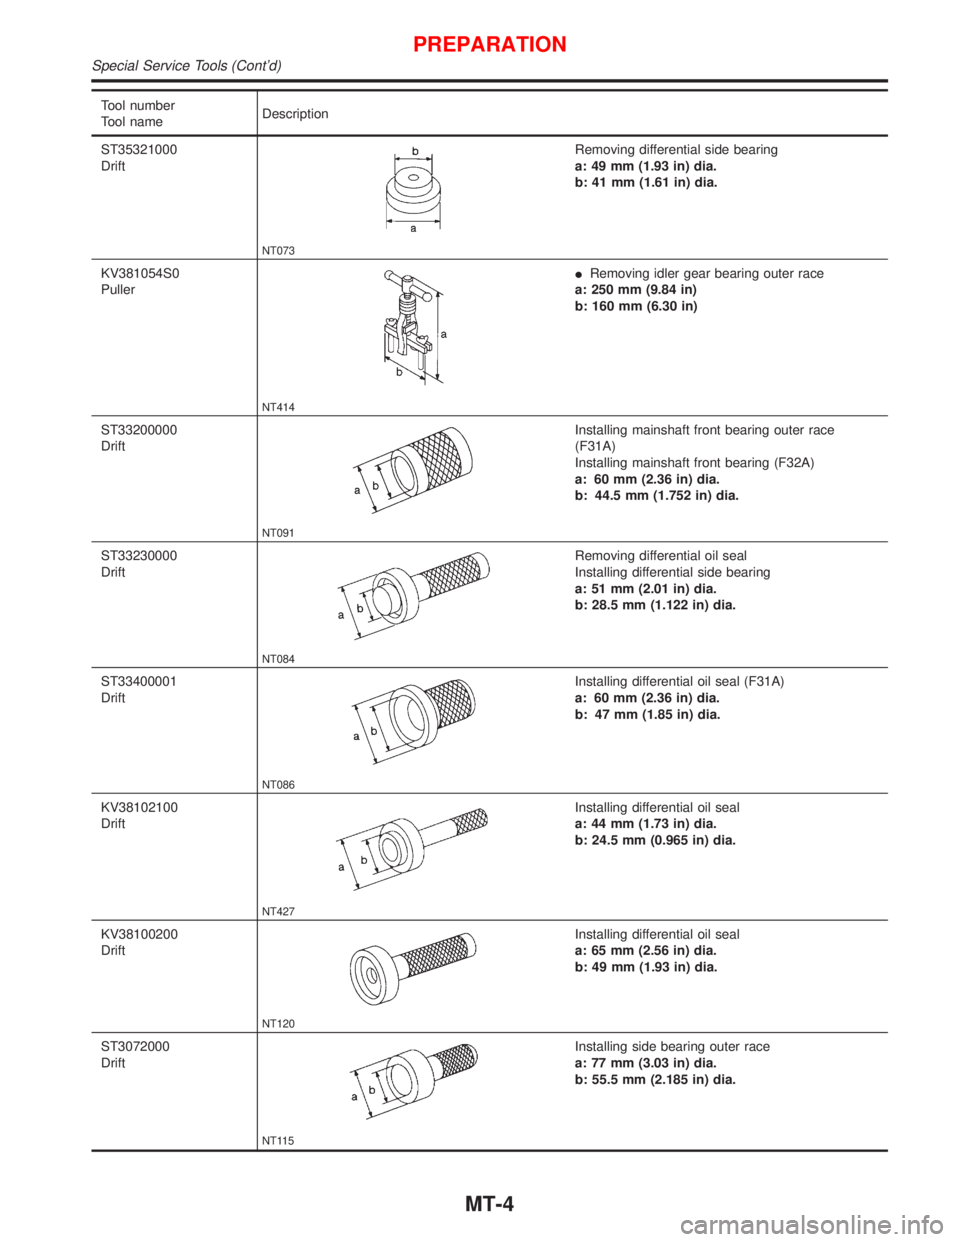
Tool number
Tool nameDescription
ST35321000
Drift
NT073
Removing differential side bearing
a: 49 mm (1.93 in) dia.
b: 41 mm (1.61 in) dia.
KV381054S0
Puller
NT414
IRemoving idler gear bearing outer race
a: 250 mm (9.84 in)
b: 160 mm (6.30 in)
ST33200000
Drift
NT091
Installing mainshaft front bearing outer race
(F31A)
Installing mainshaft front bearing (F32A)
a: 60 mm (2.36 in) dia.
b: 44.5 mm (1.752 in) dia.
ST33230000
Drift
NT084
Removing differential oil seal
Installing differential side bearing
a: 51 mm (2.01 in) dia.
b: 28.5 mm (1.122 in) dia.
ST33400001
Drift
NT086
Installing differential oil seal (F31A)
a: 60 mm (2.36 in) dia.
b: 47 mm (1.85 in) dia.
KV38102100
Drift
NT427
Installing differential oil seal
a: 44 mm (1.73 in) dia.
b: 24.5 mm (0.965 in) dia.
KV38100200
Drift
NT120
Installing differential oil seal
a: 65 mm (2.56 in) dia.
b: 49 mm (1.93 in) dia.
ST3072000
Drift
NT115
Installing side bearing outer race
a: 77 mm (3.03 in) dia.
b: 55.5 mm (2.185 in) dia.
PREPARATION
Special Service Tools (Cont'd)
MT-4
Page 2082 of 2267
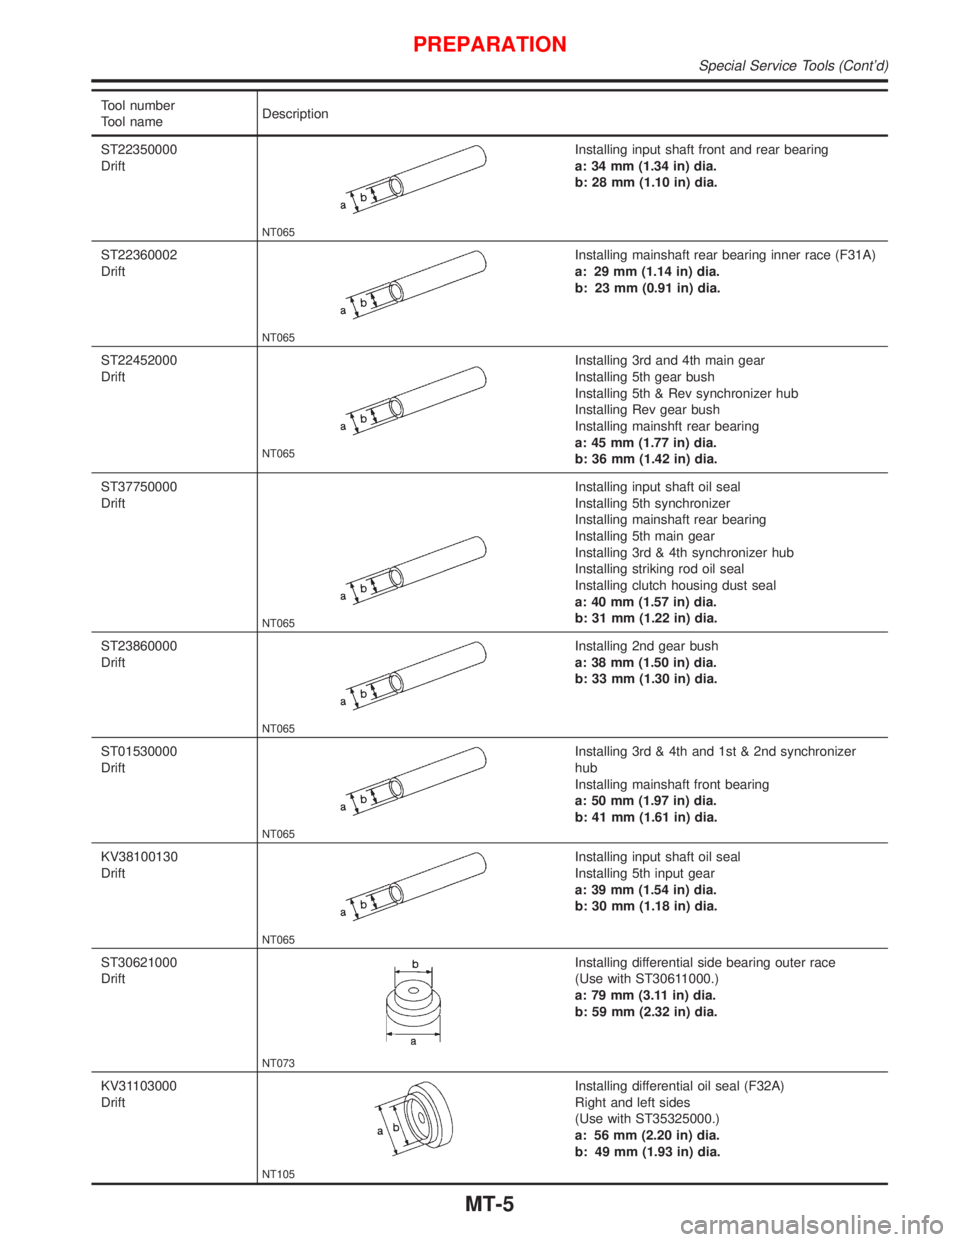
Tool number
Tool nameDescription
ST22350000
Drift
NT065
Installing input shaft front and rear bearing
a: 34 mm (1.34 in) dia.
b: 28 mm (1.10 in) dia.
ST22360002
Drift
NT065
Installing mainshaft rear bearing inner race (F31A)
a: 29 mm (1.14 in) dia.
b: 23 mm (0.91 in) dia.
ST22452000
Drift
NT065
Installing 3rd and 4th main gear
Installing 5th gear bush
Installing 5th & Rev synchronizer hub
Installing Rev gear bush
Installing mainshft rear bearing
a: 45 mm (1.77 in) dia.
b: 36 mm (1.42 in) dia.
ST37750000
Drift
NT065
Installing input shaft oil seal
Installing 5th synchronizer
Installing mainshaft rear bearing
Installing 5th main gear
Installing 3rd & 4th synchronizer hub
Installing striking rod oil seal
Installing clutch housing dust seal
a: 40 mm (1.57 in) dia.
b: 31 mm (1.22 in) dia.
ST23860000
Drift
NT065
Installing 2nd gear bush
a: 38 mm (1.50 in) dia.
b: 33 mm (1.30 in) dia.
ST01530000
Drift
NT065
Installing 3rd & 4th and 1st & 2nd synchronizer
hub
Installing mainshaft front bearing
a: 50 mm (1.97 in) dia.
b: 41 mm (1.61 in) dia.
KV38100130
Drift
NT065
Installing input shaft oil seal
Installing 5th input gear
a: 39 mm (1.54 in) dia.
b: 30 mm (1.18 in) dia.
ST30621000
Drift
NT073
Installing differential side bearing outer race
(Use with ST30611000.)
a: 79 mm (3.11 in) dia.
b: 59 mm (2.32 in) dia.
KV31103000
Drift
NT105
Installing differential oil seal (F32A)
Right and left sides
(Use with ST35325000.)
a: 56 mm (2.20 in) dia.
b: 49 mm (1.93 in) dia.
PREPARATION
Special Service Tools (Cont'd)
MT-5
Page 2083 of 2267
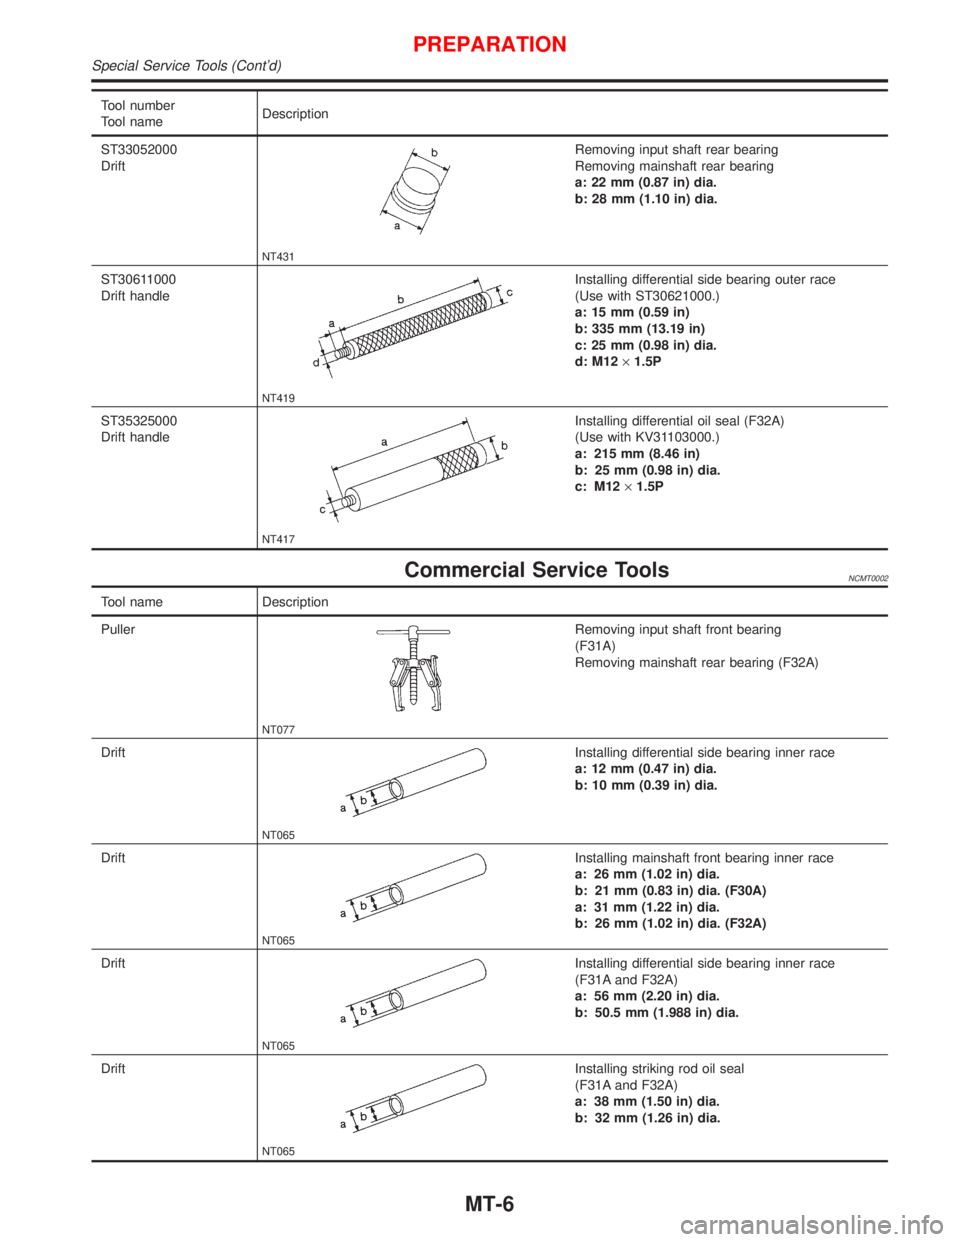
Tool number
Tool nameDescription
ST33052000
Drift
NT431
Removing input shaft rear bearing
Removing mainshaft rear bearing
a: 22 mm (0.87 in) dia.
b: 28 mm (1.10 in) dia.
ST30611000
Drift handle
NT419
Installing differential side bearing outer race
(Use with ST30621000.)
a: 15 mm (0.59 in)
b: 335 mm (13.19 in)
c: 25 mm (0.98 in) dia.
d: M12´1.5P
ST35325000
Drift handle
NT417
Installing differential oil seal (F32A)
(Use with KV31103000.)
a: 215 mm (8.46 in)
b: 25 mm (0.98 in) dia.
c: M12´1.5P
Commercial Service ToolsNCMT0002
Tool name Description
Puller
NT077
Removing input shaft front bearing
(F31A)
Removing mainshaft rear bearing (F32A)
Drift
NT065
Installing differential side bearing inner race
a: 12 mm (0.47 in) dia.
b: 10 mm (0.39 in) dia.
Drift
NT065
Installing mainshaft front bearing inner race
a: 26 mm (1.02 in) dia.
b: 21 mm (0.83 in) dia. (F30A)
a: 31 mm (1.22 in) dia.
b: 26 mm (1.02 in) dia. (F32A)
Drift
NT065
Installing differential side bearing inner race
(F31A and F32A)
a: 56 mm (2.20 in) dia.
b: 50.5 mm (1.988 in) dia.
Drift
NT065
Installing striking rod oil seal
(F31A and F32A)
a: 38 mm (1.50 in) dia.
b: 32 mm (1.26 in) dia.
PREPARATION
Special Service Tools (Cont'd)
MT-6
Page 2084 of 2267
NCMT0003
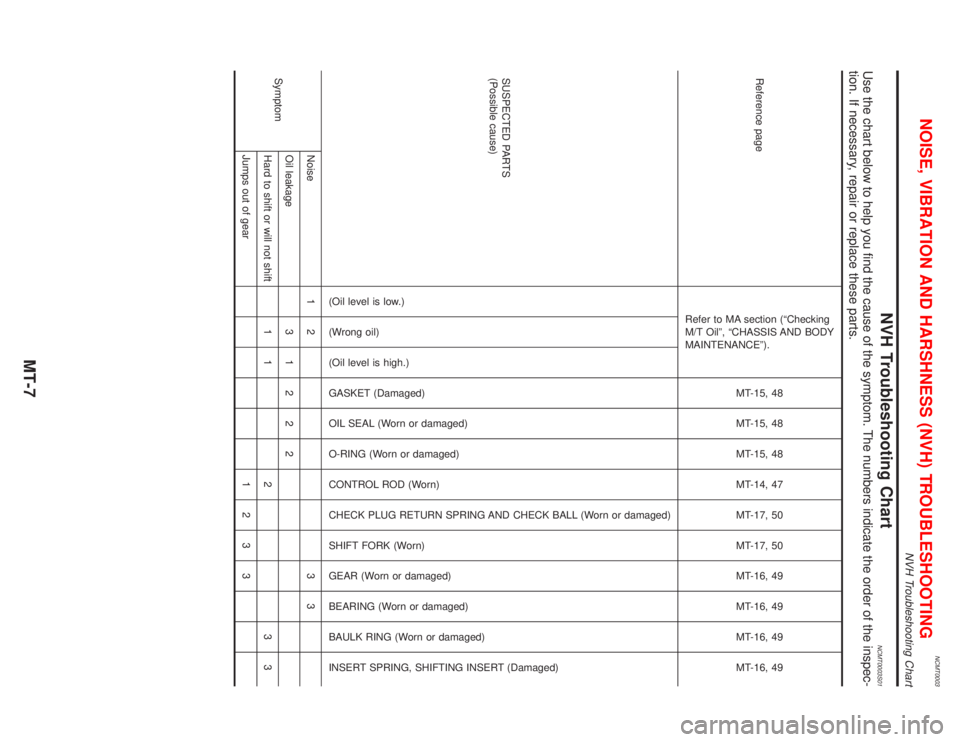
NVH Troubleshooting ChartNCMT0003S01
Use the chart below to help you find the cause of the symptom. The numbers indicate the order of the inspec-
tion. If necessary, repair or replace these parts.
Reference page
Refer to MA section (ªChecking
M/T Oilº, ªCHASSIS AND BODY
MAINTENANCEº).
MT-15, 48
MT-15, 48
MT-15, 48
MT-14, 47
MT-17, 50
MT-17, 50
MT-16, 49
MT-16, 49
MT-16, 49
MT-16, 49
SUSPECTED PARTS
(Possible cause)
(Oil level is low.)
(Wrong oil)
(Oil level is high.)
GASKET (Damaged)
OIL SEAL (Worn or damaged)
O-RING (Worn or damaged)
CONTROL ROD (Worn)
CHECK PLUG RETURN SPRING AND CHECK BALL (Worn or damaged)
SHIFT FORK (Worn)
GEAR (Worn or damaged)
BEARING (Worn or damaged)
BAULK RING (Worn or damaged)
INSERT SPRING, SHIFTING INSERT (Damaged)
SymptomNoise 1 2 3 3
Oil leakage31222
Hard to shift or will not shift 1 1 2 3 3
Jumps out of gear1233
NOISE, VIBRATION AND HARSHNESS (NVH) TROUBLESHOOTING
NVH Troubleshooting Chart
MT-7
Page 2085 of 2267
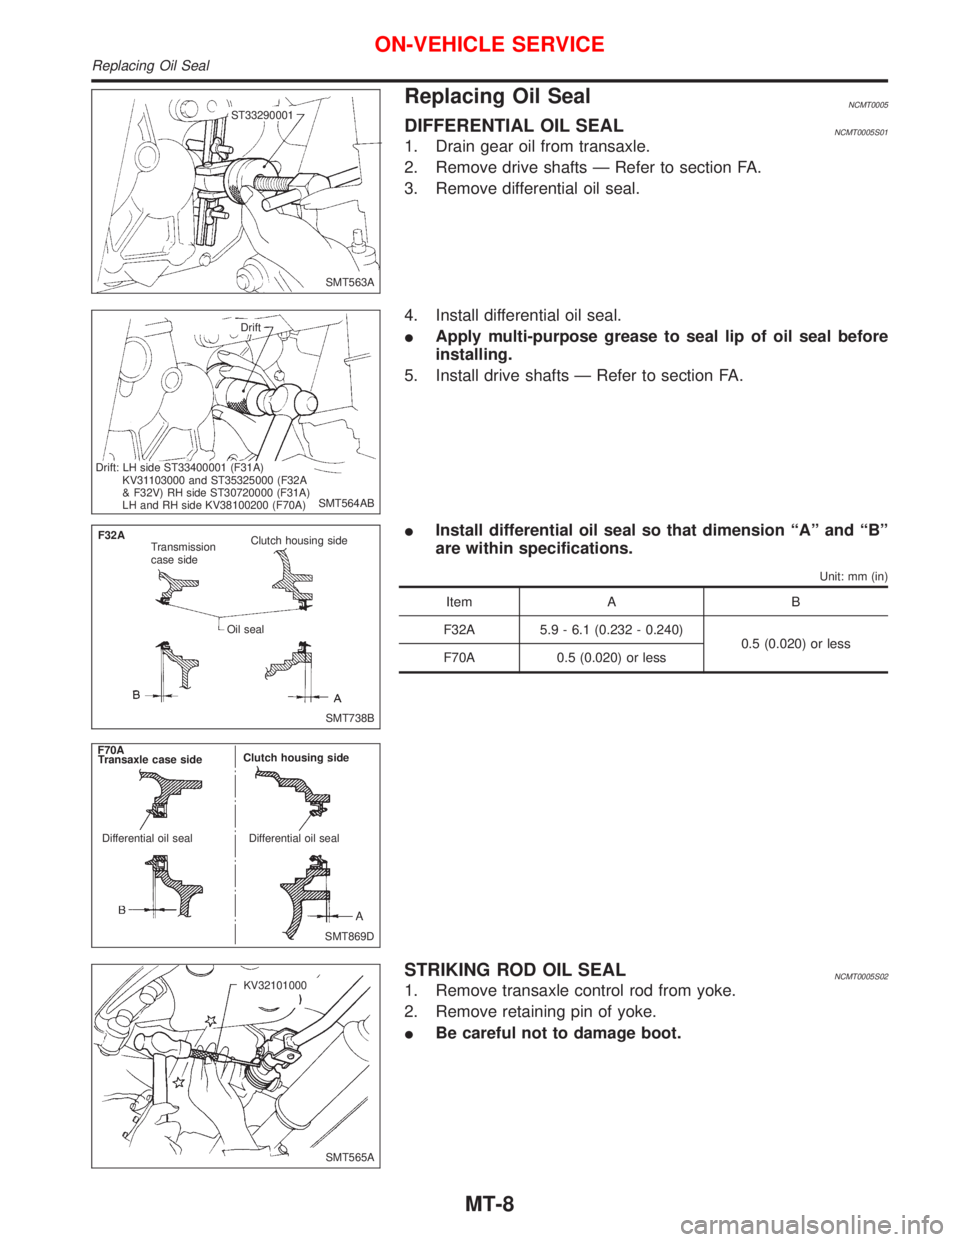
Replacing Oil SealNCMT0005
DIFFERENTIAL OIL SEALNCMT0005S01
1. Drain gear oil from transaxle.
2. Remove drive shafts Ð Refer to section FA.
3. Remove differential oil seal.
4. Install differential oil seal.
IApply multi-purpose grease to seal lip of oil seal before
installing.
5. Install drive shafts Ð Refer to section FA.
IInstall differential oil seal so that dimension ªAº and ªBº
are within specifications.
Unit: mm (in)
Item A B
F32A 5.9 - 6.1 (0.232 - 0.240)
0.5 (0.020) or less
F70A 0.5 (0.020) or less
STRIKING ROD OIL SEALNCMT0005S02
1. Remove transaxle control rod from yoke.
2. Remove retaining pin of yoke.
IBe careful not to damage boot.
SMT563A ST33290001
SMT564AB Drift
.Drift: LH side ST33400001 (F31A)
KV31103000 and ST35325000 (F32A
& F32V) RH side ST30720000 (F31A)
LH and RH side KV38100200 (F70A)
SMT738B F32A
Transmission
case sideClutch housing side
Oil seal
SMT869D Transaxle case sideClutch housing side
Differential oil seal Differential oil seal F70A
SMT565A KV32101000
ON-VEHICLE SERVICE
Replacing Oil Seal
MT-8
Page 2086 of 2267
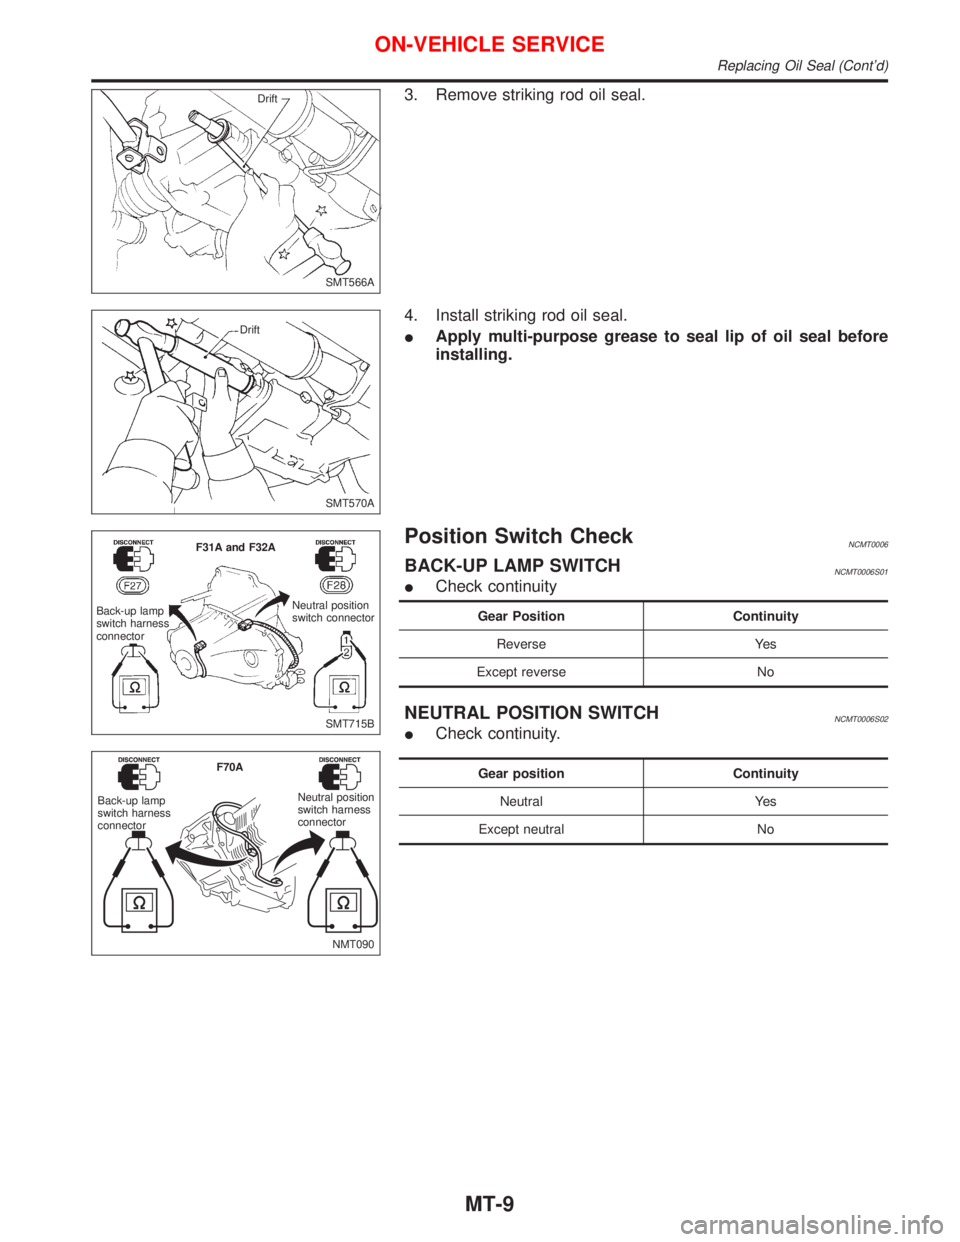
3. Remove striking rod oil seal.
4. Install striking rod oil seal.
IApply multi-purpose grease to seal lip of oil seal before
installing.
Position Switch CheckNCMT0006
BACK-UP LAMP SWITCHNCMT0006S01
ICheck continuity
Gear Position Continuity
Reverse Yes
Except reverse No
NEUTRAL POSITION SWITCHNCMT0006S02
ICheck continuity.
Gear position Continuity
Neutral Yes
Except neutral No
SMT566A Drift
SMT570A Drift
SMT715B Back-up lamp
switch harness
connectorNeutral position
switch connector F31A and F32A
NMT090 Back-up lamp
switch harness
connectorNeutral position
switch harness
connector F70A
ON-VEHICLE SERVICE
Replacing Oil Seal (Cont'd)
MT-9
Page 2087 of 2267
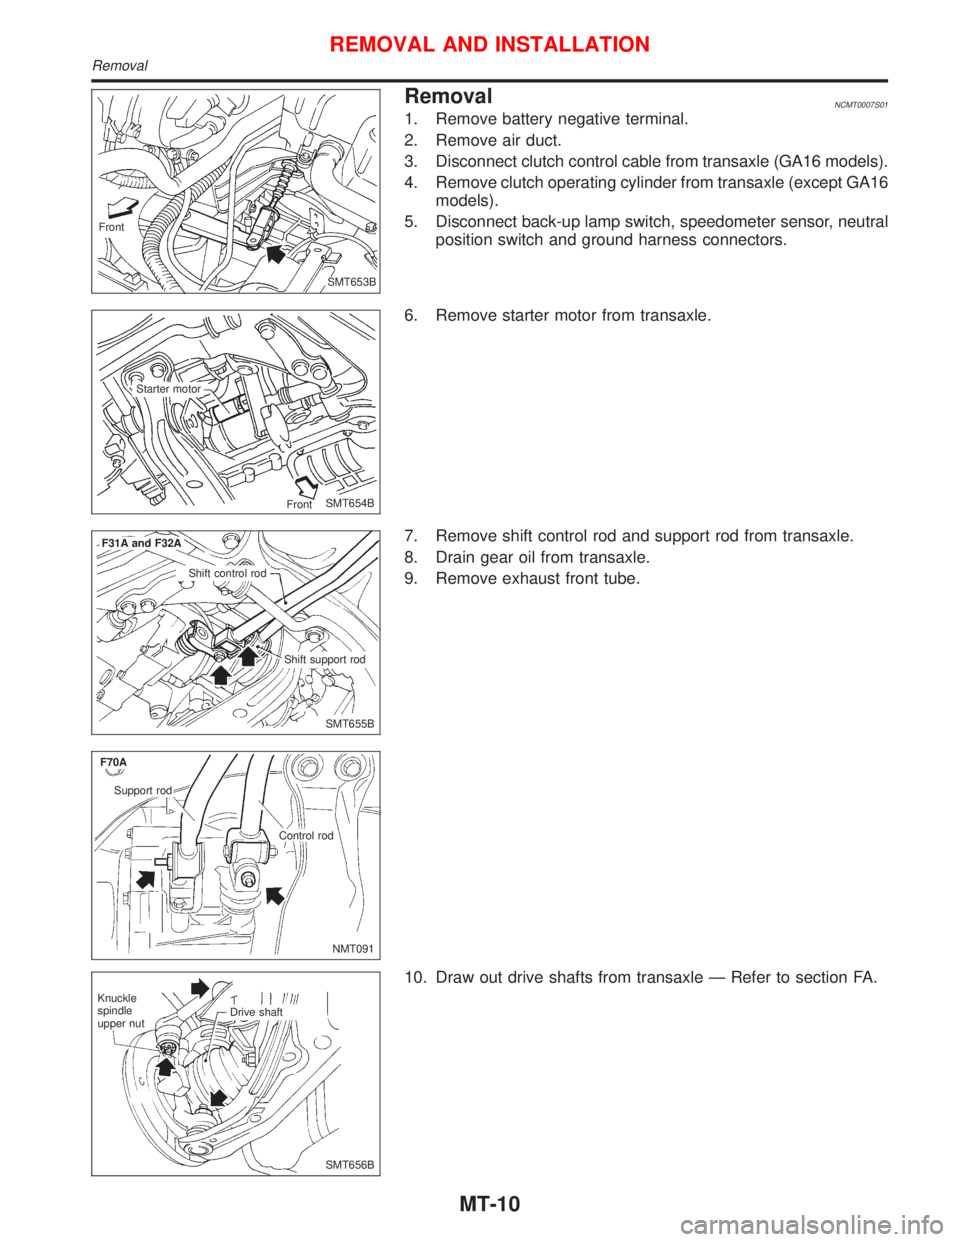
RemovalNCMT0007S01
1. Remove battery negative terminal.
2. Remove air duct.
3. Disconnect clutch control cable from transaxle (GA16 models).
4. Remove clutch operating cylinder from transaxle (except GA16
models).
5. Disconnect back-up lamp switch, speedometer sensor, neutral
position switch and ground harness connectors.
6. Remove starter motor from transaxle.
7. Remove shift control rod and support rod from transaxle.
8. Drain gear oil from transaxle.
9. Remove exhaust front tube.
10. Draw out drive shafts from transaxle Ð Refer to section FA.
.SMT653B Front
SMT654B
.Starter motor
Front
SMT655B Shift control rod
Shift support rod
.F31A and F32A
NMT091
.Control rod
.Support rod
.F70A
SMT656B Knuckle
spindle
upper nutDrive shaft
REMOVAL AND INSTALLATION
Removal
MT-10
Page 2088 of 2267
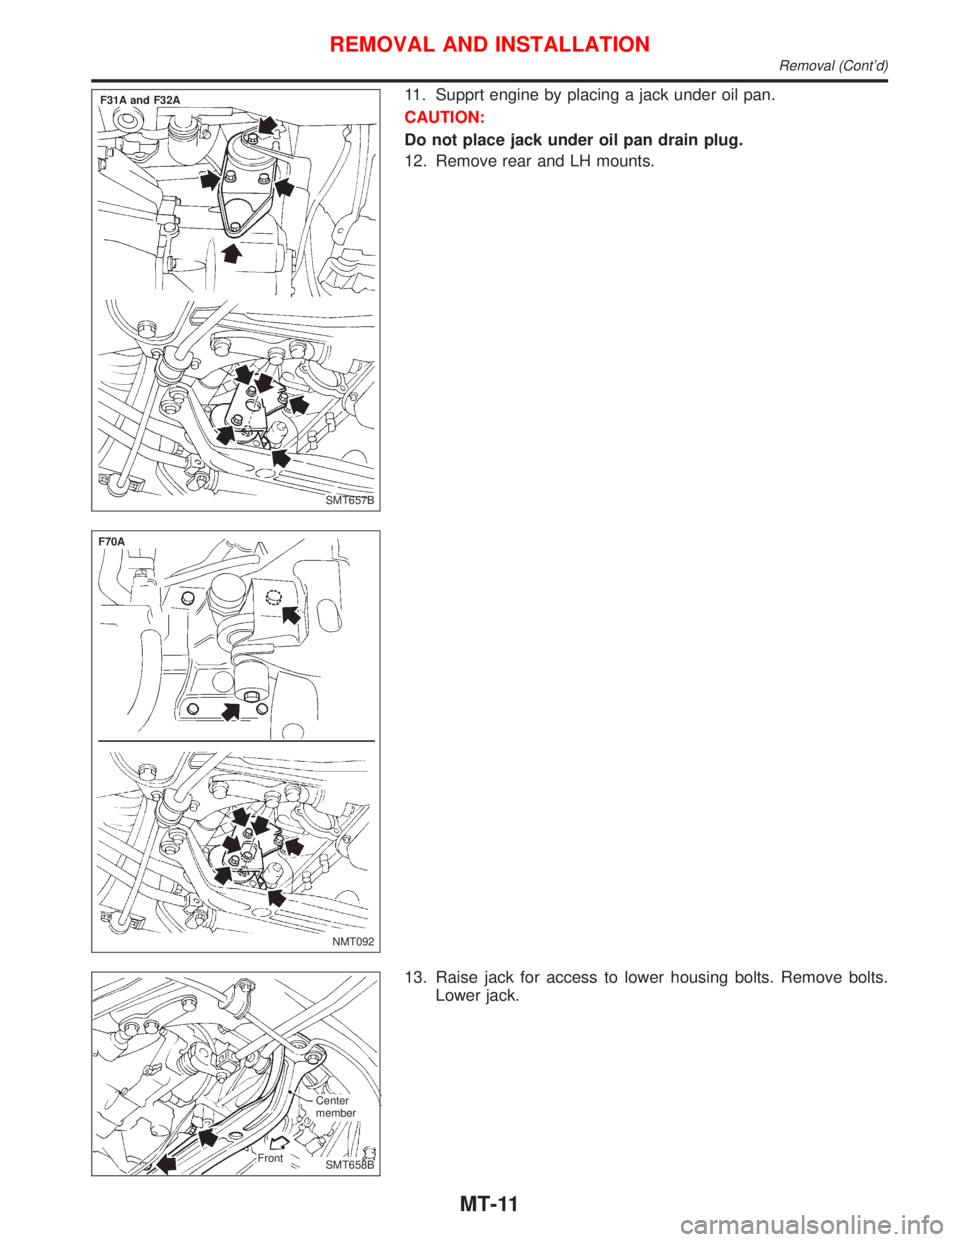
11. Supprt engine by placing a jack under oil pan.
CAUTION:
Do not place jack under oil pan drain plug.
12. Remove rear and LH mounts.
13. Raise jack for access to lower housing bolts. Remove bolts.
Lower jack.
SMT657B
.F31A and F32A
NMT092
.F70A
SMT658B Center
member
Front
REMOVAL AND INSTALLATION
Removal (Cont'd)
MT-11
Page 2089 of 2267
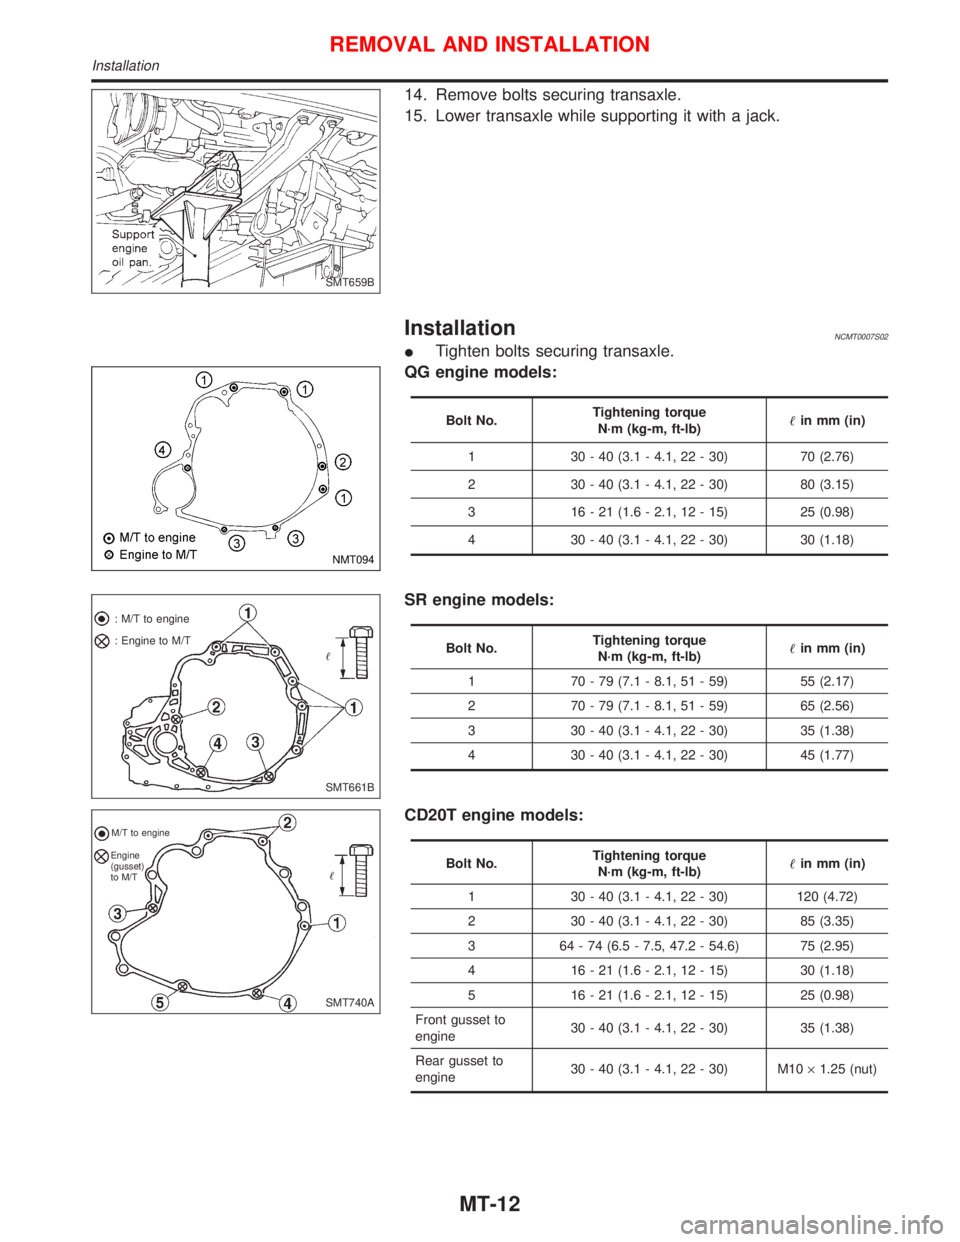
14. Remove bolts securing transaxle.
15. Lower transaxle while supporting it with a jack.
InstallationNCMT0007S02
ITighten bolts securing transaxle.
QG engine models:
Bolt No.Tightening torque
N´m (kg-m, ft-lb)in mm (in)
1 30 - 40 (3.1 - 4.1, 22 - 30) 70 (2.76)
2 30 - 40 (3.1 - 4.1, 22 - 30) 80 (3.15)
3 16 - 21 (1.6 - 2.1, 12 - 15) 25 (0.98)
4 30 - 40 (3.1 - 4.1, 22 - 30) 30 (1.18)
SR engine models:
Bolt No.Tightening torque
N´m (kg-m, ft-lb)in mm (in)
1 70 - 79 (7.1 - 8.1, 51 - 59) 55 (2.17)
2 70 - 79 (7.1 - 8.1, 51 - 59) 65 (2.56)
3 30 - 40 (3.1 - 4.1, 22 - 30) 35 (1.38)
4 30 - 40 (3.1 - 4.1, 22 - 30) 45 (1.77)
CD20T engine models:
Bolt No.Tightening torque
N´m (kg-m, ft-lb)in mm (in)
1 30 - 40 (3.1 - 4.1, 22 - 30) 120 (4.72)
2 30 - 40 (3.1 - 4.1, 22 - 30) 85 (3.35)
3 64 - 74 (6.5 - 7.5, 47.2 - 54.6) 75 (2.95)
4 16 - 21 (1.6 - 2.1, 12 - 15) 30 (1.18)
5 16 - 21 (1.6 - 2.1, 12 - 15) 25 (0.98)
Front gusset to
engine30 - 40 (3.1 - 4.1, 22 - 30) 35 (1.38)
Rear gusset to
engine30 - 40 (3.1 - 4.1, 22 - 30) M10´1.25 (nut)
SMT659B
NMT094
SMT661B : M/T to engine
: Engine to M/T
SMT740A
M/T to engine
Engine
(gusset)
to M/T
REMOVAL AND INSTALLATION
Installation
MT-12
Page 2090 of 2267
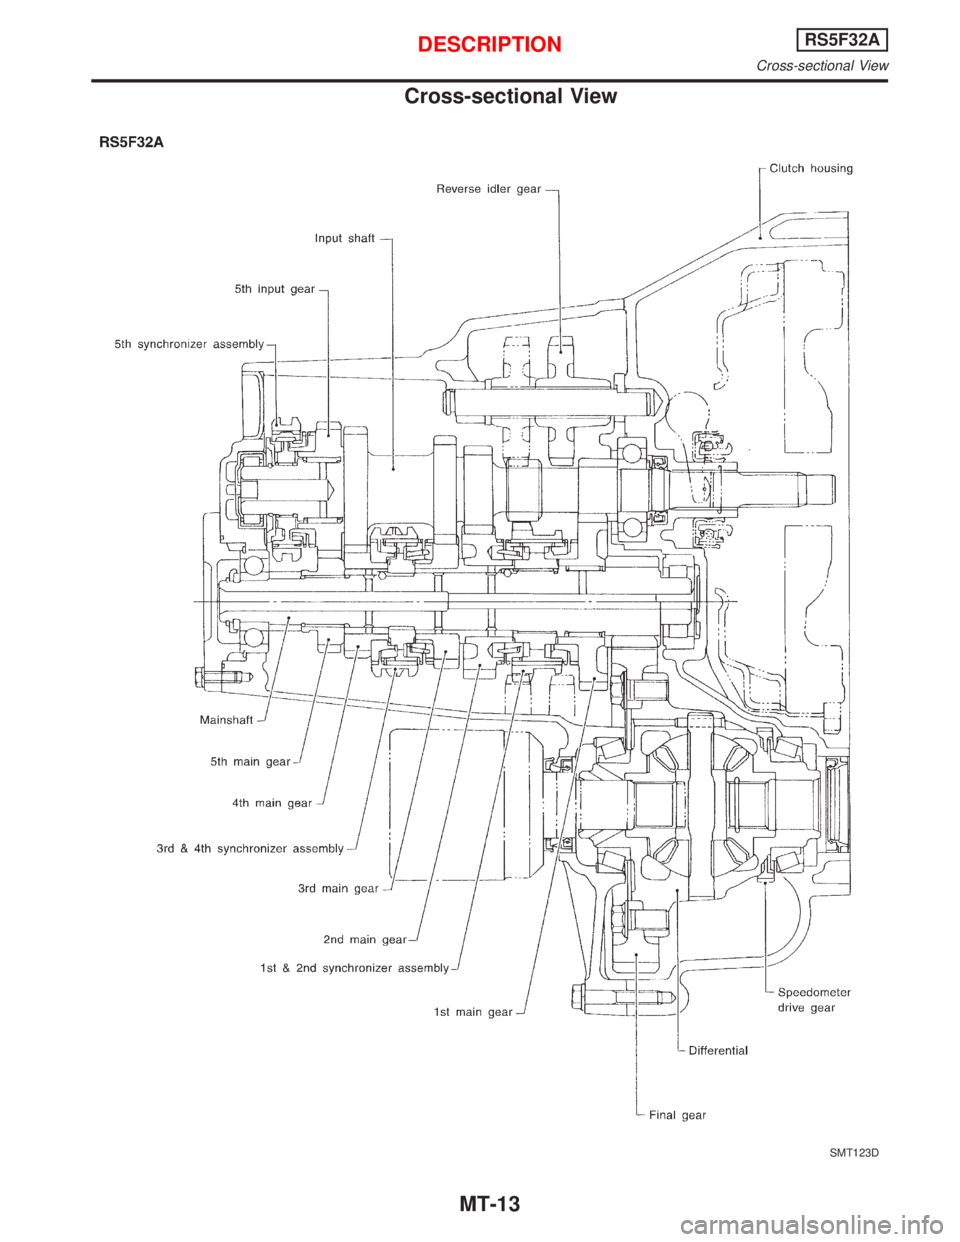
Cross-sectional View
SMT123D
DESCRIPTIONRS5F32A
Cross-sectional View
MT-13