NISSAN PRIMERA 1999 Electronic Repair Manual
PRIMERA 1999
NISSAN
NISSAN
https://www.carmanualsonline.info/img/5/57377/w960_57377-0.png
NISSAN PRIMERA 1999 Electronic Repair Manual
Trending: light, change key battery, hcg, warning lights, remote start, fuse box location, length
Page 541 of 2267
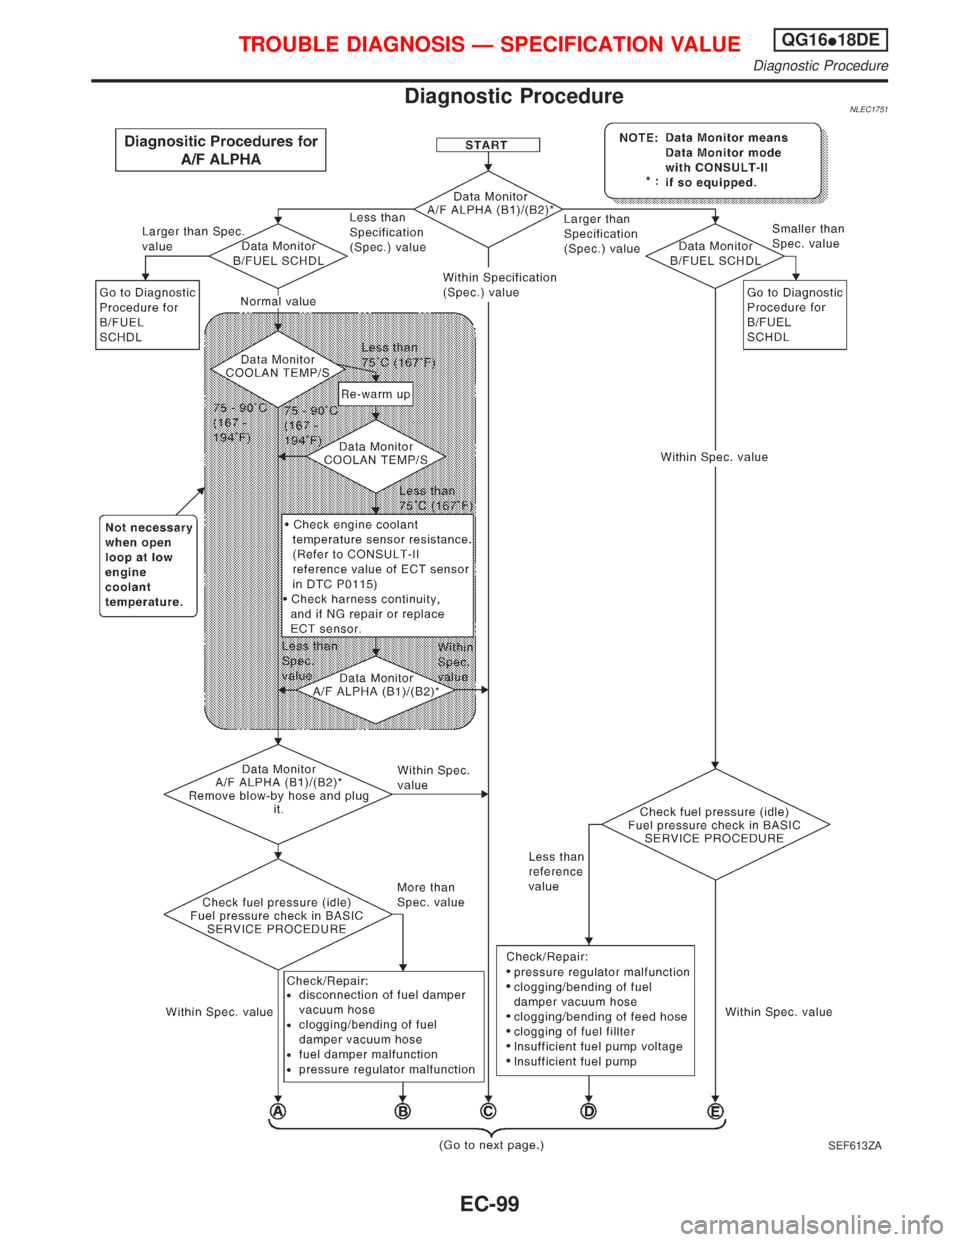
Diagnostic ProcedureNLEC1751
SEF613ZA
TROUBLE DIAGNOSIS Ð SPECIFICATION VALUEQG16I18DE
Diagnostic Procedure
EC-99
Page 542 of 2267
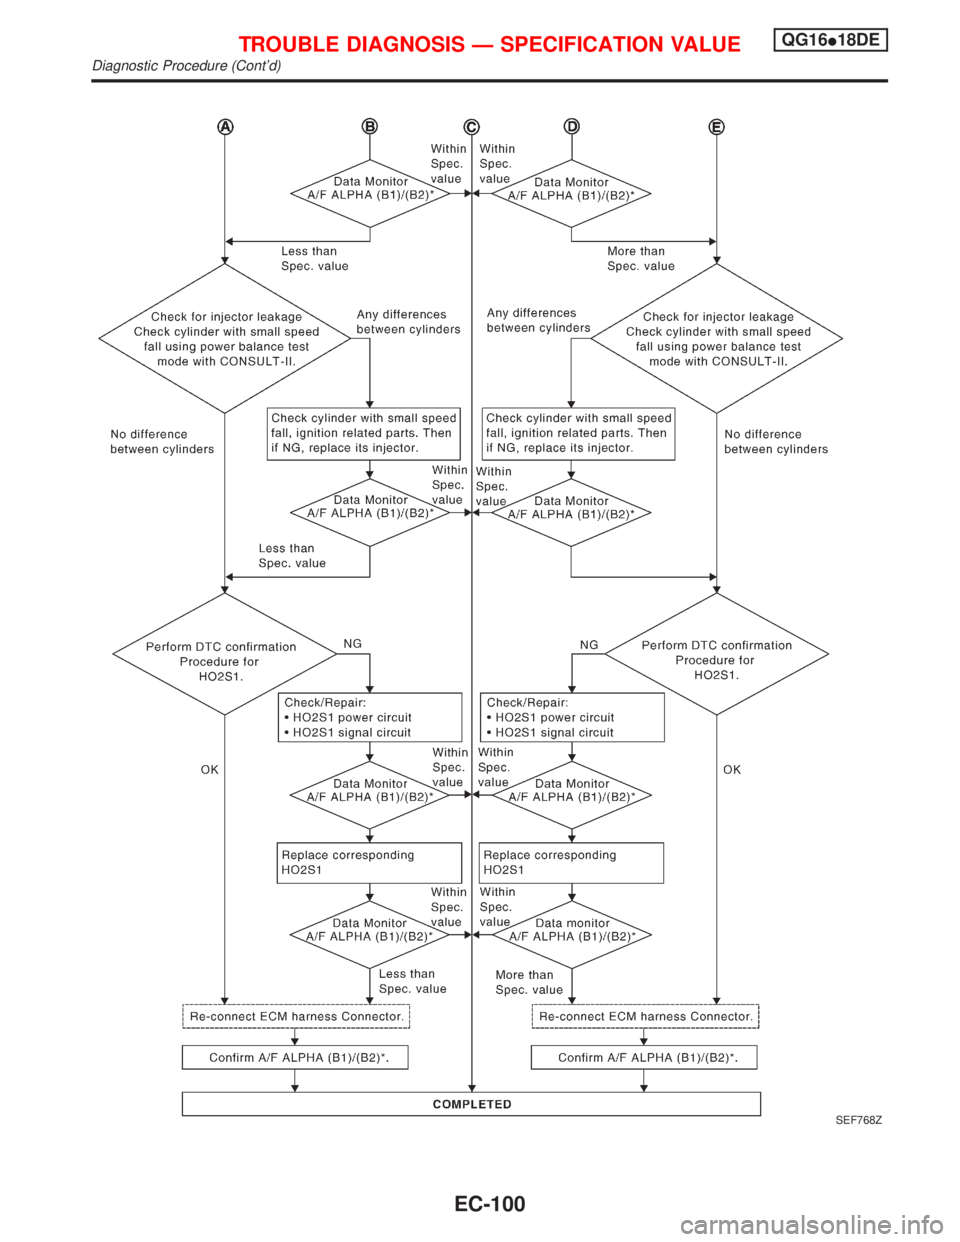
SEF768Z
TROUBLE DIAGNOSIS Ð SPECIFICATION VALUEQG16I18DE
Diagnostic Procedure (Cont'd)
EC-100
Page 543 of 2267
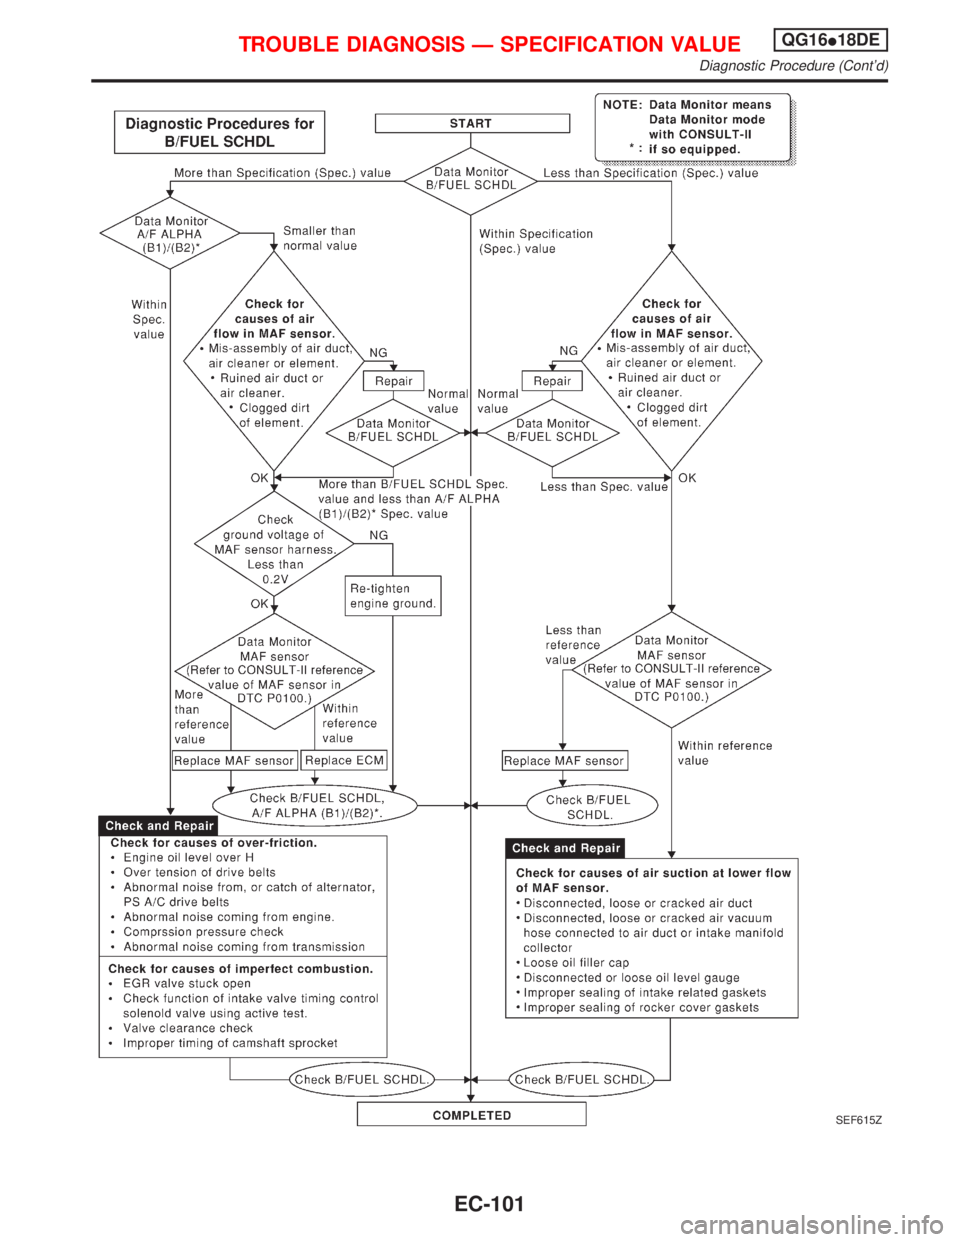
SEF615Z
TROUBLE DIAGNOSIS Ð SPECIFICATION VALUEQG16I18DE
Diagnostic Procedure (Cont'd)
EC-101
Page 544 of 2267
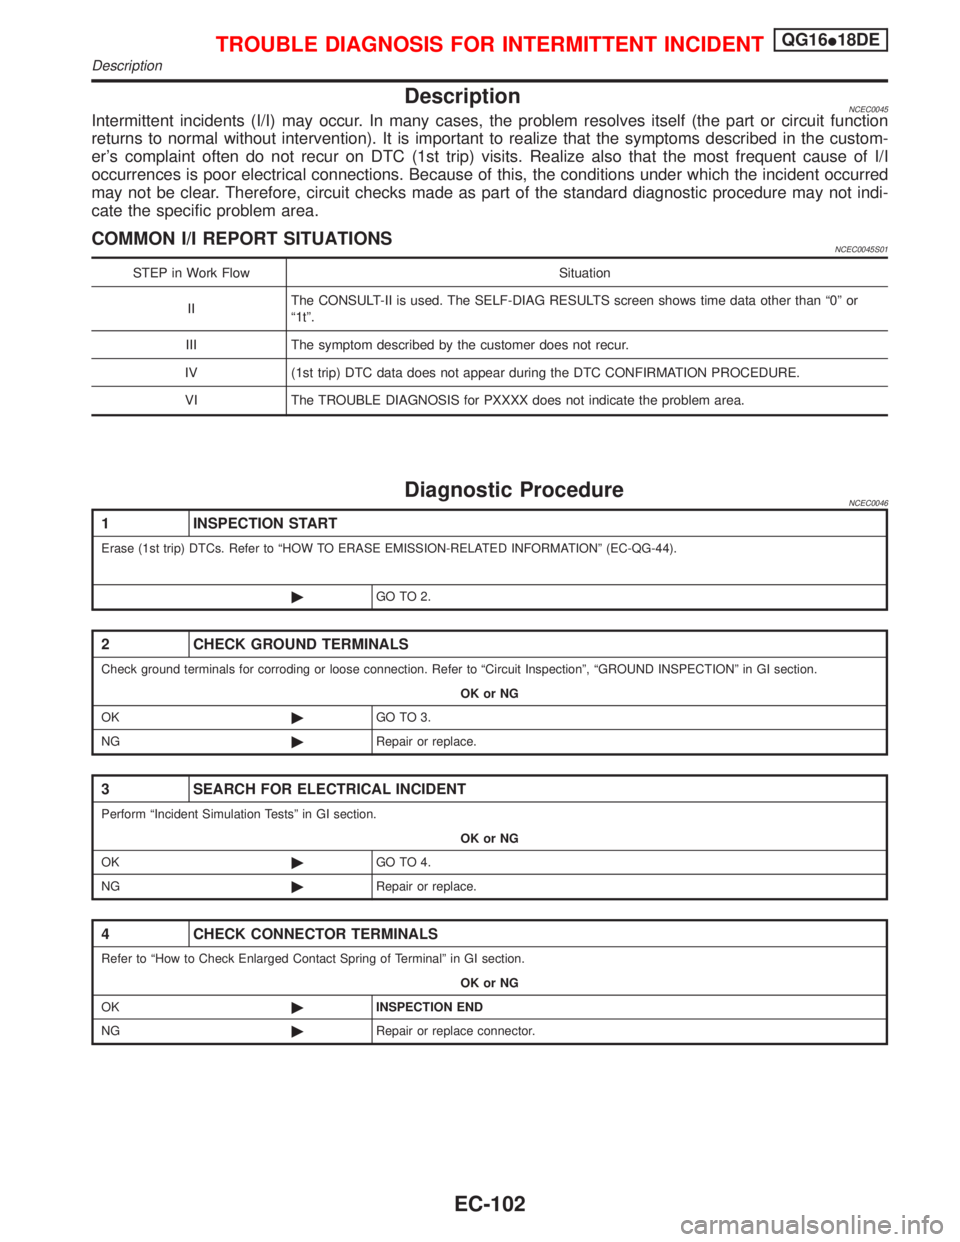
DescriptionNCEC0045Intermittent incidents (I/I) may occur. In many cases, the problem resolves itself (the part or circuit function
returns to normal without intervention). It is important to realize that the symptoms described in the custom-
er's complaint often do not recur on DTC (1st trip) visits. Realize also that the most frequent cause of I/I
occurrences is poor electrical connections. Because of this, the conditions under which the incident occurred
may not be clear. Therefore, circuit checks made as part of the standard diagnostic procedure may not indi-
cate the specific problem area.
COMMON I/I REPORT SITUATIONSNCEC0045S01
STEP in Work Flow Situation
IIThe CONSULT-II is used. The SELF-DIAG RESULTS screen shows time data other than ª0º or
ª1tº.
III The symptom described by the customer does not recur.
IV (1st trip) DTC data does not appear during the DTC CONFIRMATION PROCEDURE.
VI The TROUBLE DIAGNOSIS for PXXXX does not indicate the problem area.
Diagnostic ProcedureNCEC0046
1 INSPECTION START
Erase (1st trip) DTCs. Refer to ªHOW TO ERASE EMISSION-RELATED INFORMATIONº (EC-QG-44).
©GO TO 2.
2 CHECK GROUND TERMINALS
Check ground terminals for corroding or loose connection. Refer to ªCircuit Inspectionº, ªGROUND INSPECTIONº in GI section.
OK or NG
OK©GO TO 3.
NG©Repair or replace.
3 SEARCH FOR ELECTRICAL INCIDENT
Perform ªIncident Simulation Testsº in GI section.
OK or NG
OK©GO TO 4.
NG©Repair or replace.
4 CHECK CONNECTOR TERMINALS
Refer to ªHow to Check Enlarged Contact Spring of Terminalº in GI section.
OK or NG
OK©INSPECTION END
NG©Repair or replace connector.
TROUBLE DIAGNOSIS FOR INTERMITTENT INCIDENTQG16I18DE
Description
EC-102
Page 545 of 2267
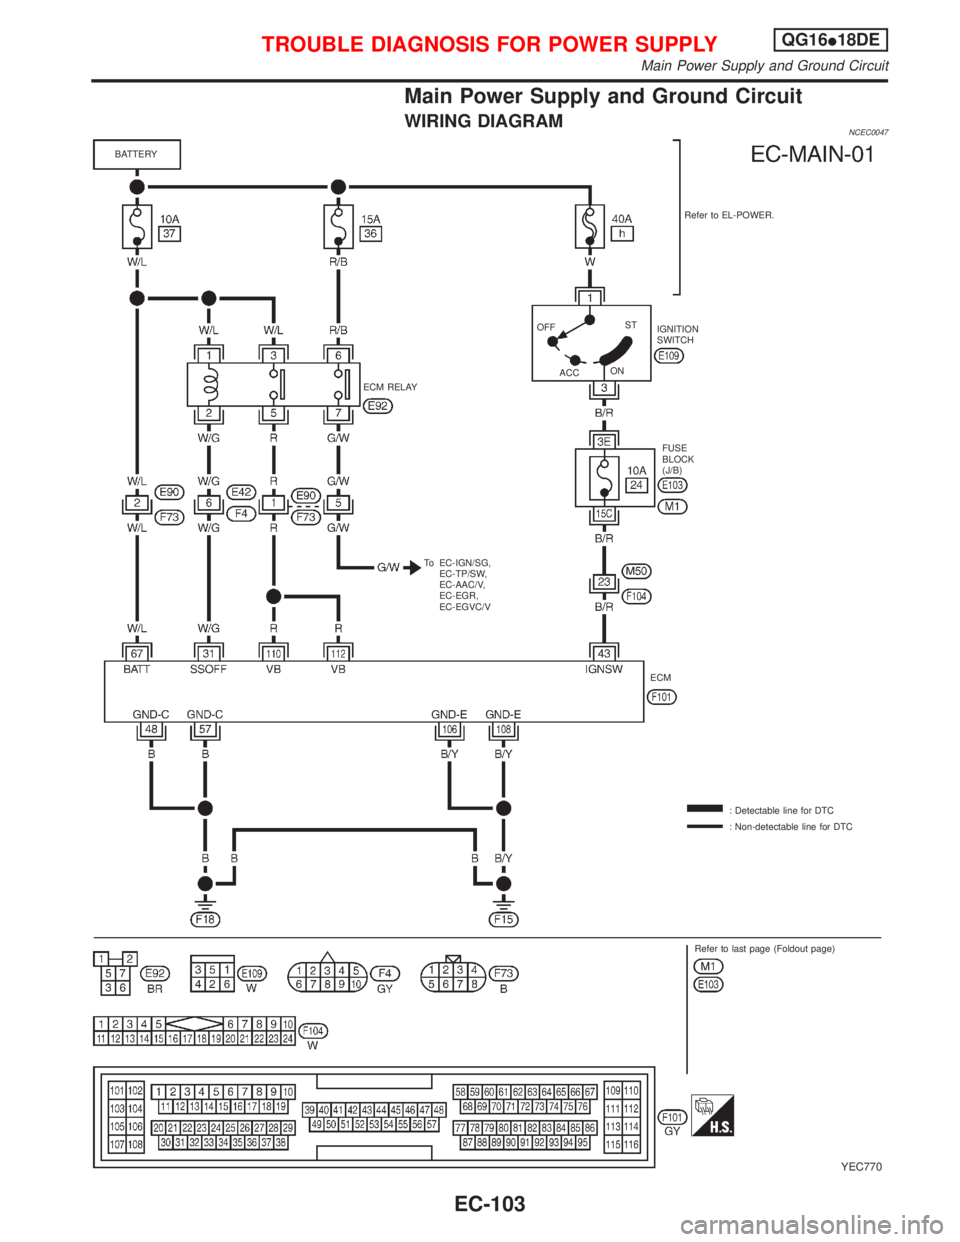
Main Power Supply and Ground Circuit
WIRING DIAGRAMNCEC0047
YEC770
BATTERY
Refer to EL-POWER.
OFF
ACCST
ONIGNITION
SWITCH
FUSE
BLOCK
(J/B)
To EC-IGN/SG,
EC-TP/SW,
EC-AAC/V,
EC-EGR,
EC-EGVC/V ECM RELAY
: Detectable line for DTC
: Non-detectable line for DTC
Refer to last page (Foldout page) ECM
TROUBLE DIAGNOSIS FOR POWER SUPPLYQG16I18DE
Main Power Supply and Ground Circuit
EC-103
Page 546 of 2267
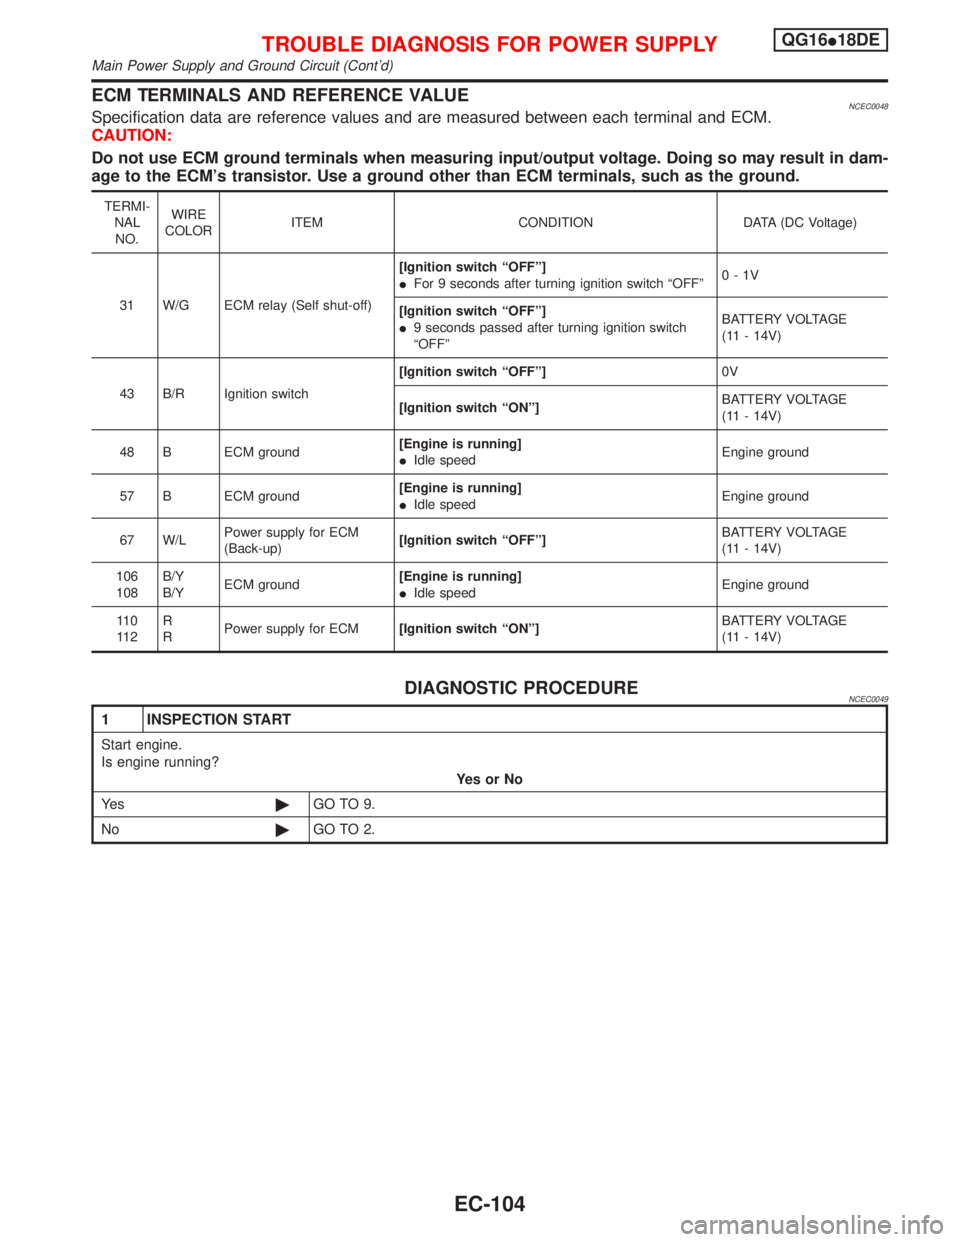
ECM TERMINALS AND REFERENCE VALUENCEC0048Specification data are reference values and are measured between each terminal and ECM.
CAUTION:
Do not use ECM ground terminals when measuring input/output voltage. Doing so may result in dam-
age to the ECM's transistor. Use a ground other than ECM terminals, such as the ground.
TERMI-
NAL
NO.WIRE
COLORITEM CONDITION DATA (DC Voltage)
31 W/G ECM relay (Self shut-off)[Ignition switch ªOFFº]
IFor 9 seconds after turning ignition switch ªOFFº0-1V
[Ignition switch ªOFFº]
I9 seconds passed after turning ignition switch
ªOFFºBATTERY VOLTAGE
(11 - 14V)
43 B/R Ignition switch[Ignition switch ªOFFº]0V
[Ignition switch ªONº]BATTERY VOLTAGE
(11 - 14V)
48 B ECM ground[Engine is running]
IIdle speedEngine ground
57 B ECM ground[Engine is running]
IIdle speedEngine ground
67 W/LPower supply for ECM
(Back-up)[Ignition switch ªOFFº]BATTERY VOLTAGE
(11 - 14V)
106
108B/Y
B/YECM ground[Engine is running]
IIdle speedEngine ground
11 0
11 2R
RPower supply for ECM[Ignition switch ªONº]BATTERY VOLTAGE
(11 - 14V)
DIAGNOSTIC PROCEDURENCEC0049
1 INSPECTION START
Start engine.
Is engine running?
YesorNo
Ye s©GO TO 9.
No©GO TO 2.
TROUBLE DIAGNOSIS FOR POWER SUPPLYQG16I18DE
Main Power Supply and Ground Circuit (Cont'd)
EC-104
Page 547 of 2267
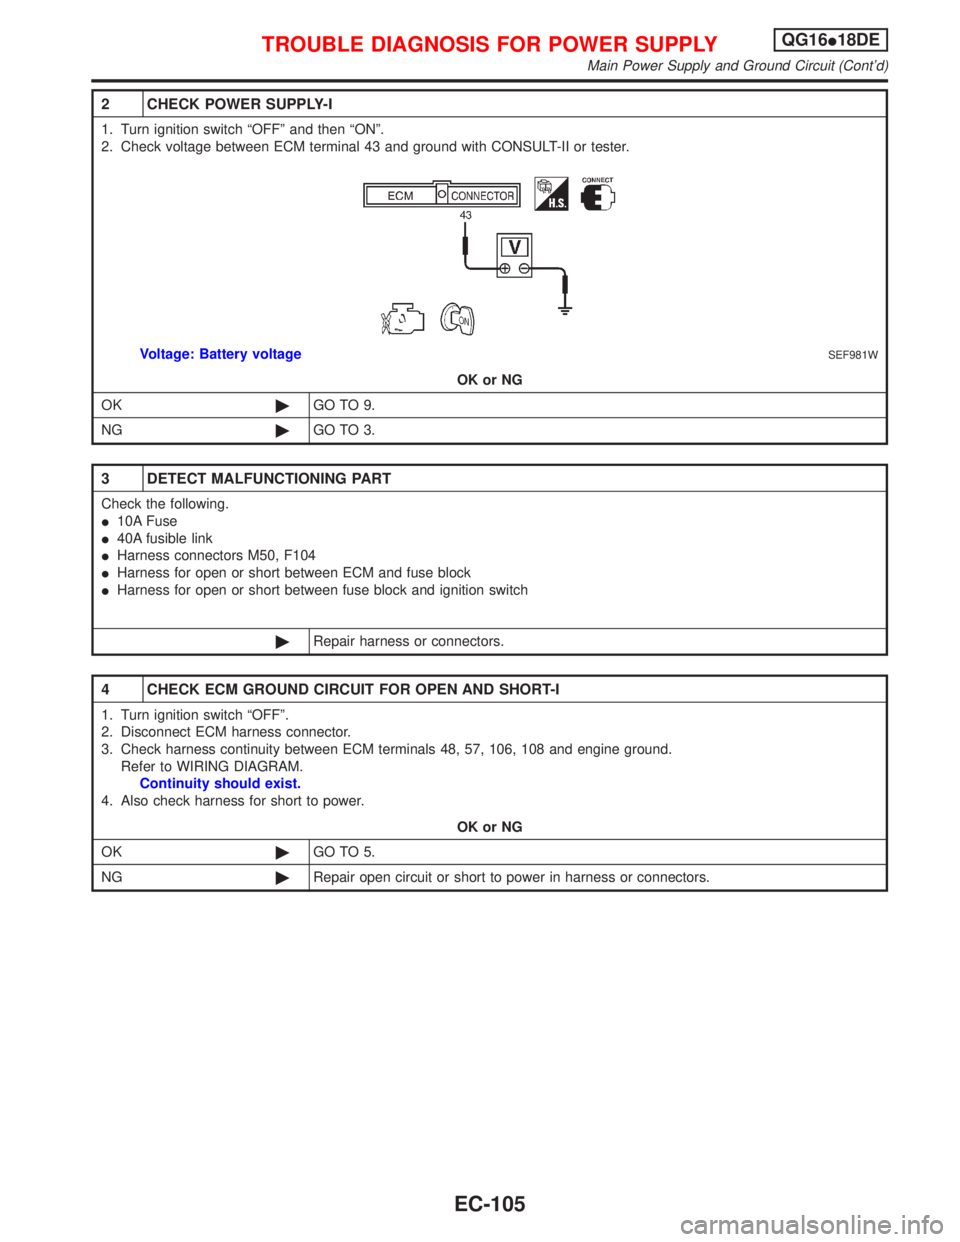
2 CHECK POWER SUPPLY-I
1. Turn ignition switch ªOFFº and then ªONº.
2. Check voltage between ECM terminal 43 and ground with CONSULT-II or tester.
SEF981WVoltage: Battery voltage
OK or NG
OK©GO TO 9.
NG©GO TO 3.
3 DETECT MALFUNCTIONING PART
Check the following.
I10A Fuse
I40A fusible link
IHarness connectors M50, F104
IHarness for open or short between ECM and fuse block
IHarness for open or short between fuse block and ignition switch
©Repair harness or connectors.
4 CHECK ECM GROUND CIRCUIT FOR OPEN AND SHORT-I
1. Turn ignition switch ªOFFº.
2. Disconnect ECM harness connector.
3. Check harness continuity between ECM terminals 48, 57, 106, 108 and engine ground.
Refer to WIRING DIAGRAM.
Continuity should exist.
4. Also check harness for short to power.
OK or NG
OK©GO TO 5.
NG©Repair open circuit or short to power in harness or connectors.
TROUBLE DIAGNOSIS FOR POWER SUPPLYQG16I18DE
Main Power Supply and Ground Circuit (Cont'd)
EC-105
Page 548 of 2267
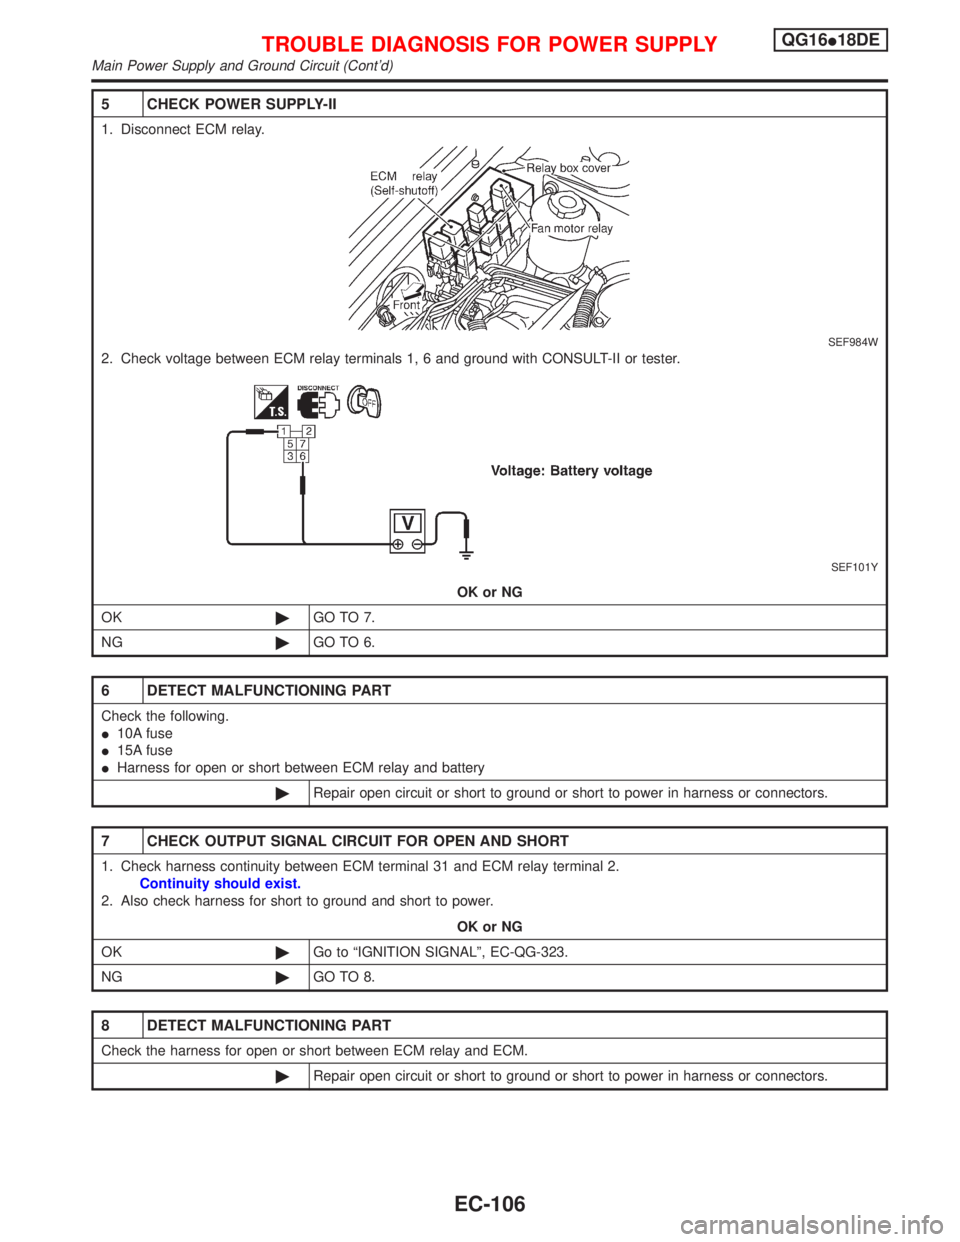
5 CHECK POWER SUPPLY-II
1. Disconnect ECM relay.
SEF984W
2. Check voltage between ECM relay terminals 1, 6 and ground with CONSULT-II or tester.
SEF101Y
OK or NG
OK©GO TO 7.
NG©GO TO 6.
6 DETECT MALFUNCTIONING PART
Check the following.
I10A fuse
I15A fuse
IHarness for open or short between ECM relay and battery
©Repair open circuit or short to ground or short to power in harness or connectors.
7 CHECK OUTPUT SIGNAL CIRCUIT FOR OPEN AND SHORT
1. Check harness continuity between ECM terminal 31 and ECM relay terminal 2.
Continuity should exist.
2. Also check harness for short to ground and short to power.
OK or NG
OK©Go to ªIGNITION SIGNALº, EC-QG-323.
NG©GO TO 8.
8 DETECT MALFUNCTIONING PART
Check the harness for open or short between ECM relay and ECM.
©Repair open circuit or short to ground or short to power in harness or connectors.
TROUBLE DIAGNOSIS FOR POWER SUPPLYQG16I18DE
Main Power Supply and Ground Circuit (Cont'd)
EC-106
Page 549 of 2267
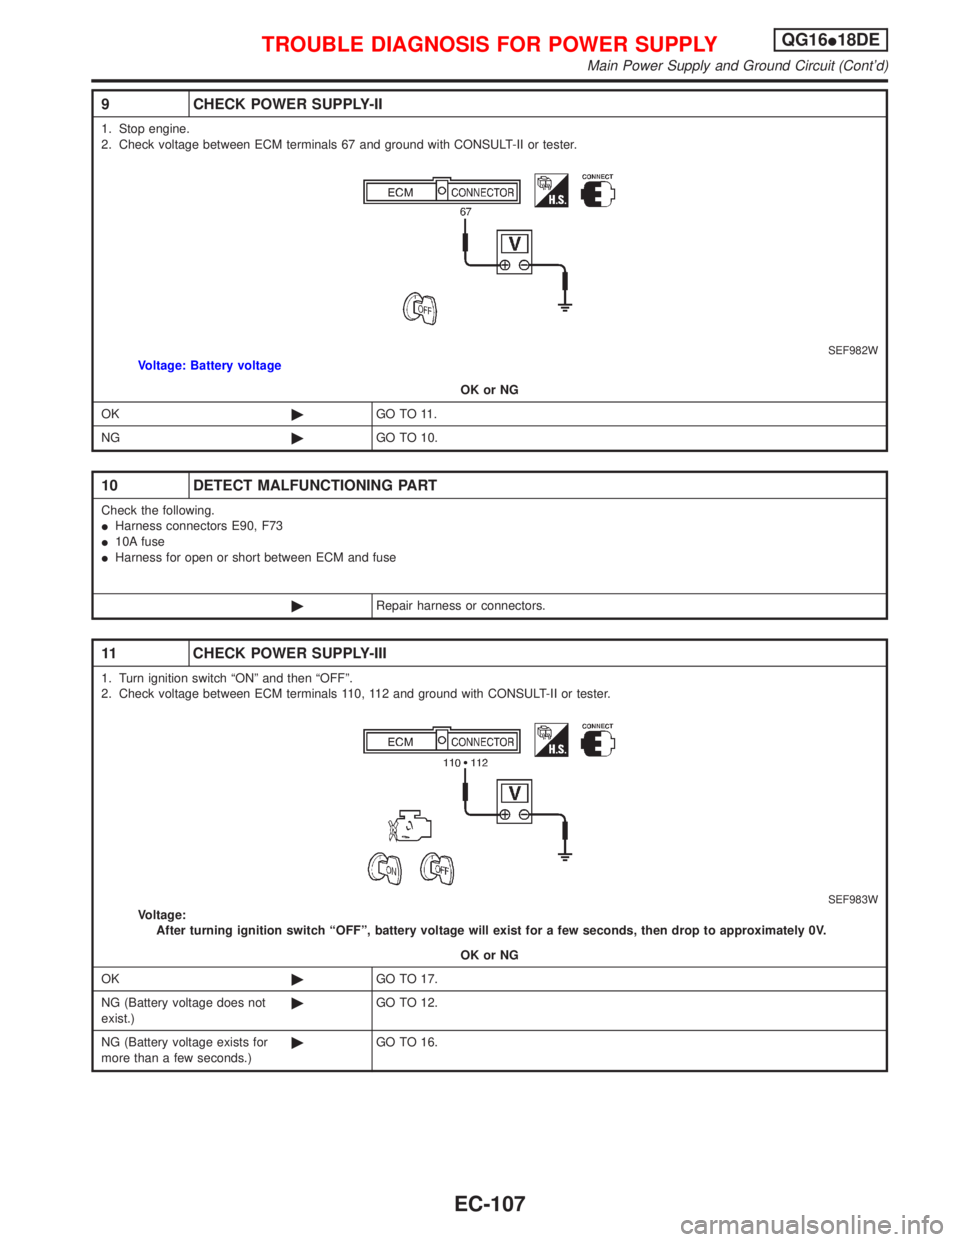
9 CHECK POWER SUPPLY-II
1. Stop engine.
2. Check voltage between ECM terminals 67 and ground with CONSULT-II or tester.
SEF982WVoltage: Battery voltage
OK or NG
OK©GO TO 11.
NG©GO TO 10.
10 DETECT MALFUNCTIONING PART
Check the following.
IHarness connectors E90, F73
I10A fuse
IHarness for open or short between ECM and fuse
©Repair harness or connectors.
11 CHECK POWER SUPPLY-III
1. Turn ignition switch ªONº and then ªOFFº.
2. Check voltage between ECM terminals 110, 112 and ground with CONSULT-II or tester.
SEF983WVoltage:
After turning ignition switch ªOFFº, battery voltage will exist for a few seconds, then drop to approximately 0V.
OK or NG
OK©GO TO 17.
NG (Battery voltage does not
exist.)©GO TO 12.
NG (Battery voltage exists for
more than a few seconds.)©GO TO 16.
TROUBLE DIAGNOSIS FOR POWER SUPPLYQG16I18DE
Main Power Supply and Ground Circuit (Cont'd)
EC-107
Page 550 of 2267
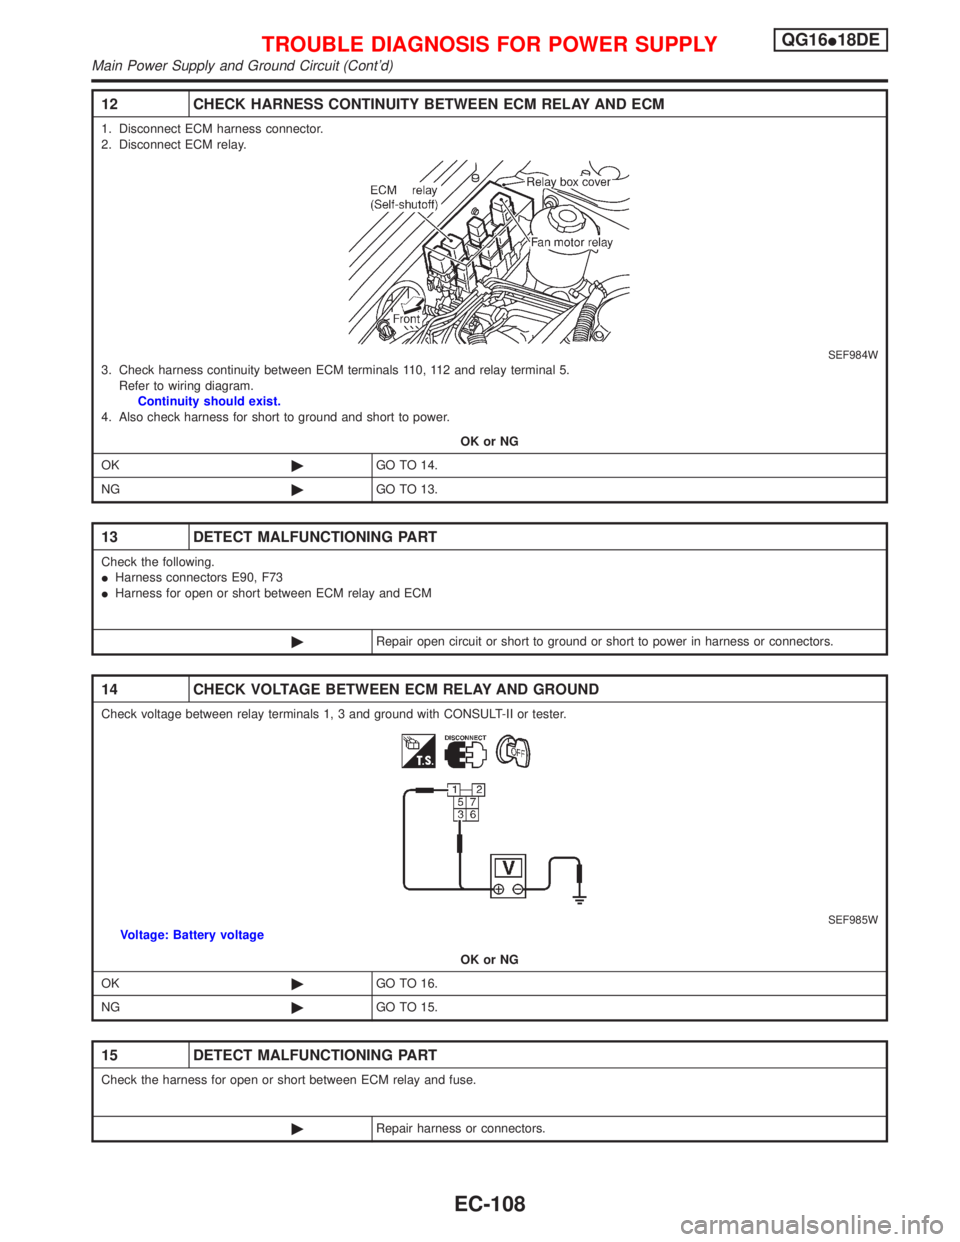
12 CHECK HARNESS CONTINUITY BETWEEN ECM RELAY AND ECM
1. Disconnect ECM harness connector.
2. Disconnect ECM relay.
SEF984W3. Check harness continuity between ECM terminals 110, 112 and relay terminal 5.
Refer to wiring diagram.
Continuity should exist.
4. Also check harness for short to ground and short to power.
OK or NG
OK©GO TO 14.
NG©GO TO 13.
13 DETECT MALFUNCTIONING PART
Check the following.
IHarness connectors E90, F73
IHarness for open or short between ECM relay and ECM
©Repair open circuit or short to ground or short to power in harness or connectors.
14 CHECK VOLTAGE BETWEEN ECM RELAY AND GROUND
Check voltage between relay terminals 1, 3 and ground with CONSULT-II or tester.
SEF985WVoltage: Battery voltage
OK or NG
OK©GO TO 16.
NG©GO TO 15.
15 DETECT MALFUNCTIONING PART
Check the harness for open or short between ECM relay and fuse.
©Repair harness or connectors.
TROUBLE DIAGNOSIS FOR POWER SUPPLYQG16I18DE
Main Power Supply and Ground Circuit (Cont'd)
EC-108
Trending: jump cable, steering, pairing phone, steering wheel adjustment, tire type, roof, sensor
