interior NISSAN PULSAR 1987 User Guide
[x] Cancel search | Manufacturer: NISSAN, Model Year: 1987, Model line: PULSAR, Model: NISSAN PULSAR 1987Pages: 238, PDF Size: 28.91 MB
Page 230 of 238

230 Body
Dismantled view of the rear door lock components. Dimension A at the stepped adjuster holder should be 0.5—2.0 mm. Turn the steppe d adjuster holder to give the correct free play.
Ensure that the snipper button pivot holder
is turned back to lock the pivot in position. Ensure that the exterior handle operates
correctly and has 0.5-2.0 mm free play at the stepped
adjuster holder. Adjust the stepped adjuster holder if
necessary.
Check the operation of the door lock assem-
bly before installing the plastic sealing sheet, the trim
panel and the interior handles as previously described.
EXTERIOR DOOR HANDLE
To Remove and Install
Remove the interior handles, the trim panel
and the plastic sealing sheet as previously described.
Remove the exterior door handle retaining
nuts from inside the inner door panel. (3) Withdraw the door handle from the door.
Installation is a reversal of the removal procedure
with attention to the following points:
Ensure that the exterior handle operates
correctly and has 0.5-2.0 mm free play at the stepped
adjuster holder. Adjust the stepped adjuster if neces-
sary. Check the operation of the door lock assem-
bly before installing the plastic sealing sheet, the trim
panel and the interior handle as previously described.
Install the striker plate to the door pillar
according to the pencil marks made on removal. Close the door and observe the alignment
with the body panel. If necessary, loosen the striker
plate retainer screws and move the striker plate in or
out to achieve a flush fit between the door and the
body panel.
Installed view of the rear door lock striker plate.
LOCK STRIKER PLATE
To Remove, Install and Adjust
Mark the rear door pillar around the striker
plate with a soft lead pencil to aid assembly.
Remove the retainer screws from the striker
plate and remove the striker plate. Inspect the striker
plate for wear or damage and renew as necessary. (5) If the door lifts or drops when the lock
engages the striker plate, l oosen the screws and move
the striker plate up or down to eliminate the lift or
drop.
NOTE: After each adjustment tighten the
striker plate screws and check the adjust-
ment. Readjust as necessary.
Page 231 of 238
Body 231
4. ENGINE BONNET
TO REMOVE, INSTAL AND ADJUST
Raise the engine bonnet and place covers on
both front mudguards. Mark the hinge mountings on
the bonnet with a soft lead pencil to aid assembly.
Place a quantity of soft rag folded several
times under each rear corner of the bonnet on the
scuttle panel. Disconnect the windscreen washer hose from
the bonnet at the tee piece. With the aid of an assistant supporting the
bonnet, remove the retaining bolts and lift the bonnet
from the vehicle. Installation is a reversal of the removal procedure
with attention to the following points:
Holding the bonnet in the position previ-
ously marked, install the bonnet hinge bolts
and
tighten to just over finger tight.
Close the bonnet and by pushing with the
hand, position the bonnet evenly in its opening.
Open the bonnet carefully and tighten the
mounting bolts. Check for correct positioning and adjust
again if necessary. Check the adjustment of the bonnet catch.
When the bonnet is closed the bonnet should align
with the front panels. When the catch is released the
bonnet should pop up sufficiently to enable the safety
catch to be released. If adjustment is necessary, mark the base
position with a pencil, loosen the retaining bolts and
move the catch in the desired direction. Tighten the
bolts and recheck.
NOTE: When adjusting the bonnet catch
ensure that the bonnet striker plate is enter-
ing centrally into the catch. Adjust the catch
or the bonnet lunges if necessary.
(7) When adjustment is complete, adjust the
bump rubbers on the radiator support panel up or
down by turning them to support the outer edges of
the bonnet.
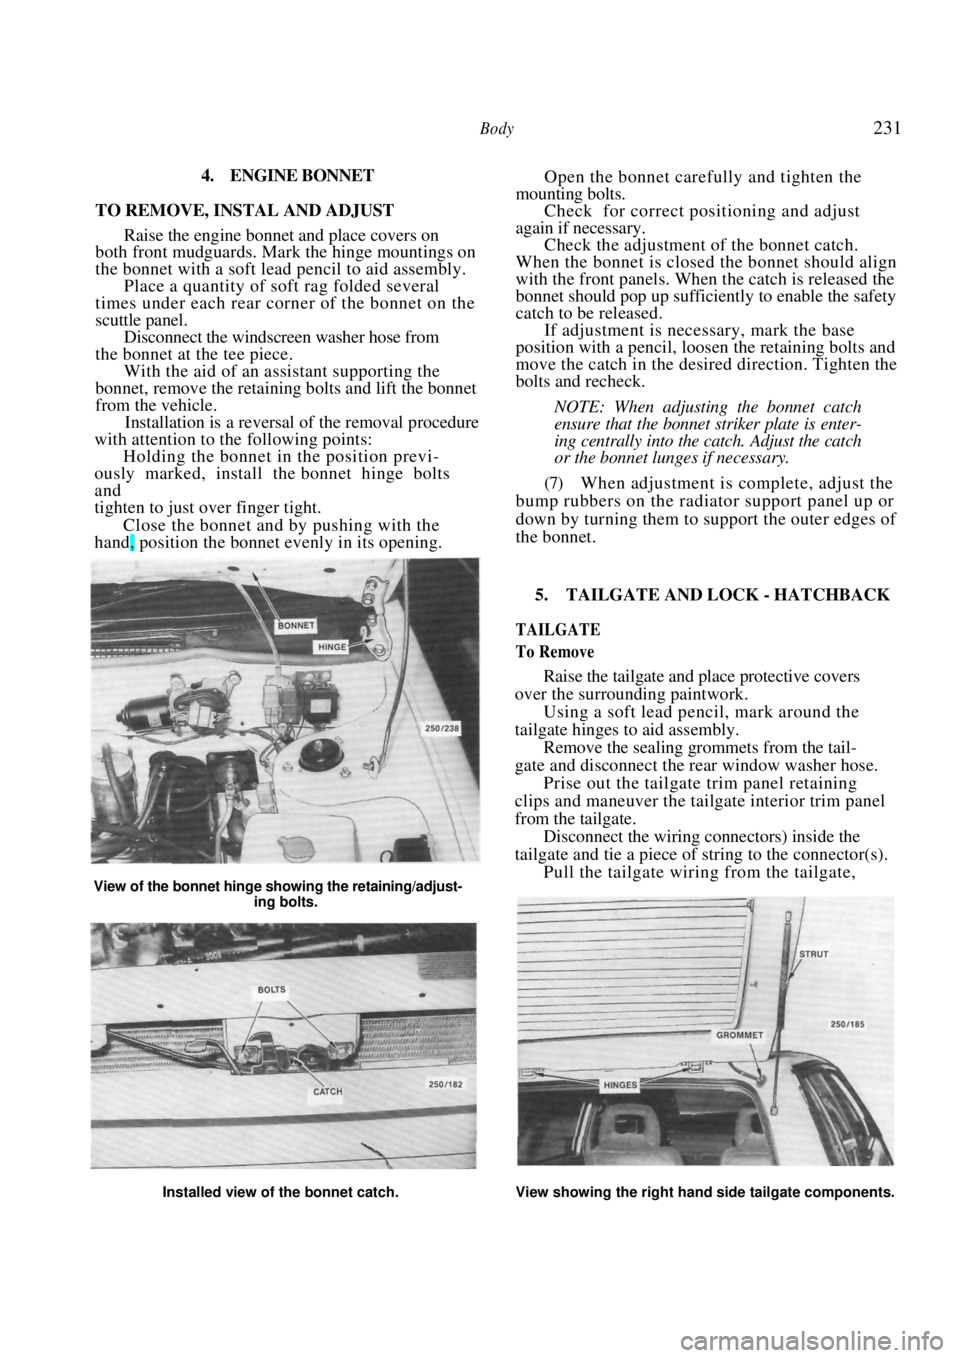
View of the bonnet hinge showing the retaining/adjust-
ing bolts.
5. TAILGATE AND LOCK - HATCHBACK
TAILGATE
To Remove
Raise the tailgate and place protective covers
over the surrounding paintwork.
Using a soft lead pencil, mark around the
tailgate hinges to aid assembly. Remove the sealing grommets from the tail-
gate and disconnect the rear window washer hose. Prise out the tailgate trim panel retaining
clips and maneuver the tailgate interior trim panel
from the tailgate.
Disconnect the wiring connectors) inside the
tailgate and tie a piece of st ring to the connector(s).
Pull the tailgate wiring from the tailgate,
Installed view of the bonnet catch. View showing the right hand side tailgate components.
Page 232 of 238

232 Body
leaving the ends of the string protruding from the
tailgate. Untie the string.
NOTE: The string will be used to pull the
wiring through the tailgate on installation.
If the wiring is pulled from the tailgate
without the string attached, installation will
be very difficult.
With the aid of an assistant supporting the
tailgate, prise out the ball joint stud snap locks from
each upper strut ball joint using a small screwdriver.
Remove the bolts retaining the hinges to the
tailgate and carefully withdraw the tailgate from the
vehicle.
To Install and Adjust
With the aid of an assistant, install the
tailgate in position on the hinges according to the
marks made on removal and install the retaining bolts.
Install the tailgate support struts and retain
the ball joints with the snap locks. Pull the tailgate wiring through using the
piece of string. Connect the wiring and install
the
tailgate trim panel. Close the tailgate and check the vertical and
lateral alignment of the tailgate in relation to the
body. If adjustment is required, loosen the tailgate
hinge retaining bolts one hi nge at a time and adjust
the tailgate as required. If vertical adjustment is required, it will be
necessary to remove or install washers under the
tailgate hinges. If required, adjust the striker plate using the
procedure that follows.
STRIKER PLATE
To Remove, Install and Adjust
Using a flat bladed screwdriver, prise out the
trim plugs and remove the trim plate from above the
striker.
Using a soft lead pencil, scribe a line around
the striker plate.
Remove the striker plate retaining bolts and
partially remove the striker plate. Disconnect the remote tailgate release cable
from the striker plate and remove the striker plate
from the vehicle. Inspect the striker plate for wear and renew
it if necessary. Installation is a reversal of the removal procedure
with attention to the following points:
Install the striker plate ensuring that it is in
the position marked on dismantling and that the
remote tailgate release cable is connected. Tighten the
retaining bolts. Close the tailgate ensuring that the striker
has actuated the locking mechanism. Check the alignment of the tailgate in its
opening and adjust the locking action by moving the
striker plate in the requir ed direction. Tighten the
retaining bolts securely.
LOCK AND LOCK CYLINDER
To Remove and Install
Prise out the tailgate trim panel retaining
clips and carefully maneuver the tailgate interior
trim panel from the tailgate.
Disconnect the actuati ng rod from the lock
cylinder assembly. Disconnect the interior lamp switch wiring
connector.
Installed view of the striker plate assembly. Hatchback
models. Dismantled view of the Hatchback lock and lock cylin-
der.
Page 233 of 238

Body 233
Remove the lock assembly retaining bolts
and withdraw the lock assembly, insulator and link
from the tailgate.
Using a suitable screwdriver, remove the
lock cylinder retaining clip and withdraw the lock
cylinder from the vehicle. Installation is a reversal of the removal procedure
with attention to the following points:
Ensure that the positioning of the lock is
correct in relation to the striker plate.
Ensure that the interior lamp switch wiring
connector is connected.
6. LUGGAGE COMPARTMENT LID
AND LOCK — SEDAN
LUGGAGE COMPARTMENT LID
To Remove
Raise the luggage compartment lid and place
protective covers over the surrounding paintwork.
Using a soft lead pencil, mark around the
luggage compartment lid hi nges to aid assembly.
With the aid of an assistant supporting the
lid, remove the hinge retaining bolts and withdraw the
luggage compartment lid from the vehicle.
To Install and Adjust
With the aid of an assistant, install the
luggage compartment lid in position on the hinges
according to the marks made on removal. Install the
retaining bolts. Close the lid and check the vertical and
lateral alignment of the l i d in relation to the body.
If adjustment is necessary, loosen the l i d
hinge retaining bolts on one hinge at a time and adjust
the lid as required.
If vertical adjustment is required, loosen the
lid hinge retaining bolts and increase or decrease the
number of washers under the bolts. If required, adjust the striker plate using the
procedure that follows.
STRIKER PLATE
To Remove, Install and Adjust
Fold back the trim material from inside the
luggage compartment.
Using a soft lead pencil, scribe a line around
the outside of each striker plate retaining bolt washer. Remove the striker plate bolts and washers
and the screw retaining the remote release cable
bracket.
Installed view of the luggage compartment lid striker
with the trim material folded back.
(4) Slide the striker assembly towards the right
hand side of the vehicle and disconnect the remote
release cable. Withdraw the striker plate from the
vehicle.
Installation is a reversal of the removal procedure
with attention to the following points:
(1) Install the remote release cable to the striker
plate and install the striker plate retaining bolts and
washers to the lines made on dismantling.
Tighten the retaining bolts to just over finger
tight.
Close the lid ensuring that the striker has
actuated the locking mechanism. Check the alignment of the luggage compart-
ment lid in its opening an d adjust the locking action
by moving the striker plate. Tighten the retaining
bolts securely.
When the striker plate is adjusted correctly
pull the remote release ca ble towards the right hand
side of the vehicle until the cable end has 0.5-1.5 mm
clearance and tighten the re taining screws. Check the
operation of the remote release cable and readjust if
necessary.
Installed view of the luggage compartment lid hinge.
Page 237 of 238

Body 237
Installed view of the front seat mounting bolts.
Installation is a reversal of the removal procedure
with attention to the following points:
Lubricate the seat slides with multi-purpose
grease prior to installation of the seat.
Install all mounting bolts by hand prior to
tightening the mounting bolts securely.
REAR SEAT CUSHION
To Remove and Install
Firmly bump the lower front of the seat
cushion rearwards and up lo release the retaining clips
from the vehicle floor panel.
With the retaining clips released, lift the
front of the seat cushion and release the rear mounting
wires. (3) Lift the rear seat cushion out of the vehicle.
Installation is a reversal of the removal procedure
with attention to the following points:
Position the centre seat belts on top of the
rear seat cushion prior to in stallation of the cushion.
Ensure that the clips at the forward edge of
the seat cushion are proper ly engaged in the floor
panel.
REAR SEAT BACKREST
To Remove and Install
Fold the rear seat backrest forward.
Remove the outer seat backrest hinge bolts.
Pull each backrest to wards the door and off
the centre hinge pins. Remove the rear seat backrest from the
vehicle. Installation is a reversal of the removal procedure.
12. VEHICLE CLEANING
CLEANING THE EXTERIOR
In order to remove dirt and road grime and thus
preserve paint finish, vehicles in continuous use
should be washed at least once a week.
Before washing the paintwork, it is good policy to
first hose all dirt from the underbody and clean out
the drain holes in the doors and sill panels.
Hose the vehicle to remove as much grit as
possible and wash using a clean chamois or sponge,
ensuring that the chamois or sponge is free from dirt
or grit which could scratch the paint surface.
Avoid washing the vehicle in bright sunlight with
high temperature as this will give the paintwork a
streaky watermarked finish.
If necessary, wash the vehicle using a reputable
brand Wash and Wax liquid. The Wash and Wax
liquid will restore the paint luster and leave the
paintwork with a protective coating of wax.
After a period it may become necessary to polish
the vehicle in order to remove built up foreign matter
and give the paintwork maximum protection from
industrial fall-out and salt from sea air etc. Before
polishing the paintwork, always wash the surface to
remove as much road grime as possible. When
polishing follow the polishing instructions which come
with the polish.
NOTE: Grease, oil or tar on the paint
surface can be removed with a little kerosene
or white spirits. To prevent staining, wash
and polish the affected area as soon as the
grease, oil or tar is removed.
CLEANING VINYL TRIM
To maintain the vinyl interior trim in good
condition it should be regularly vacuumed to remove
loose dirt and then wiped with a dry or damp cloth.
If the trim is soiled or stained, the following
cleaning procedure is recommended:
Using warm water, cheese cloth and a mild
soap, thoroughly wash the affected areas.
Repeat the operation using damp cheese
cloth only.
To complete the cleaning operation wipe the
trim over with a dry piece of cheese cloth.
NOTE: If the interior trim is badly soiled or
stained, wash with a reputable brand of
upholstery cleaner care fully following the
makers instructions.
CLEANING CLOTH TRIM
Loose dirt and dust on cloth trim should be
removed with a vacuum cleaner or a very soft brush.
Do not use a whisk brush or any other type of coarse
brush or damage to the cloth could result. If the fabric
is soiled the following cl eaning procedure is recom-
mended.
Sponge the fabric ligh tly with warm water
containing a little detergen t and household ammonia.
After sponging, rub the fabric lightly. If
soiling is still apparent, re peat the sponging operation.
Use a clean dry cloth to soak up excess fluid.