ESP NISSAN PULSAR 1987 Workshop Manual
[x] Cancel search | Manufacturer: NISSAN, Model Year: 1987, Model line: PULSAR, Model: NISSAN PULSAR 1987Pages: 238, PDF Size: 28.91 MB
Page 30 of 238
30 Engine Tune-up
(1) With the distributor cap and leads removed
as an assembly, test one lead at a time, connecting the
meter probes at the spark plug end of the lead and at
the corresponding terminal in side the cap. Resistance
should be less than 15 000 ohms.
(2) If the resistance is more than 15 000 ohms
remove the lead from the distributor cap and check
(he resistance in the lead only. The lead should be
renewed if the resistance is still more than 15 000
ohms. (3) High distributor cap resistance may be due
to corrosion deposits on the cap terminals. These
deposits should be removed with a small scraper or
emery cloth. Check the distributor cap for cracks or tracking
between the high tension terminals on both the inside
and outside of the cap. Renew the cap if cracks or
tracking are evident.
Check the carbon brush in the centre of the
distributor cap for evidence of arcing and renew as
necessary.
Check the condition of the rotor and renew if
arced excessively or cracked.
HOW TO CONNECT ELECTRICAL TEST
EQUIPMENT
NOTE: Some types of tachometers, timing
lights and ignition system analysers are not
compatible with this type of electronic igni-
tion system and may result in incorrect
readings. It is therefore recommended that
the manufacturer of the test equipment be
consulted before using the equipment.
Do not allow the tachometer lead connec-
tor to short to earth as damage to the test
equipment or ignition system may result.
Timing Light
(1) Connect the timing light to the engine fol-
lowing the instrument manufacturers instructions.
NOTE: Do not connect or disconnect the
timing light with the engine running as
voltage surges could damage the alternator.
Do not allow the high tension leads to open
circuit as damage to the ignition system
could result.
(2) Where necessary, connect the power leads of
the timing light to an external power source to prevent
possible transient voltages in the timing light damag-
ing the vehicle alternator.
Tachometer
(1) Ensure that the tachometer is compatible
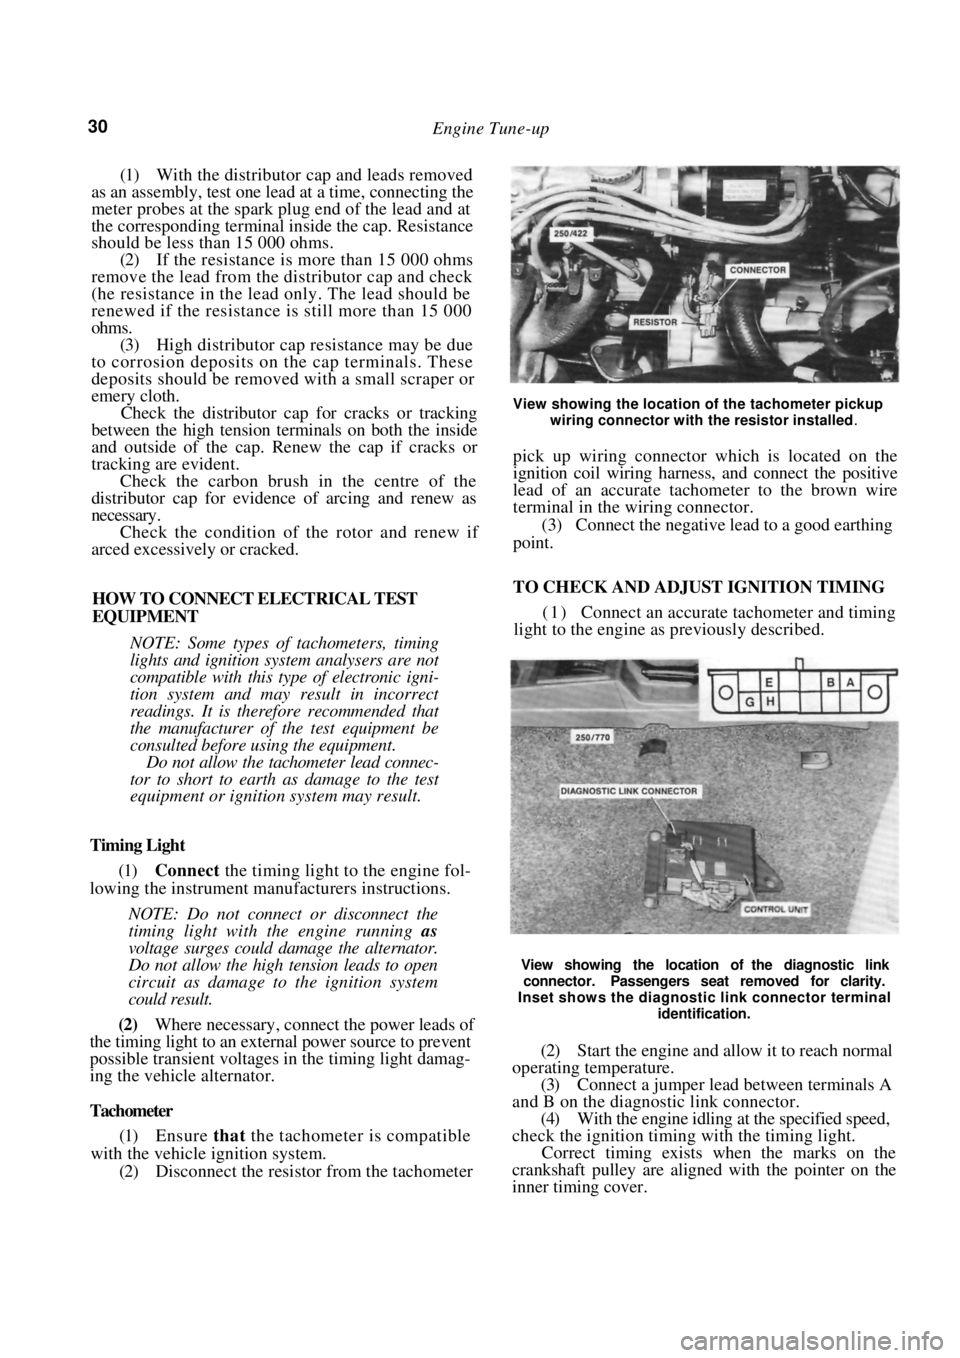
with the vehicle ignition system. (2) Disconnect the resistor from the tachometer
View showing the location of the tachometer pickup
wiring connector with the resistor installed
.
pick up wiring connector which is located on the
ignition coil wiring harness, and connect the positive
lead of an accurate tachometer to the brown wire
terminal in the wiring connector.
(3) Connect the negative lead to a good earthing
point.
TO CHECK AND ADJUST IGNITION TIMING
( 1 ) Connect an accurate tachometer and timing
light to the engine as previously described.
View showing the location of the diagnostic link
connector. Passengers seat removed for clarity.
Inset shows the diagnostic link connector terminal
identification.
(2) Start the engine and allow it to reach normal
operating temperature. (3) Connect a jumper lead between terminals A
and B on the diagnostic link connector. (4) With the engine idling at the specified speed,
check the ignition timing with the timing light.
Correct timing exists when the marks on the
crankshaft pulley are aligned with the pointer on the
inner timing cover.
Page 50 of 238

50 Engine
(4) Ensure that the tappet assemblies are full of
clean engine oil and insert the tappets in their
respective bores in the cylinde r head. Install the thrust
pads to the top of each valve assembly ensuring that
they are returned to their original location.
(5) Coat the contact surfaces of the rocker arms
with molybdenum disulphide grease and install the
rocker arms to their origin al locations on the cylinder
head. (6) Clean the mating surfaces of the camshaft
housing and cylinder head. Apply a bead of Loctite
515 to the cylinder head and camshaft housing mating
surfaces. Take care that no sea lant is forced into the
oil passages and install the camshaft housing to the
cylinder head.
(7) Install new cylinder head bolts and lubricate
the bolts and washers with oil.
(8) Apply an initial torque to the cylinder head
bolts of 25 Nm in the corr ect sequence as shown in
the illustration under the Cylinder Head heading.
Further tighten the head bolts in the correct sequence,
in three separate 60 degree stages. Refer to Specifica-
tions. (9) Install the bolts securing the camshaft
drive
belt inner cover to the camshaft housing. (10) Install the camshaft timing gear to the cam-
shaft ensuring that it is correctly located. Tighten the
camshaft timing gear retain ing boll to the specified
torque. (11) Install and adjust the camshaft drive belt as
described under the previous heading. (12) Install the distributor. Refer to the Fuel and
Engine Management section.
(13) Connect the lower radiat or hose and fill the
cooling system with the required coolant. Refer to the
Cooling and Heating Systems section if necessary. (14) Start and run the engine until normal oper-
ating temperature is attained and tighten the cylinder
head bolts another 30-50 degrees in the correct
sequence, ensuring that the tension does not exceed
135 Nm.
TO RENEW CAMSHAFT OIL SEAL,
CAMSHAFT INSTALLED
(1) Remove the camshaft drive belt from the
camshaft timing gear as described under the previous
heading.
(2) Remove the camshaft housing top cover
retaining bolts, remove the cover and discard the
gasket.
(3) Use an open end spanner to hold the cam-
shaft between the inlet and exhaust lobes of number
four cylinder and remove the camshaft timing gear
retaining bolt and the camshaft timing gear. (4) With a pointed drift, tap a small hole in the
front face of the oil seal. Insert a self tapping screw in
the hole and using a pair of pliers, pull on the screw
to remove the oil seal from the housing.
(5) Clean the seal recess and the camshaft sea!
running surface. (6) Lubricate the lip of a new oil seal with engine
oil and slide the seal over the camshaft. Ensure that
the lip of the seal faces to wards the inside of the
camshaft housing. Tap evenly around the edges of the
seal until it is fully seated in the camshaft housing.
(7) Install the camshaft timing gear to the cam-
shaft, ensuring that it is co rrectly located. Tighten the
camshaft timing gear retain ing bolt to the specified
torque. Do not allow the camshaft to rotate while
tightening the bolt. (8) Install and adjust the drive belt as described
under the previous heading. Ensure that the timing
marks are aligned. (9) Install the camshaft hou sing top cover using a
new gasket. Tighten the retaining bolts to the specified
torque.
7. CYLINDER HEAD
Special Equipment Required:
To Dismantle and Assemble — Valve spring com-
pressor
To Inspect — Dial gauge and straight edge
To Install — Drive belt adjusting tool
TO REMOVE AND INSTAL
NOTE: Due to the high residua! pressure
within the fuel system, it will be necessary to
depressurize the system before removing any
fuel supply components. Refer to the Fuel
and Engine Management section for the
correct procedure.
Allow the engine to cool prior to the
removal of the cylinder head to prevent
possible distortion of the cylinder head.
(1) Disconnect the negative battery terminal and
remove the nuts securing the earth wires to the
cylinder head bolts.
(2) Remove the camshaft drive belt as previ-
ously described.
(3) Disconnect the lower radiator hose and drain
the cooling system. Refer to the Cooling and Heating
Systems section if necessary. (4) Remove the alternator adjusting bracket
mounting bolt and insulating washers from the inlet
manifold. Loosen the adjusting bolt at the alternator
and slide the bracket away from the cylinder head. (5) Disconnect the upper radiator hose, coolant
by-pass hose and the heater hose from the thermostat
housing and on 1.6 liter m odels, the coolant hoses
from the inlet manifold. (6) Disconnect the electrica l connectors from the
throttle body, fuel injectors, coil, distributor and on
1.8 liter models, the MAT sensor. (7) Disconnect the oxygen sensor wiring connec-
tor and remove the wiring connectors from the
Page 53 of 238
Engine 53
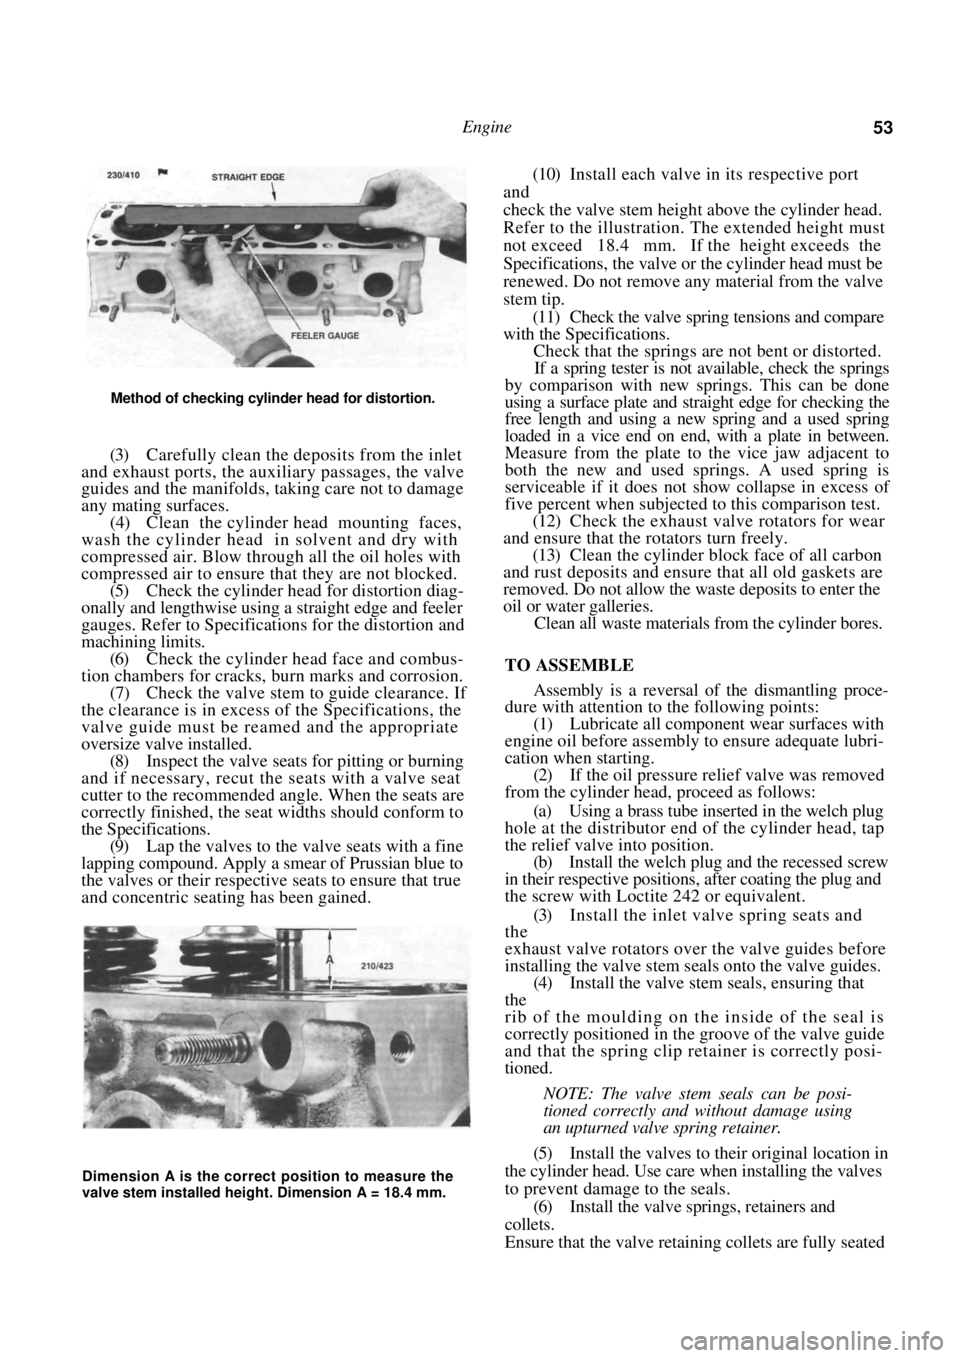
Method of checking cylinder head for distortion.
(3) Carefully clean the deposits from the inlet
and exhaust ports, the auxiliary passages, the valve
guides and the manifolds, taking care not to damage
any mating surfaces. (4) Clean the cylinder head mounting faces,
wash the cylinder head in solvent and dry with
compressed air. Blow through all the oil holes with
compressed air to ensure that they are not blocked. (5) Check the cylinder head for distortion diag-
onally and lengthwise using a straight edge and feeler
gauges. Refer to Specifications for the distortion and
machining limits. (6) Check the cylinder head face and combus-
tion chambers for cracks, burn marks and corrosion. (7) Check the valve stem to guide clearance. If
the clearance is in excess of the Specifications, the
valve guide must be reamed and the appropriate
oversize valve installed. (8) Inspect the valve seats for pitting or burning
and if necessary, recut the seats with a valve seat
cutter to the recommended angle. When the seats are
correctly finished, the seat widths should conform to
the Specifications. (9) Lap the valves to the valve seats with a fine
lapping compound. Apply a smear of Prussian blue to
the valves or their respective seats to ensure that true
and concentric seating has been gained.
(10) Install each valve in its respective port
and
check the valve stem height above the cylinder head.
Refer to the illustration. The extended height must
not exceed 18.4 mm. If the height exceeds the
Specifications, the valve or the cylinder head must be
renewed. Do not remove any material from the valve
stem tip.
(11) Check the valve spring tensions and compare
with the Specifications.
Check that the springs are not bent or distorted.
If a spring tester is not available, check the springs
by comparison with new springs. This can be done
using a surface plate and stra ight edge for checking the
free length and using a new spring and a used spring
loaded in a vice end on end, with a plate in between.
Measure from the plate to the vice jaw adjacent to
both the new and used springs. A used spring is
serviceable if it does not show collapse in excess of
five percent when subjected to this comparison test.
(12) Check the exhaust valve rotators for wear
and ensure that the rotators turn freely. (13) Clean the cylinder block face of all carbon
and rust deposits and ensure that all old gaskets are
removed. Do not allow the waste deposits to enter the
oil or water galleries. Clean all waste materials from the cylinder bores.
TO ASSEMBLE
Assembly is a reversal of the dismantling proce-
dure with attention to the following points:
(1) Lubricate all component wear surfaces with
engine oil before assembly to ensure adequate lubri-
cation when starting. (2) If the oil pressure relief valve was removed
from the cylinder head, proceed as follows:
(a) Using a brass tube inserted in the welch plug
hole at the distributor end of the cylinder head, tap
the relief valve into position. (b) Install the welch plug and the recessed screw
in their respective positions, after coating the plug and
the screw with Loctite 242 or equivalent.
(3) Install the inlet valve spring seats and
the
exhaust valve rotators over the valve guides before
installing the valve stem seals onto the valve guides.
(4) Install the valve stem seals, ensuring that
the
rib of the moulding on the inside of the seal is
correctly positioned in the groove of the valve guide
and that the spring clip retainer is correctly posi-
tioned.
NOTE: The valve stem seals can be posi-
tioned correctly and without damage using
an upturned valve spring retainer.
(5) Install the valves to their original location in
the cylinder head. Use care when installing the valves
to prevent damage to the seals.
(6) Install the valve springs, retainers and
collets.
Ensure that the valve retain ing collets are fully seated
Dimension A is the correct position to measure the
valve stem installed height. Dimension A = 18.4 mm.
Page 54 of 238

54 Engine
in the valve stem groove before releasing the spring
compressor. A sharp tap to the top of the valve stem
with a soft faced hammer will ensure that the collets
are correctly seated.
(7) Install the inlet and exhaust manifolds using
new gaskets and tighten the mounting nuts to the
specified torque as previously described. (8) Install a new sealing ring to the
thermostat
housing, install the housing to the cylinder head and
tighten the mounting bolts to the specified torque.
(9) Ensure that the lappet assemblies are filled
with clean engine oil and install the tappets in
their
respective bores in the cylinder head. (10) Install the thrust pads to the top of each
valve
assembly, ensuring that they are returned to their
original locations. (11) Coat the contact surfaces of the rocker arms
with molybdenum disulphide grease and install the
rocker arms to their origin al locations on the cylinder
head. (12) Install the cylinder head to the engine as
previously described.
8. ENGINE SUMP AND OIL PUMP PICKUP . PIPE
TO REMOVE
(1) Disconnect the negative battery terminal.
(2) Raise the front of the vehicle and support it
on chassis stands. Refer to the Wheels and Tires
section for the correct procedure.
(3) Remove the sump plug and drain the engine
oil into a container. Install and tighten the plug
after the oil has been drained.
(4)
Remove the engine pipe as described at the
end of this section.
(5) Remove the nuts and bolts retaining the
engine crossmember to the vehicle underbody and
withdraw the crossmember from the vehicle. On
automatic transaxle models, it will be necessary to
release the selector cable from the crossmember
bracket.
(6) Remove the sump retaining bolts and wash-
ers and if necessary firmly bump the sump with the
palm of the hand and remove it from the engine. (7) Remove the bolts retaining the oil pump
pickup pipe to the oil pump and disconnect the
pickup pipe from the support bracket. Remove the
pickup pipe and discard the O ring seal. (8) Remove the scraper and gasket from the
engine. (9) Clean the gasket material from the sump,
engine block and the scraper.
NOTE: If the scraper assembly is damaged
it should be renewed.
TO INSTAL
(1) Wash the inside of the sump to remove
carbon and sludge deposits. Check for any metal
deposits which may indicate an imminent component
failure. (2) Inspect the sump for dents and cracks.
Ensure that the gasket sea ling face is not distorted or
damaged. (3) Clean the pickup pipe screen with solvent
and a brush. (4) Using a new O ring seal, install the pickup
pipe. Coat the pipe retain ing bolts with Loctite 242
and tighten to the specified torque. (5) Apply a bead of KP510-00150 sealer or
equivalent to the oil pump to cylinder block mating
joint area. (6) Ensure that the sump gasket is correctly
located on the scraper and install the sump to
the
engine. Apply Loctite 242 to the threads of the sump
bolts and tighten the bolts to the specified torque.
(7) Install the front exhaust pipe using a
new
gasket and coat the threads of the flange nuts with an
anti-seize compound before tightening the nuts to the
specified torque. (8) Install the engine crossmember and
tighten
the nuts and bolts securely. If applicable, connect the
automatic transaxle selector cable to the crossmember
bracket. (9) Ensure that the sump drain plug is secure
and lower the vehicle to the ground. (10) Fill the engine with the specified amount and
grade of engine oil. Refer to the Lubrication and
Maintenance section if necessary. (11) Start and run the engine and check for oil
leaks.
View of the sump, oil pump pickup, gasket and scraper
removed from the engine.
Page 57 of 238
Engine 57
(23) Lower the vehicle to the ground and securely
tighten the wheel nuts.
10. PISTONS, CONNECTING RODS AND
CYLINDER BORES
Special Equipment Required:
To Inspect — Micrometer, cylinder measuring
gauge
To Remove Ridge from Bores — Ridge removal tool
To Deglaze Cylinder Bores — Cylinder surfacing
hone
To Install — Piston ring compressor
TO REMOVE
(1) Remove the engine sump and oil pump
pickup pipe as previously described. (2) Remove the cylinder head as previously
described. (3) Mark the relationship of the pistons to their
respective cylinders and the bearing caps to their
respective connecting rods by letter stamps or centre
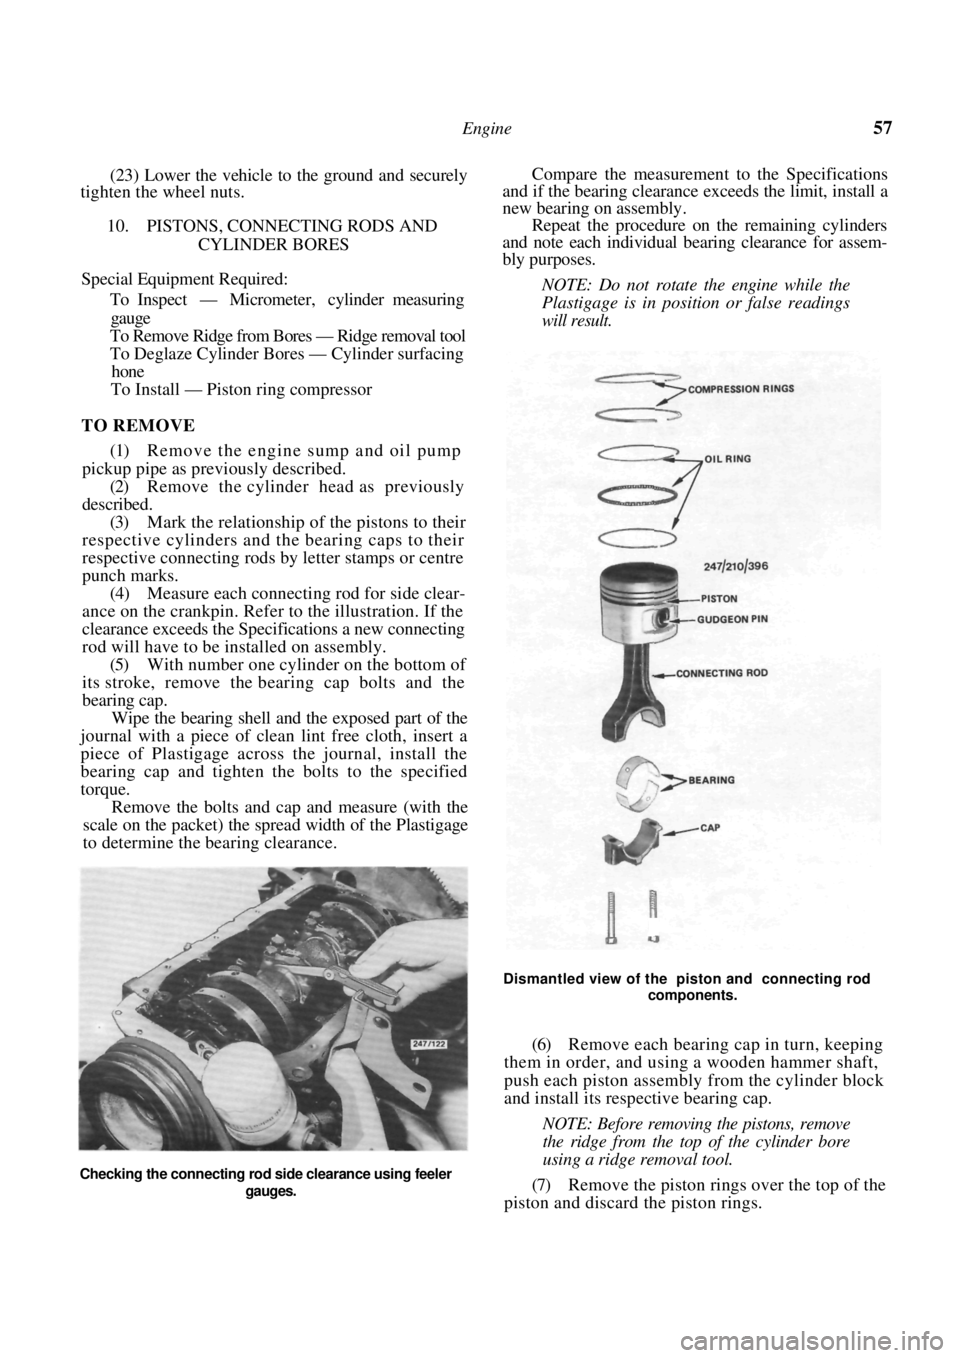
punch marks. (4) Measure each connecting rod for side clear-
ance on the crankpin. Refer to the illustration. If the
clearance exceeds the Speci fications a new connecting
rod will have to be installed on assembly. (5) With number one cylinder on the bottom of
its stroke, remove the bear ing cap bolts and the
bearing cap. Wipe the bearing shell and the exposed part of the
journal with a piece of clean lint free cloth, insert a
piece of Plastigage across the journal, install the
bearing cap and tighten the bolts to the specified
torque.
Remove the bolts and cap and measure (with the
scale on the packet) the spread width of the Plastigage
to determine the bearing clearance.
Compare the measurement to the Specifications
and if the bearing clearance exceeds the limit, install a
new bearing on assembly.
Repeat the procedure on the remaining cylinders
and note each individual bearing clearance for assem-
bly purposes.
NOTE: Do not rotate the engine while the
Plastigage is in position or false readings
will result.
Dismantled view of the piston and connecting rod
components.
(6) Remove each bearing cap in turn, keeping
them in order, and using a wooden hammer shaft,
push each piston assembly from the cylinder block
and install its respective bearing cap.
NOTE: Before removing the pistons, remove
the ridge from the top of the cylinder bore
using a ridge removal tool.
(7) Remove the piston rings over the top of the
piston and discard the piston rings.
Checking the connecting rod side clearance using feeler
gauges.
Page 58 of 238

58 Engine
TO INSPECT PISTONS AND CONNECTING
RODS
(1) Remove all carbon deposits from the bottom
of the ring grooves with a ring groove cleaning tool or
a broken ring. Use caution to avoid scoring the
bottom and sides of the ring groove.
NOTE; An ideal method of removing carbon
deposits from pistons is to immerse the
piston in a tank of chemical cleaner. After
soaking, the carbon can be readily hosed off
with water. This method minimizes the
chance of damage through scraping, particu-
larly with aluminum alloy components.
(2) Inspect the pistons for sc uff marks, scoring or
burning. (3) Inspect the ring grooves of the pistons for
excessive wear. Using a new piston ring, check the
clearances between the side of the ring and the ring
lands of the piston with feeler gauges. Compare the
side clearance with the Specifications. (4) Inspect each pair of bearing shells for wear
especially on an outer edge. If one or more pairs of
bearing shells are worn on the outer edge it is possible
that the connecting rod is bent. (5) Before renewing a piston or connecting rod,
inspect the cylinder block to see if it requires reboring
or honing.
If the cylinder block requires reboring, new over-
size pistons will have to be installed.
(6) If a piston or connecting rod is to be
renewed, a special tool wi ll be required to press the
gudgeon pin from the connecting rod. To install the
piston and gudgeon pin to the connecting rod, the
gudgeon pin boss must be accurately heated to 280
degrees C before the gudgeon pin can be inserted in
the little end of the connecting rod.
Replacement connecting rods are supplied only at
their highest production weight and must be matched
to the weight of the remaining connecting rods by
filing the big end boss. For these reasons it is
recommended that the work be entrusted to a repu-
table engine reconditioner w ho will have the special-
ised equipment and knowledge to carry out this work.
TO INSPECT CYLINDER BLOCK AND BORES
With the pistons removed as previously de-
scribed, carry out the following checks and measuring
procedures:
(1) Check the cylinder bores for cracks, scores or
scuffs.
Check for cylinder bore wear. Difference between A
and B measurement at top of piston travel is out of
round dimension. Difference between A at top and at
bottom of piston travel is cylinder taper.
(2) Using an accurate cylinder gauge, measure
each cylinder bore for wear. Take the measurements,
at the upper and lower sections of the bore in two
directions — along and across the cylinder block.
Refer to the illustration.
(3) If the wear in any cylinder exceeds the
specified limit, rebore and hone all the cylinders to the
nearest oversize for pistons and rings. (4) With a straight edge and feeler gauge, check
the top face of the cylinder block for distortion, using
the same procedure described for the cylinder head.
STRAIGHT EDGE
Measuring the piston ring side clearance.
Checking the cylinder block face for distortion.
Page 60 of 238

60 Engine
NOTE: Should the ring end gap be greater
than the specified gap, another ring set
should be obtained and the ring end gaps
checked and compared with the Specifica-
tions.
(3) Treat each ring and cylinder bore individu-
ally and ensure that the rings are assembled to the
respective piston for the cylinder bore in which they
were installed to check the end gap.
(4) Assemble each oil control ring to its respec-
tive piston bottom groove as follows:
(a) Install the oil ring expander to the
piston
groove, ensuring that the ends of the expander are
bulled together and not overlapped. (b) Position one end of the lower side rail in the
groove and peel the ring over the piston and into the
groove. (c) Similarly install the upper side rail.
(5) Install the lower compression ring into
the
lower piston groove.
NOTE: The compression rings should be
installed with the manufacturers mark fac-
ing the top of the piston. To minimize the
possibility of ring breakage the rings can be
immersed in hot water prior to installation.
(6) Install the upper compression ring into
the
upper piston groove.
(7) Space the compression ring gaps 120 degrees
apart, and ensure that the o il ring gaps and the join in
the oil ring expander are not aligned. (8) With the rings correctly installed and
gapped, remove the bearing cap from the connecting
rod. (9) Liberally lubricate the piston assembly and
install the piston ring compressor to number one
piston.
NOTE: When installing the pistons to the
cylinder ensure that the front marking on
the piston is towards the front of the engine.
(10) Turn the crankshaft until number one crank-
pin is at the bottom of its stroke. (11) Install number one piston and connecting
rod
assembly into its bore. Push the assembly down the
bore until the connecting rod can be aligned with
number one crankpin.
NOTE: The bearing shells should be lubri-
cated with engine oil before installation.
(12) Install the connecting rod cap and tighten
the
retaining bolts to the specified torque.
NOTE: If new bearing shells were installed,
check the bearing clearance with Plastigage
as previously described.
(13) With the bearing clearance as specified, in-
stal the remaining pistons in the same manner.
(14) Ensure that the crankshaft turns without
binding.
(15) With all connecting rod bolts tightened to
the specified torque, install the associated
components
by referring to the relevant headings in this section.
11. CRANKSHAFT AND MAIN BEARINGS
Special Equipment Required:
To Inspect — Micrometer, Vee blocks, dial gauge
TO REMOVE
(1) With the engine assembly removed from the
vehicle and the transaxle separated from the engine,
refer to the appropriate headings or sections and
remove the following components: sump, oil pump
pickup pipe, oil pump, and flywheel or drive plate. (2) Remove the crankshaft rear oil seal from the
Using a ring compressor to install the piston.
Checking the crankshaft end float using feeler gauges.
Page 61 of 238
Engine 61
rear main bearing cap and engine block. Discard the
oil seal.
(3) Ensure that all main bearing and connecting
rod bearing caps are numbered to ensure correct
assembly. (4) Remove the connecting rod bolts and caps,
keeping them in order. Push each piston and connect-
ing rod slightly up into the bore without pushing the
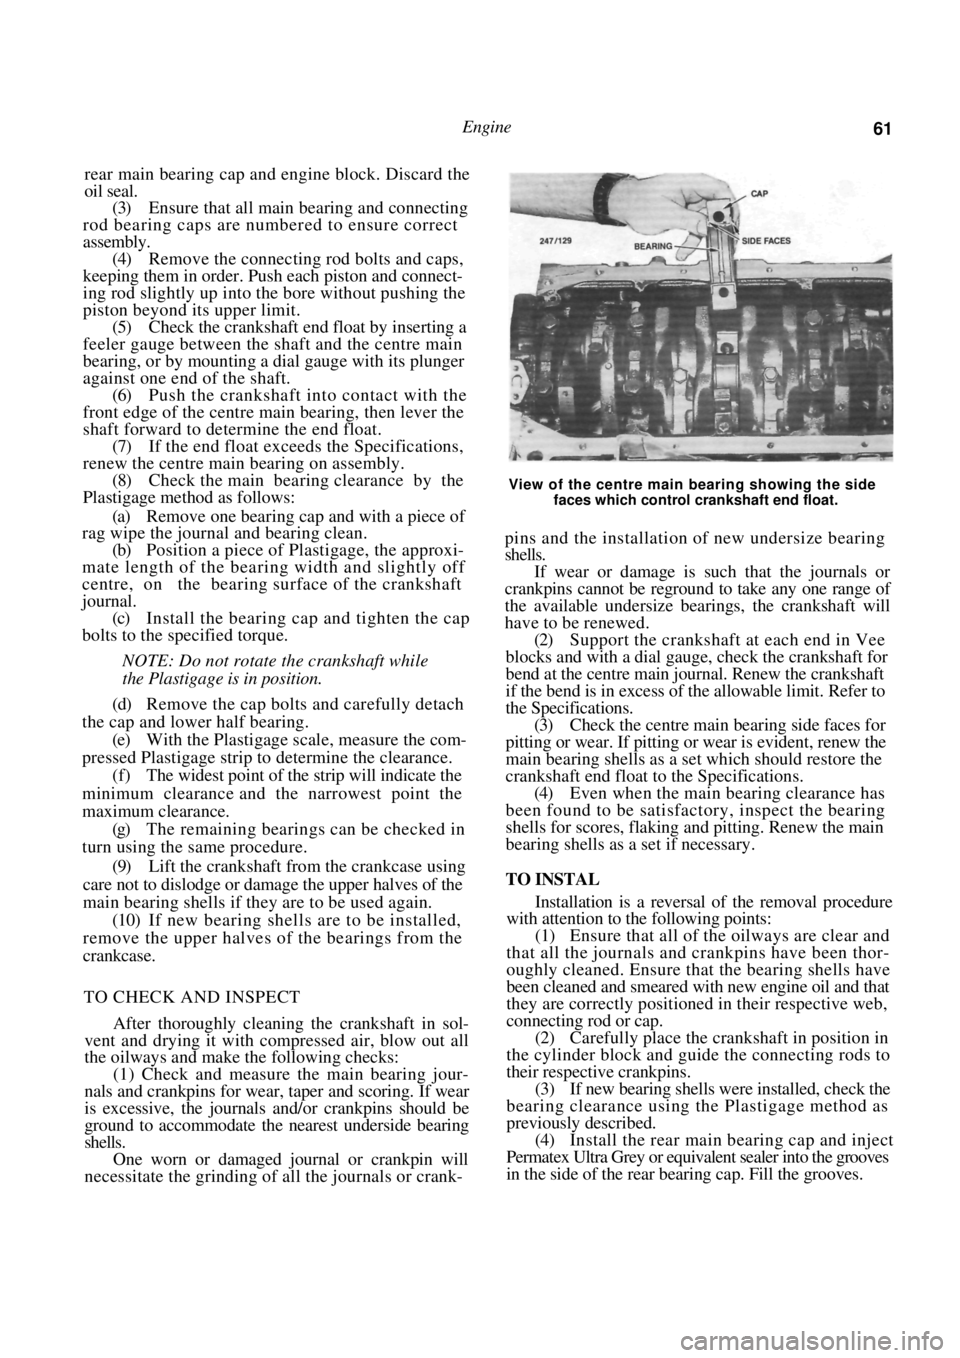
piston beyond its upper limit. (5) Check the crankshaft end float by inserting a
feeler gauge between the shaft and the centre main
bearing, or by mounting a dial gauge with its plunger
against one end of the shaft. (6) Push the crankshaft into contact with the
front edge of the centre main bearing, then lever the
shaft forward to determine the end float.
(7) If the end float exceeds the Specifications,
renew the centre main bearing on assembly. (8) Check the main bearing clearance by the
Plastigage method as follows:
(a) Remove one bearing cap and with a piece of
rag wipe the journal and bearing clean.
(b) Position a piece of Plastigage, the approxi-
mate length of the bearing width and slightly off
centre, on the bearing surface of the crankshaft
journal. (c) Install the bearing ca p and tighten the cap
bolts to the specified torque.
NOTE: Do not rotate the crankshaft while
the Plastigage is in position.
(d) Remove the cap bolts and carefully detach
the cap and lower half bearing. (e) With the Plastigage scal e, measure the com-
pressed Plastigage strip to determine the clearance. (f) The widest point of the strip will indicate the
minimum clearance and th e narrowest point the
maximum clearance. (g) The remaining bearings can be checked in
turn using the same procedure.
(9) Lift the crankshaft from the crankcase using
care not to dislodge or damage the upper halves of the
main bearing shells if they are to be used again. (10) If new bearing shells are to be installed,
remove the upper halves of the bearings from the
crankcase.
TO CHECK AND INSPECT
After thoroughly cleaning the crankshaft in sol-
vent and drying it with co mpressed air, blow out all
the oilways and make the following checks:
(1) Check and measure the main bearing jour-
nals and crankpins for wear, taper and scoring. If wear
is excessive, the journals and/or crankpins should be
ground to accommodate the nearest underside bearing
shells.
One worn or damaged journal or crankpin will
necessitate the grinding of all the journals or crank-
View of the centre main bearing showing the side
faces which control crankshaft end float.
pins and the installation of new undersize bearing
shells.
If wear or damage is such that the journals or
crankpins cannot be reground to take any one range of
the available undersize bearings, the crankshaft will
have to be renewed.
(2) Support the crankshaft at each end in Vee
blocks and with a dial gauge, check the crankshaft for
bend at the centre main jour nal. Renew the crankshaft
if the bend is in excess of the allowable limit. Refer to
the Specifications.
(3) Check the centre main bearing side faces for
pitting or wear. If pitting or wear is evident, renew the
main bearing shells as a set which should restore the
crankshaft end float to the Specifications. (4) Even when the main bearing clearance has
been found to be satisfact ory, inspect the bearing
shells for scores, flaking and pitting. Renew the main
bearing shells as a set if necessary.
TO INSTAL
Installation is a reversal of the removal procedure
with attention to the following points:
(1) Ensure that all of the oilways are clear and
that all the journals and crankpins have been thor-
oughly cleaned. Ensure that the bearing shells have
been cleaned and smeared with new engine oil and that
they are correctly positioned in their respective web,
connecting rod or cap. (2) Carefully place the crankshaft in position in
the cylinder block and guide the connecting rods to
their respective crankpins.
(3) If new bearing shells were installed, check the
bearing clearance using the Plastigage method as
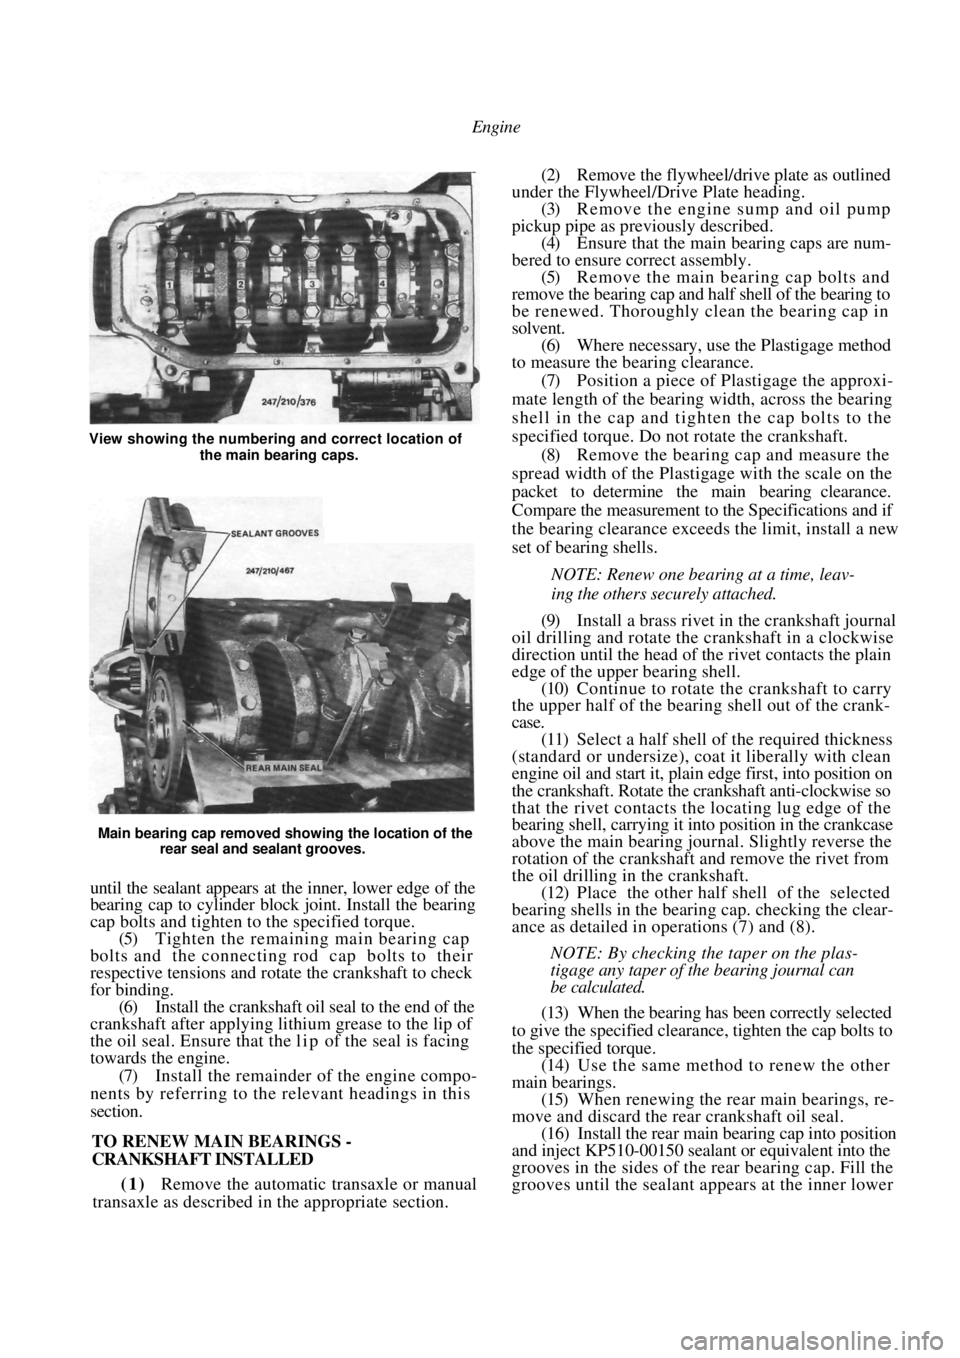
previously described. (4) Install the rear main bearing cap and inject
Permatex Ultra Grey or equivalent sealer into the grooves
in the side of the rear bearing cap. Fill the grooves.
Page 62 of 238
Engine
Main bearing cap removed showing the location of the rear seal and sealant grooves.
until the sealant appears at the inner, lower edge of the
bearing cap to cylinder block joint. Install the bearing
cap bolts and tighten to the specified torque.
(5) Tighten the remaining main bearing cap
bolts and the connecting rod cap bolts to their
respective tensions and rotate the crankshaft to check
for binding. (6) Install the crankshaft oil seal to the end of the
crankshaft after applying lithium grease to the lip of
the oil seal. Ensure that the l i p of the seal is facing
towards the engine.
(7) Install the remainder of the engine compo-
nents by referring to the relevant headings in this
section.
TO RENEW MAIN BEARINGS -
CRANKSHAFT INSTALLED
(1) Remove the automatic transaxle or manual
transaxle as described in the appropriate section.
(2) Remove the flywheel/drive plate as outlined
under the Flywheel/Drive Plate heading. (3) Remove the engine sump and oil pump
pickup pipe as previously described. (4) Ensure that the main bearing caps are num-
bered to ensure correct assembly. (5) Remove the main bearing cap bolts and
remove the bearing cap and half shell of the bearing to
be renewed. Thoroughly clean the bearing cap in
solvent. (6) Where necessary, use the Plastigage method
to measure the bearing clearance.
(7) Position a piece of Plastigage the approxi-
mate length of the bearing width, across the bearing
shell in the cap and tigh ten the cap bolts to the
specified torque. Do not rotate the crankshaft. (8) Remove the bearing cap and measure the
spread width of the Plastigage with the scale on the
packet to determine the main bearing clearance.
Compare the measurement to the Specifications and if
the bearing clearance exceeds the limit, install a new
set of bearing shells.
NOTE: Renew one bearing at a time, leav-
ing the others securely attached.
(9) Install a brass rivet in the crankshaft journal
oil drilling and rotate the crankshaft in a clockwise
direction until the head of the rivet contacts the plain
edge of the upper bearing shell. (10) Continue to rotate the crankshaft to carry
the upper half of the bearing shell out of the crank-
case.
(11) Select a half shell of the required thickness
(standard or undersize), coat it liberally with clean
engine oil and start it, plai n edge first, into position on
the crankshaft. Rotate the crankshaft anti-clockwise so
that the rivet contacts the locating lug edge of the
bearing shell, carrying it into position in the crankcase
above the main bearing journal. Slightly reverse the
rotation of the crankshaft and remove the rivet from
the oil drilling in the crankshaft. (12) Place the other half shell of the selected
bearing shells in the bear ing cap. checking the clear-
ance as detailed in operations (7) and (8).
NOTE: By checking the taper on the plas-
tigage any taper of the bearing journal can
be calculated.
(13) When the bearing has been correctly selected
to give the specified clearance, tighten the cap bolts to
the specified torque. (14) Use the same method to renew the other
main bearings. (15) When renewing the rear main bearings, re-
move and discard the rear crankshaft oil seal. (16) Install the rear main bearing cap into position
and inject KP510-00150 sealant or equivalent into the
grooves in the sides of the rear bearing cap. Fill the
grooves until the sealant a ppears at the inner lower
View showing the numbering and correct location of
the main bearing caps.
Page 131 of 238
Manual Transaxle and Drive Shafts 131
(19) Renew the rear mainshaft bearing outer race
as follows:
(a) Remove the bolts retaining the rear cover to
the transaxle case. (b) Remove the rear cover. O ring, spacer and
adjusting shim from the transaxle case. Discard the O
ring. (c) Using a suitable punch, tap the bearing outer
race out of the transaxle case. (e) Install the adjusting shim, spacer and a new O
ring to the transaxle case. Install the rear cover and
tighten the retain ing bolts securely.
(20) Renew the front mainshaft bearing outer
race as follows:
(a) Using a suitable puller, pull the outer race
out of the clutch housing.
(b) Ensure that the oil groove in the resin oil
channel is facing the oil pocket in the clutch housing. (c) Install the new outer race to the clutch
housing.
(21) Measure the end float of the input shaft fifth
gear using feeler gauges betw een the fifth gear and the
adjacent gear shoulder. Note the measurement for
later reference.
(22) Dismantle the input shaft as follows:
(a) Remove the snap ring and spacer from the
front of the input shaft. (b) Using a suitable puller, remove the bearing
from the front of the input shaft. Remove the bearing
retainer noting the installed direction. (c) Remove the snap ring from the rear of the
input shaft. (d) Remove the shift retainer, fifth gear synchro
assembly, fifth gear and th e split bearing from the rear
of the input shaft.
(23) Measure the end float of the mainshaft first,
second, third and fourth gears using feeler gauges
between the gear and the adjacent shaft shoulder.
Note the measurements for later reference.
(24) Dismantle the mainshaft as follows:
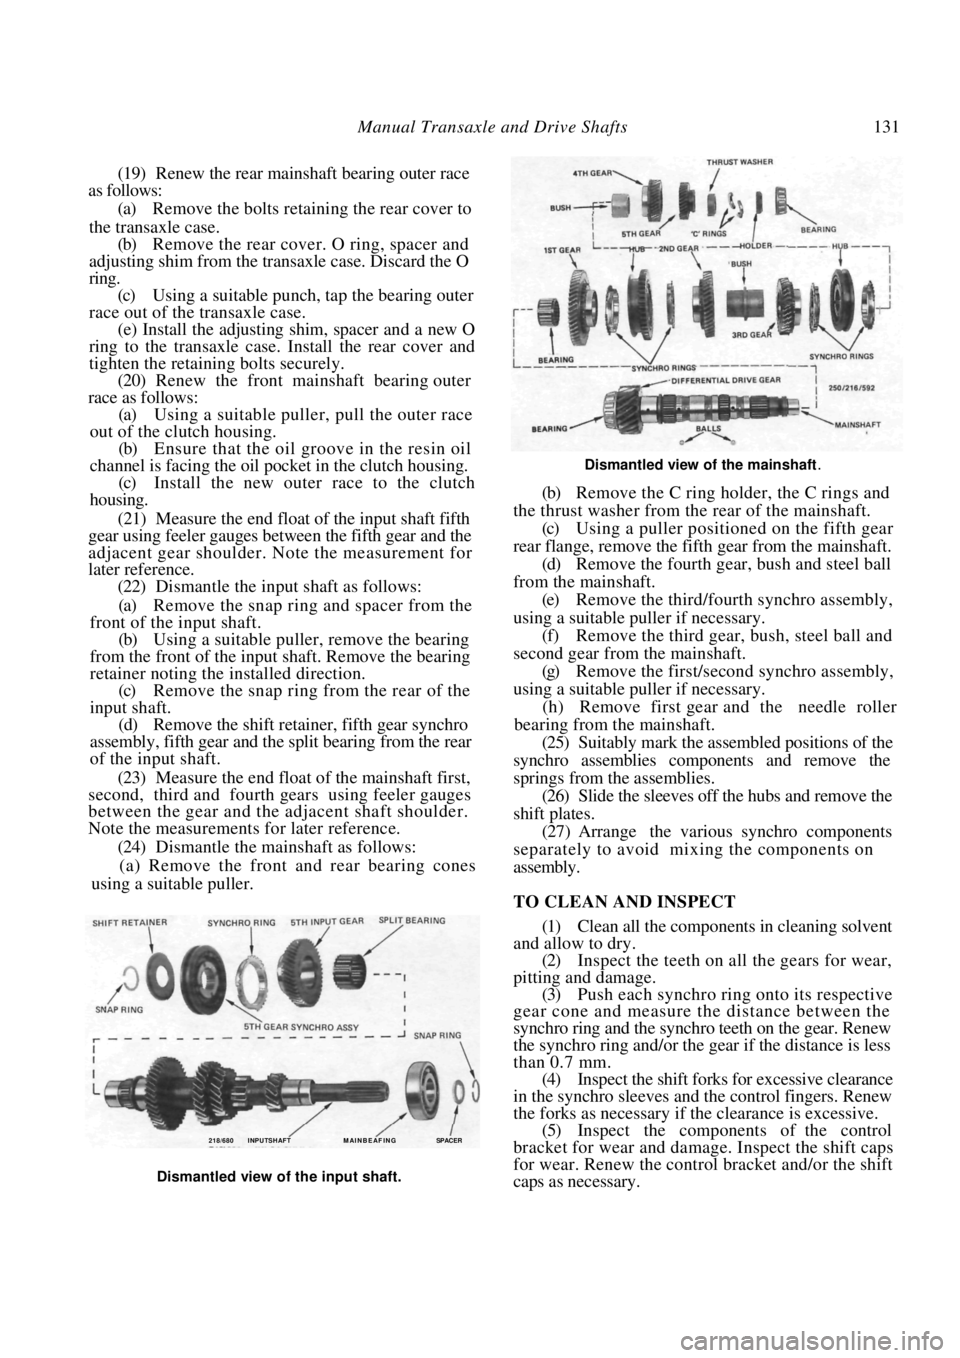
(a) Remove the front and rear bearing cones
using a suitable puller.
Dismantled view of the mainshaft.
(b) Remove the C ring holder, the C rings and
the thrust washer from the rear of the mainshaft. (c) Using a puller positioned on the fifth gear
rear flange, remove the fifth gear from the mainshaft. (d) Remove the fourth gear , bush and steel ball
from the mainshaft. (e) Remove the third/fourth synchro assembly,
using a suitable puller if necessary. (f) Remove the third gear, bush, steel ball and
second gear from the mainshaft. (g) Remove the first/second synchro assembly,
using a suitable puller if necessary. (h) Remove first gear and the needle roller
bearing from the mainshaft.
(25) Suitably mark the assembled positions of the
synchro assemblies components and remove the
springs from the assemblies.
(26) Slide the sleeves off the hubs and remove the
shift plates.
(27) Arrange the various synchro components
separately to avoid mixing the components on
assembly.
TO CLEAN AND INSPECT
(1) Clean all the components in cleaning solvent
and allow to dry.
(2) Inspect the teeth on all the gears for wear,
pitting and damage. (3) Push each synchro ring onto its respective
gear cone and measure the distance between the
synchro ring and the synchro teeth on the gear. Renew
the synchro ring and/or the gear if the distance is less
than 0.7 mm.
(4) Inspect the shift forks for excessive clearance
in the synchro sleeves and the control fingers. Renew
the forks as necessary if the clearance is excessive. (5) Inspect the components of the control
bracket for wear and damage. Inspect the shift caps
for wear. Renew the control bracket and/or the shift
caps as necessary.
218/680 INPUTSHAFT M AI N B E AF I N G SPACER
Dismantled view of the input shaft.