NISSAN TERRANO 2002 Service Repair Manual
Manufacturer: NISSAN, Model Year: 2002, Model line: TERRANO, Model: NISSAN TERRANO 2002Pages: 1767, PDF Size: 41.51 MB
Page 511 of 1767
Diagnostic Procedure
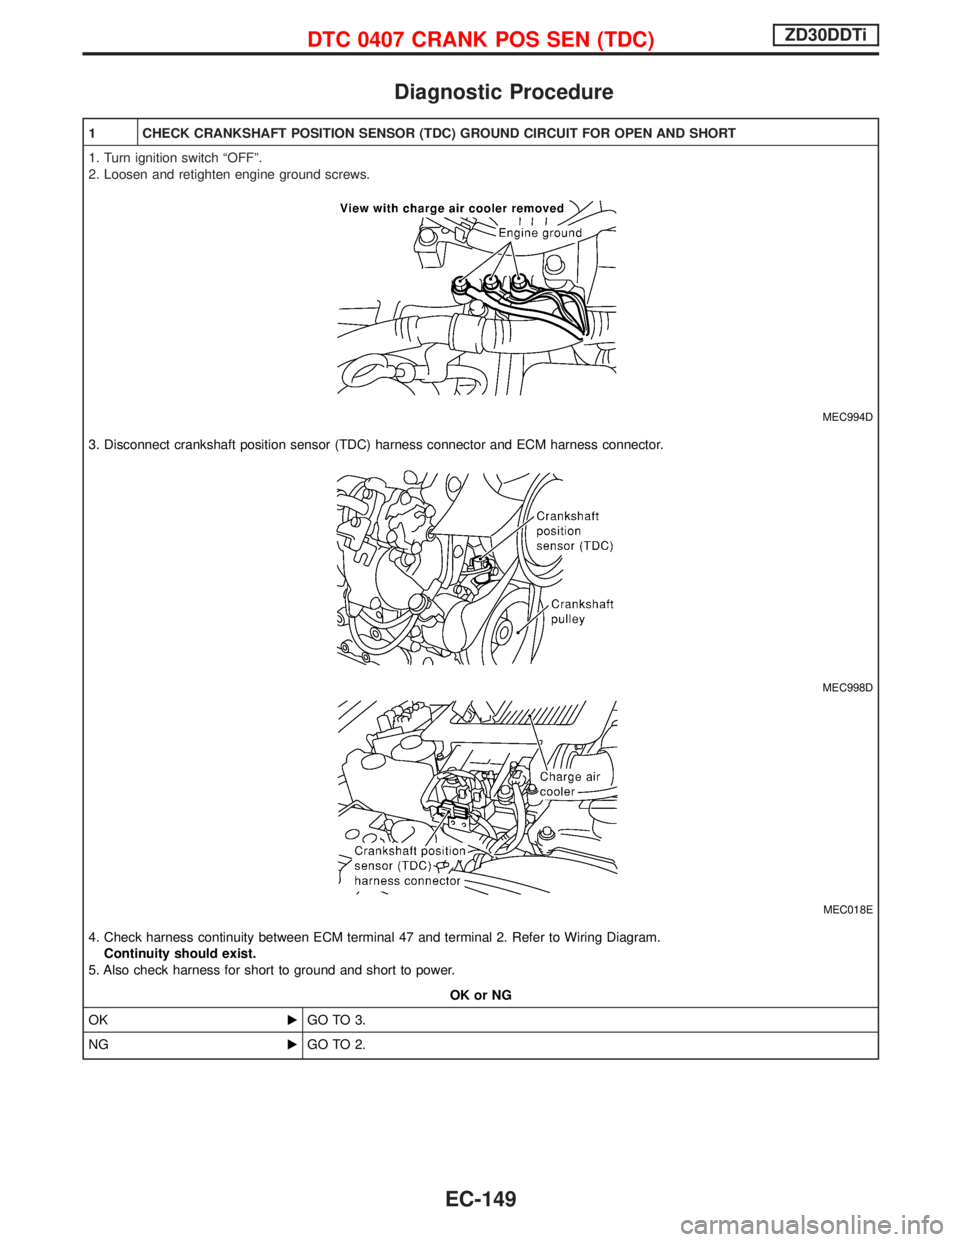
1 CHECK CRANKSHAFT POSITION SENSOR (TDC) GROUND CIRCUIT FOR OPEN AND SHORT
1. Turn ignition switch ªOFFº.
2. Loosen and retighten engine ground screws.
MEC994D
3. Disconnect crankshaft position sensor (TDC) harness connector and ECM harness connector.
MEC998D
MEC018E
4. Check harness continuity between ECM terminal 47 and terminal 2. Refer to Wiring Diagram.
Continuity should exist.
5. Also check harness for short to ground and short to power.
OK or NG
OKEGO TO 3.
NGEGO TO 2.
DTC 0407 CRANK POS SEN (TDC)ZD30DDTi
EC-149
Page 512 of 1767
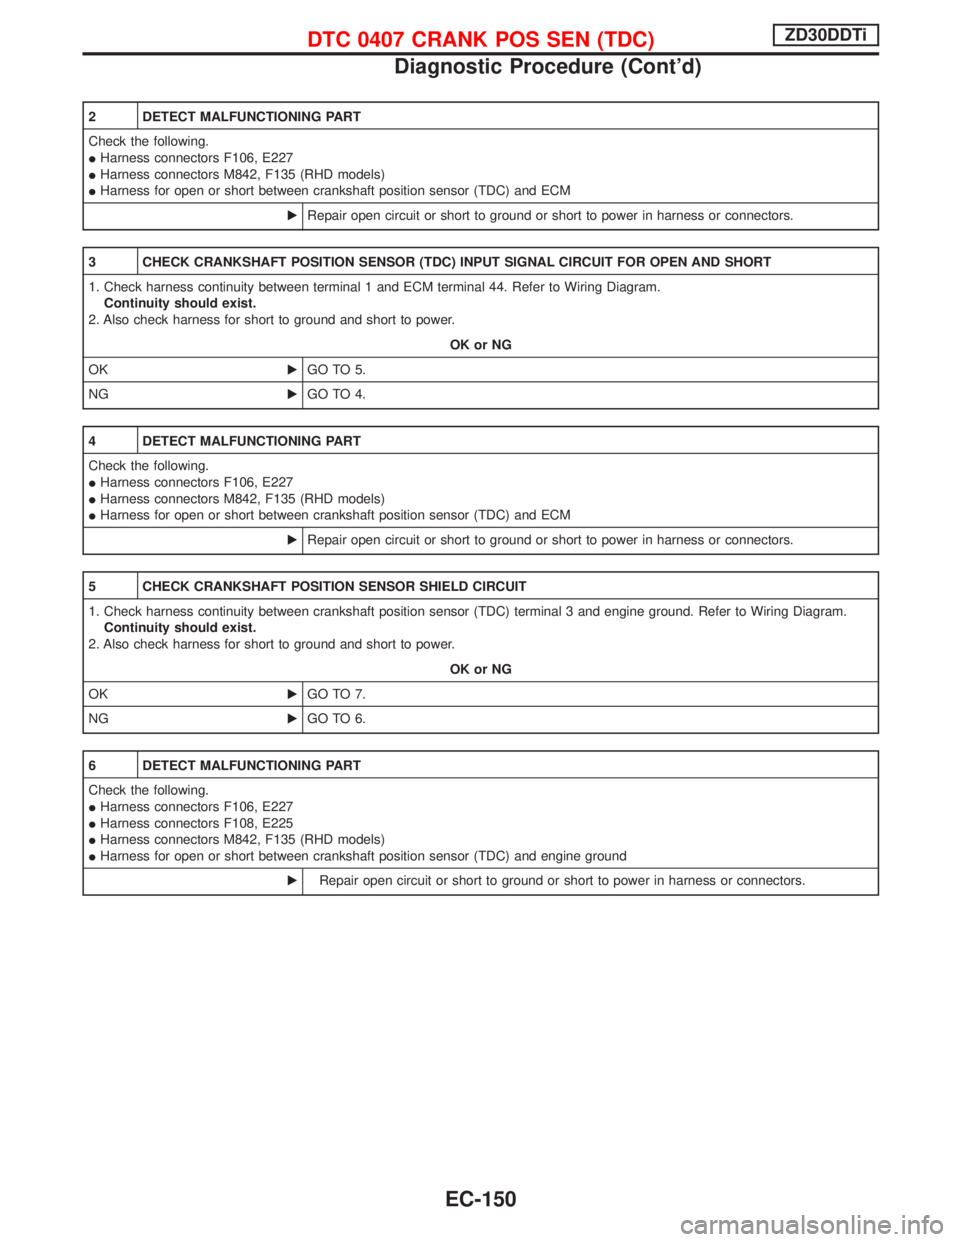
2 DETECT MALFUNCTIONING PART
Check the following.
IHarness connectors F106, E227
IHarness connectors M842, F135 (RHD models)
IHarness for open or short between crankshaft position sensor (TDC) and ECM
ERepair open circuit or short to ground or short to power in harness or connectors.
3 CHECK CRANKSHAFT POSITION SENSOR (TDC) INPUT SIGNAL CIRCUIT FOR OPEN AND SHORT
1. Check harness continuity between terminal 1 and ECM terminal 44. Refer to Wiring Diagram.
Continuity should exist.
2. Also check harness for short to ground and short to power.
OK or NG
OKEGO TO 5.
NGEGO TO 4.
4 DETECT MALFUNCTIONING PART
Check the following.
IHarness connectors F106, E227
IHarness connectors M842, F135 (RHD models)
IHarness for open or short between crankshaft position sensor (TDC) and ECM
ERepair open circuit or short to ground or short to power in harness or connectors.
5 CHECK CRANKSHAFT POSITION SENSOR SHIELD CIRCUIT
1. Check harness continuity between crankshaft position sensor (TDC) terminal 3 and engine ground. Refer to Wiring Diagram.
Continuity should exist.
2. Also check harness for short to ground and short to power.
OK or NG
OKEGO TO 7.
NGEGO TO 6.
6 DETECT MALFUNCTIONING PART
Check the following.
IHarness connectors F106, E227
IHarness connectors F108, E225
IHarness connectors M842, F135 (RHD models)
IHarness for open or short between crankshaft position sensor (TDC) and engine ground
ERepair open circuit or short to ground or short to power in harness or connectors.
DTC 0407 CRANK POS SEN (TDC)ZD30DDTi
Diagnostic Procedure (Cont'd)
EC-150
Page 513 of 1767
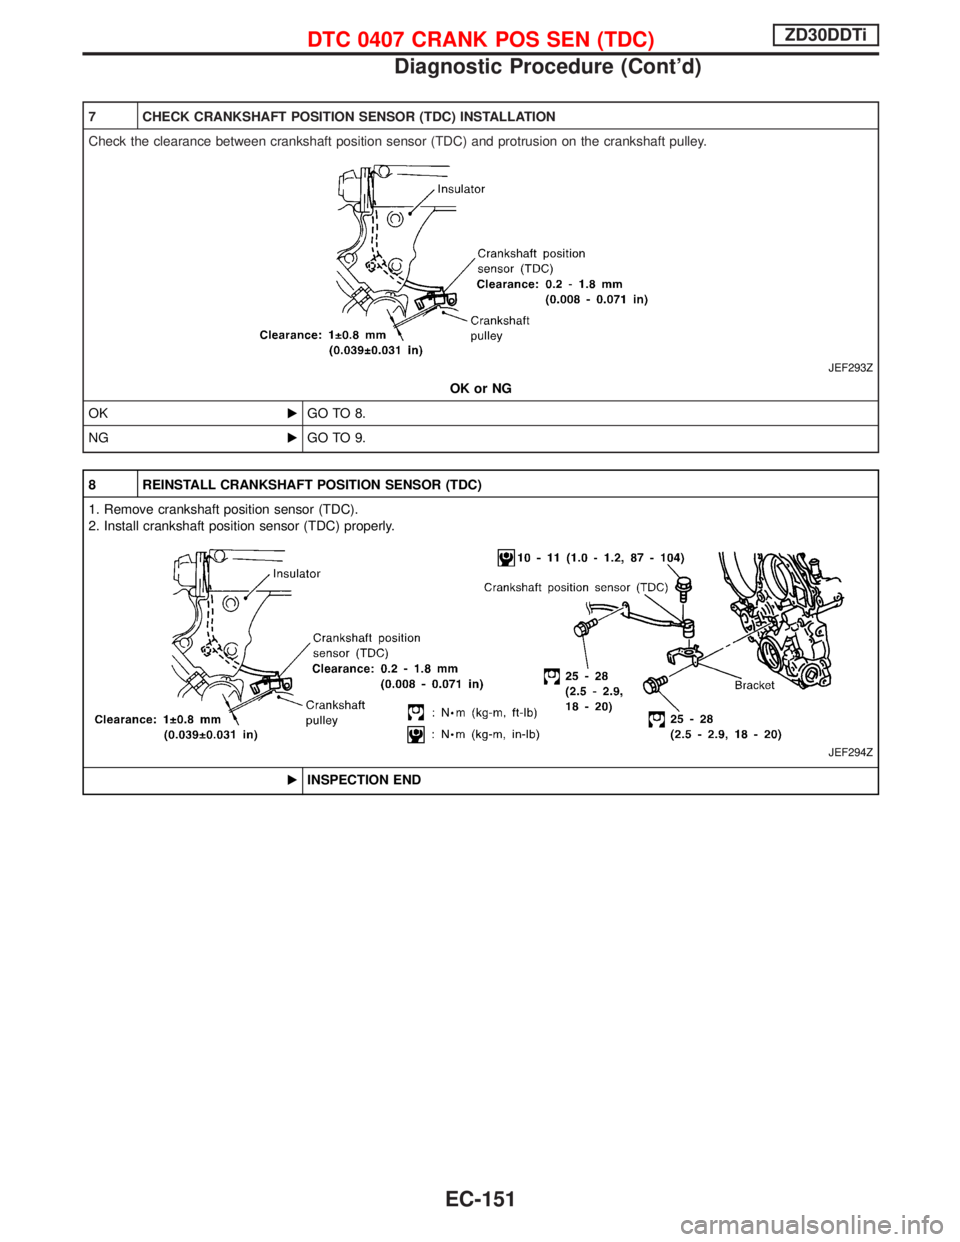
7 CHECK CRANKSHAFT POSITION SENSOR (TDC) INSTALLATION
Check the clearance between crankshaft position sensor (TDC) and protrusion on the crankshaft pulley.
JEF293Z
OK or NG
OKEGO TO 8.
NGEGO TO 9.
8 REINSTALL CRANKSHAFT POSITION SENSOR (TDC)
1. Remove crankshaft position sensor (TDC).
2. Install crankshaft position sensor (TDC) properly.
JEF294Z
EINSPECTION END
DTC 0407 CRANK POS SEN (TDC)ZD30DDTi
Diagnostic Procedure (Cont'd)
EC-151
Page 514 of 1767

9 CHECK CRANKSHAFT POSITION SENSOR (TDC)-I
1. Loosen the fixing bolt and remove the crankshaft position sensor (TDC).
2. Visually check the sensor for chipping.
SEF232Z
OK or NG
OKEGO TO 10.
NGEReplace crankshaft position sensor (TDC).
10 CHECK CRANKSHAFT POSITION SENSOR (TDC)-II
1. Disconnect crankshaft position sensor (TDC) harness connector.
2. Check resistance between crankshaft position sensor (TDC) terminals 1 and 2.
SEF295Z
OK or NG
OKEGO TO 11.
NGEReplace crankshaft position sensor (TDC).
11 CHECK INTERMITTENT INCIDENT
Refer to ªTROUBLE DIAGNOSIS FOR INTERMITTENT INCIDENTº, EC-78.
EINSPECTION END
DTC 0407 CRANK POS SEN (TDC)ZD30DDTi
Diagnostic Procedure (Cont'd)
EC-152
Page 515 of 1767
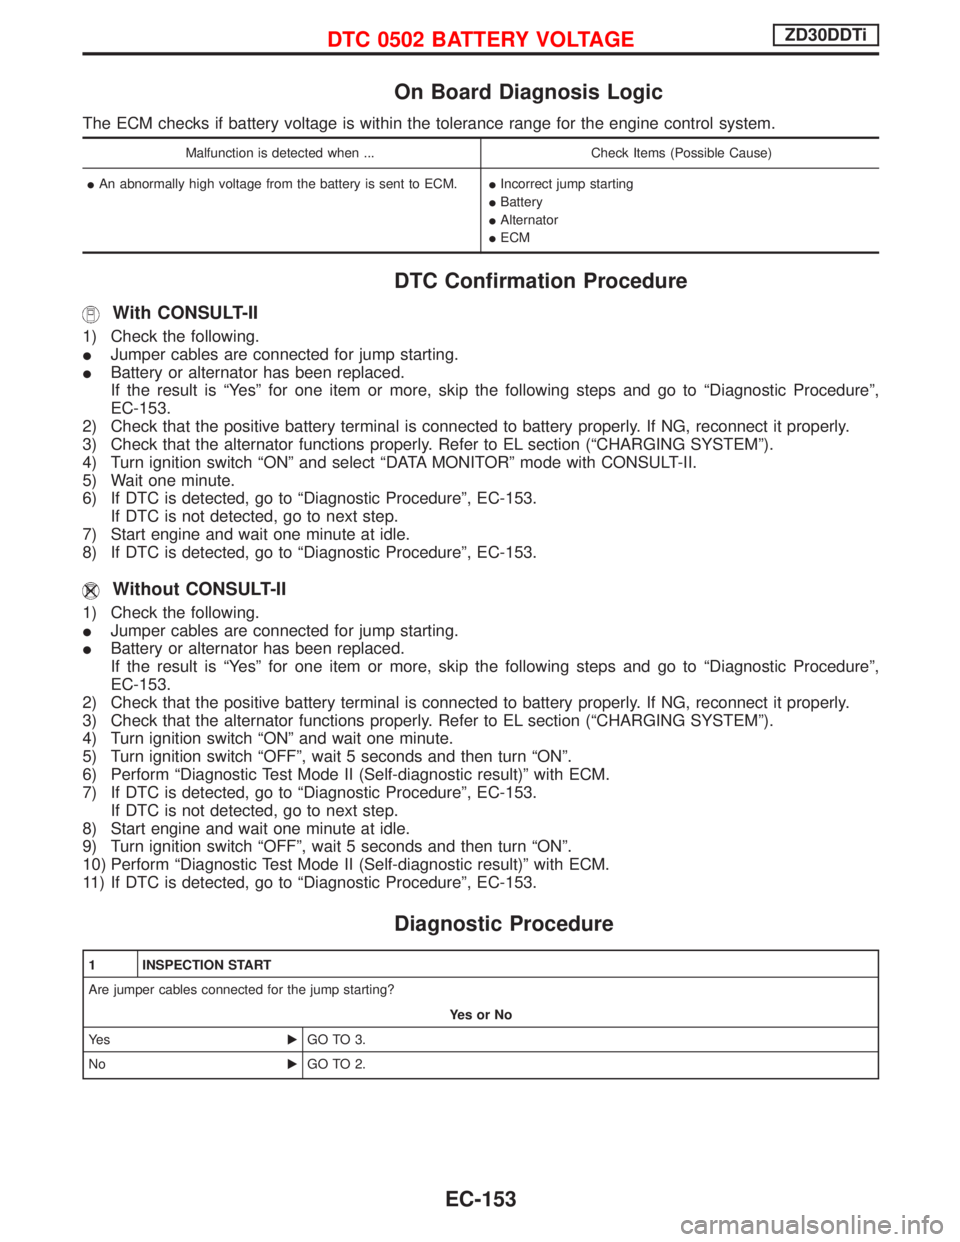
On Board Diagnosis Logic
The ECM checks if battery voltage is within the tolerance range for the engine control system.
Malfunction is detected when ... Check Items (Possible Cause)
IAn abnormally high voltage from the battery is sent to ECM.IIncorrect jump starting
IBattery
IAlternator
IECM
DTC Confirmation Procedure
With CONSULT-II
1) Check the following.
IJumper cables are connected for jump starting.
IBattery or alternator has been replaced.
If the result is ªYesº for one item or more, skip the following steps and go to ªDiagnostic Procedureº,
EC-153.
2) Check that the positive battery terminal is connected to battery properly. If NG, reconnect it properly.
3) Check that the alternator functions properly. Refer to EL section (ªCHARGING SYSTEMº).
4) Turn ignition switch ªONº and select ªDATA MONITORº mode with CONSULT-II.
5) Wait one minute.
6) If DTC is detected, go to ªDiagnostic Procedureº, EC-153.
If DTC is not detected, go to next step.
7) Start engine and wait one minute at idle.
8) If DTC is detected, go to ªDiagnostic Procedureº, EC-153.
Without CONSULT-II
1) Check the following.
IJumper cables are connected for jump starting.
IBattery or alternator has been replaced.
If the result is ªYesº for one item or more, skip the following steps and go to ªDiagnostic Procedureº,
EC-153.
2) Check that the positive battery terminal is connected to battery properly. If NG, reconnect it properly.
3) Check that the alternator functions properly. Refer to EL section (ªCHARGING SYSTEMº).
4) Turn ignition switch ªONº and wait one minute.
5) Turn ignition switch ªOFFº, wait 5 seconds and then turn ªONº.
6) Perform ªDiagnostic Test Mode II (Self-diagnostic result)º with ECM.
7) If DTC is detected, go to ªDiagnostic Procedureº, EC-153.
If DTC is not detected, go to next step.
8) Start engine and wait one minute at idle.
9) Turn ignition switch ªOFFº, wait 5 seconds and then turn ªONº.
10) Perform ªDiagnostic Test Mode II (Self-diagnostic result)º with ECM.
11) If DTC is detected, go to ªDiagnostic Procedureº, EC-153.
Diagnostic Procedure
1 INSPECTION START
Are jumper cables connected for the jump starting?
YesorNo
Ye sEGO TO 3.
NoEGO TO 2.
DTC 0502 BATTERY VOLTAGEZD30DDTi
EC-153
Page 516 of 1767
2 CHECK BATTERY AND ALTERNATOR
Check that the proper type of battery and alternator is installed.
Refer to EL section (ªBATTERYº and ªCHARGING SYSTEMº).
OK or NG
OKEGO TO 5.
NGEReplace with a proper one.
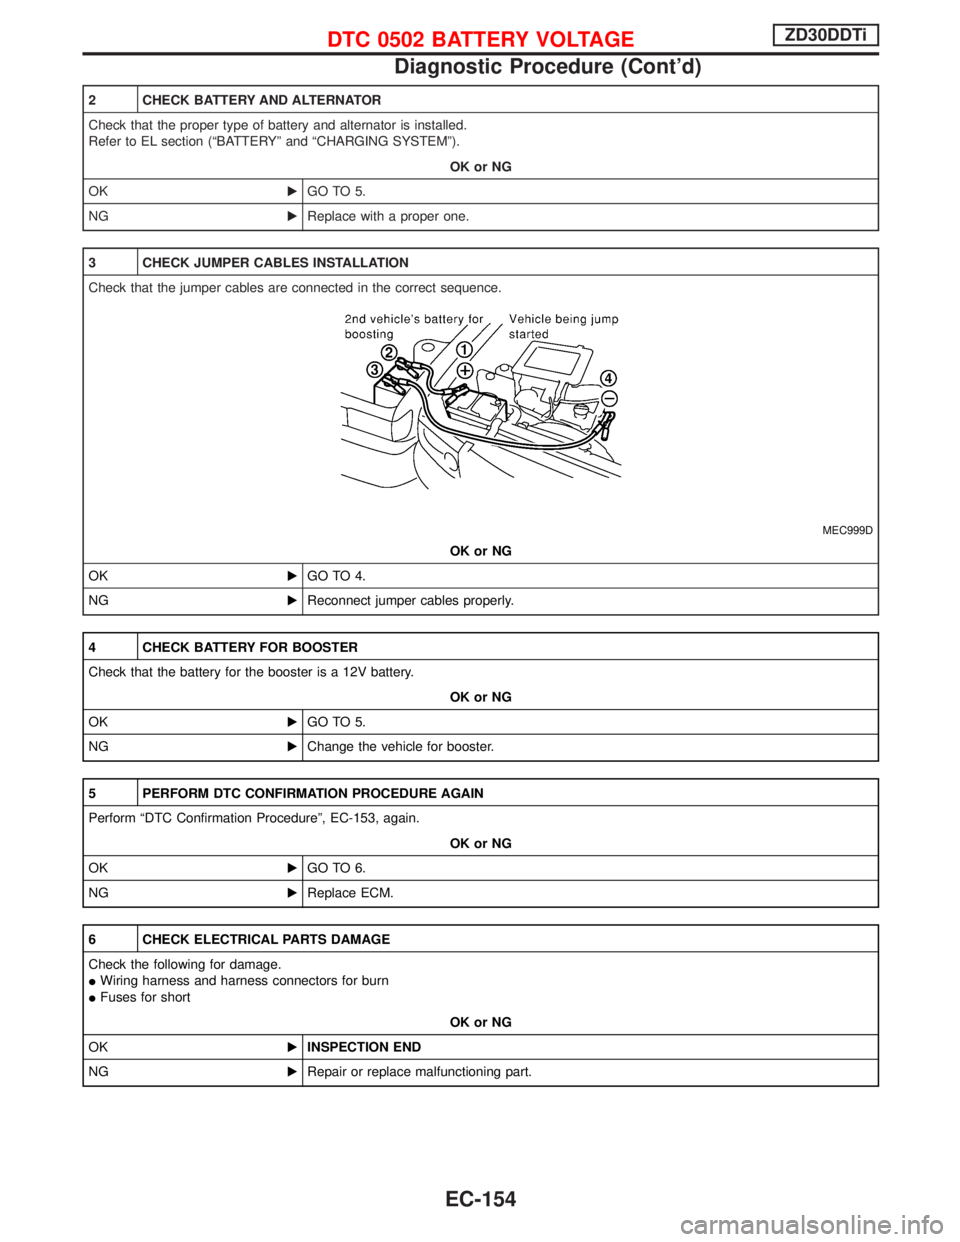
3 CHECK JUMPER CABLES INSTALLATION
Check that the jumper cables are connected in the correct sequence.
MEC999D
OK or NG
OKEGO TO 4.
NGEReconnect jumper cables properly.
4 CHECK BATTERY FOR BOOSTER
Check that the battery for the booster is a 12V battery.
OK or NG
OKEGO TO 5.
NGEChange the vehicle for booster.
5 PERFORM DTC CONFIRMATION PROCEDURE AGAIN
Perform ªDTC Confirmation Procedureº, EC-153, again.
OK or NG
OKEGO TO 6.
NGEReplace ECM.
6 CHECK ELECTRICAL PARTS DAMAGE
Check the following for damage.
IWiring harness and harness connectors for burn
IFuses for short
OK or NG
OKEINSPECTION END
NGERepair or replace malfunctioning part.
DTC 0502 BATTERY VOLTAGEZD30DDTi
Diagnostic Procedure (Cont'd)
EC-154
Page 517 of 1767
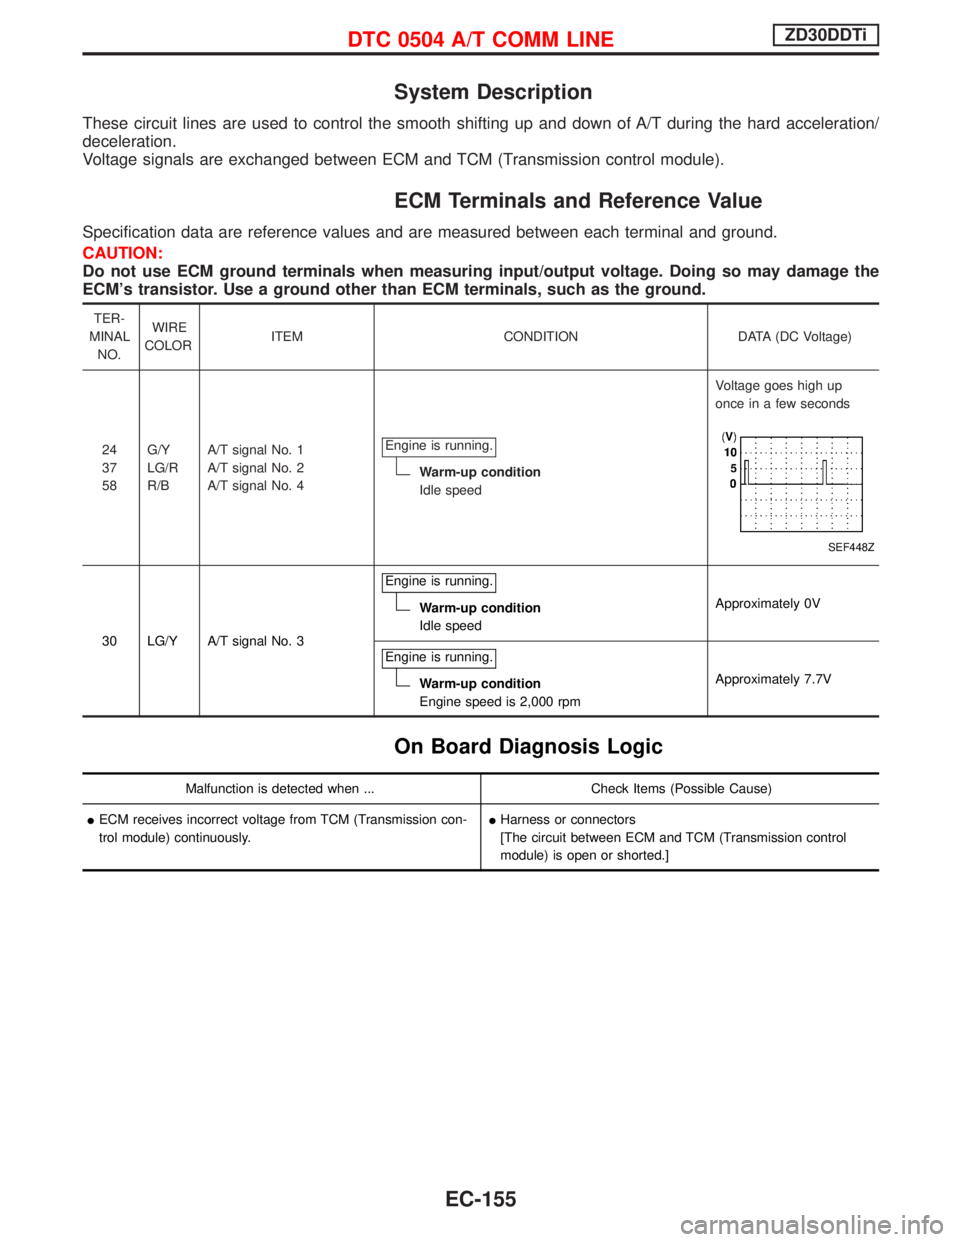
System Description
These circuit lines are used to control the smooth shifting up and down of A/T during the hard acceleration/
deceleration.
Voltage signals are exchanged between ECM and TCM (Transmission control module).
ECM Terminals and Reference Value
Specification data are reference values and are measured between each terminal and ground.
CAUTION:
Do not use ECM ground terminals when measuring input/output voltage. Doing so may damage the
ECM's transistor. Use a ground other than ECM terminals, such as the ground.
TER-
MINAL
NO.WIRE
COLORITEM CONDITION DATA (DC Voltage)
24
37
58G/Y
LG/R
R/BA/T signal No. 1
A/T signal No. 2
A/T signal No. 4Engine is running.
Warm-up condition
Idle speedVoltage goes high up
once in a few seconds
SEF448Z
30 LG/Y A/T signal No. 3Engine is running.
Warm-up condition
Idle speedApproximately 0V
Engine is running.
Warm-up condition
Engine speed is 2,000 rpmApproximately 7.7V
On Board Diagnosis Logic
Malfunction is detected when ... Check Items (Possible Cause)
IECM receives incorrect voltage from TCM (Transmission con-
trol module) continuously.IHarness or connectors
[The circuit between ECM and TCM (Transmission control
module) is open or shorted.]
DTC 0504 A/T COMM LINEZD30DDTi
EC-155
Page 518 of 1767
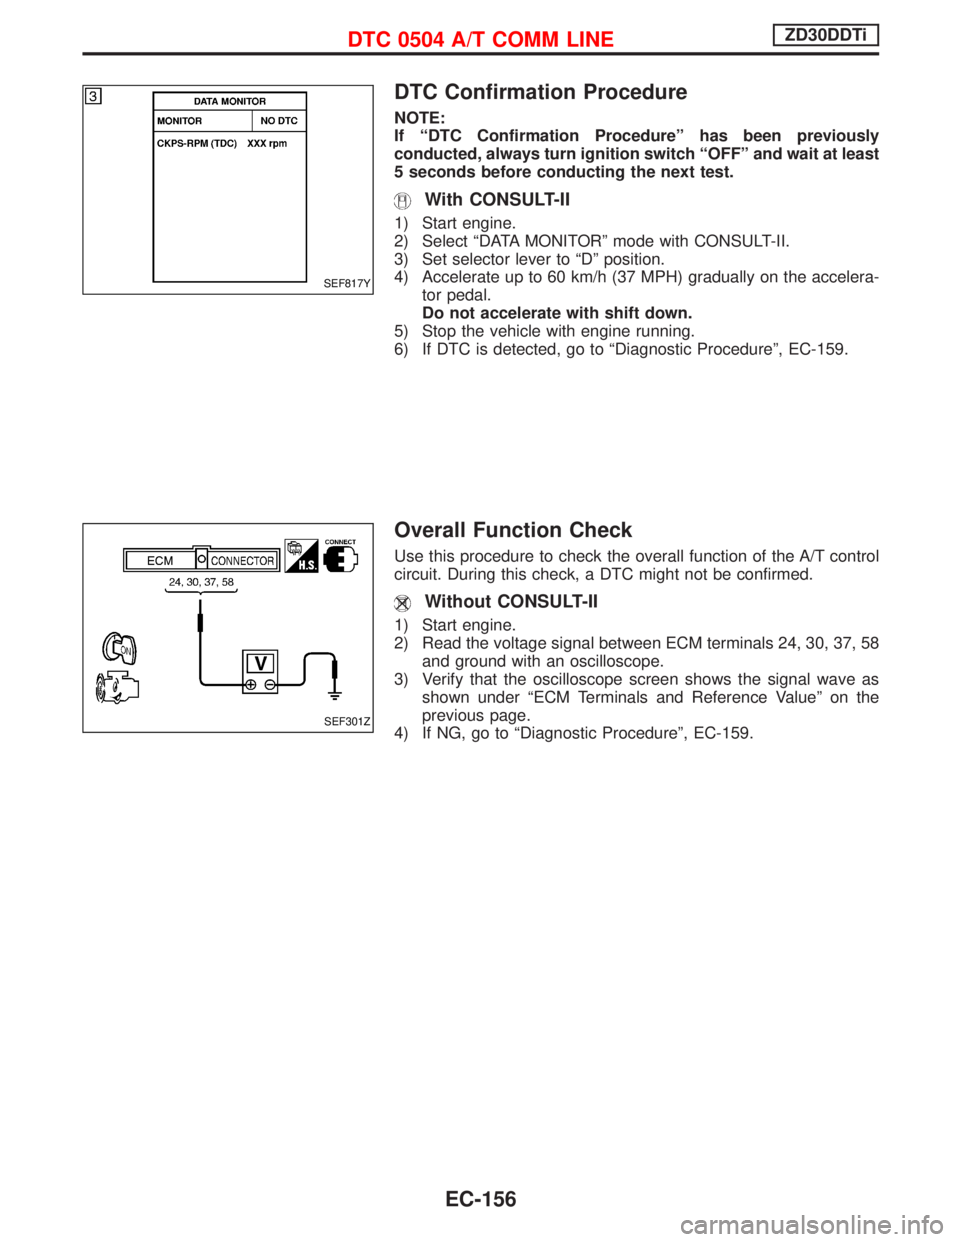
DTC Confirmation Procedure
NOTE:
If ªDTC Confirmation Procedureº has been previously
conducted, always turn ignition switch ªOFFº and wait at least
5 seconds before conducting the next test.
With CONSULT-II
1) Start engine.
2) Select ªDATA MONITORº mode with CONSULT-II.
3) Set selector lever to ªDº position.
4) Accelerate up to 60 km/h (37 MPH) gradually on the accelera-
tor pedal.
Do not accelerate with shift down.
5) Stop the vehicle with engine running.
6) If DTC is detected, go to ªDiagnostic Procedureº, EC-159.
Overall Function Check
Use this procedure to check the overall function of the A/T control
circuit. During this check, a DTC might not be confirmed.
Without CONSULT-II
1) Start engine.
2) Read the voltage signal between ECM terminals 24, 30, 37, 58
and ground with an oscilloscope.
3) Verify that the oscilloscope screen shows the signal wave as
shown under ªECM Terminals and Reference Valueº on the
previous page.
4) If NG, go to ªDiagnostic Procedureº, EC-159.
SEF817Y
SEF301Z
DTC 0504 A/T COMM LINEZD30DDTi
EC-156
Page 519 of 1767

Wiring Diagram
LHD MODELS
YEC187A
DTC 0504 A/T COMM LINEZD30DDTi
EC-157
Page 520 of 1767

RHD MODELS
YEC188A
DTC 0504 A/T COMM LINEZD30DDTi
Wiring Diagram (Cont'd)
EC-158