torque NISSAN TERRANO 2002 Service Manual PDF
[x] Cancel search | Manufacturer: NISSAN, Model Year: 2002, Model line: TERRANO, Model: NISSAN TERRANO 2002Pages: 1767, PDF Size: 41.51 MB
Page 1172 of 1767
Engine room (Left)
3. Remove air duct and air cleaner case.
4. Disconnect vacuum hose to the vehicle on the engine.
5. Disconnect harness connectors from alternator and air com-
pressor.
6. Remove alternator.
7. After removing refrigerant, remove pipes of air compressor and
inlet/outlet.
8. Disconnect heating hose, install blank cap to hose to prevent
coolant from leaking.
9. Remove heating pipe.
10. Remove heat insulator.
11. Remove catalytic converter.
Engine room (Right)
12. Remove power steering reservoir tank from bracket, and fix it
to the vehicle with a rope.
CAUTION:
Keep the reservoir tank level when fixing to prevent oil leak.
13. Remove fuel feed and return hoses.
CAUTION:
Install blank caps immediately to avoid fuel leakage.
14. Remove all harness connectors on the engine, and move har-
nesses to the side of the vehicle.
Vehicle underfloor
15. Remove starter motor.
16. Detach A/T oil cooler pipes from oil pan. (A/T model)
17. Remove rear propeller shaft.
18. Remove mounting bolts to secure the engine to transmission.
1) Remove torque converter installation bolt. (A/T model)
2) Lift transmission bottom with transmission jack, and remove
rear mount members from the vehicle.
3) Lower transmission with the jack, and remove upper mounting
bolts securing the engine to transmission.
4) Lift transmission with the jack, and reinstall rear mount mem-
bers to the vehicle.
5) Position the jack to the front side of transmission.
6) Remove remaining mounting bolts securing the engine to trans-
mission.
Removal operation
19. Remove air conditioner high pressure pipes at the rear of the
engine room.
IThis is due to some inconvenience in the rear slinger installa-
tion.
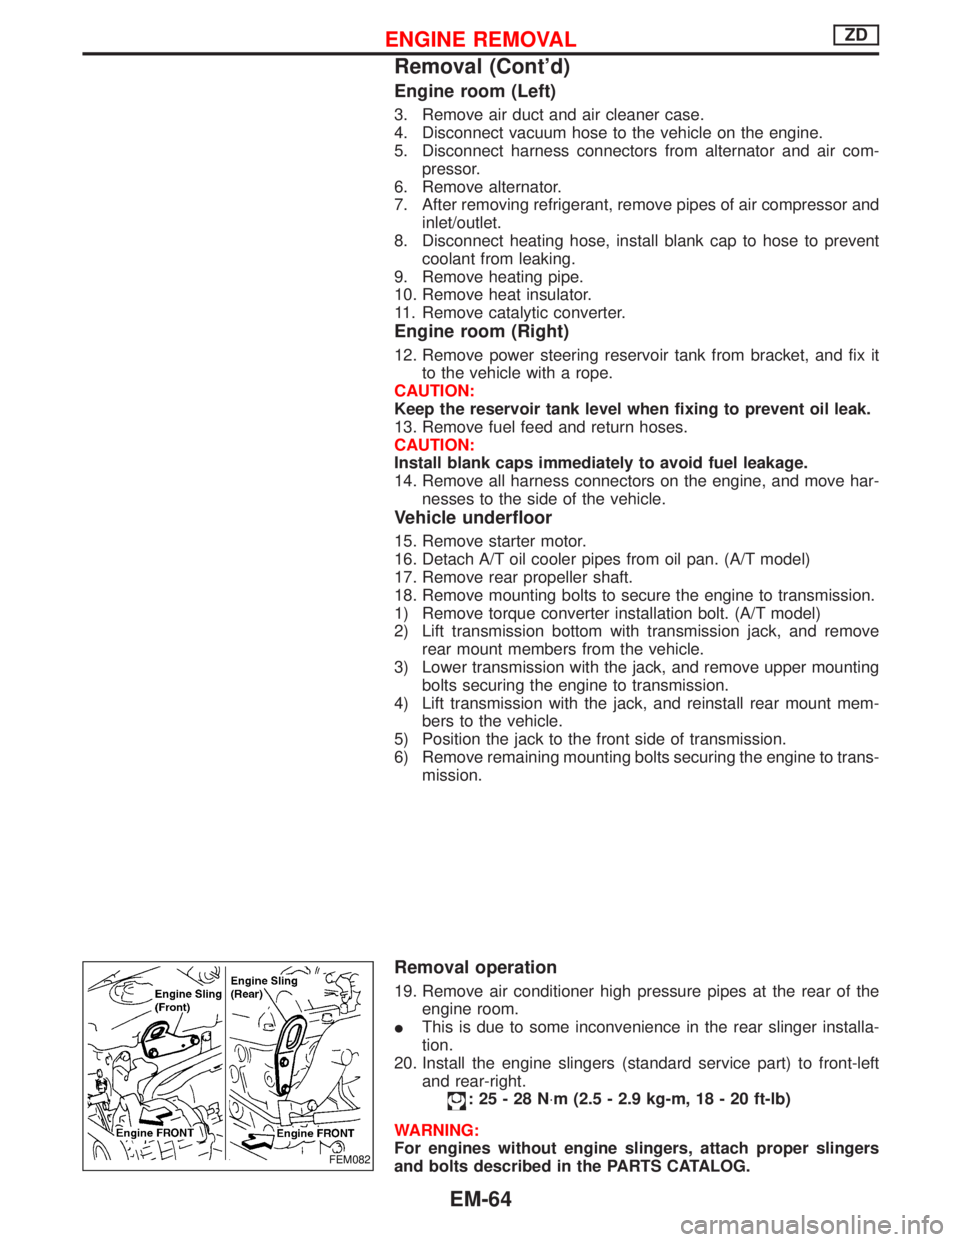
20. Install the engine slingers (standard service part) to front-left
and rear-right.
:25-28N×m (2.5 - 2.9 kg-m, 18 - 20 ft-lb)
WARNING:
For engines without engine slingers, attach proper slingers
and bolts described in the PARTS CATALOG.
FEM082
ENGINE REMOVALZD
Removal (Cont'd)
EM-64
Page 1181 of 1767
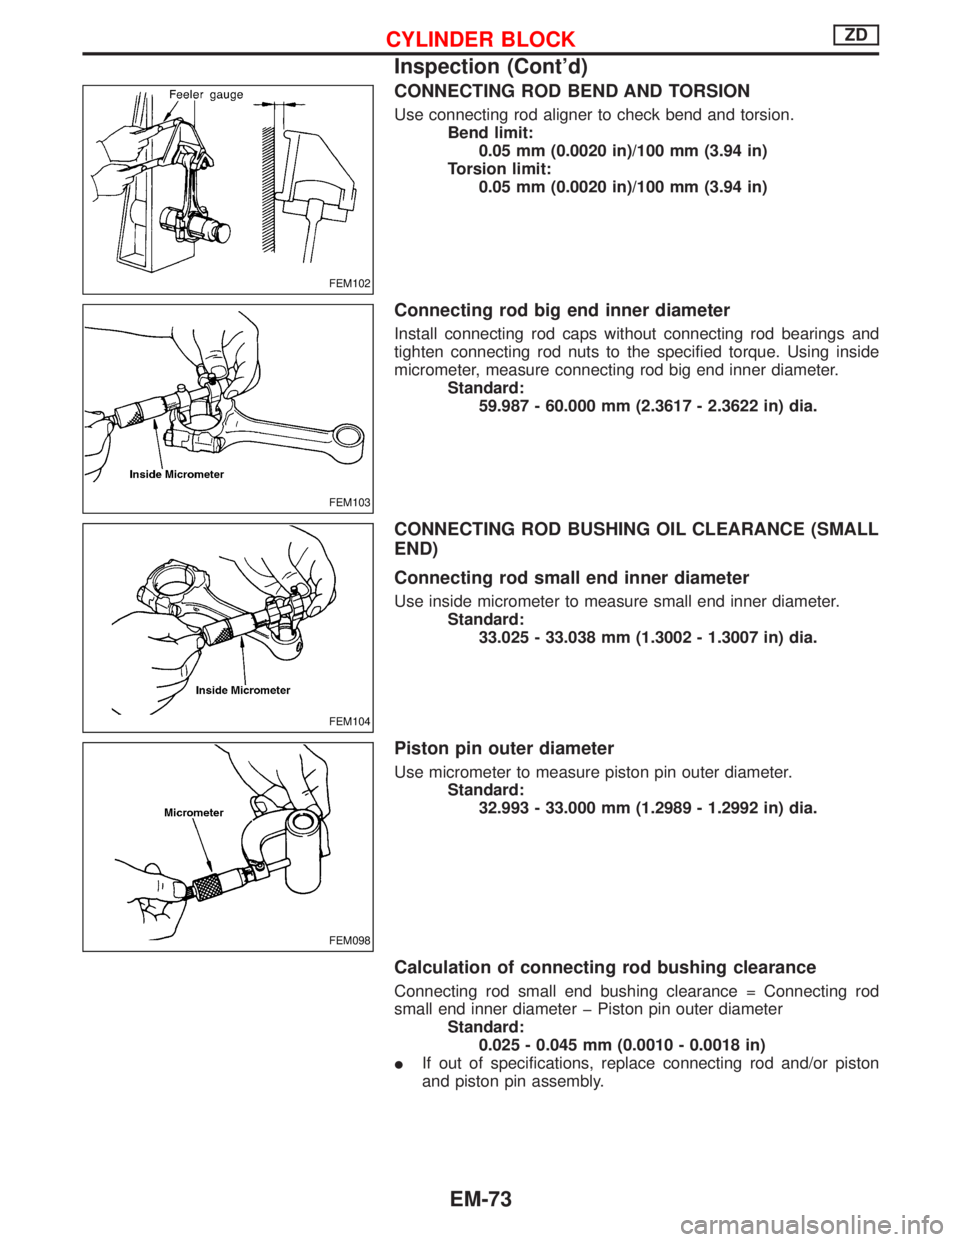
CONNECTING ROD BEND AND TORSION
Use connecting rod aligner to check bend and torsion.
Bend limit:
0.05 mm (0.0020 in)/100 mm (3.94 in)
Torsion limit:
0.05 mm (0.0020 in)/100 mm (3.94 in)
Connecting rod big end inner diameter
Install connecting rod caps without connecting rod bearings and
tighten connecting rod nuts to the specified torque. Using inside
micrometer, measure connecting rod big end inner diameter.
Standard:
59.987 - 60.000 mm (2.3617 - 2.3622 in) dia.
CONNECTING ROD BUSHING OIL CLEARANCE (SMALL
END)
Connecting rod small end inner diameter
Use inside micrometer to measure small end inner diameter.
Standard:
33.025 - 33.038 mm (1.3002 - 1.3007 in) dia.
Piston pin outer diameter
Use micrometer to measure piston pin outer diameter.
Standard:
32.993 - 33.000 mm (1.2989 - 1.2992 in) dia.
Calculation of connecting rod bushing clearance
Connecting rod small end bushing clearance = Connecting rod
small end inner diameter þ Piston pin outer diameter
Standard:
0.025 - 0.045 mm (0.0010 - 0.0018 in)
IIf out of specifications, replace connecting rod and/or piston
and piston pin assembly.
FEM102
FEM103
FEM104
FEM098
CYLINDER BLOCKZD
Inspection (Cont'd)
EM-73
Page 1182 of 1767
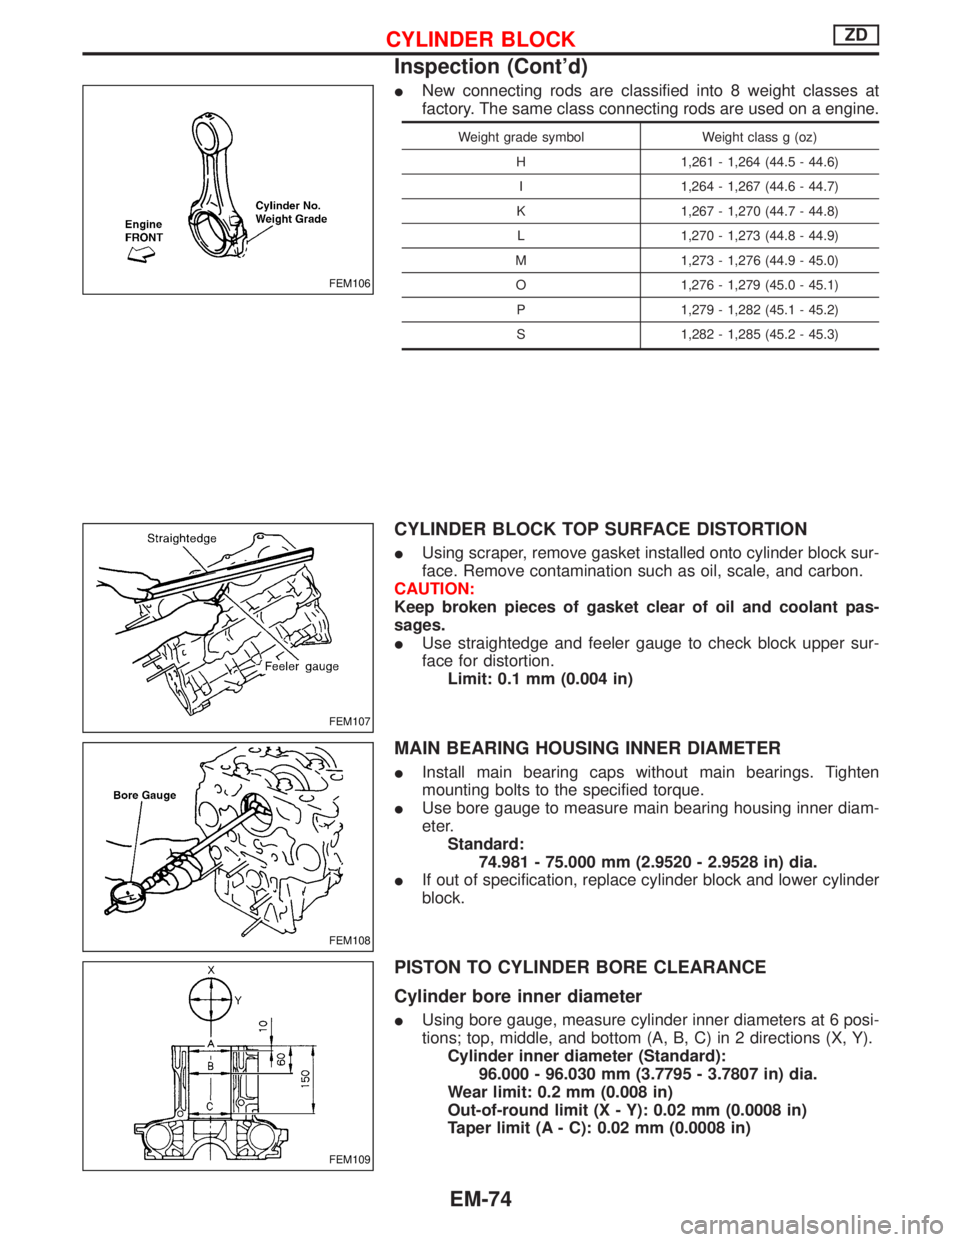
INew connecting rods are classified into 8 weight classes at
factory. The same class connecting rods are used on a engine.
Weight grade symbol Weight class g (oz)
H 1,261 - 1,264 (44.5 - 44.6)
I 1,264 - 1,267 (44.6 - 44.7)
K 1,267 - 1,270 (44.7 - 44.8)
L 1,270 - 1,273 (44.8 - 44.9)
M 1,273 - 1,276 (44.9 - 45.0)
O 1,276 - 1,279 (45.0 - 45.1)
P 1,279 - 1,282 (45.1 - 45.2)
S 1,282 - 1,285 (45.2 - 45.3)
CYLINDER BLOCK TOP SURFACE DISTORTION
IUsing scraper, remove gasket installed onto cylinder block sur-
face. Remove contamination such as oil, scale, and carbon.
CAUTION:
Keep broken pieces of gasket clear of oil and coolant pas-
sages.
IUse straightedge and feeler gauge to check block upper sur-
face for distortion.
Limit: 0.1 mm (0.004 in)
MAIN BEARING HOUSING INNER DIAMETER
IInstall main bearing caps without main bearings. Tighten
mounting bolts to the specified torque.
IUse bore gauge to measure main bearing housing inner diam-
eter.
Standard:
74.981 - 75.000 mm (2.9520 - 2.9528 in) dia.
IIf out of specification, replace cylinder block and lower cylinder
block.
PISTON TO CYLINDER BORE CLEARANCE
Cylinder bore inner diameter
IUsing bore gauge, measure cylinder inner diameters at 6 posi-
tions; top, middle, and bottom (A, B, C) in 2 directions (X, Y).
Cylinder inner diameter (Standard):
96.000 - 96.030 mm (3.7795 - 3.7807 in) dia.
Wear limit: 0.2 mm (0.008 in)
Out-of-round limit (X - Y): 0.02 mm (0.0008 in)
Taper limit (A - C): 0.02 mm (0.0008 in)
FEM106
FEM107
FEM108
FEM109
CYLINDER BLOCKZD
Inspection (Cont'd)
EM-74
Page 1185 of 1767
CONNECTING ROD BEARING OIL CLEARANCE
Method by measurement
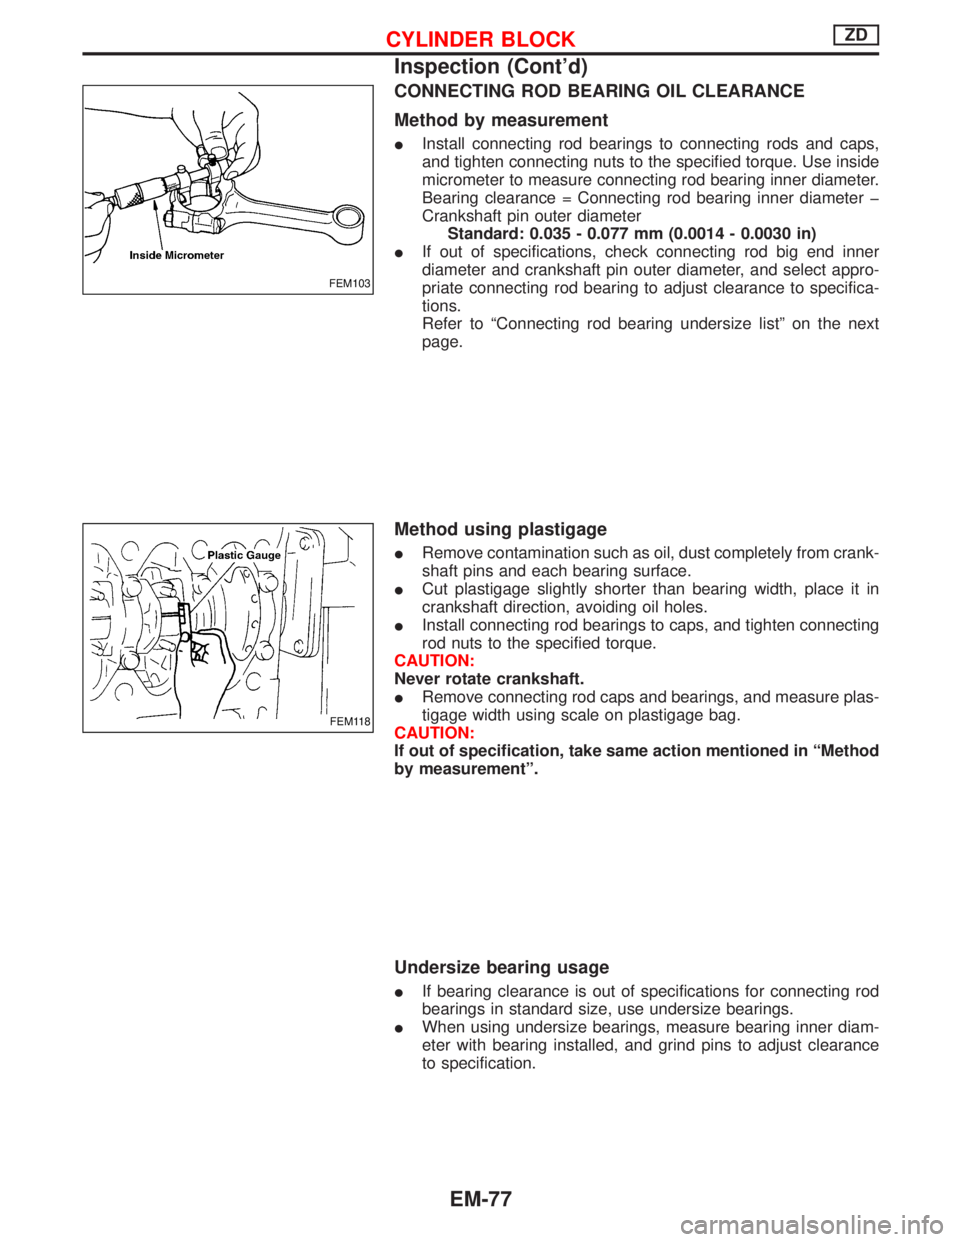
IInstall connecting rod bearings to connecting rods and caps,
and tighten connecting nuts to the specified torque. Use inside
micrometer to measure connecting rod bearing inner diameter.
Bearing clearance = Connecting rod bearing inner diameter þ
Crankshaft pin outer diameter
Standard: 0.035 - 0.077 mm (0.0014 - 0.0030 in)
IIf out of specifications, check connecting rod big end inner
diameter and crankshaft pin outer diameter, and select appro-
priate connecting rod bearing to adjust clearance to specifica-
tions.
Refer to ªConnecting rod bearing undersize listº on the next
page.
Method using plastigage
IRemove contamination such as oil, dust completely from crank-
shaft pins and each bearing surface.
ICut plastigage slightly shorter than bearing width, place it in
crankshaft direction, avoiding oil holes.
IInstall connecting rod bearings to caps, and tighten connecting
rod nuts to the specified torque.
CAUTION:
Never rotate crankshaft.
IRemove connecting rod caps and bearings, and measure plas-
tigage width using scale on plastigage bag.
CAUTION:
If out of specification, take same action mentioned in ªMethod
by measurementº.
Undersize bearing usage
IIf bearing clearance is out of specifications for connecting rod
bearings in standard size, use undersize bearings.
IWhen using undersize bearings, measure bearing inner diam-
eter with bearing installed, and grind pins to adjust clearance
to specification.
FEM103
FEM118
CYLINDER BLOCKZD
Inspection (Cont'd)
EM-77
Page 1186 of 1767
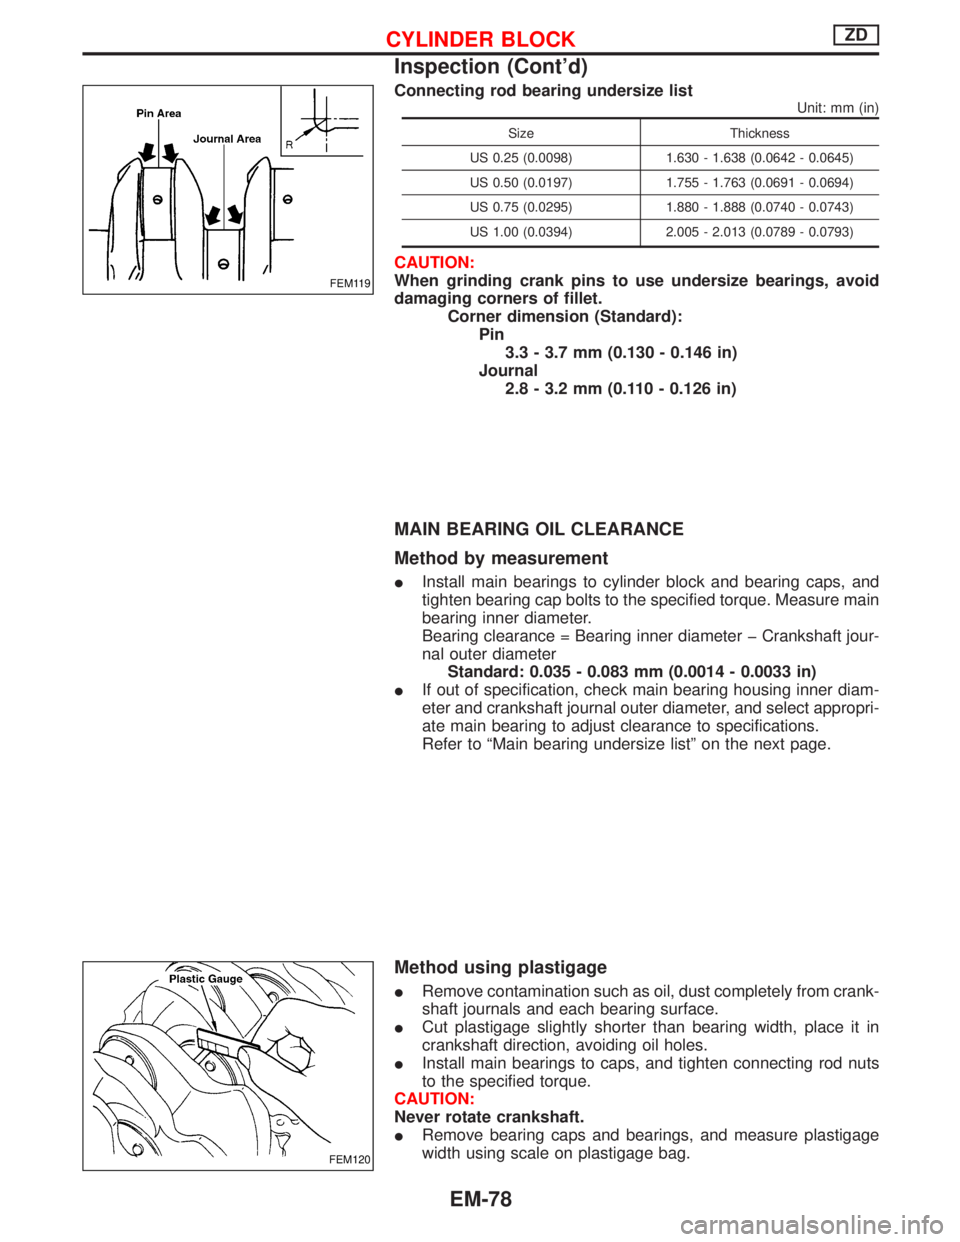
Connecting rod bearing undersize list
Unit: mm (in)
Size Thickness
US 0.25 (0.0098) 1.630 - 1.638 (0.0642 - 0.0645)
US 0.50 (0.0197) 1.755 - 1.763 (0.0691 - 0.0694)
US 0.75 (0.0295) 1.880 - 1.888 (0.0740 - 0.0743)
US 1.00 (0.0394) 2.005 - 2.013 (0.0789 - 0.0793)
CAUTION:
When grinding crank pins to use undersize bearings, avoid
damaging corners of fillet.
Corner dimension (Standard):
Pin
3.3 - 3.7 mm (0.130 - 0.146 in)
Journal
2.8 - 3.2 mm (0.110 - 0.126 in)
MAIN BEARING OIL CLEARANCE
Method by measurement
IInstall main bearings to cylinder block and bearing caps, and
tighten bearing cap bolts to the specified torque. Measure main
bearing inner diameter.
Bearing clearance = Bearing inner diameter þ Crankshaft jour-
nal outer diameter
Standard: 0.035 - 0.083 mm (0.0014 - 0.0033 in)
IIf out of specification, check main bearing housing inner diam-
eter and crankshaft journal outer diameter, and select appropri-
ate main bearing to adjust clearance to specifications.
Refer to ªMain bearing undersize listº on the next page.
Method using plastigage
IRemove contamination such as oil, dust completely from crank-
shaft journals and each bearing surface.
ICut plastigage slightly shorter than bearing width, place it in
crankshaft direction, avoiding oil holes.
IInstall main bearings to caps, and tighten connecting rod nuts
to the specified torque.
CAUTION:
Never rotate crankshaft.
IRemove bearing caps and bearings, and measure plastigage
width using scale on plastigage bag.
FEM119
FEM120
CYLINDER BLOCKZD
Inspection (Cont'd)
EM-78
Page 1187 of 1767
CAUTION:
If out of specification, take same action mentioned in ªMethod
by measurementº.
Undersize bearing usage
IIf bearing clearance is out of specifications for main bearings
in standard size, use undersize bearings.
IWhen using undersize bearings, measure bearing inner diam-
eter with bearing installed, and grind crank journals to adjust
clearance to specification.
Main bearing undersize list
Unit: mm (in)
Size Thickness
US 0.25 (0.0098) 2.130 - 2.138 (0.0839 - 0.0842)
US 0.50 (0.0197) 2.255 - 2.263 (0.0888 - 0.0891)
US 0.75 (0.0295) 2.380 - 2.388 (0.0937 - 0.0940)
US 1.00 (0.0394) 2.505 - 2.513 (0.0986 - 0.0989)
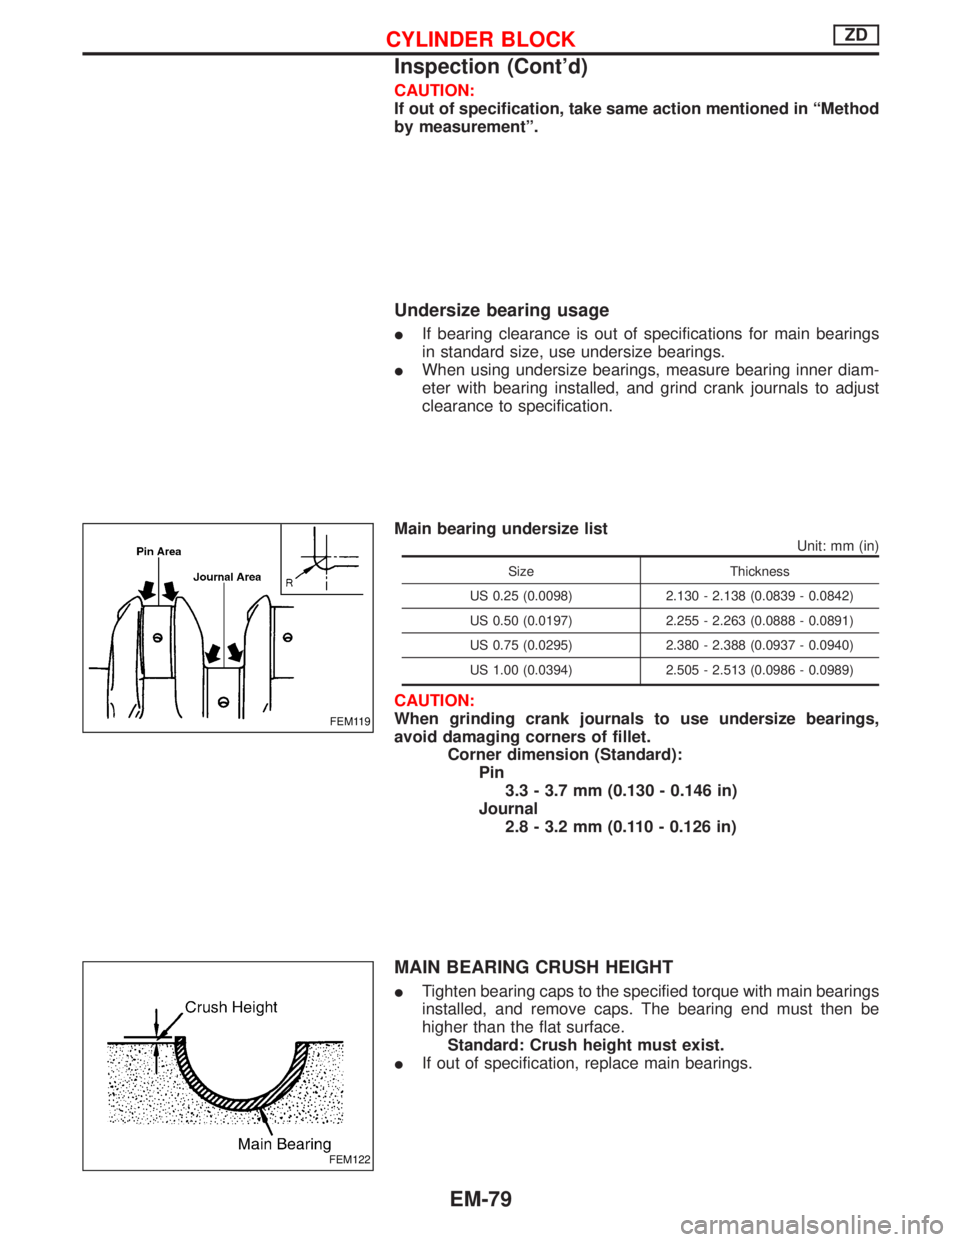
CAUTION:
When grinding crank journals to use undersize bearings,
avoid damaging corners of fillet.
Corner dimension (Standard):
Pin
3.3 - 3.7 mm (0.130 - 0.146 in)
Journal
2.8 - 3.2 mm (0.110 - 0.126 in)
MAIN BEARING CRUSH HEIGHT
ITighten bearing caps to the specified torque with main bearings
installed, and remove caps. The bearing end must then be
higher than the flat surface.
Standard: Crush height must exist.
IIf out of specification, replace main bearings.
FEM119
FEM122
CYLINDER BLOCKZD
Inspection (Cont'd)
EM-79
Page 1188 of 1767
Assembly
1. Blow air sufficiently to inside coolant passage, oil passage,
crankcase, and cylinder bore to remove foreign matter.
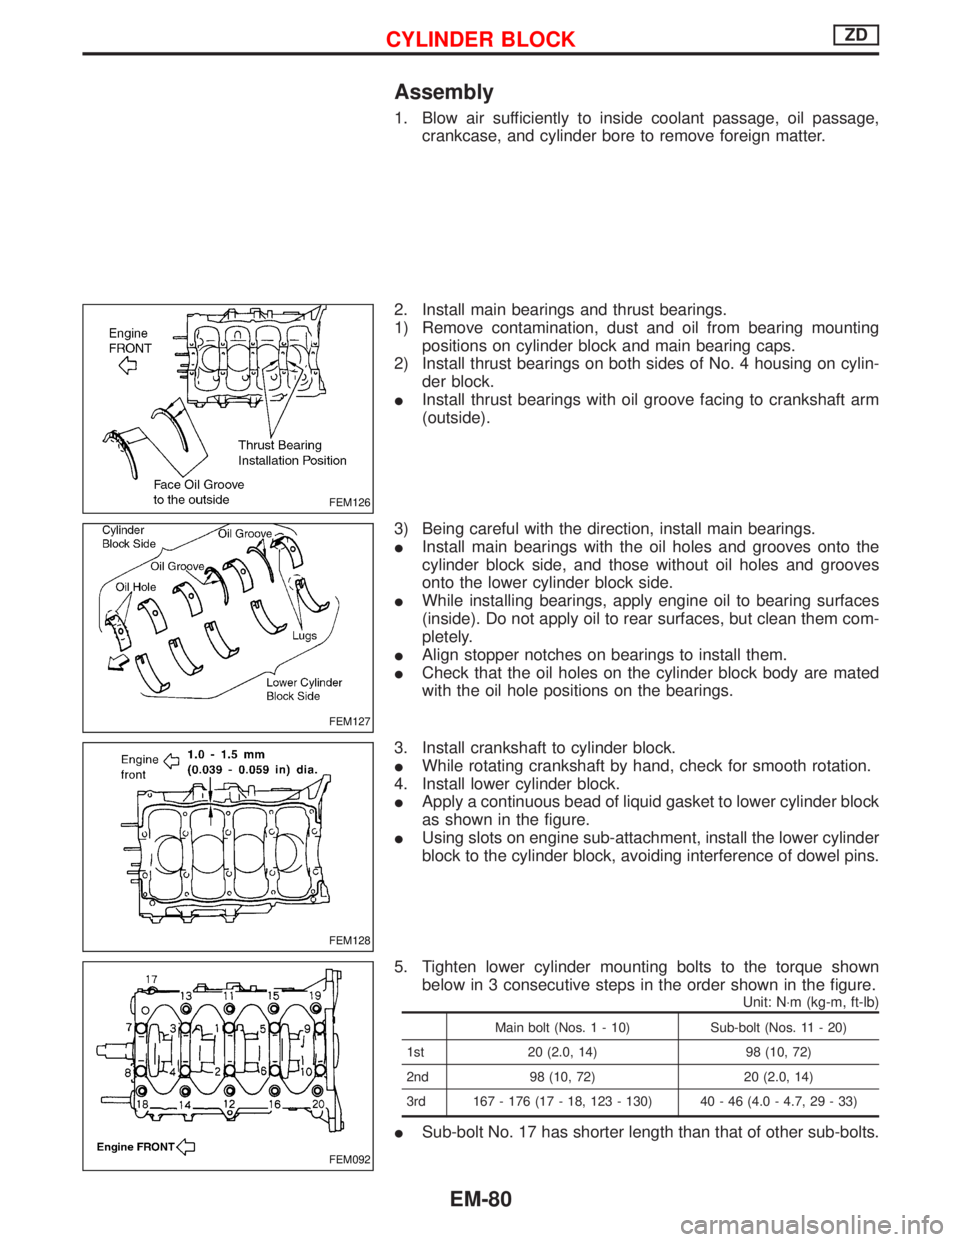
2. Install main bearings and thrust bearings.
1) Remove contamination, dust and oil from bearing mounting
positions on cylinder block and main bearing caps.
2) Install thrust bearings on both sides of No. 4 housing on cylin-
der block.
IInstall thrust bearings with oil groove facing to crankshaft arm
(outside).
3) Being careful with the direction, install main bearings.
IInstall main bearings with the oil holes and grooves onto the
cylinder block side, and those without oil holes and grooves
onto the lower cylinder block side.
IWhile installing bearings, apply engine oil to bearing surfaces
(inside). Do not apply oil to rear surfaces, but clean them com-
pletely.
IAlign stopper notches on bearings to install them.
ICheck that the oil holes on the cylinder block body are mated
with the oil hole positions on the bearings.
3. Install crankshaft to cylinder block.
IWhile rotating crankshaft by hand, check for smooth rotation.
4. Install lower cylinder block.
IApply a continuous bead of liquid gasket to lower cylinder block
as shown in the figure.
IUsing slots on engine sub-attachment, install the lower cylinder
block to the cylinder block, avoiding interference of dowel pins.
5. Tighten lower cylinder mounting bolts to the torque shown
below in 3 consecutive steps in the order shown in the figure.
Unit: N×m (kg-m, ft-lb)
Main bolt (Nos. 1 - 10) Sub-bolt (Nos. 11 - 20)
1st 20 (2.0, 14) 98 (10, 72)
2nd 98 (10, 72) 20 (2.0, 14)
3rd 167 - 176 (17 - 18, 123 - 130) 40 - 46 (4.0 - 4.7, 29 - 33)
ISub-bolt No. 17 has shorter length than that of other sub-bolts.
FEM126
FEM127
FEM128
FEM092
CYLINDER BLOCKZD
EM-80
Page 1189 of 1767
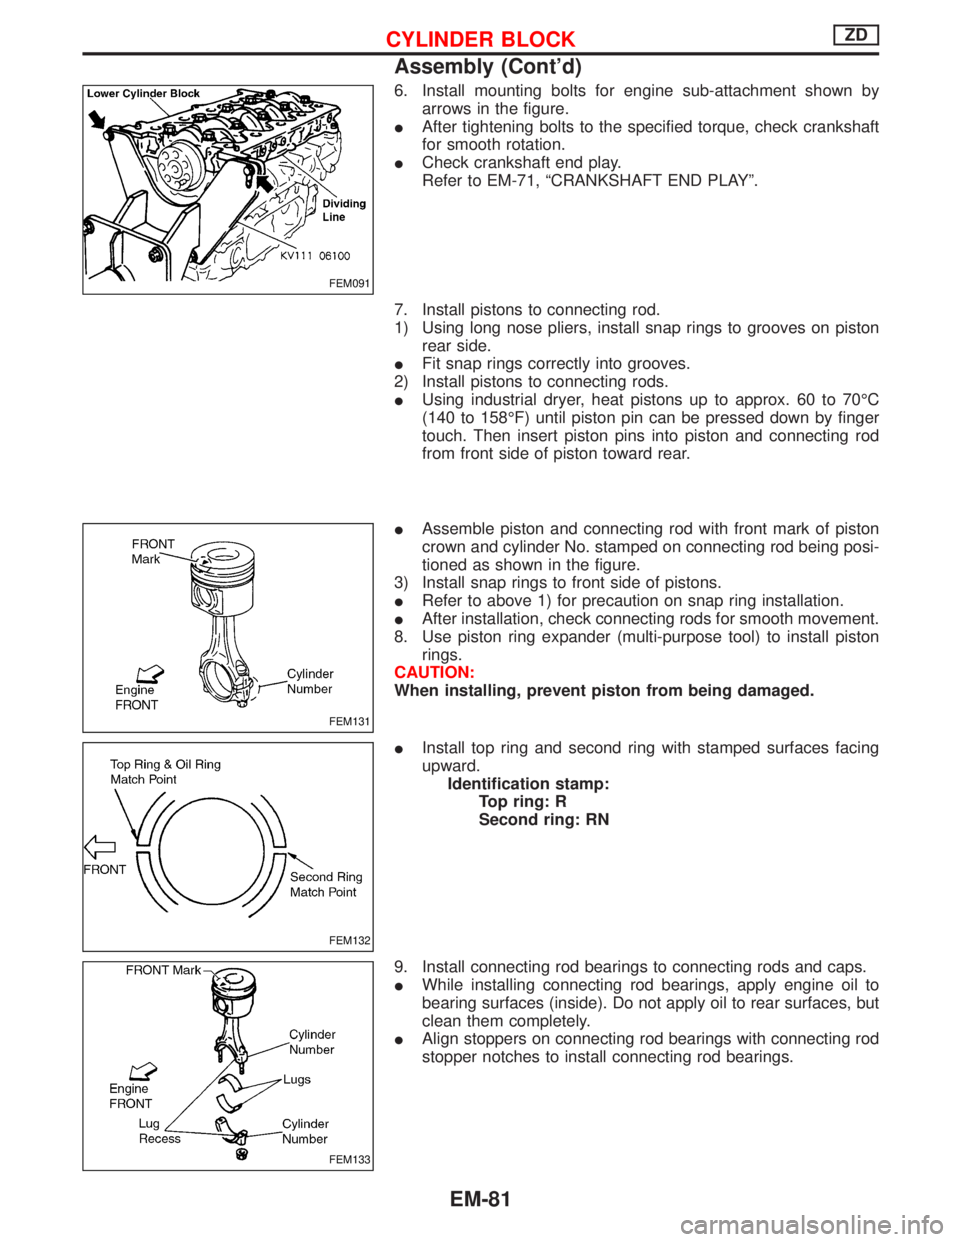
6. Install mounting bolts for engine sub-attachment shown by
arrows in the figure.
IAfter tightening bolts to the specified torque, check crankshaft
for smooth rotation.
ICheck crankshaft end play.
Refer to EM-71, ªCRANKSHAFT END PLAYº.
7. Install pistons to connecting rod.
1) Using long nose pliers, install snap rings to grooves on piston
rear side.
IFit snap rings correctly into grooves.
2) Install pistons to connecting rods.
IUsing industrial dryer, heat pistons up to approx. 60 to 70ÉC
(140 to 158ÉF) until piston pin can be pressed down by finger
touch. Then insert piston pins into piston and connecting rod
from front side of piston toward rear.
IAssemble piston and connecting rod with front mark of piston
crown and cylinder No. stamped on connecting rod being posi-
tioned as shown in the figure.
3) Install snap rings to front side of pistons.
IRefer to above 1) for precaution on snap ring installation.
IAfter installation, check connecting rods for smooth movement.
8. Use piston ring expander (multi-purpose tool) to install piston
rings.
CAUTION:
When installing, prevent piston from being damaged.
IInstall top ring and second ring with stamped surfaces facing
upward.
Identification stamp:
Top ring: R
Second ring: RN
9. Install connecting rod bearings to connecting rods and caps.
IWhile installing connecting rod bearings, apply engine oil to
bearing surfaces (inside). Do not apply oil to rear surfaces, but
clean them completely.
IAlign stoppers on connecting rod bearings with connecting rod
stopper notches to install connecting rod bearings.
FEM091
FEM131
FEM132
FEM133
CYLINDER BLOCKZD
Assembly (Cont'd)
EM-81
Page 1203 of 1767
Parts Requiring Angular Tightening
ISome important engine parts are tightened using an angular-
tightening method rather than a torque setting method.
IIf these parts are tightened using a torque setting method, dis-
persal of the tightening force (axial bolt force) will be two or
three times that of the dispersal produced by using the correct
angular-tightening method.
IAlthough the torque setting values (described in this manual)
are equivalent to those used when bolts and nuts are tightened
with an angular-tightening method, they should be used for
reference only.
ITo assure the satisfactory maintenance of the engine, bolts and
nuts must be tightened using an angular-tightening method.
IBefore tightening the bolts and nuts, ensure that the thread and
seating surfaces are clean and then coated with engine oil.
IThe bolts and nuts which require the angular-tightening method
are as follows:
(1) Cylinder head bolts
(2) Connecting rod cap nuts
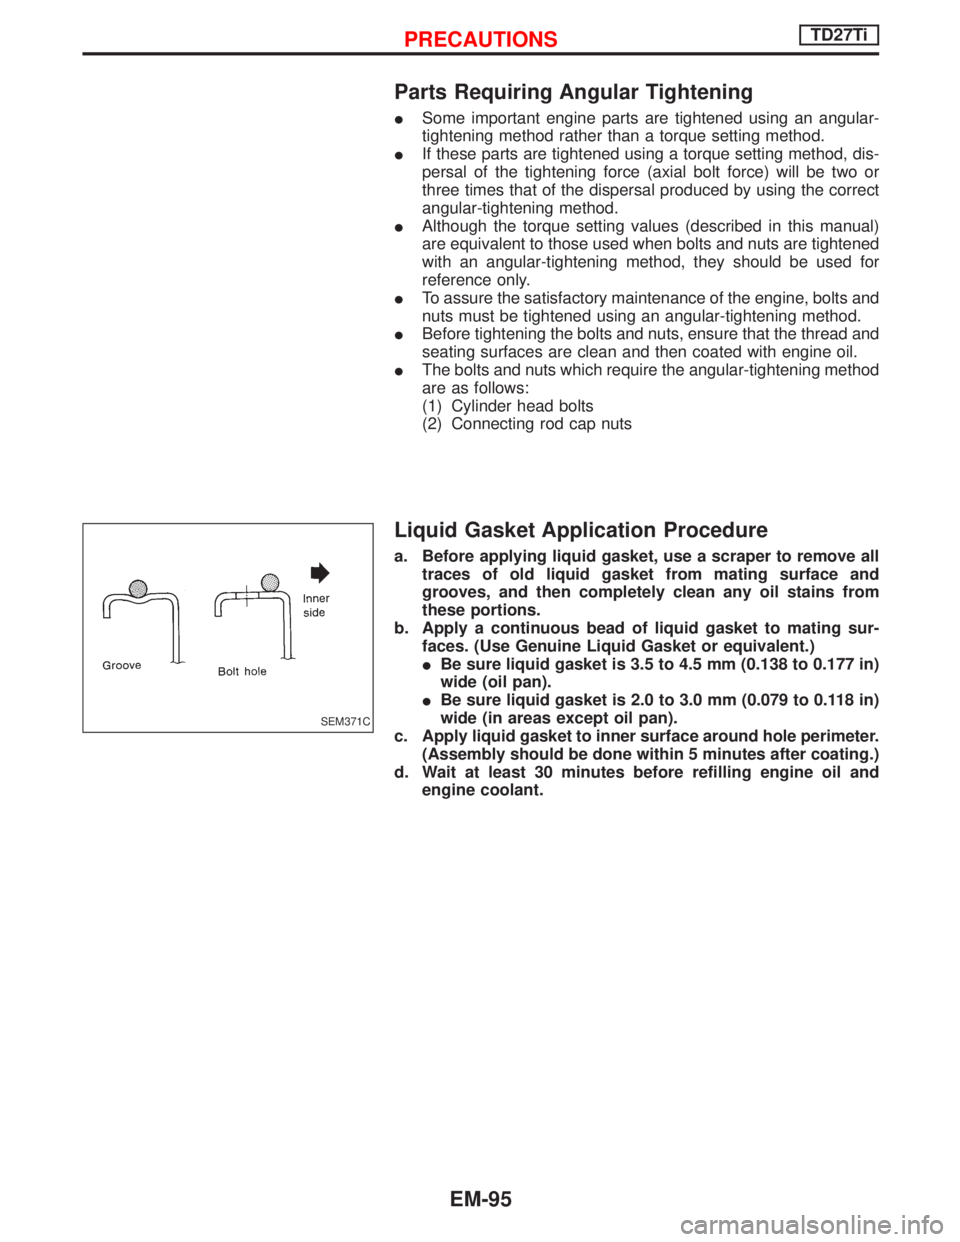
Liquid Gasket Application Procedure
a. Before applying liquid gasket, use a scraper to remove all
traces of old liquid gasket from mating surface and
grooves, and then completely clean any oil stains from
these portions.
b. Apply a continuous bead of liquid gasket to mating sur-
faces. (Use Genuine Liquid Gasket or equivalent.)
IBe sure liquid gasket is 3.5 to 4.5 mm (0.138 to 0.177 in)
wide (oil pan).
IBe sure liquid gasket is 2.0 to 3.0 mm (0.079 to 0.118 in)
wide (in areas except oil pan).
c. Apply liquid gasket to inner surface around hole perimeter.
(Assembly should be done within 5 minutes after coating.)
d. Wait at least 30 minutes before refilling engine oil and
engine coolant.
SEM371C
PRECAUTIONSTD27Ti
EM-95
Page 1261 of 1767
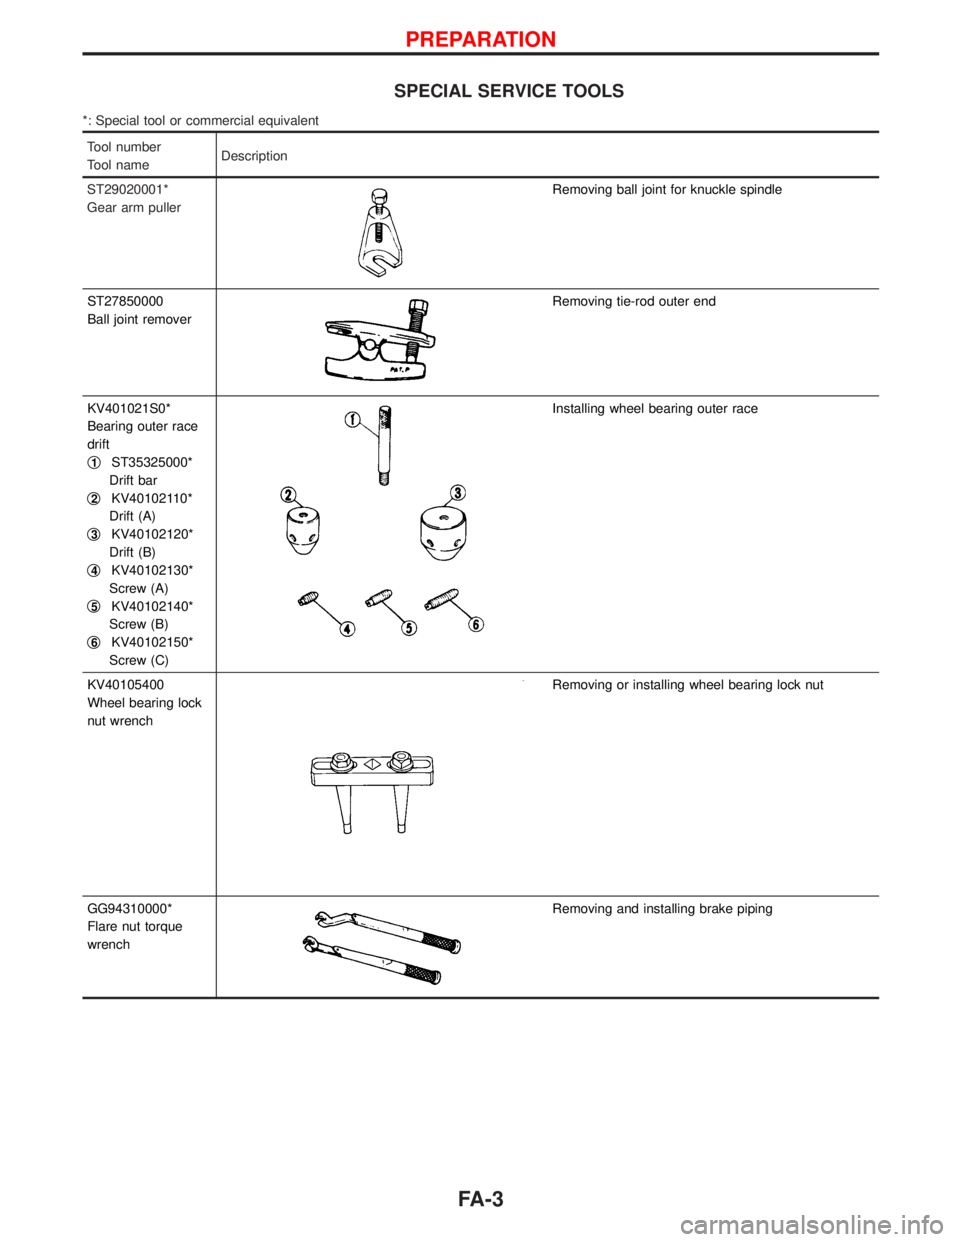
SPECIAL SERVICE TOOLS
*: Special tool or commercial equivalent
Tool number
Tool nameDescription
ST29020001*
Gear arm puller
Removing ball joint for knuckle spindle
ST27850000
Ball joint remover
Removing tie-rod outer end
KV401021S0*
Bearing outer race
drift
q
1ST35325000*
Drift bar
q
2KV40102110*
Drift (A)
q
3KV40102120*
Drift (B)
q
4KV40102130*
Screw (A)
q
5KV40102140*
Screw (B)
q
6KV40102150*
Screw (C)
Installing wheel bearing outer race
KV40105400
Wheel bearing lock
nut wrench
Removing or installing wheel bearing lock nut
GG94310000*
Flare nut torque
wrench
Removing and installing brake piping
PREPARATION
FA-3