NISSAN TERRANO 2004 Service Repair Manual
Manufacturer: NISSAN, Model Year: 2004, Model line: TERRANO, Model: NISSAN TERRANO 2004Pages: 1833, PDF Size: 53.42 MB
Page 1101 of 1833
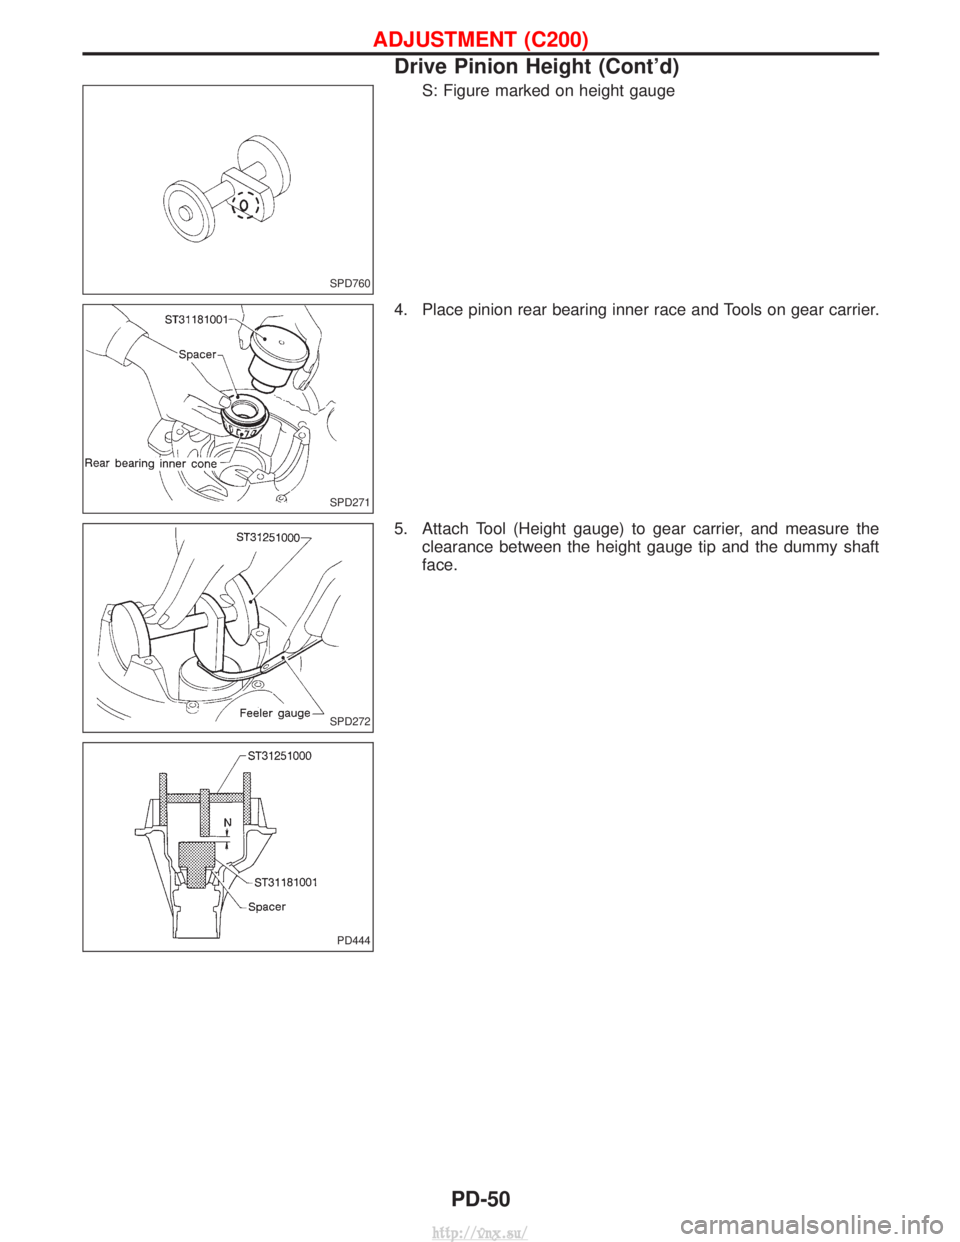
S: Figure marked on height gauge
4. Place pinion rear bearing inner race and Tools on gear carrier.
5. Attach Tool (Height gauge) to gear carrier, and measure the clearance between the height gauge tip and the dummy shaft
face.
SPD760
SPD271
SPD272
PD444
ADJUSTMENT (C200)
Drive Pinion Height (Cont'd)
PD-50
http://vnx.su/
Page 1102 of 1833
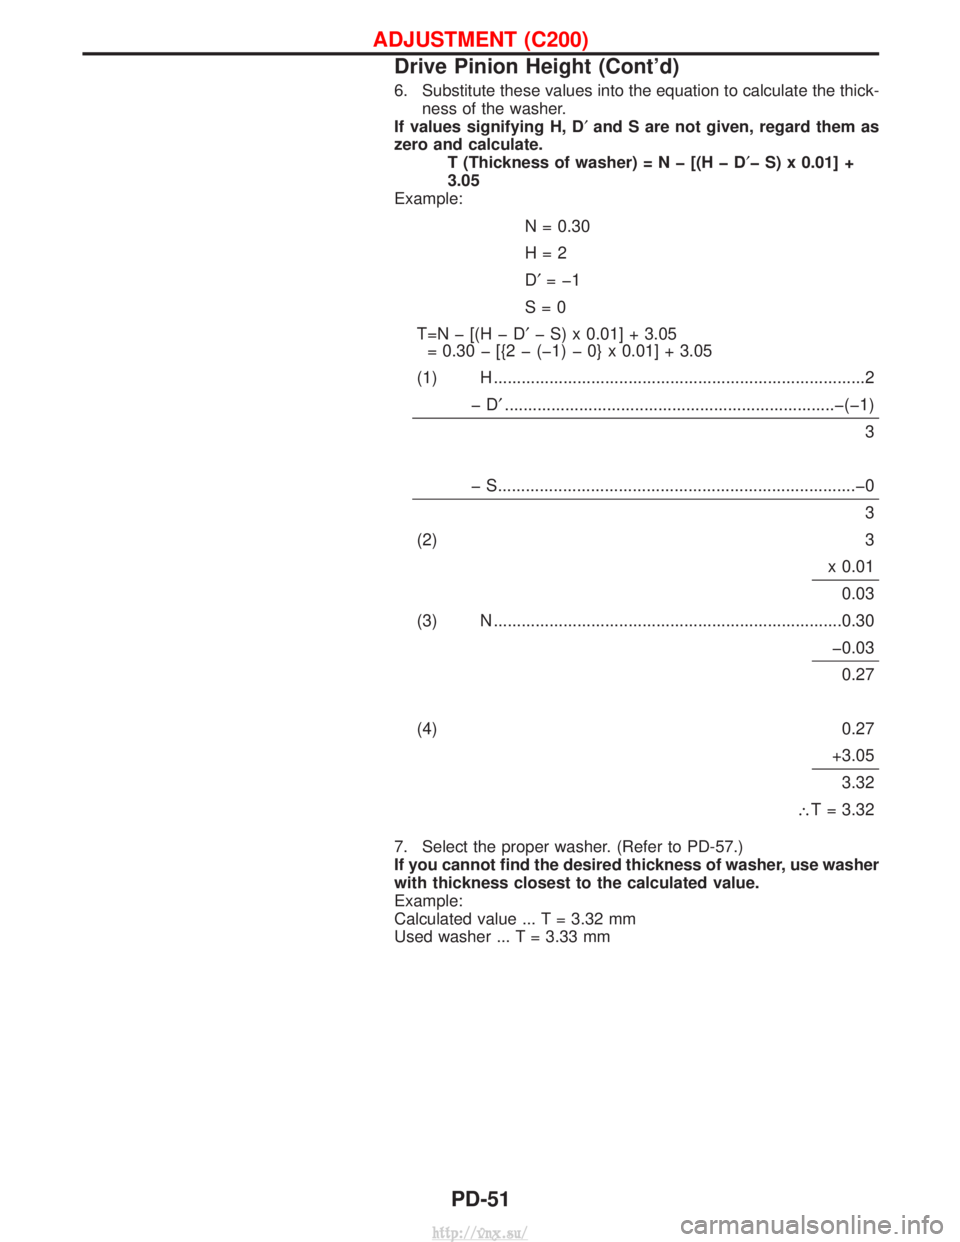
6. Substitute these values into the equation to calculate the thick-ness of the washer.
If values signifying H, D¢ and S are not given, regard them as
zero and calculate. T (Thickness of washer)=Nþ[(HþD ¢þ S) x 0.01] +
3.05
Example:
N = 0.30
H=2
D¢ =þ1
S=0
T=Nþ[(HþD ¢þ S) x 0.01] + 3.05
= 0.30 þ [{2 þ (þ1) þ 0} x 0.01] + 3.05
(1) H ........................................................................\
........2 þD¢.......................................................................þ\
(þ1)
3
þ S........................................................................\
.....þ0 3
(2) 3 x 0.010.03
(3) N ........................................................................\
...0.30 þ0.030.27
(4) 0.27 +3.053.32
\ T = 3.32
7. Select the proper washer. (Refer to PD-57.)
If you cannot find the desired thickness of washer, use washer
with thickness closest to the calculated value.
Example:
Calculated value ... T = 3.32 mm
Used washer ... T = 3.33 mm
ADJUSTMENT (C200)
Drive Pinion Height (Cont'd)
PD-51
http://vnx.su/
Page 1103 of 1833
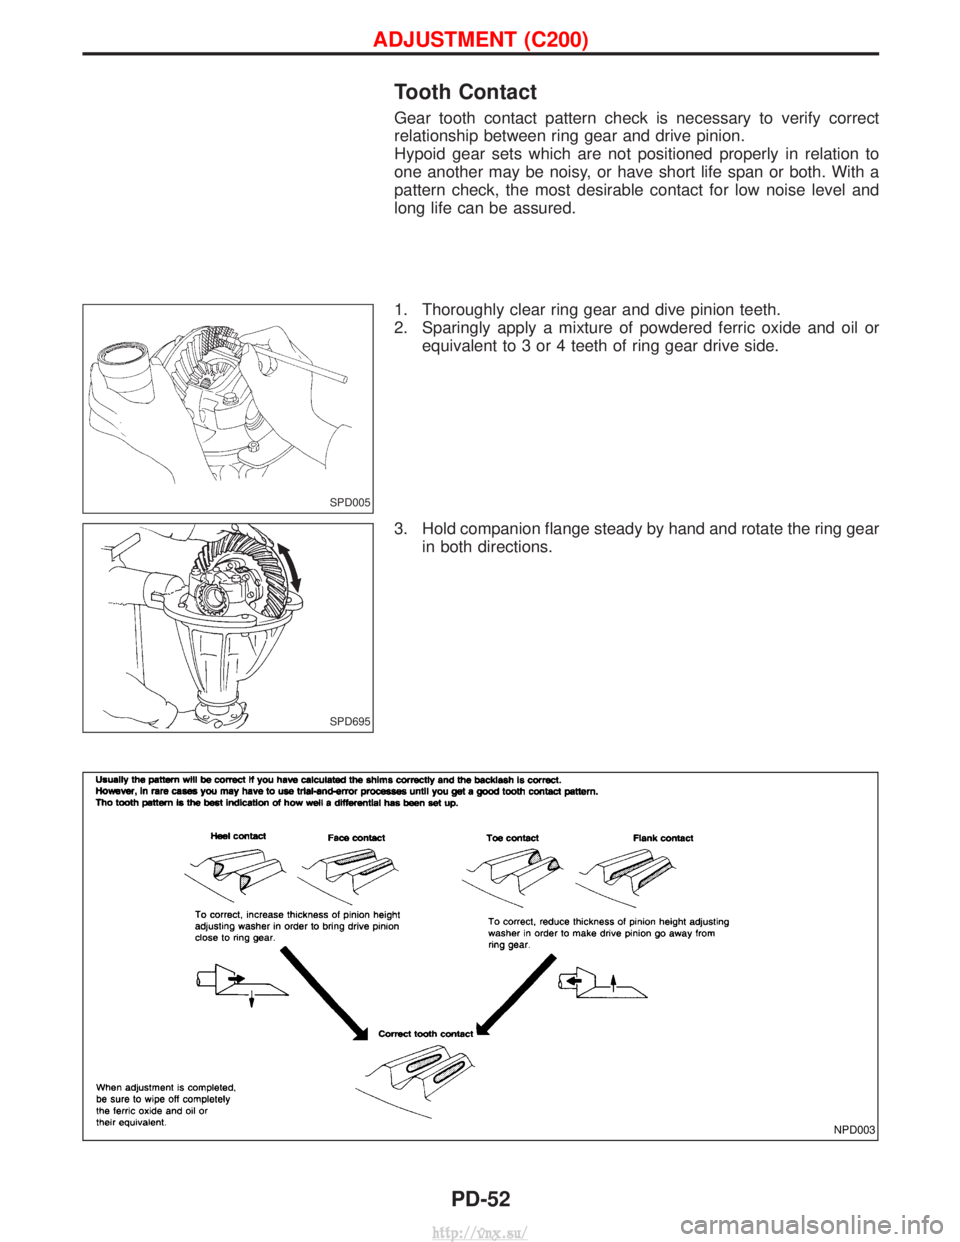
Tooth Contact
Gear tooth contact pattern check is necessary to verify correct
relationship between ring gear and drive pinion.
Hypoid gear sets which are not positioned properly in relation to
one another may be noisy, or have short life span or both. With a
pattern check, the most desirable contact for low noise level and
long life can be assured.
1. Thoroughly clear ring gear and dive pinion teeth.
2. Sparingly apply a mixture of powdered ferric oxide and oil orequivalent to 3 or 4 teeth of ring gear drive side.
3. Hold companion flange steady by hand and rotate the ring gear in both directions.
SPD005
SPD695
NPD003
ADJUSTMENT (C200)
PD-52
http://vnx.su/
Page 1104 of 1833
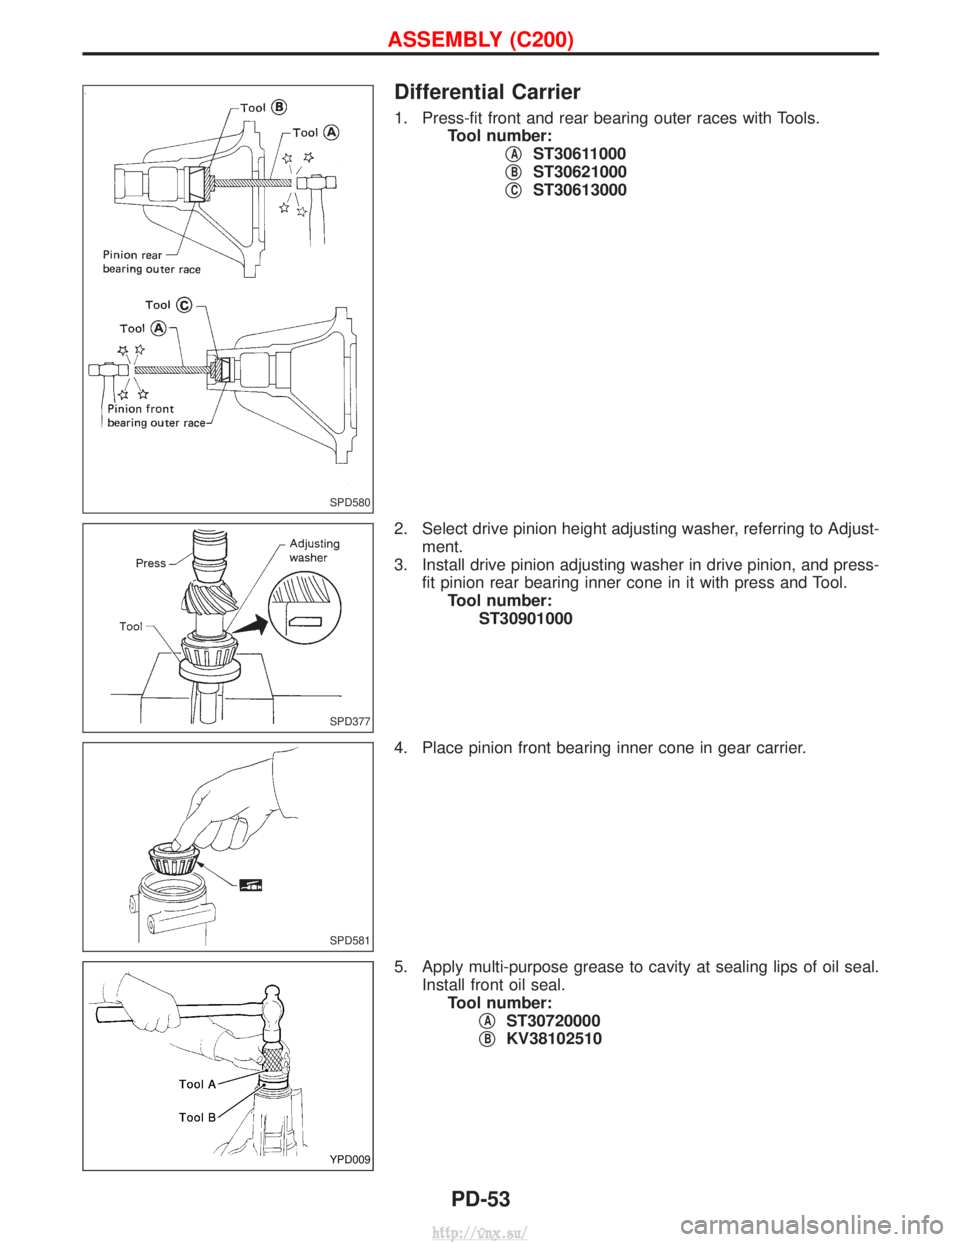
Differential Carrier
1. Press-fit front and rear bearing outer races with Tools.Tool number: q
AST30611000
q
BST30621000
q
CST30613000
2. Select drive pinion height adjusting washer, referring to Adjust- ment.
3. Install drive pinion adjusting washer in drive pinion, and press- fit pinion rear bearing inner cone in it with press and Tool.Tool number: ST30901000
4. Place pinion front bearing inner cone in gear carrier.
5. Apply multi-purpose grease to cavity at sealing lips of oil seal. Install front oil seal.Tool number: q
AST30720000
q
BKV38102510
SPD580
SPD377
SPD581
YPD009
ASSEMBLY (C200)
PD-53
http://vnx.su/
Page 1105 of 1833
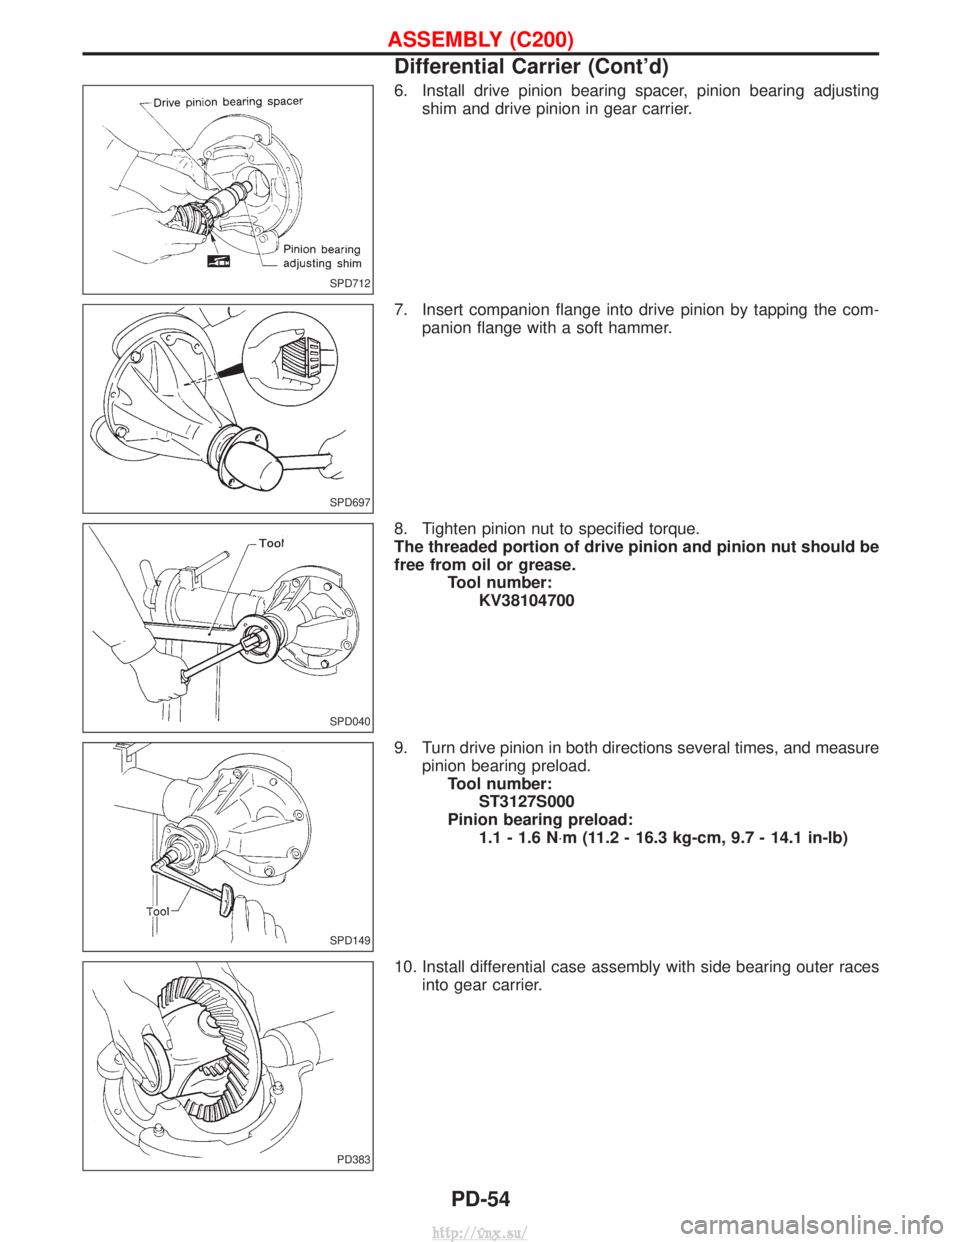
6. Install drive pinion bearing spacer, pinion bearing adjustingshim and drive pinion in gear carrier.
7. Insert companion flange into drive pinion by tapping the com- panion flange with a soft hammer.
8. Tighten pinion nut to specified torque.
The threaded portion of drive pinion and pinion nut should be
free from oil or grease. Tool number:KV38104700
9. Turn drive pinion in both directions several times, and measure pinion bearing preload.Tool number: ST3127S000
Pinion bearing preload: 1.1 - 1.6 N ×m (11.2 - 16.3 kg-cm, 9.7 - 14.1 in-lb)
10. Install differential case assembly with side bearing outer races into gear carrier.
SPD712
SPD697
SPD040
SPD149
PD383
ASSEMBLY (C200)
Differential Carrier (Cont'd)
PD-54
http://vnx.su/
Page 1106 of 1833
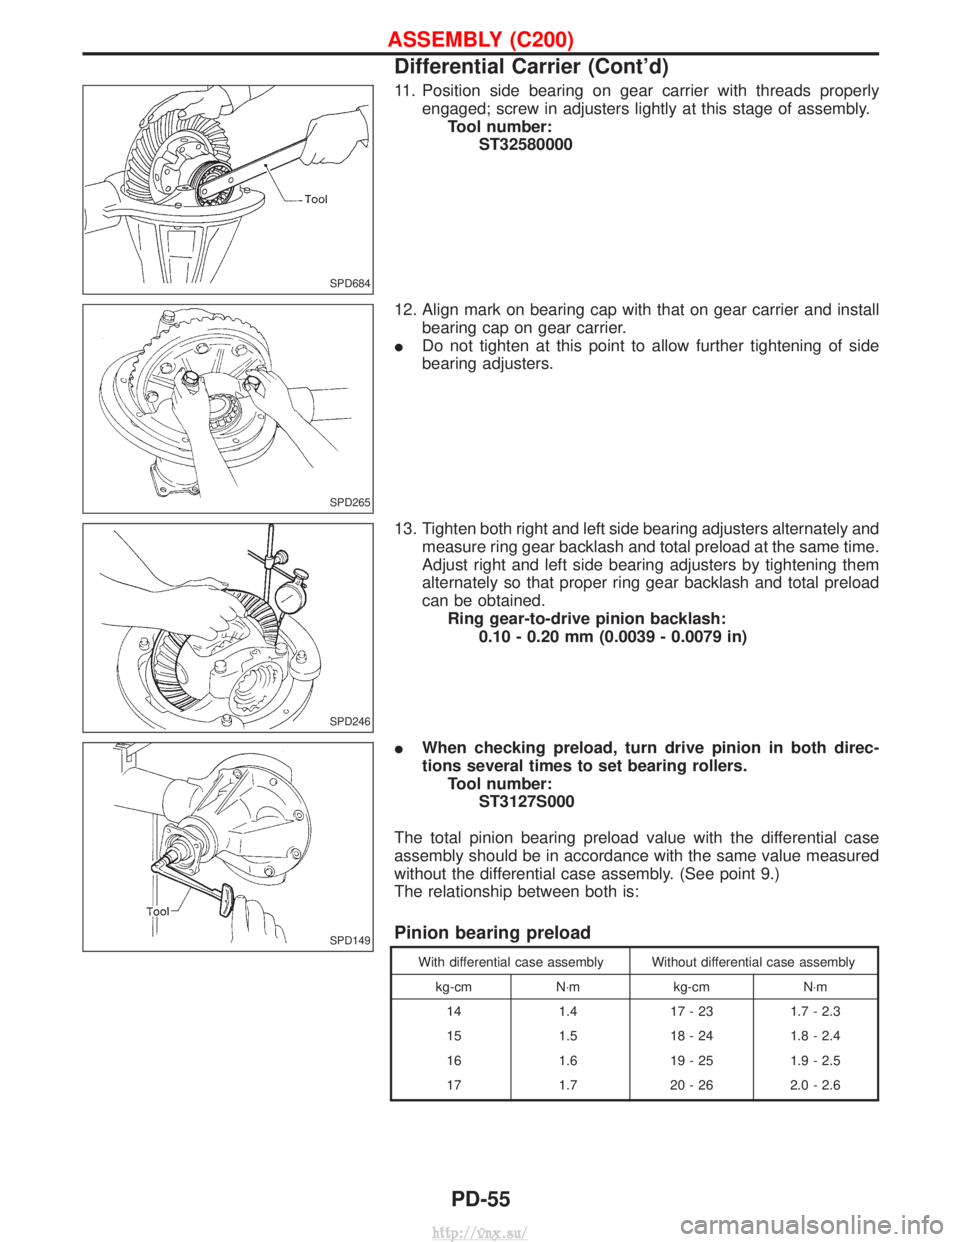
11. Position side bearing on gear carrier with threads properlyengaged; screw in adjusters lightly at this stage of assembly.Tool number: ST32580000
12. Align mark on bearing cap with that on gear carrier and install bearing cap on gear carrier.
I Do not tighten at this point to allow further tightening of side
bearing adjusters.
13. Tighten both right and left side bearing adjusters alternately and measure ring gear backlash and total preload at the same time.
Adjust right and left side bearing adjusters by tightening them
alternately so that proper ring gear backlash and total preload
can be obtained.Ring gear-to-drive pinion backlash: 0.10 - 0.20 mm (0.0039 - 0.0079 in)
I When checking preload, turn drive pinion in both direc-
tions several times to set bearing rollers.
Tool number: ST3127S000
The total pinion bearing preload value with the differential case
assembly should be in accordance with the same value measured
without the differential case assembly. (See point 9.)
The relationship between both is:
Pinion bearing preload
With differential case assembly Without differential case assembly kg-cm N×m kg-cmN×m
14 1.417 - 23 1.7 - 2.3
15 1.518 - 24 1.8 - 2.4
16 1.619 - 25 1.9 - 2.5
17 1.720 - 26 2.0 - 2.6
SPD684
SPD265
SPD246
SPD149
ASSEMBLY (C200)
Differential Carrier (Cont'd)
PD-55
http://vnx.su/
Page 1107 of 1833
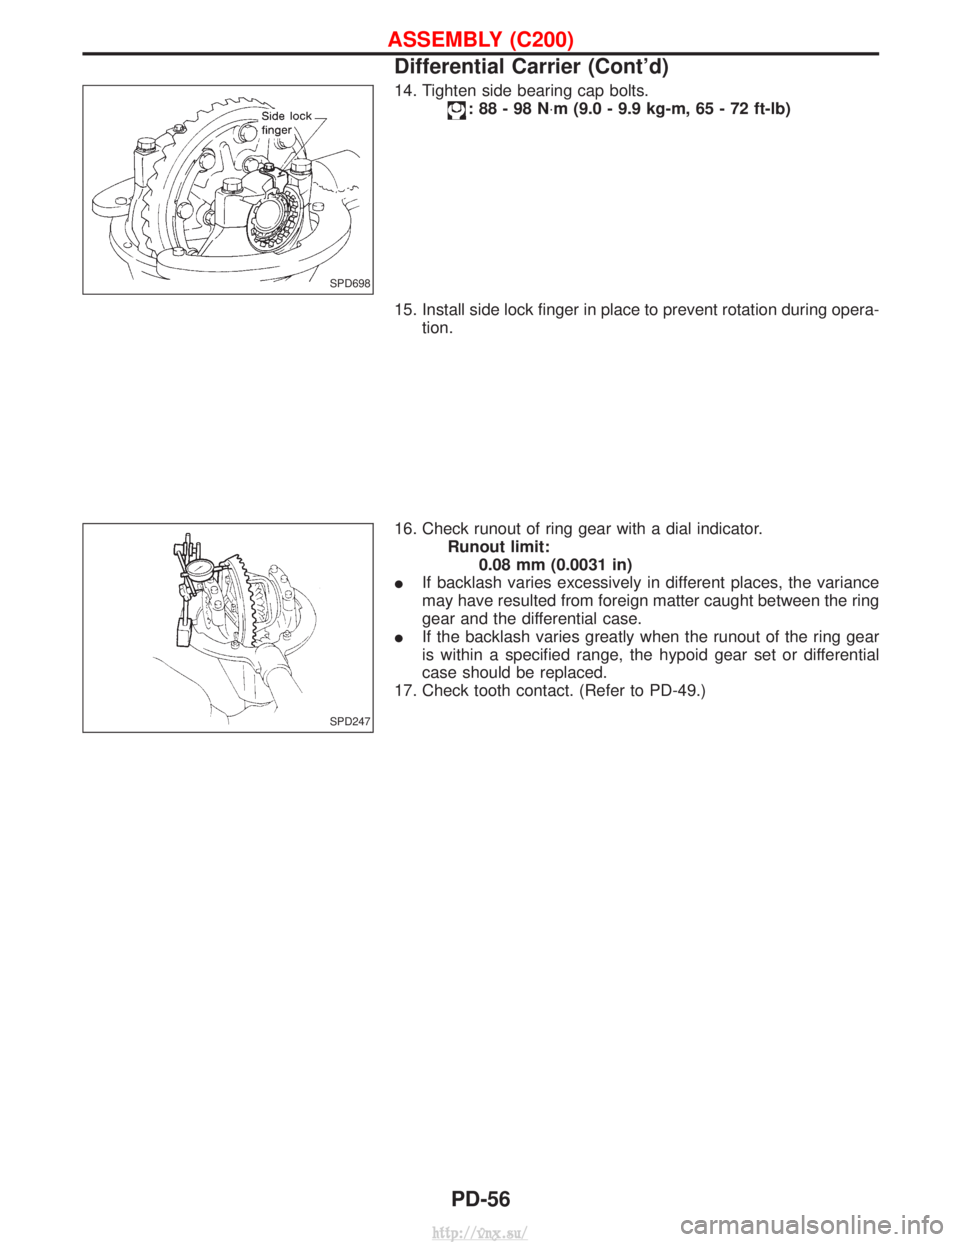
14. Tighten side bearing cap bolts.
:88-98N×m (9.0 - 9.9 kg-m, 65 - 72 ft-lb)
15. Install side lock finger in place to prevent rotation during opera- tion.
16. Check runout of ring gear with a dial indicator. Runout limit:0.08 mm (0.0031 in)
I If backlash varies excessively in different places, the variance
may have resulted from foreign matter caught between the ring
gear and the differential case.
I If the backlash varies greatly when the runout of the ring gear
is within a specified range, the hypoid gear set or differential
case should be replaced.
17. Check tooth contact. (Refer to PD-49.)
SPD698
SPD247
ASSEMBLY (C200)
Differential Carrier (Cont'd)
PD-56
http://vnx.su/
Page 1108 of 1833
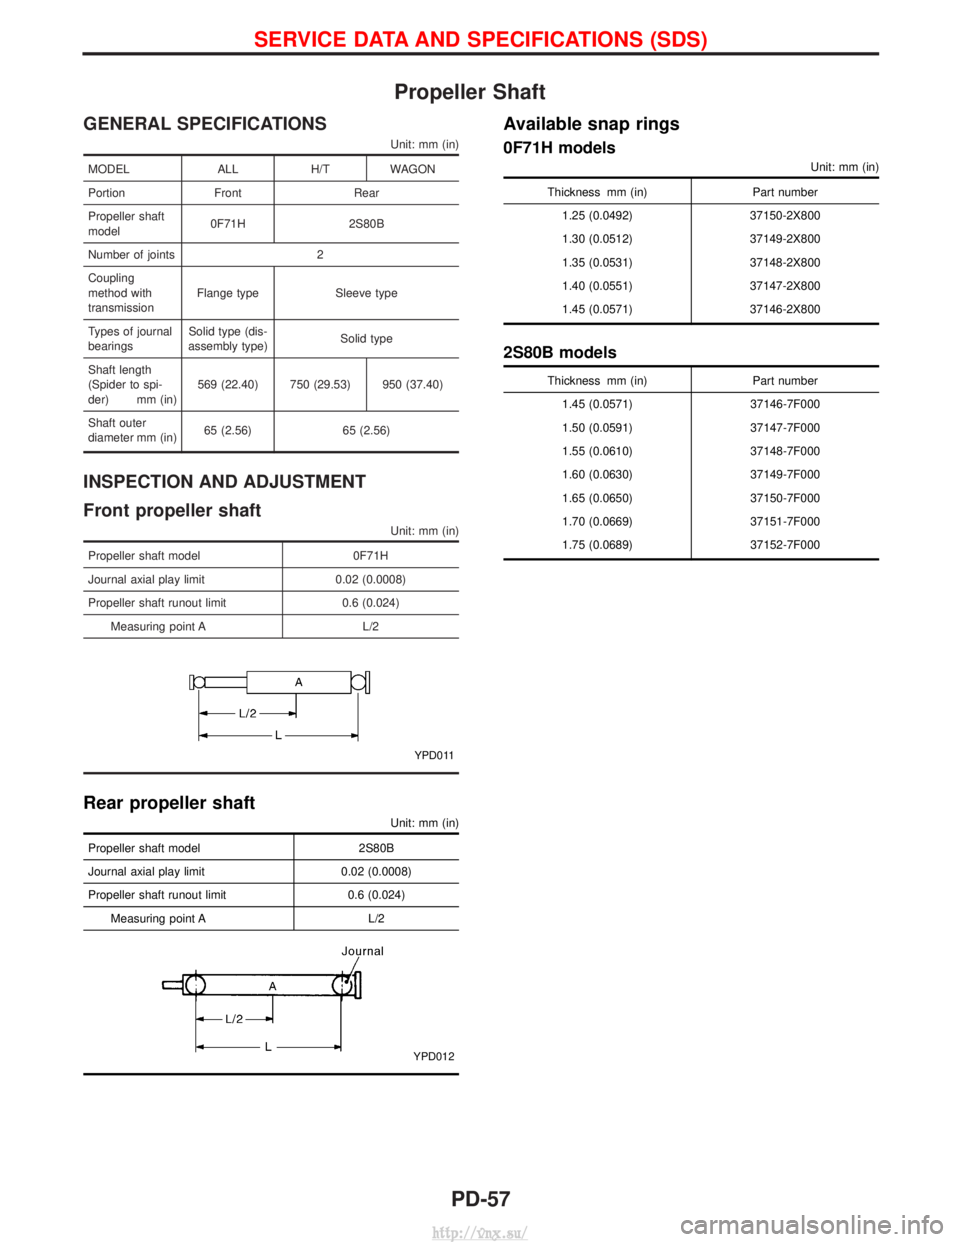
Propeller Shaft
GENERAL SPECIFICATIONS
Unit: mm (in)
MODELALLH/TWAGON
Portion Front Rear
Propeller shaft
model 0F71H 2S80B
Number of joints 2
Coupling
method with
transmission Flange type Sleeve type
Types of journal
bearings Solid type (dis-
assembly type) Solid type
Shaft length
(Spider to spi-
der) mm (in) 569 (22.40) 750 (29.53) 950 (37.40)
Shaft outer
diameter mm (in) 65 (2.56) 65 (2.56)
INSPECTION AND ADJUSTMENT
Front propeller shaft
Unit: mm (in)
Propeller shaft model
0F71H
Journal axial play limit 0.02 (0.0008)
Propeller shaft runout limit 0.6 (0.024)
Measuring point A L/2
YPD011
Rear propeller shaft
Unit: mm (in)
Propeller shaft model 2S80B
Journal axial play limit 0.02 (0.0008)
Propeller shaft runout limit 0.6 (0.024) Measuring point A L/2
YPD012
Available snap rings
0F71H models
Unit: mm (in)
Thickness mm (in) Part number
1.25 (0.0492) 37150-2X800
1.30 (0.0512) 37149-2X800
1.35 (0.0531) 37148-2X800
1.40 (0.0551) 37147-2X800
1.45 (0.0571) 37146-2X800
2S80B models
Thickness mm (in) Part number
1.45 (0.0571) 37146-7F000
1.50 (0.0591) 37147-7F000
1.55 (0.0610) 37148-7F000
1.60 (0.0630) 37149-7F000
1.65 (0.0650) 37150-7F000
1.70 (0.0669) 37151-7F000
1.75 (0.0689) 37152-7F000
SERVICE DATA AND SPECIFICATIONS (SDS)
PD-57
http://vnx.su/
Page 1109 of 1833
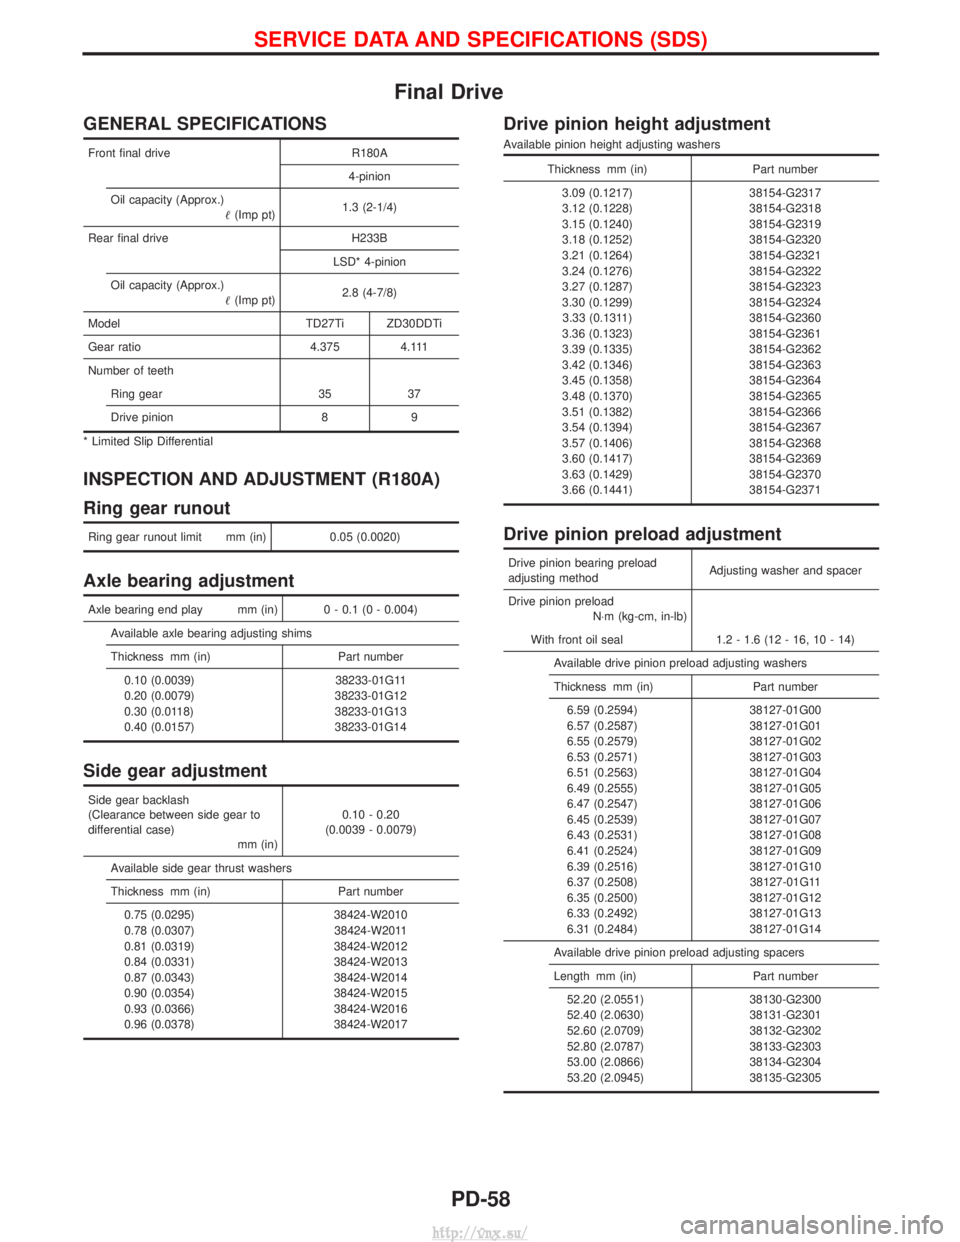
Final Drive
GENERAL SPECIFICATIONS
Front final driveR180A
4-pinion
Oil capacity (Approx.) (Imp pt) 1.3 (2-1/4)
Rear final drive H233B LSD* 4-pinion
Oil capacity (Approx.) (Imp pt) 2.8 (4-7/8)
Model TD27Ti ZD30DDTi
Gear ratio 4.375 4.111
Number of teeth Ring gear 35 37
Drive pinion 8 9
* Limited Slip Differential
INSPECTION AND ADJUSTMENT (R180A)
Ring gear runout
Ring gear runout limit mm (in) 0.05 (0.0020)
Axle bearing adjustment
Axle bearing end play mm (in) 0 - 0.1 (0 - 0.004)
Available axle bearing adjusting shims
Thickness mm (in) Part number0.10 (0.0039) 38233-01G11
0.20 (0.0079) 38233-01G12
0.30 (0.0118) 38233-01G13
0.40 (0.0157) 38233-01G14
Side gear adjustment
Side gear backlash
(Clearance between side gear to
differential case) mm (in)0.10 - 0.20
(0.0039 - 0.0079)
Available side gear thrust washers
Thickness mm (in) Part number 0.75 (0.0295) 38424-W2010
0.78 (0.0307) 38424-W2011
0.81 (0.0319) 38424-W2012
0.84 (0.0331) 38424-W2013
0.87 (0.0343) 38424-W2014
0.90 (0.0354) 38424-W2015
0.93 (0.0366) 38424-W2016
0.96 (0.0378) 38424-W2017
Drive pinion height adjustment
Available pinion height adjusting washers
Thickness mm (in) Part number
3.09 (0.1217) 38154-G2317
3.12 (0.1228) 38154-G2318
3.15 (0.1240) 38154-G2319
3.18 (0.1252) 38154-G2320
3.21 (0.1264) 38154-G2321
3.24 (0.1276) 38154-G2322
3.27 (0.1287) 38154-G2323
3.30 (0.1299) 38154-G2324 3.33 (0.1311) 38154-G2360
3.36 (0.1323) 38154-G2361
3.39 (0.1335) 38154-G2362
3.42 (0.1346) 38154-G2363
3.45 (0.1358) 38154-G2364
3.48 (0.1370) 38154-G2365
3.51 (0.1382) 38154-G2366
3.54 (0.1394) 38154-G2367
3.57 (0.1406) 38154-G2368
3.60 (0.1417) 38154-G2369
3.63 (0.1429) 38154-G2370
3.66 (0.1441) 38154-G2371
Drive pinion preload adjustment
Drive pinion bearing preload
adjusting method Adjusting washer and spacer
Drive pinion preload N×m (kg-cm, in-lb)
With front oil seal 1.2 - 1.6 (12 - 16, 10 - 14) Available drive pinion preload adjusting washers
Thickness mm (in) Part number6.59 (0.2594) 38127-01G00
6.57 (0.2587) 38127-01G01
6.55 (0.2579) 38127-01G02
6.53 (0.2571) 38127-01G03
6.51 (0.2563) 38127-01G04
6.49 (0.2555) 38127-01G05
6.47 (0.2547) 38127-01G06
6.45 (0.2539) 38127-01G07
6.43 (0.2531) 38127-01G08
6.41 (0.2524) 38127-01G09
6.39 (0.2516) 38127-01G10
6.37 (0.2508) 38127-01G11
6.35 (0.2500) 38127-01G12
6.33 (0.2492) 38127-01G13
6.31 (0.2484) 38127-01G14
Available drive pinion preload adjusting spacers
Length mm (in) Part number 52.20 (2.0551) 38130-G2300
52.40 (2.0630) 38131-G2301
52.60 (2.0709) 38132-G2302
52.80 (2.0787) 38133-G2303
53.00 (2.0866) 38134-G2304
53.20 (2.0945) 38135-G2305
SERVICE DATA AND SPECIFICATIONS (SDS)
PD-58
http://vnx.su/
Page 1110 of 1833
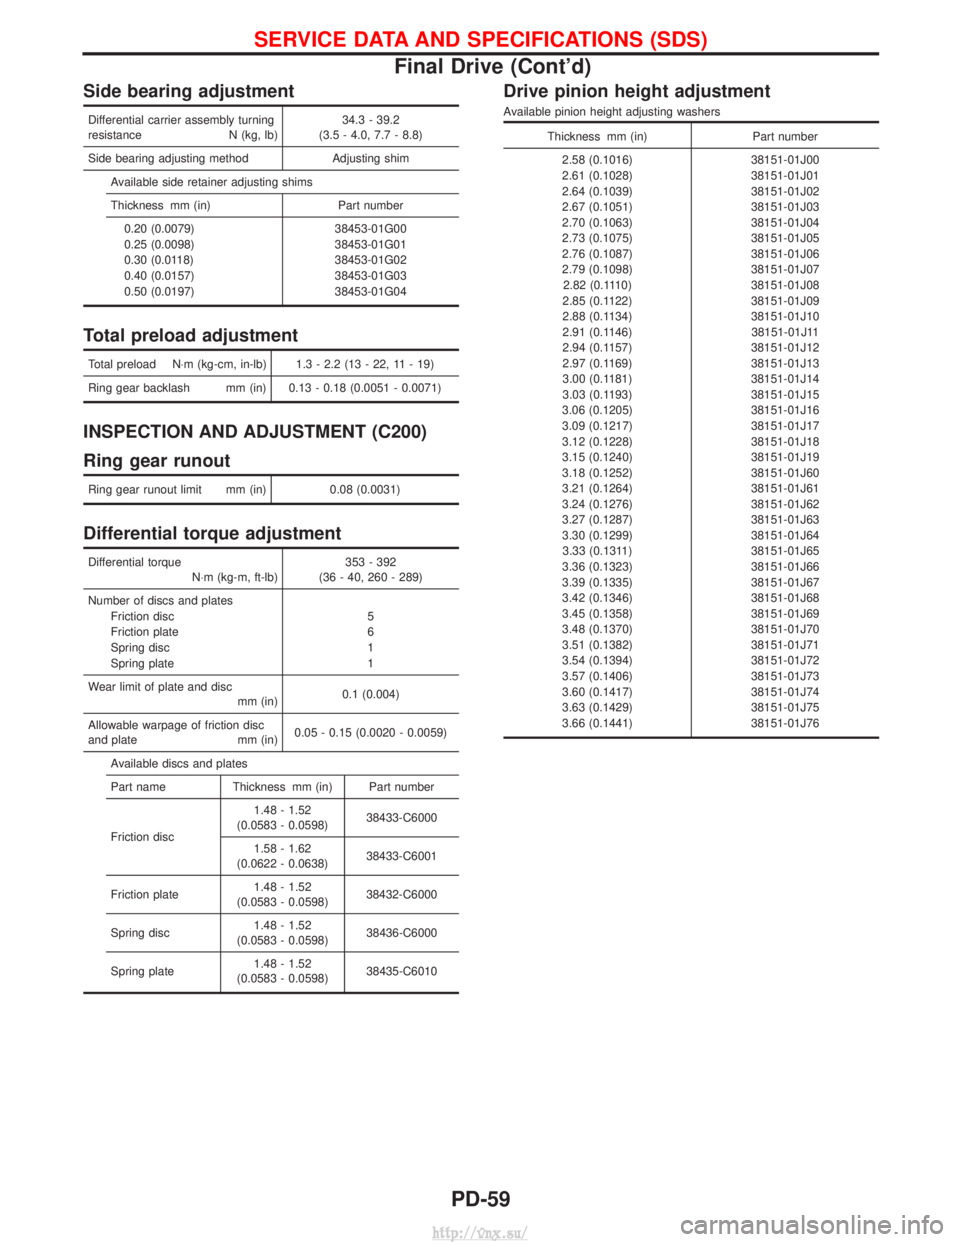
Side bearing adjustment
Differential carrier assembly turning
resistance N (kg, lb)34.3 - 39.2
(3.5 - 4.0, 7.7 - 8.8)
Side bearing adjusting method Adjusting shim Available side retainer adjusting shims
Thickness mm (in) Part number0.20 (0.0079) 38453-01G00
0.25 (0.0098) 38453-01G01
0.30 (0.0118) 38453-01G02
0.40 (0.0157) 38453-01G03
0.50 (0.0197) 38453-01G04
Total preload adjustment
Total preload N ×m (kg-cm, in-lb) 1.3 - 2.2 (13 - 22, 11 - 19)
Ring gear backlash mm (in) 0.13 - 0.18 (0.0051 - 0.0071)
INSPECTION AND ADJUSTMENT (C200)
Ring gear runout
Ring gear runout limit mm (in) 0.08 (0.0031)
Differential torque adjustment
Differential torque
N×m (kg-m, ft-lb) 353 - 392
(36 - 40, 260 - 289)
Number of discs and plates Friction disc 5
Friction plate 6
Spring disc 1
Spring plate 1
Wear limit of plate and disc mm (in)0.1 (0.004)
Allowable warpage of friction disc
and plate mm (in) 0.05 - 0.15 (0.0020 - 0.0059)
Available discs and plates
Part name Thickness mm (in) Part number
Friction disc 1.48 - 1.52
(0.0583 - 0.0598) 38433-C6000
1.58 - 1.62
(0.0622 - 0.0638) 38433-C6001
Friction plate 1.48 - 1.52
(0.0583 - 0.0598) 38432-C6000
Spring disc 1.48 - 1.52
(0.0583 - 0.0598) 38436-C6000
Spring plate 1.48 - 1.52
(0.0583 - 0.0598) 38435-C6010
Drive pinion height adjustment
Available pinion height adjusting washers
Thickness mm (in)
Part number
2.58 (0.1016) 38151-01J00
2.61 (0.1028) 38151-01J01
2.64 (0.1039) 38151-01J02
2.67 (0.1051) 38151-01J03
2.70 (0.1063) 38151-01J04
2.73 (0.1075) 38151-01J05
2.76 (0.1087) 38151-01J06
2.79 (0.1098) 38151-01J07 2.82 (0.1110) 38151-01J08
2.85 (0.1122) 38151-01J09
2.88 (0.1134) 38151-01J10
2.91 (0.1146) 38151-01J11
2.94 (0.1157) 38151-01J12
2.97 (0.1169) 38151-01J13
3.00 (0.1181) 38151-01J14
3.03 (0.1193) 38151-01J15
3.06 (0.1205) 38151-01J16
3.09 (0.1217) 38151-01J17
3.12 (0.1228) 38151-01J18
3.15 (0.1240) 38151-01J19
3.18 (0.1252) 38151-01J60
3.21 (0.1264) 38151-01J61
3.24 (0.1276) 38151-01J62
3.27 (0.1287) 38151-01J63
3.30 (0.1299) 38151-01J64 3.33 (0.1311) 38151-01J65
3.36 (0.1323) 38151-01J66
3.39 (0.1335) 38151-01J67
3.42 (0.1346) 38151-01J68
3.45 (0.1358) 38151-01J69
3.48 (0.1370) 38151-01J70
3.51 (0.1382) 38151-01J71
3.54 (0.1394) 38151-01J72
3.57 (0.1406) 38151-01J73
3.60 (0.1417) 38151-01J74
3.63 (0.1429) 38151-01J75
3.66 (0.1441) 38151-01J76
SERVICE DATA AND SPECIFICATIONS (SDS)
Final Drive (Cont'd)
PD-59
http://vnx.su/